


Modern, uncomplicated
Sewing
by
push-button
control
.ø.
:..
Congratulations! |
You have purchased a |
high- |
||||||||||||||
quality |
product that offers unique |
|
|
|
|
|
||||||||||
Your |
new sewing |
|
|
|
advantages. |
|||||||||||
machine can take |
any material |
|||||||||||||||
in its |
||||||||||||||||
stride |
|
|
||||||||||||||
and will sew through |
|
|
||||||||||||||
thick and thin |
||||||||||||||||
for you. |
|
|
|
|
|
|
|
|
|
|
|
|
|
|
||
It features the very |
latest |
in design |
and |
|
|
|||||||||||
technology, |
and |
this instruction book |
is just |
|
||||||||||||
as uncomplicated as your |
PFAFF sewing |
|
||||||||||||||
machine, |
It |
applies |
both to the 2046 |
model |
and |
|||||||||||
to the |
2034. Should |
be any |
difference |
in |
||||||||||||
operation |
we have |
there |
||||||||||||||
pointed that |
|
separately. |
||||||||||||||
|
|
|
|
|
|
|
|
|
out |
|||||||
If you now take time enough to study |
the |
|
|
|||||||||||||
instruction |
book, |
nothing can go wrong. After all, |
||||||||||||||
this is |
the |
|||||||||||||||
only way to learn all the things |
the |
|||||||||||||||
machine |
can do, |
and to make full |
use |
of |
them. |
|||||||||||
|
|
|
||||||||||||||
If |
have |
any further questions, |
that |
is |
no |
|
||||||||||
you |
|
|||||||||||||||
problem! |
Your PFAFF dealer will be |
at your |
|
|||||||||||||
service with |
any |
help or advice you |
need. |
|
||||||||||||
So now you |
can |
get started! We wish you many |
||||||||||||||
enjoyable |
hours of creating your fashion ideas. |
|||||||||||||||
|
|
|
||||||||||||||
p9.
•1
N |
|
|
Narrow edge foot |
|
|
Needle |
plate, changing |
|
Needle table |
|
|
Needle |
threader, Integrated |
|
Needle, |
changing |
|
Needle, |
threading |
|
Needle/bobbin thread tension |
|
|
Non-elastic/elastic stitches |
|
|
Non-stick fancy stitch foot for |
leather |
|
0 |
|
|
|
Overlock stitches |
|
|
|
P |
|
|
|
Parts of the |
sewing |
machine |
(2046) |
Parts of the |
sewing |
machine |
(2034) |
Patchwork and quilting |
|
||
“Pattern start’ |
|
|
|
‘Pattern start” within |
stitch sequence |
||
Pattern |
length/pattern |
width, |
|
|
|||
changing for decorative stitches |
|||
Pattern |
length/stitch density |
||
|
|||
Pattern |
mirroring |
|
|
Pattern |
settings, altering |
||
|
|||
Pattern |
sizes, altering |
|
|
Pattern |
width/stitch length, altering |
||
|
|||
Patterns, storing |
|
||
Pintuck |
foot |
|
|
Pintuck |
foot |
with guide |
|
Presser feet (special accessories) |
|||
Presser feet |
(standard |
accessories) |
|
Presser toot |
lifter |
|
|
Presser foot, |
changing |
|
|
R |
|
|
|
Removable accessory tray |
|||
Repairing tears |
|
||
Reverse |
sewing |
|
|
Roll hemming |
|
||
Ruffler |
|
|
|
I
|
109 |
|
114 |
110, |
111 |
|
27 |
|
31 |
26-27 |
|
24-26 |
|
54-58 |
|
|
106 |
|
60 |
S |
|
|
|
|
Sewing |
function |
buttons |
|
|
Sewing |
problems and their solutions |
|||
|
|
|||
Sewing |
programs, selecting |
|||
Shell |
edging |
|
|
|
Shirring |
foot |
|
|
|
Stitch |
patterns, formation |
|
||
Stitch |
sequence |
buttons |
|
|
Stitch |
sequence, |
deleting |
|
|
Stitch |
sequence, |
deleting |
from |
|
|
||||
Stitch |
sequence, |
inserting |
into |
|
|
||||
Stitch |
sequences, general |
notes |
||
|
||||
Stitch |
width/needle position, altering |
|||
|
||||
14-15 |
T |
|
|
|
|
|
|
Tapering |
with satin-stitch |
zigzag |
|||||
16-17 |
|||||||
|
|
|
|||||
Technical |
data |
|
|
||||
77-82 |
|
|
|||||
Thread |
cutter |
|
|
||||
49 |
|
|
|||||
Thread |
tension, general |
notes |
|||||
52 |
|||||||
|
|
||||||
Threading |
|
|
|||||
|
|
|
|||||
84 |
Tie-off |
|
|
|
|
||
|
|
|
|
|
|
||
39 |
Tips |
for a |
perfect buttonhole |
||||
|
|
|
|
|
|
||
42 |
Top feed (integrated dual |
|
feed) |
||||
|
|
|
|
|
|
||
37-40 |
Twin |
needle |
|
|
|||
|
|
|
|
|
|
||
37 |
Twin |
needle, threading |
|
|
|||
|
|
|
|||||
|
|
|
|
|
|
||
38, |
39 |
49, |
50 |
101 |
|
106 |
|
98-99 |
|
96, |
97 |
U |
|
Utility |
stitches, |
Utility |
stitches, |
V |
|
Voltage |
switch |
Quilt Expression
Expression 2034
2046
29 |
|
Window, |
adjusting the contrast |
|
21 |
z |
|
|
|
|
|
Zippers, sewing in |
|
|||||
59 |
|
|||||
1/4 |
inch |
|
|
|
|
|
41 |
quilt |
and |
patchwork |
foot |
||
7/9 |
|
|
|
|
|
|
66 |
hole |
foot |
|
|
|
|
|
|
|
|
|
|
|
103 |
|
|
|
|
|
|
Introduction |
|
|
42 |
116, |
117 |
|
36 |
|
67 |
|
102 |
|
45 |
|
49 |
|
51 |
|
50 |
|
51 |
|
48 |
|
38 |
88-89 |
|
118 |
|
|
28 |
|
24 |
26, |
27 |
|
42 |
|
76 |
32, |
33 |
|
44 |
|
31 |
6,7 |
|
8, |
9 |
19 |
|
36 |
|
54 |
|
104 |
|
107 |
|
5
, |
‘ |
|
re |
— |
|
- |
It |
uuL |
|
|
|
|
|
E |
|
o |
— |
|
CD |
CD Cl) |
_______
,, |
ci, - |
ci, |
ci, CD |
. |
4 |
|
|
C |
|
|
|
‘II1IiIlI’’I1iiilII’’ |
I |
|
11‘h |
|
|
|
|
|
|
,IIIlIIII,,jIlI |
|
Bi’iIi |
|
|
ill |
|
|
llhi’ |
IllhIII’nI!IIIIII1 |
|
|
Ii |
|
|
|
ii |
|
|
|
|
|
|
|
|
|
|
|
|
|
iii |
|
4 |
|
4 |
|
) |
|
|
-o |
|
|
.. |
4 |
4 |
|
|
- |
|
||||
|
|
|
C |
- |
- |
|
|
|
|
|
|||
oi - o -
L
1CD |
LLLLLLIL |
|
|
i |
|
|
|
|
.. |
|
|
) |
C |
)) |
|
.. |
(,) |
||
C |
.. .. |
||
|
|
C C |
|
c9 (9
) |
a)C |
a)C |
. |
) |
,, |
r\ |
.. |
|
|
. |
a) |
‘II1’’ |
,hhhiI |
HIHlI |
DHIHjH |
I |
|
|
|
|
Ihhhiiii |
‘ |
lli |
|
|
Ill |
|
|
I |
I’ |
|
|
|
|
||
|
|
|
|
|
a) |
- |
0 |
|
qiiiq• |
|
|
|
I |
||
|
|
||
iiiiiiMIll1 |
IlIIIIIIliIII |
|
111111 |
|
till |
a)a)
“
a)) . r\
)‘k |
yI |
|
•y |
||
|
||
Jlk |
|
|
C,) |
C,) CD |
T _ L!il
IIIllhlj
a)a)CD
a)) .. C
. — * ..
.
CDC) 0 |
- |
1<CD U) |
C) |
CD Cl) |
x V |
CD Cl) Cl) |
r%)0CA) |
|
‘ |
|
|
|
m |
|
|
|
|
|
|
|
|
|
LT1 |
r’) |
|
|
a) |
|
|
(A)(a |
|
hIll! |
fII |
II |
|
|
|
1111111 I |
i’h |
11H |
III!! |
|
|
cD |
C |
|
C— —o D |
o |
Cl) |
a)—
“O[2(a
p r1_
“-
c) °?i
I |
|
Iliflhllill |
I’l |
|
I |
0jr\.) |
I |
(.3, |
(.A)
C) ..
IIlI hiiljii
‘I’’
\ç/\/ (A)
3 |
(n |
III i!l!
III111111111111
CD
111111 11111!
‘‘‘lllI’’I’IIlII‘Ij
C.”
|
— |
() |
) |
( |
|
|
. |
I |
I |
|
IIIIt!!IIhiIiIilI!!j1 “I |
||
Ii |
|
|
iii |
II |
|
Iui!! |
|
|
IllIllIl |
|
|
|
a) |
|
I’lliiIILII |
11iHjj |
|
tIiIhl |
I!!!! |
|
lI |
||
I!i!i |
||
111H |
||
11H |
||
a) |
(a |
iuouuoei
uonoes
91-
rinicai section
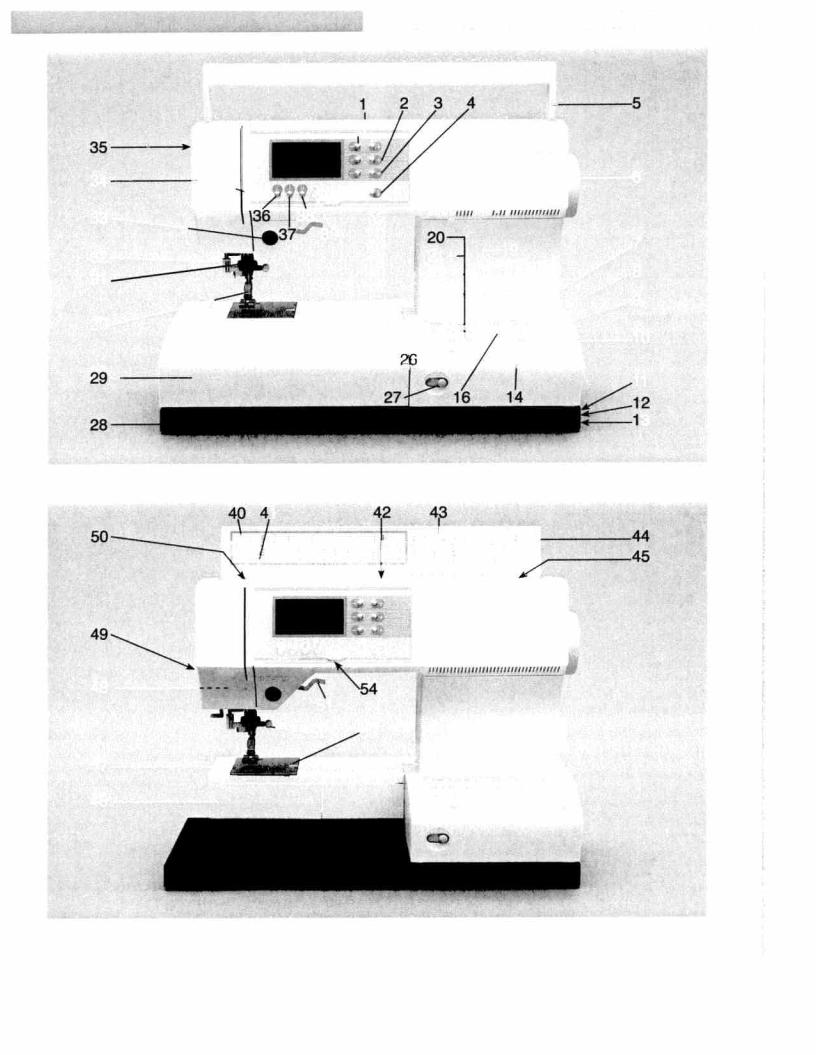
Parts of the sewing machine (model 2034)
1 -1+ button A (stitch width/pattern width controls)
2 -1+ button B (stitch length/pattern length controls)
3-1+ button C (stitch density/balance controls)
4Info button
5Carrying handle
6Handwheel
7M” button
8Cursor buttons
9Clear/pattern start button
10Stitch selection button
11Connection socket “lead cord”
12Connection socket “foot control”
13Master switch
14m+button
16Direct selection button “Alphabet”
17Direct selection button “Linen buttonhole”
18Direct selection button “Elastic blind hem stitch”
19Direct selection button “Zigzag stitch”
20Direct selection button “Stretch triple straight stitch”
21Direct selection button “Blindhem stitch”
22Direct selection button “Bridging stitch”
23Direct selection button “Button attaching program”
24Direct selection button “Straight stitch”
25Direct selection button “Elastic stitch”
26Direct selection button “Closed overlock stitch”
27Slide for lowering the feed dog
28Base plate
29Removable accessory tray
30Presser foot holder with presser foot
31Integrated dual feed!IDT
32Integrated needle threader
33‘Reverse sewing” button
34Threading slots
35Needle thread tension
36“Tie-off” button
37“Needle up/down” button
38“Slow sewing” button
39“Pattern mirror” button! “Lock” button
40Take-up lever
41Thread guide
42Spool holder with spool cap
43Hole for second spool holder
44Lid with stitch program chart
45Bobbin winder
46Bobbin door
47Free arm
48Sewing bulb (max. 5 W)
49Thread cutter
50Thread take-up
51Presser foot lifter
52Needle holder with retaining (set) screw
53Needle plate
54 Contrast control
t
t
F
F
F
F
F
F
F
F
F
F
F
F
r
F
F
F
F
F
S
F
F
F
F
F
*


caI!!ctio_J
Accessory tray |
|
Arranging the accessories |
|
|
|
|
marked with numbers. |
|
|
Open the accessory tray |
by placing your left index finger on |
The standard accessories are |
|
|
the ridged area on the left ot the lid and open the lid upwards |
Arrange the parts in the respective compartments of |
the |
||
and towards you. |
|
accessory tray. |
|
|
|
|
|
|
|
‘U |
A |
|
iT |
4. |
|
Ta |
a |
sa. |
|
&Uaa4 arnas |
at.4 |
|||||
|
Accessories 2034/2046
(see also pages 96-97)
I
I
I I I t
I I I S
I I I I I
20
I

I
|
|
|
|
|
I |
|
II |
|
|
|
|
Inserting the |
bobbin |
|
|
|
|
|
|
|
|
||
|
|
|
|
|
When doing |
so, |
|||||
Insert the full |
bobbin |
in the |
bobbin case. |
||||||||
|
|||||||||||
|
through slot |
A, then under |
tension |
||||||||
pull the thread sideways |
|||||||||||
|
|
||||||||||
spring B until |
it rests in the opening (see |
|
. |
|
|
|
|||||
arrow) |
|
|
|
||||||||
Check: |
|
|
|
|
|
|
turn |
clockwise. |
|||
When you pull the thread, |
the bobbin |
must |
|||||||||
|
|
|
|
||||||||
—
-c
E
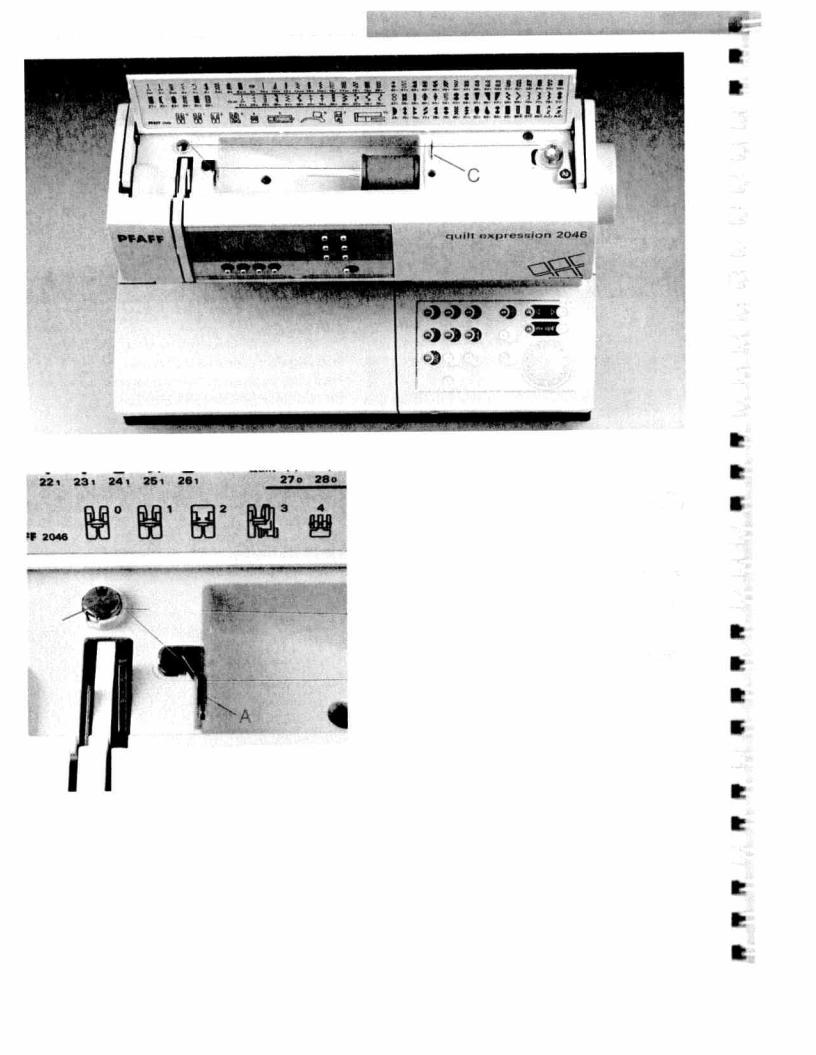
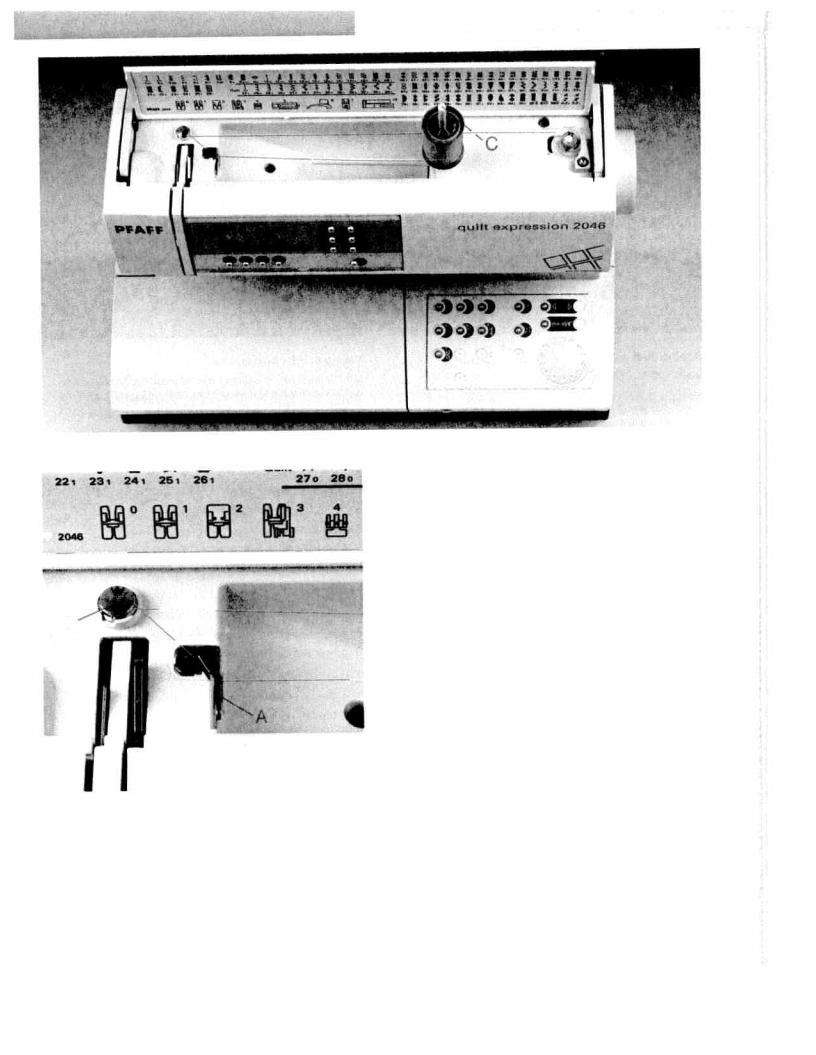
Inserting |
the bobbin |
case |
|
|
|
|
||
Lift latch E and |
push the bobbin case fully onto |
pin C of |
|
|||||
|
must face |
|
||||||
the sewing |
hook. Opening D of the |
bobbin case |
|
|
||||
|
|
|
|
|
|
|
||
upwards. |
|
|
|
|
|
|
|
|
Check: |
|
|
|
|
|
|
must not |
fall |
Pull the bobbin |
thread |
. The bobbin case |
||||||
sharply |
|
|
|
|
||||
out of the |
hook. |
|
|
|
|
|
|
|
25
nical |
section |
- |
I |
I
|
|
|
|
|
|
— |
|
Ia |
|
|
|
|
|||
I |
I |
|
|
|
|
|
|
+ |
$. |
|
40 |
Ba |
6a 7ra |
8o9wu |
|
iwa |
2o |
30i2 |
|||||
|
|
|
|
||||
|
|
|
|
|
|
Quitt4!, |
|
21a |
22i |
23i |
24i |
25i |
26i |
27o |
|
|
|||||||
|
|
|
|
||||
|
|
012 |
j3 |
||||
|
|
|
|||||
PAFF 2046 |
III |
|
|
|
|||
|
|
|
|
|
|||
|
|
|
|
|
A |
|
|
|
|
|
1I |
|
|||
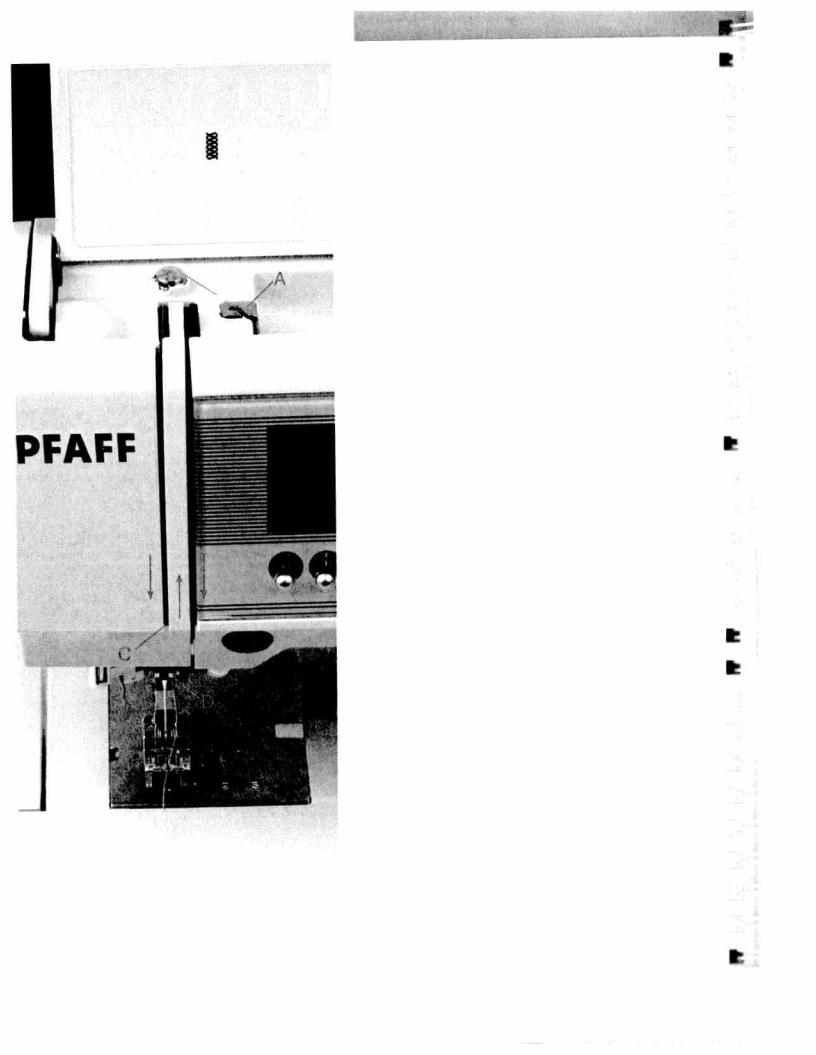
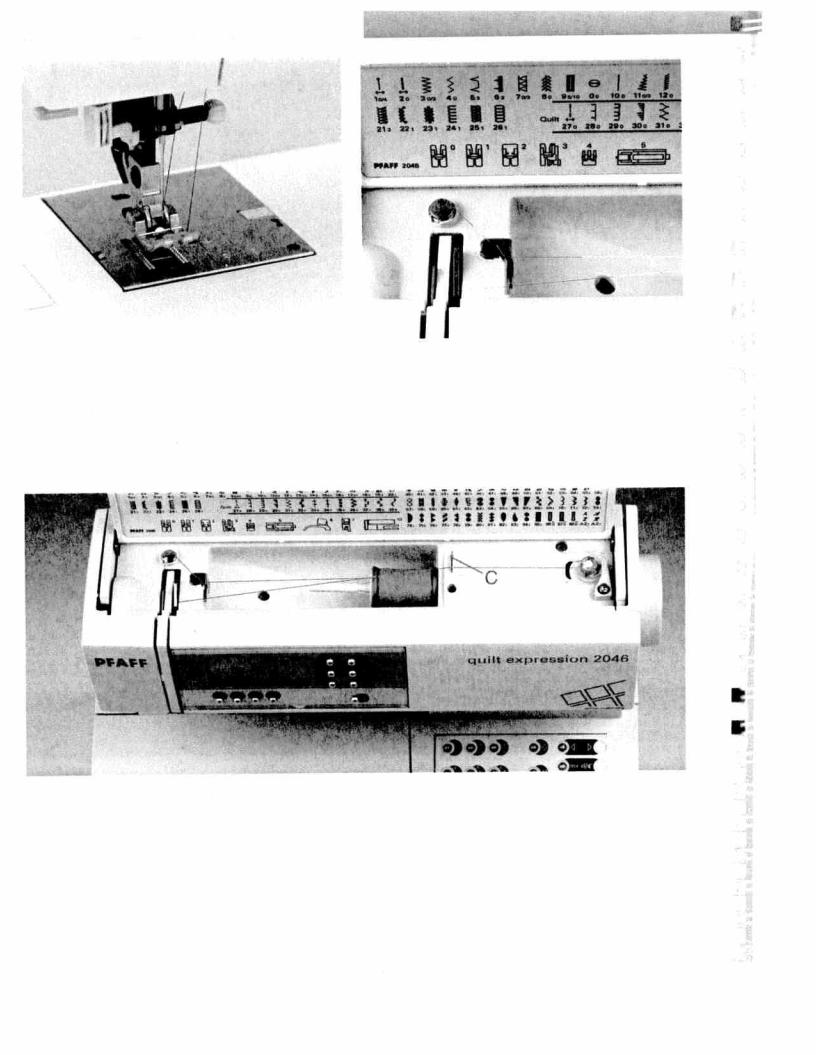
Threading the needle |
|
|
|
|
|
|
|
||||
Switch off |
the master |
switch. |
|
|
|
|
|
|
|||
|
|
|
|
|
|
|
|
||||
Raise the |
presser foot lifter |
(51). Place the thread on |
the |
||||||||
spool holder and |
fit a spool |
cap of the |
right size. |
|
|
||||||
Using both hands, pull the thread into |
thread guide A from |
||||||||||
the front. |
Place the thread from right to left into the pre |
slot |
|||||||||
tension device B. |
Now pass it |
through |
the left threading |
||||||||
|
|||||||||||
downwards. Pull |
the thread |
around the stop C in the |
right |
||||||||
The |
|||||||||||
threading |
slot and upwards |
to |
the take-up lever (40). |
||||||||
|
right |
||||||||||
thread must be pulled into the |
take-up |
lever from left to |
|||||||||
Pass the |
thread downwards |
in |
the right-hand threading |
slot. |
|||||||
Pull the thread from the side |
behind one |
of the two thread |
|||||||||
guides D. |
|
|
|
|
|
|
|
|
|
|
|
To thread |
the needle, |
please |
refer to the |
next page. |
|
|
|||||
t
PFAFF
S
26
aecnncaa
sectkjri
I /
-
Integrated
Needle
threader
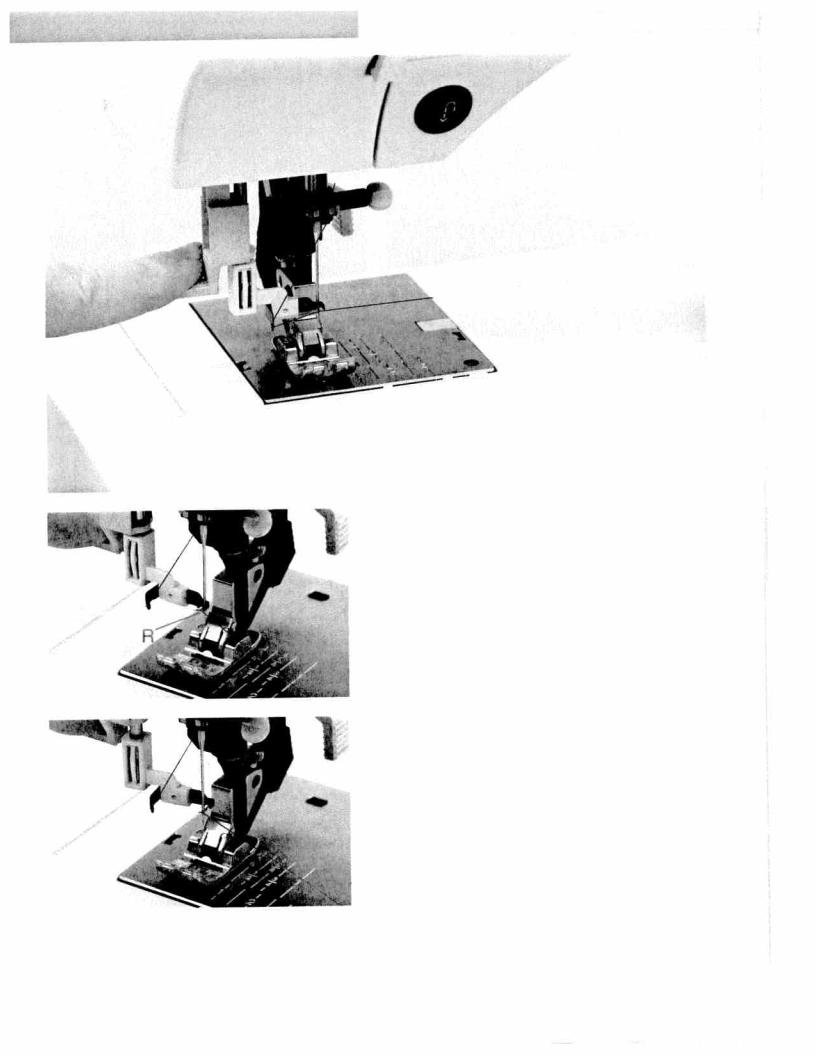
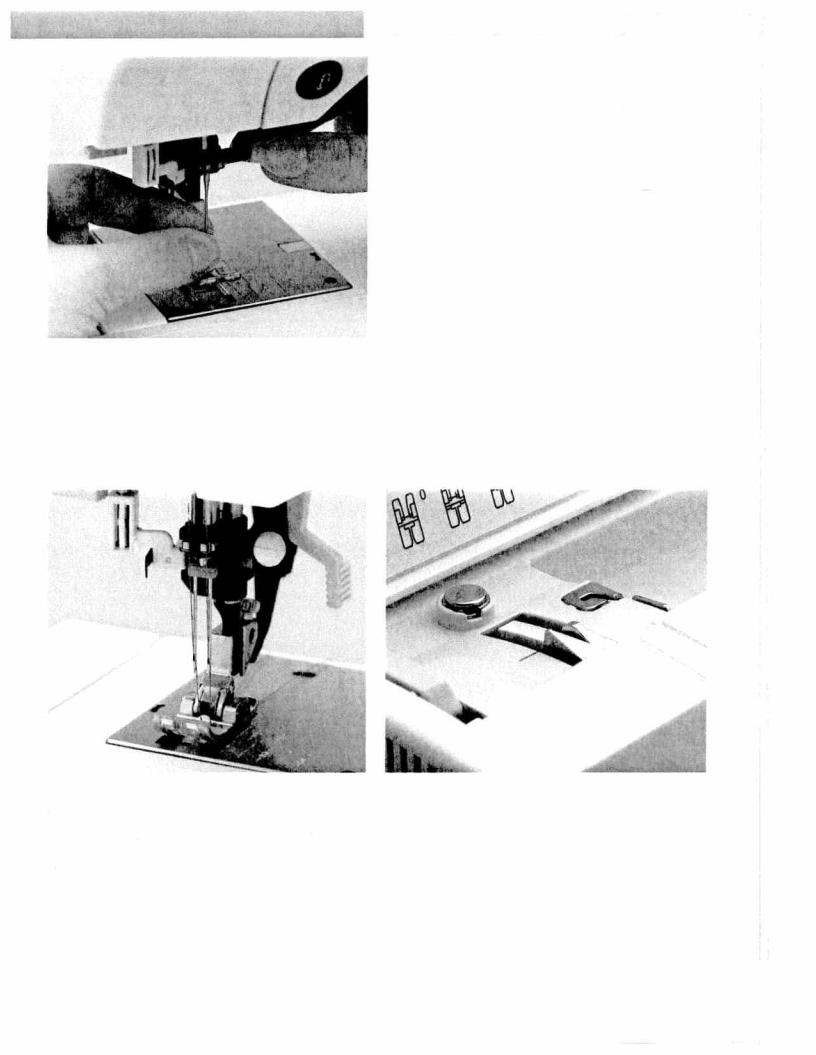
In order to |
make threading the needle easier and |
quicker. |
the PFAFF |
Integrated Needle threader. Lower the |
presser |
foot. Press the threader down with the handle. Threader |
||
use
hook |
R swivels through the |
needle eye. Place |
the thread |
|
over |
hook 0 and under the |
thread hook R and |
hold |
the |
end of the thread taut. Reduce the pressure so that |
the |
|||
needle threader slowly moves upwards. At the same time |
||||
the threader hook |
|
thread |
through the |
thread |
loop forms |
swivels out of the |
needle eye |
and pulls the |
||
eye. Release the |
|
end of the |
thread so a |
and |
behind the needle. |
Release the threader |
|||
pull
the
rest
of
the
thread
end through the
needle
eye.
27
,nicaI
section
I
w
Presser foot lifter |
|
|
Drawing-up the bobbin thread |
|
|
||
|
|
Raise the presser |
foot. While holding the end of |
the |
needle |
||
The presser foot is |
raised or lowered with the |
presser foot |
|||||
|
|||||||
|
|
|
|||||
lifter (51). |
|
|
thread, press the foot control so the needle moves down and |
||||
|
|
up. Pull the needle thread to draw up the bobbin |
thread. |
||||
|
|
|
|||||
|
|
|
|
|
|||
V 1
Bobbin thread |
|
|
|
|
|
Thread cutter |
|
|
|
|
|
|
|
|
Pull the thread from the |
back to the |
front over the thread |
||
Close the bobbin door (46) |
and |
pull the thread |
under the |
||||||
|
|
||||||||
presser foot to |
the |
left |
|
|
|
cutter (49), |
|
|
|
|
|
|
|
|
|
||||
I I
5
S
28
hnical |
section |
i’4 |
2e |
3 |
4 |
b |
31* |
|
* |
|
a. |
•
.
11
3Q
I
) I
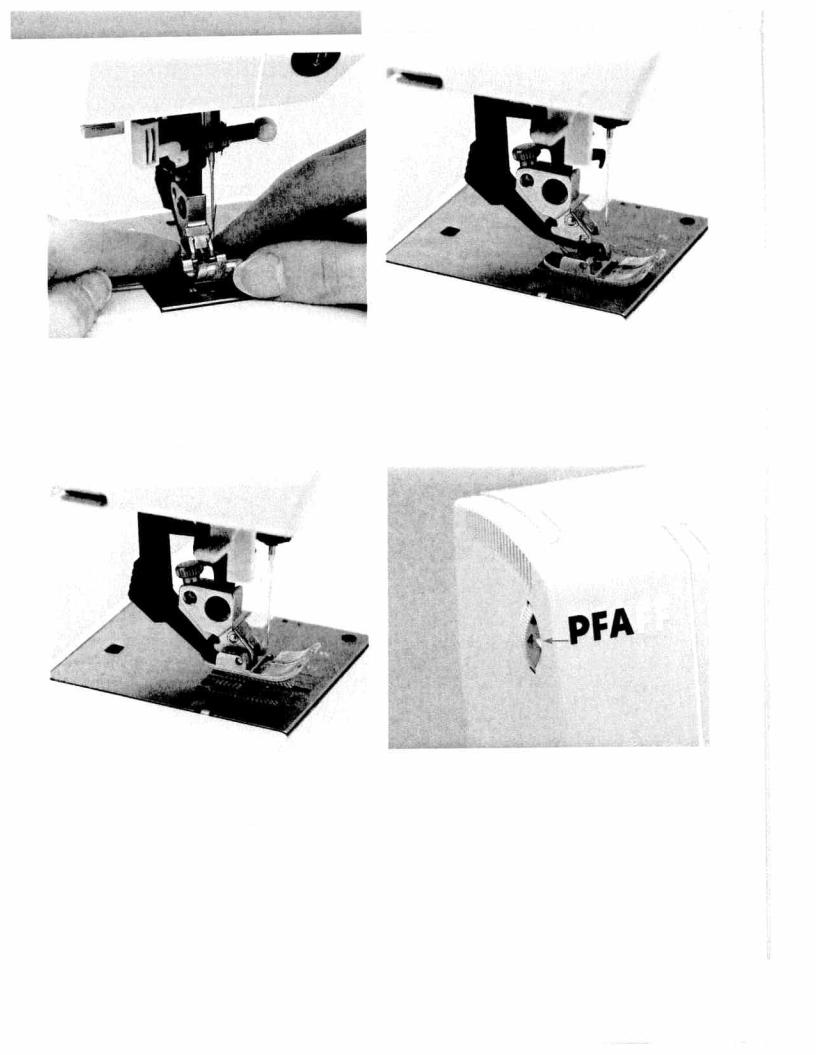
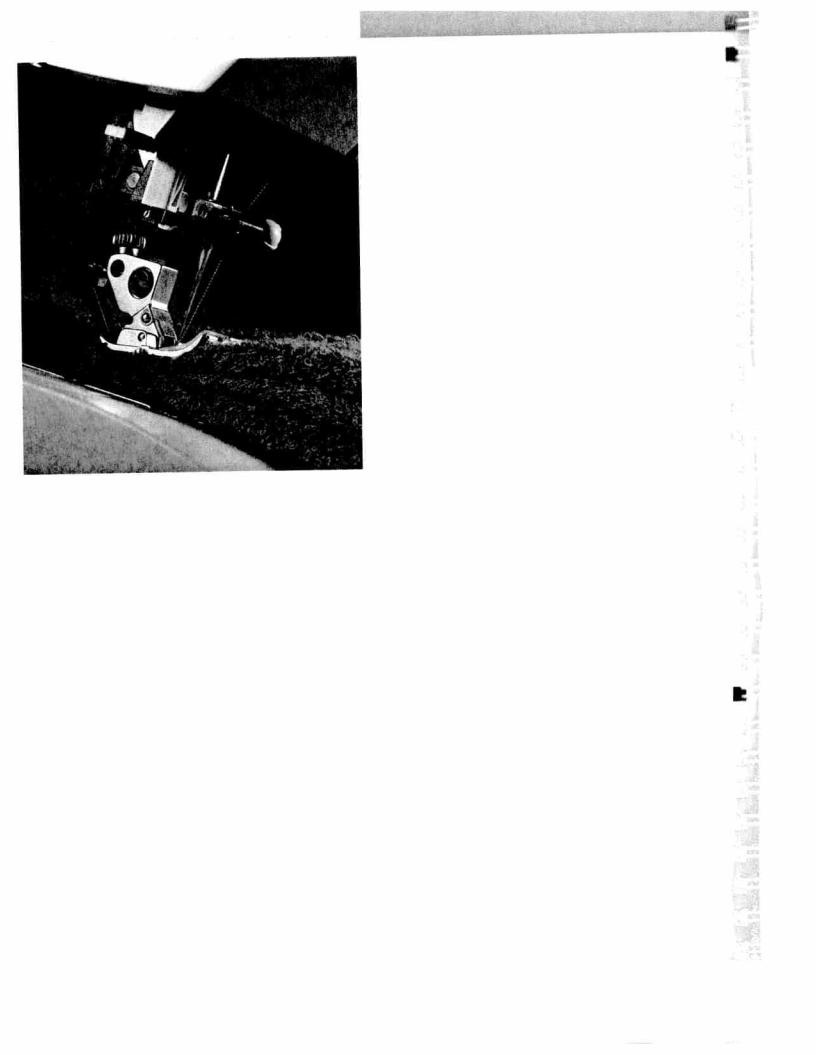
Winding a bobbin through |
the needle |
|
|
|
|
|
|
It is possible to wind bobbins even when the machine |
is |
||
fully threaded. Raise the presser toot lifter (51) |
to the |
top |
|
position. Pull the needle thread underneath the |
presser foot |
||
and upward through the right-hand threader slot (34). |
|
||
I
Place the thread from |
left to |
right through the take-up |
lever |
||
|
|||||
(40). |
|
|
|
|
|
Important: |
The take U-up lever must be at its highest |
position. |
|||
|
|
||||
g
C
11
1*
-
I
I
-
-
Guide the thread to clockwise direction.
the right |
under thread guide |
Push the |
bobbin to the right. |
C. Wind the beginning |
of the thread |
several |
||
Hold the end |
of the thread firmly and |
press |
||
times around the the foot control.
bobbin
in
a
30
inical
secUon
The
IDT
(Integrated
Dual
Feed)
For
sewing
any
fabric
precisely
PFAFF
provides the
ideal
solution: |
|
the Integrated |
Dual |
industrial |
machines, the |
IDT |
|
top and |
bottom at the same |
||
Feed, |
IDT system |
. As on |
||
feeds |
the |
fabric from |
the |
|
time The |
material |
is |
fed |
|
precisely.
On
light
fabrics
such
as
silk
or
rayon
the
dual
feed
prevents
puckering
of
the
seam.
The
even
feeding
action |
also |
ensures |
|
striped fabrics. |
The |
||
|
|||
perfect matching of checked and IDT keeps all layers of quilt projects
aligned
to
prevent
stretching
of
the
top
layers.
32
inica |
section |
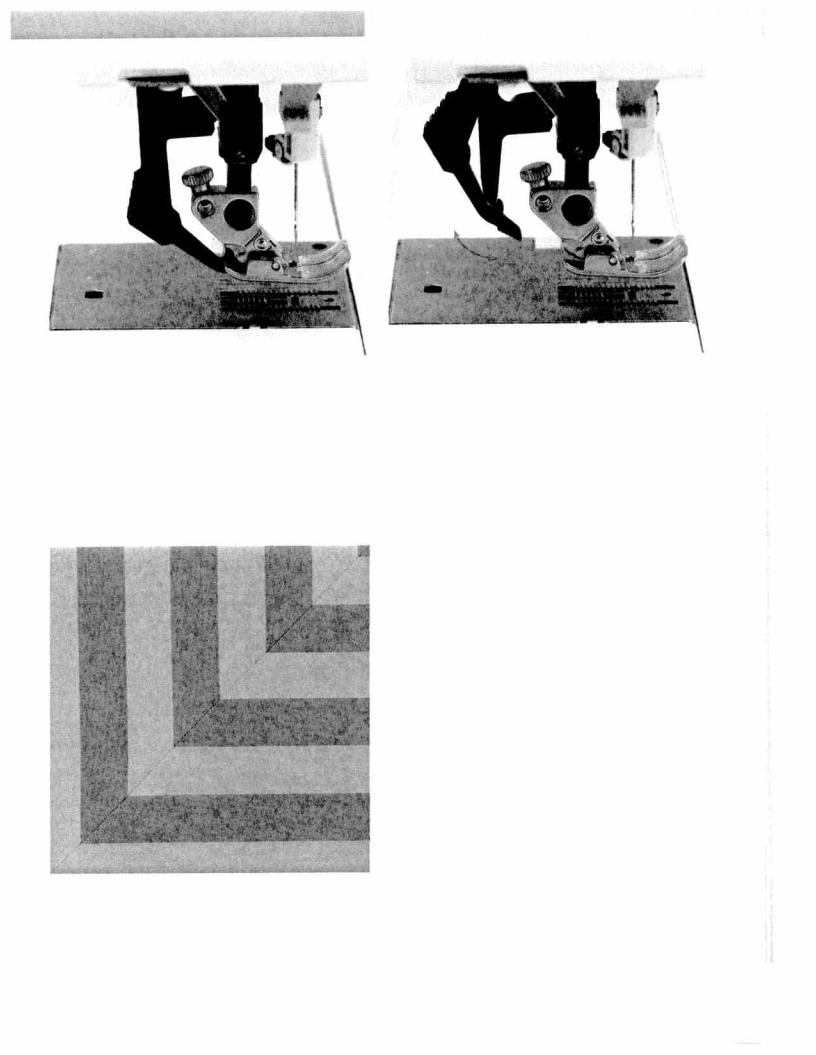
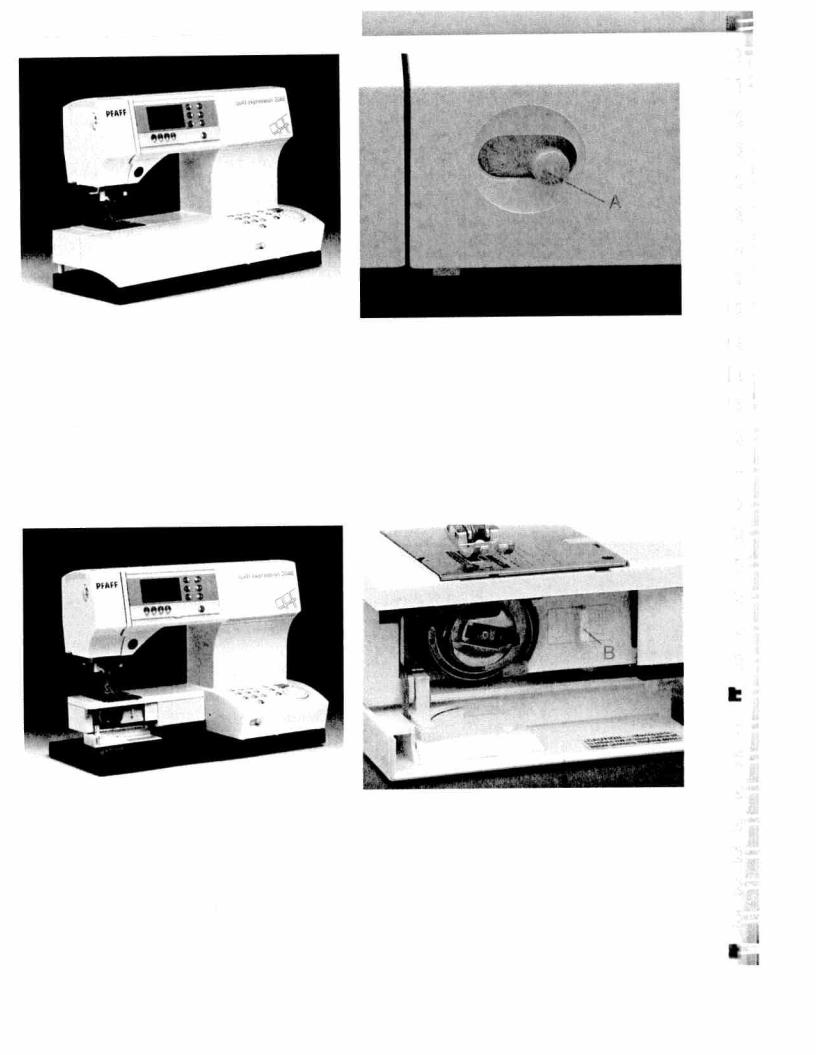
Lowering the teed dog |
|
|
|
For certain sewing work such |
as tree-motion quilting or |
||
darning and when the machine must be cleaned, the |
feed |
||
dog has to be lowered. |
|
|
|
Raise the |
presser foot before |
lowering the feed dog. |
Push |
slide A to |
the left. |
|
|
To engage the feed dog move the slide to the right. |
|
||
Raise the presser foot before engaging the feed dog. |
|
||
r
You can also lower the |
feed dog by opening the bobbin |
door |
and moving slide B to the right. To engage the feed dog |
|
|
move the slide to the left. |
|
|
Raise the presser foot |
before lowering or raising the feed |
|
dog. |
|
|
w
t
I L
I.
I
34
 Loading...