


coverlockTM 4.0
O w n e r ’ s M a n u a l
This household sewing machine is designed to comply with IEC/EN 60335-2-28 and UL1594
IMPORTANT SAFETY INSTRUCTIONS
When using an electrical appliance, basic safety precautions should always be followed, including the following:
Read all instructions before using this household sewing machine.
DANGER - To reduce the risk of electric shock:
•A sewing machine should never be left unattended when plugged in. Always unplug this sewing machine from the electric outlet immediately after using and before cleaning.
WARNING - To reduce the risk of burns, Àre, electric shock, or injury to persons:
•This sewing machine is not intended for use by persons (including children) with reduced physical, sensory or mental capabilities, or lack of experience and knowledge, unless they have been given supervision or instruction concerning use of the sewing machine by a person responsible for their safety.
•Children should be supervised to ensure that they do not play with the sewing machine.
•Use this sewing machine only for its intended use as described in this manual. Use only attachments recommended by the manufacturer as contained in this manual.
•Never operate this sewing machine if it has a damaged cord or plug, if it is not working properly, if it has been dropped or damaged, or dropped into water. Return the sewing machine to the nearest authorized dealer or service center for examination, repair, electrical or mechanical adjustment.
•Never operate the sewing machine with any air openings blocked. Keep ventilation openings of the sewing machine and foot controller free from the accumulation of lint, dust, and loose cloth.
•Keep Àngers away from all moving parts. Special care is required around the sewing machine needle and blades.
•Always use the proper needle plate. The wrong plate can cause the needle to break.
•Do not use bent needles.
•Do not pull or push fabric while stitching. It may deÁect the needle causing it to break.
•Wear safety glasses.
•Switch the sewing machine off (“0”) when making any adjustment in the needle area, such as threading needle, changing needle, or changing presser foot, etc.
•Always unplug sewing machine from the electrical outlet when removing covers, lubricating, or when making any other user servicing adjustments mentioned in the instruction manual.
•Never drop or insert any object into any opening.
•Do not use outdoors.
•Do not operate where aerosol (spray) products are being used or where oxygen is being administrated.
•To disconnect, turn all controls to the off (“0”) position, then remove plug from outlet.
•Do not unplug by pulling on cord. To unplug, grasp the plug, not the cord.
SAVE THESE INSTRUCTIONS
OPERATING INSTRUCTIONS |
|
INTRODUCTION |
|
Parts of the machine.................................................................... |
4 |
Accessories....................................................................................... |
5 |
Optional accessories from INSPIRA™.................................... |
6 |
PREPARATIONS |
|
Connecting the foot control and the power supply ........ |
7 |
Setting up the spool stand ........................................................ |
7 |
Setting up the telescopic thread stand ................................ |
8 |
Front cover ....................................................................................... |
8 |
Open .............................................................................................................. |
8 |
Close .............................................................................................................. |
8 |
Attaching the waste tray............................................................. |
8 |
Presser foot lift ............................................................................... |
8 |
Changing the presser foot ......................................................... |
9 |
Needle information....................................................................... |
9 |
Changing the needles.................................................................. |
9 |
Movable upper cutter ............................................................... |
10 |
Disengaging, position B...................................................................... |
10 |
Engaging, position A ............................................................................ |
10 |
2-thread overlock converter.................................................... |
10 |
Engaging ................................................................................................... |
10 |
Disengaging............................................................................................. |
10 |
Upper looper ................................................................................. |
11 |
Disengaging............................................................................................. |
11 |
Engaging ................................................................................................... |
11 |
Changing to coverstitch table B ............................................ |
11 |
Stitch Ànger lever setting ......................................................... |
11 |
THREADING |
|
General threading information .............................................. |
12 |
Threading the upper looper (red)......................................... |
13 |
Threading the lower looper (yellow).................................... |
14 |
Threading chainstitch looper (purple)................................ |
15 |
Threading the right needle ..................................................... |
16 |
Threading the left needle ........................................................ |
17 |
Threading the chainstitch needle ......................................... |
18 |
Threading the coverstitch needles ....................................... |
19 |
Threading the right coverstitch needle........................................ |
19 |
Threading the middle coverstitch/chainstitch needle........... |
20 |
Threading the coverstitch left needle ........................................... |
21 |
Needle threader ........................................................................... |
22 |
Changing thread .......................................................................... |
22 |
TOUCH SCREEN |
|
Touch screen overview .............................................................. |
23 |
Select a stitch................................................................................ |
23 |
Recommendations................................................................................ |
23 |
On-screen stitch adjustments ................................................ |
24 |
Thread tension ....................................................................................... |
24 |
Differential feed...................................................................................... |
24 |
Stitch length ............................................................................................ |
24 |
Sewing speed.......................................................................................... |
24 |
Save Stitch...................................................................................... |
25 |
Personal Name....................................................................................... |
25 |
Delete personal stitch.......................................................................... |
25 |
Load Stitch ..................................................................................... |
25 |
Settings menu............................................................................... |
26 |
Display contrast ..................................................................................... |
26 |
Sound......................................................................................................... |
26 |
Language .................................................................................................. |
26 |
Calibrate touch screen........................................................................ |
26 |
Info System .................................................................................... |
26 |
Pop-ups ........................................................................................... |
27 |
STITCHES & SEWING TECHNIQUES |
|
Stitch overview.............................................................................. |
28 |
Start sewing ................................................................................... |
33 |
Pin Placement ........................................................................................ |
33 |
Chain off.................................................................................................... |
33 |
Rolled edge sewing..................................................................... |
34 |
Coverstitch sewing ...................................................................... |
34 |
Machine set up....................................................................................... |
34 |
Start sewing............................................................................................. |
34 |
Securing the coverstitch seam end............................................... |
34 |
Flatlock sewing ............................................................................. |
35 |
Standard Áatlock stitch....................................................................... |
35 |
Ornamental Áatlock stitch ................................................................. |
35 |
Ladder stitch ........................................................................................... |
35 |
Chainstitch sewing...................................................................... |
36 |
Machine set up....................................................................................... |
36 |
Start and end of sewing ..................................................................... |
36 |
Sewing hints .................................................................................. |
36 |
Pintuck sewing ....................................................................................... |
36 |
Sew in Circles.......................................................................................... |
36 |
Securing the thread chain................................................................. |
36 |
Braiding by chaining off..................................................................... |
36 |
Lowering the needle(s) ....................................................................... |
36 |
STITCH ADJUSTMENTS |
|
Stitch width adjustment ........................................................... |
37 |
Width adjustment by changing needle position ...................... |
37 |
Width adjustment with the cutting width dial........................... |
37 |
Presser foot pressure adjustment ........................................ |
37 |
Stitch length adjustment.......................................................... |
37 |
Differential feed adjustment ................................................... |
38 |
Gathered overlock (stretch, knit fabrics) ..................................... |
38 |
Stretch overlock (lightweight fabrics) ........................................... |
38 |
Thread tension Àne tuning ...................................................... |
39 |
MAINTENANCE |
|
Machine maintenance............................................................... |
41 |
Cleaning .................................................................................................... |
41 |
Cleaning the touch screen................................................................. |
41 |
Oiling .......................................................................................................... |
41 |
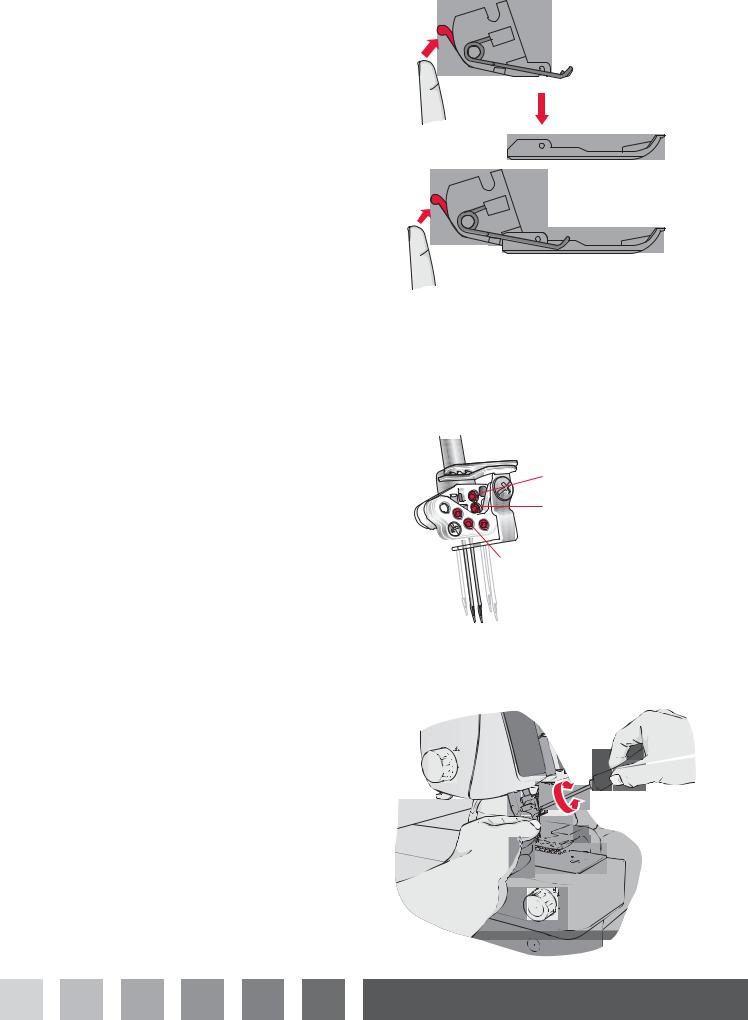
Replacing the movable upper cutter ............................................ |
41 |
Storage............................................................................................. |
42 |
Servicing.......................................................................................... |
42 |
Trouble shooting .......................................................................... |
42 |
Machine speciÀcations.............................................................. |
43 |
Intellectual Property ................................................................... |
43 |

Parts of the machine
4 |
|
2 |
1 |
|
|
|
|
5 |
3 |
|
|
|
|
|
|
|
coverlock |
4.0 |
|
|
|
|
6
7
8
18


 17
17  16
16
10 9
11
12
1.Telescopic thread stand
2.Handle
3.Touch screen
4.Load stitch button
5.Save stitch button
6.Clear button
7.Settings menu button
8.Info button
9.Stitch plate
10.Flat bed extension
11.Cutter cover A 12.Front cover 13.Power & light switch
14.Foot control/electric power cord socket 15.Handwheel
16.Spool stand 17.Cone holder 18.Spool pin
15
13 14
PFAFF |
coverlock4.0 |
|
19 |
|
germandesign |
|
|
|
|
|
20
21
22 
25
23
24
19.Presser foot pressure adjusting dial 20.Thread cutter
21.Presser foot lift
22.Hole for extension table
23.Presser foot ankle 24.Presser foot 25.Cutting width dial
4 Introduction
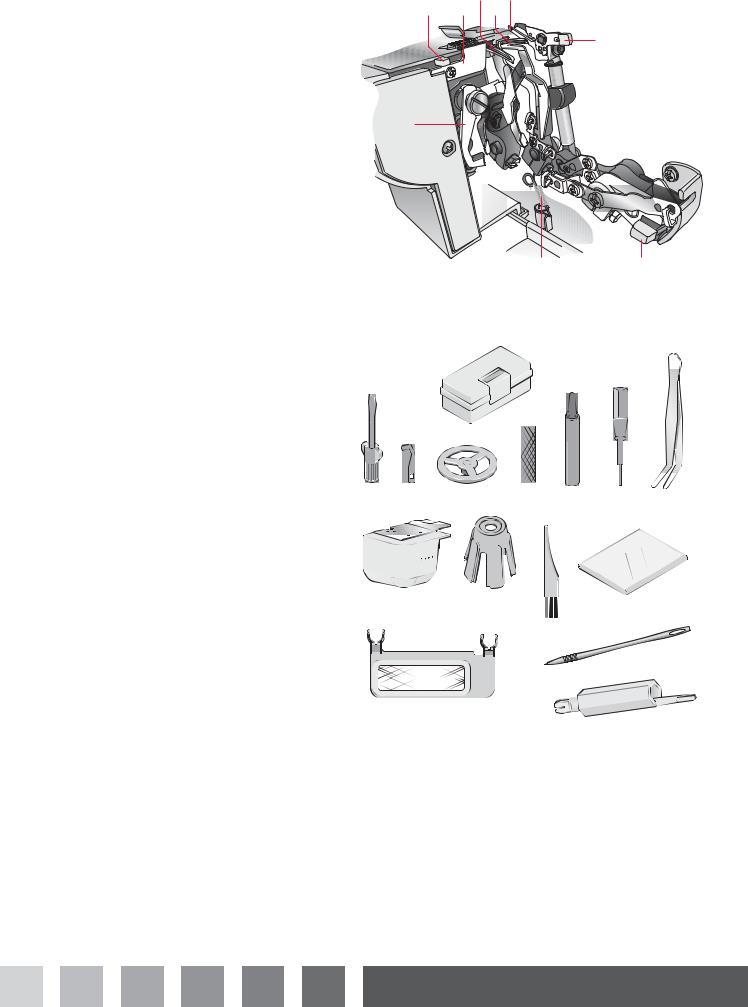
26.Moveable upper cutter 27.Stitch Ànger lever 28.Stationary lower cutter 29.Chainstitch/Coverstitch looper 30.Lower looper
31.Upper looper 32.2-thread converter 33.Upper looper clutch
33.Chain/coverstitch thread guide
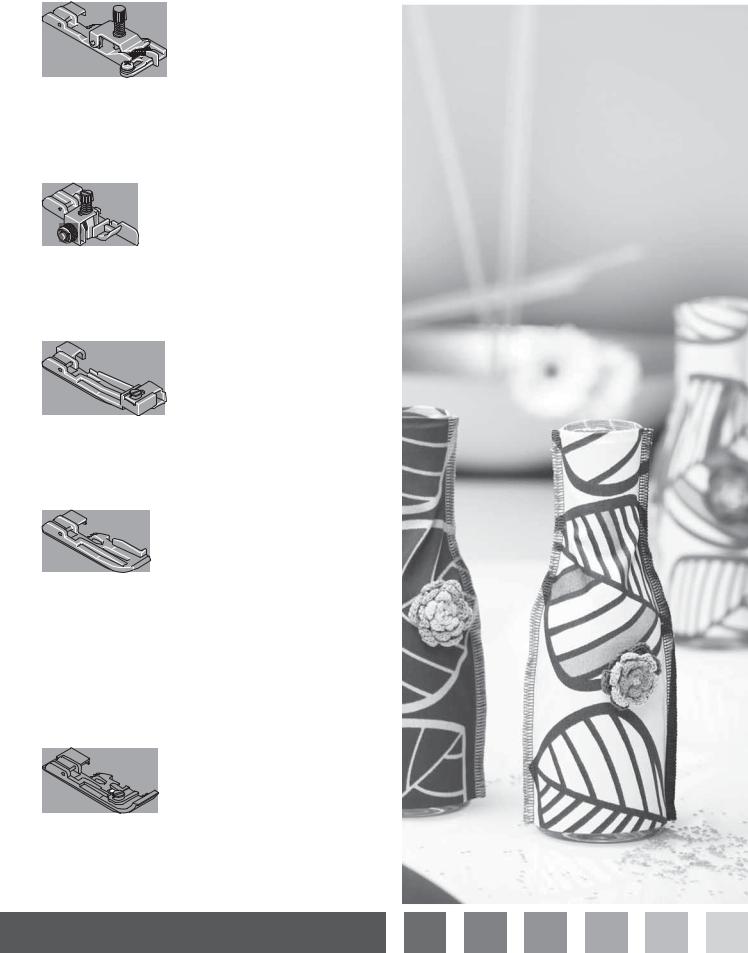
Accessories
Accessories are contained in the accessory box.
1.Accessory box
2.Screwdriver
3.Knife blade (for the movable upper cutter)
4.Thread unreeling discs (5)
5.Thread spool nets (5)
6.Oiler
7.Allen key
8.Tweezers (placed on the inside of the front cover)
9.Coverstitch table B (for Cover/chainstitch)
10.Cone holders (5) 11.Lint brush 12.Dust cover 13.Waste tray
14.Stylus (placed on the inside of the front cover) 15.Needle threader
16.Extension table including four legs and push pin (not pictured).
Assemble the extension table and legs according to the illustrations provided with the table. The push pin is used in the small holes in the table to hold your fabric in place when sewing circles (see page 36).
17.Needle pack (not pictured) system ELx705 including three needles, size #14/90 and two needles, size #12/80. Two needles, size #14/90, are in the machine on delivery.
29 31
27 28 30
32
26
34 33
1
2 |
3 |
4 |
5 |
6 |
7 |
8 |
9  10
10 

 12 11
12 11
13 |
14 |
|
|
|
15 |
Introduction 5
Optional accessories from INSPIRA™
Optional presser feet specially prepared for this machine are available at your PFAFF® dealer. The snap-on type presser foot used on this machine allows easy removal and replacement.
Elastic Foot 620 08 65-96
The Elastic Foot guides and stretches narrow elastic (¼-½”, 6-12mm) as you sew it to fabric. It is great for sewing for active wear, lingerie and other elastic insertion techniques.
Blindhem & Lace Foot 620 08 69-96
The Blindhem Foot is perfect for sewing invisible hems and for applying lace. The hem is sewn, overcast and trimmed in one step.
Beading Foot 620 08 66-96
The Beading Foot smoothly guides beads and pearls through a channel on the foot for easy application on garments or crafts.
Piping Foot 620 08 67-96
The Piping Foot is perfect for inserting packaged piping into seams and on edges for a tailored Ànish. The trim is sewn between the two layers of fabric in one step. A
groove under the foot helps guide the piping. You can also create your own piping for a custom Ànish.
The Piping Foot makes it fast and easy to cover cording with fabric and to insert piping into seams for a professional look!
Taping Foot 620 08 68-96
The Taping Foot is used to apply seam tapes to seams to prevent stretching. It is especially good for stabilizing shoulder seams. With this foot you can reinforce and construct seams in one step.
6 Introduction
Some fabrics have a lot of excess dye which can cause discoloration on other fabric but also on your overlock machine. This discoloring may be very difÀcult or impossible to remove.
Fleece and denim fabric, especially red and blue, often contain a lot of excess dye.
If you suspect that your fabric/ready-to-wear garment contains a lot of excess dye, always pre-wash it before sewing to avoid the discoloring.
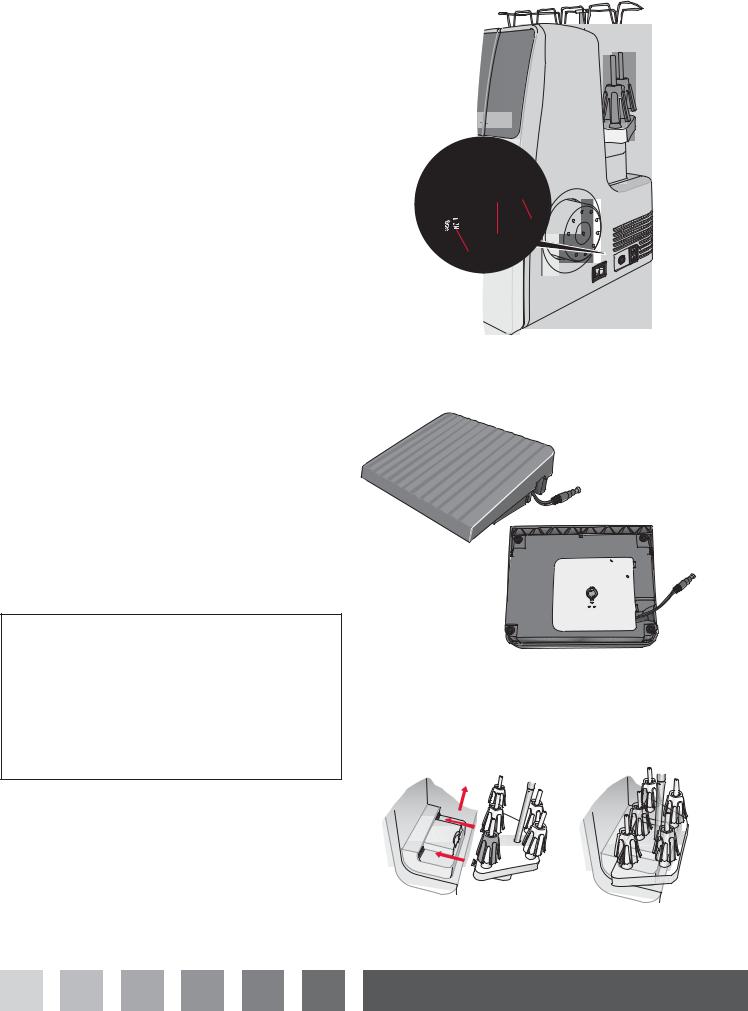
Connecting the foot control and the power supply
Among the accessories you will Ànd the power cord and the foot control.
Note: Before plugging in the foot control, check to ensure that it is type ”FR5” (see underside of foot control).
1.Pull out the cord from the foot control. Connect the foot control to the front socket on the bottom right side of the machine (A).
2.Connect the power cord to the rear socket on the bottom right side of the machine (B). Plug the cord into the wall socket.
Before plugging your machine in, make sure the voltage is the same as indicated on the plate under the machine. SpeciÀcations vary from country to country.
3.Press the ON/OFF switch to ON to turn on power and light (C).
Note: When the front cover is open the safety switch is activated and prevents the machine from sewing, even if the foot control is pressed.
Note: To retract the foot control cord, unplug the foot control from the machine (A). Pull the cord gently and release - the cord will retract itself into the foot control.
POLARIZED PLUG INFORMATION (FOR U.S.A. & CANADA ONLY)
This appliance has a polarized plug (one blade wider than the other). To reduce the risk of electric shock, this plug is intended to Àt in a polarized outlet only way. If the plug does not Àt fully in the outlet, reverse the plug. If it still does not Àt, contact a qualiÀed electrician to install the proper outlet. Do not modify the plug in any way.
Setting up the spool stand
Insert the spool stand then push to right as illustrated.
B
A
C
Preparations 7
Setting up the telescopic thread stand
Extend the telescopic thread stand to its full height, then turn until it clicks into place. Place the thread spools over the cone holders on the spool pin.
If the machine is already threaded, straighten the threads to prevent tangling.
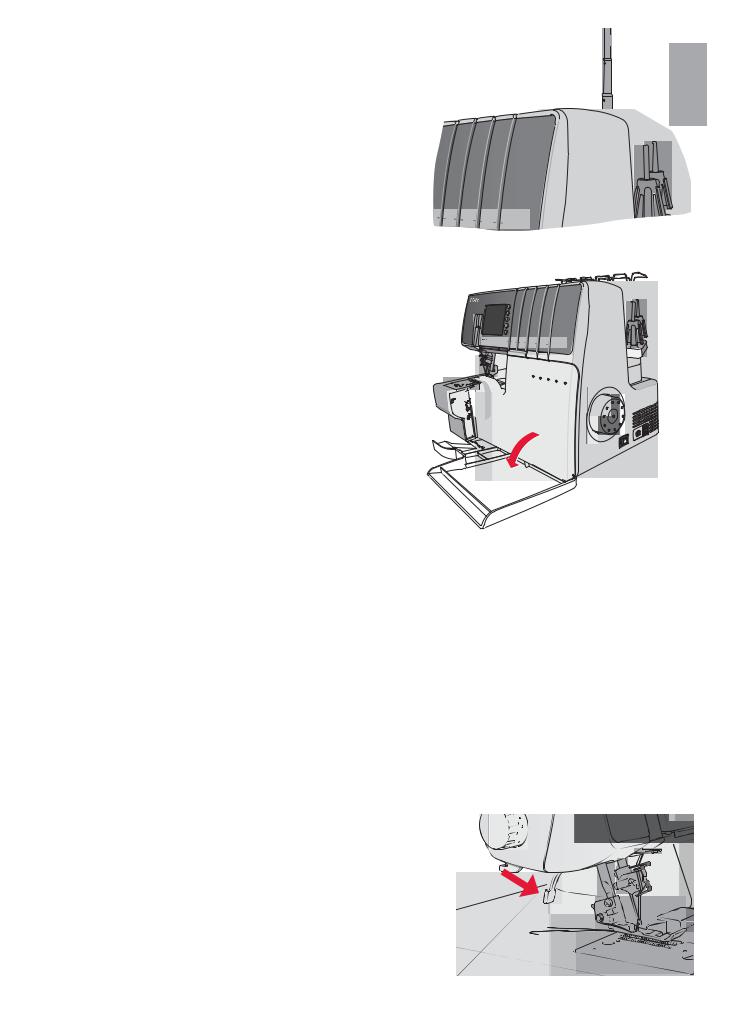
Front cover
Open
First push the cover to the right as far as it will go and then pull it downward toward you.
Close
First pull the cover upward and then slide it to the left until it locks.
Note: The front cover has a safety switch and the machine will not sew if the front cover is open.
Attaching the waste tray
Position the machine so the front is nearly aligned with the edge of the table. Insert the U-shaped hooks of the waste tray onto the two suction cups on the underside of the machine. Make sure the trim falls into the bag while sewing.
coverlock 4.0


 1
1
2
coverlock 4.0
Presser foot lift
Raise the presser foot by lowering presser foot lift at the back of the machine.
Pressing down on the presser foot lift puts the presser foot in the extra lift position.
germandesign
8 Preparations
Changing the presser foot
 Turn off the main power switch and unplug the machine.
•Raise the presser foot.
•Turn the handwheel toward you until the needles are at the highest position.
•Push the red button on the back of the presser foot ankle to release the presser foot.
•Raise the presser foot to the extra lift position and the foot will come off.
•Place the new foot with the pin right underneath the groove of the ankle while in the extra lift position. Lower the presser foot. Push the red button on the back of the presser foot ankle and the foot will snap into place.
Needle information
This overlock uses a Áat shank industrial needle that eliminates the possibility of inserting the needle backwards.
Do not attempt to use a standard household sewing machine needle of any size or type in this overlock.
Use INSPIRA™ needle EL x 705 sizes 14/90 and 12/80, supplied with this machine.
Changing the needles
 Turn off the main power switch and unplug the machine.
•Turn the handwheel toward you until the needles are at the highest position.
•Place a thick piece of fabric under the presser foot. Lower the needles halfway into the fabric.
•Loosen, but do not remove the needle clamp screw with the allen key while you are holding the needles.
Note: When inserting needles into the A and/or B needle clamps it is necessary to loosen the needle clamp screws for both A and B.
•Remove the selected needle.
•Hold the new needle with the Áat surface to the back.
•Insert the needle into the needle clamp as far as it will go.
•Securely tighten the needle clamp screw using the allen key.
Note: Do not over-tighten the screw as this may cause the needle clamp to be damaged.
A
B
C 


 E D
E D
A. Overlock left needle B. Overlock right needle
C.Coverstitch left needle
D.Coverstitch middle needle
E.Coverstitch right needle
Preparations 9

Movable upper cutter
Disengaging, position B
 Turn off the main power switch and unplug the machine.
•Turn the handwheel toward you until the upper cutter is raised to the highest position.
•Open the front cover.
•Pull the movable cutter knob to the right as far as it will go.
•Turn the knob toward you counter clockwise until the cutter clicks into the locked position B.
Engaging, position A
•Open the front cover and pull the movable cutter knob to the right as far as it will go.
•Turn the knob clockwise until the cutter clicks into the cutting position A.
A |
|
B |
B |
|
A |
|
B |
B |
|
2-thread overlock converter
Engaging
 Turn off the main power switch and unplug the machine.
2-thread overlock stitches are sewn using one needle thread and the lower looper thread. Before sewing, the 2-thread converter must be attached to the upper looper.
•Open the front cover.
•Raise the white handle on the 2-thread converter to insert the sharp edge (A) of the converter in the eye (B) of the upper looper.
Disengaging
 Turn off the main power switch and unplug the machine.
•Lower the white handle on the converter and remove the sharp edge (A) from the eye (B) of the upper looper.
A
B 


10 Preparations
Upper looper
Disengaging
For coverstitch and chaintitch sewing the upper looper needs to be disengaged.
•Turn the handwheel until the upper looper is in its lowest position.
•Push the clutch lever to the right and back until position B is visible from the front.
Engaging
•Turn the handwheel until the upper looper is in its lowest position.
•Pull the clutch lever toward you until position A is visible from the front.
Changing to coverstitch table B
For coverstitch and chainstitch sewing the coverstitch |
1 |
table B should be used. |
• Lift the hook (1) to release the cutter cover A and pull it towards you.
•Insert the coverstitch table B by Àtting the two front pins (2) into the holes (3) and make sure the hook (4) clicks into place.
Stitch Ànger lever setting
The stitch Ànger lever should be set to N for all standard overlock sewing. To sew rolled edge you need to retract the stitch Ànger by setting the stitch Ànger lever to R.
When moving the stitch Ànger lever, be sure to push the lever as far as it will go in each direction.
N
N
R
B |
A |
|


 3
3
2 
4
R
N
R
Preparations 11

General threading information
A color coded diagram is located inside the front cover for quick reference. Always start threading the loopers and then the needles from right to left.
See the table below for recommendations on what needles and thread to use for different fabric weights.
Tip: Your new machine is threaded to sew a standard overlock. Tie your own threads to these threads and carefully pull them through the machine, to easily thread your new overlock machine the Àrst time.
Note: If the lower looper should come unthreaded, do the following;
1.Unthread the needle(s)
2.Thread the lower looper
3.Thread the needle(s)
Fabric |
Light fabric |
Medium fabric |
Heavy fabric |
|
(voil, crepe, georgette, etc.) |
(cotton, chino, wool, satin |
(denim, jersey, tweed etc.) |
|
|
etc.) |
|
Needles |
#12 |
#14 |
#14 |
Thread |
Polyester |
Twisted thread |
Twisted thread |
|
(spun Àlament) |
#60/2 |
#50/2 - #60/2 |
|
Twisted thread |
|
|
|
#60/2 - #100/3 |
|
|
|
Twisted thread |
|
|
|
#80/3 - #100/3 |
|
|
|
|
|
|
12 Threading

Threading the upper looper (red) |
1 |
1 |
• Raise the presser foot to release tension discs. |
|
|
|
2 |
|
• Pass the thread from back to front through the thread |
|
|
guide on the thread stand (1). |
|
|
• Thread the top cover thread guide by pulling the |
|
coverlock |
thread towards the left until it slips under the guide. |
|
4.0 |
|
|
|
Then pull the thread along the right side of the button |
|
3 |
as illustrated (2). |
|
|
|
|
•Lift up the handle and bring the thread under it. While holding the thread with both hands, pass it between the tension discs and pull it down to make certain it is properly placed between the tension discs (3)
2
•Thread the looper area of the machine following the red color coded thread guides (4-9).
9 |
4 |
|
8 |
|
5 |
7 |
6 |
• |
Use the tweezers to thread the hole in the upper looper |
|
|
from front to back (9). |
|
• |
Pull about 10 cm (4”) of thread through the looper and |
9 |
|
place it to the back of the stitch plate. |
Threading 13

Threading the lower looper (yellow)
•Raise the presser foot to release tension discs.
•Pass the thread from back to front through the thread guide on the thread stand (1).
•Thread the top cover thread guide by pulling the thread towards the left until it slips under the guide. Then pull the thread along the right side of the button as illustrated (2).
•Lift up the handle and bring the thread under it. While holding the thread with both hands, pass it between the tension discs and pull it down to make certain it is properly placed between the tension discs (3).
•Turn the handwheel toward you until the lower looper extends out 10 mm (3/8”) from the needle plate edge.
•Thread the looper area of the machine following the yellow color coded thread guides (4-10).
•Place the thread through threading guide (4).
•Place the thread through the right slot of threading guide (5).

 9
9
•To thread the last thread guide (9), pull about 10 cm (4”) of thread through the guide (8).
Tip: Moving the stitch Ànger lever to R makes the threading easier. Remember to set it back to N before starting to sew.
Option 1
•Place the thread into the “V” cutouts (A) on threader lever. Pull the threader lever (B) up into place and back to snap the thread into thread guide 9. Thread the looper eye (10) from front to back using the tweezers.
Option 2
•Thread the looper eye (10) from front to back using the tweezers. Make sure the thread runs into the “V” cutouts (A) on threader lever. Firmly hold the thread tail with left hand and pull the threader lever (B) up into place and back to snap the thread into thread guide 9.
1
 1
1
2
coverlock4.0
3

2
5
4
10 


 5
5

 7 8
7 8 

6
9
A
 A
A
B


 B
B


Option 1 |
Option 2 |
14 Threading
 Loading...