


Owner’s manual
Manuel d’utilisation
Gebrauchsanleitung
Manuale d’istruzioni
Handleiding
hobby™ 350 p
punching machine

English .......................................................................... |
2-11 |
French.......................................................................... |
12-21 |
German ....................................................................... |
22-31 |
...........................................................................Italian |
32-41 |
|
|
|
|
Dutch........................................................................... |
42-51 |
This household sewing machine is designed to comply with IEC/EN 60335-2-28 and UL1594
IMPORTANT SAFETY INSTRUCTIONS
When using an electrical appliance, basic safety precautions should always be followed, including the following:
Read all instructions before using this household sewing machine.
DANGER -To reduce the risk of electric shock:
•A sewing machine should never be left unattended when plugged in. Always unplug this sewing machine from the electric outlet immediately after using and before cleaning.
•Always unplug before relamping. Replace bulb with same type rated 15 Watt.
WARNING -To reduce the risk of burns, fire, electric shock, or injury to persons:
•Do not allow to be used as a toy. Close attention is necessary when this sewing machine is used by or near children and infirm persons.
•Use this sewing machine only for its intended use as described in this manual. Use only attachments recommended by the manufacturer as contained in this manual.
•Never operate this sewing machine if it has a damaged cord or plug, if it is not working properly, if it has been dropped or damaged, or dropped into water. Return the sewing machine to the nearest authorized dealer or service center for examination, repair, electrical or mechanical adjustment.
•Never operate the sewing machine with any air openings blocked. Keep ventilation openings of the sewing machine and foot controller free from the accumulation of lint, dust, and loose cloth.
•Keep fingers away from all moving parts. Special care is required around the sewing machine needle.
•Always use the proper needle plate. The wrong plate can cause the needle to break.
•Do not use bent needles.
•Do not pull or push fabric while stitching. It may deflect the needle causing it to break.
•Switch the sewing machine off (“0”) when making any adjustment in the needle area, such as threading needle, changing needle, threading bobbin, or changing presser foot, etc.
•Always unplug sewing machine from the electrical outlet when removing covers, lubricating, or when making any other user servicing adjustments mentioned in the instruction manual.
•Never drop or insert any object into any opening.
•Do not use outdoors.
•Do not operate where aerosol (spray) products are being used or where oxygen is being administrated.
•To disconnect, turn all controls to the off (“0”) position, then remove plug from outlet.
•Do not unplug by pulling on cord. To unplug, grasp the plug, not the cord.
•The sound pressure level under normal operating conditions is 70dB(A).
SAVETHESE INSTRUCTIONS
2
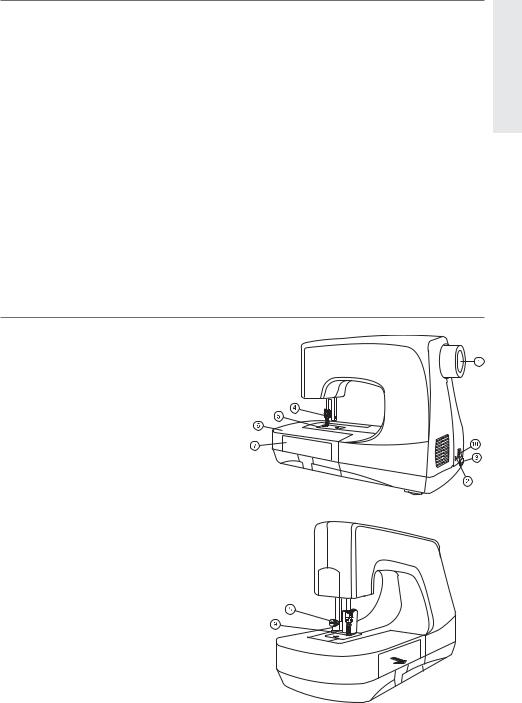
Table of Contents
Table of Contents.......................................... |
3 |
Overview of the machine............................. |
3 |
Accessories...................................................... |
4 |
Setting Up........................................................ |
4 |
Attaching the power cord and foot control4 |
|
Machine speed ............................................... |
4 |
For the USA and Canada .............................. |
4 |
Cloth Presser................................................... |
5 |
Getting Started ............................................... |
6 |
Fabric and trims that can be used................ |
6 |
Laundering embellished projects................. |
6 |
NOTE: Laundering rules of |
|
“pre-washing”:................................................ |
6 |
Start Embellishing.......................................... |
7 |
Flat Bed Extension / Free Arm................... |
8 |
Accessory Storage .......................................... |
8 |
Maintenance.................................................... |
9 |
Changing the needle(s) ................................. |
9 |
Replacing the light bulb............................... |
10 |
Cleaning the lint box.................................... |
10 |
Trouble Shooting ......................................... |
11 |
Needle bent or Needle breakage .............. |
11 |
Specifications ................................................ |
11 |
Overview of the machine
1.Handwheel
2.Socket for foot control
3.Power switch
4.Needle clamp holder
5.Needle plate
6.Flat Bed Extension
7.Accessory storage
8.Cloth presser height adjusting screw
9.Clear fabric cover with needle guard
10.Connection socket
English
3
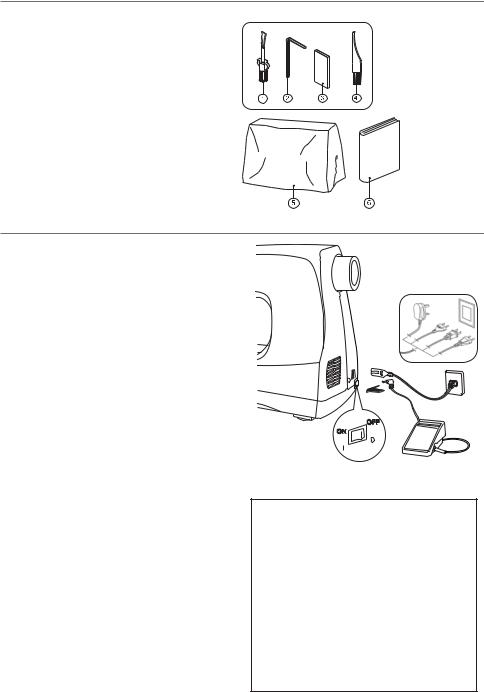
Accessories
1.Screwdriver
2.1,5 mm Allen wrench
3.Needles
4.Cleaning brush
5.Machine cover
6.Instruction book
Setting Up
Attaching the power cord and foot control
Plug the power cord into machine socket, then into a wall outlet. Always make sure the power is OFF and remove the plug from the wall outlet when the machine is not in use, or when making any adjustments such as changing needles or light bulb.
 Note: Before plugging in, check to ensure that the foot control is of type “4C-337G” or “C-9000”.
Machine speed
The machine speed is adjusted by increasing or decreasing the pressure on the foot control.
When not in use, do not place anything on the foot control to prevent damage to the foot control or motor.
For the USA and Canada
This sewing machine has a polarized plug (one blade wider than the other).
To reduce the risk of electric shock, this plug is intended to fit in a polarized outlet only one way. If the plug does not fit fully in the outlet, reverse the plug.
If it still does not fit, contact a qualified electrician to install the proper outlet. Do not modify the plug in any way.
4
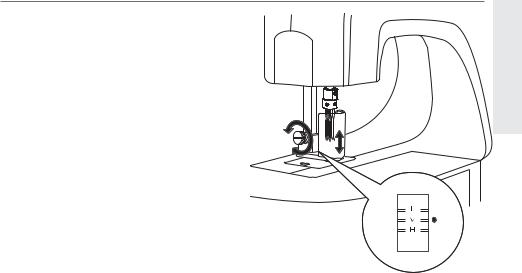
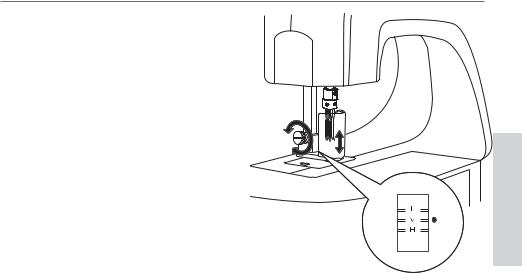
Cloth Presser
The cloth presser is to prevent cloth/fabric/ materials from lifting during the felting process.
1.Place the cloth/fabric/materials on the needle plate and under the cloth presser.
2.Loosen the cloth presser height adjusting screw to adjust the height of the cloth presser.
3.Move the clear fabric cover with needle guard up or down until the red indicator on the presser bar aligns with the correct height for the thickness of your fabric and felting material.
L= low position for thin or medium fabrics.
M= medium position for medium weight fabrics.
H= high position for heavy or thick fabrics.
4.Tighten the clear fabric cover height adjusting screw.
Note: The fabric and felting material must move freely under the clear fabric cover with needle guard without any restrictions.
English
5

Getting Started
Let your creativity soar with this needle felting machine! Now you can make your projects even more creative. Let your imagination soar to create beautiful felted embellishment on your garments, arts and crafts, home decorating, quilting, sewing, scrap booking and much more.
Fabric and trims that can be used
Just about any fabric can be felted with the needle felting machine, however, some fabrics tend to have more favorable results when embellishing or laundering afterward.
The recommended fabrics and trims are those made from natural fibers, such as linen, wool, wool roving, and wool, silk or cotton yarns. The best characteristic for fabrics is a napped or textured surface.
A napped surface will adhere to a natural fiber/napped surface/or mixed fiber base.
Avoid synthetics with “wash and wear” type of weaves and finishes that have a smooth surface.
Laundering embellished projects
To determine if your embellished project is washable, it is recommended that you do a test sample first from the fabrics you intend to use. Wash the finished sample the same way you will wash it after the project is completed.
For example, if you plan on washing the completed project with a load of jeans and then put it into the dryer, then do so with the sample. Do not “pamper” unless you plan on pampering the finished project.
NOTE: Laundering rules of “pre-washing”:
Pre-washing all fabrics before sewing does not apply. With the needle felting machine, you want thefinished project to “shrink” so the felted fibers will stay meshed. With this in mind, be sure to make the project a little large, since the main fabric is a natural fiber, to allow for shrinkage.
Because of not pre-washing fibers before embellishing, color fading can occur when working with bright and contrasting colors. Be sure to make a test sample and wash it for best results.
6
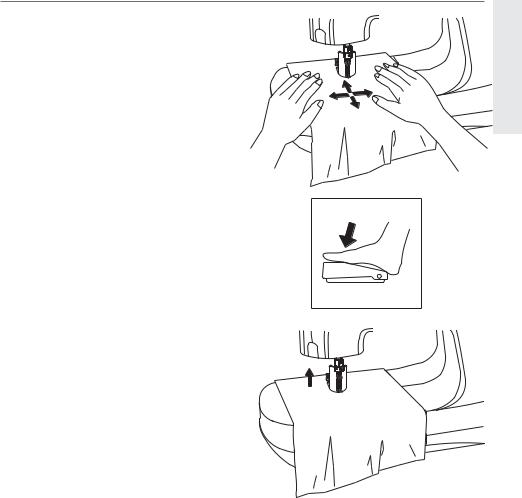
Start Embellishing
Layer the project fabric with the material that will be felted together to create the embellishment. Make sure that the smaller piece to be felted is on the correct side of the project (right or wrong side).
The embellishing fabric can be put on either the right or the wrong side of the project. Experiment first on scraps to see which look you like best for your project.
Place the layers to be felted together under the clear fabric cover with needle guard. Adjust the height if you need to at this time so the project can move freely under the clear fabric cover with needle guard
(see page 3).
Move the fabric in any direction so the needles can mesh the layers together.
When you have finished embellishing the needle stop position will automatically be up and out of the project. Because the needles always stop in the highest up position, your projects are very easy to place into the felting area and very easy to remove. You will never break needles placing or removing your project.
English
7
Flat Bed Extension / Free Arm
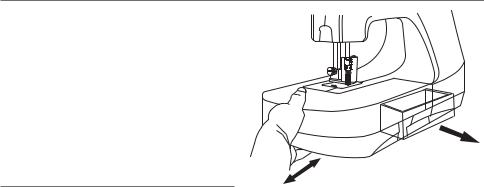
Remove the flat bed extension by sliding it to the left and the machine will convert to a free arm. This will allow you to embellish sleeves, pant legs, and small areas that are sewn in the round. This will also give you access to the free arm door to clean out the lint that has accumulated from felting.
Accessory Storage
Open the accessory storage compartment by pulling the drawer forward.
8
Maintenance
Changing the needle(s)
Use #S1037 needles for the needle felting machine. Do not use any other type of needles.
Note: #S1037 needle is a very special needle and is exclusive for the needle felting machine. Purchase these needles at the same authorized dealer where you purchased your machine.
 When you change needle(s), unplug the power cord from the wall outlet.
1.Turn the handwheel until the needle bar is at the highest position.
2.Remove the presser height adjusting screw and carefully remove the clear fabric cover with needle guard, from the machine.
3.Loosen the front needle clamp holder fixing screw by turning the 1.5mm Allen wrench counter-clockwise.
4.Hold the needle clamp, lower it slowly and remove it from the needle bar.
5.To remove the individual outer needles, loosen the needle fixing screw on the needle clamp by turning the 1.5mm Allen wrench counter-clockwise and remove the needle(s). Insert the new needle(s) until the top of the needle touches the top of the needle hole. Tighten the needle fixing screw with 1.5mm hexagon wrench by turning the Allen wrench clockwise.
Note: #S1037 needles do not have a front or back, therefore, you can insert the needle in any direction.
English
9
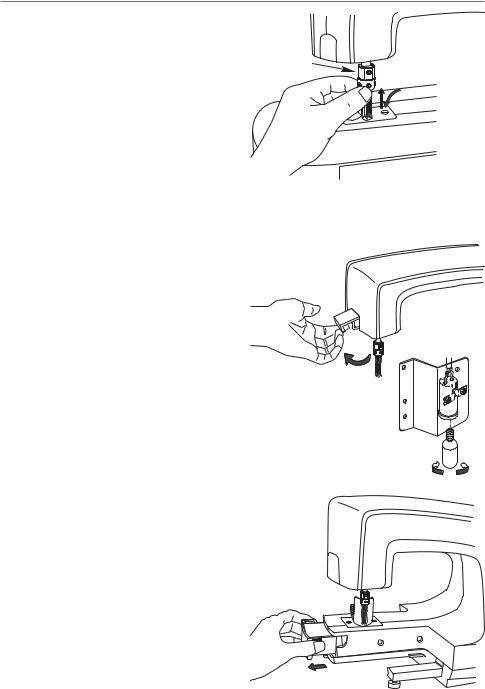
6.When replacing the needle clamp, make sure the needle bar is in its highest position. Insert the needle clamp into the needlebar, rotate and lightly push upward till the pin seats into the needle bar. Tighten the needle clamp screw clockwise with 1.5mm Allen wrench.
Note: Replace the clear fabric cover with needle guard and presser height adjusting screw before continuing to use the machine.
Replacing the light bulb
 For safety reasons, unplug main power cord prior to replacing light bulb.
1.Make sure that the light bulb is completely cool before removing it from the machine.
2.Open lamp cover.
3.Remove the light bulb and replace new one with the same type rated, MAX 15W.
Cleaning the lint box
Slide the flatbed extension to the left to remove it from the machine. Grasp the lint box by the ridged finger grips in the front and back and pull to the left to slide the lint box off the machine.
Clean the lint out after each project.
An accumulation of lint in the box or under the stitch plate may cause needle breakage.
Slide the lint box back into the machine.
Groove (inside holder)
10

Trouble Shooting
Needle bent or Needle breakage
1. |
Are you moving the materials too quickly? |
English |
|
2. |
Are the needles touching the cloth presser or needle plate? |
||
|
|||
3. |
Is there dust or lint around the edge of the needles, cloth presser,or in the holes of the |
|
|
|
needle plate? |
|
|
4. |
Does the lint box area need to be cleaned? |
|
For problems other than bent needles or needle breakage, please contact your retailer.
Specifications
Needle: #S1037
Number of needles: 5
Needle Clamp: Round type
Feeding: Manual
Light bulb: MAX 15 W
Measurement: 435mm x 189mm x 292mm
Weight: 5.6 kg
We reserve the right to change the machine equipment and the assortment of accessories without prior notice, or make modifications to the performance or design.
Such modifications, however, will always be to the benefit of the user and the product.
Non-original Parts and Accessories
The warranty does not cover any defect or damage caused by use of non-original accessories or parts.
Please note that on disposal, this product must be safely recycled in accordance with relevant National legislation relating to electrical/electronic products. If in doubt please contact your retailer for guidance.
11
Cette machine à coudre à usage familial est conçue pour répondre aux normes EC/EN 60335-2-28 et
UL1594
CONSIGNES DE SÉCURITÉ IMPORTANTES
Lors de l’utilisation d’un appareil électrique, les précautions de sécurité essentielles doivent toujours être respectées, y compris les suivantes :
Lisez attentivement toutes les instructions avant d’utiliser cette machine à coudre à usage domestique.
DANGER - Pour éviter tout risque d’électrocution :
•Une machine à coudre branchée ne doit jamais être laissée sans surveillance. Débranchez toujours la machine du réseau électrique immédiatement après usage et avant de la nettoyer.
•Débranchez-la toujours avant de changer une ampoule. Remplacez l’ampoule par une ampoule de même type et de même puissance (15 Watts).
DANGER - Pour éviter tout risque de brûlure, d’incendie, d’électrocution ou de blessure :
•Ne laissez pas les enfants jouer avec la machine. Il est fortement recommandé de redoubler d’attention lorsque la machine est située à proximité d’enfants ou de personnes handicapées.
•N’utilisez cette machine à coudre que pour l’usage prévu, comme décrit dans ce manuel. N’utilisez que les accessoires recommandés par le fabricant, conformément à nos indications.
•Ne faites jamais fonctionner la machine à coudre si la prise ou le cordon d’alimentation sont endommagés, si elle ne fonctionne pas correctement ou si elle est tombée par terre, ou a été au contact de l’eau. Retournez la machine au revendeur ou au centre de service technique le plus proche de chez vous pour toute révision, réparation ou réglage mécanique ou électrique.
•Ne faites jamais fonctionner la machine à coudre si le système de ventilation est obstrué. Évitez toute présence de peluche, poussières, chutes de tissus dans la ventilation ou dans la pédale de commande.
•N’approchez pas les doigts des parties mobiles, en particulier au niveau de la zone située autour de l’aiguille de la machine.
•Utilisez toujours la plaque à aiguille appropriée. L’aiguille risque de se casser avec une plaque non adaptée.
•N’utilisez jamais d’aiguilles courbes.
•Ne tirez pas sur le tissu et ne le poussez pas pendant la couture. Vous éviterez ainsi de désaxer l’aiguille puis de la casser.
•Éteignez la machine (position ”0”) lors des réglages au niveau de l’aiguille, par exemple : enfilage de l’aiguille, changement d’aiguille, bobinage de la canette, changement de pied presseur, etc.
•Débranchez toujours la machine à coudre pour retirer les couvercles, pour le graissage, ou pour tout autre réglage de service par l’utilisateur, mentionné dans le manuel d’instructions.
•Ne faites jamais tomber ou ne glissez aucun objet dans les ouvertures.
•N’utilisez pas la machine à l’extérieur.
•N’utilisez pas votre machine à proximité de bombes aérosols ou de vaporisateurs ou lorsque de l’oxygène est administré.
•Pour débrancher, commencez toujours par éteindre votre machine (interrupteur en position 0).
•Ne débranchez pas la machine en tirant sur le cordon. Pour débrancher, saisir la prise, et non le cordon.
•Tenez la prise quand vous enroulez le cordon dans l’enrouleur. Ne la faites pas ”claquer” contre l’enrouleur.
•Le niveau de bruit dans des conditions de fonctionnement normal est de 70 dB(A).
CONSERVEZ CES INSTRUCTIONS
12
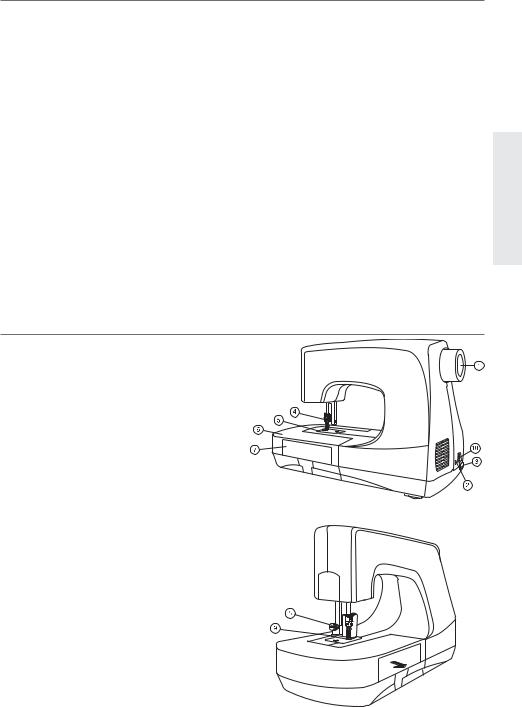
Table des matières
Vue d’ensemble de la machine ................... |
13 |
Accessoires.................................................... |
14 |
Réglage........................................................... |
14 |
Branchement de la pédale de commande.14 |
|
Vitesse de la machine ................................. |
14 |
Pied-de-biche ............................................... |
15 |
Démarrage..................................................... |
16 |
Tissus et fils utilisables ................................ |
16 |
Lavage des ouvrages décorés...................... |
16 |
Commencer à coudre .................................. |
17 |
Extension à plateau étendu / bras libre.... |
18 |
Rangement des accessoires......................... |
18 |
Entretien........................................................ |
19 |
Changement d’aiguille ................................ |
19 |
Remplacement de l’ampoule ...................... |
20 |
Nettoyage du compartiment à peluches ... |
20 |
Dépannage .................................................... |
21 |
L’aiguille est pliée ou se casse. ................... |
21 |
Caractéristiques techniques......................... |
21 |
French
Vue d’ensemble de la machine
1 Volant à main
2.Prise de la pédale de commande
3.Interrupteur d’alimentation
4.Pince-aiguille
5. Plaque à aiguille
6. Extension à plateau étendu
7.Rangement des accessoires
8.Vis de réglage en hauteur du pied-de- biche
9.Protège-tissu transparent avec protègeaiguille
10.Prise
13

Accessoires
1.Tournevis
2.Clé Allen 1,5 mm
3.Aiguilles
4.Brosse de nettoyage
5.Housse de la machine
6.Manuel d’utilisation
Réglage
Branchement de la pédale de commande
Branchez le cordon d’alimentation de la pédale de commande dans la prise de la machine, puis dans une prise murale.
Assurez-vous toujours que l’alimentation se trouve sur OFF et sortez la fiche de la prise murale lorsque vous n’utilisez pas la machine, ou lorsque vous effectuez des opérations telles que le changement d’aiguille ou le remplacement de l’ampoule.
 Remarque : Avant de brancher, vérifiez que la pédale est de type « 4C-337G » ou « C-9000 ».
Vitesse de la machine
La vitesse de la machine est régulée par l’augmentation ou la diminution de la pression sur la pédale de commande.
Lorsque vous n’utilisez pas la machine, ne placez rien sur la pédale de commande
afin d’éviter tout dommage de la pédale de commande ou du moteur.
Pour les Etats Unis et le Canada
Cette machine à coudre est équipée d’une prise polarisée (une fiche est plus large que l’autre).
Afin de réduire le risque d’électrocution, cette prise est destinée à être adaptée dans une prise polarisée à sens unique. Si la fiche ne s’adapte pas totalement dans la prise, retournez la fiche. Si elle ne s’adapte
toujours pas, contactez un électricien qualifié afin d’installer une prise correcte. N’essayez en aucun cas de modifier la fiche.
14
Pied-de-biche
Le pied-de-biche sert à empêcher le vêtement / tissu / matériau de se soulever pendant le processus de feutrage.
1.Placez le vêtement / tissu / matériau sur la plaque à aiguille et sous le pied-de- biche.
2.Desserrez la vis de réglage en hauteur du pied-de-biche pour ajuster la hauteur du pied-de-biche.
3.Déplacez le protège-tissu transparent avec protège-aiguilles vers le haut ou vers le bas jusqu’à ce que le repère rouge sur la barre du pied-de-biche s’aligne avec la bonne hauteur pour l’épaisseur de votre tissu et du matériau de feutrage.
L = position basse pour les tissus fins ou moyens.
M = position moyenne pour les tissus d’épaisseur moyenne.
H = position haute pour les tissus épais ou très épais.
4.Serrez la vis de réglage en hauteur du protège-tissu transparent.
Note : Le tissu et le matériau de feutrage doivent bouger librement sous le protège-tissu transparent avec protège-aiguille sans aucune entrave.
French
15
 Loading...