


PFAFF®
extra 874
875
876
Bedienungsanleitung
Mode
dbmploi
Libretto
istruzioni
Instruction
book
Ben kiappen rs I’extérieur
verso I’esterno
ezza |
per |
macchine |
per |
|
|||||||||
|
|
||||||||||||
famiglia |
secondo |
|
|
|
|||||||||
novimento alternativo |
|
||||||||||||
nte |
dove |
prestare |
suffi |
|
|||||||||
|
|
|
|||||||||||
lone |
e tenere |
|
constante |
|
|||||||||
nb |
II |
punto |
di |
|
lavoro. |
|
|||||||
•e |
ago, piedino, |
spolina |
|
||||||||||
|
|
|
|
||||||||||
igo, |
nelle interruzioni |
i |
|||||||||||
te |
del lavoro |
|
e |
|
durante |
||||||||
nutenzione |
Si |
deve |
|
|
|||||||||
a |
corrente |
della |
dalla |
|
|||||||||
gliendo |
Ia |
spina |
|
||||||||||
•0. |
|
|
|
|
|
|
|
|
|
|
per |
a |
|
nassima |
consentita |
||||||||||||
di 15 |
Watt. |
|
di |
|
trasmis |
|
|||||||
della |
cinghia |
|
|
||||||||||
solamenta |
|||||||||||||
ssere regolata |
|||||||||||||
|
|
|
|
|
|||||||||
avoid injury to |
|
your |
fin |
||
needle during |
sewing. |
||||
‘ou |
unplug the |
power |
|||
ver |
you have |
to |
leave |
||
or want to clean |
it, oil |
||||
mechanical and |
|
||||
arts. |
|
|
|
|
|
se |
only a 15-watt |
light |
|||
|
|
||||
ewing lamp. |
be |
adjusted |
|||
It must never |
|||||
t an authorized |
agent. |
||||
|
|
||||
United Kingdom |
|
||||
7 |
|
ge |
69 |
Parti della macchina per cucire |
|
|||||||
1 |
Leva tendifilo |
|
|
|
||||
2 |
Tensione |
dello spolatore |
|
|
||||
3 |
Maniglia |
|
|
|
|
|
|
|
4 |
Portarocchetti |
|
|
|||||
5 |
Spolatore |
|
|
|
|
|
|
|
6 |
Volantino |
|
|
|
|
|
|
|
7 |
Disco di |
disinnesto |
|
|
||||
8 |
Interruttore |
|
principale |
|
|
|||
9 |
Regolatore |
|
lunghezza punto |
per |
||||
10 |
Piano variabile con scomparto |
|||||||
|
accessori |
|
|
|
|
|
|
|
11 |
Placcadago |
piedino con |
piedino |
|||||
12 |
Supporto del |
|||||||
13 |
Fessura |
per |
infilatura |
|
|
|||
|
|
|
||||||
14 |
Tensione |
superiore |
|
|
||||
15 |
Leva aizapiedino |
|
|
|||||
16 |
Morsetto |
d’ago con vite |
|
|
||||
17 |
Tabella dei |
punti |
|
|
||||
|
|
|
|
|||||
18 |
Base piana |
|
|
|
|
|||
19 |
Sportello, |
dietro crochet |
|
|
||||
20 |
Guidafili |
|
|
|
rammendo |
|
|
|
21 |
Fermo per |
|
|
|
||||
per selezione |
motivi |
|
||||||
22 |
Manopola |
|
|
|||||
23 |
Tasto per |
|
cucire indietro |
|
|
|||
24 |
Braccio |
libero |
|
|
||||
|
|
|
|
|
|
|
||
Parts of the sewing |
machine |
|
|||||||||
|
|
|
|||||||||
1 |
Take-up |
lever |
retainer |
|
|||||||
2 |
Bobbin thread |
|
|||||||||
3 |
Carrying handle |
|
|
|
|||||||
4 |
Spool |
pin |
|
|
|
|
|
|
|
|
|
5 |
Bobbin |
winder |
|
|
|
|
|||||
6 |
Hand |
wheel |
|
knob |
|
|
|
||||
7 |
Stop |
motion |
|
|
|
|
|||||
|
|
|
|
|
|
||||||
8 |
Master switch |
|
|
|
|
||||||
9 |
Stitch length |
key |
support with |
|
|||||||
|
|
|
|||||||||
10 |
Detachable |
work |
|
||||||||
|
accessory |
box |
|
|
|
|
|||||
11 |
Needle |
plate |
holder |
with sewing |
foot |
||||||
12 |
Sewing |
foot |
|
||||||||
13 |
Threading |
slots |
|
|
|
||||||
14 |
Needle |
thread |
tension |
|
|||||||
|
|
|
|
||||||||
15 |
Presser |
bar |
|
lifter |
|
|
|
||||
16 |
Needle holder |
with |
screw |
|
|||||||
17 |
Table of |
stitch |
patterns |
|
|||||||
|
|
|
|
||||||||
18 |
Bed plate |
|
cover |
|
|
|
|||||
19 |
Free |
arm |
|
|
hook) |
|
|||||
|
(enclosing sewing |
|
|||||||||
|
|
|
|||||||||
20 |
Thread |
guide |
|
operations |
|
||||||
21 |
Stop |
for |
darning |
|
|||||||
22 |
Stitch pattern |
selector wheel |
|
||||||||
23 |
Reverse-feed |
control |
|
||||||||
|
|
|
|
||||||||
24 |
Free |
arm |
|
|
|
|
|
|
|
||

Haube abheben. |
Anlasser |
||
Maschine nehmen. |
So |
wie |
|
|
|||
P aus der die Zeich
flung
ihn
zeigt
wird
er
wieder
weg
geràumt.
Retirer
Ia
housse.
Basculer
Ia
poignée
dans le |
sens de Ia |
flèche. |
Sortir le |
|||
rheostat |
a |
pédale |
P |
de Ia |
machine. |
|
le ranger, |
procéder |
comme |
indique |
|||
|
||||||
Pour sur
‘illustration.
Sollevare
Ia
custodia.
Ribaltare
Ia
mani
glia.
Togliere
il
reostato
dalla
macchina.
Per
riporre
attenersi
al
disegno.
Lift off cover. Fold carrying |
handle |
|||
rear. Take foot control |
P |
out |
of the |
|
to
the
machine. away, the
When the machine |
is |
|
foot control |
is placed |
|
put back
in
the
machine
as
shown
in
the
illustration.
Elektrischer |
Anschlu6: |
stellen. |
||
Anlasser auf |
den |
Boden |
||
Stecker |
||||
in die Maschine, |
und |
|||
|
||||
Stecker P
Q in die
Wandsteckdose
stecken.
Hauptschalter
R
drücken.
Branchement |
électrique: |
|||
Placer le rheostat |
a |
pédale |
||
Brancher Ia fiche |
P |
dans |
Ia |
|
|
||||
sur le sol. machine et
Ia
fiche
0
dans
Ia
prise
murale. Actionner
l’interrupteur
general
R.
Collegamento elettrico:
Mettere |
|
spina |
P |
presa |
a |
il reostato sul pavimento. |
Inserire |
|||
nella |
macchina, |
e spina |
0 |
nella |
muro. |
Premere |
I’interruttore |
prin |
|
cipale.
Electrical connection: |
|
|
Set the foot control on the floor. |
Insert |
|
P in the machine and plug |
0 |
in the |
socket. Press master switch |
R. |
|
plug wall
2

Spulen vorbereiten: Nahflächenvergro8erung und herausnehmen.
etwas
anheben
Preparation des |
canettes: |
||
Lever |
quelque peu |
Ia boite |
|
ment |
et Ia sortir. |
|
|
de
range
Preparazione
per
avvolgere
a
spoilna:
SoHevare leggermente e toglierlo.
ii
piano variabile
Preparation
for
bobbin
winding:
Lift
it.
detachable
work
support
and remove
Verschlu8klappe
19
nach unten
äffnen.
Ouvrir
le
capot
19
vers
le
bas.
Aprire
sportello
19
verso
ii
basso.
Open
free
arm
cover
19.
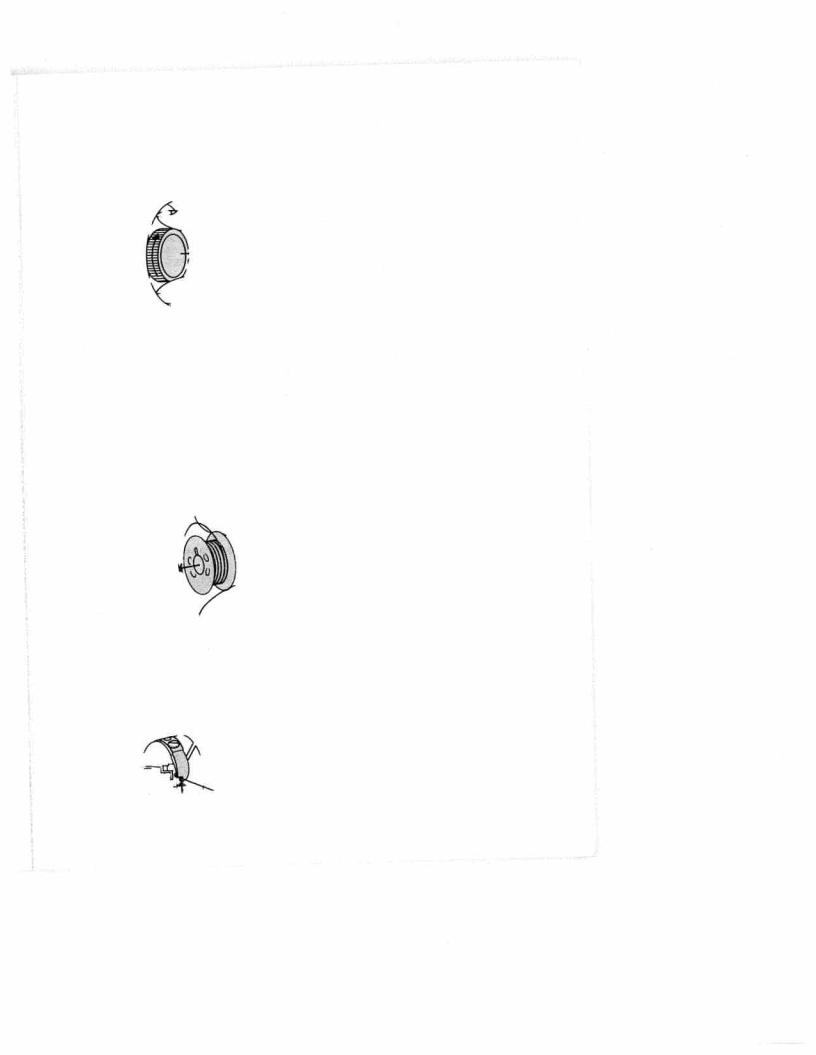
• Hauptschalter anheben und die
8 ausschalten. |
Klappe |
Spulenkapsel |
heraus |
P
ziehen. |
|
|
|
a |
• Mettre |
Ia |
machine |
hors circuit |
|
I’interrupteur général |
8. Lever le |
loquet |
||
et retirer |
Ia |
bolte a canette. |
|
|
• Disinserire I’interruttore principale 8. |
||||
Sollevare |
ii |
chiusino |
P e togliere |
Ia cap |
P
sula
della spolina.
• Switch of latch P and
f master pull out
switch 8. Raise the bobbin case.
Klappe P loslassen ausnehmen.
und
die
Spule
her
Lãcher
le
loquet
P
et retirer
Ia
canette.
Rilasciare chiusino spolina.
P
e
togliere
Ia
Release
latch
P
and
take
out
the
bobbin.
3


Nähwerk |
ausschalten |
Scheibe |
7 |
|
|
||||||||
Handrad |
6 |
festhalten mid |
|
|
|||||||||
|
|
|
|||||||||||
|
|
drehen. |
|
|
|
|
|
|
|
||||
nach vorn |
|
|
|
|
|
|
|
|
|||||
|
|
|
|
|
|
|
|
|
|
|
|||
Débrayer |
|
le mécanisme |
de |
couture |
7 |
||||||||
|
|
le disque |
|||||||||||
Retenir |
le |
|
volant 6 et tourner |
||||||||||
|
|
||||||||||||
|
|
|
|
|
|||||||||
|
|
|
. |
|
|
|
|
|
|
|
|
|
|
vers l’avant |
|
|
|
|
|
|
|
|
|
||||
Disirmestare |
ii |
meccanismo |
del |
cucito |
|||||||||
ii |
volantino |
6 |
|
e |
girare |
II |
|
||||||
Tenere |
fermo |
|
|
||||||||||
|
|
|
|||||||||||
disco 7 |
in |
avanti. |
|
|
|
|
|
|
|
||||
Disengaging |
the sewing |
mechanism |
|
||||||||||
|
and turn knob |
||||||||||||
Hold hand wheel 6 steady |
|||||||||||||
|
|
|
|
|
|
||||||||
7 toward |
you. |
|
|
|
|
|
|
|
|
|
|||
Garnrollenstifte |
4 |
ganz hochziehen |
und |
|
|||
|
|
|
Garnrolle |
|
|
. |
|
|
|
|
|
|
aufstecken |
|
|
|
|
|
||||
Tirer |
les |
broches |
a fond |
vers |
le haut |
et |
|||
|
|||||||||
meltre Ia |
bobine en place. |
|
|
|
|||||
Estrarre |
completamerite |
i |
perni |
porta |
|
||||
II |
rocchetto del |
|
|||||||
rocchetti |
4 |
e sistemarci |
|
|
|||||
|
|
|
|
|
|||||
fib. |
|
|
|
|
|
|
|
|
|
Pull |
thread |
stand |
pins |
4 |
up completely |
|
|||
and |
place |
thread |
reels |
on |
them. |
|
|||
5

Spulen |
|
|
|
|
|
|
|
||
Hauptschalter einschalten, |
|
|
|||||||
Den |
Faden |
von |
|
der |
Garnrolle in |
die |
|||
Spulervorspannung |
2 ziehen |
nach rechts |
|||||||
führen |
und |
einige Male in Pteilrichtung |
|||||||
urn |
die Spute wicketn. |
Dann |
den |
Fu13- |
|||||
anlasser betatigen und |
spulen. 1st die |
||||||||
Spule |
volt, |
bleibt |
sie |
stehen. |
Die |
voIle |
|||
Spule |
nach |
links |
drücken, abnehrnen |
||||||
und |
den Faden |
abschneiden. |
|
|
|||||
|
|
|
|
|
|
||||
Bobinage |
|
|
|
|
|
a |
|
|
|||
Mettre |
Ia rnachine en |
circuit |
‘interrup |
||||||||
teur |
general. |
|
|
|
|
|
|
|
|||
Tirer |
le |
fit |
de Ia bobine dans Ia |
preten |
|
||||||
sion |
2 |
du |
dévidoir, |
le coucher a droite |
et |
||||||
I’enrouler de quelques |
tours, dans le |
|
|||||||||
sens |
de |
Ia |
flèche, sur |
Ia |
canette. Agir |
|
|||||
sur Ia |
pédale du |
rheostat |
et |
bobiner. Des |
|||||||
que |
Ia |
canette est pleine, |
le |
dévidoir |
|
||||||
s’arréte. |
Pousser |
Ia |
canette |
vers Ia |
|
||||||
gauche, |
Ia |
retirer |
et |
couper |
le fit. |
|
|||||
Avvolgere |
Ia spolina |
|
|
||||
Inserire |
l’interruttore principale. |
|
|||||
Tirare it |
fib |
dat |
rocchetto nella tensione |
||||
delbo spolatore |
2, |
riportarto |
verso destra |
||||
e avvolgerbo alcune |
volte in |
senso |
delta |
||||
freccia attorno |
alla |
spolina. |
Quindi |
azio |
|||
nare it reostato |
e |
avvotgere |
Ia spolina. |
||||
Quando |
Ia |
spolina è piena |
si ferma da |
||||
sola. Prernere Ia |
spolina piena verso |
||||||
sinistra, |
toglierla e tagliare |
it fib. |
|
||||
|
|
||||||
Bobbin |
winding |
|
|
|
|
|
|
|
||||
Switch |
on |
master |
switch. |
|
|
|
|
|
||||
Pull |
thread |
|
from |
thread reel |
into |
thread |
||||||
retainer |
2, |
|
lead |
to |
the |
right and |
wind |
a |
||||
few |
times around |
the |
bobbin |
in |
the |
|
||||||
direction of |
the arrow. |
Then |
actuate |
the |
||||||||
foot |
control |
and |
wind |
the |
bobbin. |
The |
||||||
bobbin |
stops as |
soon |
as |
it is |
full. |
Push |
||||||
the |
full |
bobbin to |
the left, |
remove |
it and |
|||||||
cut |
off the |
thread. |
|
|
|
|
|
|
|
|||
6
Nähwerk
Handrad
einschalten festhalten und
Scheibe
7
nach
hinten
drehen.
Dann
Handrad
nach
vorne
drehen,
bis
es einrastet.
Embrayage |
du |
mécanisme |
le |
disque |
|||
Retenir |
le volant et tourner |
||||||
|
|
. Tourner |
le volant |
vers |
|||
|
|
|
|||||
vers l’arrière |
|
|
|
|
. |
||
l’avant |
jusqu’à |
ce quil |
senclenche |
||||
|
|
|
|
||||
7
lnserimento tenere fermo
meccanismo |
|
ii volantino |
e |
|
|
di cucito girare II disco
7
verso
dietro.
Girare
quindi
ii
volantino
in
avanti
finchè
s’innesta.
Engaging |
the |
|
Hold the |
hand |
|
sewing |
mechanism |
|
wheel |
firmly and turn |
|
disk
7 toward the |
back, |
then turn |
the |
hand |
|||||
|
in. |
||||||||
wheel forward |
again |
until |
it |
snaps |
|||||
|
|
|
|
|
|
|
|
||
Spule einlegen |
P |
||
Den Faden |
in den |
||
Offnung |
R |
ziehen. |
|
|
|
|
|
(Faden Schlitz
nach |
|
|
. |
hinten) |
|||
0 und |
bis |
zur |
|
|
|||
Mise en |
place |
de |
|||
se |
déroulant |
vers |
|||
Ia |
fente |
0 |
jusqu’à |
||
|
|
|
|||
Ia canette |
(P), |
le |
fil |
|
l’arrière. Tirer |
le |
til |
par |
|
l’ouverture |
R. |
|
|
|
Inserimento |
|
della |
spolina |
|||
|
verso |
|
. |
|||
fib |
va rivobto |
|
||||
|
dietro) |
|||||
fib |
nella fessura |
Q, |
quindi |
|||
all’apertura |
R. |
|
|
|
||
|
|
|
|
|
||
P (Il capo lntrodurre tirare fino
del II
Insert the |
bobbin |
(P), |
with |
|||
unreeling |
to the |
rear. |
Draw |
|||
into slot Q and |
eye |
A. |
|
|
||
|
|
|
||||
the the
thread thread
7

Oberfaden
einlegen:
•
Hauptschalter
8
|
. |
Nadel |
und |
Fadenhebel |
||
ausschalten |
|
|
|
. |
||
müssen oben |
stehen. Nähful3 |
anheben |
||||
in die |
||||||
Den Faden |
von der |
Garnrolle |
||||
Spulervorspannung
2,
durch
die
Off
nung |
F, den |
Schlitz Q, |
||
Fuhrungsstuck |
R, |
nach |
||
hinter oben
das in den
Schlitz zurück
S, durch den |
Fadenhebel |
1 |
||
durch den Schlitz |
5, |
hinter |
||
|
|
|||
die
Fuhrung |
T |
|
und |
in |
|
die |
rechte |
Faden |
|
|
|
|||||||||||||||||||
fuhrung |
U |
|
am |
Nadelhalter |
ziehen. |
|
|
|
|
|||||||||||||||||||||
|
|
|
|
|
|
ía |
|
|
|
|||||||||||||||||||||
Enfilage |
de |
l’aiguille: |
• |
Mettre |
gd |
|||||||||||||||||||||||||
machine |
hors |
circuit |
a |
I’interrupteur |
||||||||||||||||||||||||||
|
de |
|||||||||||||||||||||||||||||
L’aiguille |
et |
le |
levier |
releveur |
||||||||||||||||||||||||||
ndral |
8. |
|||||||||||||||||||||||||||||
|
|
|
|
haute. |
|
|||||||||||||||||||||||||
til |
doivent |
se trouver |
en |
|
position |
|
|
|||||||||||||||||||||||
|
|
|
de |
Ia |
|
|||||||||||||||||||||||||
|
. |
|
Tirer |
le |
fil |
|
||||||||||||||||||||||||
Lever |
le |
pied |
|
|
|
|
|
|
|
|
|
|||||||||||||||||||
presseur |
|
|
|
du |
dévidoir |
2, |
||||||||||||||||||||||||
bobine |
dans |
Ia |
pretension |
|||||||||||||||||||||||||||
|
|
|
|
le |
guide-fil |
|||||||||||||||||||||||||
par les fentes |
|
P |
et |
Q, |
derriere |
|||||||||||||||||||||||||
|
|
le |
rele |
|||||||||||||||||||||||||||
R, |
Remonter |
dans |
Ia |
fente |
|
S, |
par |
|||||||||||||||||||||||
|
|
|
|
S |
||||||||||||||||||||||||||
veur |
de |
fil |
|
1, |
redescendre |
par |
|
Ia |
fente |
|||||||||||||||||||||
|
|
|
||||||||||||||||||||||||||||
|
|
|
|
|
|
et |
dans |
|||||||||||||||||||||||
et |
passer |
derriere |
|
le |
guide-hI |
T |
||||||||||||||||||||||||
|
|
|
. |
|
|
|
||||||||||||||||||||||||
|
|
|
|
|
|
|
|
|
|
|
|
|
du |
|
|
|
|
|
|
|
|
|
|
|
|
|
|
|||
le |
|
|
-fil |
droit |
U |
|
pince-aiguille |
|
|
|
||||||||||||||||||||
guide |
|
|
|
|
del |
|
fib |
|
superiore: |
|
|
|
|
|
||||||||||||||||
tnserimento |
|
|
|
|
|
8. |
||||||||||||||||||||||||
|
I’interrutt |
ore |
principale |
|||||||||||||||||||||||||||
• |
Disinserire |
|||||||||||||||||||||||||||||
|
|
|||||||||||||||||||||||||||||
|
|
|
|
essere |
in |
|
|
|||||||||||||||||||||||
Ago |
e |
leva |
tendifilo |
devono |
|
|
||||||||||||||||||||||||
|
|
il |
fib |
dab |
||||||||||||||||||||||||||
alto. |
Aizare |
il |
|
piedino. |
Portare |
|||||||||||||||||||||||||
|
|
|
|
|
|
|
|
|
|
|
delbo |
|
spolatore |
|||||||||||||||||
rocchetto |
|
nella tensione |
|
|||||||||||||||||||||||||||
|
l’apertura |
P, |
|
nella |
fessura |
Q, |
||||||||||||||||||||||||
attraverso |
|
|||||||||||||||||||||||||||||
|
|
|
|
|
|
|
verso |
l’alto |
|
nella |
fes |
|||||||||||||||||||
dietro |
Ia guida R, |
|
|
|||||||||||||||||||||||||||
sura |
S, |
nella |
leva |
tendifilo |
1, |
di |
|
ritorno |
||||||||||||||||||||||
|
Ia |
|
guida T |
|||||||||||||||||||||||||||
attraverso |
Ia |
fessura |
S, |
dietro |
|
|||||||||||||||||||||||||
|
|
|
|
|
|
a |
destra |
|
dell’ago. |
|
|
|
||||||||||||||||||
e |
nel |
guidafilo U |
|
|
|
|
|
|||||||||||||||||||||||
Upper threading: |
• |
Switch |
off |
master |
||||||||||||||||||||||||||
|
|
|
|
and |
take-up |
lever |
||||||||||||||||||||||||
switch |
8. |
|
Roth needle |
|
||||||||||||||||||||||||||
|
|
|
. |
|
Raise |
sewing |
||||||||||||||||||||||||
must |
be |
in |
“up” |
|
|
|
|
|
|
|
|
|||||||||||||||||||
|
position |
|
|
and |
|
draw |
it |
|||||||||||||||||||||||
foot. |
Pull |
|
thread |
|
from |
spool |
|
|||||||||||||||||||||||
|
|
|
|
|
|
|
||||||||||||||||||||||||
into
bobbin
tension
stud
2,
through
opening piece R,
P, slot Q, upwards
behind through
guiding slot S,
|
-up lever |
1, |
back through |
|||||
through take |
T |
|
and |
then |
into the |
|||
slot |
5, behind guide |
|
||||||
|
|
holder. |
||||||
right |
thread guide U |
on |
|
the |
needle |
|||
|
|
|||||||
Den |
Oberfaden |
von |
||
durch |
das |
Nadelöhr |
||
|
|
|||
vorn nach fädeln.
hinten
Enfiler arrière
le fib |
d’aiguille |
de |
l’avant |
||
|
|
|
|
|
. |
par |
Ie |
chas |
d’aiguille |
||
|
|
|
|||
en
lnfilare lb |
fib |
superiore |
dab |
|||
|
Ia |
cruna |
||||
dietro attraverso |
||||||
|
|
|
||||
davanti debl’ago.
verso
Thread
the
needle
from
front
to
back.
9

Unterfaden
heraufholen:
Oberfaden
festhalten. und einen
Handrad nach |
vorn drehen |
||
Such nähen |
bis |
Nadel und |
|
Fadenhebel
wieder
oben
stehen.
Mit
dem |
Oberfaden |
oben |
ziehen. |
den
Unterfaden
nach
Remontée
du
hi
inférieur:
Tendre
tégè
rement te fit vers ‘avant
d’aiguilte. et coudre
Tourner un point
te votant jusqu’à
ce |
que |
l’aiguille et |
|
trouvent |
a nouveau |
||
le |
releveur de fit |
se |
||
en |
position |
haute. |
||
Remonter
le
fit
de
canette
a
‘aide
du
fit
d’aiguille.
Far it fib
salire ii fib superiore.
inferiore: Tenere Girare it votantino
fermo in
avanti |
e cucire un |
|
leva |
tendifilo siano |
|
|
||
punto finchè di nuovo in
ago e posizione
superiore. |
Tirare con |
|
fib |
inferiore in sü. |
|
|
||
it
fib
superiore
it
Drawing up
the
bobbin
thread:
Hold
the |
needle thread |
taut. |
||
wheel |
towards |
you |
and |
|
|
|
|||
Turn
sew
the hand
a stitch until
both needle and take-up lever |
|||
tioned |
up. |
Putt out the bobbin |
|
means |
of |
the |
needle thread. |
|
|
|
|
are posi thread by
Oberund Unterfaden nach rechts den Nähfub3 tegen (etwa 10cm).
unter
Coucher
les
deux
fits
vers
l’arriere
a
droite |
sous be pied |
|
dépasser |
d’environ |
|
presseur. 10cm.
Les
taisser
Porre i |
fili superiore ed |
piedino, |
(circa 10 cm). |
|
inferiore
sotto
it
Place under
both the
threads |
towards the right |
|||
sewing |
foot |
(approx |
10 cm). |
|
Verschbul3klappe
19
schlieBen.
Fermer
be
capot
19.
Chiudere
to
sportelbo
19.
Close free-arm
cover
19.
10

NahflachenvergroBerung, |
wie |
der |
|||
|
. |
||||
|
|
|
|
|
|
zeigt, |
an die |
Maschine |
schieben |
||
|
|
|
|||
Pfeil
Placer Ia machine,
boIte de comme
rangement |
contre |
Ia |
le montre Ia |
|
. |
flèche |
||
Applicare |
ii |
piano |
variabile |
alla |
|
|
come |
indicato |
dalla |
||
macchina, |
|
||||
|
|
|
|||
|
|
|
|
|
|
freccia.
Push work |
support |
against |
||
as shown |
by |
the |
arrow. |
|
|
|
|||
the
machine,
Stoff
unter
den
Náhful3
legen.
Placer
du
tissu
sous
le
pied
presseur.
Porre
Ia
stoffa
sotto
il
piedino.
Place
fabric
under
the
sewing
foot.
Beim
Hebel
Einlegen extrem |
dicker |
|||
. |
||||
|
|
|
||
15 |
höher |
anheben |
||
|
|
|||
Stofflagen
Pour |
les |
tissus |
très |
|||
|
||||||
|
le |
levier |
||||
davantage |
||||||
|
|
|
||||
epais, 15.
lever
in caso |
di |
|
|
mamente |
|
leva 15. |
|
To insert |
|
lever 15. |
|
spessori |
di |
stoffa |
estre |
Ia |
|||||
|
|
||||||||
|
|
|
ulteriormente |
||||||
grossi aizare |
|||||||||
|
|||||||||
|
|
|
|
|
|||||
extra-thick |
fabric |
plies |
raise |
|
|||||
|
|
||||||||
|
|
|
|
|
|
|
|||
|
|
|
|
|
|
. |
|
Hauptschalter |
einschalten |
|
|||||
|
15 |
|
. |
|
|||
|
|
|
|
|
|
||
Stoffdrückerhebel |
|
senken |
|
||||
|
|
|
|
||||
Mettre |
a machine |
en |
circuit |
a |
|||
|
|||||||
|
|
|
|
||||
|
. |
|
|
|
|
|
|
|
|
|
|
|
|
|
|
teur general |
levier |
15. |
|
||||
Descendre |
le |
|
|||||
|
|
|
|||||
|
|
|
|
|
|
||
l’interrup
|
|
|
|
|
. |
|
|
Inserire |
l’interruttore |
|
|||||
|
a leva |
premistoffa |
|||||
Abbassare |
|||||||
|
|
|
|
||||
Switch |
|
on |
master |
switch. |
|||
presser |
bar |
lifter |
15. |
||||
Lower |
|||||||
|
|||||||
|
|
|
|||||
15.
11
Fadenspannung Uberprufen |
|
|||||
Die |
normale Einstellung liegt im Bereich |
|||||
von |
3—5. Je |
höher |
die Zahi, |
je fester die |
||
Spannung. |
Die Uberprufung |
wird |
mit |
|||
dem |
Zickzackstich |
vorgenommen. |
Eine |
|||
kurze |
Naht |
nähen. |
Die Fadenverknotung |
|||
soil |
in |
der Mitte der Stoffiagen liegen. |
||||
Der |
Bereich |
3 ist zum Knopflochnahen. |
||||
|
||||||
Arilasser |
niedertreten: |
Je |
tiefer |
man |
|||||
drückt, |
um |
so schneller |
näht die |
exclusiv. |
|||||
|
|||||||||
Abaisser |
Ia |
pédale |
du |
rheostat: |
Plus Ia |
||||
pédale |
sera |
abaissée, |
plus |
Ia exclusiv’ |
|||||
coudra |
vite. |
|
|
|
|
|
|
||
Premere |
ii |
reostato: |
PiU a |
fondo |
si |
||||
preme |
ii |
pedale, piü |
veloce |
cucirà a |
|||||
“exclusiv”. |
|
|
|
|
|
|
|
||
Operating |
the toot |
control: The more |
|||||||
you press |
down the pedal, |
the faster the |
|||||||
machine |
runs. |
|
|
|
|
|
|||
Oberfadenspannung 14 |
|
|
|
||||||||
P |
= Einstellmarkierung. |
|
|
|
|||||||
Tension |
du |
fil |
d’aiguille |
14 |
|
||||||
P |
repère |
de |
reglage. |
|
|
|
|||||
|
|
|
|
||||||||
Tensione |
superiore 14 |
|
|
|
|||||||
P |
= marcatura di |
regolazione. |
|||||||||
Needle |
thread |
tension 14 |
|
|
|||||||
P |
= Setting |
mark. |
|
|
|
|
|||||
Tensions |
des |
fils |
|
|
|
|
|||||
Position |
de |
reglage |
normale |
dans Ia |
|||||||
plage, |
entre |
3 |
et |
5. |
Tension |
d’autant |
|||||
plus forte |
que |
ie chiffre est |
êlevé. |
||||||||
ContrOler |
a |
l’aide |
du point |
zigzag. |
|||||||
Coudre |
quelques |
points. Les |
fils doivent |
||||||||
se |
nouer |
dans |
i’épaisseur |
des tissus. |
|||||||
3: |
Piage de |
réglage |
pour |
boutonnières. |
|||||||
|
|||||||||||
\/\JV\/\/V\A,
/
VVV\/V\N\i /V
12
Controtlo delle |
tensioni |
del |
fib |
|
|
|
|||||||
La regolazione |
normale si |
trova |
nel |
|
|||||||||
|
|
plO |
|||||||||||
5. |
Piü |
alto |
ii |
numero, |
|||||||||
settore, |
fra 3 |
e |
|||||||||||
ii |
|||||||||||||
forte |
Ia |
tensione. |
Si Ia a |
verifica con |
|||||||||
punto zigzag. |
Eseguire una |
breve |
cuci |
||||||||||
|
|
|
dei |
fili |
deve |
avve |
|||||||
tura. |
L’annodamento |
||||||||||||
nire |
nel |
centro |
della |
stoffa. |
|
|
|
|
|||||
II settore 3 serve |
per |
cucire |
occhielli. |
|
|||||||||
|
|
|
|
||||||||||
Checking |
the |
needte thread |
tension |
|
|||
|
|
The normal |
setting is in the range |
bet |
||||||||
ween |
3 and |
5. |
The higher |
the |
number, |
|||||
the tighter the |
tension. |
To |
check the |
ten |
||||||
|
||||||||||
sion, |
set the |
machine |
at a |
wide zigzag |
||||||
stitch. Sew |
a |
short seam. |
The |
threads |
||||||
must |
interlock |
in |
the middle of |
the |
mate |
|||||
rial. |
|
|
|
|
|
|
|
|
|
|
Use |
range |
3 |
for |
sewing buttonholes. |
|
|||||
/
Stoffdrückerhebel |
15 |
hochstellen. |
|
nach hinten |
|
|
. |
herausnehmen |
|||
Stoff
Relever le levier vers l’arriOre.
15.
Degager
le
tissu
Alzare |
Ia leva alzapiedino |
stoffa |
verso dietro. |
15.
Togliere
Ia
Raise fabric
presser bar by pulling it
lifter 15. Remove |
the |
|
|
||
toward the |
back. |
|
Fadenabschneider
P:
Fäden einlegen
und
nach unten
ziehen.
Coupe-fit |
P: |
Coucher |
|
fente et les firer |
vers |
||
|
|||
es fils le bas.
dans
Ia
Tagtiafito
basso.
P:
lnserire
i
fili
e
tirarli
verso
il
Thread
the slot
cutter P: |
Draw |
the |
threads |
|
and pull |
them |
downwards. |
||
|
|
|
||
into
13

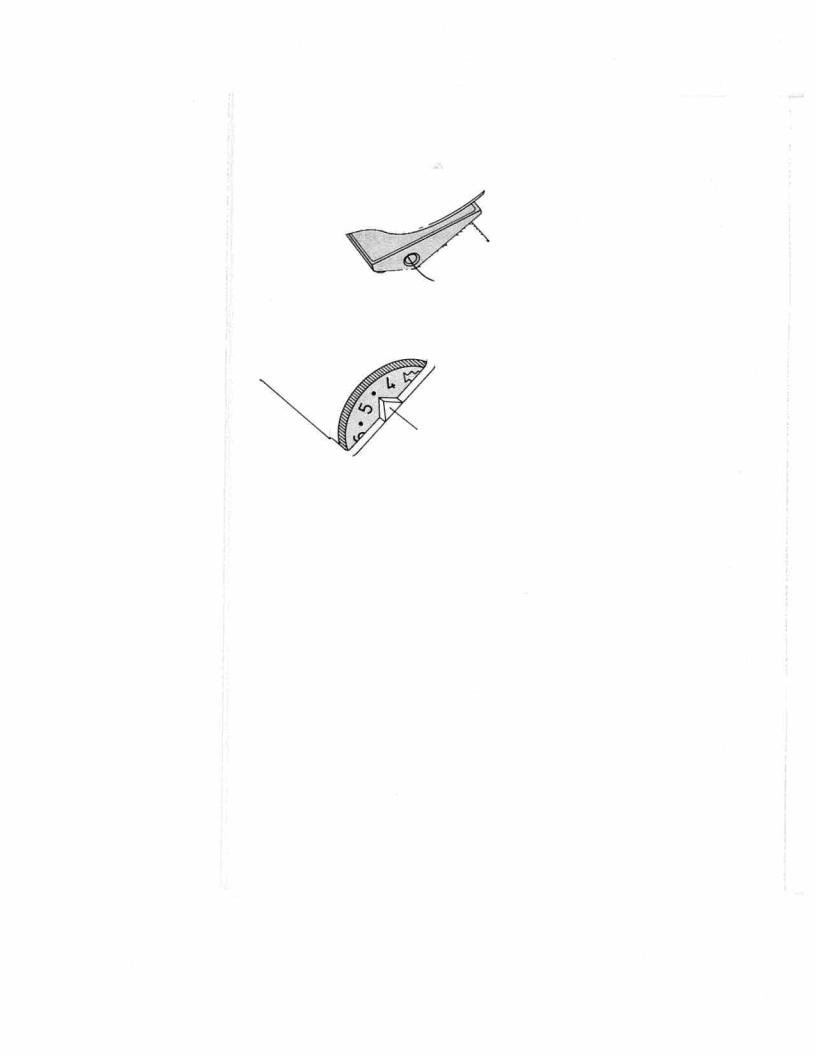
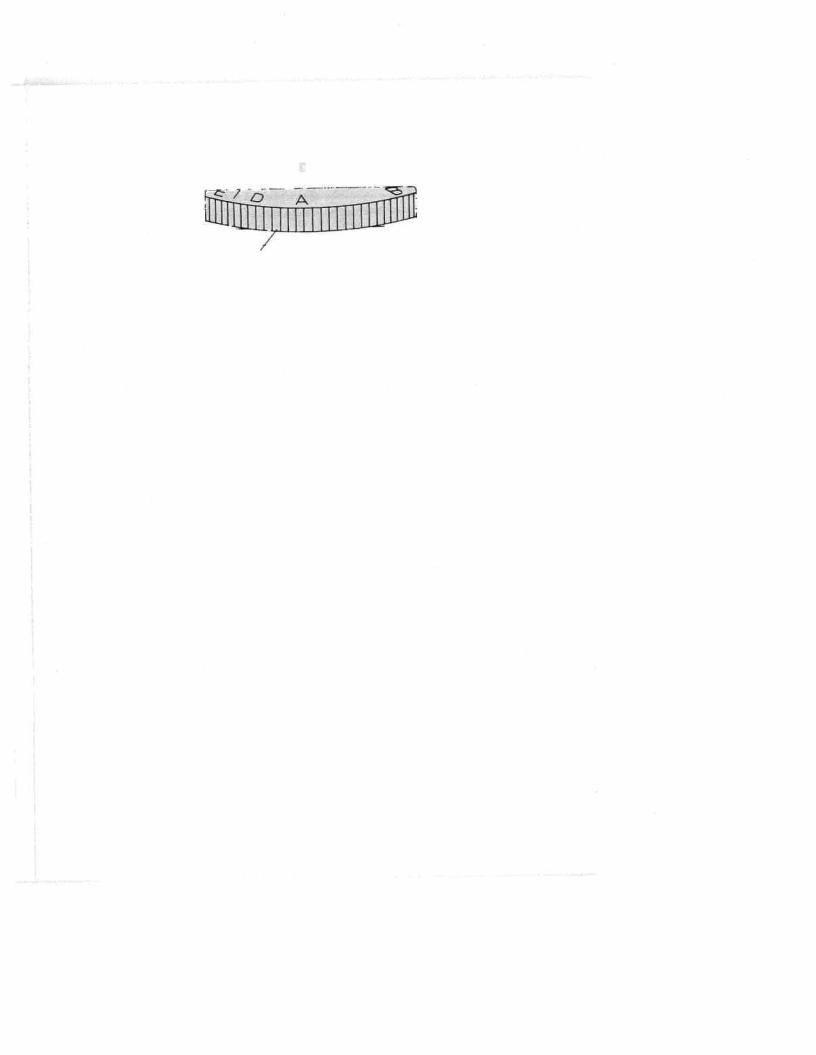
Stichlängeri
einstellen
Die |
Zahien |
auf dem |
Stichlängen |
|||||||
|
||||||||||
Einsteller |
9 |
geben |
|
|||||||
die |
Stichlánge |
|||||||||
an. |
Der |
Einstellbereich |
||||||||
1st |
0 |
bis 6 |
||||||||
in mm mm.
Die
gewunschte
Stichlange
wird
an
die
Einstellmarkierung
A
gedreht.
Die |
Abbildung 0 unten zeigt |
die |
|||
lung |
|||||
des |
Stichlängen-Einsteflers |
||||
Nähen der |
Stretchstiche. |
|
|||
|
|
|
|
||
Einstel zum
Réglage
de
Ia
longueur
du point
Les chiffres longueur du
sur le |
disque |
point |
en mm. |
9 |
indiquent Ia |
|
|
||
La |
longueur |
|
du |
point est |
reglable |
|
La |
longueur |
de point |
|
quée |
face au |
repere |
|
|
|
||
entre |
0 |
choisie |
|
R. |
|
et 6 est
mm. indi
L’illustration |
Q |
(en |
bas) |
montre |
le |
|||
reglage du |
regle- |
|
|
|
|
|
||
|
|
|
point pour |
a |
couture |
|||
des
points
elastiques.
Regolazione |
della |
Iunghezza |
||
I |
numeri |
sul |
bottone regolatore |
|
del punto della
lunghezza
del
punto
9
corrispondono
alla lunghezza del punto settore di regolazione va
in da
mm. 0 a
II 6
mm.
Regolare rata sulla
Ia |
lunghezza |
|
|
||
marcatura |
di |
|
di |
punto |
deside |
|
regolazione |
R. |
||
La figura 0 |
in |
basso |
||
lazione |
|
del |
regolatore |
|
èucire |
i |
punti |
stretch. |
|
mostra |
a |
rego |
|
del |
punto |
per |
|
|
|||
Regulating
the
stitch
length
The |
numbers on stitch length |
control 9 |
||||
indicate |
the |
stitch length |
in |
milimeters. |
||
The
stitch length
range
is
0
to
6
mm.
Turn
the
control
to
set
the
number
indicating
the
stitch
length
at
mark
R.
Fig. 0 |
(bottom) shows |
stitch |
length control for |
|
how |
to |
set the |
|
|
|||
sewing |
the |
||
stretch stitches.
‘4

RUckwärtsnähen |
|
Die Taste 23 |
. |
niederdrücken |
|
Solange
die
Taste gedruckt
wird,
nãht
die
Maschine
rückwärts.
Couture
Abaisser
en |
marche |
arrière |
||
Ia |
touche |
23. |
La machine |
|
coud
en
arrière
aussi
longtemps que
a
touche
est maintenue
en
bas.
La cucitura |
iridietro |
|
II |
||
|
23. |
Finchè |
|||
Premere ii tasto |
|||||
|
|||||
rimane premuto |
Ia macchina |
||||
|
|
|
|||
indietro. |
|
|
|
|
|
tasto cuce
Reverse
sewing
Press |
button 23. |
As long as you hold |
||
this button |
the |
machine sews back |
||
wards. |
|
|
|
|
15
Sicherheitshinweise |
|
|
|
|
|
||||||||
für |
Haushaltriähmaschinen |
|
|
|
|||||||||
nach |
DIN |
57700 |
Tell |
28 |
|
|
|
||||||
bzw. |
IEC 335 Tell 28 |
|
|
|
|
|
|||||||
a) |
Der |
Benutzer |
hat wegen |
der atif- und |
|||||||||
|
abgehenden |
Nadel |
geriugend |
Vor |
|||||||||
|
sicht |
walten |
zu lassen und |
die |
Näh |
||||||||
|
stelle |
bei |
der Arbeit |
standig |
zu |
beob |
|||||||
|
achten. |
|
|
|
|
|
|
|
|
|
|||
b) |
Beim |
Verlassen der |
Maschine, bei |
||||||||||
|
Wartungsarbeiten |
oder |
beim |
Wech |
|||||||||
|
sein |
von |
mechanischen |
Teilen oder |
|||||||||
|
Zubehör, |
1st |
die Maschine |
durch |
|||||||||
|
Herausziehen |
des |
Netzsteckers aus |
||||||||||
|
der |
Steckdose vom Netz zu tren |
|||||||||||
|
nen. |
|
|
|
|
|
|
|
|
|
|
||
c) |
Die |
|
maximal |
zulässige Leistung der |
|||||||||
|
Lampe |
betragt |
15 Watt. |
|
|
|
|||||||
d) |
Die |
|
Spannung |
des |
Antriebsriemens |
||||||||
|
dart |
nur |
von |
einem |
|||||||||
|
Mechaniker em |
||||||||||||
|
gestelit |
werden. |
|
|
|
|
|
||||||
Mesures de |
sécurité |
|
|
|
|
|
|||
a) |
Toujours faire preuve de |
prudence |
et |
||||||
|
continuellement |
surveiller |
le travail. |
|
|||||
b) |
Toujours |
débrancher Ia |
machine |
du |
|||||
|
secteur avant de quitter |
Ia |
|
|
|||||
|
machine, avant |
les |
travaux d’entre |
||||||
|
tien et |
en |
cas de remplacement de |
||||||
|
pièces |
mécaniques |
ou |
d’accessoi |
|||||
|
res. |
||||||||
|
|
|
|
|
|
|
|
|
|
c) |
Puissance |
maximale |
admissible |
de |
|
||||
|
lampoule: |
15 Watts. |
|
|
|
|
|
||
d) |
Contier |
le |
reglage de |
a |
tension |
de |
Ia |
||
|
courroie |
d’entrainement |
au mécani |
|
|||||
|
cien. |
|
|||||||
|
|
|
|
|
|
|
|
|
|
Norme |
di |
sicurezza |
per |
macchine per |
||||||||||
cucire |
per |
uso famiglia |
secondo |
|||||||||||
DIN |
57700 parte |
28 |
|
|
|
|
|
|||||||
o |
IEC |
335 |
parte |
28 |
|
|
|
|
|
|||||
a) |
In |
virti |
del |
movimento |
alternativo |
|||||||||
|
delI’ago, lutente |
deve |
prestare suffi |
|||||||||||
|
ciente |
attenzione |
e tenere |
constante |
||||||||||
|
mente |
d’occhio ii |
punto di |
lavoro. |
||||||||||
b) |
Ne! |
cambiare |
ago, piedino, |
spolina |
||||||||||
|
e |
placca |
d’ago, nelle |
interruzioni |
||||||||||
|
non |
custodite |
del lavoro |
e |
durante |
|||||||||
|
I |
lavori |
di |
manutenzione Si |
deve |
|||||||||
|
disinserire |
Ia |
corrente |
della |
|
|||||||||
|
macchina |
togliendo |
Ia |
spina dalla |
||||||||||
|
presa |
a |
muro. |
|
|
|
|
|
|
|||||
C) |
La |
potenza massima consentita per |
||||||||||||
|
Ia |
lampadina e |
di |
15 Watt. |
|
|
||||||||
d) |
La |
tensione |
della cinghia di trasmis |
|||||||||||
|
sione deve |
essere |
regolata |
solamenta |
||||||||||
|
dal |
meccanico. |
|
|
|
|
|
|
||||||
Notes on safety |
|
|
|
|
|
||||
a) |
Take |
care |
to |
avoid |
injury |
to your fin |
|||
b) |
gers |
by the needle |
during sewing. |
||||||
Make |
sure |
you unplug the power |
|||||||
|
cord |
whenever you have to leave |
|||||||
|
the machine |
or want to |
clean |
it, oil |
|||||
|
it or |
change |
mechanical |
and |
acces |
||||
|
sory |
parts. |
|
|
|
|
|
||
C) |
Be sure to |
use only |
a 15-watt |
light |
|||||
d) |
bulb |
in the |
sewing lamp. |
|
|
|
|||
The |
drive belt |
must |
never |
be |
adju |
||||
|
sted |
by anyone but |
an authorized |
||||||
|
agent. |
|
|
|
|
|
|
|
|
16
L
Symbol |
Buchst. |
|
Symbole |
Lettre |
|
Symboli |
Lettera |
|
Symbol |
Letter |
|
fl |
A |
C |
|
|
|
J |
|
D |
|
|
|
||
———— |
|
E |
|
I IIiiiii,,, |
|
F |
|
|
|
||
‘\,t\I’\,/ |
|
G |
|
|
|
||
|
|
H |
|
,.f,A,. |
I |
|
|
,A., |
K |
||
|
|||
|
|
||
f’\,r |
|
L |
|
‘V |
|
M |
|
1 |
|
||
|
N |
||
j\J’L |
|
0 |
|
|
|
Stichmusterjabelle |
|||
|
Stich |
|
|
Knopflochsymbole |
|||
Geradstich |
Stichiage |
rechts |
|
Geradstich |
Stichiage |
Mitte |
|
Zickzack |
|
|
|
Elastikstich |
|
|
|
Langettenstich |
|
||
Elastischer |
Blindstich |
breit |
|
Elastischer Blindstich |
schmal |
||
Muschelkantenstich |
breit |
||
Muschelkantenstich |
schmal |
||
Verbindungsstich |
breit |
||
Verbindungsstich schmal |
|||
Tableau |
des |
motifs |
|||||||
|
|
|
|
Point |
|
|
|
|
|
symbole |
boutonniere |
||||||||
point droit: |
deport |
a |
droite |
||||||
point |
droit; |
deport |
au |
milieu |
|||||
|
|
point |
zigzag |
|
|
||||
|
point |
zigzag |
piqué |
|
|||||
|
|
point |
danse |
|
|
||||
point |
invisible |
élastique |
large |
||||||
point |
invisible |
élastique |
étroit |
||||||
point |
cocotte |
large |
|
||||||
point |
cocotte |
étroit |
|
||||||
point |
en |
crénau |
large |
||||||
point |
en |
crénau |
étroit |
||||||
————
“\/AV’ :S:S: <>
‘
. /‘\./‘\
,--...-—..
D E F G H I K L M N
‘‘
Stretch-3fachGeradstich |
|
rechte Stichlage |
|
Stretch-3fachGeradstich |
|
Stichlage Mitte |
|
Stretch-3fach-Zickzackstich |
|
Breite einstellbar |
|
Wabenstich |
|
Kantenstich |
|
Dekorstich |
|
Dekorstich |
|
Overlockstich breit |
|
Overlockstich schmal |
|
Geschlossener Overlockstich |
breit |
Geschlossener Overlockstich |
|
schmal |
|
triple couture point droit |
||
deport |
du |
point droit |
triple couture point droit |
||
deport du |
point milieu |
|
triple |
point zigzag |
|
largeur |
variable |
|
point |
nid |
d’abeille |
point |
de bordure |
|
point |
de Florence |
|
point |
de |
Florence |
point |
overlock |
large |
point |
overlock |
étroit |
point overlock termé large |
||
point |
overlock |
fermé |
|
étroit |
|
18
|
La |
tabella dei punti |
|
|
|||
|
|
|
Pupto |
|
|
|
|
|
Simbolo per occhiello |
|
|||||
Punto |
diritto, |
posizione |
ago |
destra |
|||
Punto |
diritto, |
posizione |
ago |
centro |
|||
|
|
|
Zigzag |
|
|
|
|
|
|
Punto |
elastico |
|
|
||
|
|
Punto |
festone |
|
|
||
Punto |
invisibile elastico |
largo |
|||||
Stitch |
pattern table |
|
Stiohiange |
||||
|
Longoear do |
pont |
|||||
|
|
|
|
|
|||
|
|
|
|
|
Longhezze del |
|
punto |
|
|
Stitch |
|
|
Stfth length |
||
|
Buttonhole symbols |
|
|
|
|
||
Straight |
stitch, |
right |
needle |
position |
0,5—6 |
|
|
|
|
|
|||||
Straight |
stitch, |
centre |
needle |
position |
0,5—6 |
|
|
|
|
Zigzag |
|
0,5—6 |
|
|
|
|
Elastic stitch |
|
0,5—4 |
|
|
||
|
|
|
|
|
|||
|
|
. |
stitch |
|
1—5 |
|
|
|
Scallopping |
|
|
|
|
||
Modell
Modèles
Modelli
Model
874 875 876
874
874 875
874 875
874 875 876
874 875
|
|
1—4 |
874 |
Elastic blindstitch, |
wide |
875 |
|
|
876 |
||
|
|
|
Punto
invisibile
elastico
stretto
Elastic
blindstitch, narrow
1—4
876
Punto
conchiglia
argo
Shell-edge
stitch,
wide
1—4
876
Punto |
conchiglia stretto |
Punto |
congiuntura largo |
Shell-edge |
stitch, |
narrow |
Joining |
stitch, |
wide |
1—4
1—4
876
876
Punto
congiuntura
stretto
Joining stitch,
narrow
1—4
876
Punto triplo diritto, |
|
||||
posizione ago destra |
|||||
Punto triplo diritto, |
|||||
posizione ago àentro |
|||||
Punto triplo zigzag, |
|||||
larghezza regolabile |
|||||
Punto nido d’ape |
|
||||
|
Punto al |
bordo |
|
||
|
Punto decorativo |
|
|||
|
Punto decorativo |
|
|||
Punto |
Overlock |
argo |
|||
Punto |
Overlock |
stretto |
|||
Punto |
Overlock |
chiuso |
largo |
||
Punto |
Overlock |
chiuso |
stretto |
||
Elastic triple straight stitch, |
|
right needle position |
|
Elastic triple straight stitch, |
|
centre needle |
position |
Elastic triple zigzag stitch, |
|
width adjustable |
|
Honeycomb |
stitch |
Edge finishing stitch |
|
Ornamental |
stitch |
Ornamental |
stitch |
Overlock stitch, |
wide |
||
Overlock stitch, |
narrow |
||
Closed |
overlock stitch, |
wide |
|
Closed |
overlock stitch, |
narrow |
|
875 876
875 876
875 876
876
876
876
876
876
19
 Loading...