


WHMDC05H3E5
PANASONIC WHMDC05H3E5, WHMDC07H3E5, WHMDC09H3E5, WHMDC12H6E5, WHMDC16H6E5 User Manual
...
Quick Menu Guide
(Mono bloc) Air-to-Water Heatpump
2-7 English
Guía del menú rápido
Bomba de calor de aire a agua (Mono bloc)
8-13 Español
Guida rapida dei menu
Pompa di calore Aria-acqua (Mono bloc)
14-19 Italiano
Handleiding snelmenu
(Mono bloc) Air-to-Water Warmtepomp
20-25 Nederlands
Przewodnik po skróconym menu
(Monoblok) pompa ciepła powietrze-woda
26-31 Polski
Οδηγός Σύντομου Μενού
Αντλία Θερμότητας Αέρος-Νερού (Monoblock)
32-37 Ελληνικά
Průvodce Rychlá nabídka
Tepelné čerpadlo vzduch-voda (Monoblok)
38-43 Český
Guide du menu rapide
Pompe à chaleur air-eau (Mono bloc)
44-49 Français
Schnellmenü-Anleitung
(Kompaktgerät) Luft/Wasser-Wärmepumpe
50-55 Deutsch
Hızlı Menü Kılavuzu
(Monoblok) Hava-Su Isı Pompası
56-61 Türkçe
Snabbmenyguide
(Monobloc) Luft-till-Vatten-Värmepump
62-67 Svenska
Hurtigmenyveiledning
(Monobloc) Luft-til-vann-varmepumpe
68-73 Norsk
Pikavalikko-opas
(Monobloc) Ilmavesilämpöpumppu
74-79 Suomi
Hurtig menuvejledning
(Monobloc) Luft-til-vand-varmepumpe
80-85 Dansk
Útmutató a gyorsmenühöz
(Monoblokk) Levegő-víz hőszivattyú
86-91 Magyar
Hitri vodnik meniju
(Monoblok) Toplotna črpalka zrak-voda
92-97 Slovenščina
Vodič za Brzi izbornik
(Monoblok) toplinska pumpa zrak-voda
98-103
Hrvatski
ACXF55-14590
Model No.
WH-MDC05H3E5
WH-MDC07H3E5
WH-MDC09H3E5
Model No.
WH-MDC12H6E5
WH-MDC16H6E5
WH-MXC09H3E5
WH-MXC12H6E5
WH-MXC09H3E8
WH-MXC12H9E8
WH-MXC16H9E8
Quick Menu Guide
(Mono bloc)
Air-to-Water Heatpump
ACXF55-14590_FC0817-0_QG.indb 1ACXF55-14590_FC0817-0_QG.indb 1 7/18/2017 4:50:19 PM7/18/2017 4:50:19 PM

2
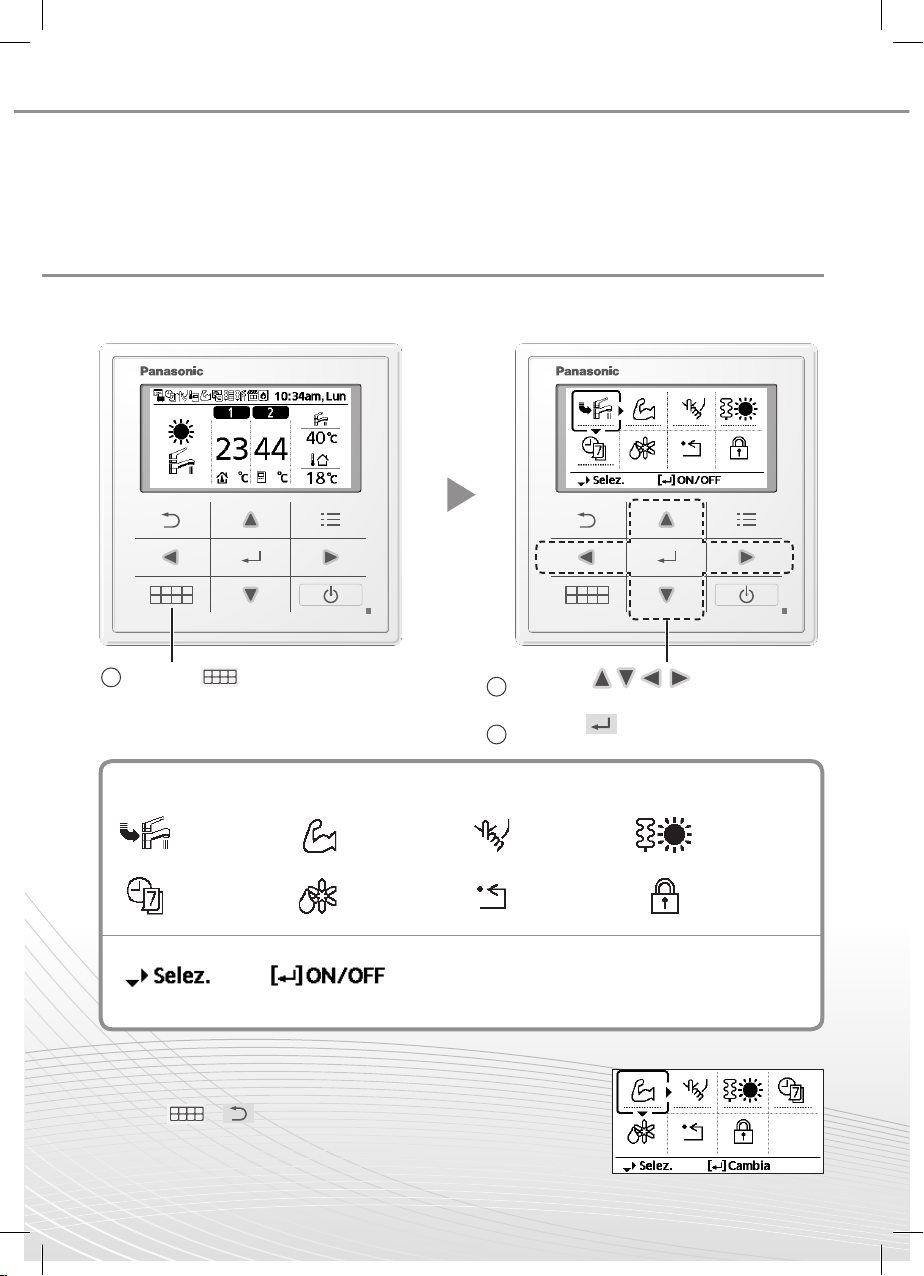
This Quick Guide explains how to use the Quick Menu.
Please read the Operating Instructions thoroughly before using the Quick Menu.
Before Use
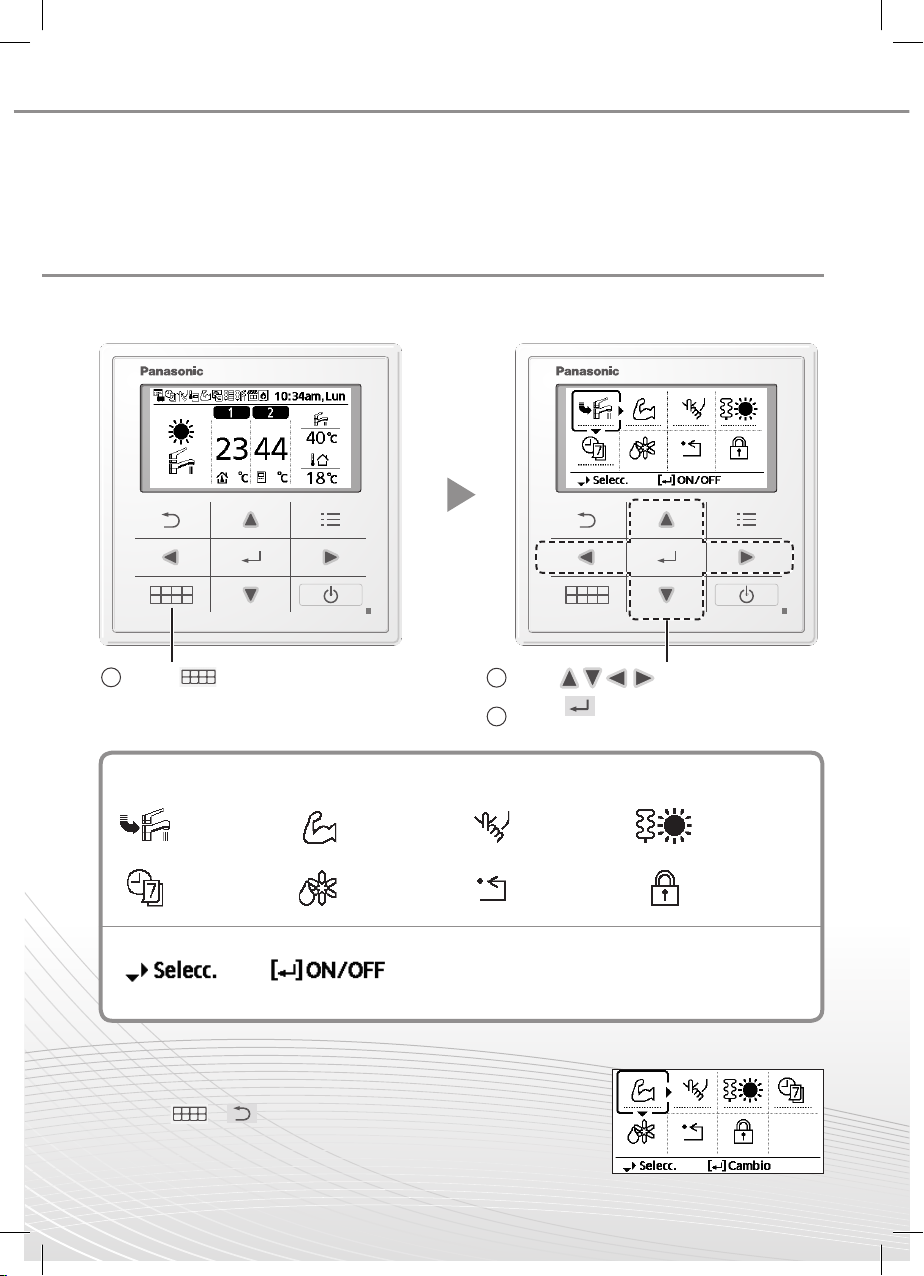
How to use the Quick Menu
After the initial settings have been completed, you can select a quick menu from the
following options and edit the setting.
Select each setting and confirm the setting
according to the instructions displayed at the
bottom of the screen. (The icons refer to each
selection key.)
Quick Menu
To return to the Main Screen,
Press or .
Force DHW Powerful Quiet
Force
Heater
Weekly
Timer
Force
Defrost
Error Reset R/C Lock
■ Note:
• If the system is not
connected to the tank
(Tank Connection is
OFF), the Quick Menu
screen will be displayed
as right. Make sure the
Tank Connection is ON.
1
Press
.
2
Use
to select menu.
3
Press
to turn on/off the select
menu.
ACXF55-14590_FC0817-0_QG.indb 2ACXF55-14590_FC0817-0_QG.indb 2 7/18/2017 4:50:21 PM7/18/2017 4:50:21 PM

3
English
How to use the Quick Menu
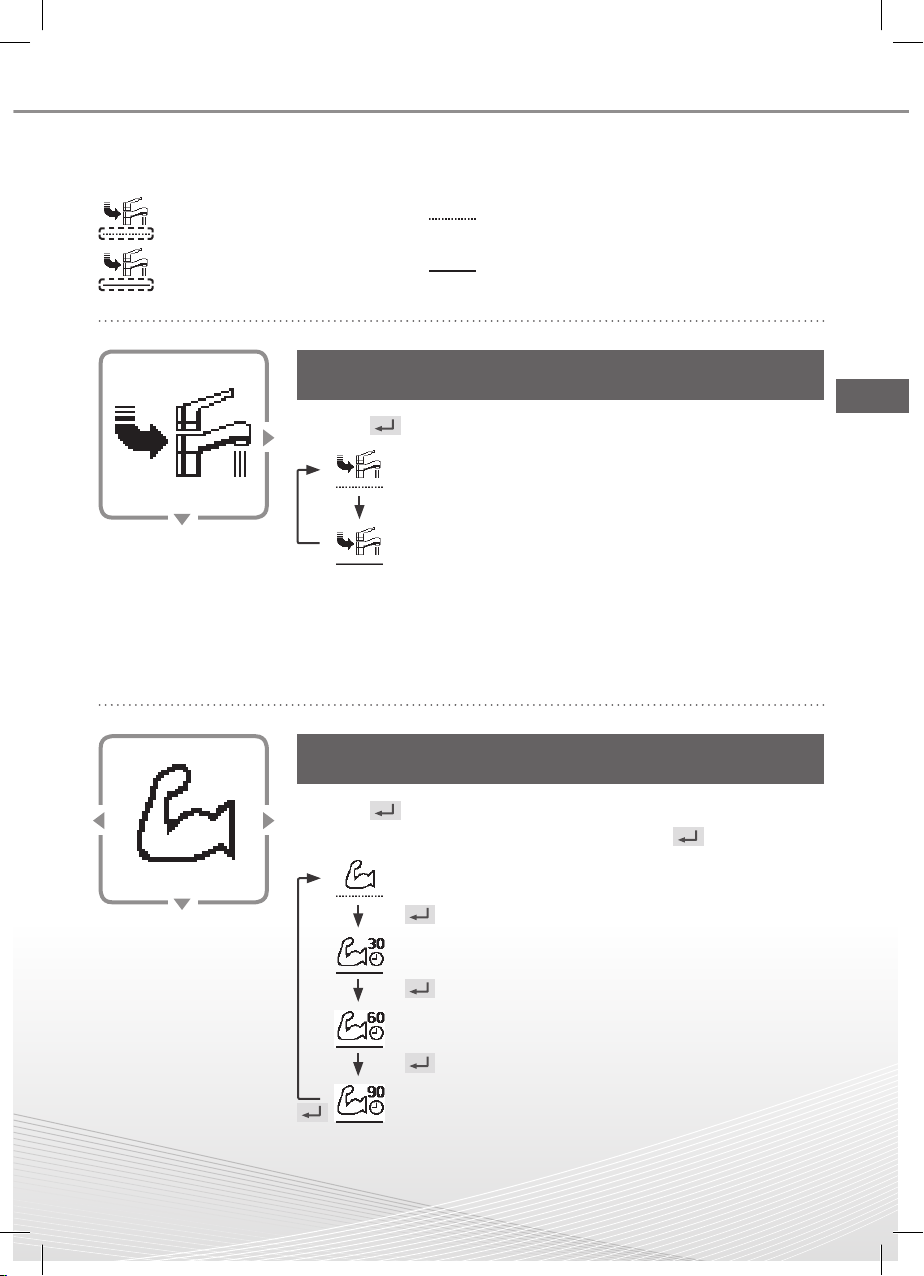
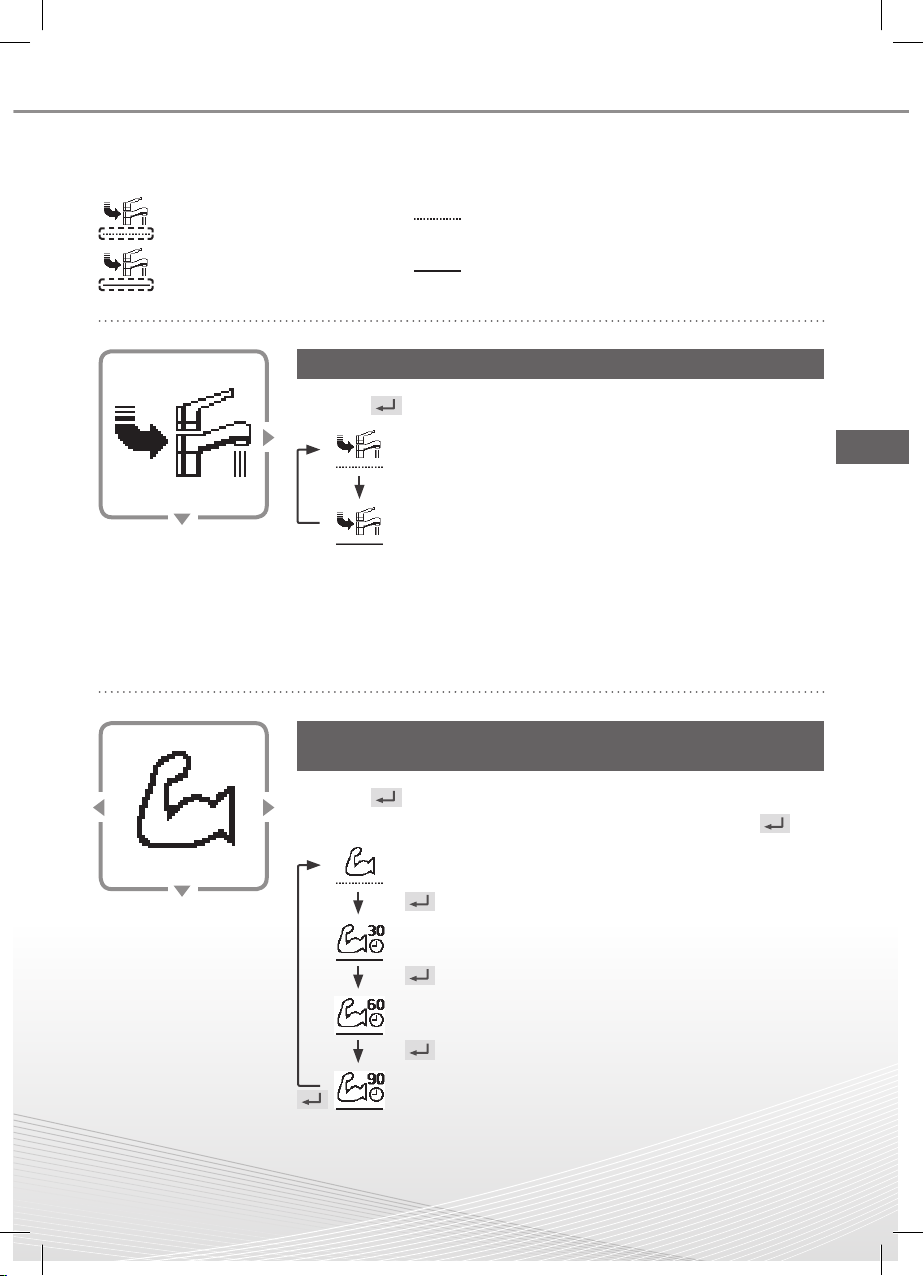
Notes on operation icon
Example:
• Operation icon indicate with “ ” = OFF
• Operation icon indicate with “ ” = ON
Select this icon to turn the Tank DHW on or off.
Press to confirm your selection.
• Force DHW is turned off.
• Force DHW is turned on.
■ Note:
• Force DHW is disabled when Force Heater is turned on.
• When Force DHW is turned off, operation & mode should change back to
the previous memorized status.
Force DHW
Select this icon to operate the heating/cooling system
powerfully.
Press to confirm your selection.
(The powerful operation starts approximately 1 minute after is
pressed.)
• Powerful mode is set off.
• The Powerful mode operates for 30 minutes.
• The Powerful mode operates for 60 minutes.
• The Powerful mode operates for 90 minutes.
■ Note:
• Powerful is disabled when operation is turned OFF.
Powerful
ACXF55-14590_FC0817-0_QG.indb 3ACXF55-14590_FC0817-0_QG.indb 3 7/18/2017 4:50:21 PM7/18/2017 4:50:21 PM

4
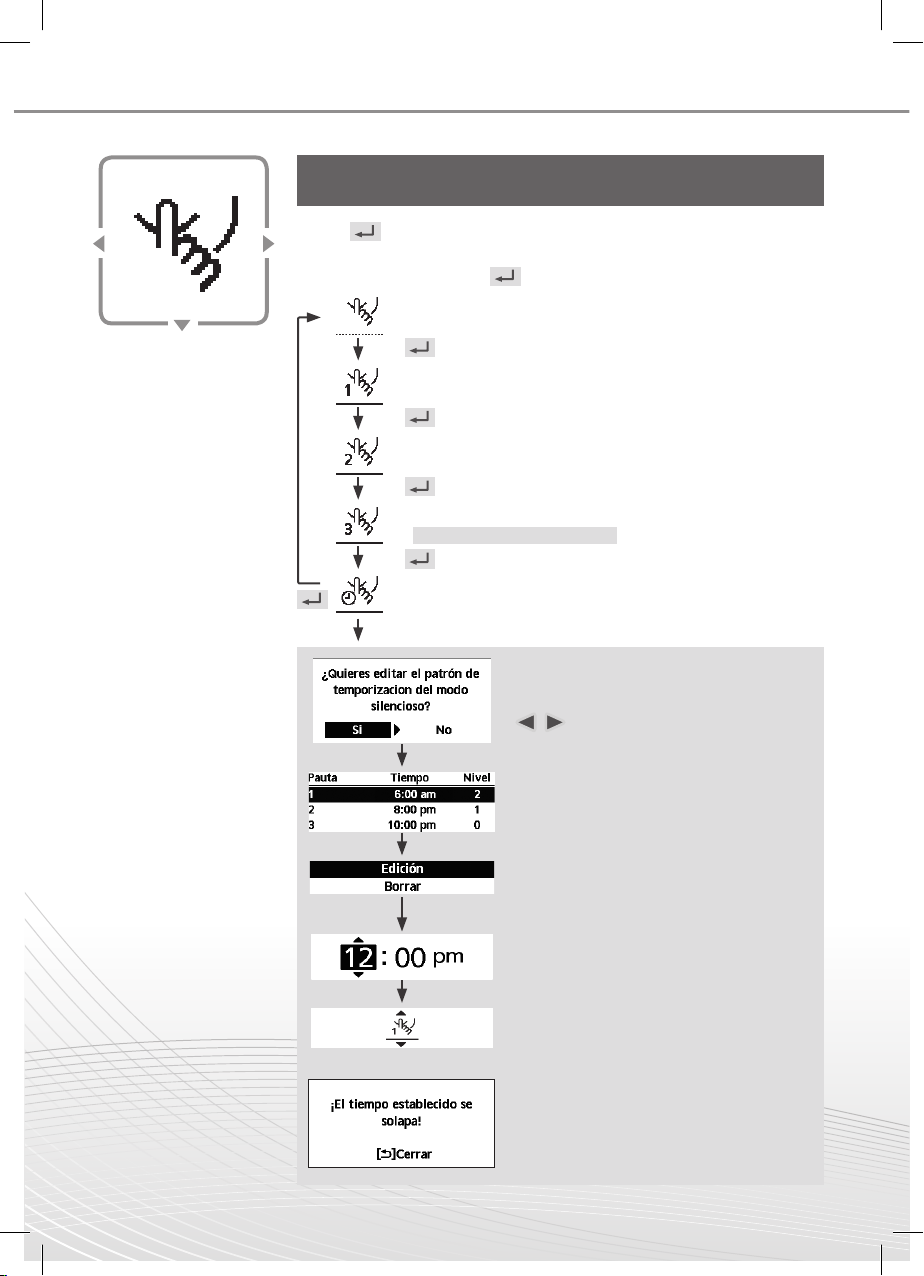
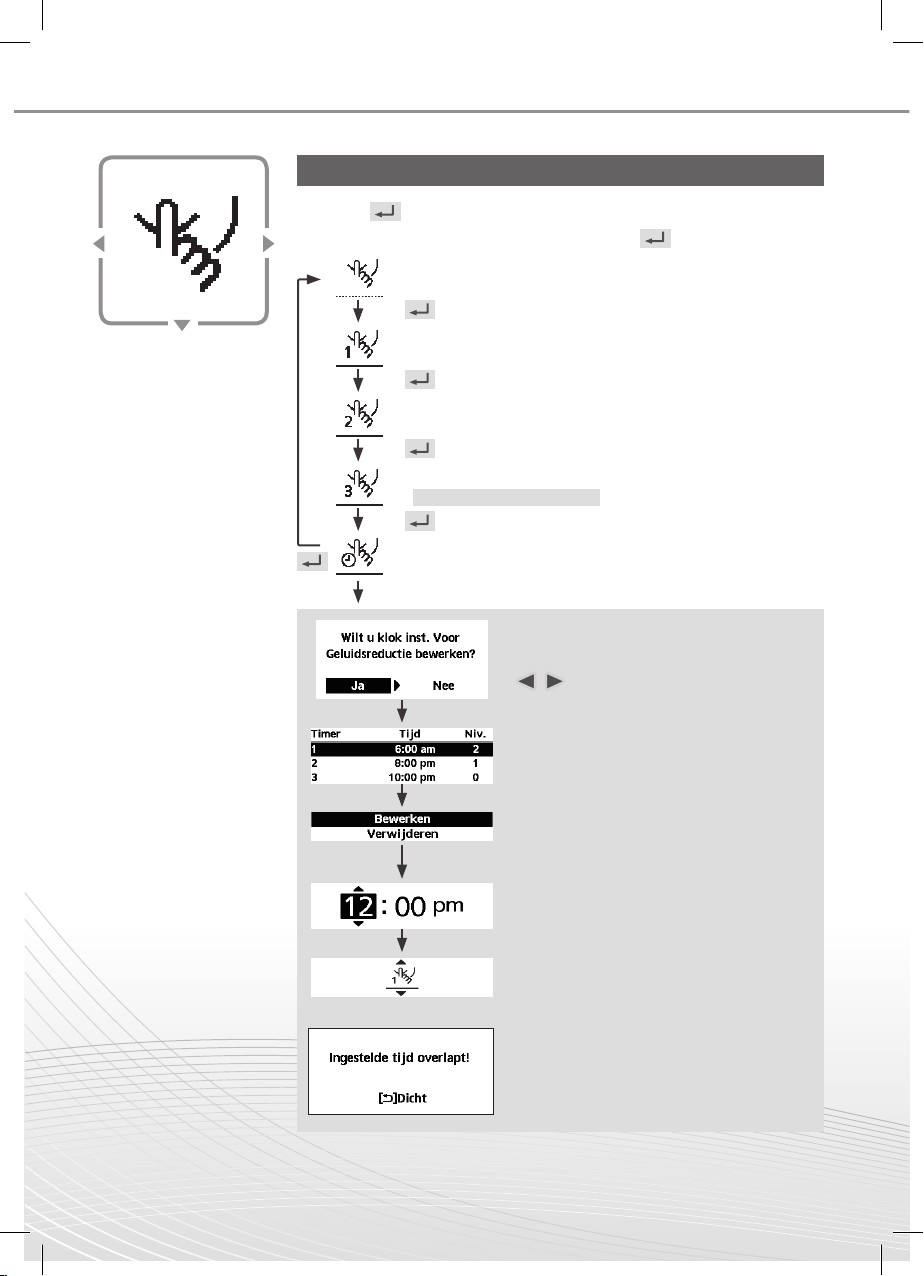
Select this icon to operate quietly.
Press to confirm your selection.
(The quiet operation starts approximately 1 minute after is pressed.)
• Quiet mode is set off.
• The Quiet mode operates at level 1.
• The Quiet mode operates at level 2.
• The Quiet mode operates at level 3.
Level 3 is the most quiet mode.
• Select this to set a timer for the Quiet mode operation.
After 1 sec delay.
Quiet
Select “Yes”.
• Select “Yes” using
buttons.
Select pattern “1” ~ “6”.
Select “Edit”.
• If you select “Delete”, the timer setting of
the selected pattern will be deleted.
Set the hour and minutes.
Select the level of Quiet.
■ Note:
• If the time overlaps with another pattern,
"Set time is overlapped!" will appear on
the screen.
How to use the Quick Menu
ACXF55-14590_FC0817-0_QG.indb 4ACXF55-14590_FC0817-0_QG.indb 4 7/18/2017 4:50:21 PM7/18/2017 4:50:21 PM
5
English
How to use the Quick Menu
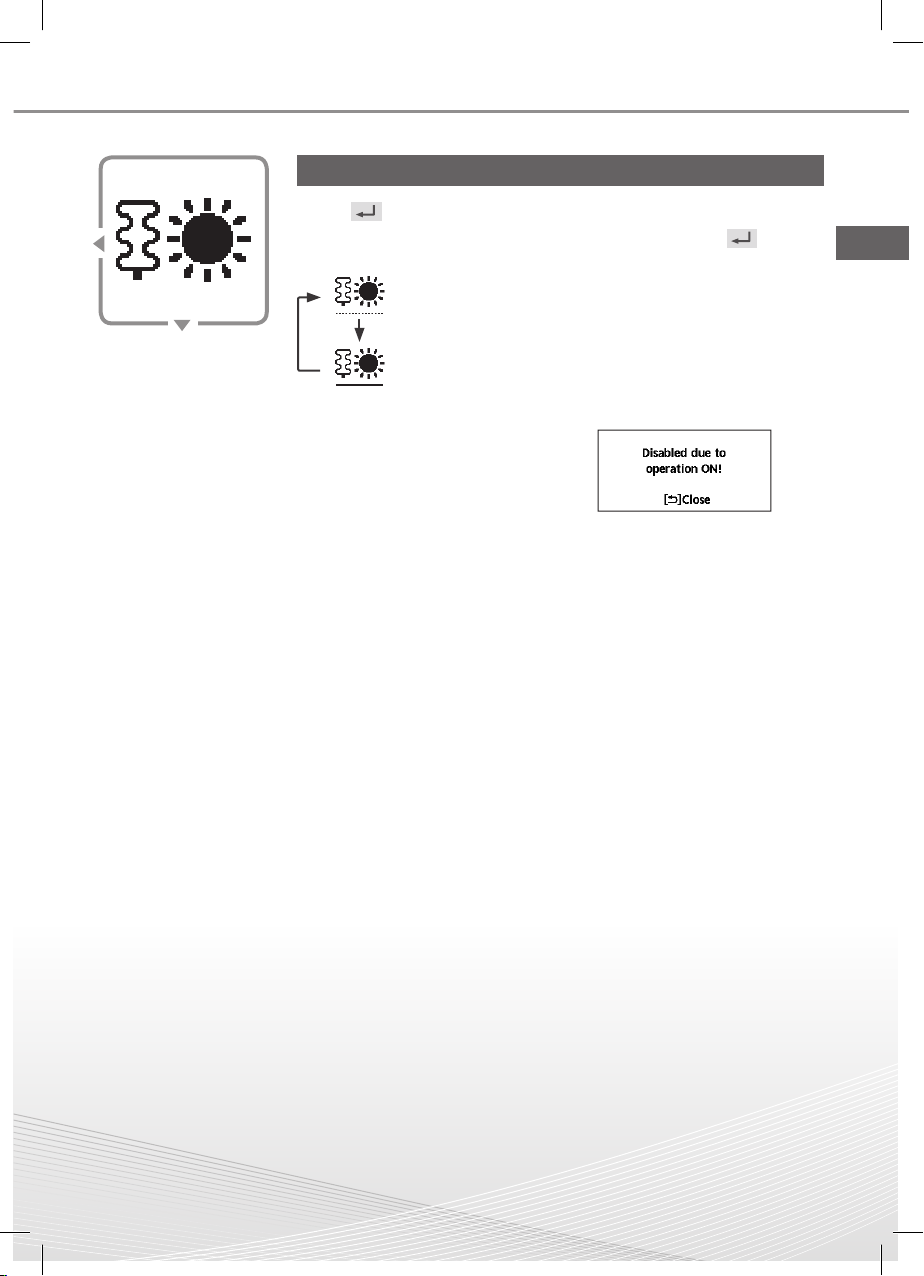
Select to force the Heater on.
Press to confirm your selection.
(The Force Heater mode starts approximately 1 minute after is
pressed.)
• Force Heater is turned off.
• Force Heater is turned on.
■ Note:
• Force Heater is disabled whenever
operation is already on and ‘Disabled
due to operation ON!’ will be
displayed.
Force
Heater
ACXF55-14590_FC0817-0_QG.indb 5ACXF55-14590_FC0817-0_QG.indb 5 7/18/2017 4:50:22 PM7/18/2017 4:50:22 PM
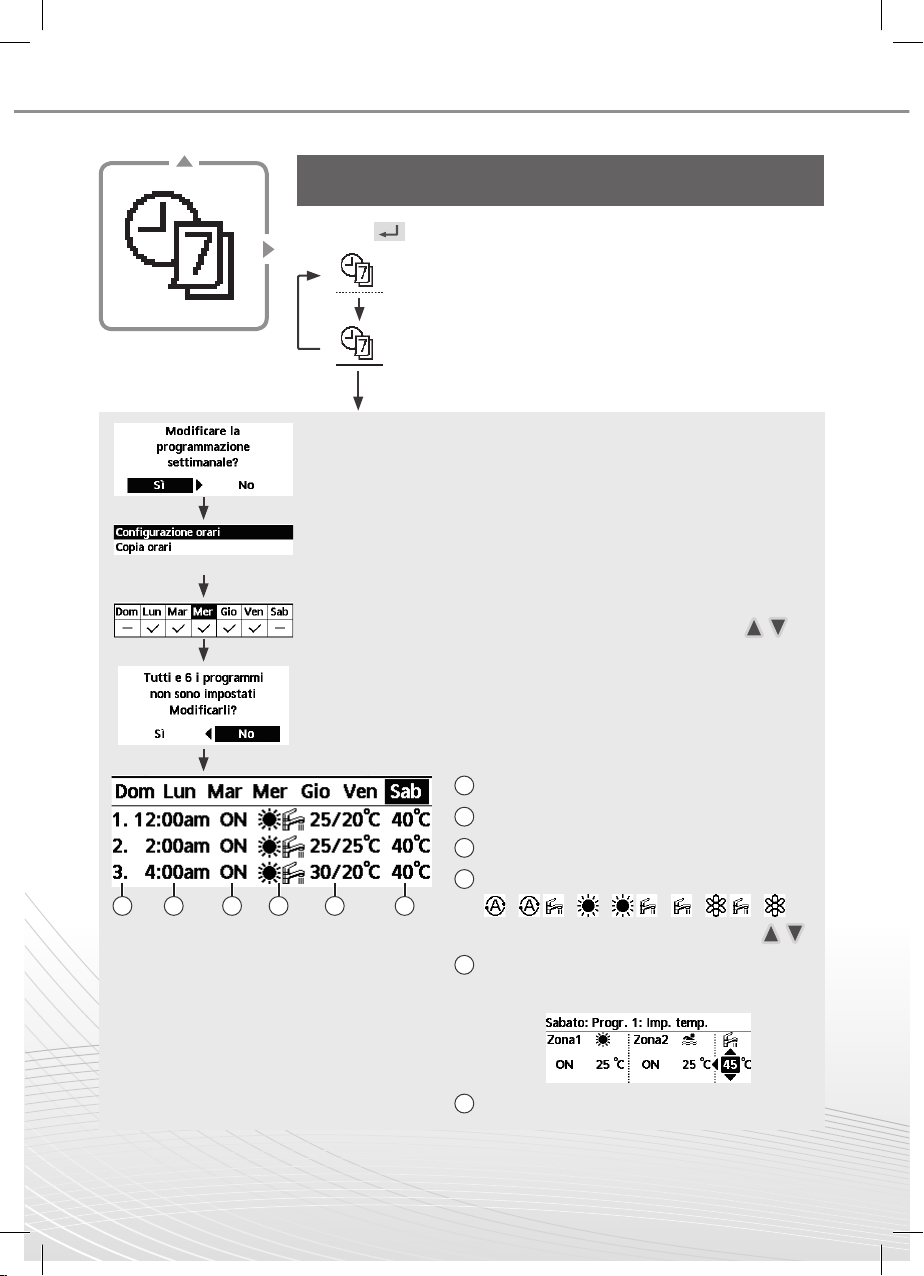
6
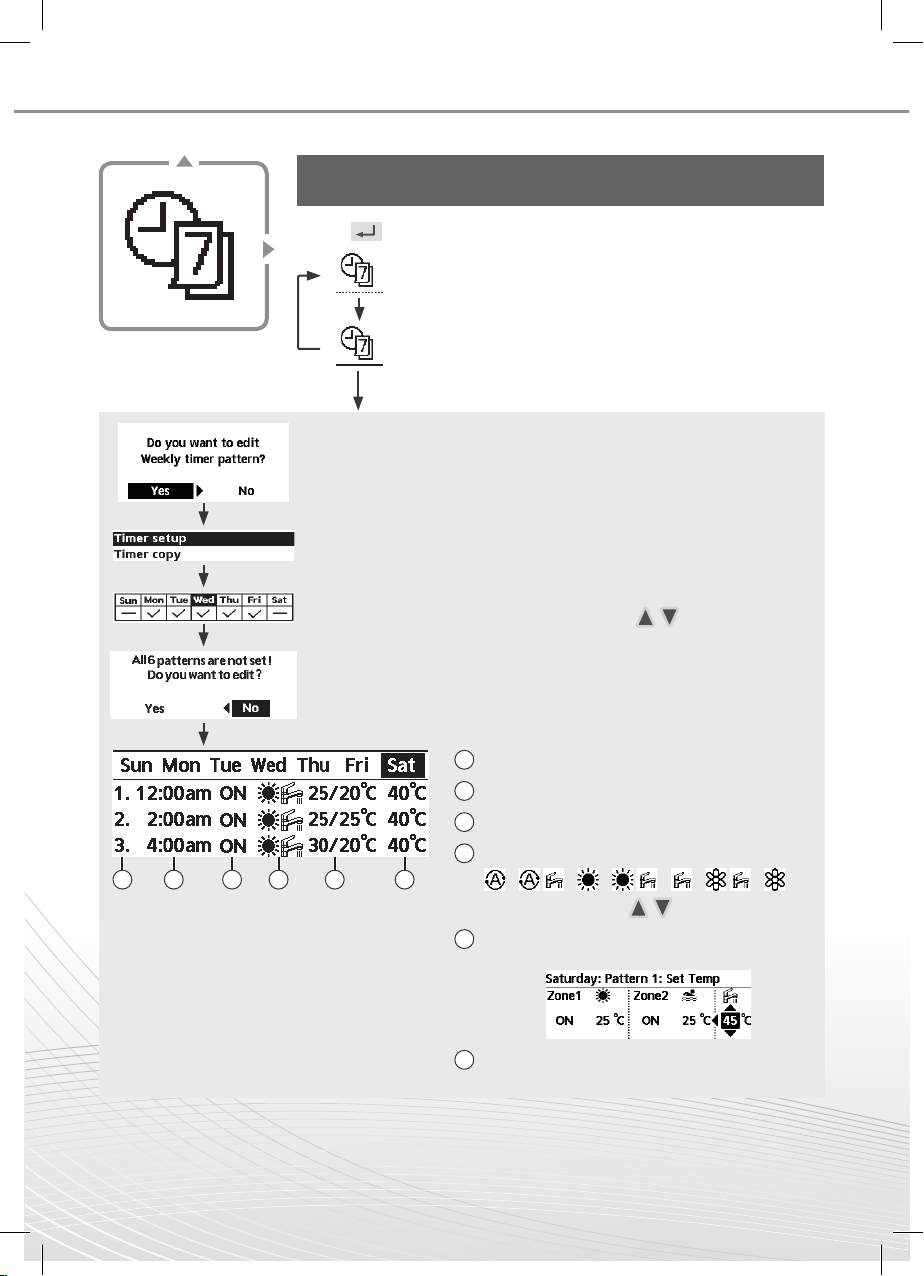
Select this icon to delete (cancel) or change the pre-set
Weekly Timer.
Press to confirm your selection.
• Timer is not ON.
• Timer is set.
After 1 sec delay.
Weekly
Timer
Select “Yes”.
• If you select “No”, the screen will return to the Main Screen.
• Timer setup: Select Timer setup to edit the Weekly Timer.
• Timer copy: Select to copy a timer setting.
[Example of a Timer setup]
Select the day(s) which you wish to edit using buttons.
If all 6 patterns are not preset, this screen will be displayed.
1 2 3 4 5 6
1 Select pattern “1” ~ “6”.
2 Set the hour and minutes of the Timer.
3 Select ON/OFF of the Timer.
4 Select the operation mode.
/ / / / / /
• Select mode using buttons.
5
Set the temperature for both Zone 1 and 2
(if your system has the 2-Zone setting).
6 Set the Tank temperature.
■ Note:
• Timer is disabled when Force Heater is turned on or Heat-Cool SW is enabled.
• If you have preset the Weekly Timer on 2 zones, you must repeat the same procedure with Zone 2.
How to use the Quick Menu
ACXF55-14590_FC0817-0_QG.indb 6ACXF55-14590_FC0817-0_QG.indb 6 7/18/2017 4:50:22 PM7/18/2017 4:50:22 PM

7
English
How to use the Quick Menu
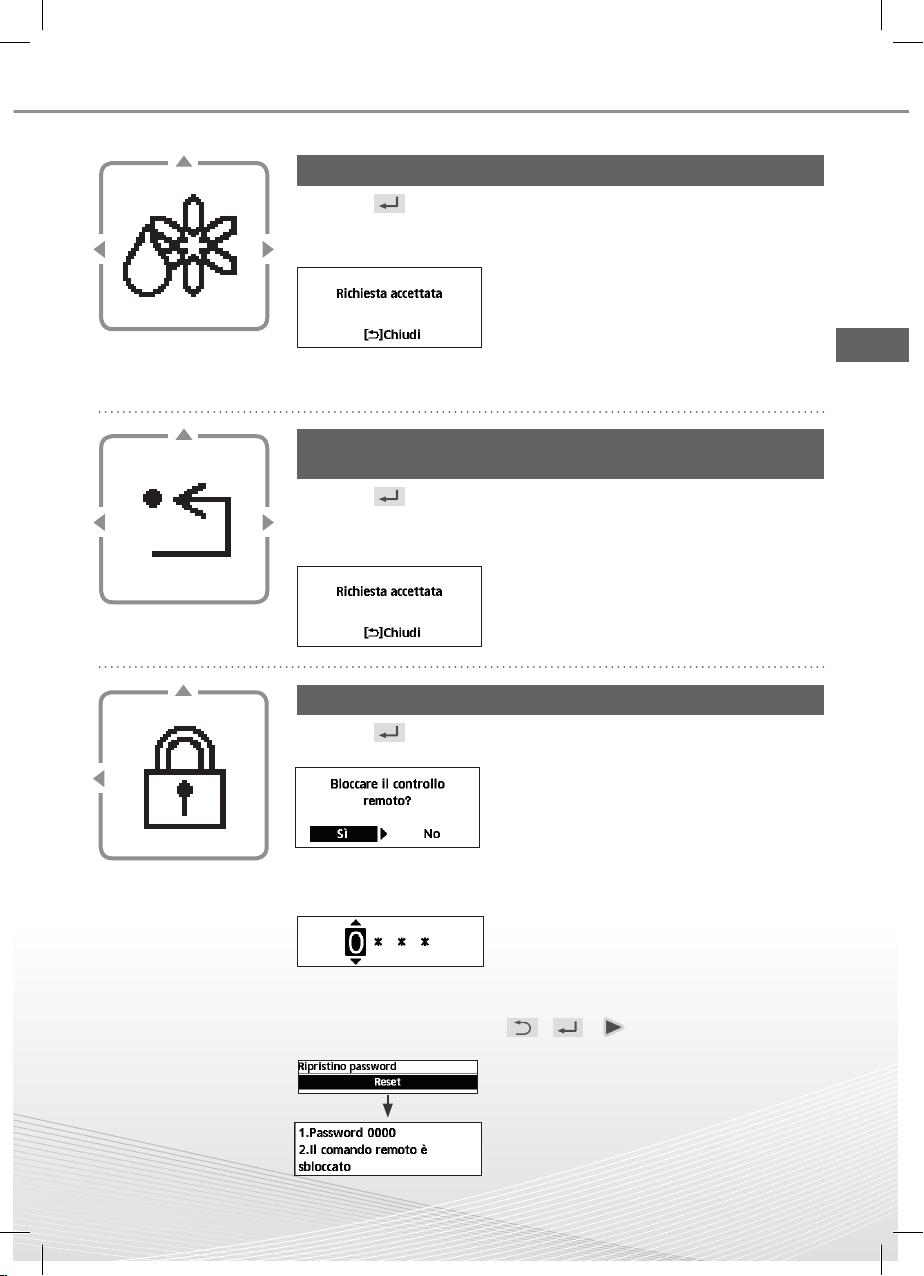
Select to defrost the frozen pipes.
Press to confirm your selection.
(When the mode is accepted, below screen will be displayed.)
Force
Defrost
Select to restore the previous settings when error has
occurred.
Press to confirm your selection.
(When the mode has been accepted, below screen will be displayed.)
• Make sure all units are turned off before
selecting this mode which restores the whole
system to the previous settings.
Error Reset
Select to lock the Remote Controller.
Press to confirm your selection.
(When the mode has been accepted, below screen will be displayed.)
Select “Yes”.
(The Main Screen will be locked.)
• If “No” is selected, the screen will return to the
Main Screen.
To unlock the Remote Controller
Press any key.
(When the mode has been accepted, below screen will be displayed.)
Enter any 4 digits of number (if the number is
correct, the screen will be unlocked).
To reset forgotten password (under operation OFF screen)
Press , and continuously for 5 seconds.
(When the mode has been accepted, below screen will be displayed.)
Select “Reset”.
(The screen will be off after 3 seconds.)
R/C Lock
ACXF55-14590_FC0817-0_QG.indb 7ACXF55-14590_FC0817-0_QG.indb 7 7/18/2017 4:50:22 PM7/18/2017 4:50:22 PM
8
Esta guía rápida describe cómo utilizar el menú rápido.
Por favor, lea detenidamente las instrucciones de manejo antes de usar el menú rápido.
Antes de utilizar el sistema
Cómo utilizar el menú rápido
Una vez terminados los ajustes iniciales, es posible seleccionar un menú rápido para
editar los ajustes de cualquiera de las siguientes opciones.
Seleccione cada opción y confirme su configuración
siguiendo las instrucciones mostradas en la
parte inferior de la pantalla. (Estos iconos hacen
referencia a cada una de las teclas de selección).
Menú rápido
Para volver a la pantalla
principal,
Presione o .
ACS forzado Potente Silencioso
Calefactor
forzado
Temporiz.
semanal
Desescarche
forzado
Borrar
errores
Bloqueo R/C
■Nota:
• Si el sistema no tiene conectado
el acumulador ACS (La conexión
al acumulador ACS está OFF), el
menú rápido se mostrará como
en esta figura. Cerciórese de
que la conexión del acumulador
ACS está ON.
1
Pulse
.
2
Utilice para seleccionar un menú.
3
Pulse
para activar o desactivar el
menú seleccionado.
ACXF55-14590_FC0817-0_QG.indb 8ACXF55-14590_FC0817-0_QG.indb 8 7/18/2017 4:50:22 PM7/18/2017 4:50:22 PM

9
Cómo utilizar el menú rápido
Seleccione el siguiente icono para encender y apagar el
acumulador ACS.
Pulse para confirmar su selección.
• ACS forzada desactivada.
• ACS forzada activada.
■Nota:
• Al conectar el calefactor forzado se deshabilita el ACS forzado.
• Cuando se desactiva el ACS forzada, el funcionamiento y el modo
recuperan el estado memorizado anterior.
ACS forzado
Seleccione este icono para el funcionamiento potente en
frío o calor.
Pulse para confirmar su selección.
(El funcionamiento potente se inicia aproximadamente 1 minuto después
de haber pulsado ).
• Se desactiva el funcionamiento potente.
• El modo potente funciona durante 30 minutos.
• El modo potente funciona durante 60 minutos.
• El modo potente funciona durante 90 minutos.
■Nota:
• El modo potente se desconecta al apagar el sistema.
Potente
Notas sobre el icono de funcionamiento
Ejemplo:
• Icono de funcionamiento con “ ” = OFF
• Icono de funcionamiento con “ ” = ON
Español
ACXF55-14590_FC0817-0_QG.indb 9ACXF55-14590_FC0817-0_QG.indb 9 7/18/2017 4:50:22 PM7/18/2017 4:50:22 PM
10
Seleccione este icono para activar el funcionamiento
silencioso.
Pulse para confirmar su selección.
(El funcionamiento silencioso se inicia aproximadamente 1 minuto
después de haber pulsado ).
• Se desactiva el funcionamiento silencioso.
• Modo silencioso funcionando en nivel 1.
• Modo silencioso funcionando en nivel 2.
• Modo silencioso funcionando en nivel 3.
El nivel 3 es el más silencioso.
• Seleccione este icono para temporizar el modo de
funcionamiento silencioso.
Tras 1 segundo de retardo.
Silencioso
Seleccione “Si”.
• Seleccione “Si” mediante los botones
.
Seleccione el patrón “1” ~ “6”.
Seleccione “Edición”.
• En caso de seleccionar “Borrar”,
se borrará el ajuste del patrón del
temporizador que haya seleccionado.
Ajuste la hora y los minutos.
Seleccione el nivel de silencio.
■Nota:
• En caso de que coincida en el tiempo con
otro patrón, la pantalla mostrará
“El tiempo establecido se solapa!”.
Cómo utilizar el menú rápido
ACXF55-14590_FC0817-0_QG.indb 10ACXF55-14590_FC0817-0_QG.indb 10 7/18/2017 4:50:22 PM7/18/2017 4:50:22 PM

11
Cómo utilizar el menú rápido
Seleccione este icono para activar el calefactor forzado.
Pulse para confirmar su selección.
(El calefactor forzado se inicia aproximadamente 1 minuto después de
haber pulsado ).
• Calefactor forzado desactivado.
• Calefactor forzado activado.
■Nota:
• El calefactor forzado se deshabilita
siempre que el equipo esté en
funcionamiento y se mostrará
¡Deshabilitado debido a la
operación ON!
Calefactor
forzado
Español
ACXF55-14590_FC0817-0_QG.indb 11ACXF55-14590_FC0817-0_QG.indb 11 7/18/2017 4:50:22 PM7/18/2017 4:50:22 PM

12
Seleccione este icono para borrar (cancelar) o cambiar el
temporizador semanal.
Pulse para confirmar su selección.
• El temporizador no está activado.
• El temporizador está ajustado.
Tras 1 segundo de retardo.
Temporiz.
semanal
Seleccione “Si”.
• Al seleccionar “No” volverá a la pantalla principal.
• Config. temporizador: Seleccione Config. temporizador para editar el
temporizador semanal.
• Copia temporiz.: Seleccione para copiar los ajustes de un temporizador.
[Ejemplo de los ajustes de un temporizador]
Seleccione el(los) día(s) que desee editar mediante los botones .
Si no ha ajustado ninguno de los 6 patrones se mostrará esta pantalla.
1 2 3 4 5 6
1 Seleccione el patrón “1” ~ “6”.
2
Establezca la hora y los minutos del programa.
3 Seleccione ON u OFF para el programa.
4 Seleccione el modo de funcionamiento.
/ / / / / /
• Seleccione el modo mediante los botones .
5
Establezca las temperaturas para las
zonas 1 y 2 (en caso de que su sistema
disponga de ajuste para 2 zonas).
6
Establezca la temperatura del acumulador ACS.
■Nota:
• El temporizador se deshabilita cuando se activa el calefactor forzado o se actúa sobre el interruptor frío-calor.
• En caso de haber seleccionado el temporizador semanal para dos zonas, deberá repetir el mismo
procedimiento para la zona 2.
Cómo utilizar el menú rápido
ACXF55-14590_FC0817-0_QG.indb 12ACXF55-14590_FC0817-0_QG.indb 12 7/18/2017 4:50:22 PM7/18/2017 4:50:22 PM

13
Cómo utilizar el menú rápido
Seleccione este icono para descongelar las tuberías.
Pulse para confirmar su selección.
(Al aceptar el modo se mostrará esta pantalla).
Desescarche
forzado
Seleccione este icono para recuperar la configuración
anterior en caso de error.
Pulse para confirmar su selección.
(Al aceptar el modo se mostrará esta pantalla).
• Cerciórese de que todas las unidades están
apagadas antes de seleccionar este modo,
ya que restaurará el sistema completo a la
configuración anterior.
Borrar
errores
Seleccionar para bloquear el mando a distancia.
Pulse para confirmar su selección.
(Al aceptar el modo se mostrará esta pantalla).
Seleccione “Si”.
(La pantalla principal quedará bloqueada).
• Si selecciona “No” se volverá a la pantalla
principal.
Para bloquear el mando a distancia.
Pulse cualquier tecla.
(Al aceptar el modo se mostrará esta pantalla).
Introduzca los 4 dígitos del código (La pantalla
se desbloquea al introducir el código correcto).
Para resetear una contraseña olvidada (en la pantalla de
desactivar funciones)
Pulse , y continuamente durante 5 segundos.
(Al aceptar el modo se mostrará esta pantalla).
Seleccione “Reinicio”.
(La pantalla se apagará después de
3 segundos.)
Bloqueo R/C
Español
ACXF55-14590_FC0817-0_QG.indb 13ACXF55-14590_FC0817-0_QG.indb 13 7/18/2017 4:50:22 PM7/18/2017 4:50:22 PM
14
Questa Guida rapida spiega come utilizzare il Menu rapido.
Leggere attentamente le istruzioni per l’uso prima di utilizzare il Menu rapido.
Prima dell’uso
Come utilizzare il Menu rapido
Al termine delle impostazioni iniziali, è possibile selezionare un menu rapido dalle seguenti
opzioni e modificare l’impostazione.
Selezionare ogni impostazione e verificare
l’impostazione in base alle istruzioni visualizzate
nella parte inferiore della schermata. (Le icone si
riferiscono ad ogni tasto di selezione.)
Menu rapido
Per tornare alla schermata
principale,
Premere o .
ACS forzato Powerful
Modalità
silenziosa
Forza risc.
Progr.
settimanale
Sbrinamento
forzato
Reset errore Blocco R/C
■Nota:
• Se il sistema non è
collegato al serbatoio
(Conn. serbatoio su OFF),
la schermata Menu rapido
viene visualizzata come
a destra. Assicurarsi che
Conn. serbatoio sia su ON.
1
Premere
.
2
Utilizzare
per selezionare
il menu.
3
Premere
per attivare/disattivare il
menu selezionato.
ACXF55-14590_FC0817-0_QG.indb 14ACXF55-14590_FC0817-0_QG.indb 14 7/18/2017 4:50:23 PM7/18/2017 4:50:23 PM

15
Come utilizzare il Menu rapido
Selezionare questa icona per attivare o disattivare la
funzione ACS forzata.
Premere per confermare la scelta.
• ACS forzato è disattivato.
• ACS forzato è attivato.
■Nota:
• ACS forzato è disattivato quando Resistenza forzata è attivata.
• Quando ACS forzato è disattivato, il funzionamento e la modalità tornano
allo stato precedentemente memorizzato.
ACS forzato
Selezionare questa icona per azionare in a massima
potenza l’impianto di riscaldamento/raffreddamento.
Premere per confermare la scelta.
(Il funzionamento Powerful si avvia circa 1 minuto dopo la pressione di .)
• La modalità Powerful è disattivata.
• La modalità Powerful funziona per 30 minuti.
• La modalità Powerful funziona per 60 minuti.
• La modalità Powerful funziona per 90 minuti.
■Nota:
• La modalità Powerful viene disabilitata quando si spegne il
funzionamento.
Powerful
Note sull’icona operativa
Esempio:
• Icona operativa indicata con “ ” = OFF
• Icona operativa indicata con “ ” = ON
Italiano
ACXF55-14590_FC0817-0_QG.indb 15ACXF55-14590_FC0817-0_QG.indb 15 7/18/2017 4:50:23 PM7/18/2017 4:50:23 PM

16
Selezionare questa icona per un funzionamento silenzioso.
Premere per confermare la scelta.
(Il funzionamento silenzioso si avvia circa 1 minuto dopo la pressione di
.)
• La modalità Silenz. è disattivata.
• La modalità Silenz. funziona sul livello 1.
• La modalità Silenz. funziona sul livello 2.
• La modalità Silenz. funziona sul livello 3.
Il livello 3 è la modalità più silenziosa.
• Selezionare per impostare un timer per il funzionamento
in modalità silenziosa.
Dopo 1 sec. di ritardo.
Modalità
silenziosa
Selezionare “Sì”.
• Selezionare “Sì” con i pulsanti
.
Selezionare il programma “1” ~ “6”.
Selezionare “Modifica”.
• Se si seleziona “Elimina”, l’impostazione
del timer del programma selezionato
viene eliminata.
Impostare ora e minuti.
Impostare il livello della modalità Silenz.
■Nota:
• Se l’ora si sovrappone con un altro
programma, sullo schermo viene
visualizzato “L’ora impostata si
sovrappone”.
Come utilizzare il Menu rapido
ACXF55-14590_FC0817-0_QG.indb 16ACXF55-14590_FC0817-0_QG.indb 16 7/18/2017 4:50:23 PM7/18/2017 4:50:23 PM

17
Come utilizzare il Menu rapido
Selezionare per forzare l’attivazione della resistenza.
Premere per confermare la scelta.
(La modalità Resistenza forzata si avvia circa 1 minuto dopo aver
premuto .)
• Resistenza forzata è disattivato.
• Resistenza forzata è attivato.
■Nota:
• Resistenza forzata viene disabilitata
quando l’operazione è già attivata e
viene visualizzato “Disattivato perché
funzionamento attivo”.
Forza risc.
Italiano
ACXF55-14590_FC0817-0_QG.indb 17ACXF55-14590_FC0817-0_QG.indb 17 7/18/2017 4:50:23 PM7/18/2017 4:50:23 PM
18
Selezionare questa icona per eliminare (annullare) o
passare a Progr. settimanale preimpostato.
Premere per confermare la scelta.
• Il timer non è attivato.
• Timer impostato.
Dopo 1 sec. di ritardo.
Progr.
settimanale
Selezionare “Sì”.
• Se si seleziona “No”, si torna alla schermata principale.
• Configurazione orari: Selezionare Configurazione orari per modificare
Progr. settimanale.
• Copia orari: Selezionare per copiare una configurazione orario.
[Esempio di Configurazione orari]
Selezionare il giorno in cui eseguire la modifica con i pulsanti .
Se non sono preimpostati tutti i 6 programmi, viene visualizzata questa
schermata.
1 2 3 4 5 6
1 Selezionare il programma “1” ~ “6”.
2 Impostare l’ora e i minuti del timer.
3 Selezionare ON/OFF del timer.
4 Selezionare la modalità operativa.
/ / / / / /
• Selezionare la modalità con i pulsanti .
5
Impostare la temperatura delle zone 1 e 2
(se il sistema dispone di impostazione di
2 zone).
6 Impostare la temperatura del serbatoio.
■Nota:
• Il timer viene disabilitato quando si attiva Riscaldatore forzato o si abilita SW risc./raff.
• Se si è preimpostato Progr. settimanale su 2 zone, si deve ripetere la stessa procedura sulla zona 2.
Come utilizzare il Menu rapido
ACXF55-14590_FC0817-0_QG.indb 18ACXF55-14590_FC0817-0_QG.indb 18 7/18/2017 4:50:23 PM7/18/2017 4:50:23 PM
19
Come utilizzare il Menu rapido
Selezionare per avviare la funzione sbrinamento.
Premere per confermare la scelta.
(Quando si accetta la modalità, viene visualizzata la seguente
schermata.)
Sbrinamento
forzato
Selezionare per ripristinare le precedenti impostazioni
quando si verifica un errore.
Premere per confermare la scelta.
(Quando è stata accettata la modalità, viene visualizzata la seguente
schermata.)
• Assicurarsi che tutte le unità siano spente
prima di selezionare questa modalità che
ripristina le impostazioni predefinite dell’intero
sistema.
Reset errore
Selezionare per bloccare il telecomando.
Premere per confermare la scelta.
(Quando è stata accettata la modalità, viene visualizzata la seguente schermata.)
Selezionare “Sì”.
(La schermata principale viene bloccata.)
• Se si seleziona “No”, si torna alla schermata
principale.
Per sbloccare il telecomando
Premere un tasto.
(Quando è stata accettata la modalità, viene visualizzata la seguente schermata.)
Immettere 4 cifre della password
(se la password è corretta, la schermata viene
sbloccata).
Per ripristinare la password dimenticata (nella schermata
di funzionamento OFF)
Premere continuamente , e per 5 secondi.
(Quando è stata accettata la modalità, viene visualizzata la seguente schermata.)
Selezionare “Reset”.
(Lo schermo si spegne dopo 3 secondi.)
Blocco R/C
Italiano
ACXF55-14590_FC0817-0_QG.indb 19ACXF55-14590_FC0817-0_QG.indb 19 7/18/2017 4:50:23 PM7/18/2017 4:50:23 PM
20
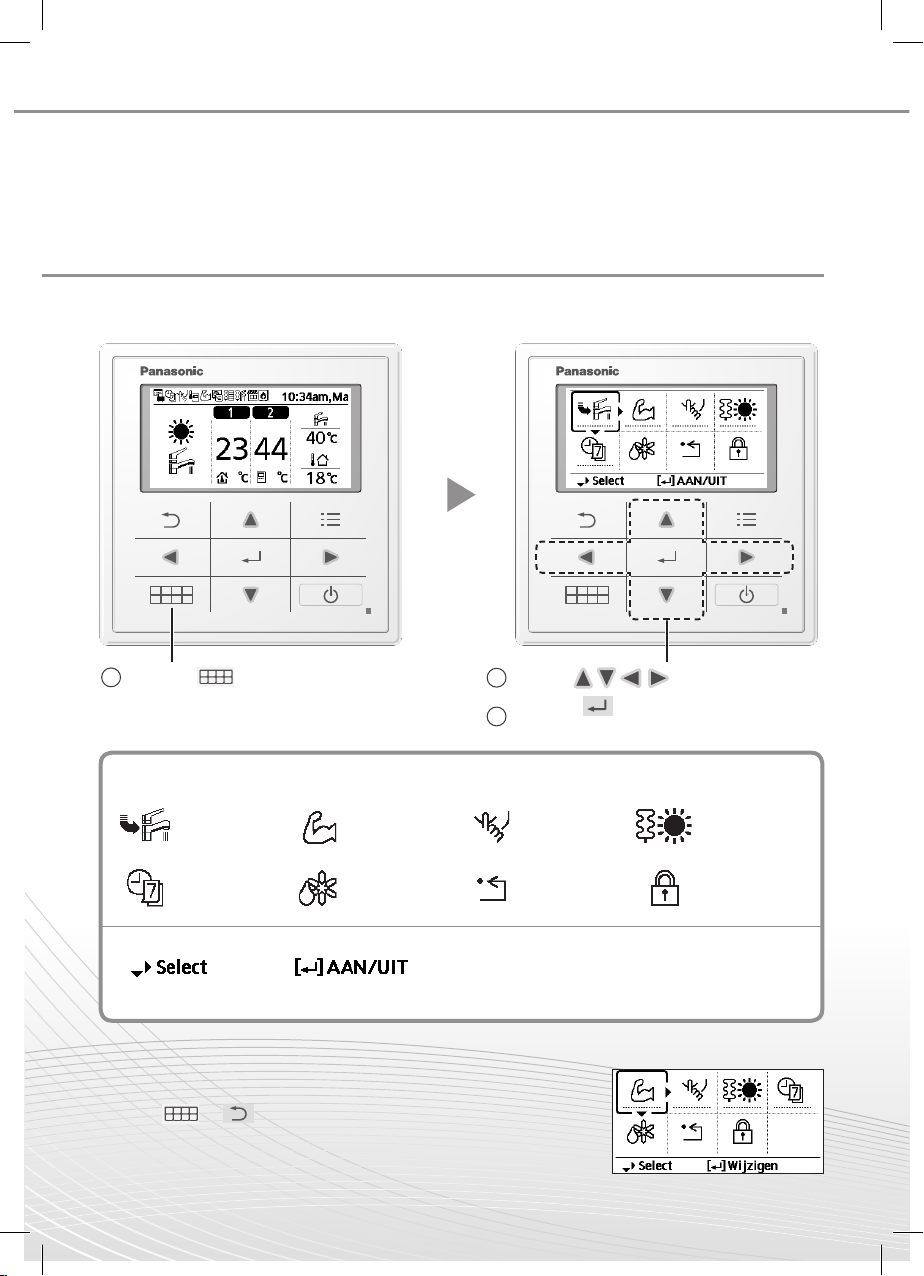
Deze beknopte handleiding legt het gebruik van het snelmenu uit.
Lees deze gebruikshandleiding zorgvuldig door voordat u het snelmenu gaat gebruiken.
Vóór ingebruikname
Hoe gebruikt u het snelmenu
Nadat de eerste instellingen afgerond zijn, kunt u een snelmenu kiezen uit de volgende
opties en de instellingen bewerken.
Selecteer elke instelling en bevestig deze in
overeenstemming met de instructies die onderin
het scherm worden weergegeven. (De icoontjes
verwijzen naar elke keuzeknop.)
Snelmenu
Om naar het hoofdscherm terug
te gaan,
druk op of .
Forceren
warmtapwater
Extra
vermogen
Stil
Forceren
verwarming
Week-timer
Forceren
ontdooien
Reset
foutmelding
Vergrendel
R/C
■Opmerking:
• Als het systeem niet op de tank
is aangesloten (aansluiting
tank is UIT), zal het snelmenu
worden weergegeven zoals
hiernaast is afgebeeld. Zorg
ervoor dat de aansluiting van
de tank AAN is.
1
Druk op
.
2
Gebruik om het menu te kiezen.
3
Druk op
om het geselecteerde
menu aan/uit te zetten.
ACXF55-14590_FC0817-0_QG.indb 20ACXF55-14590_FC0817-0_QG.indb 20 7/18/2017 4:50:23 PM7/18/2017 4:50:23 PM
21
Hoe gebruikt u het snelmenu
Selecteer dit icoontje om de warmtapwatertank in of uit te
schakelen.
Druk op , om uw keuze te bevestigen.
• Forceren warmtapwater is uitgeschakeld.
• Forceren warmtapwater is ingeschakeld.
■Opmerking:
• Forceren warmtapwater is niet beschikbaar als forceren verwarming
ingeschakeld is.
• Als forceren warmtapwater uitgeschakeld is, zullen werking en stand
teruggaan naar de vorige status in het geheugen.
Forceren
warmtapwater
Selecteer dit icoontje om de werking van het
verwarmings-/koelingssysteem krachtiger te maken.
Druk op , om uw keuze te bevestigen.
(De krachtige werking start ongeveer 1 minuut nadat is ingedrukt.)
• De stand extra vermogen is uitgeschakeld.
• De stand extra vermogen werkt ongeveer 30 minuten.
• De stand extra vermogen werkt ongeveer 60 minuten.
• De stand extra vermogen werkt ongeveer 90 minuten.
■Opmerking:
• Extra vermogen is niet beschikbaar als de werking UITgeschakeld is.
Extra
vermogen
Opmerkingen bij functie-icoontje
Voorbeeld:
• Functie-icoontje aangegeven met " " = UIT
• Functie-icoontje aangegeven met " " = AAN
Nederlands
ACXF55-14590_FC0817-0_QG.indb 21ACXF55-14590_FC0817-0_QG.indb 21 7/18/2017 4:50:24 PM7/18/2017 4:50:24 PM
22
Selecteer dit icoontje voor een stille werking.
Druk op , om uw keuze te bevestigen.
(De stille werking start ongeveer 1 minuut nadat is ingedrukt.)
• De stille stand is uitgeschakeld.
• De stille stand werkt op niveau 1.
• De stille stand werkt op niveau 2.
• De stille stand werkt op niveau 3.
Niveau 3 is de stilste stand.
• Selecteer dit om een timer voor werking van de stille
stand in te stellen.
Na 1 sec. vertraging.
Stil
Selecteer "Ja".
• Selecteer "Ja" met gebruik van de
knoppen.
Selecteer schema "1" ~ "6".
Selecteer "Bewerken".
• Als u "Verwijderen" selecteert, wordt de
timerinstelling van het gekozen schema
gewist.
Stel de uren en minuten in.
Selecteer het niveau van de stille stand.
■Opmerking:
• Als de tijd overlapt met een ander
schema wordt op het scherm "Ingestelde
tijd overlapt!" weergegeven.
Hoe gebruikt u het snelmenu
ACXF55-14590_FC0817-0_QG.indb 22ACXF55-14590_FC0817-0_QG.indb 22 7/18/2017 4:50:24 PM7/18/2017 4:50:24 PM

23
Hoe gebruikt u het snelmenu
Selecteer om de verwarming geforceerd aan te zetten.
Druk op , om uw keuze te bevestigen.
(De stand forceren verwarming start ongeveer 1 minuut nadat is
ingedrukt.)
• Forceren verwarming is uitgeschakeld.
• Forceren verwarming is ingeschakeld.
■Opmerking:
• Forceren verwarming is niet
beschikbaar als het apparaat al in
bedrijf is en "Schakel unit uit voor
installateur instellingen!" wordt dan op
het scherm weergegeven.
Forceren
verwarming
Nederlands
ACXF55-14590_FC0817-0_QG.indb 23ACXF55-14590_FC0817-0_QG.indb 23 7/18/2017 4:50:24 PM7/18/2017 4:50:24 PM

24
Selecteer dit icoontje om de ingestelde week-timer te
verwijderen of te wijzigen.
Druk op , om uw keuze te bevestigen.
• Timer staat niet AAN.
• Timer is ingesteld.
Na 1 sec. vertraging.
Week-timer
Selecteer "Ja".
• Als u "Nee" selecteert, zal het scherm terugkeren naar het
hoofdscherm.
• Timerinstelling: Selecteer instelling timer om de week-timer te bewerken.
• Timer kopie: Selecteer om een timerinstelling te kopiëren.
[Voorbeeld van een timerinstelling]
Selecteer de dag(en) die u wil bewerken met gebruik van de
knoppen.
Als niet alle 6 schema's ingesteld zijn, wordt dit scherm weergegeven.
1 2 3 4 5 6
1 Selecteer schema "1" ~ "6".
2 Stel de uren en minuten van de timer in.
3 Selecteer AAN/UIT van de timer.
4 Selecteer de gewenste stand.
/ / / / / /
• Selecteer de stand met gebruik van de
knoppen.
5
Stel de temperatuur in voor zowel zone 1 als 2
(als uw systeem de 2-zone instelling heeft).
6 Stel de temperatuur van de tank in.
■Opmerking:
• Timer is niet beschikbaar als forceren verwarming aan staat of Warmte-koude schakeling is ingeschakeld.
• Als u de week-timer in 2 zones hebt ingesteld, dan moet u dezelfde procedure voor zone 2 herhalen.
Hoe gebruikt u het snelmenu
ACXF55-14590_FC0817-0_QG.indb 24ACXF55-14590_FC0817-0_QG.indb 24 7/18/2017 4:50:24 PM7/18/2017 4:50:24 PM

25
Hoe gebruikt u het snelmenu
Selecteer om bevroren leidingen te ontdooien.
Druk op , om uw keuze te bevestigen.
(Als de stand geactiveerd is, wordt het volgende scherm weergegeven.)
Forceren
ontdooien
Selecteer om de vorige instellingen te herstellen als er een
fout is opgetreden.
Druk op , om uw keuze te bevestigen.
(Als de stand geactiveerd is, wordt het volgende scherm weergegeven.)
• Zorg dat alle units uitstaan voordat u deze
stand selecteert, waarmee het hele systeem
teruggezet wordt naar de vorige instellingen.
Reset
foutmelding
Selecteer om de afstandsbediening te vergrendelen.
Druk op , om uw keuze te bevestigen.
(Als de stand geactiveerd is, wordt het volgende scherm weergegeven.)
Selecteer "Ja".
(Het hoofdscherm wordt vergrendeld.)
• Als "Nee" wordt geselecteerd, zal het scherm
terugkeren naar het hoofdscherm.
Ontgrendeling van de afstandsbediening
Druk op een willekeurige knop.
(Als de stand geactiveerd is, wordt het volgende scherm weergegeven.)
Geef de 4 cijfers van het wachtwoord in
(als het getal juist is, wordt het scherm
ontgrendeld).
Voor het resetten van vergeten wachtwoord (ook bij scherm UIT)
Houd , en 5 seconden lang ingedrukt.
(Als de stand geactiveerd is, wordt het volgende scherm weergegeven.)
Selecteer "Reset".
(Het scherm gaat na 3 seconden uit.)
Vergrendel
R/C
Nederlands
ACXF55-14590_FC0817-0_QG.indb 25ACXF55-14590_FC0817-0_QG.indb 25 7/18/2017 4:50:24 PM7/18/2017 4:50:24 PM

26
Niniejszy skrócony przewodnik objaśnia korzystanie z menu podręcznego.
Przed użyciem menu podręcznego należy dokładnie przeczytać instrukcję obsługi.
Przed użyciem
Jak używać menu podręcznego
Po zakończeniu początkowej konfiguracji można wybrać menu podręczne spośród
poniższych opcji i dokonać edycji ustawień.
Wybierz odpowiednie ustawienia i potwierdź
je, wykonują instrukcje wyświetlone w
dolnej części ekranu. (Ikony odnoszą się do
poszczególnych klawiszy wyboru.)
Menu podręczne
Aby powrócić do
ekranu głównego,
naciśnij lub .
Wymuszenie
grzania C.W.U.
Tryb
intensywny
Praca cicha Nagrzewnica
Harm.
tygodniowy
Wymuszenie
odszraniania
Resetowanie
błędu
Blokada
sterownika
■Uwaga:
• Jeśli system nie jest podłączony
do zbiornika (połączenie
zbiornika jest wyłączone),
zostanie wyświetlony
ekran menu podręcznego,
przedstawiony z prawej strony.
Upewnij się, że połączenie
zbiornika jest włączone.
1
Naciśnij
.
2
Wybierz menu za pomocą
.
3
Naciśnij
, aby włączyć/wyłączyć
wybrane menu.
ACXF55-14590_FC0817-0_QG.indb 26ACXF55-14590_FC0817-0_QG.indb 26 7/18/2017 4:50:24 PM7/18/2017 4:50:24 PM
27
Jak używać menu podręcznego
Wybierz tę ikonę, aby włączyć lub wyłączyć grzanie c.w.u.
Naciśnij , aby potwierdzić swój wybór.
• Wymuszenie grzania c.w.u. jest wyłączone.
• Wymuszenie grzania c.w.u. jest włączone.
■Uwaga:
• Wymuszenie grzania c.w.u. jest wyłączone, gdy włączone jest
wymuszone działanie grzałki.
• Gdy wymuszenie grzania c.w.u. jest wyłączone, działanie i tryb powinny
powrócić do poprzednio zapamiętanego stanu.
Wymuszenie
C.W.U.
Wybierz tę ikonę, aby włączyć intensywny tryb działania
systemu grzania/chłodzenia.
Naciśnij , aby potwierdzić swój wybór.
(Intensywne działanie rozpocznie się ok. 1 minutę po naciśnięciu .)
• Tryb intensywny jest wyłączony.
• Tryb intensywny działa przez 30 minut.
• Tryb intensywny działa przez 60 minut.
• Tryb intensywny działa przez 90 minut.
■Uwaga:
• Tryb intensywny jest wyłączony, gdy wyłączone jest działanie.
Tryb
intensywny
Uwagi na temat ikony działania
Przykład:
• Ikona działania ze wskazaniem „ ” = WYŁ.
• Ikona działania ze wskazaniem „ ” = WŁ.
Polski
ACXF55-14590_FC0817-0_QG.indb 27ACXF55-14590_FC0817-0_QG.indb 27 7/18/2017 4:50:24 PM7/18/2017 4:50:24 PM
28
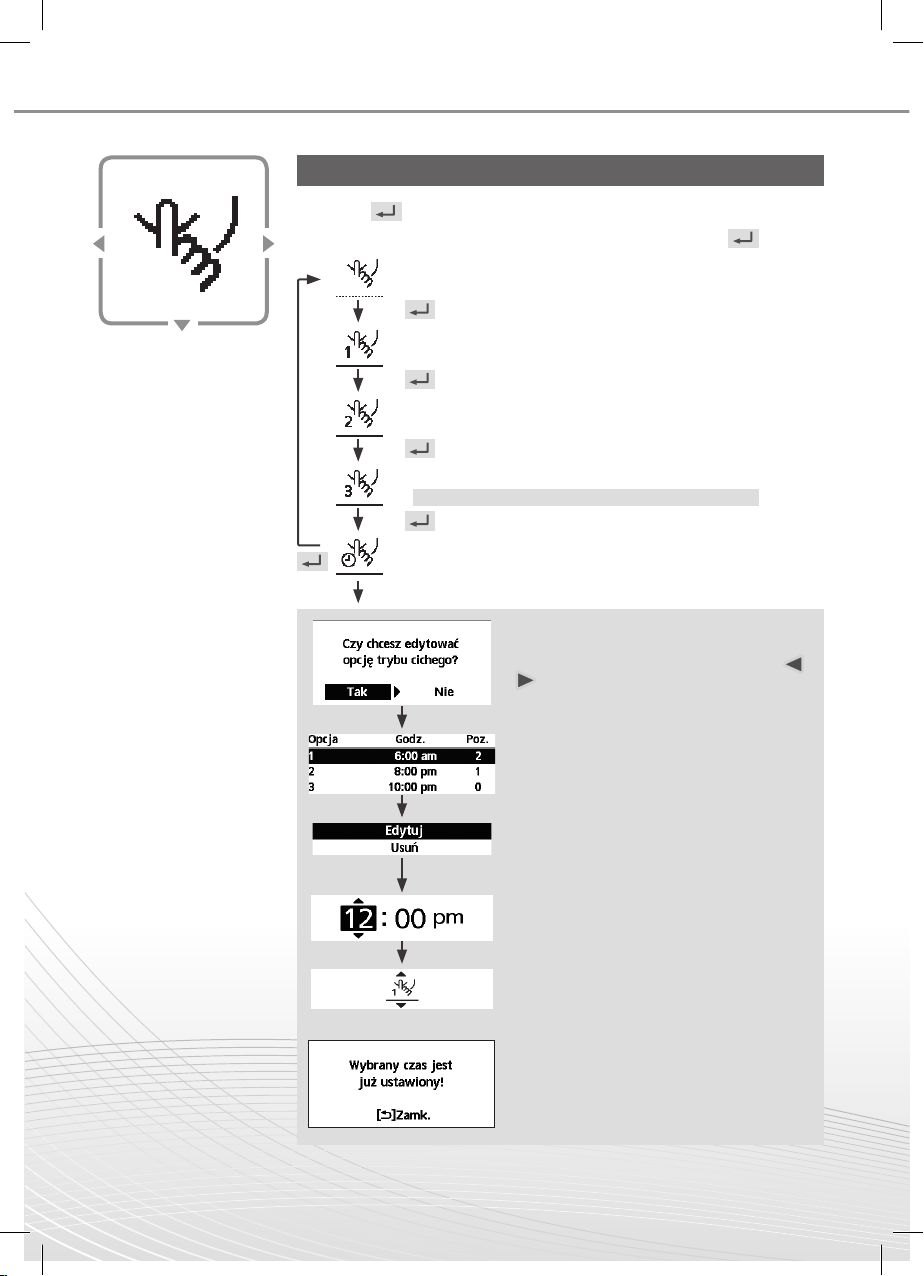
Wybierz tę ikonę, aby włączyć tryb cichy.
Naciśnij , aby potwierdzić swój wybór.
(Chiche działanie rozpocznie się ok. 1 minutę po naciśnięciu .)
• Tryb cichy jest wyłączony.
• Tryb cichy działa na poziomie 1.
• Tryb cichy działa na poziomie 2.
• Tryb cichy działa na poziomie 3.
Najcichszym poziomem trybu cichego jest poziom 3.
• Wybierz tę pozycję, aby ustawić harmonogram działania
trybu cichego.
Po 1 s opóźnienia.
Praca cicha
Wybierz „Tak”.
• Wybierz „Tak” za pomocą przycisków
.
Wybierz opcję „1” – „6”.
Wybierz „Edytuj”.
• Jeśli wybierzesz „Usuń”, ustawienie
harmonogramu wybranej opcji zostanie
usunięte.
Ustaw godzinę i minuty.
Wybierz poziom trybu cichego.
■Uwaga:
• Jeśli czas nakłada się na inną opcję, na
ekranie wyświetlony zostanie komunikat
„Wybrany czas jest już ustawiony!”.
Jak używać menu podręcznego
ACXF55-14590_FC0817-0_QG.indb 28ACXF55-14590_FC0817-0_QG.indb 28 7/18/2017 4:50:24 PM7/18/2017 4:50:24 PM
29
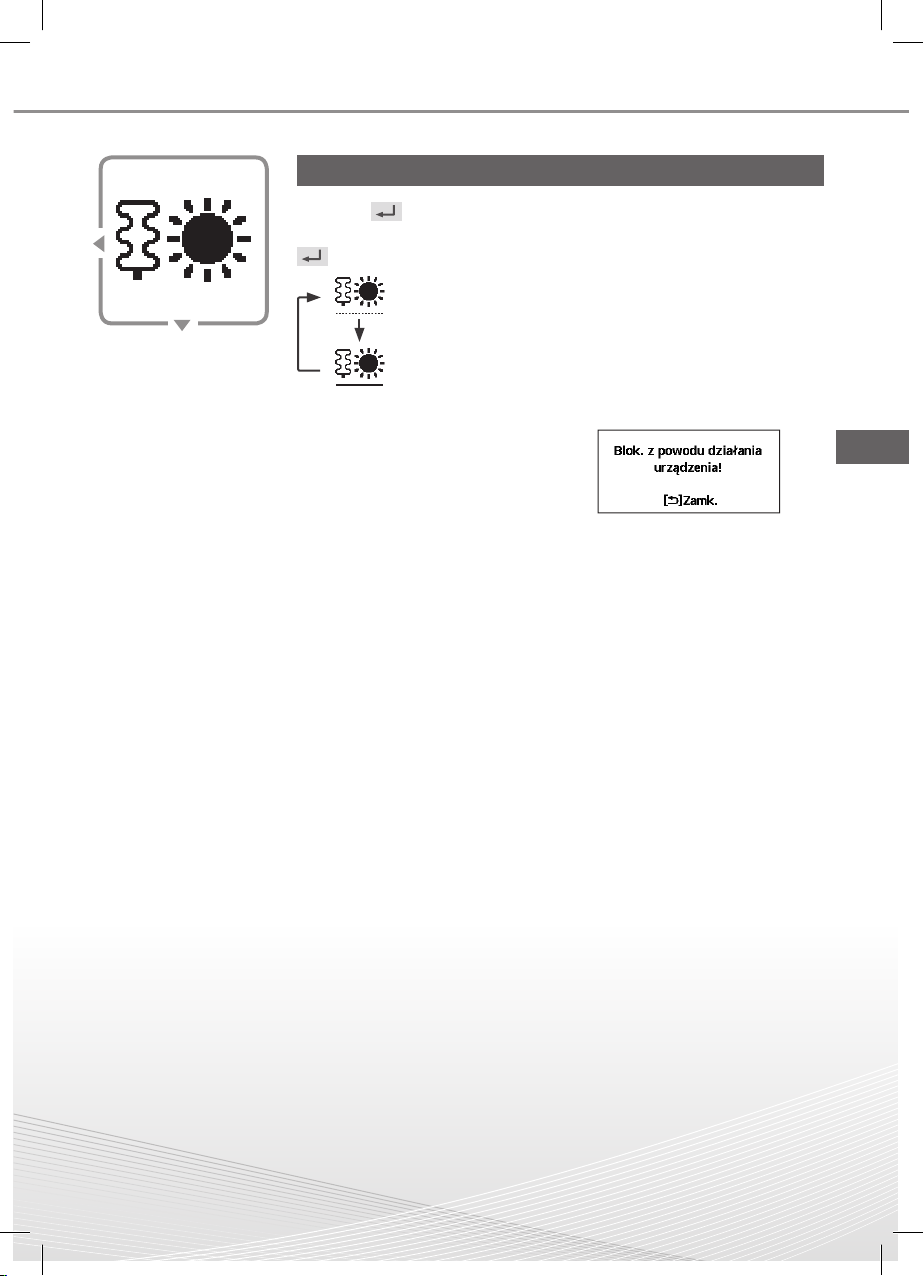
Jak używać menu podręcznego
Wybierz, aby wymusić włączenie grzałki.
Naciśnij , aby potwierdzić swój wybór.
(Tryb wymuszenia grzałki rozpocznie się ok. 1 minutę po naciśnięciu
.
• Wymuszenie grzałki jest wyłączone.
• Wymuszenie grzałki jest włączone.
■Uwaga:
• Wymuszenie grzałki jest wyłączony,
gdy jej działanie jest już włączone.
Wyświetla się wtedy napis „Blok. z
powodu działania urządzenia!”
Nagrzewnica
Polski
ACXF55-14590_FC0817-0_QG.indb 29ACXF55-14590_FC0817-0_QG.indb 29 7/18/2017 4:50:24 PM7/18/2017 4:50:24 PM

30
Wybierz tę ikonę, aby usunąć (anulować) bądź zmienić
ustawienie harmonogramu tygodniowego.
Naciśnij , aby potwierdzić swój wybór.
• Harmonogram nie jest włączony.
• Harmonogram jest ustawiony.
Po 1 s opóźnienia.
Harm.
tygodniowy
Wybierz „Tak”.
• Jeśli wybierzesz „Nie”, powrócisz do ekranu głównego.
• Ustawienia harmonogramu: Wybierz Ustawienie harmonogramu, aby
dokonać edycji harmonogramu tygodniowego.
• Kopiuj harmonogram: Wybierz, aby skopiować ustawienie
harmonogramu.
[Przykładowe ustawienie harmonogramu]
Za pomocą przycisków wybierz dzień (dni), które chcesz edytować.
Ten ekran zostanie wyświetlony, jeśli nie ustawiono wszystkich 6 opcji.
1 2 3 4 5 6
1 Wybierz opcję „1” – „6”.
2 Ustaw godzinę i minuty w harmonogramie.
3 Wybierz wł. / wył. w harmonogramie.
4 Wybierz tryb działania.
/ / / / / /
• Wybierz tryb za pomocą przycisków .
5
Ustaw temperaturę dla strefy 1 i 2 (jeśli
system jest ustawiony jako 2-strefowy).
6
Ustaw temperaturę zbiornika.
■Uwaga:
• Harmonogram jest wyłączony, gdy włączone jest wymuszenie grzałki lub przeł. grzanie / chłodzenie.
• W przypadku ustawiania harmonogramu tygodniowej w 2 strefach należy wykonać takie czynności
dla 2. strefy.
Jak używać menu podręcznego
ACXF55-14590_FC0817-0_QG.indb 30ACXF55-14590_FC0817-0_QG.indb 30 7/18/2017 4:50:25 PM7/18/2017 4:50:25 PM
 Loading...