


Operating Instructions
Air-to-Water Heatpump
Model No. |
|
Indoor Unit |
Outdoor Unit |
WH-SDH09C0E8 WH-UD09CN8 |
|
WH-SDH12C0E8 |
WH-UD12CN8 |
ENGLISH |
2 |
~ 9 |
Before operating the unit, read these operating instructions thoroughly and keep them for future reference. |
|
|
Before operating the unit, make sure the installation has been carried out correctly by authorized dealer correctly and |
|
|
precisely following the installation instructions given. |
|
|
SVENSKA |
10 |
~ 17 |
Innan du använder enheten, läs noga igenom denna bruksanvisning och spara den för framtida bruk. |
|
|
Innan du använder enheten, se till att installationen har utförts noggrant och korrekt av auktoriserad återförsäljare som |
|
|
följt de givna installationsinstruktionerna. |
|
|
NORSK |
18 |
~ 25 |
Les bruksanvisningen nøye før du bruker denne enheten, og oppbevar den for fremtidig bruk. |
|
|
Før du bruker enheten, må du forsikre deg om at autorisert forhandler har utført korrekt og presis installasjon og har |
|
|
fulgt installasjonsinstruksjonene som er gitt. |
|
|
SUOMI |
26 |
~ 33 |
Lue nämä käyttöohjeet huolellisesti ennen yksikön käyttämistä ja säilytä ne tulevaisuutta varten. |
|
|
Varmista ennen laitteen käyttöä, että asennuksen on suorittanut valtuutettu jälleenmyyjä ja että se on tehty oikein ja |
|
|
tarkasti annettuja asennusohjeita noudattaen. |
|
|
DANSK
Læs brugsanvisningen grundigt igennem før du benytter anlægget og gem den til fremtidig brug.
Sørg for, at anlægget er installeret korrekt af en autoriseret forhandler i overensstemmelse med de følgende instruktioner, før anlægget tages i brug.
© Panasonic HA Air-Conditioning (M) Sdn. Bhd. 2010. Unauthorized copying and distribution is a violation of law.
34 ~ 41
F567545

Thank you for purchasing
Panasonic Product
TABLE OF CONTENTS
SAFETY PRECAUTIONS
2~3
CONTROL PANEL
4~6
INDOOR UNIT
7
TROUBLESHOOTING
8
INFORMATION
9
NOTE
The illustrations in this manual are for explanation purposes only and may differ from the actual unit. It is subjected to change without notice for future improvement.
OPERATION CONDITION
Water outlet |
Indoor |
||
Temperature (°C) |
|||
|
|||
HEATING |
Max. |
55 |
|
Min. |
25 |
||
|
|||
|
|
||
Ambient |
Outdoor |
||
Temperature (°C) |
|||
|
|||
HEATING |
Max. |
35 |
|
Min. |
-20 |
||
|
|||
NOTICE : When the outdoor temperature is out of the above temperature range, the heating capacity will drop significantly and outdoor unit might stop for protection control.
2
SAFETY PRECAUTIONS
•Panasonic Air-to-Water Heatpump is a split system consisting
only of an indoor unit and an outdoor unit. This system designed for combination with Panasonic Tank Unit. In case of non-Panasonic Tank Unit is being used with Panasonic Air-to-Water Heatpump System, Panasonic cannot guarantee neither good operation nor reliability of the system.
•This manual describes how to operate the Heatpump system between indoor and outdoor units only.
•Other operation such as water tank, radiator and underfloor system, please refer to respective manufacturer operation manuals.
To prevent personal injury, injury to others, or property damage, please comply with the following.
Incorrect operation due to failure to follow instructions below may cause harm or damage, the seriousness of which is classified as below:
 WARNING This sign warns of death or serious injury.
This sign warns of injury or damage to CAUTION property.
The instructions to be followed are classified by the following symbols:
This symbol denotes an action that is
PROHIBITED.
These symbols denote an actions that is COMPULSORY.
 WARNING
INDOOR UNIT AND OUTDOOR UNIT
This appliance is not intended for use by persons (including children) with reduced physical, sensory or mental capabilities, or lack of experience and knowledge, unless they have been given supervision or instruction concerning use of the appliance by a person responsible for their safety. Children should be supervised to ensure that they do not play with the appliance.
Please consult authorized dealer or specialist to repair, install, remove and reinstall the unit. Improper installation and handling will cause leakage, electric shock or fire.
Do not install the unit in a potentially explosive or flammable atmosphere. Failure to do so could result in fire.
Do not insert your fingers or other objects into the indoor or outdoor unit, rotating parts may cause injury.
Do not touch the outdoor unit during lightning, it may cause electric shock.
Do not attempt to repair the unit by yourself. Otherwise, it may cause injury if it is mishandling.
Do not install the indoor unit at outdoor. This is designed for indoor installation only.

WARNING
POWER SUPPLY
Do not use modified cord, joint cord, extension cord or unspecified cord to prevent overheating and fire.
Do not share the same power outlet with other equipment to prevent overheating and fire.
Do not operate with wet hands to prevent electric shock.
If the supply cord is damage, it must be replaced by the manufacturer, its service agent or similarly qualified persons in order to avoid a hazard.
This unit is equipped with Residue Current Circuit Breaker (RCCB). It is strongly recommended to check the operation of the RCCB after installation and periodically after servicing or maintenance by authorized dealer to ensure it is in good working order. Otherwise, it may cause electrical shock or fire in case of malfunction.
It is strongly recommended to install Residual Current Device (RCD) on-site to prevent electric shock or fire.
It is recommended to wear gloves during servicing or maintenance in order to avoid hazard.
This equipment must be earthed to prevent electrical shock or fire.
Prevent electric shock by switching off the power supply when:
- Before cleaning or servicing.
-Extended non-use.
-Abnormally strong lightning activity.
This appliance is for multiple uses. All power supply circuits must be turn off before access to any of the terminals in the indoor unit, to avoid electrical shock, burn or fatal injury.
|
Stop using the product when any abnormality/ |
|
|
failure occurs and disconnect the power plug |
|
|
or turn off the power switch and breaker. |
|
|
(Risk of smoke/fire/electric shock) |
|
Examples of |
• The RCCB switches off by itself. |
|
• Burning smell, abnormal noise or vibration |
||
abnormality/ |
sound is observed when the unit is in use. |
|
failure |
||
• Hot water keeps on coming off the unit. |
||
|
||
|
|
|
|
Contact immediately your local dealer for |
|
|
maintenance/repair. |
|
|
|
 CAUTION
INDOOR UNIT AND OUTDOOR UNIT
Do not wash the indoor unit with water, benzene, thinner or scouring powder.
Do not install the unit close to any combustible equipment or at bathroom. Otherwise, it may cause electric shock or fire.
Do not touch the water discharge pipe at the indoor unit during operation.
Do not place anything on top or beneath of the unit.
Do not sit or step on the unit, you may fall down accidentally.
Do not touch the sharp aluminium fin, sharp parts may cause injury.
Ensure drainage pipe is connected properly.
Otherwise, leakage may occur.
Check the installation rack periodically to make sure that it is not damaged. After long periods of use, the strength of the installation rack may have deteriorated.
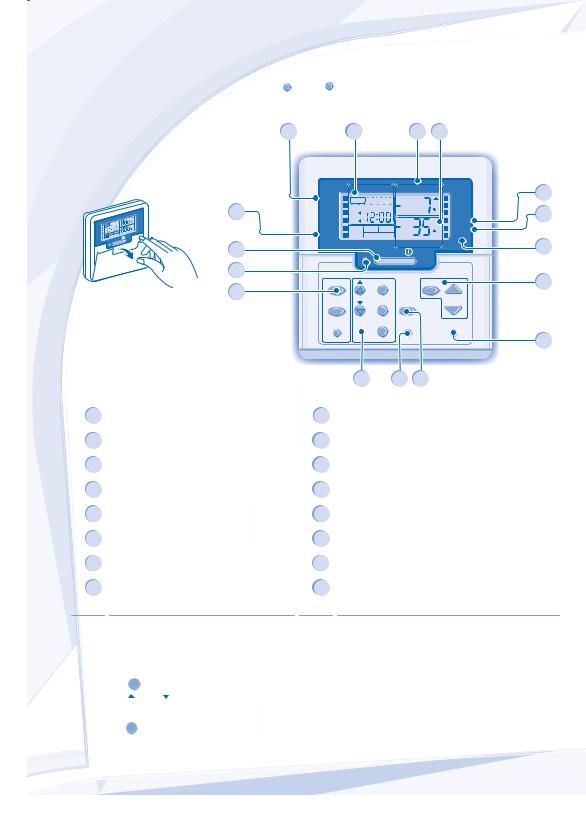
CONTROL PANEL
Do not let the control panel get wet. Otherwise, it may cause electric shock or fire.
Do not press the buttons on the control panel with hard, pointed objects. Otherwise, it may damage the unit.
Do not wash the control panel with water, benzene, thinner or scouring powder.
Do not inspect or service the control panel by yourself. Please consult authorized dealer. Otherwise, it may cause injury if mishandling.
Shower |
Panel |
Indoor Unit |
|
Power Supply |
|
Outdoor Unit |
|
Floor Heating
Control Panel
Water Tank Unit
ENGLISH
3

CONTROL PANEL
•Some functions described in this manual may not be applicable to your unit.
•Consult your nearest authorized dealer for further information.
ERROR
• For normal operation, the RESET and PUMPDW buttons are not in use.
|
|
|
|
|
|
|
15 |
14 |
13 |
12 |
|
||
Open the cover to |
|
|
|
|
|
|
|
||||||
use the buttons |
HEAT |
TIMER |
OUTDOOR |
|
11 |
||||||||
|
|
|
|
|
|
|
TIMER 1 2 3 4 5 6 |
|
|
|
|
||
|
|
|
|
|
|
|
16 |
MONTUEWEDTHUFRI SAT SUN |
|
|
C |
|
10 |
|
|
|
|
|
|
ACTUAL |
ON |
|
|
|
|||
|
|
TIMER 6 |
OUTDOORC |
BOOSTER |
OFF |
|
|
|
SETTING |
||||
|
ON |
|
1 2 3 4 5SUN |
C |
SETTING |
|
|
|
|
|
|||
|
|
|
FRI SAT |
STATUSW |
|
|
|
|
|
STATUS |
|
||
|
TIMER |
|
|
|
|
|
|
|
|
|
|||
HEAT |
MONTUEWEDTHU |
|
|
PUMPD |
QUIET |
|
|
|
C |
PUMPDW |
|
||
QUI ET |
|
|
NOTAVAILABL |
WATER |
|
|
|
|
|
||||
TANK |
OFF |
|
SOLAR |
REMOTE |
OUTLET |
|
|
|
|
|
|
|
|
ET |
|
|
E |
|
|
|
|
|
|
|
|
||
QUI |
|
|
|
OFF/ON |
|
|
|
WATER OUTLET |
|
9 |
|||
OPERATION |
|
|
|
|
|
|
1 |
|
|
||||
|
|
|
|
|
|
|
OFF/ON |
|
|
|
|||
|
|
|
|
|
|
|
2 |
SETTING |
|
|
STATUS |
8 |
|
|
|
|
|
|
|
|
TIMER |
SET |
|
CHECK |
|
||
|
|
|
|
|
|
|
3 |
SELECT |
QUIET |
|
|
SEARCH |
|
|
|
|
|
|
|
|
OFF/ON |
|
|
|
|||
|
|
|
|
|
|
|
|
|
|
|
|||
|
|
|
|
|
|
|
|
CANCEL |
ERROR |
|
|
|
|
|
|
|
|
|
|
|
CLOCK |
RESET |
|
|
PUMPDW |
|
|
|
|
|
|
|
|
|
|
|
|
|
|
|
7 |
|
|
|
|
|
|
|
|
4 |
5 |
6 |
|
|
|
1 |
OFF/ON Button |
9 |
System Pumpdown Mode OFF/ON Indicator |
2 |
Operation LED |
10 |
System Status Check Mode OFF/ON Indicator |
3 |
Timer Setting Group Buttons |
11 |
System Setting Mode OFF/ON Indicator |
4 |
System Setting Mode Buttons |
12 |
Water Outlet Temperature Display |
5 |
Error Reset Button |
13 |
Outdoor Ambient Temperature Display |
6 |
Quiet Operation Button |
14 |
Timer/Clock Setting Display |
7 |
System Pumpdown Mode Button |
15 |
Heat Mode OFF/ON Indicator |
8 |
System Status Check Mode Buttons |
16 |
Quiet Operation OFF/ON Indicator |
CONTROL PANEL PREPARATION
Setting Current Day and Time
CLOCK
1.Press  .
.
2.Press or
or to set current day.
SET
3.Press  to confirm.
4.Repeat steps 2 and 3 to set the current time.
Notes:
•The current day and time need to be set when:
-The power is turned on for the first time.
-After a long time has elapsed since the power was last turned on.
•The current time that has been set will be the standard time for all the Timer operations.
4
BASIC OPERATION
OFF / ON |
TO TURN ON OR OFF THE UNIT |
|
•When unit is ON, operation LED is lit and the actual temperature for water outlet and outdoor ambient are shown on the control panel display.
•The outdoor unit will provide heating capacity to the indoor unit.
QUIET |
TO ENJOY QUIET ENVIRONMENT |
|
• This operation reduces outdoor unit noise. In this condition, it may cause decrease in heating capacity.
STATUS
CHECK
SEARCH SYSTEM STATUS CHECK MODE
1.Press CHECK for 5 seconds to enter STATUS mode.
2.Press  or
or  to check the Water Inlet Temperature, Compressor Running Frequency or Error History.
•Press CANCEL to exit STATUS mode.
•Once STATUS mode is entered, “STATUS” indicator is ON.
•STATUS mode cannot be activated when the “SETTING” indicator is ON.
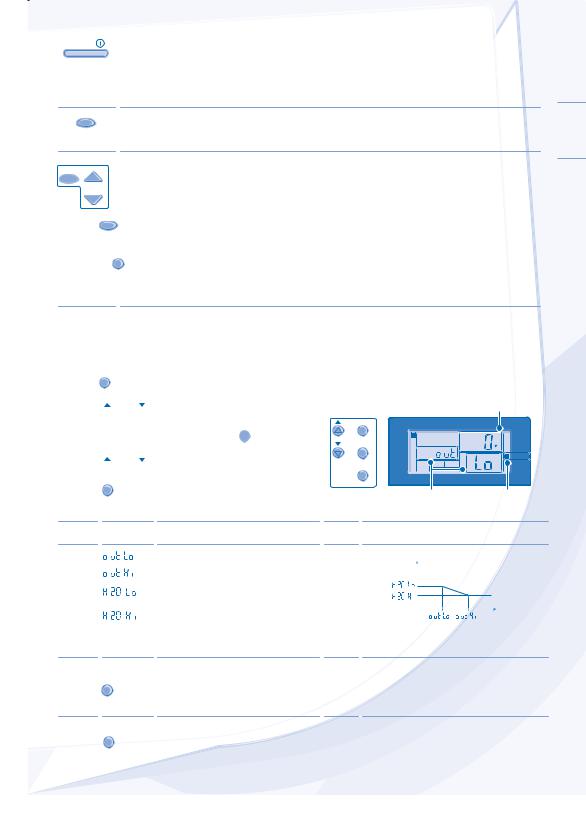
ADVANCE OPERATION
•It is strongly recommended to contact the nearest authorized dealer to change the water temperature range.
•Using the control panel could set the temperature range for water outlet temperature and outdoor ambient temperature.
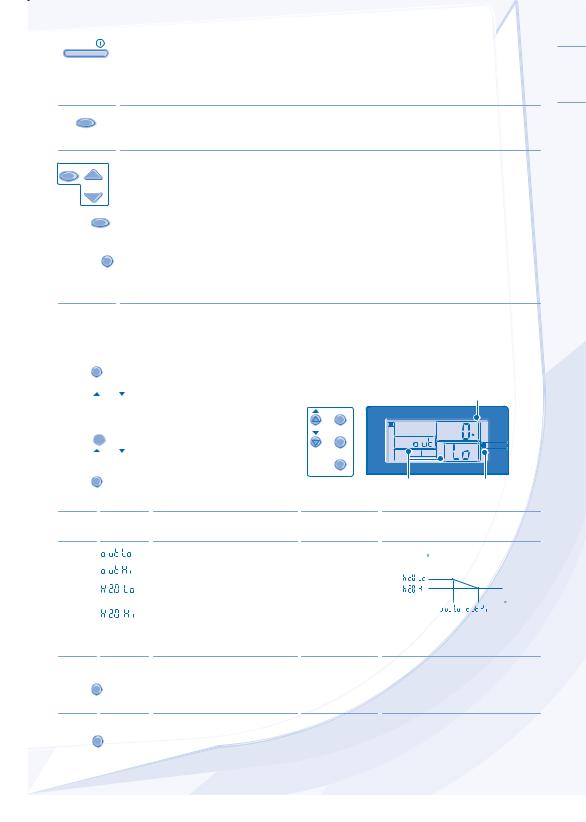
1.Press SET for 5 seconds to enter “SETTING” mode. “SETTING” indicator is ON.
2.Press or
or to choose a parameter.
3.After selecting the desired parameter,
SELECT
press  to enter the parameter.
4.Press or
or to set the desired temperature.
5.Press SET again to confirm the setting.
• Repeat steps 2 to 5 to set other parameters.
SYSTEM SETTING MODE |
|
|
|
SETTING |
|
Temperature display |
|
|
|
|
|
SET |
TIMER |
OUTDOOR |
ACTUAL |
|
|||
|
HEAT |
|
|
SELECT |
ON |
C |
BOOSTER |
|
SETTING |
||
|
|
|
|
CANCEL |
QUIET |
|
STATUS |
|
PUMPDW |
||
|
|
||
|
OPERATION |
WATER OUTLET |
|
Parameter * SETTING indicator
Operation |
Parameter * |
Description |
|
|
|
Mode |
|
|
|
|
|
HEAT |
|
Low outdoor ambient set temperature (-15°C ~ 15°C). |
Water |
|
|
HEAT |
|
High outdoor ambient set temperature (-15°C ~ 15°C). |
Temperature |
|
|
|
|
|
|
||
HEAT |
|
Water outlet set temperature at low outdoor ambient |
|
|
|
|
temperature (25°C ~ 55°C). |
|
|
|
|
|
|
|
|
|
|
HEAT |
|
Water outlet set temperature at high outdoor ambient |
|
Outdoor |
|
|
temperature (25°C ~ 55°C). |
|
Temperature |
||
|
|
|
|||
HEAT |
OFF |
Heating OFF selection (YES/NO) |
|
|
|
Set temperature for turning OFF heating operation (-20°C ~ -5°C). |
|||||
WATER TEMPERATURE THERMO SHIFT SETTING
1. Press SET within 5 seconds.
• Repeat steps 3 to 5 to set the desired shift temperature (-5°C ~ 5°C).
Notes:
•Press CANCEL or wait 30 seconds to exit “SETTING” mode.
•The setting temperature will be stored in the system once confirm.
•“SETTING” mode cannot be activated when the “PUMPDW” and “STATUS” indicator is ON.
ENGLISH
5

WEEKLY TIMER SETTING
Timer Display |
|
|
Lights up if Timer |
|
6 different programs can be set in a day (1 ~ 6) |
operation is selected |
|
|
|
TIMER 1 2 3 4 5 6 |
Indicates the selected day |
|
SETTING |
|
MONTUEWEDTHUFRI SAT SUN |
TIMER |
SET |
|
|
Indicates the next timer operation day |
|
|
|
|
ON |
Time to be selected (10 minutes step) |
OFF/ON |
SELECT |
|
OFF |
|
|
|
|
|
|
CANCEL |
|
|
|
OFF Timer |
CLOCK |
|
|
|
|
||
ON Timer |
|
|
||
To automatically switch “OFF” the unit |
|
|
||
To automatically switch “ON” the unit |
|
|
||
Day to be selected |
|
|
|
|
Function |
Step |
|
|
|
Enter timer mode
Set day & time
Add/Modify timer
Disable timer
Enable timer
TIMER
Press  .
.
1. Press or
or to select your desired day.
SELECT
2. Press  to confirm
3. “1” will be blinking, press |
SELECT |
to set program 1. |
OFF/ON
4.Press  to select ON or OFF timer.
5.Press or
or to select your desired time.
6.Press SET to confirm program 1. The selected day will be highlighted with ▼.
•After 2 seconds, the display will move to the next program.
7.Repeat steps 4 to 7 to set programs 2 to 6.
•During timer setup, if no button is pressed within 30 seconds, or if the SET button is pressed the setting at that moment is confirmed and timer setup is ended.
Repeat the steps above.
Press |
TIMER |
CANCEL |
, then press |
. |
Press TIMER , then press SET .
Check timer |
1. Press |
TIMER |
. |
SELECT
2.Press  or
or  until your desired day is shown, press
  to confirm your selection.
3.Press or
or to check the set programs.
Cancel timer |
1. Press |
TIMER |
. |
2. Press  or
or  until your desired day is shown.
SELECT
3.Press  to enter program setting.
4.Press  or
or  until your desired program is shown.
5. Press |
CANCEL |
to cancel the program. |
Notes:
•You can set the Timer for each day of the week (Monday to Sunday) with 6 programs per day.
•When the unit is switched on by the ON TIMER, it will use the previously set temperature to control the water outlet temperature.
•Same timer program cannot be set in the same day.
•You may also select collective days with same timer setting.
6 |
• Promotes energy saving by allowing you to set up to 6 programs in any given day. |
INDOOR UNIT
• Switch off the power supply before cleaning.
CAUTION
CLEANING INSTRUCTIONS |
|
HINT |
• Do not use benzene, thinner or scouring powder. |
|
• To ensure optimal performance of the unit, cleaning |
• Use only soap ( pH7) or neutral household detergent. |
|
maintenance has to be carried out at regular intervals. |
• Do not use water hotter than 40°C. |
|
Please consult authorized dealer. |
WATER PRESSURE GAUGE |
||
|
|
• Do not press or hit the glass |
|
|
cover with hard, pointed |
|
0.2 |
objects. This may damage the |
0.1 |
0.3 |
unit. |
|
||
0 |
0.4 |
• Ensure that the water |
|
MPa |
pressure is between 0.05 to |
|
|
0.2 MPa (0.1 MPa = 1 bar). |
|
|
• In case the water pressure is |
|
|
out of the above range, please |
|
|
consult authorized dealer. |
ENGLISH
INDOOR UNIT & CONTROL PANEL
•Do not splash water directly.
•Wipe the unit gently with a soft, dry cloth.
EXTERNAL FILTER
•Please clean the external filter at least once a year. Fail to do so might cause filter clogged, consequent system breakdown. Please consult authorized dealer.
OUTDOOR UNIT
•Do not obstruct the air inlet and air outlet vents, it may cause low performance or breakdown. Please remove obstacles to assure the ventilation.
•During winter, please clean and remove the snow near outdoor unit so that the snow does no cover the air inlet and air outlet vents.
INSPECTION
•In order to ensure optimal performance of the unit, seasonal inspections on the unit, external filter and field wiring have to be carried out at regular intervals. This maintenance should be carried out by authorized dealer.
•Clear any obstruction at the air inlet and air outlet vents of outdoor unit.
FOR EXTENDED NON-USE
• Turn off the power supply.
NON SERVICEABLE CRITERIAS
TURN OFF POWER SUPPLY then please consult authorized dealer under the following conditions:
•Abnormal noise during operation.
•Water/foreign particles have entered the control panel.
•Water leaks from Indoor unit.
•Circuit breaker switches off frequently.
• Power cord becomes unnaturally warm. |
7 |
|

TROUBLESHOOTING
The following symptoms do not indicate malfunction. |
|
SYMPTOM |
CAUSE |
Water flowing sound during operation.
Operation is delayed a few minutes after restart.
Outdoor unit emits water/steam.
Outdoor unit emits steam during heating mode.
Outdoor unit does not operate.
Air-to-Water Heatpump system operation will turn off.
System difficult to heat-up.
System cannot get warm instantly.
Operation starts after power resumes.
►
►
►
►
►
►
►
►
►
•Refrigerant flow inside the unit.
•The delay is a protection to the unit’s compressor.
•Condensation or evaporation occurs on pipes.
•This is due to defrost operation happens at the heat exchanger.
•When the outdoor temperature is out of the operation condition range, the heatpump system enter protection control.
•If indoor unit water inlet temperature is lower than 20°C. Please set the heater of tank more than 20°C.
•When heating is operated by indoor unit together with floor heating or panel heater simultaneously, there may be case where warm water temperature is getting
lower and cause floor heating or panel heater heat-up is weaken.
•When outdoor air temperature is low, it may be difficult to get warm.
•Is the snow pile blocking the discharge outlet or intake inlet of outdoor unit.
•When water outlet set temperature is low, it may be difficult to get warm.
•Due to the nature of the heatpump system, it may take some time to heat-up the water if the unit is operated from cold-start.
•Auto restart is in function and operates under.
Check the following before calling for servicing. |
|
SYMPTOM |
CHECK |
Heating operation is not working efficiently.
Noisy during operation.
The unit does not work.
Operation LED is no lit or control panel display is blank.
►
►
►
►
•Set the temperature correctly.
•Is the panel heater valve closed.
•Clear any obstruction at the air inlet and air outlet vents of outdoor unit.
•Check if the unit has been installed at an incline or the cover is not closed properly.
•Check if the circuit breaker is tripped.
•Is the power supply off or power failure.
The operation LED blinks and error code appear on control panel display.
TIMER |
TIMER 1 2 3 4 5 6 |
MONTUEWEDTHUFRI SAT SUN |
ON |
OFF |
•Turn the unit off and reveal the error code to authorized dealer.
•Timer operation cancel when error code occur.
8
INFORMATION
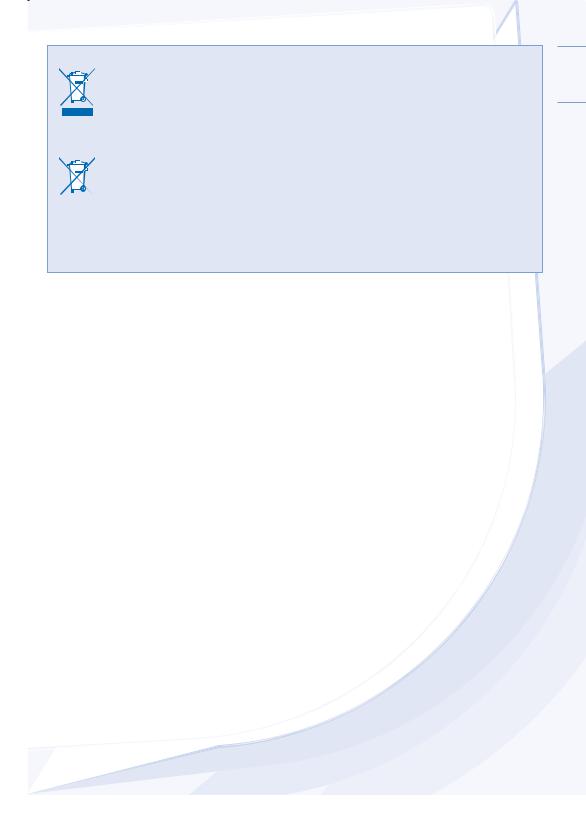
Information for Users on Collection and Disposal of Old Equipment
These symbols on the products, packaging, and/or accompanying documents mean that used electrical and
electronic products should not be mixed with general household waste.
For proper treatment, recovery and recycling of old products, please take them to applicable collection points, in accordance with your national legislation and the Directives 2002/96/EC and 2006/66/EC.
By disposing of these products correctly, you will help to save valuable resources and prevent any potential negative effects on human health and the environment which could otherwise arise from inappropriate waste handling.
For more information about collection and recycling of old products, please contact your local municipality, your waste disposal service or the point of sale where you purchased the items.
Penalties may be applicable for incorrect disposal of this waste, in accordance with national legislation.
For business users in the European Union
If you wish to discard electrical and electronic equipment, please contact your dealer or supplier for further information.
[Information on Disposal in other Countries outside the European Union]
These symbols are only valid in the European Union. If you wish to discard these items, please contact your local authorities or dealer and ask for the correct method of disposal.
ENGLISH
9
Tack för ditt inköp av
Panasonic -produkt
INNEHÅLLSFÖRTECKNING
SÄKERHETSFÖRESKRIFTER
10~11
KONTROLLPANEL
12~14
INOMHUSDEL
15
PROBLEMLÖSNING
16
INFORMATION
17
OBS
Bilderna i denna skötselanvisning är endast illustrativa och kan därför skilja sig från den faktiska modellen. Förändringar kan göras utan föregående meddelande angående framtida förbättringar.
TILLÅTNA
DRIFTSFÖRHÅLLANDEN
Vattenutloppstemperatur |
Inomhus |
||
|
(°C) |
||
|
|
||
VÄRME |
|
Max. |
55 |
|
Min. |
25 |
|
|
|
||
|
|
||
Omgivningstemperatur |
Utomhus |
||
|
(°C) |
||
|
|
||
VÄRME |
|
Max. |
35 |
|
Min. |
-20 |
|
|
|
||
MÄRK : Då utomhustemperaturen är utanför temperaturområdet ovan, sjunker uppvärmningskapaciteten avsevärt och utomhusenheten kan stoppa för skyddskontroll.
10
SÄKERHETSFÖRESKRIFTER
•Panasonics Luft-till-Vatten-Värmepump är ett split-system
som består av endast en inomhusenhet och en utomhusenhet. Det här systemet är tillverkat för att användas med Panasonics ackumulatortank. Om du använder Panasonics Luft-till-Vatten- Värmepump med en ackumulatortank från en annan tillverkare än Panasonic, kan Panasonic varken garantera god prestanda eller tillförlitlig drift.
•I denna manual beskrivs hur du använder värmepumpsystemet mellan inomhusoch utomhusenheterna enbart.
•För annan användning av t.ex. vattentank, värmeelement och golvvärmesystem, se bruksanvisningen från respektive tillverkare.
För att undvika skada på dig själv, skada på andra, eller skada på egendom, var god iaktta följande.
Felaktig användning orsakad av att skötselanvisningen inte följts kan leda till skador, nedan klassas deras allvar:
VARNING |
Denna symbol varnar för dödsfara eller |
|
allvarliga skador. |
||
|
Denna symbol varnar för personskada eller FÖRSIKTIGHET skada på egendom.
Instruktioner klassificeras med följande symboler:
Denna symbol betecknar en handling som är FÖRBJUDEN.
Denna symbol betecknar ett handhavande som MÅSTE UTFÖRAS.
 VARNING
INOMHUSOCH UTOMHUSENHET
Denna apparat är inte avsedd att användas av personer (inklusive barn) med reducerad fysiska, sensoriska eller mentala färdigheter, eller brist på erfarenhet och kunskap, ifall de inte övervakats eller instruerats om användandet av apparaten av en person som ansvarar för deras säkerhet. Barn bör övervakas för att se till att de inte leker med apparaten.
Var god rådfråga auktoriserad återförsäljare eller specialist för att reparera, installera, avlägsna och återinstallera enheten. Felaktig installation och hantering orsakar läckage, elstöt eller eldsvåda.
Installera inte enheten i en potentiellt explosiv eller lättantändlig miljö. Underlåtenhet i detta kan resultera i skada till följd av eldsvåda.
För inte in dina fingrar eller andra föremål i inomhuseller utomhusenheten, eftersom roterande delar kan orsaka personskada.
Rör inte utomhusenheten under blixtoväder, då det kan orsaka elstöt.
Försök inte reparera enheten på egen hand. Detta kan i så fall orsaka personskada, om det görs på fel sätt.
Installera inte inomhusenheten utomhus. Den är endast utformad för installation inomhus.
 VARNING
STRÖMFÖRSÖRJNING
Använd inte modifierad sladd,
förgreningssladd, 
 förlängningssladd eller

 ospecificerad sladd för att undvika
överhettning och eldsvåda.
Dela inte samma strömuttag med annan utrustning för att undvika överhettning och eldsvåda.
Manövrera inte enheten med våta händer för att undvika elstöt.
Om elkabeln är skadad måste den bytas av tillverkaren eller auktoriserad serviceverkstad eller motsvarande behörig person för att undvika skador.
Denna enhet är utrustad med Jordfelsskydd (RCCB). Du rekommenderas starkt att kontrollera RCCB:ns drift efter installationen och med jämna mellanrum efter service eller underhåll av auktoriserad återförsäljare för att försäkra dig om
att den är i gott skick. Annars kan den orsaka elstöt eller eldsvåda, ifall fel uppstår på den.
Du rekommenderas starkt att installera den med Restströmenhet (RCD) på platsen för att förhindra elstöt eller brand.
Det rekommenderas att man har på sig handskar under service och underhåll för att undvika skada.
Utrustningen måste jordas för att förhindra elstötar och brand.
Undvik elstöt genom att stänga av strömförsörjningen då:
- Före rengöring eller service.
-Längre tid utan användning.
-Onormalt starkt blixtoväder.
Denna apparat är till för flera användare. Alla strömförsörjningskretsar måste vara avstängda innan något av uttagen på inomhusenheten används för att undvika elektrisk stöt, brand eller dödlig skada.
|
Sluta använda produkten om något onormalt/ |
|
|
fel uppträder och koppla ur strömkontakten |
|
|
eller stäng av med strömväxlaren och brytaren. |
|
|
(Risk för rök/eld/elstöt) |
|
Exempel på |
• RCCB:n stängs av av sig själv. |
|
• Bränd lukt, onormala störljud eller vibrationsljud |
||
vad som är |
||
kan observeras då enheten är i drift. |
||
onormalt/fel |
||
• Varmt vatten fortsätter komma från enheten. |
||
|
Kontakta omedelbart din lokala återförsäljare för underhåll/reparation.
 FÖRSIKTIGHET
INOMHUSOCH UTOMHUSENHET
Tvätta inte inomhusenheten med vatten, bensen, thinner eller skurpulver.
Installera inte enheten nära någon antändbar utrustning eller i våtrum. Det finns i så fall risk för elstöt eller eldsvåda.
Rör inte utgående varmvattenrör vid inomhusenheten under användning.
Ställ ingenting ovanpå eller under enheten.
Sitt inte och ställ dig inte på enheten, eftersom du då kan trilla och skada dig.
Rör inte den vassa aluminiumflänsen, eftersom vassa delar kan orsaka personskada.
Se till så att dräneringsslangen är korrekt ansluten. Annars kan läckage uppstå.
Kontrollera installationskonsollerna med jämna mellanrum för att vara säker på att inga skador uppstått. Efter längre användningsperioder, kan installationskonsollernas styrka ha försvagats.
KONTROLLPANEL
Låt inte kontrollpanelen bli våt. Det finns i så fall risk för elstöt eller eldsvåda.
Tryck inte på knapparna på kontrollpanelen med hårda, spetsiga föremål. Det kan i så fall orsaka skada på enheten.
Tvätta inte kontrollpanelen med vatten, bensen, thinner eller skurningspulver.
Utför inte kontroll eller service av kontrollpanelen själv. Var god rådfråga auktoriserad återförsäljare. Detta kan annars orsaka personskada, om det görs på fel sätt.
Dusch Panel
Inom-husdel
Strömför-sörjning 

Utom-husdelen 

Golvupp-värmning
Kontroll-panel
Vatten-tankenhet
SVENSKA
11
KONTROLLPANEL
•En del av funktionerna som beskrivs i denna manual kanske inte finns tillgängliga på din enhet.
•Rådfråga din närmaste auktoriserade återförsäljare för mer information.
ERROR
• Under normal användning används inte knapparna RESET eller PUMPDW.
|
|
|
|
|
|
|
15 |
14 |
13 |
12 |
|
||
Öppna locket för att |
|
|
|
|
|
|
|
||||||
använda knapparna |
HEAT |
TIMER |
OUTDOOR |
|
11 |
||||||||
|
|
|
|
|
|
|
TIMER 1 2 3 4 5 6 |
|
|
|
|
||
|
|
|
|
|
DOOR |
|
16 |
MONTUEWEDTHUFRI SAT SUN |
|
|
C |
|
10 |
|
|
|
|
|
ACTUAL |
ON |
|
|
|
||||
|
TIMER |
6 |
OUT |
C |
BOOSTER |
OFF |
|
|
|
SETTING |
|||
|
ON |
1 2 3 4 5SUN |
|
C |
SETTING |
|
|
|
|
|
|||
|
THUFRI SAT |
|
STATUSW |
|
|
|
|
|
STATUS |
|
|||
HEAT |
TIMER |
|
|
|
|
|
|
|
|
|
|||
MONTUEWED |
|
|
|
PUMPD |
QUIET |
|
|
|
C |
PUMPDW |
|
||
QUI ET |
|
NOTAVAILABL |
WATER |
|
|
|
|
|
|
||||
TANK |
OFF |
SOLAR |
REMOTE |
|
OUTLET |
|
|
|
|
|
|
|
|
ET |
|
E |
|
|
|
|
|
|
|
|
|
||
QUI |
|
OFF/ON |
|
|
1 |
|
WATER OUTLET |
|
9 |
||||
OPERATION |
|
|
|
|
|
|
|
|
|||||
|
|
|
|
|
|
|
OFF/ON |
|
|
|
|||
|
|
|
|
|
|
|
2 |
SETTING |
|
|
STATUS |
8 |
|
|
|
|
|
|
|
|
TIMER |
SET |
|
CHECK |
|
||
|
|
|
|
|
|
|
3 |
SELECT |
QUIET |
|
|
SEARCH |
|
|
|
|
|
|
|
|
OFF/ON |
|
|
|
|||
|
|
|
|
|
|
|
|
|
|
|
|||
|
|
|
|
|
|
|
|
CANCEL |
ERROR |
|
|
|
|
|
|
|
|
|
|
|
CLOCK |
RESET |
|
|
PUMPDW |
|
|
|
|
|
|
|
|
|
|
|
|
|
|
|
7 |
|
|
|
|
|
|
|
|
4 |
5 |
6 |
|
|
|
1 |
Knappen OFF/ON |
9 |
Systemutpumpningsläge OFF/ON-indikator |
2 |
Driftlampa |
10 |
Kontrollera Systemstatusläge OFF/ON-indikator |
3 |
Timerinställningsgruppknappar |
11 |
Systeminställningsläge OFF/ON-indikator |
4 |
Lägesknappar |
12 |
Display för Utgående vattentemperatur |
5 |
Knappen Felåterställning |
13 |
Display för Utetemperaturen |
6 |
Knappen Tyst Drift |
14 |
Timer/Klockinställningsdisplay |
7 |
Utpumpningsknapp |
15 |
Värmeläge OFF/ON-indikator |
8 |
Knappar för kontroll av systemstatus |
16 |
Tyst Drift OFF/ON-indikator |
KONTROLLPANELFÖRBEREDELSE
Ställa in Aktuell Dag och Tid
CLOCK
1.Tryck på  .
.
2.Tryck på eller
eller för att ställa in aktuell dag.
SET
3.Tryck på  för att bekräfta.
4.Upprepa steg 2 och 3 för att ställa in aktuell tid.
Noteringar:
•Den aktuella dagen och tiden behöver ställas in då:
-Strömmen sätts på första gången.
-En lång tid gått sedan strömmen senast sattes på.
•Den aktuella tiden som har ställts in blir standardtid för alla Timerfunktioner.
12
GRUNDLÄGGANDE ANVÄNDNING
OFF / ON |
SÄTTA PÅ OCH STÄNGA AV ENHETEN |
|
•Då enheten är på (ON), är driftlampan tänd och den faktiska temperaturen för vattenutloppet och utomhusomgivningen visas på kontrollpaneldisplayen.
•Utomhusenheten förser inomhusenheten med värmningskapacitet.
QUIET |
FÖR ATT FÅ EN TYST OMGIVNING |
|
• Denna funktion reducerar utomhusenhetens störljud. I detta läge kan uppvärmningskapaciteten minskas.
STATUS
CHECK
 SEARCH KONTROLLERA SYSTEMSTATUSLÄGE
SVENSKA
1. Tryck in CHECK i 5 sekunder för att gå till läget STATUS.
2. Tryck på  eller
eller  för att kontrollera Vatteninloppstemperaturen, Kompressordriftsfrekvensen eller Felhistorian.
•Tryck på CANCEL för att gå ur läget STATUS.
•Då läget STATUS aktiverats, är “STATUS”-indikatorn på (ON).
•Läget STATUS kan inte aktiveras när indikatorn “SETTING” lyser.
AVANCERAD ANVÄNDNING
•Du rekommenderas starkt att kontakta närmaste auktoriserade återförsäljare för att ändra vattentemperaturområdet.
•Med kontrollpanelen kan du ställa in temperaturområdet för vattenutloppstemperaturen och den omgivande utomhustemperaturen.
1.Tryck in SET i 5 sekunder för att gå till läget SETTING. “SETTING”-indikatorn är på (ON).
2.Tryck på eller
eller för att välja en parameter.
SELECT
3.Efter att du valt önskad parameter, tryck på  för att gå till parametern.
4.Tryck på eller
eller för att ställa in den önskade temperaturen.
5.Tryck på SET igen för att bekräfta inställningen.
• Repetera steg 2 till 5 för att ställa in andra parametrar.
SYSTEMINSTÄLLNINGSLÄGE |
|
||
SETTING |
|
Temperaturdisplay |
|
|
|
|
|
SET |
TIMER |
OUTDOOR |
ACTUAL |
|
|||
|
HEAT |
|
|
SELECT |
ON |
C |
BOOSTER |
|
SETTING |
||
|
|
|
|
CANCEL |
QUIET |
|
STATUS |
|
PUMPDW |
||
|
|
||
|
OPERATION |
WATER OUTLET |
|
Parameter * SETTING-indikator
Driftsläge |
Parameter * Beskrivning |
|
|
|
||
HEAT |
|
Låg utomhustemperatur inställd (-15°C ~ 15°C). |
Vattentemperatur |
|
|
|
HEAT |
|
Hög utomhustemperatur inställd (-15°C ~ 15°C). |
|
|
||
HEAT |
|
Vattenutloppstemperaturen inställd vid låg omgivande |
|
|
|
|
|
utomhustemperatur (25°C ~ 55°C). |
|
|
|
||
|
|
|
|
|
||
HEAT |
|
Vattenutloppstemperaturen inställd vid hög omgivande |
|
|
|
|
|
|
Utomhustemperatur |
||||
|
utomhustemperatur (25°C ~ 55°C). |
|
||||
HEAT |
OFF |
Valet värmning OFF (AV) (YES / NO (JA / NEJ)) |
|
|
|
|
Inställd temperatur för ställande av värmardriften till OFF (-20°C ~ -5°C). |
||||||
|
|
|||||
VATTENTEMPERATUR TERMOVÄXLINGSINSTÄLLNING
1. Tryck på SET inom 5 sekunder.
• Upprepa steg 3 till 5 för att ställa in önskad växlingstemperatur (-5°C ~ 5°C). Noteringar:
• Tryck på CANCEL eller vänta i 30 sekunder för att gå ur läget SETTING.
• Inställningstemperaturen kommer att lagras i systemet efter att den bekräftats.
• Läget “SETTING” kan inte aktiveras då “PUMPDW” -och “STATUS” -indikatorn är på (ON). |
13 |

VECKOVIS TIMERINSTÄLLNING
Timerdisplay |
|
|
Tänds om Timer- |
|
6 olika program kan ställas in på en dag (1 - 6) |
drift väljs |
|
|
|
TIMER 1 2 3 4 5 6 |
Indikerar den valda dagen |
|
SETTING |
|
MONTUEWEDTHUFRI SAT SUN |
TIMER |
SET |
|
|
Indikerar dag för nästa timer-drift |
|
|
|
|
ON |
Tid att välja (10 minuters-steg) |
OFF/ON |
SELECT |
|
OFF |
|
|
|
|
Timer AV (OFF) |
|
CANCEL |
|
|
|
CLOCK |
||
|
|
|
||
Timer PÅ (ON) |
För att automatiskt växla enheten till ”OFF” |
|
|
|
För att automatiskt växla enheten till ”ON” |
|
|
||
Dag att välja |
|
|
|
|
Funktion |
Steg |
|
|
|
Gå till timerläge
Ställ in dag & tid
Lägg till/Ändra timer
Inaktivera timer
Aktivera timer
TIMER
Tryck på  .
.
1. Tryck på eller
eller  för att välja din önskade dag.
2. |
Tryck på |
SELECT |
|
för att bekräfta. |
|||
3. |
”1” blinkar, tryck på |
SELECT |
|
för att ställa in program 1. |
|||
OFF/ON
4.Tryck på  för att välja ON eller OFF för timern.
5.Tryck på eller
eller för att välja din önskade tid.
6.Tryck på SET för att bekräfta program 1. Den valda dagen markeras med ▼.
•Efter 2 sekunder flyttar displayen till nästa program.
7.Upprepa steg 4 till 7 för att ställa in program 2 till 6.
•Under timerinställningen, om ingen knapp trycks ner inom 30 sekunder, eller om knappen SET trycks ner, bekräftas inställningen vid det ögonblicket och timerinställningen avslutas.
Upprepa stegen ovan.
Tryck på |
TIMER |
CANCEL |
, och tryck sedan på |
. |
Tryck på TIMER , och tryck sedan på SET .
Kontrollera timer |
1. Tryck på |
TIMER |
. |
SELECT
2.Tryck på  eller
eller  tills din önskade dag visas, tryck på
  för att bekräfta ditt val.
3.Tryck på eller
eller för att kontrollera de inställda programmen.
Ta bort timer |
1. Tryck på |
TIMER |
. |
2. Tryck på  eller
eller  tills din önskade dag visas.
SELECT
3.Tryck på  för att gå till programinställning.
4.Tryck på  eller
eller  tills ditt önskade program visas.
5. Tryck på |
CANCEL |
för att ta bort programmet. |
Noteringar:
•Du kan ställa in Timern för varje dag i veckan (Måndag till Söndag) med 6 program per dag.
•När enheten sätts på med Timer ON, används den tidigare inställda temperaturen för att kontrollera vattenutloppstemperaturen.
•Samma timerprogram kan inte ställas in samma dag.
•Du kan även välja samlade dagar med samma timerinställning.
14 |
• Gynnar energisparande genom att du kan ställa in upp till 6 program på en angiven dag. |
 Loading...