


Please read these Operating Instructions before using the unit and save for future reference.
FOR OPERATION ASSISTANCE,
CALL 1-800-HELP-FAX (1-800-435-7329)
 This product is designed for use in the United States of America, and may not operate in other countries.(See page 60 for more details.)
 Este producto ha sido disñado para su uso en los Estados Unidos de América, y puede no funcionar correctamente en otros países. (Consulte la página 60 para tener más detalles.)
Personal Facsimile
Model No. KX-F580
Contents
Installation and Connection . . . . p. 6 Initial Preparation. . . . . . . . . . . . p. 11
Basic Operations . . . . . . . . . . . . p. 17
Advanced Operations. . . . . . . . .p. 26
Troubleshooting and
Routine Care. . . . . . . . . . . . . . . .p. 49 General Information. . . . . . . . . . p. 56

Thank you for purchasing the Panasonic Facsimile.
Things you should keep records of
Attach your sales receipt here
|
|
|
|
|
|
|
|
For your future reference |
|
|
|
|
|
|
Date of purchase |
|
Serial No. |
|
|
|
|
|
|
|
(found on the bottom of the unit) |
|
|
|
Dealer's name and address |
|
|
|
|
|
|
Dealer's telephone number |
|
|
|
|
|
|
|
|
|
|
|
|
Caution:
The Telephone Protection Act of 1991 requires the following information to be clearly stated either at the top or bottom margin of the first message page when transmitting messages via telephone facsimile;
—Date and time of transmission,
—Identification of the business, entity or person(s) sending the facsimile, and —Telephone number of the business, entity or person(s).
To program this information into your facsimile machine, complete all the instructions on pages 11 through 13.
Copyright:
This manual is copyrighted by Kyushu Matsushita Electric Co., Ltd. (KME) and its licensee. Under the copyright laws, this manual may not be reproduced in any form, in whole or part, without the prior written consent of KME and its licensee.
© Kyushu Matsushita Electric Co., Ltd. 1996
Included accessories (To order, call toll free 1-800-332-5368.)
Power cord . . . |
. . . . 1 pc. |
Telephone line |
Handset . . . . . . . . . . |
1 pc. Handset cord . . |
. . . . 1 pc. |
|
|
(p. 10) |
cord. . . . . . . . . |
. . . . . . 1 pc. |
|
(p. 8) |
(p. 8) |
|
|
|
(p. 10) |
|
|
|
|
PQJA200Z |
|
PQJA59V |
PFJXE0108Z |
PQJA212N |
|
Handset cradle |
. . . . 1 pc. |
Paper stacker. |
. . . . . 1 pc. |
Recording paper. . . |
1 pc. |
|
|
(p. 8) |
|
(p. 9) |
|
(p. 9) |
|
|
|
|
|
|
—See page 59 for replacement |
|
|
PFYAF780M |
|
PQUS10136Z |
|
of the recording paper. |
|
|
|
|
|
|
||
 If any items are missing, check with place of purchase.
 The part numbers listed above are subject to change without notice.
 Save the original carton and packaging.
2
Important safety instructions
When using this product, basic safety precautions should always be followed to reduce the risk of fire, electric shock, and injury to persons, including the following:
1.Read and understand all instructions.
2.Follow all warnings and instructions marked on this product.
3.Unplug this product from wall outlets before cleaning. Do not use liquid or aerosol cleaners. Use a damp cloth for cleaning.
4.Do not use this product near water, for example, near a bath tub, wash bowl, kitchen sink, or laundry tub, in a wet basement, or near a swimming pool.
5.Do not place this product on an unstable cart, stand or table. The product may fall, causing serious damage to the product or personal injury.
6.Slots and openings in the cabinet and the back or bottom are provided for ventilation, to protect it from overheating. These openings must not be blocked or covered. The openings should never be blocked by placing the product on the bed, sofa rug, or other similar surface. This product should never be placed near or over a radiator or heat register. This product should not be placed in a built-in installation unless proper ventilation is provided.
7.This product should be operated only from the type of power source indicated on the marking label. If you are not sure of the type of power supplied to your home, consult your dealer or local power company.
8.This product is equipped with a three wire grounding type plug, a plug having a third (grounding) pin. This plug will only fit into a grounding type power outlet. This is a safety feature. If you are unable to insert the plug into the outlet, contact your electrician to replace your obsolete outlet. Do not defeat the safety purpose of the grounding type plug.
9.Do not allow anything to rest on the power
cord. Do not locate this product where the cord could be damaged by people walking on it.
10.Do not overload wall outlets and extension cords as this can result in the risk of fire or electric shock.
11.Never push objects of any kind into this product through cabinet slots as they may touch dangerous voltage points or short out parts that could result in a risk of fire or electric shock. Never spill liquid of any kind on the product.
12.To reduce the risk of electric shock, do not disassemble this product, but take it to an authorized servicenter when some service or repair work is required. Opening or removing covers may expose you to dangerous voltages or other risks. Incorrect reassembly can cause electric shock when the appliance is subsequently used.
13.Unplug this product from the wall outlet and refer servicing to an authorized servicenter under the following conditions:
A.When the power supply cord or plug is damaged or frayed.
B.If liquid has been spilled into the product.
C.If the product has been exposed to rain or water.
D.If the product does not work normally by following the operating instructions.
Adjust only those controls, that are covered by the operating instructions because improper adjustment of other controls may result in damage and will often require extensive work by an authorized technician to restore the product to normal operation.
E.If the product has been dropped or the cabinet has been damaged.
F.If the product exhibits a distinct change in performance.
14.Avoid using a telephone (other than a cordless type) during an electrical storm. There may be a remote risk of electric shock from lightning.
15.Do not use the telephone to report a gas leak in the vicinity of the leak.
SAVE THESE
INSTRUCTIONS
INSTALLATION:
1.Never install telephone wiring during a lightning storm.
2.Never install telephone jacks in wet locations unless the jack is specifically designed for wet locations.
3.Never touch uninsulated telephone wires or terminals unless the telephone line has been disconnected at the network interface.
4.Use caution when installing or modifying telephone lines.
WARNING:
To prevent the risk of fire or electrical shock, do not expose this product to rain or any type of moisture.
OTHER INFORMATION
 Keep the unit away from electrical noisegenerating devices,such as fluorescent lamps and motors.
 The unit should be kept free from dust, moisture, high temperature, and vibration.
 The unit should not be exposed to direct sunlight.
 Do not place heavy objects on top of this unit.
 Do not damage the power cord.
 Do not touch the plug with wet hands.
 Do not use benzine, thinner, or any abrasive powder, to clean the cabinet. Wipe it with a soft cloth.
3

Table of Contents
Installation and Connection
Location of controls . . . . . . . . . . . . . . . . . . . . . . . . . . . . . . . . . . . . . . . . . . . . . . . . . . . . . . . . . . . 6 Installing your unit. . . . . . . . . . . . . . . . . . . . . . . . . . . . . . . . . . . . . . . . . . . . . . . . . . . . . . . . . . . . . 8 Connections . . . . . . . . . . . . . . . . . . . . . . . . . . . . . . . . . . . . . . . . . . . . . . . . . . . . . . . . . . . . . . . . . . . 10
Initial Preparation |
|
Setting the date, time, logo and facsimile telephone number . . . . . . . . . . . . . . |
11 |
Selecting the receive mode . . . . . . . . . . . . . . . . . . . . . . . . . . . . . . . . . . . . . . . . . . . . . . . . . |
14 |
Adjusting volumes . . . . . . . . . . . . . . . . . . . . . . . . . . . . . . . . . . . . . . . . . . . . . . . . . . . . . . . . . . . |
16 |
Basic Operations |
|
Making voice calls . . . . . . . . . . . . . . . . . . . . . . . . . . . . . . . . . . . . . . . . . . . . . . . . . . . . . . . . . . . . 17 Answering voice calls . . . . . . . . . . . . . . . . . . . . . . . . . . . . . . . . . . . . . . . . . . . . . . . . . . . . . . . . 17 Transmitting documents . . . . . . . . . . . . . . . . . . . . . . . . . . . . . . . . . . . . . . . . . . . . . . . . . . . . . 18 Receiving documents . . . . . . . . . . . . . . . . . . . . . . . . . . . . . . . . . . . . . . . . . . . . . . . . . . . . . . . . 20 Making a copy . . . . . . . . . . . . . . . . . . . . . . . . . . . . . . . . . . . . . . . . . . . . . . . . . . . . . . . . . . . . . . . . 25
Advanced Operations |
|
Automatic dialing |
|
Storing phone numbers for automatic dialing . . . . . . . . . . . . . . . . . . . . . . . . . . . . . . . |
26 |
Making voice calls using automatic dialing. . . . . . . . . . . . . . . . . . . . . . . . . . . . . . . . . . |
27 |
Transmitting documents using automatic dialing . . . . . . . . . . . . . . . . . . . . . . . . . . . |
27 |
Electronic telephone directory . . . . . . . . . . . . . . . . . . . . . . . . . . . . . . . . . . . . . . . . . . . . . . . |
28 |
Telephone |
|
Voice contact (talking to the caller during or after fax reception or transmission) . . . . . . |
29 |
TONE, FLASH and REDIAL/PAUSE buttons . . . . . . . . . . . . . . . . . . . . . . . . . . . . . . . |
30 |
Facsimile |
|
Polling (retrieving fax documents) . . . . . . . . . . . . . . . . . . . . . . . . . . . . . . . . . . . . . . . . . . . . . . . . |
31 |
Delayed transmission (sending a fax at a later time) . . . . . . . . . . . . . . . . . . . . . . . . . . . . |
32 |
Sending documents overseas . . . . . . . . . . . . . . . . . . . . . . . . . . . . . . . . . . . . . . . . . . . . . . . |
33 |
Remote fax receiving (using an extension to receive a fax message) . . . . . . . . . . . . . |
34 |
Junk mail prohibitor (preventing the reception of unwanted fax documents) . . . . . . . |
35 |
Receiving with distinctive ring service . . . . . . . . . . . . . . . . . . . . . . . . . . . . . . . . . . . . . . . |
36 |
Signaling your pager that you have received a fax document . . . . . . . . . . . . . . |
37 |
4

Special setting
Using an external telephone answering machine . . . . . . . . . . . . . . . . . . . . . . . . . . 38
Changing the logo print position . . . . . . . . . . . . . . . . . . . . . . . . . . . . . . . . . . . . . . . . . . . . . 42 Changing the display contrast . . . . . . . . . . . . . . . . . . . . . . . . . . . . . . . . . . . . . . . . . . . . . . . 42 Setting the friendly reception. . . . . . . . . . . . . . . . . . . . . . . . . . . . . . . . . . . . . . . . . . . . . . . . . 43 Setting the handset switch . . . . . . . . . . . . . . . . . . . . . . . . . . . . . . . . . . . . . . . . . . . . . . . . . . . 43 Resetting the advanced features . . . . . . . . . . . . . . . . . . . . . . . . . . . . . . . . . . . . . . . . . . . . 44
Others
Summary of user programmable features . . . . . . . . . . . . . . . . . . . . . . . . . . . . . . . . . . 45 Printing reports and lists. . . . . . . . . . . . . . . . . . . . . . . . . . . . . . . . . . . . . . . . . . . . . . . . . . . . . . 46
Troubleshooting and Routine Care
Error messages on the display . . . . . . . . . . . . . . . . . . . . . . . . . . . . . . . . . . . . . . . . . . . . . . 49 Before requesting help . . . . . . . . . . . . . . . . . . . . . . . . . . . . . . . . . . . . . . . . . . . . . . . . . . . . . . . 50 Clearing a recording paper jam . . . . . . . . . . . . . . . . . . . . . . . . . . . . . . . . . . . . . . . . . . . . . . 52 Clearing a document jam . . . . . . . . . . . . . . . . . . . . . . . . . . . . . . . . . . . . . . . . . . . . . . . . . . . . 53 Adjusting the feeder pressure . . . . . . . . . . . . . . . . . . . . . . . . . . . . . . . . . . . . . . . . . . . . . . . 54 Removing the handset cradle . . . . . . . . . . . . . . . . . . . . . . . . . . . . . . . . . . . . . . . . . . . . . . . . 54 Cleaning the inside of the unit . . . . . . . . . . . . . . . . . . . . . . . . . . . . . . . . . . . . . . . . . . . . . . . 55
General Information
FCC information . . . . . . . . . . . . . . . . . . . . . . . . . . . . . . . . . . . . . . . . . . . . . . . . . . . . . . . . . . . . . . 56 Limited warranty . . . . . . . . . . . . . . . . . . . . . . . . . . . . . . . . . . . . . . . . . . . . . . . . . . . . . . . . . . . . . . 57 Service center directory . . . . . . . . . . . . . . . . . . . . . . . . . . . . . . . . . . . . . . . . . . . . . . . . . . . . . . 58 Information for users . . . . . . . . . . . . . . . . . . . . . . . . . . . . . . . . . . . . . . . . . . . . . . . . . . . . . . . . . 59 Accessory order information . . . . . . . . . . . . . . . . . . . . . . . . . . . . . . . . . . . . . . . . . . . . . . . . . 59 Specifications . . . . . . . . . . . . . . . . . . . . . . . . . . . . . . . . . . . . . . . . . . . . . . . . . . . . . . . . . . . . . . . . . 60 Speed dialer list . . . . . . . . . . . . . . . . . . . . . . . . . . . . . . . . . . . . . . . . . . . . . . . . . . . . . . . . . . . . . . 61 Index. . . . . . . . . . . . . . . . . . . . . . . . . . . . . . . . . . . . . . . . . . . . . . . . . . . . . . . . . . . . . . . . . . . . . . . . . . . 63
Connection |
and Installation |
|
|
|
|
Preparation Initial |
|
|
|
|
|
Operations Basic |
|
|
|
|
|
Operations |
Advanced |
|
|
|
|
Care Routine and |
Troubleshooting |
|
|
|
|
Information |
General |
|
|
5
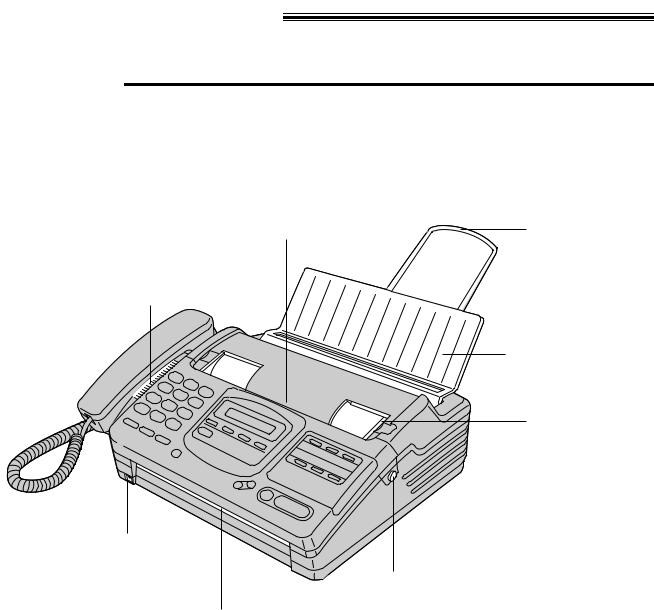
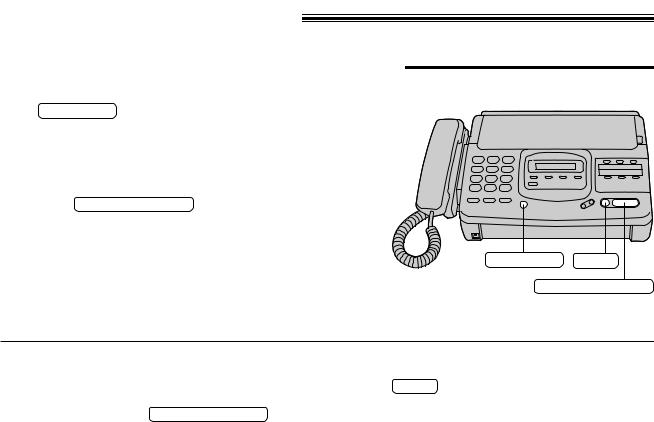
Location of controls
Front view
Document entrance |
Paper stacker (p. 9) |
Speaker
Document feeder tray
(p. 18)
Document guide(s)
(p. 18)
Microphone (p. 17)
Front lid open button (p. 8, 53)
Document exit
6
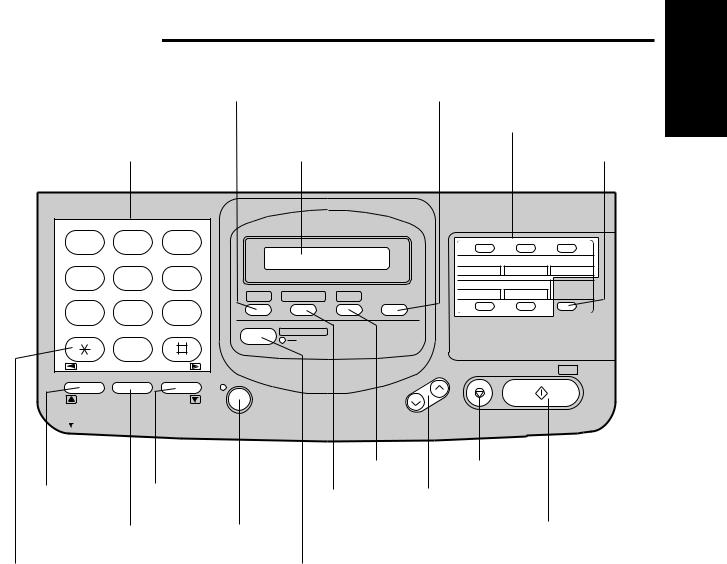
Control panel
|
HELP (p. 10) |
RESOLUTION (p. 18) |
|
|
Direct call stations |
Dial keypad |
Display panel |
LOWER (p. 26, 27) |
|
ABC |
|
DEF |
|
|
|
|
|
1 |
2 |
|
3 |
|
|
|
|
|
GHI |
JKL |
|
MNO |
|
|
1 |
2 |
3 |
4 |
5 |
|
6 |
|
|
6 |
7 |
8 |
|
|
|
4 |
5 |
LOWER |
|||
PRS |
TUV |
|
WXY |
HELP DIRECTORY MENU RESOLUTION |
9 |
10 |
||
|
|
|||||||
7 |
8 |
|
9 |
|
|
|
|
|
|
OPER |
|
|
AUTO RECEIVE |
|
|
|
|
|
0 |
|
|
|
FAX |
|
|
|
|
|
|
|
|
|
|
|
|
TONE |
|
|
|
|
|
STOP |
START/COPY/ SET |
|
FLASH |
REDIAL/PAUSE |
MUTE |
|
|
||||
|
|
|
|
|
||||
|
|
|
|
SP-PHONE |
RINGER |
|
|
|
|
|
|
|
VOLUME HANDSET |
|
|
|
|
MIC |
|
|
|
|
SP-PHONE |
|
|
|
|
|
|
|
|
|
|
|
|
|
|
|
|
|
MENU |
STOP |
|
|
FLASH (p. 30) |
MUTE (p. 17) |
DIRECTORY VOLUME (p. 16) |
|
|||||
|
|
|
|
|
(p. 27, 28) |
|
|
|
REDIAL/PAUSE |
SP-PHONE |
|
START/COPY/SET |
|||||
|
(p. 30) |
|
|
(p. 17, 29) |
|
|
|
|
TONE (p. 30) |
|
|
|
AUTO RECEIVE (p. 14) |
|
|
|
|
and Installation
Connection
7

Installing your unit
Installing the handset cradle
If you want to use this unit with a handset, install the handset and handset cradle.
 To save space or to use the unit mainly for faxes, you may remove the handset cradle.
Even if the handset and handset cradle are not installed, you can make or answer calls using the SP-PHONE button. When you do not use the handset and handset cradle, see pages 43 and 54.
1 Connect the handset cord.
 Handset cord
Handset
2 |
A |
Open the front lid by pressing the front lid open |
|
button. |
BOpen the back lid by lifting up the tabs located on both sides.

 Tab
Tab

 B
B
A |
Front lid open |
|
button |
3 |
Insert the handset cradle by matching the triangles. |
Triangles |
||
|
|
|||
|
|
|
||
4 |
Press down on the |
marked on the handset |
Hooks |
|
cradle until it clicks into place. |
||||
|
||||
|
Make sure the two hooks lock the handset |
|
||
|
cradle firmly. |
|
|
|
|
|
|
Triangles |
|
5 |
Place the handset on the handset cradle and close |
the lids securely. |
 If the following message is displayed when the unit is turned on, the handset cradle is not installed correctly.
CHECK CRADLE
Check step 4 again.
8
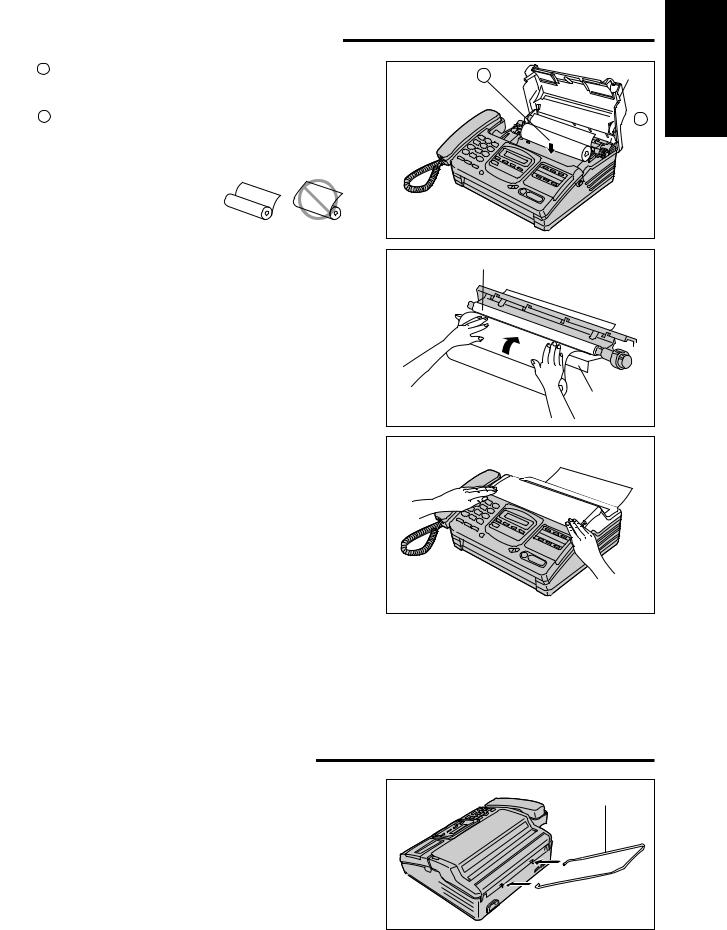
Installing the recording paper
1 |
A Open the back lid by lifting up the tabs located |
on both sides. |
BInstall a recording paper roll in the unit.
 Make sure that the shiny side of the paper is facing down and there is no slack, tape, or glue residue on the paper roll.
|
correct |
incorrect |
2 |
Insert the leading edge of the recording paper |
|
between the recording paper roller and the silver |
||
plate.
Close the back lid by gently pressing down on both 3 ends.
Note:
B |
Tab |


 A
A
Recording paper roller
Silver plate
 Only use the included roll of paper or specified recording paper, or else the print quality may be affected and/or excessive thermal head wear may occur.
 The beginning of some recording paper rolls are secured with glue or tape.
Cut approximately 150 mm (6 inches) from the new roll of paper prior to installation.  To order recording paper, see page 59.
Installing the paper stacker
Install the paper stacker.
Paper stacker |
9 |
and Installation
Connection

Connections
Power cord
Telephone line cord
Note:
|
Dialing mode switch: |
DIALING MODE |
|||||||
|
Set to TONE. |
|
|
|
|
|
|
|
|
|
|
|
|
|
|
|
|
||
|
|
If you cannot dial, |
|
|
|
|
|
|
|
|
|
set to PULSE. |
TONE |
|
|
||||
|
|
|
|
|
PULSE |
||||
|
|
|
|
||||||
|
|
|
|
|
|
|
|
|
|
Connect to LINE.
Single telephone line (Lineprotectorsurge ) (RJ11C)
Power outlet
(120 V, 60 Hz) (Powerprotectorsurge )
 For additional equipment protection, we recommend the use of a surge protector. The following types are available; TELESPIKE BLOK MODEL TSB (TRIPPE MFG. CO.), SPIKE BLOK MODEL SK6-0 (TRIPPE MFG. CO.), SUPER MAX (PANAMAX) or MP1 (ITW LINX).
 You can connect an extension phone or a telephone answering machine to the unit on the external telephone jack (EXT). See page 38.
 When you operate this product, the power outlet should be near the product and easily accessible.
Helpful hint:
 If assistance is needed, press HELP . The unit will print a quick reference.
HELP
10
Setting the date, time, logo and facsimile telephone number 
Before using your unit, program the correct date and time, your logo and your facsimile telephone number.
This information will be printed on the top of the each page transmitted from your unit. To change the print position, see page 42.
Setting the date and time
1 |
Press |
MENU . |
|
|
|
|
|
SYSTEM SET UP |
|||
2 |
Press |
, then |
0 1 . |
|
|
|
SET DATE & TIME |
||||
3 |
Press START/COPY/SET . |
|
|||
4 |
Enter the correct month/day/year/hour/minute by |
||||
selecting each 2 digits. |
|
||||
|
Then press |
for AM or |
for PM. |
||
Example: Aug. 10 1996, 3:00PM
|
|
Press |
0 |
8 |
1 |
0 |
9 |
6 |
0 |
3 |
0 |
0 , |
|
|
then press |
|
for PM. |
|
|
|
|
||||
5 |
Press |
START/COPY/SET . |
|
|
|
|
|
|
||||
6 |
Press |
MENU . |
|
|
|
|
|
|
|
|
|
|
Note:
 If you make a mistake while programming, press STOP then make corrections.
 The accuracy of the clock will be approximately ±60 seconds a month.
Dial keypad |
MENU |
1 2 3
4 5 6
7 8 9
0
STOP
START/COPY/SET
Preparation Initial
11

Setting your logo
Usually the logo is a company, division or personal name in an abbreviated form.
1 |
Press |
MENU . |
Dial keypad |
||
|
SYSTEM SET UP |
||||
|
|
|
|
||
2 |
Press |
, then 0 2 . |
|
|
|
|
YOUR LOGO |
1 |
2 |
3 |
|
|
4 |
5 |
6 |
||
3 |
|
|
|||
Press |
START/COPY/SET . |
7 |
8 |
9 |
|
|
LOGO= |
|
0 |
|
|
|
|
|
|
||
4 |
Enter your logo up to 30 characters. |
|
|
|
|
Refer to the instructions on page 13. |
|
|
|
||
5 Press START/COPY/SET .
6 Press MENU .
Setting your facsimile telephone number
1 |
Press |
MENU . |
|
|
|
|||
|
|
SYSTEM SET UP |
||||||
2 |
Press |
, then 0 3 . |
|
|
|
|||
|
YOUR TEL NO. |
|
||||||
3 |
Press START/COPY/SET . |
|
|
|||||
|
|
|||||||
|
|
|
No.= |
|
||||
4 |
|
|
|
|||||
Enter your facsimile telephone number up to |
|
|||||||
20 digits. |
|
|
|
|
||||
|
The |
button inserts a space and the |
|
|
button |
|||
|
|
|||||||
|
a “+”. |
|
|
|
|
|||
|
If you make a mistake, press STOP to delete |
|||||||
|
the wrong number to the left of the cursor. |
|
||||||
5 |
Press START/COPY/SET . |
|
|
|
|
|||
6 |
Press |
MENU . |
|
|
|
|
||
Dial keypad
1 2 3
4 5 6
7 8 9
0
MENU
START/COPY/SET
MENU
START/COPY/SET
12

How to enter characters and symbols
The dial keypad and the direct call stations can be used as character input keys and command keys. Pressing 0-9 and direct call station 1 will alternately select a character as shown below.
Keys |
|
|
|
|
|
|
|
|
|
|
|
Number of times |
|
|
|
|
|
|
|
|
||||||||
|
|
|
|
|
|
|
|
|
|
|
|
|
|
|
|
|
|
|
|
|
|
|
|
|||||
|
1 |
|
2 |
3 |
4 |
5 |
6 |
|
7 |
|
8 |
9 |
10 |
|
11 |
|
12 |
13 |
||||||||||
|
|
|
|
|
|
|
|
|
|
|
||||||||||||||||||
|
|
|
|
|
|
|
|
|
|
|
|
|
|
|
|
|
|
|
|
|
|
|
|
|
|
|
|
|
1 |
|
|
1 |
|
[ |
] |
{ |
} |
+ |
|
- |
|
/ |
= |
, |
|
. |
|
_ |
|
||||||||
|
|
|
|
|
|
|
|
|
|
|
|
|
|
|
|
|
|
|
|
|
|
|
|
|
|
|
|
|
2 |
|
|
|
A |
|
B |
C |
a |
b |
|
c |
|
2 |
|
|
|
|
|
|
|
|
|
|
|||||
|
|
|
|
|
|
|
|
|
|
|
|
|
|
|
|
|
|
|
|
|
|
|
|
|
|
|
|
|
3 |
|
|
D |
|
E |
F |
d |
e |
|
f |
|
3 |
|
|
|
|
|
|
|
|
|
|
||||||
|
|
|
|
|
|
|
|
|
|
|
|
|
|
|
|
|
|
|
|
|
|
|
|
|
|
|
|
|
4 |
|
|
G |
|
H |
I |
g |
h |
|
i |
|
4 |
|
|
|
|
|
|
|
|
|
|
||||||
|
|
|
|
|
|
|
|
|
|
|
|
|
|
|
|
|
|
|
|
|
|
|
|
|
|
|
|
|
5 |
|
|
|
J |
|
K |
L |
j |
k |
|
l |
|
5 |
|
|
|
|
|
|
|
|
|
|
|||||
|
|
|
|
|
|
|
|
|
|
|
|
|
|
|
|
|
|
|
|
|
|
|
|
|
|
|
|
|
6 |
|
|
M |
|
N |
O |
m |
n |
|
o |
|
6 |
|
|
|
|
|
|
|
|
|
|
||||||
|
|
|
|
|
|
|
|
|
|
|
|
|
|
|
|
|
|
|
|
|
|
|
|
|
|
|
|
|
7 |
|
|
|
P |
|
Q |
R |
S |
p |
|
q |
|
r |
|
s |
7 |
|
|
|
|
|
|
|
|||||
|
|
|
|
|
|
|
|
|
|
|
|
|
|
|
|
|
|
|
|
|
|
|
|
|
|
|
|
|
8 |
|
|
|
T |
|
U |
V |
t |
u |
|
v |
|
8 |
|
|
|
|
|
|
|
|
|
|
|||||
|
|
|
|
|
|
|
|
|
|
|
|
|
|
|
|
|
|
|
|
|
|
|
|
|
|
|
|
|
9 |
|
|
W |
|
X |
Y |
Z |
w |
|
x |
|
y |
|
z |
9 |
|
|
|
|
|
|
|
||||||
|
|
|
|
|
|
|
|
|
|
|
|
|
|
|
|
|
|
|
|
|
|
|
|
|
|
|
|
|
0 |
|
|
0 |
|
( |
) |
< |
> |
! |
|
" |
|
# |
$ |
% |
|
& |
|
¥ |
|
||||||||
|
|
|
|
|
|
|
|
|
|
|
|
|
|
|
|
|
|
|
|
|
|
|
|
|
|
|
|
|
6 |
|
|
|
|
: |
|
; |
? |
| |
|
|
@ |
|
^ |
|
’ |
¤ |
|
|
|
|
|
|
|
||||
|
|
|
|
|
|
|
|
|
|
|
|
|
|
|
|
|||||||||||||
1 |
|
|
|
|
|
|
|
|
|
|
|
|
|
|
|
|
|
|
|
|
|
|
|
|
|
|
|
|
|
|
|
|
|
|
|
|
|
|
|
|
|
|
|
|
|
|
|
|
|
|
|
|
|
|
|
|
|
|
|
|
|
|
|
INSERT key (Used to insert one character or one space.) |
|
|
|
|
|
|
|
|||||||||||||||
|
2 |
|
|
|
|
|
|
|
|
|
|
|
||||||||||||||||
|
7 |
|
|
|
|
|
|
|
|
|
|
|
|
|
|
|
|
|
|
|
|
|
|
|
|
|
|
|
|
|
|
|
|
|
|
|
|
|
|
|
|
|
|
|
|
|
|
|
|
|
|
|
|
|
|
|
|
|
5 |
|
|
|
|
DELETE key (Used to delete one character.) |
|
|
|
|
|
|
|
|
|
|||||||||||||
|
10 |
|
|
|
|
|
|
|
|
|
|
|
|
|
||||||||||||||
|
|
|
|
|
|
|
|
|
|
|
|
|
|
|
|
|
|
|
|
|
|
|
|
|
|
|
|
|
|
|
|
|
|
|
|
|
|
|
|
|
|
|
|
|
|
|
|
|
|
|
|
|
|
|
|
|
|
|
4 |
|
|
|
|
|
SPACE key (Used to replace one character with a space.) |
|
|
|
|
|
|
|
||||||||||||||
|
9 |
|
|
|
|
|
|
|
|
|
|
|
|
|||||||||||||||
|
|
|
|
|
|
|
|
|
|
|
|
|
|
|
|
|
|
|
|
|
|
|
|
|
|
|
|
|
|
|
|
|
|
|
|
|
key (Used to move the cursor to the right.) |
|
|
|
|
|
|
|
|
|
|||||||||||
|
|
|
|
|
|
|
|
|
|
|
|
|
|
|
|
|
||||||||||||
|
|
|
|
|
|
|
|
|
|
|
|
|
|
|
|
|
|
|
|
|
|
|
|
|
|
|
|
|
|
|
|
|
|
|
|
|
key (Used to move the cursor to the left.) |
|
|
|
|
|
|
|
|
|
|||||||||||
|
|
|
|
|
|
|
|
|
|
|
|
|
|
|
|
|
||||||||||||
|
|
|
|
|
|
|
|
|
|
|
|
|
|
|
|
|
|
|
|
|
|
|
|
|
|
|
|
|
For example, when entering “Mike” as your logo: |
|
|
|
|
|
|
|
|
|
|
|
|
|
|
||||||||||||||
1 Press |
6 . |
|
|
|
|
|
|
|
|
|
|
3 Press |
5 |
five times. |
|
|
|
|||||||||||
|
|
|
|
|
|
|
|
|
|
|
|
|
|
|
|
|||||||||||||
|
|
|
|
LOGO=M |
|
|
|
|
|
|
|
|
|
LOGO=Mik |
|
|
||||||||||||
2 Press |
4 six times. |
|
|
|
|
|
|
|
|
4 Press |
3 |
five times. |
|
|
|
|
|
|
||||||||||
|
LOGO=Mi |
|
|
|
|
|
|
|
LOGO=Mike |
|
||||||||||||||||||
|
|
|
|
|
|
|
|
|
|
|
|
|
|
|
|
|
|
|
|
|
|
|
|
|
|
|
|
|
Note:
 If you use the same number key continuously to enter the next character, press
  to move the cursor.
To correct a mistake while programming
Use  and
and  to move the cursor to the incorrect character, then make the correction.
or
Press STOP to delete the character to the left of the cursor.
To see the layout of the direct call station keys
Remove the directory card cover with a pencil or similar object and turn the directory card over.
Preparation Initial
13

Selecting the receive mode
The unit combines the functions of facsimile and telephone as well as providing a TAM (Telephone Answering Machine) interface. This unit has two types of receive modes; AUTO RECEIVE and MANUAL RECEIVE. —When you are unable to answer, set the AUTO RECEIVE mode.
—When you are available, set the MANUAL RECEIVE mode.
Press AUTO RECEIVE to switch to the desired mode.
AUTO RECEIVE

 FAX
FAX
AUTO RECEIVE

 FAX
FAX
¡AUTO RECEIVE mode
The FAX indicator light goes on.
FAX mode: (pre-selected setting)
Select this mode when you use the unit solely as a fax machine (see page 21).
Display: FAX MODE
 You can select the EXT.TAM mode instead of the FAX mode as an AUTO RECEIVE mode (page 15).
EXT. TAM mode:
Select this mode when you connect a telephone answering machine to the external telephone (EXT.) jack and leave the home or office (see page 38).
 If your external telephone does not have an answering/recording feature, do not select this mode. We recommend that you select the TEL mode.
AUTO RECEIVE

 FAX
FAX
¡MANUAL RECEIVE mode
The FAX indicator light goes off.
TEL mode: (pre-selected setting)
Select this mode when you wish to answer all calls manually.
Display: TEL MODE
 When no one answers an incoming call by 15 rings, the unit will temporarily activate the fax function to receive documents.
Display: EXT.TAM MODE
Note:
 Regardless of the mode you select, you can always place calls and send faxes.
14

Changing the setting of the AUTO RECEIVE mode
You can select either FAX mode (pre-selected setting) or EXT.TAM mode in the AUTO RECEIVE mode. If you want to change the setting, follow the steps below.
1 |
Press |
MENU . |
|
|
Dial keypad |
MENU |
||
|
|
|
SYSTEM SET UP |
|||||
|
|
|
|
|
|
|
||
2 |
Press |
, then |
0 5 . |
AUTO RECEIVE |
1 |
2 |
3 |
|
3 |
Press START/COPY/SET . |
|
4 |
5 |
6 |
|
||
|
7 |
8 |
9 |
|
||||
|
|
|
|
|
||||
|
|
|
MODE=FAX |
|
0 |
|
|
|
4 |
Press |
or |
to select the desired setting. |
|
|
|
|
|
5 |
Press |
START/COPY/SET . |
|
|
|
|
START/COPY/SET |
|
|
|
|
|
|
||||
6 |
Press |
MENU . |
|
|
|
|
|
|
Preparation Initial
Changing the setting of the MANUAL RECEIVE mode
You can select either TEL mode (pre-selected setting) or TEL/FAX mode in the MANUAL RECEIVE mode. If you want to change the setting, follow the steps below.
1
2
3
4
5
6
Press MENU .
SYSTEM SET UP
Press  , then 0 8 .
MANUAL RECEIVE
Press START/COPY/SET .
MODE=TEL
Press  or
or  to select the desired setting.
Press START/COPY/SET .
Press MENU .
Dial keypad |
MENU |
1 2 3
4 5 6
7 8 9
0
START/COPY/SET
15

Adjusting volumes
¡ Ringer volume
Press VOLUME ( / ¨) while the unit is idle.  3 levels (high/low/off) are available.
To turn the ringer off:
1. Press VOLUME ( ) repeatedly.  The following message will be shown.
RINGER OFF= OK?
2. Press START/COPY/SET .
While the ringer volume is set to off:
The display will show the following message and the unit will not ring when receiving a call.
RINGER OFF
¡ Handset volume
Press VOLUME ( / ¨) while using the handset.  3 levels (high/middle/low) are available.
¡ Speaker volume
Press VOLUME ( / ¨) while using the speakerphone.
 8 levels (high to low) are available.
VOLUME
START/COPY/SET
16

Making voice calls
1 |
Press SP-PHONE or lift the handset. |
Dial keypad |
2 |
Dial a phone number. |
|
If you misdial, hang up and dial again. |
|
|
3 |
When the other party answers, speak into the |
|
microphone or handset. |
|
|
4 |
When finished, press SP-PHONE again or hang |
|
up the handset. |
|
MUTE VOLUME
SP-PHONE
Microphone
Answering voice calls
1 |
When the unit rings, lift the handset or press |
SP-PHONE . |
|
2 |
When finished, hang up the handset or press |
SP-PHONE . |
MUTE VOLUME
SP-PHONE
Operations Basic
Voice muting
Using this feature, the other party cannot hear you but you can hear them.
1. Press MUTE during a telephone conversation.
<MUTE>
2.To resume the conversation, press MUTE again.
Hints for speakerphone operation
 Use the speakerphone in a quiet room.
 If the other party has difficulty hearing you, adjust the volume using VOLUME .
 If you and the other party speak at the same time, parts of your conversation will be lost.
 To switch to the handset, lift the handset. To switch back to the speakerphone again, press
SP-PHONE .
17

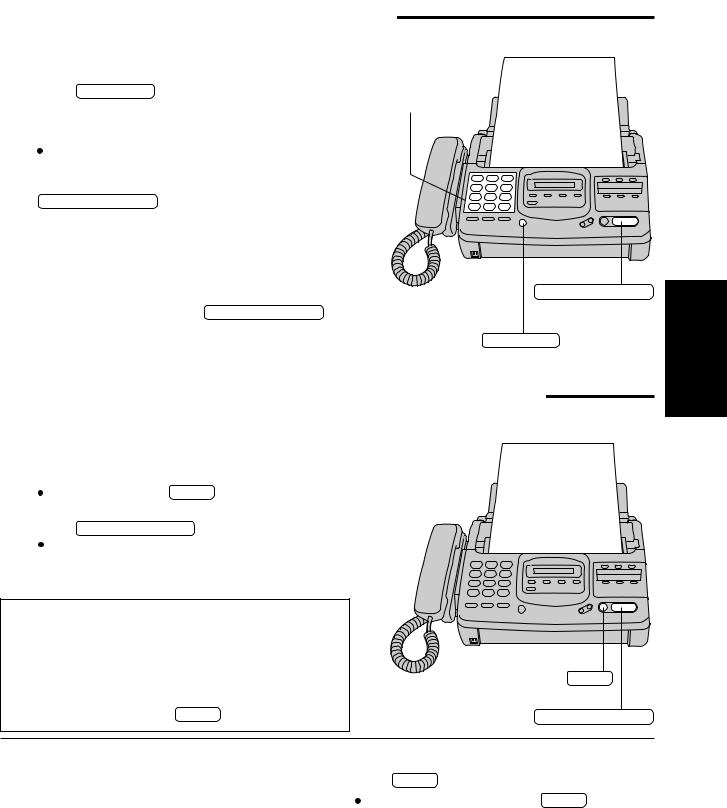
Transmitting documents
Documents you can send
Minimum size |
Maximum size |
|
Effective scanning area Document weight |
|
|
|
|
|
|
128 mm (5") |
600mm (23 |
Scanned |
|
") / 8 |
area |
|
5 |
|
128 mm |
4 mm |
|
|
(5") |
208 mm (83/16") |
216 mm |
Paper width |
(81/2") |
216 mm (81/2") |
Note:
Single sheet:
45 to 90 g/m2 (12 to 24 lb.) Multiple sheets:
60 to 75 g/m2 (16 to 20 lb.)
 Remove clips, staples or other similar fastening objects.
 Check that ink, paste or correction fluid has dried.
 Do not send the following types of documents. Use copies for fax transmission. —Chemically treated paper such as carbon or carbonless duplicating paper —Electrostatically charged paper
—Heavily curled, creased or torn paper —Paper with a coated surface
—Paper with a faint image
—Paper with printing on the opposite side that can be seen through the front (e.g. newspaper)
Loading documents
1 Open the document feeder tray.
2 |
Insert the documents FACE DOWN until a beep tone |
|
is heard. |
|
|
|
The unit can accept up to 15 sheets of paper at a |
|
|
time. |
|
3 |
Adjust the document guides to the width of the |
|
document. |
|
|
4 setting.Press RESOLUTION repeatedly to the desired |
||
|
|
For printed or typewritten |
|
STANDARD |
|
|
originals with normal-sized |
|
|
|
|
|
|
|
|
|
characters. |
|
|
For originals with small |
|
FINE |
|
|
printing. |
|
|
|
|
|
|
|
|
|
For originals with minute |
|
SUPER FINE |
|
|
printing. |
|
|
|
|
|
|
|
|
|
For originals containing |
|
HALF TONE |
|
|
photographs, shaded |
|
|
|
|
|
|
drawings, etc. |
Document feeder tray
Document guides
FACE DOWN
RESOLUTION
Note:
 Using the fine, super fine or half tone setting will increase transmission time.
 If the resolution setting is changed during feeding, it will be effective from the next sheet.
 The super fine resolution only works with other compatible machines.
18
Transmitting documents manually
1 |
Insert the documents FACE DOWN until a beep |
|
tone is heard. |
|
|
2 |
Press SP-PHONE or lift the handset. |
|
Dial keypad |
FACE DOWN |
|
|
||
3 |
Dial a phone number. |
|
If you misdial, hang up and dial again. |
|
4 |
When a fax tone is heard, press |
START/COPY/SET . |
|
5 |
Hang up the handset if using it. |
Note:
 If the other party answers your call, ask them to start receiving a fax, then press your START/COPY/SET .
  The unit will automatically end the transmission after the last sheet is transmitted.
START/COPY/SET
SP-PHONE
Transmitting documents with fewer procedures
1 |
Insert the documents FACE DOWN until a beep |
tone is heard. |
|
2 |
Dial a phone number. |
If you misdial, press STOP and dial again. |
|
3 |
Press START/COPY/SET . |
The unit will start to dial and transmit the |
documents.
Fax Auto Redial
 If there is no answer or the line is busy, the unit will automatically redial the number up to 5 times.
This feature is available when you transmit documents with fewer procedures, automatic dialing (p. 27), delayed transmission (p. 32) and receive polling (p. 31). To cancel redialing, press STOP .
FACE DOWN
STOP
START/COPY/SET
To send 16 or more sheets |
To stop transmission |
at a time. |
Press STOP . |
|
|
Insert the first 15 sheets of the document. Add the |
To eject the document, press STOP again. |
extra sheets (up to 15) before the last sheet is fed |
|
into the unit. |
|
Operations Basic
19
Receiving documents
Receiving fax documents manually
1 |
When the unit rings, lift the handset or press |
SP-PHONE to answer the call. |
|
2 |
When: |
—document reception is required, |
|
|
—a slow beep is heard, or |
|
—no sound is heard, |
|
press START/COPY/SET . |
3 |
Hang up the handset if using it. |
 The recording paper will print out face side down.
SP-PHONE STOP
START/COPY/SET
Friendly reception
When you answer the call and hear a slow beep, the unit will automatically start reception even if you do not press START/COPY/SET .
 If this feature is not required, set to OFF (see page 43).
To stop reception
Press STOP .
20
 Loading...