


Operating Instructions
Multi-Function Printer
Model No. KX-MB1500
KX-MB1520
The pictured model is KX-MB1500.
Do NOT connect the unit to a computer with the USB cable until prompted to do so during the setup of Multi-Function Station (CD-ROM).
For hearing or speech impaired TTY users, TTY: 1-877-833-8855
KX-MB1520 only:
RThis unit is compatible with Caller ID. Subscription to the appropriate service through your service provider/telephone company is required.

Thank you for purchasing a Panasonic product.
You can select the English or Spanish language.
The display and reports will be in the selected language. The default setting is English. If you want to change the setting, see feature #110 on page 46.
Caution:
RDo not rub or use an eraser on the printed side of the recording paper, as the print may smear.
Notice for product disposal, transfer, or return (KX-MB1520 only):
RThis product can store your private/confidential information. To protect your privacy/confidentiality, we recommend that you erase the information from the memory before you dispose of, transfer or return the product.
Environment:
RPanasonic’s strategic direction incorporates concern for the environment into all aspects of the product life cycle, from product development to energy saving designs; from greater product reusability to waste-conscious packaging practices.
For U.S.A. only: Please visit http://www.panasonic.com/environmental for more information.
Note:
RMost illustrations shown in these instructions are based on a KX-MB1500.
Trademarks:
RMicrosoft, Windows, Windows Vista, Internet Explorer and PowerPoint are either registered trademarks or trademarks of Microsoft Corporation in the United States and/or other countries.
RPentium is a trademark of Intel Corporation in the U.S. and other countries.
RMicrosoft product screen shot(s) reprinted with permission from Microsoft Corporation.
RAdobe and Reader are either registered trademarks or trademarks of Adobe Systems Incorporated in the United States and/or other countries.
RAvery is a registered trademark of Avery Dennison Corporation.
RXEROX is a registered trademark of Xerox Corporation in the U.S. and/or other countries.
RAll other trademarks identified herein are the property of their respective owners.
Copyright:
RThis material is copyrighted by Panasonic System Networks Co., Ltd., and may be reproduced for internal use only. All other reproduction, in whole or in part, is prohibited without the written consent of Panasonic System Networks Co., Ltd.
© Panasonic System Networks Co., Ltd. 2011
2

Important Information
For your safety
Laser radiation
CLASS 1 LASER PRODUCT
RThe printer of this unit utilizes a laser. Use of controls or adjustments or performance of procedures other than those specified herein may result in hazardous radiation exposure.
Laser diode properties
Laser output : Max. 10 mW
Wavelength : 760 nm - 800 nm
Emission duration : Continuous
IEC 60825-1 : 2007
LED light
CLASS 1 LED PRODUCT
RWhen using the unit, do not look directly at the CIS’s LED light. Direct eye exposure can cause eye damage.
CIS’s LED light properties
LED radiation output : Max. 1 mW
Wavelength :
Red 630 nm typical
Green 520 nm typical
Blue 465 nm typical
Emission duration : Continuous
Fuser unit
RDuring or immediately after printing, the fuser unit (A) gets hot. This is normal. Do not touch the fuser unit.
Note:
RThe area near the rear cover (B) may also get warm. This is normal.
A B
For best performance
Toner cartridge
RWhen replacing the toner cartridge, do not allow dust, water, or liquids to come in contact with it. This may affect print quality.
RFor optimal performance, genuine Panasonic toner cartridge is recommended. We cannot be responsible for problems that may be caused by a non-Panasonic toner cartridge:
–Damage to the unit
–Poor print quality
–Improper operation
RDo not leave the toner cartridge out of the protective bag for a long time. It will affect the printing quality.
RRead the instructions on page 10 before you begin installation of the toner cartridge. After you have read them, open the toner cartridge protective bag. The toner cartridge contains a photosensitive drum. Exposing it to light may damage the drum.
–Do not expose the toner cartridge to light for more than 5 minutes.
–Do not touch or scratch the green drum surface.
–Do not place the toner cartridge near dust or dirt, or in a high humidity area.
–Do not expose the toner cartridge to direct sunlight.
RTo extend the life of the toner cartridge, the power should never be turned OFF immediately after printing. Leave the power turned ON for a minimum of 30 minutes after printing.
Location
RTo avoid malfunction, do not position the unit near appliances such as TVs or speakers which generate an intense magnetic field.
Static electricity
RTo prevent static electricity damage to the interface connectors or other electrical components inside the unit, touch a grounded metal surface before touching the components.
Environment
RKeep the unit away from electrical noise generating devices, such as fluorescent lamps and motors.
RThe unit should be kept free from dust, high temperature and vibration.
RThe unit should not be exposed to direct sunlight.
RDo not place heavy objects on top of the unit. When you leave the unit unused for a long period of time, unplug this unit from the power outlet.
RThe unit should be kept away from heat sources such as heaters, kitchen stoves, etc. Damp basements should also be avoided.
For assistance, please visit http://www.panasonic.com/help |
3 |

Important Information
RDo not cover slots or openings on the unit. Inspect the air circulation vents regularly and remove any dust build-up with a vacuum cleaner (A).
A
A
–Copyright material or trademarks without the consent of the owner
–Postage stamps and other negotiable instruments
This list is not inclusive and no liability is assumed for either its completeness or accuracy. In case of doubt, contact your legal counsel.
Notice:
RInstall your machine near a supervised area to prevent illegal copies from being made.
Routine care
RWipe the outer surface of the unit with a soft cloth. Do not use benzine, thinner, or any abrasive powder.
Moving the unit
When moving the unit, carry it as shown.
Illegal copies
RIt is unlawful to make copies of certain documents.
Copying certain documents may be illegal in your country. Penalties of fines and/or imprisonment may be imposed on those found guilty. The following are examples of items that may be illegal to copy in your country.
–Currency
–Bank notes and checks
–Bank and government bonds and securities
–Passports and identification cards
4 |
For assistance, please visit http://www.panasonic.com/help |

Table of Contents
1. Introduction and Installation
Accessories |
|
|
1.1 |
Supplied accessories .................................... |
7 |
1.2 |
Accessory information ................................... |
7 |
Finding the Controls |
|
|
1.3 |
Button descriptions ........................................ |
8 |
1.4 |
Overview ....................................................... |
9 |
Installation |
|
|
1.5 |
Toner cartridge ............................................ |
10 |
1.6 |
Connections ................................................ |
12 |
1.7 |
Turning the power ON ................................. |
13 |
1.8 |
Recording paper .......................................... |
13 |
2. Preparation |
|
|
Setup |
|
|
2.1 |
Dialing mode (KX-MB1520 only) ................. |
17 |
2.2Selecting the operation mode (Scan/Copy)
(Fax: KX-MB1520 only) |
...............................17 |
Document Requirements |
|
2.3 Setting the original ...................................... |
18 |
Volume |
|
2.4Adjusting the volume (KX-MB1520
|
only) ............................................................ |
18 |
Initial Programming |
|
|
2.5 |
Date and time (KX-MB1520 only) ............... |
19 |
2.6 |
Your logo (KX-MB1520 only) ...................... |
19 |
2.7 |
Your fax number (KX-MB1520 only) ........... |
20 |
2.8 |
Installing Multi-Function Station .................. |
20 |
2.9 |
Starting Multi-Function Station .................... |
22 |
3. Printer |
|
|
Printer |
|
|
3.1 |
Printing from Windows applications ............ |
24 |
3.2 |
Easy Print Utility .......................................... |
25 |
4. Scanner
Scanner
4.1 |
Scanning from the unit (Push Scan) |
...........26 |
4.2 |
Scanning from a computer (Pull |
|
|
Scan) ........................................................... |
27 |
5. Copier |
|
|
Copy |
|
|
5.1 |
Making a copy ............................................. |
28 |
5.2 |
More copying features ................................. |
29 |
6. Fax (KX-MB1520 only)
Sending Faxes
6.1 |
Sending a fax manually ............................... |
34 |
6.2 |
Storing items for the phonebook ................. |
35 |
6.3 |
Sending a fax using phonebook .................. |
36 |
6.4Sending an electronic document as a fax
message from your computer |
.....................36 |
Receiving Faxes
6.5Receiving a fax automatically : Auto answer
ON |
...............................................................37 |
6.6Receiving a fax manually : Auto answer
OFF |
.............................................................38 |
6.7Using the unit with an answering
machine ....................................................... |
39 |
6.8Junk fax prohibitor (preventing fax reception
from undesired callers) ................................ |
40 |
6.9 Receiving a fax on your computer ............... |
41 |
7. Caller ID (KX-MB1520 only) |
|
Caller ID |
|
7.1 Caller ID service .......................................... |
42 |
7.2Viewing and calling back using caller
|
information .................................................. |
42 |
7.3 |
Erasing caller information ............................ |
42 |
7.4 |
Storing caller information into the |
|
|
phonebook .................................................. |
43 |
8. Distinctive Ring (KX-MB1520 |
|
|
only) |
|
|
Distinctive Ring |
|
|
8.1 |
Distinctive Ring service ............................... |
44 |
8.2Using two or more phone numbers on a single
telephone line |
..............................................44 |
8.3Using three or more phone numbers on a single
telephone line |
..............................................44 |
8.4Programming the ring pattern assigned for
|
fax ............................................................... |
44 |
9. Programmable Features |
|
|
Features Summary |
|
|
9.1 |
Programming ............................................... |
45 |
9.2 |
Basic features ............................................. |
46 |
9.3 |
Fax features (KX-MB1520 only) .................. |
50 |
9.4 |
Copy features .............................................. |
54 |
9.5 |
PC print features ......................................... |
55 |
9.6 |
Scan features .............................................. |
56 |
10. Useful Information |
|
|
Useful Information |
|
|
10.1 |
Character entry (KX-MB1520 only) ............. |
57 |
10.2 |
Status of the unit ......................................... |
57 |
10.3 |
Canceling the operations ............................ |
58 |
11. Help |
|
|
Reports and Displays |
|
|
11.1 |
Report messages (KX-MB1520 only) .......... |
59 |
11.2 |
Display messages ....................................... |
60 |
Troubleshooting |
|
|
11.3 |
When a function does not work ................... |
62 |
12. Paper Jams |
|
|
Jams |
|
|
12.1 |
Recording paper jam ................................... |
68 |
13. Cleaning |
|
|
Cleaning |
|
|
13.1 |
Cleaning the white plates and glass ............ |
71 |
5

Table of Contents
14. General Information |
|
|
Printed Reports |
|
|
14.1 |
Reference lists and reports |
.........................72 |
Specifications |
|
|
14.2 |
Specifications .............................................. |
72 |
15. Index |
|
|
15.1 |
Index............................................................ |
75 |
6

1. Introduction and Installation
1.1 Supplied accessories
A Toner cartridge |
B CD-ROM |
(starter)*1 |
(PNJKMB1502Z)*3 |
C Important |
D Quick installation |
information guide |
guide |
(English– |
(PNQW2924Z)*3 |
PNQW2949Z)*3 |
|
(Spanish– |
|
PNQW2948Z)*3 |
|
E Power cord |
F Telephone line cord |
(PNJA1022Z)*3 |
(PFJA02B002Y)*2*3 |
Note:
RISO/IEC 19752 standard is as follows:
–Environment: 23 ± 2 °C (73 ± 3 °F) / 50 ± 10% RH
–Print mode: Continuous printing
To place an order online (for customers in the U.S.A. or Puerto Rico)
Visit our web site: http://www.panasonic.com/mfpsupplies
RFor questions regarding online orders:
Email:
customerservice@shop.us.panasonic.com Telephone: (800) 405-0652
To place an order by fax
Fax: (800) 237-9080
Include:
–your name, shipping address and telephone number
–credit card type, number, expiration date and your signature
–part number and quantity
To place an order by telephone Telephone: (800) 332-5368
(Monday - Friday 9 am to 9 pm, EST.)
*1 Prints about 500 pages at ISO/IEC 19752 standard page.
*2 KX-MB1520 only
*3 Part numbers are subject to change without notice.
Note:
RSave the original carton and packing materials for future shipping and transportation of the unit.
RAfter unpacking the product, take care of the packing materials and/or power plug cap appropriately.
1.2 Accessory information
n Replacement accessory
Accessories for this unit can be ordered online, by fax, or by telephone.
To ensure that the unit operates properly, we recommend the use of Panasonic toner cartridge.
–Toner cartridge
R Model No. (Part No.): KX-FAT407
R Prints about 2,500 pages at ISO/IEC 19752 standard page.
For assistance, please visit http://www.panasonic.com/help |
7 |

1. Introduction and Installation
1.3 Button descriptions
AB C
D E F G H I J KLM N O
* The pictured model is KX-MB1520.
 MQualityN
RTo select the contrast (page 28) and resolution (page 28) when copying.
RTo select the contrast (page 34) and resolution (page 34) when sending a fax (KX-MB1520 only).
 MCaller IDN (KX-MB1520 only)
RTo use Caller ID features (page 42).
MPage LayoutN
RTo make copies using various page layouts (page 30).
 MMenuN
R To start or exit programming.
 Mic (KX-MB1520 only)
R The built-in microphone.
For beep sounds (KX-MB1500 only)
R Key beeps etc. will be heard.
 MFax Auto AnswerN (KX-MB1520 only)
RTo turn the auto answer setting ON/OFF (page 37).
 MFaxN (KX-MB1520 only)/MCopyN/MScanN
RTo switch to the fax mode (KX-MB1520 only), scan mode or copy mode (page 17).
 MRedialN (KX-MB1520 only)
RTo redial the last number dialed. If the line is busy when you send a fax, the unit will automatically redial the number 1 time.
MVN (Pause) (KX-MB1520 only)
RTo insert a pause during dialing.
MCopy SizeN
RTo select the copy size (page 28).
 MFlashN (KX-MB1520 only)
RTo access special telephone services or for transferring extension calls.
MZoomN
RTo enlarge or reduce a document when copying (page 29).
 MMuteN (KX-MB1520 only)
RTo mute your voice during a conversation. Press again to resume the conversation.
 MSP-PhoneN (KX-MB1520 only)
R To make or receive phone calls.
 Navigator key
RTo select desired settings.
RTo adjust the volume (KX-MB1520 only) (page 18).
MWN (Phonebook) (KX-MB1520 only)
RTo search for a stored item (page 36). To make a phone call, press MSP-PhoneN. To send a fax, see page 36.
RTo initiate the phonebook (page 35).
MXN (Collate)
R To make a collate copy (page 29).
 MSetN
MSetN
R To store a setting during programming.
 MStopN
RTo stop an operation or programming session.
RTo erase a character/number.
 MStartN
RTo copy a document (page 28).
RTo scan a document (push scan) (page 26).
RTo send a fax (KX-MB1520 only) (page 34).
 MToneN (KX-MB1520 only)
RTo change from pulse to tone temporarily during dialing when your line has rotary/pulse service.
8 |
For assistance, please visit http://www.panasonic.com/help |

1. Introduction and Installation
1.4 Overview
1.4.2 Rear view
A
1.4.1 Front view
A B C D
B C D
E FG
 Rear cover
 Power switch
 Power inlet
 USB interface connector
HI
* The pictured model is KX-MB1520.
 Speaker (KX-MB1520 only)
  Recording paper exit
RThe unit can hold up to approximately 30 sheets of printed paper. Remove the printed paper before the recording paper exit becomes full.
 Manual input tray
 Document cover
 Recording paper guides
 Paper input tray
 Front cover
 External telephone jack (KX-MB1520 only)
 Telephone line jack (KX-MB1520 only)
For assistance, please visit http://www.panasonic.com/help |
9 |

1. Introduction and Installation
1.5 Toner cartridge
The supplied toner cartridge is a starter toner cartridge.
Caution:
RRead the following instructions before you begin installation. After you have read them, open the toner cartridge protective bag. The toner cartridge contains a photosensitive drum. Exposing it to light may damage the drum.
–Do not expose the toner cartridge to light for more than 5 minutes.
–Do not touch or scratch the green drum surface.
–Do not place the toner cartridge near dust or dirt, or in a high humidity area.
–Do not expose the toner cartridge to direct sunlight.
RDo not leave the toner cartridge out of the protective bag for a long time. It will affect the printing quality.
RDo not add toner to the toner cartridge. We cannot be responsible for any damage to the unit or degradation of print quality which may occur from the use of a non-Panasonic toner cartridge.
1 Remove the toner cartridge from the protective bag.
2Shake the toner cartridge horizontally more than 5 times.
3Detach the orange protective cover (A) from the toner cartridge.
R Do not touch or scratch the green drum surface (B).
A
 B
B
4 Open the front cover (A).
A
10 |
For assistance, please visit http://www.panasonic.com/help |
1. Introduction and Installation
5Hold the toner cartridge (A) by the center handle, then insert firmly to lock into place.
A
6 Close the front cover.
Note:
RTo ensure that the unit operates properly, we recommend the use of Panasonic toner cartridge. See page 7 for accessory information.
Waste disposal method
Waste material should be disposed of under conditions which meet all national and local environmental regulations.
Toner save feature
If you want to reduce toner consumption, set the toner save setting to ON (feature #482 on page 49). The toner cartridge will last approximately 20 % longer. This feature may lower the print quality.
When to replace the toner cartridge
When the display shows the following, replace the toner cartridge.
–“TONER LOW”
–“TONER EMPTY”
–“DRUM LIFE LOW REPLACE SOON”
–“DRUM LIFE OVER CHANGE CARTRIDGE”
Toner cartridge life:
RSee page 74 for information on the toner cartridge life.
RTo check the life and quality of the drum inside the toner cartridge, print the printer test list (page 72). If the printing quality is still poor or “DRUM LIFE OVER CHANGE CARTRIDGE” appears on the display, replace the toner cartridge.
For assistance, please visit http://www.panasonic.com/help |
11 |

1. Introduction and Installation
1.6 Connections
Caution:
RWhen you operate this product, the power outlet should be near the product and easily accessible.
A
C
B E
Note:
RDo not place any objects within 10 cm (4 inches) of the right and left sides of the unit.
RIf any other device is connected to the same telephone line, this unit may disturb the network condition of the device (KX-MB1520 only).
Using surge protectors
RThe warranty does not cover damage due to power line surges or lightning. For additional protection, we recommend using a surge protector (E).
If the unit shares a single telephone line with a DSL service (KX-MB1520 only)
Fax transmission/reception may be disturbed, noise interference may be heard during telephone conversations, or Caller ID (page 42) may not function properly. Please attach a DSL filter (F) to the telephone line cord of the unit to prevent this. A DSL filter may be provided by your DSL service provider.
F
D
* The pictured model is KX-MB1520.  Power cord
R Connect to a power outlet (120 V, 60 Hz).
 Telephone line cord*1
R Connect to a single telephone line jack (RJ11C).
 [EXT] jack*1
RYou can connect an answering machine or an extension telephone. Remove the stopper if attached, and take care of it appropriately.
 Answering machine (not supplied)*1 *1 KX-MB1520 only
IMPORTANT NOTICE FOR THE USB
CONNECTION
RDO NOT CONNECT THE UNIT TO A COMPUTER WITH THE USB CABLE UNTIL PROMPTED TO DO SO DURING THE SETUP OF MULTI-FUNCTION STATION (page 20).
12 |
For assistance, please visit http://www.panasonic.com/help |

1. Introduction and Installation
1.7 Turning the power ON
Turn the power switch to the ON position (A).
A
1.8 Recording paper
Note for recording paper:
RWe recommend that you test paper (especially special sizes and types of paper) on the unit before purchasing large quantities.
RDo not use the following types of paper:
–Paper with cotton and/or fiber content that is over 20 %, such as letterhead paper or paper used for resumes
–Extremely smooth or shiny paper, or paper that is highly textured
–Coated, damaged or wrinkled paper
–Paper with foreign objects attached, such as tabs or staples
–Paper that has dust, lint or oil stains
–Paper that will melt, vaporize, discolor, scorch or emit dangerous fumes near 200 °C (392 °F), such as vellum paper. These materials may transfer onto the fusing roller and cause damage.
–Moist paper
–Inkjet paper
RSome paper is designed to be printed on only one side. Try printing on the other side of the paper if you are not happy with the print quality, or if misfeeding occurs.
RFor proper paper feeding and best print quality, we recommend using long-grained paper.
RDo not use paper of different types or thicknesses at the same time. This may cause paper jams.
RAvoid double-sided printing.
RDo not use paper printed from this unit for double-sided printing with other copiers or printers. This may cause paper jams. Do not use paper printed from other copiers or printers for printing with this unit. This may cause paper jams.
RTo avoid curling, do not open paper packs until you are ready to use the paper. Store unused paper in the original packaging, in a cool and dry location.
RFor customers who live in high humidity areas: Please be sure to store paper in an air-conditioned room at all times. If you print using moist paper, it may cause paper jam.
1.8.1 Paper input tray
The paper input tray unit can hold the following paper. If you load more than the specified amount of paper, paper jam may occur and the paper may be damaged.
–Up to 150 sheets of 64 g/m² to 75 g/m² (17 lb to 20 lb) paper.
–Up to 130 sheets of 90 g/m² (24 lb) paper.
RA4, letter and 16K-size paper can be used. 16K-size paper can only be used when using the unit for printing or copying.
RPlease refer to page 73 for information on recording paper.
For assistance, please visit http://www.panasonic.com/help |
13 |
1. Introduction and Installation
R |
The unit is set for printing letter-size plain paper |
3 Load the paper, print-side down (A). |
||
|
by default. |
Important: |
||
|
– To use other paper sizes, change the |
|||
|
R Push down to lock the plate (B) in the paper |
|||
|
recording paper size setting (feature #380 on |
|||
|
page 48). |
input tray, if necessary. |
||
|
– To use thin paper, change the recording paper |
|
|
|
|
type setting (feature #383 on page 49). |
A |
||
1 |
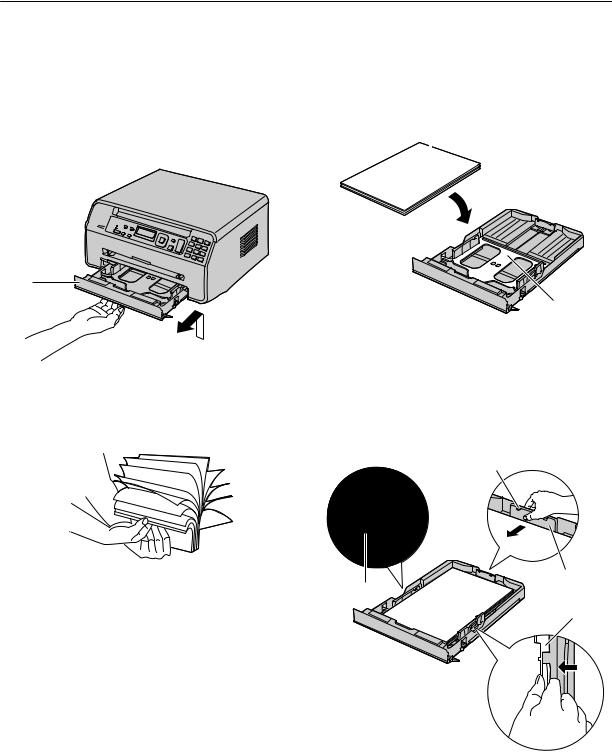
Lift the paper input tray (A), and pull it completely |
|||
|
|
|||
|
out. |
|
|
|
|
|
|
|
|
A
2Before loading a stack of paper, fan the paper to prevent paper jams.
B
4Adjust the recording paper guides. Pinch the rear guide (A), then slide it to match the paper size mark. Pinch the right guide (B), then slide it to adjust the width to the size of the recording paper.
R Make sure that the recording paper is under the paper limit mark (C), and the paper should not be loaded over the snubbers (D).
D
A
C
B
14 |
For assistance, please visit http://www.panasonic.com/help |

1. Introduction and Installation
5 Insert the paper input tray into the unit.
RAfter use, pull up the paper exit, and then replace the tab (A) to the original position.
A
Note:
RIf the paper is not loaded correctly, re-adjust the paper guides, or the paper may jam.
RIf the paper input tray does not close, the plate in the paper input tray may not be in the locked position. Push the paper down and make sure that the paper is laying flat in the paper input tray.
To expand the paper exit
You can temporarily expand the paper exit before printing.
–When printing on small sized paper, you can pull it out easily.
–When printing several pages (20 to 30 pages), paper stacking will be supported.
Caution for the paper input tray
R Do not drop the paper input tray.
RHold the paper input tray with both hands when removing or installing. The paper input tray weighs approximately 1.5 kg (3.3 lb) when fully loaded with recording paper.
Approx. 1.5 kg (3.3 lb)
For assistance, please visit http://www.panasonic.com/help |
15 |
1. Introduction and Installation
1.8.2 Manual input tray
You can use the manual input tray for printing with the computer and for copying. It can hold one page at a time. When printing or copying multiple pages, add the next page after the first page has been fed into the unit.
RPlease refer to page 73 for information on recording paper.
RWhen printing with the computer, custom size recording paper can also be used.
RThe unit is set for printing letter-size plain paper by default.
–To use other paper sizes, change the recording paper size setting (feature #381 on page 48).
–To use thin or thick paper, change the recording paper type setting (feature #384 on page 49).
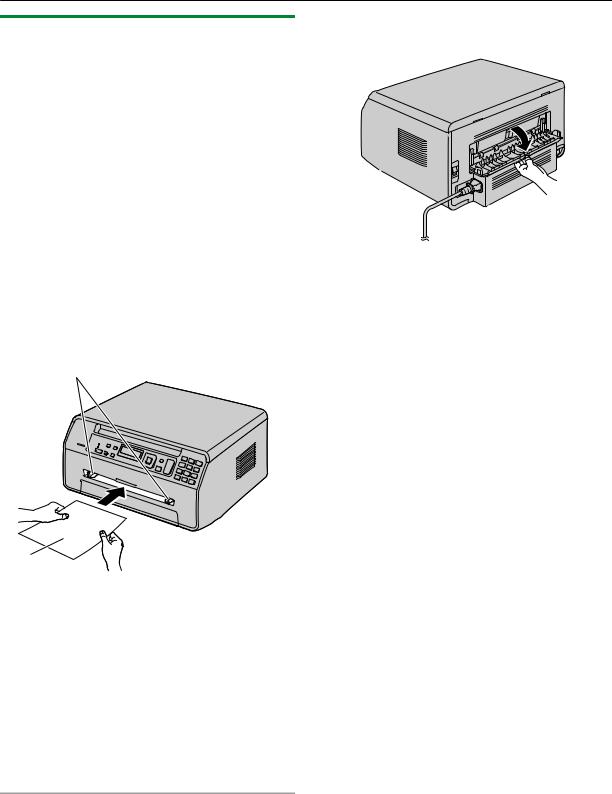
1Adjust the width of the guides (A) to the size of the recording paper.
2Insert the paper, print-side up (B) until the unit grasps the paper and a single beep is heard.
A
B
Note:
RTo print from the manual input tray;
–when printing with the computer, select #2 for the printer properties.
–when making a copy, set the copy input tray setting to “#2” beforehand (feature #460 on page 54).
If these settings are not changed, when printing or copying multiple pages, the 1st page will be printed from the manual input tray, but the rest of the pages will be printed from the paper input tray.
RIf the paper is not inserted correctly, re-adjust the paper, or the paper may jam.
When printing on thick paper
RWhen you use thick paper for the recording paper, be sure to open the rear cover before start printing. Thick paper will be printed out from the rear side.
Therefore, if you print with the cover closed, the paper may jam inside the unit.
16 |
For assistance, please visit http://www.panasonic.com/help |

2. Preparation
2.1 Dialing mode (KX-MB1520 only)
If you cannot dial (page 34), change this setting according to your telephone line service.
MMenuN
MSetN
1 MMenuN
2 Press MBNM1NM2NM0N to display “DIALING MODE”.
3Press M1N or M2N to select the desired setting. M1N “PULSE”: For rotary/pulse dial service. M2N “TONE” (default): For tone dial service.
4 MSetN
5 Press MMenuN to exit.
2.2 Selecting the operation mode (Scan/Copy) (Fax: KX-MB1520 only)
You can select the desired mode by pressing the following button repeatedly.
KX-MB1500 KX-MB1520
–MFaxN (KX-MB1520 only): Select this mode when using the unit as a fax machine (page 34).
–MCopyN: Select this mode when using the unit as a copier (page 28).
–MScanN: Select this mode when using the unit as a scanner (page 26).
Note:
RThe default operation mode is the copy mode.
RYou can change the default operation mode (feature #463 on page 49) and the timer before returning to the default operation mode (feature #464 on
page 49) (KX-MB1520 only).
For assistance, please visit http://www.panasonic.com/help |
17 |

2. Preparation
2.3 Setting the original
A
B
1 Open the document cover (A).
2Place the document FACE DOWN on the scanner glass (B), aligning the top left of the document with the corner where the  mark is positioned.
3 Close the document cover.
Note:
RPlace the original onto the scanner glass gently. To avoid malfunction, do not press down too firmly.
RIf the original is a book thicker than 15 mm (19/32"), do not close the document cover.
RConfirm that any ink, paste or correction fluid has dried completely.
REffective scanning area is shown by the shaded area:
Effective scanning area
|
|
|
|
|
|
4 mm |
|
|
|
|
|||
|
|
|
|
(5/32") |
||
|
|
|
|
|
208 mm |
|
|
|
|
|
(8 3/16") |
||
|
|
|
|
|
|
4 mm |
|
|
|
|
|||
|
|
|
|
|
|
|
|
|
|
|
(5/32") |
||
|
|
|
|
|||
4 mm |
|
289 mm |
|
|
4 mm |
|
|
|
|
||||
(5/32") |
(11 3/8") |
|
(5/32") |
|||
2.4 Adjusting the volume (KX-MB1520 only)
Important:
RBefore adjusting the volume, set the operation mode to fax mode. If the MFaxN light is OFF, turn it ON by pressing MFaxN repeatedly.
MSetN MCNMDN
MFaxN
Ringer volume
While the unit is idle, press MCN or MDN.
To turn the ringer OFF
Press MCN repeatedly to display “RINGER OFF= OK?”.
A MSetN
RThe unit will not ring.
RTo turn the ringer back ON, press MDN.
Speaker volume
While using the speakerphone, press MCN or MDN.
18 |
For assistance, please visit http://www.panasonic.com/help |

2. Preparation
2.5 Date and time (KX-MB1520 only)
We recommend you to set the date and time. The other party will receive your unit’s date and time as the header information.
MMenuN
MSetN MFNMEN
MFaxN
1 MMenuN A MBNM1NM0NM1N A MSetN
2Enter the current month/date/year by selecting 2 digits for each.
Example: August 3, 2011
M0NM8N M0NM3N M1NM1N
3Enter the current hour/minute by selecting 2 digits for each.
Example: 10:15 PM (12 hour clock format)
1.M1NM0N M1NM5N
2.Press MGN repeatedly to select “PM”.
4 MSetN
5 Press MMenuN to exit.
Note:
RTo check the current date and time setting, temporarily change the unit to the fax mode by pressing MFaxN repeatedly (page 17).
RYour unit’s date and time will be used as the header information for the following:
– When sending faxes (page 34).
RIf the date and time is not set correctly, the other party will receive an incorrect date and time as their header. This may confuse the other party.
RThe accuracy of the clock is approximately ±60 seconds a month.
To correct a mistake
Press MFN or MEN to move the cursor to the incorrect number, and make the correction.
If you have subscribed to a Caller ID service
The date and time will be automatically set according to the received caller information.
RIf the time has not previously been set, Caller ID will not adjust the clock.
RYou can turn this feature OFF (feature #226 on page 48).
2.6 Your logo (KX-MB1520 only)
You can program your logo (name, company name, etc.) so that it appears on the top of each page sent.
MStopN MMenuN
MSetN MFNMEN
1 MMenuN A MBNM1NM0NM2N A MSetN
2Enter your logo, up to 30 characters (see page 57 for character entry). A MSetN
3 Press MMenuN to exit.
To correct a mistake
Press MFN or MEN to move the cursor to the incorrect character, and make the correction.
R To erase all characters, press and hold MStopN.
For assistance, please visit http://www.panasonic.com/help |
19 |

2. Preparation
2.7 Your fax number (KX-MB1520 only)
You can program your fax number so that it appears on the top of each page sent.
MStopN MMenuN
MFlashN MSetN MFNMEN
1 MMenuN A MBNM1NM0NM3N A MSetN
2Enter your fax number, up to 20 digits. R To enter a “+”, press MGN.
R To enter a space, press MBN.
R To enter a hyphen, press MFlashN. R To erase a number, press MStopN.
3 MSetN
4 Press MMenuN to exit.
To correct a mistake
Press MFN or MEN to move the cursor to the incorrect number, and make the correction.
R To erase all numbers, press and hold MStopN.
2.8 Installing Multi-Function
Station
2.8.1 Required computer environment
Panasonic Multi-Function Station software enables the unit to carry out the following functions:
–Printing on plain paper, thin and thick paper and labels
–Previewing documents and changing printer settings before printing (Easy Print Utility)
–Scanning documents and converting an image into text with OCR software (not supplied)
–Scanning from other applications for Microsoft® Windows® that support TWAIN scanning and WIA scanning (Windows XP/Windows Vista®/Windows 7)
–Storing, editing or erasing items in the phonebook using your computer (KX-MB1520 only)
–Programming the features using your computer
–Sending, receiving fax documents using your computer (KX-MB1520 only)
To use Multi-Function Station on your computer, the following are required:
Operating System:
Windows 2000/Windows XP/Windows Vista/Windows 7
CPU:
Windows 2000: Pentium® P or higher processor Windows XP: Pentium Q or higher processor Windows Vista/Windows 7: Pentium 4 or higher processor
RAM:
Windows 2000/Windows XP: 128 MB (256 MB or more recommended)
Windows Vista: 512 MB (1 GB or more recommended) Windows 7: 1 GB (2 GB or more recommended)
Other Hardware:
CD-ROM drive
Hard disk drive with at least 600 MB of available space USB interface
Other:
Internet Explorer® 5.0 or later
Warning:
RTo assure continued emission limit compliance:
–use only shielded USB cable (Example: Hi-Speed USB 2.0 certified cable).
RTo protect the unit, use only shielded USB cable in areas where thunderstorms occur.
Note:
RA USB cable is not supplied. Please purchase a shielded Type-A male/Type-B male USB cable.
20 |
For assistance, please visit http://www.panasonic.com/help |
2. Preparation
2.8.2 Installing Multi-Function Station on a computer
RInstall Multi-Function Station (CD-ROM) before connecting the unit to a computer with the USB cable. If the unit is connected to a computer with the USB cable before installing Multi-Function Station, the [Found New Hardware Wizard] dialog box will appear. Click [Cancel] to close it.
RThe screenshots shown in these instructions are for Windows XP and are included for reference only.
RThe screenshots shown in these instructions may differ slightly from those of the actual product.
RSoftware features and appearance are subject to change without notice.
RIf you are also using KX-MB200/KX-MB700/ KX-FLB880 series, see page 67.
1Start Windows and exit all other applications.
R You must be logged in as an administrator in order to install Multi-Function Station.
2Insert the supplied CD-ROM into your CD-ROM drive.
R If the [Select Language] dialog box appears, select the language that you want to use with this software. Click [OK].
R If the installation does not start automatically:
Click [Start]. Choose [Run...]. Type “D:\Install”
(where “D” is the drive letter of your CD-ROM drive). Click [OK].
(If you are not sure what the drive letter is for your CD-ROM drive, use Windows Explorer and look for the CD-ROM drive.)
3[Easy Installation]
R The installation will start automatically.
4When the setup program starts, follow the on-screen instructions.
R Easy Print Utility (page 25) and Device Monitor (page 58) will also be installed.
5If the [Connection Type] dialog box appears, select
[Connect directly with a USB cable.]. A [Next]
R The [Connect Device] dialog box will appear.
6Connect the unit to a computer with the USB cable (A), then click [Next].
A
RIf the unit is connected to your computer, the model name will be automatically detected.
RYou can change the name of the unit if necessary.
7Click [Install], then follow the on-screen instructions. R The files will be copied to your computer.
Important notice
If you are using Windows XP, Windows Vista or Windows 7, a message may appear after connecting the unit with the USB cable. This is normal and the software will not cause any difficulties with your operating system. You can continue the installation with no problem. This kind of message is displayed:
RFor Windows XP users
“The software you are installing for this hardware has not passed Windows Logo testing to verify its compatibility with Windows XP.”
RFor Windows Vista/Windows 7 users
“Would you like to install this device software?”
To view or install the operating instructions data
1.Start Windows and insert the supplied CD-ROM into your CD-ROM drive.
2.Click [Operating Instructions], then follow the on-screen instructions to view or install the operating instructions in PDF format.
R Adobe® Reader® is required to view the operating instructions.
Note:
RIf the screen prompts you to insert the CD-ROM for the operating system when installing Multi-Function Station, insert it into your CD-ROM drive.
RIf you install the operating instructions, you can view
it anytime by clicking [ ] on the Multi-Function Station launcher.
To use another unit with the computer
You need to add the printer driver for each unit, as follows.
1.Start Windows and insert the supplied CD-ROM into your CD-ROM drive.
For assistance, please visit http://www.panasonic.com/help |
21 |

2. Preparation
2.[Modify] A [Add Multi-Function Station Driver]. Then follow the on-screen instructions.
Note:
RYou cannot connect more than one unit to the same computer at the same time.
To modify the software (To add or uninstall each component)
You can select the components to install or uninstall anytime after the installation.
You must be logged in as an administrator in order to modify Multi-Function Station.
1.Start Windows and insert the supplied CD-ROM into your CD-ROM drive.
2.[Modify] A [Modify Utilities]. Then follow the on-screen instructions.
To uninstall the software
You must be logged in as an administrator in order to uninstall Multi-Function Station.
[Start] A [All Programs] or [Programs] A [Panasonic] A the unit’s name A [Uninstall]. Then follow the on-screen instructions.
2.9 Starting Multi-Function Station
[Start] A [All Programs] or [Programs] A [Panasonic] A the unit’s name A [Multi-Function
Station]
R Multi-Function Station will appear.
* The pictured model is KX-MB1520.
[Scan] (page 27)
RTo scan and display the scanned images.
RTo scan and create an image file.
RTo scan and send by email.
RTo scan and convert an image into editable text data using OCR software (not supplied).
[PC FAX] (KX-MB1520 only)
RTo send a document created on the computer as a fax message (page 36).
RTo display a fax document received on the computer (page 41).
[Remote Control] (page 57)
RTo program the features.
RTo store, edit or erase items in phonebook.*1
RTo view items in the journal report or Caller ID list.*1
RTo store caller information into phonebook.*1
*1 KX-MB1520 only
[Utilities]
R To start the Multi-Function Viewer (page 27). R To start the Device Monitor (page 58).
R To start the OCR application (page 26). [OCR Path] must be set beforehand.
[Settings] (page 23)
R To change the general settings.
R To change the settings for scanning.
[ ]
]
R For detailed instructions on Multi-Function Station. R To view operating instructions.
22 |
For assistance, please visit http://www.panasonic.com/help |

2. Preparation
[ ]
]
R To display usage tips.
[  ]
]
R To display information about Multi-Function Station.
Note:
RYou can confirm if the unit is connected to your computer by using Device Monitor (page 58).
RComputer features (printing, scanning, etc.) may not function properly in the following situations:
–When the unit is connected to a computer that was custom-built by the user.
–When the unit is connected to the computer via a PCI card or other expansion card.
–When the unit is connected to another piece of hardware (such as a USB hub or interface adapter) and not connected directly to the computer.
To change the settings
You can change the settings for Multi-Function Station beforehand.
1.Select [Settings] from Multi-Function Station.
2.Click the desired tab and change the settings. A
[OK]
[General]
–[Launcher display setting]: To select the display type of the launcher.
–[OCR Path]: To select the OCR software (not supplied).
[Scan]
–[Save to]: To select the folder where the scanned image will be saved.
–[Viewer][File][Email][OCR][Custom]: To change scanning settings for Multi-Function scan application.
To select the default Email software
The default Email software is used when using scan to email (page 26).
You can select the default Email software as follows.
For Windows 2000:
1.[Start] A [Settings] A [Control Panel] A [Internet Options] A [Programs] A [E-mail]
2.Select the desired MAPI-compliant Email software such as [Outlook Express], etc. A [OK]
For Windows XP:
1.[Start] A [Control Panel] A [Internet Options] A [Programs] A [E-mail]
2.Select the desired MAPI-compliant Email software such as [Outlook Express], etc. A [OK]
For Windows Vista:
1.[Start] A [Control Panel] A [Internet Options] A [Programs] A [Set programs] A [Set program access and computer defaults]
R If the [User Account Control] dialog box appears, click [Continue].
2.[Custom]
3.Select the desired MAPI-compliant Email software such as [Windows Mail], etc. from [Choose a default e-mail program]. A [OK]
For Windows 7:
1.[Start] A [Control Panel] A [Network and Internet] A [Internet Options] A [Programs] A [Set programs] A [Set program access and computer defaults]
2.[Custom]
3.Select the desired MAPI-compliant Email software from [Choose a default e-mail program]. A [OK]
For assistance, please visit http://www.panasonic.com/help |
23 |
3. Printer
3.1 Printing from Windows applications
You can print a file created in a Windows application. For example, to print from WordPad, proceed as follows:
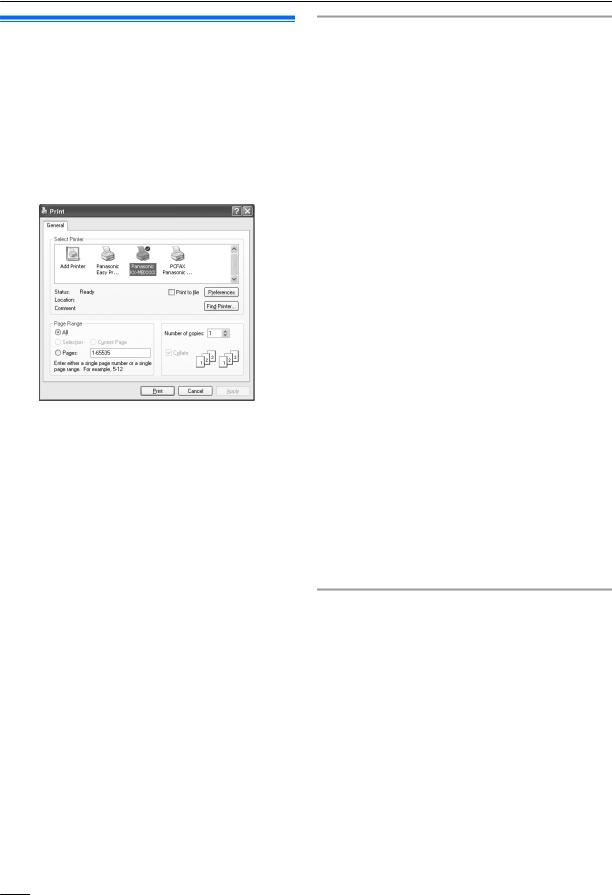
1 Open the document you want to print.
2Select [Print...] from the [File] menu. R The [Print] dialog box will appear.
For details about the [Print] dialog box, click [?], then click the desired item.
* The pictured model is KX-MB1520.
Note:
RFor Microsoft PowerPoint®, select [Color] or remove the check next to [Grayscale] in the print dialog so that colored or gray objects will be printed in grayscale properly.
3Select the unit’s name as the active printer.
R If you have changed the name of the unit when installing, select that name from the list.
RTo change the printer settings, proceed as follows.
For Windows 2000:
Click the desired tab and change the printer settings.
For Windows XP/Windows Vista/Windows 7:
Click [Preferences], then click the desired tab. Change the printer settings, then click [OK].
4Click [Print].
R The unit will start printing.
Note:
RTo stop printing from the unit, see page 58.
RTo load paper, see page 13, 16.
RFor details about the paper specifications, see page 73.
RIf a printing error occurs, the Device Monitor (page 58) will start automatically and display the error information.
Setting the printer properties
You can change the printer setting in step 3. We recommend that you test paper (especially special sizes and types of paper) on the unit before purchasing large quantities.
You can change or display the settings on the following tabs.
[Basic]: Paper size, media type, pages per sheet, etc. [Output]: Number of prints, collate, etc.
[Quality]: Quality, contrast, toner save feature, etc. [Effects]: Watermark, overlay.
[Profile]: Saving the desired settings, selecting the saved settings, etc.
[Support]: Version information.
Note:
RSelect the desired media type on the [Basic] tab according to the recording paper.
Recording paper type |
Media type |
|
|
Plain paper |
[Plain Paper] |
75 g/m² to 90 g/m² |
|
(20 lb to 24 lb) |
|
Thin paper |
[Thin Paper] |
64 g/m² to 75 g/m² |
|
(17 lb to 20 lb) |
|
Thick paper |
[Thick Paper] |
90 g/m² to 165 g/m² |
|
(24 lb to 44 lb) |
|
Label |
[Label] |
RWhen printing from a computer, the printer properties setting overrides the following unit’s programming features:
–Media type setting (feature #383 on page 49 and feature #384 on page 49)
–Toner save setting (feature #482 on page 49)
To print on labels
You can print not only on plain paper but also on special media (labels).
RPlease refer to page 73 for information on recording paper.
RTo load paper, see page 16.
Use labels designed for laser printing. We recommend the following:
Avery® 5160/5161/5162/5163/5164/5165/5167/5168
XEROX® LWH100/LWH110/LWH120/LWH130/LWH140
RUse the manual input tray to print labels.
RLoad label sheets one page at a time for printing, print-side up.
RRemove each label after printing.
RDo not use the following types of labels:
24
 Loading...