Panasonic KX-DT390 User Manual

Quick Reference Guide
Digital DSS Console
Model No. KX-DT390
Thank you for purchasing a Digital DSS Console. Please read this manual carefully before using this product and save this manual for future use. This manual is designed to be used with your Digital DSS Console and a Panasonic PBX.
The Digital DSS Console can be used with the following Panasonic Digital Proprietary Telephones (DPTs): KX-DT333, KX-DT343, and KX-DT346.
The Digital DSS Console must be connected directly to the main unit.
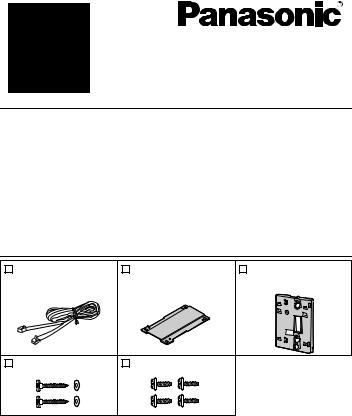
Accessories (included)
Telephone Line |
Plate: 1 |
Wall Mounting |
Cord: 1 |
|
Adaptor*1: 1 |
Screws for wall: 2 |
Screws for plate: 4 |
|
*1 This telephone comes with the wall mounting adaptor already attached. To remove the adaptor, refer to step 1 on page 4.
Document Version 2009-03

Location of Controls
DSS Buttons with Busy Lamp Field (BLF): To access an extension, simply press a DSS button.
These buttons also can be assigned for the One-touch Dialing and reassigned to other features.
The BLF indicates the current status of the corresponding extension.
Connection
39 |
54 |
69 |
84 |
38 |
53 |
68 |
83 |
37 |
52 |
67 |
82 |
36 |
51 |
66 |
81 |
35 |
50 |
65 |
80 |
34 |
49 |
64 |
79 |
33 |
48 |
63 |
78 |
32 |
47 |
62 |
77 |
31 |
46 |
61 |
76 |
30 |
45 |
60 |
75 |
29 |
44 |
59 |
74 |
28 |
43 |
58 |
73 |
27 |
42 |
57 |
72 |
26 |
41 |
56 |
71 |
25 |
40 |
55 |
70 |
<Back view> |
Connect to a PBX. |
The telephone line cord (included)
CAUTION:
Ensure the cord is inserted in the grooves and the hook ( A ) to prevent damage to the connector or the cord itself.
Operation Board Angle Adjustment
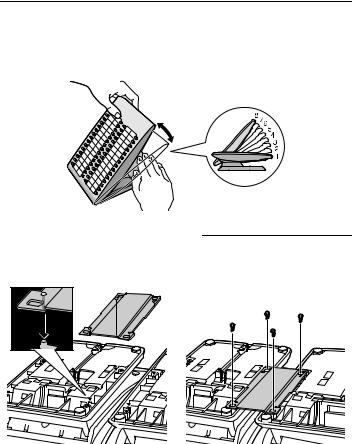
The angle of the operation board can be set to one of eight angles (level 1 = 0°, level 8 = 45°).
CAUTION:
Hold the operation board until the operation board is secured at the desired angle. Make sure you do not pinch your fingers when raising or lowering the operation board.
To raise:
Gently lift the operation board one level at a time.
2 |
Document Version 2009-03 |

Operation Board Angle Adjustment
To lower:
Raise the operation board to level 8. Next, with one hand on the base of the unit, lift the operation board again to release the latch, then slowly push the operation board down to level 1. If the operation board cannot be lowered to level 1, repeat this step.
|
Attaching a DPT |
1. Fit the protrusions on the |
2. Attach the plate with the 4 |
KX-DT390 and a DPT into the |
screws (included). |
4 holes on the plate (included). |
|
Document Version 2009-03 |
3 |
 Loading...