


HM-TA2
Table of contents
 Loading...
Owner’s Manual
For USA and Puerto Rico assistance, please call: 1-800-211-PANA(7262) or,
contact us via the web at: http://www.panasonic.com/contactinfo
For Canadian assistance, please call: 1-800-561-5505 or visit us at www.panasonic.ca
P
PC
High Definition Mobile Camera
Model No. HM-TA20
HM-TA2
Before connecting, operating or adjusting this product, please read the
instructions completely.
Spanish Quick Use Guide is included.
Guía para rápida consulta en español está incluida.
1AG6P1P6253--(S)
VQT3N87
Dear Customer,
HM-TA2
Thank you for choosing
Panasonic!
You have purchased one
of the most sophisticated
and reliable products on
the market today. Used
properly, we’re sure it will
bring you and your family
years of enjoyment.
Please take time to fi ll in th e i nf orm a ti o n on the ri gh t.
HM-TA20
The serial number is on the tag located on the inner side of the HDMI/
Headphone cover of your ca mera.
The serial number is on the tag located on the inner side of the SD card
door of your camera.
Be sure to retain this manual as your convenient camera information
source.
Date of Purchase
Dealer Purchased From
Dealer Address
Dealer Phone No.
Model No.
Serial No.
Safety Precautions
HM-TA20
WARNING:
TO REDUCE THE RISK OF FIRE, ELECTRIC SH OCK OR
PRODUCT DAMAGE,
≥ Do not let water or other liquids drip or splash inside the unit.
≥ Do not expose accessories to rain, moi st ure, dripping or splashing.
≥ Do not place objects filled with liquids, such as vases, on
accessories.
≥ Use only the recommended accessories.
≥ Do not remove covers.
≥ Do not repair this unit by yourself. Refer servicing to qualified
service personnel.
2 VQT3N87

WARNING:
HM-TA2
TO REDUCE THE RISK OF FIRE, ELECTRIC SH OCK OR
PRODUCT DAMAGE,
≥ Do not expose this unit to rain, moistu re, dripping or splashing.
≥ Do not place objects filled with liquids, such as vases, on this unit.
≥ Use only the recommended accessories.
≥ Do not remove covers.
≥ Do not repair this unit by yourself. Refer servicing to qualified
service personnel.
CAUTION!
DO NOT INSTALL OR PLACE THIS UNIT IN A BOOKCASE, BUILTIN CABINET OR IN ANOTHER CONFINED SPACE. ENSURE THE
UNIT IS WELL VENTILATED. TO PREVENT RISK OF ELECTRIC
SHOCK OR FIRE HAZARD DUE TO OVERHEATING, ENSURE
THAT CURTAINS AND ANY OTHER MATERIALS DO NOT
OBSTRUCT THE VENTILATION VENTS.
AC adaptor (optional)
This AC adaptor operates on AC between 100 V and 240 V.
But
≥ In the U.S.A. and Canada, the AC adaptor must be connected to a
120 V AC power supply only.
≥ When connecting to an AC supply outside of the U.S.A. or Canada,
use a plug adaptor to suit the AC outlet configuration.
THE SOCKET OUTLET SHALL BE INSTALLED NEAR THE
EQUIPMENT AND SHALL BE EASILY ACCESSIBLE.
VQT3N87 3

THE FOLLOWING APPLIES ONLY IN THE U.S.A.
FCC Note:
This equipment has been tested and found to comply with the limits for a
Class B digital device, pursuant to Part 15 of the FCC Rules. These limits
are designed to provide reasonable protection against harmful
interference in a residential installation. This equipment generates, uses,
and can radiate radio frequency energy and, if not installed and used in
accordance with the instructions, may cause harmful interferenc e to radio
communications. However , there is no guarantee that interference will not
occur in a particular installation. If this equipment does cause harmful
interference to radio or television reception, which can be determined by
turning the equipment off and on, the user is encouraged to try to correct
the interference by one or more of the following measures:
≥ Reorient or relocate the receiving antenna.
≥ Increase the separation between the equipment and receiver.
≥ Connect the equipment into an outlet on a circuit different from that
to which the receiver is connec ted.
≥ Consult the dealer or an experienced radio/TV technician for help.
FCC Caution: To assure continued compliance, follow the
Any changes or modifications not expressly approved by the party
responsible for complianc e could void the user’s authority to operate
this equipment.
Declaration of Confor m it y
Trade Name: Panasonic
Model No.: HM-TA20/ HM-TA2
Responsible party: Panasonic Corporation of North Amer ica
Support Contact: Panasonic Consumer Electronics Company
This device complies with Part 15 of the FCC Rules. Operation is
subject to the following two conditions: ( 1) This device may not cause
harmful interference, and (2) this device mus t ac cept any interf ere nce
received, including interference that may cause undesired operation.
attached installation instructions and use only
shielded inter face cab les w ith fe rrite core w hen
connecting to computer or peripheral devices.
One Panasonic Way, Secaucus, NJ 07094
1-800-211-PANA (7262)
THE FOLLOWING APPLIES ONLY IN CANADA.
This Class B digital apparatus complies with Canadian ICES-003.
4 VQT3N87

Product Identification Marking is located on the bottom of unit.
HM-TA20 HM-TA2
A lithium ion battery that is recyclable
powers the product you have purchased.
Please call 1-800-8-BATTERY for information
on how to recycle this battery.
U.S.A./CANADA CONSUMERS: ATTENTION:
WARNING
<For USA-California only>
This product contains a CR Coin Cell Lithium Battery which contains
Perchlorate Material – special handling may apply.
See www.dtsc.ca.gov/hazardouswaste/perchlorate
.
Precautions
USE & LOCATION
≥ TO AVOID SHOCK HAZARD ... Y our c amera and power supply sho uld
not be exposed to rain or moisture . Do not co nnect the po wer supp ly or
operate your camera if it gets we t. Your camera has been designed for
outdoor use, however it is no t designed to sustain direct exposure to
water, rain, sl eet, snow, sand, dust, or a dire ct s plash ing from a pool or
even a cup of coffee. This action could permanently damage the
internal parts of your cam er a . Do no t attempt to disasse m bl e this un it.
There are no user serviceable parts inside. Unplug your camera from
the power supply before cleaning.
≥ AS WITH ANY SMALL OBJECT, SD CARDS CAN BE SWALLOWED
BY YOUNG CHILDREN. DO NOT ALLOW CHILDREN TO HANDLE
THE SD CARD.
VQT3N87 5
CAUTION
≥ DO NOT AIM YOUR CAMERA AT THE SUN OR OTHER BRIGHT
OBJECTS
≥ DO NOT EXPOSE YOUR CAMERA TO EXTENDED HIGH
TEMPERATURE ... Such as, in direct sunlight, inside a closed car,
next to a heater, etc... This action could permanently damage the
internal parts of your camera.
≥ AVOID SUDDEN CHANGES IN TEMPERATURE ... If the unit is
suddenly moved from a cold place to a warm place, moisture may form
on the SD card and inside the unit.
≥ DO NOT LEAVE YOUR CAMERA OR THE POWER SUPPLY
TURNED ON WHEN NOT IN USE.
≥ STORAGE OF YOUR CAMERA ... Store and handle your camera in a
manner that will not subject it to un necessary movement (avoid
shaking and striking). Your camera contains a sensitive pick-up device
which could be damaged by improper handling or storage.
CARE
≥ TO CLEAN YOUR CAMERA ... Do not use strong or abrasive
detergents when cleaning your camera body.
TO PROTECT THE LENS
≥
your hand. Use a commercial camera lens solution and lens paper
when cleaning the lens. Improper cleaning can scratch the lens coating.
≥ TO PROTECT THE FINISH OF YO UR CAMERA ... Before handling
your camera, make sure your hands and face are free from any
chemical products, suc h as suntan lotion, as it may damage the finish.
-If you see this symbol-
Information on Dispos a l in other Countr i e s outside the
European Union
This symbol is only valid in the European Union.
If you wish to discard this product, please contact
your local authorities or dealer and ask for the
correct method of disposal.
... Do not touch the surface of the lens with
6 VQT3N87
∫ Indemnity about recorded content
HM-TA2
HM-TA20
Panasonic does not accept any responsibility for damages directly or
indirectly due to any type of problems that result in loss of recording or
edited content, and doe s not guarantee any content if recor ding or editing
does not work properly. Likewise, the above also applies in a case wher e
any type of repair is made to the unit.
∫
About recording method and compatibility of this unit
This unit can record detailed hi gh definition images based on the MP4
format (MPEG-4 AVC/H.264 codec).
≥ Since the recording method is differen t from the AVCHD format, the
data is not compatible.
∫ Cards that you can use with this unit
SD Memory Card, SDHC Memory Card and SDXC Memory Card
≥ 4 GB or more Memory Cards that do not have the SDHC logo or 48 GB
or more Memory Cards that do not have the SDXC logo are not based
on SD Memory Card Specifications.
≥ Refer to page 27 for more details on SD cards.
∫ For the purposes of this owner’s manual
≥ SD Memory Card, SDHC Memory Card and SDXC Memory Card are
referred to as the “SD ca rd” .
≥ Pages for reference are indicated by an arrow, for example: l 00
This owner’s manual is designed for use with models
and . Pictures may be slightly dif ferent from the original.
≥ The illustrations used in this owner’s manual show model
, however, parts of the explanation refer to different
models.
≥ Depending on the model, some functions are not availa ble.
≥ Features may vary, so pl ease read carefully.
≥ Not all models may be available depending on the region of
purchase.
HM-TA20
VQT3N87 7

Contents
HM-TA20
Please be sure to read “(Important) About the Waterproof/
Dustproof and Anti-shock Performance of this unit
[HM-T A 20]” (
unit from being mishandled, which may cause water to seep in.
(Important)
About th e Wate r p ro of/
Dustproof and Anti-shock
Performance of this unit
[HM-TA20]................................. 10
Check before using
underwater .............................. 12
Using this unit underwater....... 14
Care of this unit after
using it underwater.................. 15
Accessories.............................. 17
Parts identification and
handling.................................... 18
Charging the battery................ 22
Charging and motion pictures
recording time ..... .. ... ............... 25
Approximate operating time and
number of recordable
still pictures ...... ... .. ................. . 25
Charging and voices recording
time ......................................... 26
Preparing the card ................... 27
Cards that y o u can use
with this unit ............................ 27
Inserting/removing
an SD card .............................. 29
Turning the unit on/off............. 31
How to use the touch
screen ....................................... 32
Setting date and time............... 33
l
10) before using this unit underwater to prevent the
Recording/Playback
Recording. ... ... ................. .. ... .... 34
Selecting a mode .................... 34
Recording m otion picture s ...... 35
Recording still pictures............ 36
Recording voices .. ... ... ............ 37
Intelligent Auto Mode.............. 38
Digital zoom in/out function..... 39
Recording with the LED light... 39
Night View mode..................... 40
Effect function
Preparation
(applying special effects) ........ 40
For underwater recording
[HM-TA20]................ ... ... ......... 41
Playback ................................... 42
Playing back the slide show/
continuous playback.. .. ........... 46
Zooming in on a still picture
during playback
(Playback zoom)..................... 47
Deleting scenes, still pictures
or voices..... ... ................. .. ... ... . 48
Creating still picture from
motion picture .................. ... .... 50
To delete unwanted parts of a
motion picture .................. ... .... 51
Setting of online sharing of
motion picture s......... ... ............ 52
Using the Setup menu
screen ........................... ... ......... 53
Menu list.................................. 53
Watching Motion/Still Pictures
on your TV................................ 58
8 VQT3N87

With a PC
What you can do with a PC..... 60
Operating environment ........... 62
Installation ................................ 65
Connecting to a PC.................. 67
About the PC display............... 68
Starting HD Writer PE 2.0 ........ 69
Reading the operating
instructions of the softwa re
applications ............................. 69
If using Mac .............................. 70
To use as a camera for
Skype ........................................ 71
How to connect ....................... 73
Others
Indications................................ 74
Messages/Troubleshooting..... 77
Cautions for use....................... 81
Requests when disposing
of this unit................................. 86
About copyrigh t ................. .. ... . 89
Recording modes/approximate
recordable time
(motion pictures).......................90
Approximate number of
recordable pictu re s .. ... ... ......... 91
Recording modes/approximate
recordable time (voic e s)........... 9 1
Specifications........................... 92
Optional access o ri es...... ..........98
Accessory Order Form
(For USA and Puerto Rico
Customers).............................. 99
Limited Warranty (ONL Y FOR
U.S.A. AND PUERTO RICO) ...100
Warranty
(For Canadian Customers).....102
Index ........................................103
Spanish Quick Use Guide/
Guía española para el
uso rápido................................104
VQT3N87 9

(Important) About the Waterproof/Dustproof and Anti-shock Performance of this unit [HM-TA20]
Waterproof/Dustproof Performance
This unit’s waterproof/dustproof rating complies with the
“IP58” rating. Provided the care and maintenance guidelines
described in this document are strictly followed, this unit can
operate underwater, to a depth not exceeding 3m (10 feet) for
a time not exceeding 60 minutes. (*1)
Anti-shock Performance
This unit also complies with “MIL-STD 810F Method 516.5Shock”. This unit has cleared a drop test from a height of
1.5 m (5.0 feet) onto 3 cm (0.10 feet) thick plywood. In most
cases this unit should not sustain any damage if dropped from
a height not exceeding 1.5 m (5.0 feet). (*2)
This does not guarantee no destruction, no malfunction, or
waterproofing in all conditions.
*1 This means that this unit can be used underwater for specified time
in specified pressure in accordance with the handling method
established by Panasonic .
*2 “MIL-STD 810F Method 516.5-Shock” is the test met hod s tan dard of
the U.S. Defense Department, which specifies performing drop tests
from a height of 122 cm (4.0 feet), at 26orientations (8 corners,
12 ridges, 6 faces) using 5 sets of devices, and passing the
26 orientation drops within 5 devices. (If failure occurs during the
test, a new set is used to pass the drop orientation test with i n a total
of 5 devices.)
Panasonic’s test method is based on the above “MIL-ST D 810F
Method 516.5-Shock”. However, the drop height was changed from
122 cm (4.0 feet) to 150 cm (5.0 feet) dropping ont o 3cm (0.10feet )
thick plyboard. This drop test was passed.
(Disregarding appearance change such as loss of paint or distor tion
of the part where dr op im pa ct is ap pl ied.)
10 VQT3N87

∫ Handling of this unit
≥ Waterproofing is not guaranteed if the unit is subject to an impact as a
result of being hit or dropp ed etc. If an impact to this unit occurs, it
should be inspected (subject to a fee) by a Pa nasonic’ s Servic e Center
to verify that the waterproofing is still effective.
≥ The waterproof performance may be degrade d du e t o the s trong water
pressure when this unit is used deep er than 3 m (10 feet) underwater.
≥ When this unit is splashed with detergent, soap, hot spring, bath
additive, sun oil, sun screen, chemical, etc., wipe it off immediately.
≥ Waterproof function of this unit is for sea water and fresh water only.
≥ Any malfunction caused by customer misuse, or mishandling will not
be covered by the warranty.
≥ The inside of this unit is not waterproof. Water leakage will cause
malfunction.
≥ Supplied accessories are not waterproof.
≥ Cards are not waterproof. Do not handle with a wet hand. Also, do not
insert wet card into this unit.
≥ Do not leave this unit for a long period of time in places where
temperature is very low (at ski resorts or at high altitude etc.) or very
high [above 35 oC (95 °F)], inside a car under strong sunlight, close to
a heater, on the beach, etc. W aterproof performance may be
degraded.
≥ Foreign objects may adhere to the inner side of the door/cover
(around the rubber seal or connecting terminals) when the door/
cover is open ed o r closed in plac es wi t h sand or dust etc . T h is
may result in the impairment of the waterproof performance if the
door/cover is closed with foreign objects adhered. Be extremely
careful since it may result in malfunction etc.
≥ If any foreign object is adhered to the inner side of the door/cover,
remove with a lint-free cloth.
≥ If any liquid such as water droplets is adhered to this unit or inner
side of the door/cover, wipe off with a soft dry cloth. Do not open
or close the door/cover near the water, when underwater, using
wet hands, or when this unit is wet. It may cause water leakage.
VQT3N87 11

∫ When inner side of the lens is fogged (condensation)
It is not a malfunction or failure of this unit. It may be caused by the
environment in which this unit is used.
What to do when inner side of the lens is fogged
≥ Turn off the unit and open the door/cover in a place with const ant
ambient temperature, away f r om high temperatures, humidity, sand
and dust. The fog will disappear nat urally in 10minutes to 2 hours with
the door/cover open whe n t he te mper atu re of this unit get s c los e to the
ambient temperature.
≥ Contact Panasonic’s Service Cent er if the fogging does not disappear.
Conditions in which inner side of the lens may be fogged
Condensation may occur and th e inner side of the lens may be fogged
when this unit is used in areas that undergo a significant change in
temperature or in high humidit y, such as the following:
≥ When this unit is used underwater suddenly after being on a hot
beach etc.
≥ When this unit is moved to a wa rm area from a cold area, such as
at a ski resort or at high altitude
≥ When the door/cover is opened in a high-humidity environment
Check before using underwater
Do not open or close the door/cover in places with sand and
dust, close to water, or with wet hands. Sand or dust adhering
may cause water leaks.
1 Check that there are no foreign objects on the inner
side of the door/cover.
≥ If there is any foreign object, such as lint , hair, sand, etc., on the
surrounding area, water will leak within a few seconds causing
malfunction.
≥ Wipe it off with a dry soft cloth if there is any l i quid.
It may cause water leaks and malfun ct ion if you use this unit with
liquid adhered.
≥ If there is any foreign material, remove with the lint-free cloth.
≥ Be extremely careful to remove any sand etc. that may adhere to
the sides and corners of the rubber seal.
12 VQT3N87

2 Check for cracks and deformation of the rubber seal
on the door/cover.
≥
The integrity of the rubber seals may decrease after about 1 year,
with use and age. To avoid permanently damaging this unit the
seals should be replaced once each year. Please contact
Panasonic’s Service Center for related costs and other information.
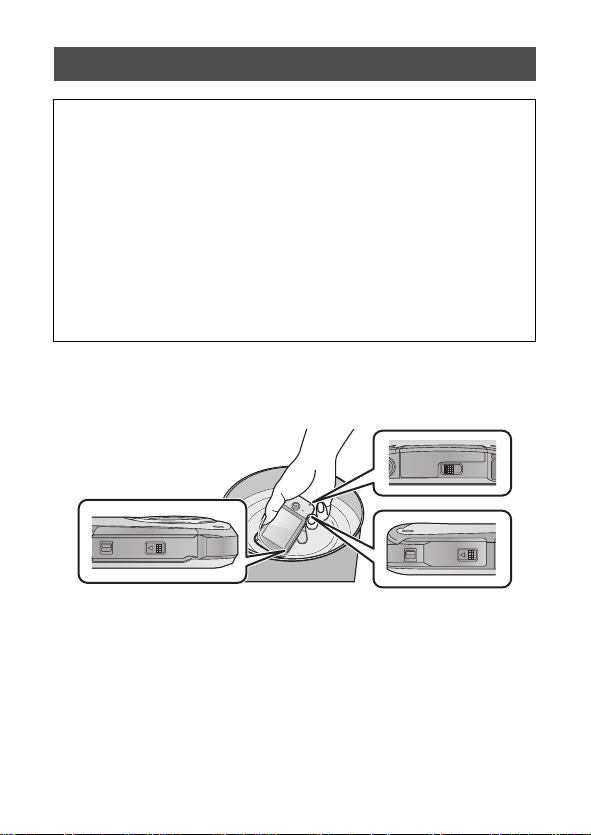
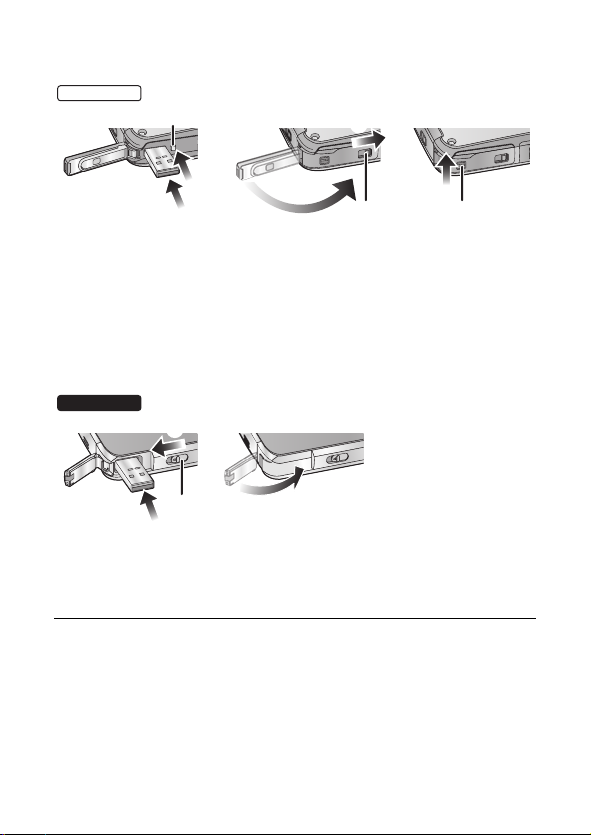
3 Close the door/cover securely.
≥ Lock the LOCK lever securely until the red part is no longer visible.
≥ To prev ent water seeping into this unit, be careful not to trap
foreign objects such as liquids, sand, hair or dust etc.
USB terminal cover
HDMI/Headphone
cover
SD card door
A LOCK lever
B Open/close lever
C Released state
D Locked st ate
E Red part
VQT3N87 13

Using this unit underwater
≥ Use this unit underwater at a depth o f up to 3 m (10 feet) with the water
temperature between 0oC and 35 oC (32 oF to 95 °F).
≥ Do not use this unit at a depth of over 3 m (10 feet).
≥ Do not use it in the hot water over 35 oC (95 °F) (in the bath or ho t
spring).
≥ Do not use this unit underwater not longer than 60 minutes
continuously.
≥ Do not open or close the door/cover.
≥ Do not apply shock to this unit underwater. (Waterproof performance
may not be maintained, and there is a chance of water leak.)
≥ Do not dive into water holding this unit. Do not use this unit in a location
where water will splash strongly, such as near rapids or waterfalls.
(Strong wa ter pressure may be applied, and it may cause malfunction.)
≥ This unit will sink in the water. Take care not to drop this unit and lose it
underwater by securely placing the strap around your wrist or similar
measure.
≥ Attaching a tripod with a 5.5 mm (0.22 q) screw or larger may open a
hole in this unit through which water will leak.
≥ The touch screen will not work underwater. I t will malf unction, so make
sure to press the screen lock button. (l 41)
14 VQT3N87
Care of this unit after using it underwater
Do not open or close the door/cover until the sand and dust is
removed by rinsing this unit with water.
Make sure to clean this unit after using it.
≥ Thoroughly wipe off any water droplets, sand, and saline matter on
your hands, body, hair, etc.
≥ It is recommended to clean this unit indoo rs, avoiding places whe re
water spray or sand may fall.
Do not leave this unit uncared for more than 60 minutes after
using it underwater.
≥ Leaving this unit with foreign objects or saline matter on it may
cause damage, discolorat i on, corrosion, unusual odour, or
deterioration of the waterproof performance.
1 Rinse with water with the door/cover closed.
≥ After use at the seaside or unde rwater, soak the unit in fresh water
in a shallow container for 10 minutes or less.
VQT3N87 15
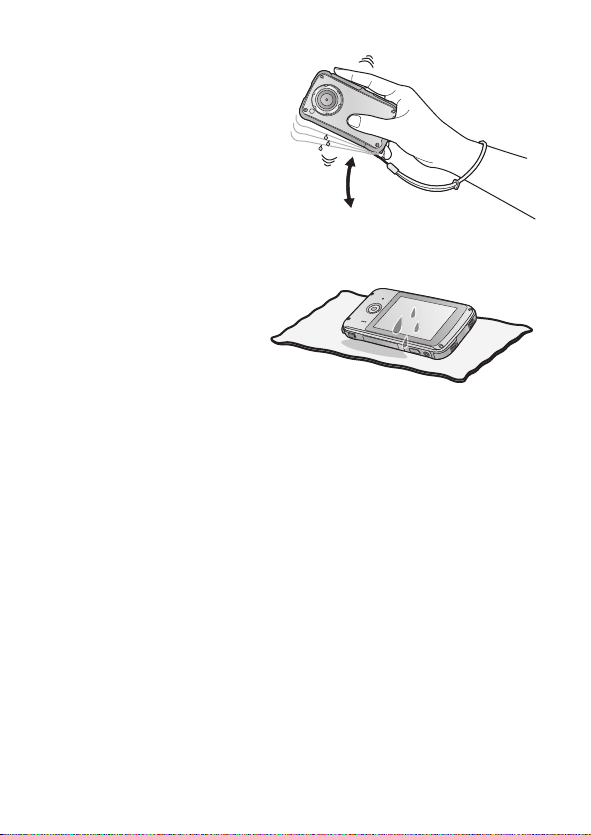
2 Drain water by holding
this unit upside down
and shaking it lightly a
few times.
≥ After usin g thi s un i t at the
seaside or underwater, or
after washing it, water will
remain at the speaker site
of this unit for a while and it
may cause lower sound or sound distortion.
≥ Fasten the strap firmly to prevent this unit from dropping.
3 Wipe off water
drops on this unit
with a dry soft cloth
and dry this unit in a
shaded area which
is well ventilated.
≥ Dry this unit by standing it on a dry cloth.
≥ Do not dry this unit with hot air from dryer or similar. Waterproof
performance will deteriorate due to deformati on.
≥ Do not use chemicals such as benzine, thinner, alcohol, or
cleanser , or soap or detergents.
4 Confirm that there are no water droplets, open the
door/cover, and wipe off any water droplets or sand
left inside using a soft dry cloth.
≥ Water droplets may adhere to the card when the door/cover is
opened without thoroughly drying. Also, water may accumulate in
the gap around the card compartment or the terminal connector.
Be sure to wipe any water off with a soft dry cloth.
≥ The water droplets may seep into this unit when the door/cover is
closed while it is still wet, causing conden sation or failure.
16 VQT3N87
Accessories
Check the accessories before using this unit.
Keep the accessories out of reach of children to prevent swallowing.
Product numbers correct as of April 2011. These may be subject to
change.
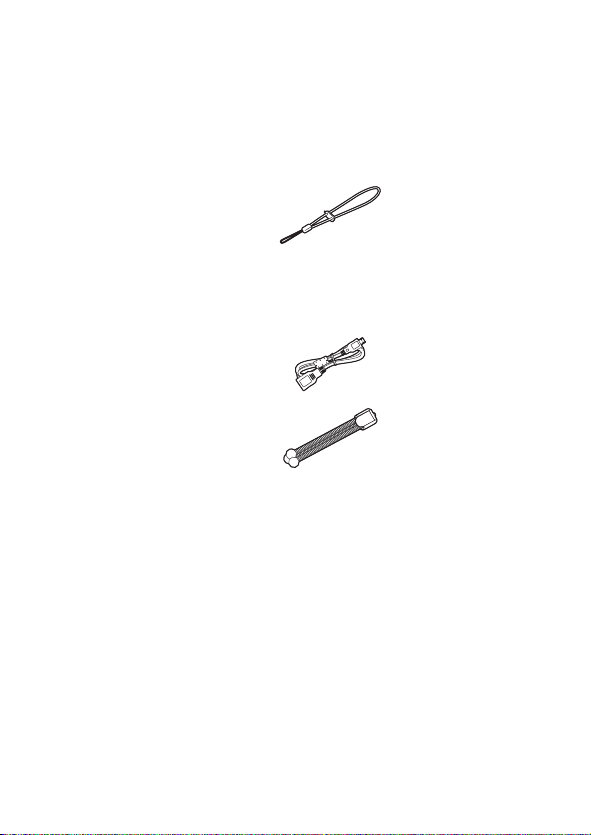
Hand strap with stylus pen
VFC4708
≥ The stylus pen is used for operations that are
hard to operate with your fingers or performing
detailed operation s wit h the touch screen
operation. (l 32)
USB extension cord
VFA0545
Tripod
VFC4709
≥ The unit comes with built-in HD Writer PE 2.0 video editing
software.
≥ Supplied accessories are not waterproof.
VQT3N87 17
Preparation
HM-TA20
HM-TA2
1
8
2
3
4
6
7
5
1
2
3
4
6
7
5
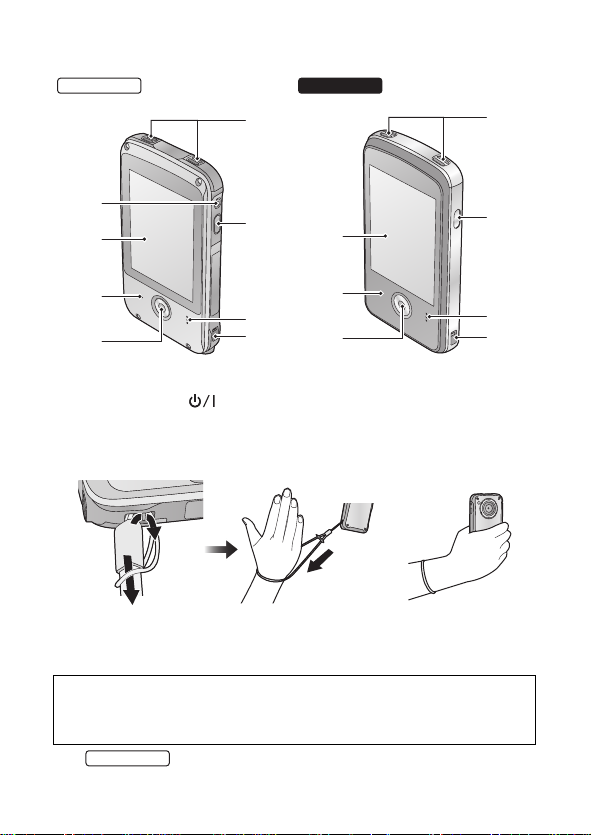
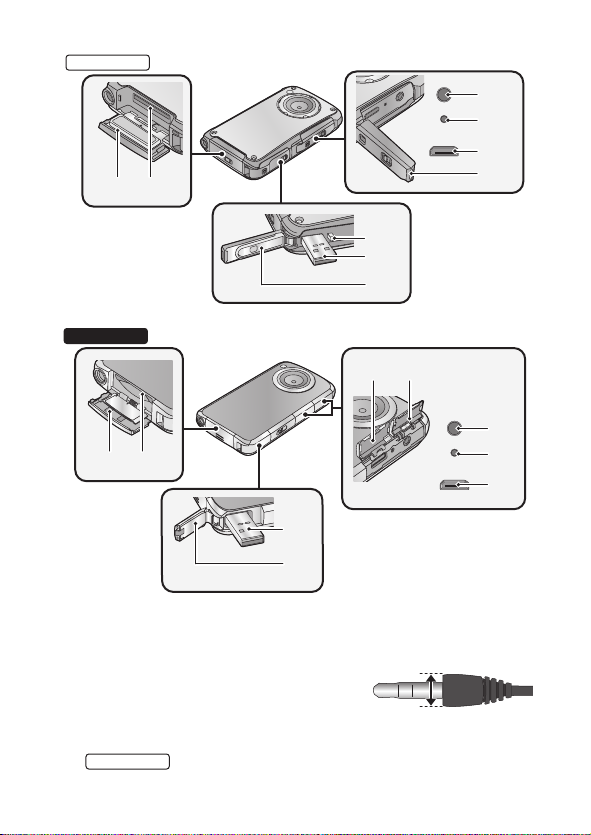
Parts identification and handling
1 Internal microphones
2 Power button [ ] (l 31)
3 Speaker
4 Hand strap fixture
≥
Attach the hand strap to this unit and adjust its length using the stylus pen.
5 Recording button (l 35)
6 Status ind icator (l 22, 29, 31, 58)
7 LCD monitor (Touch screen) (l 32)
Due to limitations in LCD productio n technology , there may be some
tiny bright or dark spots on th e LCD monitor screen. However, this is
not a malfunction and does no t affect the recorded pict ure.
HM-TA20
8
Screen lock button (l 41)
18 VQT3N87

9 Tripod receptacle
HM-TA20
HM-TA2
91011
910
12
11
HM-TA2
≥ If you attach a tripod
with a 5.5 mm (0.22 q)
screw or larger, it may
damage this unit.
10 LED light (l 39)
11 Lens
12
USB Latch (l 22)
VQT3N87 19
RESET
13 14
15
16
17
18
19
20
21
HM-TA20
RESET
13 14
15
16
17
20
21
22 23
HM-TA2
HM-TA20
13 SD card door (l 29)
14 Card slot (l 29)
15 Headphone terminal [Ë]
≥ Use the earphone/headphone with a A
part width ‰ 11 mm (0.43 q) or smaller.
16 Reset button [RESET] (l 80)
17 HDMI mini connector (l 58)
18
20 VQT3N87
HDMI/Headphone cover
HM-TA20
19
USB Latch (l 22)
20 USB terminal [ ] (l 22, 65, 67, 73)
21 USB terminal cover (l 22)
HM-TA2
22
HDMI cover
HM-TA2
23
Headphone terminal cover
HM-TA20
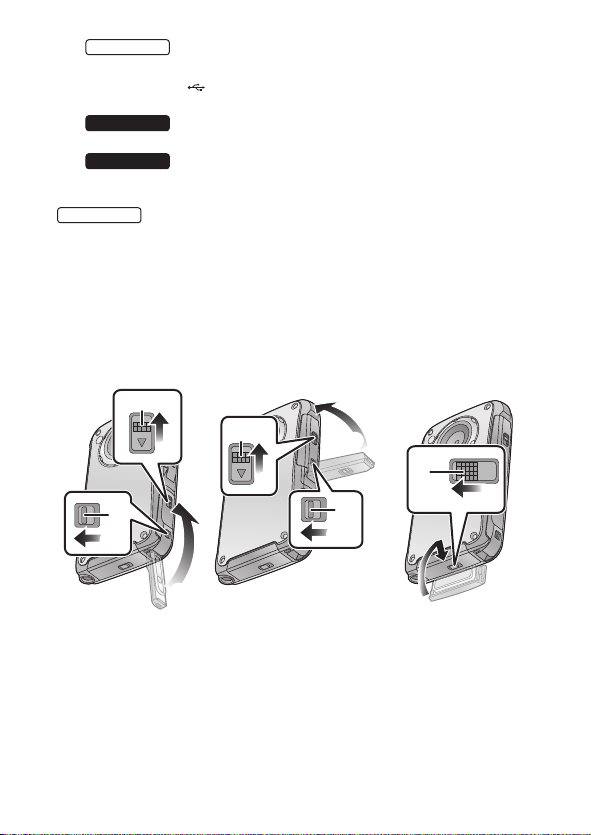
About locks for USB terminal cover, HDMI/Headphone cover and
SD card door
Each door/cover is equipped with a LOCK lever to lock the open/close
lever. When opening and closing the door/cover, slide the LOCK lever
and then slide the open/close lever.
USB terminal cover
HDMI/Headphone
cover
SD card door
A LOCK lever
B Open/close lever
VQT3N87 21
Preparation
HM-TA20
HM-TA2
Charging the battery
When this unit is purchased, th e battery is not charged. Charge
the battery fully before using this unit for the first time.
Important:
≥ This unit has a built-in rechargeable lithium-ion battery. Do not
remove except when disposing of this unit.
≥ The battery will not be charged if the unit is turned on.
≥ The battery can also be charged using the AC adaptor (optional).
(l 23, 98)
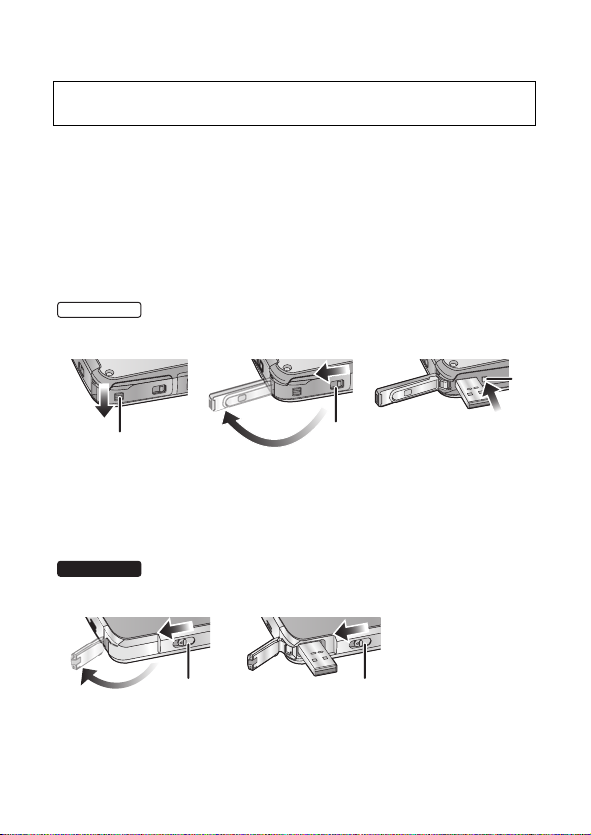
1 Take out the USB terminal.
≥ Be careful as the USB terminal will jump out.
1 Slide the LOCK lever for the USB terminal cover A to release the
lock on the open/close lever for the USB terminal cover B.
2 Open the USB terminal cover while slidin g the open/close lever for
the USB terminal cover B in the direction indicat ed by the arrow.
3 Press the USB Latch C until the USB terminal comes out.
1 Slide the USB Latch A until the USB terminal cover opens.
2 Slide the USB Latch A again until the USB terminal comes out.
22 VQT3N87
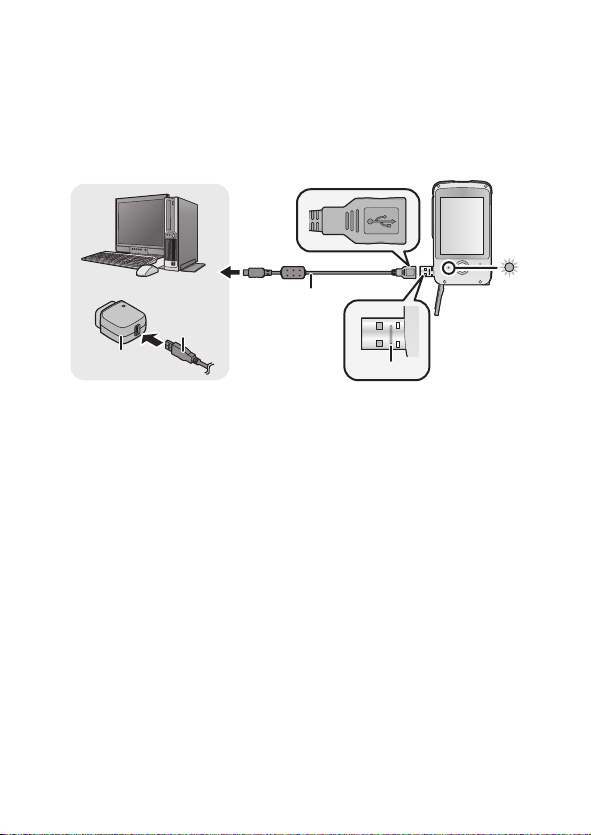
2 Connect USB terminal of this unit to a PC with a USB
extension cord.
≥ Be sure to connect USB terminal of this unit to a PC with a USB
extension cord when charging the battery.
≥ Connect the USB extension cord by inserting it securely all the
way without forcing.
A USB extension cord (supplied)
B AC adaptor (optional)
≥ Do not use any other USB extension cords except the sup plied one.
(Operation is not guaranteed with any other USB extension cords.)
≥
Insert the USB extension cord securely all the way. (Insert to line C.) It
will not operate properly if it is not inserted all the way.
≥ Always use a genuine Panasonic AC adaptor (VSK0750; optional).
≥ The status indicator will flash red at an int erval of 2seco nds, indi ca ting
that charging has begun.
≥ During charging, the status indic ator flashes. When charging is
finished, the status indicator turns off.
VQT3N87 23
∫ To return the USB terminal to its original position
HM-TA2
≥
When pressing the USB terminal with your fi nger s, p re ss slowly and carefully.
HM-TA20
1 Press the USB Latch C.
2 While press i n g o n th e U S B La tch C, press the USB terminal with
your finger .
≥ Release your finger from the USB Latch C, and push in the USB
terminal until it is locked.
3 Close the USB terminal cover.
4 While the USB terminal cover is closed, slide the open/close lever fo r
the USB terminal cover B toward the directio n of the arrow.
5 Slide the LOCK lever for the USB terminal cover A to lock the open/
close lever for the USB terminal cover B.
1
Slide the USB Latch A.
2
While the USB Latch A is slid, press the USB terminal with your finger .
≥ Release your finger from the USB Latch A, and push in the USB
terminal until it is locked.
3 Close the USB terminal cover.
≥ Please refer to page 82 if the stat us indicator flashes quickl y.
≥ Do not heat or expose to flame.
≥ Do not leave unit in an automobile exposed to direct s unlight for a long
period time with doors and windows clos ed.
≥ If the operating time is still too short even after the battery is fully
charged, the battery has worn out and needs to be replace d. Contact
consumer support. (l 101, 102)
Operation is not guaranteed for all devices equipped with a USB terminal.
≥
24 VQT3N87

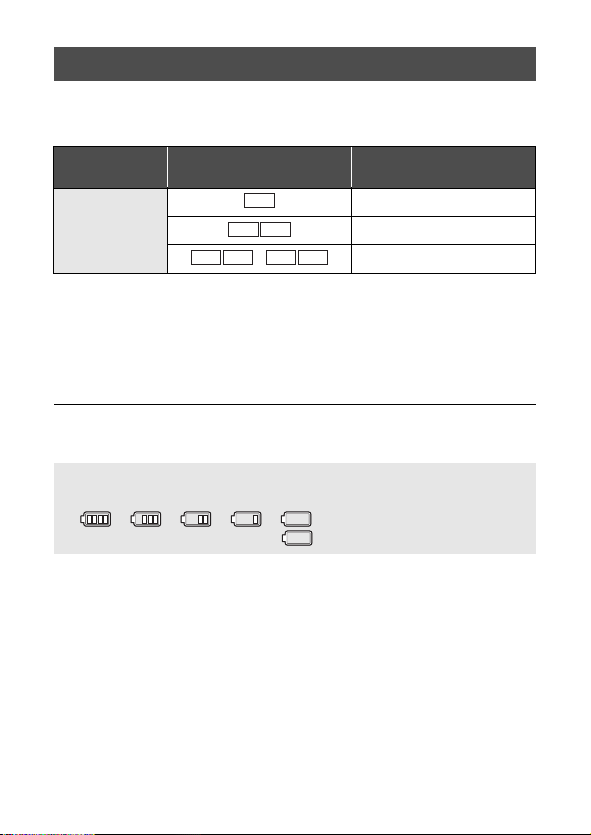
Charging and motion pictures recording time
∫ Charging/Recording time
≥ Temperature: 25 oC (77 oF)/humidity: 60%RH
Maximum
Charging time
4h20min
* Maximum continuous recordable time for one scene:
j
If [Video Rec Mode] is set to //:
29min59sec
jIf [Video Rec Mode] is set to :
Approx. 20 min (up to 4 GB recording capacity)
≥ These times are approximations.
≥
The indicated charging time is for when the battery has been
discharged completely. Charging time and recordable time vary
depending on the usage conditions such as high/low temperature.
≥ The actual recordable time refers to the recordable time when
repeatedly starting/ stopping rec ording, t urning the unit on/of f, adjus ting
the zoom etc.
This unit becomes warm after use or charging. This is not a malfunction.
≥
Recordin g m o de
/ 1h30min 55min
continuous
recordable time
1h25min 50min
1h45min 1h
*
Actual
recordable
time
Approximate operating time and number of recordable still pictures
Number of recordable
pictures
Recording time
Playback time Approx. 210 min
Recording conditions by CIPA standard
≥ CIPA is an abbreviation of Camera & Imaging Product s Association.
≥ Using a Panasonic SD Memory Card (2 GB)
Approx.
230 pictures
Approx. 115 min
By CIPA standard
VQT3N87 25
Charging and voices recording time
PCM
128Low
AAC
∫ Charging/Recording time
≥ Temperature: 25 oC (77 oF)/humidity: 60%RH
Charging time
Recording mode
Maximum continuous
recordable time
4h30min
256
AAC
AAC
128
/ 4h30min
4h30min
4h20min
* Maximum continuous recordabl e time for one voice:
Approx. 5 h (up to 4 GB recording capacity)
≥ These times are approximations.
The indicated charging time is for when the battery has been
≥
discharged completely. Charging time and recordable time vary
depending on the usage conditions such as high/low temperature.
≥ This unit becomes warm after use or charging. Th is is not a
malfunction.
Battery capacit y indica tion
≥ The display changes as the battery capacity reduces.
####
If the battery discharges, then will become red.
*
26 VQT3N87

Preparation
Preparing the card
The following operations can be performed using this unit.
≥ When a card has not been inserted: Scenes, still pictures and
voices can be recorded on the buil t-in memory and played back.
( appears.)
≥ When a card has been inserted: Scenes, sti ll pictures and voices
can be recorded on the card and played back.
Normally, insert the card to use.
Cards that you can use with this unit
This unit (an SDXC compatible device) is compa tible with SD Memory
Cards, SDHC Memory Cards and SDXC Memory Cards. When u sin g
an SDHC memory card/SDXC memory card with other equipment,
check the equipment is compatible with these memory cards.
Use SD cards conforming to Class 4 or higher of the SD Speed
Class Rating* for motion picture recording.
Card
type
SD
Memory
Card
SDHC
Memory
Card
SDXC
Memory
Card
* SD Speed Class Rating is the speed
standard regarding continuous writing.
Check via the label on the card, etc.
Capacity
8MB/
16 MB/32 MB/64 MB/
128 MB/256 MB
512MB/1GB/2GB
4 GB/6 GB/8 GB/
12 GB/16 GB/24 GB/
32 GB
48 GB/64 GB
Cannot be
guaranteed in
operation.
Can be used. Can be used.
Motion picture/
Voice recording
e.g.:
Still picture
recording
Cannot be
guaranteed in
operation.
VQT3N87 27
≥ Please confirm the latest information about SD Memory Cards/SDHC
32
Memory Cards/SDXC Memory Cards that can be used for motion
picture recording on the following website.
http://panasonic.jp/support/global/cs/e_cam
(This website is in English only.)
≥ 4 GB or more Memory Cards that do not have the SDHC logo or 48 GB
or more Memory Cards that do not have the SDXC logo are not based
on SD Memory Card Specifications.
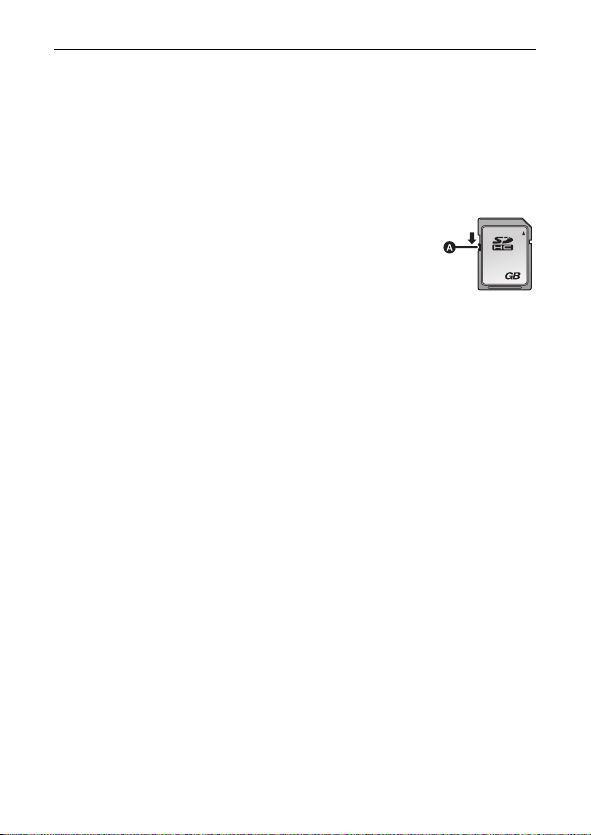
≥
When the write-protect switch A on SD card is locked, no
recording, deletion or editing will be possible on the card.
≥ Keep the Memory Card out of reach of children to
prevent swallowing.
∫ About Built-in Memory
≥ Recordable Memory size: Approx. 10 MB
≥ You cannot copy the recorded pictures to a card.
≥ The built-in memory can be used as a temporary stor age device.
≥ The access time for the built- in memory ma y be longer t han the ac cess
time for a card.
28 VQT3N87
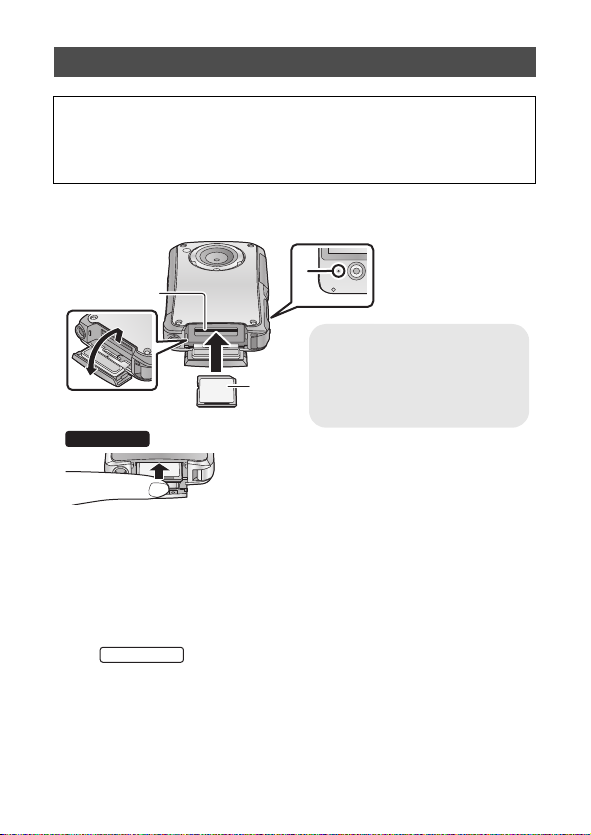
Inserting/removing an SD card
HM-TA2
Status indicator A
≥ When this unit is accessing
the SD card, the status
indicator lights up.
≥ Insert SD card as shown in the figure.
When using an SD card not from Pana sonic, or one previously used
on other equipment, for the first time on this unit, format the SD card.
(l 57) When the SD card is formatted, all of the recorded data is
deleted. Once the data is deleted, it cannot be restored.
Caution:
Check that the status indicator has gone off.
1 Open the SD card door and insert (remove) the SD
card into (from) the card slot B.
≥ Face the label side C in the direction shown in the illustration and
press it straight in as far as it will go.
≥ Press the center of the SD card and then pull it straight out.
HM-TA20
≥
Open the SD card door after releas ing the lock with the LOCK
lever for the SD card door.
2 Securely close the SD card door.
VQT3N87 29

≥ Do not touch the terminals on the back of the SD card.
≥ Do not apply strong shocks, bend, or drop the SD card.
≥ Electrical noise, static electricity or the failure of this unit or t he SD card
may damage or erase the data stored on the SD card.
≥ When the status indicator is lit, do not:
jRemove the SD card
jTurn the unit off
jInsert and remove the USB terminal
jExpose the unit to vibrations or shock
Performing the above while the st atus indicator is on may result in
damage to data/SD card or this unit.
≥ Do not expose the terminals of the SD card to wate r, dirt or dust .
≥ Do not place SD cards in the following areas:
jIn direct sunlight
jIn very dusty or humid areas
jNear a heater
jLocations susceptible to significant difference in temperature
(condensation can occur.)
jWhere static electricity or electromagnetic waves occur
≥ To p rot ect SD card s, r etu rn t hem to t heir cas es whe n you are not us in g
them.
≥ About disposing of or giving away the SD card. (l 85)
30 VQT3N87
Loading...