


 Loading...
KEY TELEPHONE USER GUIDE
® |
Before using this phone, please read these instructions completely.
Section 750
Issued August, 1998
The contents of this manual are subject to change without notice and do not constitute a commitment on the part of Matsushita Communication Industrial Co. Ltd (MCI). Every effort has been made to ensure the accuracy of this document. However, due to ongoing product improvements and revisions, Panasonic cannot guarantee the accuracy of printed material after the date of publication, nor can it accept responsibility for errors or omissions. Panasonic will update and revise this document as needed.
The software and hardware described in this document may be used or copied only in accordance with the terms of the license pertaining to the said software or hardware.
Reproduction, publication, or duplication of this manual, or any part thereof, in any manner, mechanically, electronically, or photographically, is prohibited without permission of the Matsushita Communication Industrial Co. Ltd (MCI).
©Copyright 1998 by Matsushita Communication Industrial Co. Ltd (MCI)
All rights reserved.

Contents
Contents
Preface . . . . . . . . . . . . . . . . . . . . . . . . . . . . . . . . . . . . . . . . . . . . . . . . . . . . . . . . . . . . 5
1. Understanding Your Phone. . . . . . . . . . . . . . . . . . . . . . . . . . . 7
Non-Display Phones . . . . . . . . . . . . . . . . . . . . . . . . . . . . . . . . . . . . . . . . . . . . . . . . . 7
Small-Display Phones . . . . . . . . . . . . . . . . . . . . . . . . . . . . . . . . . . . . . . . . . . . . . . . . 9
Changing the Default Display . . . . . . . . . . . . . . . . . . . . . . . . . . . . . . . . . . . . . . . 11
Understanding Display Information . . . . . . . . . . . . . . . . . . . . . . . . . . . . . . . . . . 11
Using Variable Mode . . . . . . . . . . . . . . . . . . . . . . . . . . . . . . . . . . . . . . . . . . . . . . 12
Large-Display Phones . . . . . . . . . . . . . . . . . . . . . . . . . . . . . . . . . . . . . . . . . . . . . . . 13
Changing the Default Display . . . . . . . . . . . . . . . . . . . . . . . . . . . . . . . . . . . . . . . 15
Understanding Display Information. . . . . . . . . . . . . . . . . . . . . . . . . . . . . . . . . . . 16
2. Setting Up Your Phone . . . . . . . . . . . . . . . . . . . . . . . . . . . . . |
18 |
Adjusting Volume and Display Settings . . . . . . . . . . . . . . . . . . . . . . . . . . . . . . . . 18 Setting Up Flexible Function Keys . . . . . . . . . . . . . . . . . . . . . . . . . . . . . . . . . . . . 19 Setting Up One-touch Keys . . . . . . . . . . . . . . . . . . . . . . . . . . . . . . . . . . . . . . . . . . 20 Setting Up Speed Dialling. . . . . . . . . . . . . . . . . . . . . . . . . . . . . . . . . . . . . . . . . . . . 22
Assigning and Deleting PSD Numbers . . . . . . . . . . . . . . . . . . . . . . . . . . . . . . . . 22 Assigning SSD Numbers . . . . . . . . . . . . . . . . . . . . . . . . . . . . . . . . . . . . . . . . . . . 25 Linking System Speed Dial Numbers . . . . . . . . . . . . . . . . . . . . . . . . . . . . . . . . . 25 Assigning and Deleting Names for PSD Numbers . . . . . . . . . . . . . . . . . . . . . . . 26
3. Placing Outside Calls . . . . . . . . . . . . . . . . . . . . . . . . . . . . . . |
31 |
Accessing an Outside Line . . . . . . . . . . . . . . . . . . . . . . . . . . . . . . . . . . . . . . . . . . . 31
Using Account Codes . . . . . . . . . . . . . . . . . . . . . . . . . . . . . . . . . . . . . . . . . . . . . . . 32
Non-verified Account Codes . . . . . . . . . . . . . . . . . . . . . . . . . . . . . . . . . . . . . . . . 32
Verified Account Codes . . . . . . . . . . . . . . . . . . . . . . . . . . . . . . . . . . . . . . . . . . . . 33
Redialing Outside Numbers . . . . . . . . . . . . . . . . . . . . . . . . . . . . . . . . . . . . . . . . . . 33
Using Speed Dialling . . . . . . . . . . . . . . . . . . . . . . . . . . . . . . . . . . . . . . . . . . . . . . . 34
Dialling Speed Dial Numbers . . . . . . . . . . . . . . . . . . . . . . . . . . . . . . . . . . . . . . . 34
Checking Speed Dial Numbers . . . . . . . . . . . . . . . . . . . . . . . . . . . . . . . . . . . . . . 36
4. Handling Incoming Calls . . . . . . . . . . . . . . . . . . . . . . . . . . . . 38
Answering Calls . . . . . . . . . . . . . . . . . . . . . . . . . . . . . . . . . . . . . . . . . . . . . . . . . . . 38
Using Call Hold . . . . . . . . . . . . . . . . . . . . . . . . . . . . . . . . . . . . . . . . . . . . . . . . . . . . 38
Transferring Calls. . . . . . . . . . . . . . . . . . . . . . . . . . . . . . . . . . . . . . . . . . . . . . . . . . 40
Supervised Transfers . . . . . . . . . . . . . . . . . . . . . . . . . . . . . . . . . . . . . . . . . . . . . . 40
3

Contents
Unsupervised Transfers . . . . . . . . . . . . . . . . . . . . . . . . . . . . . . . . . . . . . . . . . . . . 40
Call Pickup . . . . . . . . . . . . . . . . . . . . . . . . . . . . . . . . . . . . . . . . . . . . . . . . . . . . . . . 41
Extension Group Pickup . . . . . . . . . . . . . . . . . . . . . . . . . . . . . . . . . . . . . . . . . . . 41
Extension Direct Pickup. . . . . . . . . . . . . . . . . . . . . . . . . . . . . . . . . . . . . . . . . . . . 42
Trunk Group Pickup. . . . . . . . . . . . . . . . . . . . . . . . . . . . . . . . . . . . . . . . . . . . . . . 43
Trunk Direct Pickup . . . . . . . . . . . . . . . . . . . . . . . . . . . . . . . . . . . . . . . . . . . . . . . 43
Call Park . . . . . . . . . . . . . . . . . . . . . . . . . . . . . . . . . . . . . . . . . . . . . . . . . . . . . . . . . 44
5. Communicating Within Your Office . . . . . . . . . . . . . . . . . . . 45
Calling Other Extensions . . . . . . . . . . . . . . . . . . . . . . . . . . . . . . . . . . . . . . . . . . . . 45
. . . . . . . . . . . . . . . . . . . . . . . . . . . . . . . . . . . . . . . . . . . . . . . . . . . . . . . . . . . . . . . 45 Switching Between Tone and Voice Calling . . . . . . . . . . . . . . . . . . . . . . . . . . . . 46
Using Paging . . . . . . . . . . . . . . . . . . . . . . . . . . . . . . . . . . . . . . . . . . . . . . . . . . . . . . 47
Answering a Page (Meet-Me Answer). . . . . . . . . . . . . . . . . . . . . . . . . . . . . . . . . 47
Making Announcements to Busy Extensions . . . . . . . . . . . . . . . . . . . . . . . . . . . . 48
Answering an Announcement . . . . . . . . . . . . . . . . . . . . . . . . . . . . . . . . . . . . . . . 48 Transferring Calls with an Announcement . . . . . . . . . . . . . . . . . . . . . . . . . . . . . 48
Using Call Forwarding . . . . . . . . . . . . . . . . . . . . . . . . . . . . . . . . . . . . . . . . . . . . . . 49 Using Camp-on (Call Waiting) . . . . . . . . . . . . . . . . . . . . . . . . . . . . . . . . . . . . . . . 51 Using Message Waiting/Callback . . . . . . . . . . . . . . . . . . . . . . . . . . . . . . . . . . . . . 52 Using Do-Not-Disturb . . . . . . . . . . . . . . . . . . . . . . . . . . . . . . . . . . . . . . . . . . . . . . . 53
6. Using Additional Features. . . . . . . . . . . . . . . . . . . . . . . . . . . 55
Using the MIC Key . . . . . . . . . . . . . . . . . . . . . . . . . . . . . . . . . . . . . . . . . . . . . . . . . 55 Using Off-Hook Monitor . . . . . . . . . . . . . . . . . . . . . . . . . . . . . . . . . . . . . . . . . . . . 56 Using Handsfree Answerback and Operation . . . . . . . . . . . . . . . . . . . . . . . . . . . 56 Using Voice Recognition. . . . . . . . . . . . . . . . . . . . . . . . . . . . . . . . . . . . . . . . . . . . . 56 Using the Flash Feature . . . . . . . . . . . . . . . . . . . . . . . . . . . . . . . . . . . . . . . . . . . . . 57 Making Conference Calls . . . . . . . . . . . . . . . . . . . . . . . . . . . . . . . . . . . . . . . . . . . . 57 Controlling Background Music . . . . . . . . . . . . . . . . . . . . . . . . . . . . . . . . . . . . . . . 58 Using Timed Reminders . . . . . . . . . . . . . . . . . . . . . . . . . . . . . . . . . . . . . . . . . . . . . 58 Using Caller ID . . . . . . . . . . . . . . . . . . . . . . . . . . . . . . . . . . . . . . . . . . . . . . . . . . . . 59
Caller ID Call Log . . . . . . . . . . . . . . . . . . . . . . . . . . . . . . . . . . . . . . . . . . . . . . . . 59 Call Log Operation for a Small-display Phones . . . . . . . . . . . . . . . . . . . . . . . . . 60 Call Log Format for the Large-Display Phone . . . . . . . . . . . . . . . . . . . . . . . . . . 61
Walking Class of Service . . . . . . . . . . . . . . . . . . . . . . . . . . . . . . . . . . . . . . . . . . . . 62
Appendix A. Dial Code List . . . . . . . . . . . . . . . . . . . . . . . . . . . . 63
Appendix B. Customized PSD Bin Numbers . . . . . . . . . . . . . . 66
4

PREFACE
The Key Telephone User Guide is for anyone who uses a Panasonic digital telephone in conjunction with the Panasonic ICX. The ICX is a telephone system that provides you with a powerful set of features for handling calls.
This manual provides an overview of the following digital phones and offers detailed information about using the features provided by the ICX:
:
|
|
U.K. |
Hong Kong |
||
• |
12 key-Standard |
VB-D411UK |
|
|
|
|
|
||||
• |
12 key-Speakerphone |
|
|
VB-44221HK |
|
|
|
||||
• |
12 key-Display Speakerphone |
VB-D411DSUK |
VB-44223HK |
||
• |
12 key-Large Display Speakerphone |
VB-D411LDSUK |
VB-44225HK |
||
• 12 key-Soft key Display Speakerphone |
VB-D411DSVUK VB-44224HK |
||||
• |
24 key-Display |
VB-D611DUK |
|
|
|
|
|
||||
• |
24 key-Display Speakerphone |
VB-D611DSUK |
VB-44233HK |
||
• |
EM24-24 key Expansion Module |
VB-D331UK |
VB-44310HK |
||
• |
DSS-72 key DSS/BLF |
VB-D631UK |
VB-44320HK |
||
HOW TO USE THIS MANUAL
We recommend that you read the entire manual before using your digital phone, in order to get a clear idea of its capabilities.
WHAT THIS MANUAL CONTAINS
This manual contains the following chapters:
•Chapter 1, “Understanding Your Phone” - Describes features of Panasonic digital telephones.
•Chapter 2, “Setting Up Your Phone” - Provides procedures for setting up telephone features such as Flexible Function (FF) keys.
Key Telephone User’s Guide |
5 |

Preface
•Chapter 3, “Placing Outside Calls” - Provides procedures for making outside calls.
•Chapter 4, “Handling Incoming Calls” - Provides several procedures for answering calls.
•Chapter 5, “Communicating Within Your Office” - Provides procedures for handling internal calls.
•Chapter 6, “Using Additional Features” - Provides procedures for using additional features.
•Appendix A, “Dial Code List.” - Provides a list of dial codes used for programming FF keys.
•Appendix B, “Customized PSD Bin Numbers.” - Provides a table for documenting or tracking your personalized list of speed dial numbers.
NOTATION USED
This user guide uses the following conventions:
•References to chapters and sections are enclosed in quotation marks and include the title and page number. For example: “Setting Up Flexible Function Keys” on page 19.
•References to information you are to enter or dial are printed in boldface, mixed-case characters. For example: Enter 73*.
•References to the telephone keypad are printed in bold, upper case characters. For example: Press the HOLD key.
FOR MORE INFORMATION
For more information about features available with the Panasonic ICX system and digital phones, contact your system administrator or ICX dealer, or refer to the Panasonic publication Feature Operation (Section 700).
6 |
Key Telephone User’s Guide |
1. UNDERSTANDING YOUR PHONE
The following information in this chapter will familiarize you with your Panasonic digital phone and enable you to effectively use its call-handling features:
•Non-Display Phones (page 7)
•Small-Display Phones (page 9)
•Large-Display Phones (page 13)
•Using Variable Mode (page 12)
•Changing the Default Display (pages 11 and 15)
•Understanding Display Information (pages 11 and 16)
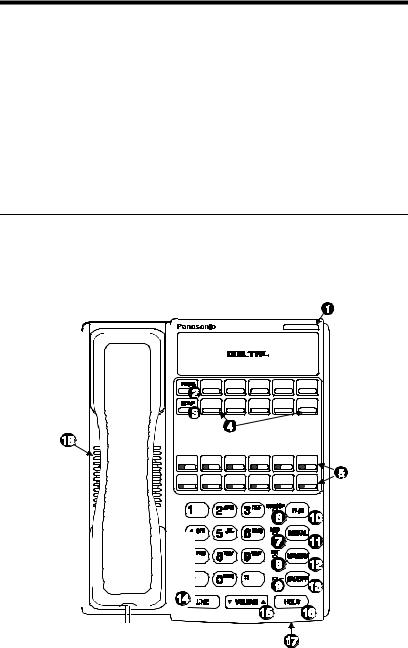
NON-DISPLAY PHONES
Non-display phones do not have a Liquid Crystal Display (LCD). Table 1 on page 8 describes the features (1-18 below) that are typical of non-display phones.
Figure 1. Non-display phone
|
|
|
|
|
|
|
|
|
|
|
|
|
|
|
|
|
|
|
|
|
|
|
|
|
|
|
|
|
|
|
|
|
|
|
|
|
|
|
|
|
|
|
|
|
|
|
|
|
|
|
|
|
|
|
|
|
|
|
|
|
|
|
|
|
|
|
|
|
|
|
|
|
|
|
|
|
|
|
|
|
|
|
|
|
|
|
|
|
|
|
|
|
|
|
|
|
|
|
|
|
|
|
|
|
|
|
|
|
|
|
|
|
|
|
|
|
|
|
|
|
|
|
|
|
|
|
|
|
|
|
|
|
|
|
|
|
|
|
|
|
|
|
|
|
|
|
|
|
|
|
|
|
|
|
|
|
|
|
|
|
|
|
|
|
|
|
|
|
|
|
|
|
|
|
|
|
|
|
|
|
|
|
|
|
|
|
|
|
|
|
|
|
|
|
|
|
|
|
|
|
|
|
|
|
|
|
|
|
|
|
|
|
|
|
|
|
|
|
|
|
|
|
|
|
|
|
|
|
|
|
|
|
|
|
|
|
|
|
|
|
|
|
|
|
|
|
|
|
|
|
|
|
|
|
|
|
|
|
|
|
|
|
|
|
|
|
|
|
|
|
|
|
|
|
|
|
|
|
|
|
|
|
|
|
|
|
|
|
|
|
|
|
|
|
|
|
|
|
|
|
|
|
|
|
|
|
|
|
|
|
|
|
|
|
|
|
|
|
|
|
|
|
|
|
|
|
|
|
|
|
|
|
|
|
|
|
|
|
|
|
|
|
|
|
|
|
|
|
|
|
|
|
|
|
|
|
|
|
|
|
|
|
|
|
|
|
|
|
|
|
|
|
|
|
|
|
|
|
|
|
|
|
|
|
|
|
|
|
|
|
|
|
|
|
|
|
|
|
|
|
|
|
|
|
|
|
|
|
|
|
|
|
|
|
|
|
|
|
|
|
|
|
|
|
|
|
|
|
|
|
|
|
|
|
|
|
|
|
|
|
|
|
|
|
|
|
|
|
|
|
|
|
|
|
|
|
|
|
|
|
|
|
|
|
|
|
|
|
|
|
|
|
|
|
|
|
|
|
|
|
|
|
|
|
|
|
|
|
|
|
|
|
|
|
|
|
|
|
|
|
|
|
|
|
|
|
|
|
|
|
|
|
|
|
|
|
|
|
|
|
|
|
|
|
|
|
|
|
|
|
|
|
|
|
|
|
|
|
|
|
|
|
|
|
|
|
|
|
|
|
|
|
|
|
|
|
|
|
|
|
|
|
|
|
|
|
|
|
|
|
|
|
|
|
|
|
|
|
|
|
|
|
|
|
|
|
|
|
|
|
|
|
|
|
|
|
|
|
|
|
|
|
|
|
|
|
|
|
|
|
|
|
|
|
|
|
|
|
|
|
|
|
|
|
|
|
|
|
|
|
|
|
|
|
|
|
|
|
|
|
|
|
|
|
|
|
|
|
|
|
|
|
|
|
|
|
|
|
|
|
|
|
|
|
|
|
|
|
|
|
|
|
|
|
|
|
|
|
|
|
|
|
|
|
|
|
|
|
|
|
|
|
|
|
|
|
|
|
|
|
|
|
|
|
|
|
|
|
|
|
|
|
|
|
|
|
|
|
|
|
|
|
|
|
|
|
|
|
|
|
|
|
|
|
|
|
|
|
|
|
|
|
|
|
|
|
|
|
|
|
|
|
|
|
|
|
|
|
|
|
|
|
|
|
|
|
|
|
|
|
|
|
|
|
|
|
|
|
|
|
|
|
|
|
|
|
|
|
|
|
|
|
|
|
|
|
|
|
|
|
|
|
|
|
|
|
|
|
|
|
|
|
|
|
|
|
|
|
|
|
|
|
|
|
|
|
|
|
|
|
|
|
|
|
|
|
|
|
|
|
|
|
|
|
|
|
|
|
|
|
|
|
|
|
|
|
|
|
|
|
|
|
|
|
|
|
|
|
|
|
|
|
|
|
|
|
|
|
|
|
|
|
|
|
|
|
|
|
|
|
|
|
|
|
|
|
|
|
|
|
|
|
|
|
|
|
|
|
|
|
|
|
|
|
|
|
|
|
|
|
|
|
|
|
|
|
|
|
|
|
|
|
|
|
|
|
|
|
|
|
|
|
|
|
|
|
|
|
|
|
|
|
|
|
|
|
|
|
|
|
|
|
|
|
|
|
|
|
|
|
|
|
|
|
|
|
|
|
|
|
|
|
|
|
|
|
|
|
|
|
|
|
|
|
|
|
|
|
|
|
|
|
|
|
|
|
|
|
|
|
|
|
|
|
|
|
|
|
|
|
|
|
|
|
|
|
|
|
|
|
|
|
|
|
|
|
|
|
|
|
|
|
|
|
|
|
|
|
|
|
|
|
|
|
|
|
|
|
|
|
|
|
|
|
|
|
|
|
|
|
|
|
|
|
|
|
|
|
|
|
|
|
|
|
|
|
|
|
|
|
|
|
|
|
|
|
|
|
|
|
|
|
|
|
|
|
|
|
|
|
|
|
|
|
|
|
|
|
|
|
|
|
|
|
|
|
|
|
|
|
|
|
|
|
|
|
|
|
|
|
|
|
|
|
|
|
|
|
|
|
|
|
|
|
|
|
|
|
|
|
|
|
|
|
|
|
|
|
|
|
|
|
|
|
|
|
|
|
|
|
|
|
|
|
|
|
|
|
|
|
|
|
|
|
|
|
|
|
|
|
|
|
|
|
|
|
|
|
|
|
|
|
|
|
|
|
|
|
|
|
|
|
|
|
|
|
|
|
|
|
|
|
|
|
|
|
|
|
|
|
|
|
|
|
|
|
|
|
|
|
|
|
|
|
|
|
|
|
|
|
|
|
|
|
|
|
|
|
|
|
|
|
|
|
|
|
|
|
|
|
|
|
|
|
|
|
|
|
|
|
|
|
|
|
|
|
|
|
|
|
|
|
|
|
|
|
|
|
|
|
|
|
|
|
|
|
|
|
|
|
|
|
|
|
|
|
|
|
|
|
|
|
|
|
|
|
|
|
|
|
|
|
|
|
|
|
|
|
|
|
|
|
|
|
|
|
|
|
|
|
|
|
|
|
|
|
|
|
|
|
|
|
|
|
|
|
|
|
|
|
|
|
|
|
|
|
|
|
|
|
|
|
|
|
|
|
|
|
|
|
|
|
|
|
|
|
|
|
|
|
|
|
|
|
|
|
|
|
|
|
|
|
|
|
|
|
|
|
|
|
|
|
|
|
|
|
|
|
|
|
|
|
|
|
|
|
|
|
|
|
|
|
|
|
|
|
|
|
|
|
|
|
|
|
|
|
|
|
|
|
|
|
|
|
|
|
|
|
|
|
|
|
|
|
|
|
|
|
|
|
|
|
|
|
|
|
|
|
|
|
|
|
|
|
|
|
|
|
|
|
|
|
|
|
|
|
|
|
|
|
|
|
|
|
|
|
|
|
|
|
|
|
|
|
|
|
|
|
|
|
|
|
|
|
|
|
|
|
|
|
|
|
|
|
|
|
|
|
|
|
|
|
|
|
|
|
|
|
|
|
|
|
|
|
|
|
|
|
|
|
|
|
|
|
|
|
|
|
|
|
|
|
|
|
|
|
|
|
|
|
|
|
|
|
|
|
|
|
|
|
|
|
|
|
|
|
|
|
|
|
|
|
|
|
|
|
|
|
|
|
|
|
|
|
|
|
|
|
|
|
|
|
|
|
|
|
|
|
|
|
|
|
|
|
|
|
|
|
|
|
|
|
|
|
|
|
|
|
|
|
|
|
|
|
|
|
|
|
|
|
|
|
|
|
|
|
|
|
|
|
|
|
|
|
|
|
|
|
|
|
|
|
|
|
|
|
|
|
|
|
|
|
|
|
|
|
|
|
|
|
|
|
|
|
|
|
|
|
|
|
|
|
|
|
|
|
|
|
|
|
|
|
|
|
|
|
|
|
|
|
|
|
|
|
|
|
|
|
|
|
|
|
|
|
|
|
|
|
|
|
|
|
|
|
|
|
|
|
|
|
|
|
|
|
|
|
|
|
|
|
|
|
|
|
|
|
|
|
|
|
|
|
|
|
|
|
|
|
|
|
|
|
|
|
|
|
|
|
|
|
|
|
|
|
|
|
|
|
|
|
|
|
|
|
|
|
|
|
|
|
|
|
|
|
|
|
|
|
|
|
|
|
|
|
|
|
|
|
|
|
|
|
|
|
|
|
|
|
|
|
|
|
|
|
|
|
|
|
|
|
|
|
|
|
|
|
|
|
|
|
|
Key Telephone User Guide |
7 |
||||||||||||||||||||||||||||||||||||||||||

1. Understanding Your Phone
Table 1. Non-display phone features
# |
Feature |
Description |
|
|
|
1 |
Message Waiting Indicator |
Indicates that you have a message. |
|
|
|
2 |
PROG Key |
Used to program Flexible Function (FF) and one- |
|
|
touch keys, to adjust ringer volume, and to send a |
|
|
flash signal. Depending on the setup of your sys- |
|
|
tem, may also be used to transfer calls. |
|
|
|
3 |
CONF Key |
Used to establish conference calls and to check FF |
|
|
key and one-touch features. |
|
|
|
4 |
One-Touch Keys |
Used to make outside calls or to access system fea- |
|
|
tures. |
|
|
|
5 |
Flexible Function (FF) |
Used to access outside lines or to access system fea- |
|
Keys |
tures. |
|
|
|
6 |
DND/CF Indicator |
Indicates that Do-Not-Disturb (DND) or Call For- |
|
|
warding is set. |
|
|
|
7 |
MIC Indicator |
Indicates that your voice is not muted (i.e., party on |
|
|
the other end can hear you). Goes off when your |
|
|
hands-free microphone is muted and flashes when |
|
|
your handset is muted. |
|
|
|
8 |
INT Indicator |
Lights when you are on a call and flashes when you |
|
|
hold a call. |
9 |
ON/OFF Indicator |
Lights when the ON/OFF key has been pressed. |
|
|
|
10 |
FL/R Key |
Used to end an outside call and to either restore out- |
|
side dial tone or switch to external dial tone status |
|
|
|
|
|
|
without hanging up the receiver. |
|
|
|
11 |
REDIAL Key |
Used to redial the last number dialled. |
|
|
|
12 |
MEMORY Key |
Used to access speed dialling or enter account |
|
|
codes. |
|
|
|
13 |
ON/OFF Key |
Used to make a call without lifting the handset or to |
|
|
turn the speaker on and off. |
14 |
LINE Key |
Used to seize a free outside line. |
|
|
|
15 |
VOLUME Key |
Used to adjust the level of tones, background |
|
|
music, ringing, receiver volume, and display con- |
|
|
trast. |
|
|
|
16 |
HOLD Key |
Used to hold calls, to retrieve held calls, and to |
|
|
complete FF key programming. |
|
|
|
17 |
Microphone |
Used to talk to another party without using the |
|
|
handset. |
|
|
|
18 |
Speaker |
Outputs tones and voice at your extension. |
|
|
|
8 |
Key Telephone User Guide |
1. Understanding Your Phone
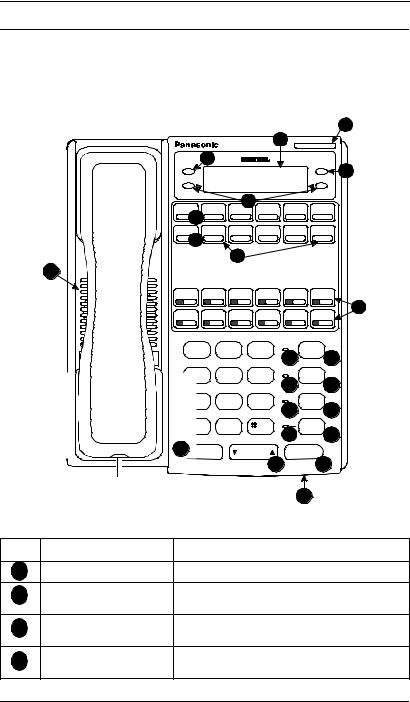
SMALL-DISPLAY PHONES
Small-display phones have a display containing two lines of text. Table 2 on page 9 describes the features (1-22 below) that are typical of small-display phones.
Figure 2. Small-display phone
|
|
|
|
|
|
|
|
|
|
|
|
|
|
|
|
|
|
|
|
|
|
|
|
|
|
|
|
||
|
|
|
|
|
|
|
|||
|
|
|
|
|
|
|
|
||
|
|
|
|
|
|
|
|
|
|
|
|
|
|
|
|
|
|
|
|
|
|
|
|
|
|
|
|
|
|
|
|
|
|
|
|
|
|
|
|
|
|
|
|
|
|
|
|
|
|
|
|
|
|
|
|
|
|
|
|
|
|
|
|
|
|
|
|
|
|
|
|
|
|
|
|
|
|
|
|
|
|
|
|
|
|
|
|
||
|
|
|
|
|
|
|
|
|
|
|
|
|
|
|
|
|
|||
|
|
|
|
|
|
|
|
|
|
|
|
|
|
|
|
|
|
|
|
|
|
|
|
|
|
||||
|
|
|
|
|
|
|
|
|
|
|
|
|
|
|
|
|
|
|
|
|
|
|
|
|
|
||||
|
|
|
|
|
|
|
|
|
|
|
|
|
|
|
|
||||
|
|
|
|
|
|
||||
|
|
|
|
|
|
||||
|
|
|
|
|
|
|
|
|
|
Table 2. Small-display phone features |
|
|
|
|
|
|
|
||
# |
Feature |
|
|
|
|
|
Description |
||
1 |
Message Waiting Indicator |
Indicates that you have a message. |
|||||||
2 |
Display |
Displays information about the phone’s status, |
|||||||
|
|
menus, and dialling directories, . |
|||||||
3 |
MODE Key |
Used to change display modes from Default Mode |
|||||||
|
|
to Speed Dial Mode or Extension Directory Mode. |
|||||||
4 |
END Key |
Used to exit Directory Mode and return the display |
|||||||
|
|
to Default Mode. |
|
|
|
||||
Key Telephone User Guide |
|
|
|
|
|
|
|
9 |
|

1. Understanding Your Phone
# |
Feature |
Description |
|
|
|
5 |
Soft Keys |
Used to select speed dial directories or numbers. |
|
|
|
6 |
PROG Key |
Used to program Flexible Function (FF) and one- |
|
|
touch keys, to adjust ringer volume, and to send a |
|
|
flash signal. Depending on the setup of your sys- |
|
|
tem, may also be used to transfer calls. |
|
|
|
7 |
CONF Key |
Used to establish conference calls and to check FF |
|
|
key and one-touch features. |
|
|
|
8 |
One-Touch Keys |
Used to make outside calls or to access system fea- |
|
|
tures. |
|
|
|
9 |
Flexible Function (FF) |
Used to access outside lines or to access system fea- |
|
Keys |
tures. |
|
|
|
10 |
DND/CF Indicator |
Indicates that Do-Not-Disturb (DND) or Call For- |
|
|
warding is set. |
|
|
|
11 |
INT Indicator |
Lights when you are on a call and flashes when you |
|
|
hold a call. |
|
|
|
12 |
MIC Indicator |
Indicates that your voice is not muted (i.e., party on |
|
|
the other end can hear you). Goes off when your |
|
|
hands-free microphone is muted and flashes when |
|
|
your handset is muted. |
|
|
|
13 |
ON/OFF Indicator |
Lights when the ON/OFF key has been pressed. |
|
|
|
14 |
FL/R Key |
Used to end an outside call and to either restore out- |
|
|
side dial tone or switch to external dial tone status |
|
|
without hanging up the receiver. |
|
|
|
15 |
REDIAL Key |
Used to redial the last number dialled. |
|
|
|
16 |
MEMORY Key |
Used to access speed dialling or enter account |
|
|
codes. |
|
|
|
17 |
ON/OFF Key |
Used to make a call without lifting the handset or to |
|
|
turn the speaker on and off. |
|
|
|
18 |
LINE Key |
Used to seize a free outside line. |
|
|
|
19 |
VOLUME Key |
Used to adjust the level of tones, background |
|
music, ringing, receiver volume, and display con- |
|
|
|
trast. |
|
|
|
20 |
HOLD Key |
Used to hold calls, to retrieve held calls, and to |
|
|
complete FF key programming. |
|
|
|
21 |
Microphone |
Used to talk to another party without using the |
|
|
handset. |
|
|
|
22 |
Speaker |
Outputs tones and voice at your extension. |
|
|
|
10 |
Key Telephone User Guide |
1. Understanding Your Phone
Changing the Default Display
The MODE key enables you to change the software mode of the display from Default Mode (i.e., time and date) to Directory Mode (i.e., System Speed Dial [SSD], Personal Speed Dial [PSD], or Extension directories). The END key enables you to return the display to Default Mode.
While in Directory Mode, the soft keys enable you to view either the SSD, PSD, or Extension directories. After selecting the desired directory, the soft keys also enable you to either view or dial speed dial or extension numbers. (For more information on using directories to make calls, see “Dialling Speed Dial Numbers” on page 34 and “Calling Other Extensions” on page 45.)
While in Variable Mode, you can also use the soft keys to access various system features.
Notes:
•You must be in Directory Mode to view speed dial and extension directories or dial speed dial numbers using the soft keys.
•The system features displayed in Variable Mode require system programming
To display the Directory Mode on a small-display phone
1. (A)Press the MODE key one time to access the speed dial directories. (
and appear on the second line of the display.)
OR
(B)Press the MODE key twice to access the Extension Directory. ( appears on the second line of the display.)
2.Press the END key to return to Default Mode.
Understanding Display Information
Display information indicates the status of the phone. However, this information will vary depending on how the phone is programmed and its status. Several of the more common displays are illustrated below.
Figure 3. Idle condition for small-display phone (display default)
|
|
|
|
|
|
|
|
Extension |
|
|
|
|
|
|
User name |
|
|
|
|||||
|
|
|
|
|
|
|
|
Key Telephone User Guide |
11 |

1. Understanding Your Phone
Figure 4. Messages received for small-display phone
|
|
|
|
|
|
|
|
|
|
|
|
|
||||
Number of |
|
|
|
|
|
|
Person that |
|||||||||
|
|
|
|
|
|
|
|
|
|
|
||||||
messages |
|
|
|
|
|
left the first |
||||||||||
|
|
|
|
|
|
|
|
|
|
|||||||
|
|
|
|
|
|
|
|
|||||||||
|
|
|
|
|
|
|
|
|
|
|
|
|
|
|
message |
|
Figure 5. Reminder alarm for small-display phone |
|
|
|
|
||||||||||||
|
|
|
|
|
|
|
|
|
|
|
|
|
|
|
|
|
|
|
|
|
|
|
|
|
|
|
|
|
|
||||
Alarm time |
|
|
|
|
|
|
|
|
Alarm |
|||||||
|
|
|
|
|
|
|
|
|||||||||
|
|
|
|
|
|
indicator |
||||||||||
|
|
|
|
|
|
|
|
|
|
|
|
|
|
|
||
Figure 6. Incoming outside call for small-display phone |
|
|
|
|
||||||||||||
Incoming outside |
|
|
|
|
|
|
|
|
|
|
Outside line |
|||||
|
|
|
! |
|
" |
|
|
|||||||||
call |
|
|
|
|
|
|
|
number |
||||||||
|
|
|
|
|
|
|
|
|
|
|||||||
Figure 7. Outside call in progress for small-display phone
Outside call |
|
|
|
|
|
! #$ |
% & |
|
|
|
|
Call |
|
|
|
|
|
|
|
|
|
|
|||||
in progress |
|
|
|
|
|
|
duration |
||||||
|
|
|
|
|
|
||||||||
|
|
|
|
|
|
|
|
|
|
|
|
||
|
|
|
|
|
|
|
|
|
|
|
|
|
|
Figure 8. Internal calling in use for small-display phone |
|
|
|
|
|
|
|||||||
Intercom call |
|
|
|
|
|
|
|
|
|
|
Called |
||
|
|
|
|
' |
( |
|
|
|
|
||||
|
|
|
|
|
|
|
|
||||||
|
|
|
|
|
party |
||||||||
|
|
|
|
|
|
|
|
|
|
|
|
||
Using Variable Mode
Using Variable Mode allows you to use the soft keys to access programmed system features when your phone is in the following states:
•During an intercom call
•During a CO dial tone
•During a trunk call
•After dialling a busy extension
To activate Variable Mode on a small-display phone
1. Lift the handset or press the ON/OFF key.
12 |
Key Telephone User Guide |
1. Understanding Your Phone
2.Press Variable Mode Key.
3.Replace the handset or press the ON/OFF key.
To use Variable Mode on a small-display phone
1.After turning Variable Mode on, the display will reflect the programmed features during an intercom call, CO dial tone, trunk call, or after dialling a busy extension.
2.Press the > or < key next to the desired feature.
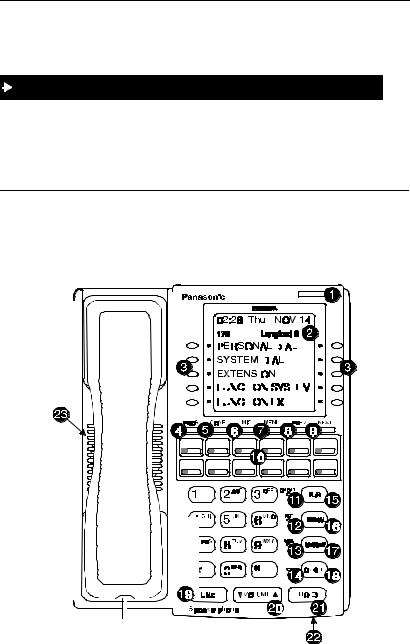
LARGE-DISPLAY PHONES
Large-display phones are distinguished by their large displays. Table 3 on page 14 describes the features (1-23 below) that are typical of large display phones.
Figure 9. Large-display phone
|
|
|
|
|
|
|
|
|
|
|
|
|
|
|
|
|
|
|
|
|
|
|
|
|
|
|
|
|
|
|
|
|
|
|
|
|
|
|
|
|
|
|
|
|
|
|
|
|
|
|
|
|
|
|
|
|
|
|
|
|
|
|
|
|
|
|
|
|
|
|
|
|
|
|
|
|
|
|
|
|
|
|
|
|
|
|
|
|
|
|
|
|
|
|
|
|
|
|
|
|
|
|
|
|
|
|
|
|
|
|
|
|
|
|
|
|
|
|
|
|
|
|
|
|
|
|
|
|
|
|
|
|
|
|
|
|
|
|
|
|
|
|
|
|
|
|
|
|
|
|
|
|
|
|
|
|
|
|
|
|
|
|
|
|
|
|
|
|
|
|
|
|
|
|
|
|
|
|
|
|
|
|
|
|
|
|
|
|
|
|
|
|
|
|
|
|
|
|
|
|
|
|
|
|
|
|
|
|
|
|
|
|
|
|
|
|
|
|
|
|
|
|
|
|
|
|
|
|
|
|
|
|
|
|
|
|
|
|
|
|
|
|
|
|
|
|
|
|
|
|
|
|
|
|
|
|
|
|
|
|
|
|
|
|
|
|
|
|
|
|
|
|
|
|
|
|
|
|
|
|
|
|
|
|
|
|
|
|
|
|
|
|
|
|
|
|
|
|
|
|
|
|
|
|
|
|
|
|
|
|
|
|
|
|
|
|
|
|
|
|
|
|
|
|
|
|
|
|
|
|
|
|
|
|
|
|
|
|
|
|
|
|
|
|
|
|
|
|
|
|
|
|
|
|
|
|
|
|
|
|
|
|
|
|
|
|
|
|
|
|
|
|
|
|
|
|
|
|
|
|
|
|
|
|
|
|
|
|
|
|
|
|
|
|
|
|
|
|
|
|
|
|
|
|
|
|
|
|
|
|
|
|
|
|
|
|
|
|
|
|
|
|
|
|
|
|
|
|
|
|
|
|
|
|
|
|
|
|
|
|
|
|
|
|
|
|
|
|
|
|
|
|
|
|
|
|
|
|
|
|
|
|
|
|
|
|
|
|
|
|
|
|
|
|
|
|
|
|
|
|
|
|
|
|
|
|
|
|
|
|
|
|
|
|
|
|
|
|
|
|
|
|
|
|
|
|
|
|
|
|
|
|
|
|
|
|
|
|
|
|
|
|
|
|
|
|
|
|
|
|
|
|
|
|
|
|
|
|
|
|
|
|
|
|
|
|
|
|
|
|
|
|
|
|
|
|
|
|
|
|
|
|
|
|
|
|
|
|
|
|
|
|
|
|
|
|
|
|
|
|
|
|
|
|
|
|
|
|
|
|
|
|
|
|
|
|
|
|
|
|
|
|
|
|
|
|
|
|
|
|
|
|
|
|
|
|
|
|
|
|
|
|
|
|
|
|
|
|
|
|
|
|
|
|
|
|
|
|
|
|
|
|
|
|
|
|
|
|
|
|
|
|
|
|
|
|
|
|
|
|
|
|
|
|
|
|
|
|
|
|
|
|
|
|
|
|
|
|
|
|
|
|
|
|
|
|
|
|
|
|
|
|
|
|
|
|
|
|
|
|
|
|
|
|
|
|
|
|
|
|
|
|
|
|
|
|
|
|
|
|
|
|
|
|
|
|
|
|
|
|
|
|
|
|
|
|
|
|
|
|
|
|
|
|
|
|
|
|
|
|
|
|
|
|
|
|
|
|
|
|
|
|
|
|
|
|
|
|
|
|
|
|
|
|
|
|
|
|
|
|
|
|
|
|
|
|
|
|
|
|
|
|
|
|
|
|
|
|
|
|
|
|
|
|
|
|
|
|
|
|
|
|
|
|
|
|
|
|
|
|
|
|
|
|
|
|
|
|
|
|
|
|
|
|
|
|
|
|
|
|
|
|
|
|
|
|
|
|
|
|
|
|
|
|
|
|
|
|
|
|
|
|
|
|
|
|
|
|
|
|
|
|
|
|
|
|
|
|
|
|
|
|
|
|
|
|
|
|
|
|
|
|
|
|
|
|
|
|
|
|
|
|
|
|
|
|
|
|
|
|
|
|
|
|
|
|
|
|
|
|
|
|
|
|
|
|
|
|
|
|
|
|
|
|
|
|
|
|
|
|
|
|
|
|
|
|
|
|
|
|
|
|
|
|
|
|
|
|
|
|
|
|
|
|
|
|
|
|
|
|
|
|
|
|
|
|
|
|
|
|
|
|
|
|
|
|
|
|
|
|
|
|
|
|
|
|
|
|
|
|
|
|
|
|
|
|
|
|
|
|
|
|
|
|
|
|
|
|
|
|
|
|
|
|
|
|
|
|
|
|
|
|
|
|
|
|
|
|
|
|
|
|
|
|
|
|
|
|
|
|
|
|
|
|
|
|
|
|
|
|
|
|
|
|
|
|
|
|
|
|
|
|
|
|
|
|
|
|
|
|
|
|
|
|
|
|
|
|
|
|
|
|
|
|
|
|
|
|
|
|
|
|
|
|
|
|
|
|
|
|
|
|
|
|
|
|
|
|
|
|
|
|
|
|
|
|
|
|
|
|
|
|
|
|
|
|
|
|
|
|
|
|
|
|
|
|
|
|
|
|
|
|
|
|
|
|
|
|
|
|
|
|
|
|
|
|
|
|
|
|
|
|
|
|
|
|
|
|
|
|
|
|
|
|
|
|
|
|
|
|
|
|
|
|
|
|
|
|
|
|
|
|
|
|
|
|
|
|
|
|
|
|
|
|
|
|
|
|
|
|
|
|
|
|
|
|
|
|
|
|
|
|
|
|
|
|
|
|
|
|
|
|
|
|
|
|
|
|
|
|
|
|
|
|
|
|
|
|
|
|
|
|
|
|
|
|
|
|
|
|
|
|
|
|
|
|
|
|
|
|
|
|
|
|
|
|
|
|
|
|
|
|
|
|
|
|
|
|
|
|
|
|
|
|
|
|
|
|
|
|
|
|
|
|
|
|
|
|
|
|
|
|
|
|
|
|
|
|
|
|
|
|
|
|
|
|
|
|
|
|
|
|
|
|
|
|
|
|
|
|
|
|
|
|
|
|
|
|
|
|
|
|
|
|
|
|
|
|
|
|
|
|
|
|
|
|
|
|
|
|
|
|
|
|
|
|
|
|
|
|
|
|
|
|
|
|
|
|
|
|
|
|
|
|
|
|
|
|
|
|
|
|
|
|
|
|
|
|
|
|
|
|
|
|
|
|
|
|
|
|
|
|
|
|
|
|
|
|
|
|
|
|
|
|
|
|
|
|
|
|
|
|
|
|
|
|
|
|
|
|
|
|
|
|
|
|
|
|
|
|
|
|
|
|
|
|
|
|
|
|
|
|
|
|
|
|
|
|
|
|
|
|
|
|
|
|
|
|
|
|
|
|
|
|
|
|
|
|
|
|
|
|
|
|
|
|
|
|
|
|
|
|
|
|
|
|
|
|
|
|
|
|
|
|
|
|
|
|
|
|
|
|
|
|
|
|
|
|
|
|
|
|
|
|
|
|
|
|
|
|
|
|
|
|
|
|
|
|
|
|
|
|
|
|
|
|
|
|
|
|
|
|
|
|
|
|
|
|
|
|
|
|
|
|
|
|
|
|
|
|
|
|
|
|
|
|
|
|
|
|
|
|
|
|
|
|
|
|
|
|
|
|
|
|
|
|
|
|
|
|
|
|
|
|
|
|
|
|
|
|
|
|
|
|
|
|
|
|
|
|
|
|
|
|
|
|
|
|
|
|
|
|
|
|
|
|
|
|
|
|
|
|
|
|
|
|
|
|
|
|
|
|
|
|
|
|
|
|
|
|
|
|
|
|
|
|
|
|
|
|
|
|
|
|
|
|
|
|
|
|
|
|
|
|
|
|
|
|
|
|
|
|
|
|
|
|
|
|
|
|
|
|
|
|
|
|
|
|
|
|
|
|
|
|
|
|
|
|
|
|
|
|
|
|
|
|
|
|
|
|
|
|
|
|
|
|
|
|
|
|
|
|
|
|
|
|
|
|
|
|
|
|
|
|
|
|
|
|
|
|
|
Key Telephone User Guide |
13 |
||||||||||||||||||||||||||||||||||||||||||||||||||||||||||||||

1. Understanding Your Phone
Table 3. Large-display phone features
# |
Feature |
|
Description |
|
|
|
|
1 |
Message Waiting Indicator |
Indicates that you have a message. |
|
|
|
|
|
2 |
Display |
Displays information about the phone’s status, |
|
|
|
menus, and dialling directories. |
|
3 |
Soft Keys |
Used to select menus, directories, speed dial num- |
|
|
|
bers, and to access call-handling features. |
|
4 |
PROG Key |
Used to program FF and one-touch keys, to adjust |
|
|
|
ringer volume and to send a flash signal. Depending |
|
|
|
on the setup of your system, may also be used to |
|
|
|
transfer calls. |
|
|
|
|
|
5 |
CONF Key |
Used to establish conference calls and to check |
|
|
|
Flexible Function (FF) and one-touch key settings. |
|
|
|
|
|
6 |
MIC Key |
Used to activate/deactivate the Microphone/Mute |
|
|
|
function. When activated, the party on the other end |
|
|
|
can hear you. (See item 13, MIC Indicator.) |
|
|
|
|
|
7 |
MENU Key |
Used to return to the default Main Menu screen |
|
|
|
which contains the following items: |
|
|
|
• |
Personal Dial |
|
|
• |
System Dial |
|
|
• |
Extension |
|
|
• |
Function System |
|
|
• |
Function Ext |
|
|
|
|
8 |
PREV Key |
Used to return to the previous screen. |
|
|
|
|
|
9 |
NEXT Key |
Used to advance to the next screen. |
|
|
|
|
|
10 |
Flexible Function (FF) |
Used to access outside lines or to access system fea- |
|
|
Keys |
tures. |
|
|
|
|
|
11 |
DND/CF Indicator |
Indicates that Do-Not-Disturb (DND) or Call For- |
|
|
|
warding is set. |
|
|
|
|
|
12 |
INT Indicator |
Lights when you are on a call and flashes when you |
|
|
|
hold a call. |
|
13 |
MIC Indicator |
Indicates that your voice is not muted (i.e., party on |
|
|
|
the other end can hear you). Goes off when your |
|
|
|
hands-free microphone is muted and flashes when |
|
|
|
your handset is muted. |
|
|
|
|
|
14 |
ON/OFF Indicator |
Lights when the ON/OFF key has been pressed. |
|
|
|
|
|
15 |
FL/R Key |
Used to end an outside call and to either restore out- |
|
|
side dial tone or switch to external dial tone status |
||
|
|
without hanging up the receiver. |
|
|
|
|
|
16 |
REDIAL Key |
Used to redial the last number dialled. |
|
|
|
|
|
14 |
Key Telephone User Guide |

|
|
1. Understanding Your Phone |
|
|
|
# |
Feature |
Description |
|
|
|
17 |
MEMORY Key |
Used to access speed dialling or enter account |
|
|
codes. |
|
|
|
18 |
ON/OFF Key |
Used to make a call without lifting the handset or to |
|
|
turn the speaker on and off. |
|
|
|
19 |
LINE Key |
Used to seize a free outside line. |
|
|
|
20 |
VOLUME Key |
Used to adjust level of tones, background music, |
|
|
ringing, receiver volume, and display contrast. |
|
|
|
21 |
HOLD Key |
Used to hold calls, to retrieve held calls, and to |
|
|
complete FF key programming. |
|
|
|
22 |
Microphone |
Used to talk to another party without using the |
|
|
handset. |
|
|
|
23 |
Speaker |
Outputs tones and voice at your extension. |
|
|
|
Changing the Default Display
The ten soft keys located alongside the display on a large-display phone allow you to change the software mode of the display. Instead of displaying the Main Menu (Default Mode) for instance, you can set your phone to display one of the following directories or menus:
•Personal Dial - Allows you to program, view, or dial PSD numbers using the soft keys.
•System Dial - Allows you to view or dial SSD numbers using the soft keys.
•Extension - Allows you to view or dial other extensions using the soft keys.
•Function System - Allows you to access most key telephone features, such as Call Forwarding, Do-Not-Disturb (DND), Microphone Mute, Background Music, Call Pickup, Account Codes, etc.
•Function Extension - Allows you to assign frequently used phone features for easy access. Most items found under the Function System Menu can be assigned to the Function Extension Menu in any order you desire.
To display a directory or menu on a large-display phone
1.Press the soft key to the left of the desired directory or menu. (The selected directory or menu of feature displays.)
2.Press the MENU key to return to the Main Menu.
Note: Menus are programmable or customizable per extension. Therefore, the actual menu that displays depends on your system configuration.
Key Telephone User Guide |
15 |
1. Understanding Your Phone
Understanding Display Information
Display information indicates the status of the phone. However, this information will vary depending on how the phone is programmed and its status. Several of the more common displays are illustrated below.
Figure 10. Idle condition for large-display phone (display default
|
|
|
|
|
|
|
Extension |
|
|
|
|
|
User name |
|
|
|
! # #
) #
!
*+ ! ) *+ !
Figure 11. Messages received for large-display phone
Number of |
|
|
|
|
Person that |
||||||||
|
|
|
|
|
|||||||||
|
|
|
|
|
|
|
|
|
|
||||
messages |
|
|
left the first |
||||||||||
|
|
|
|
|
|
|
|||||||
|
|
|
|
! # # |
|
|
message |
||||||
|
|
|
|
) # |
|
|
|
|
|
||||
|
|
|
|
! |
|
|
|
|
|
|
|||
|
|
|
|
*+ |
! |
) |
|
|
|
|
|
||
|
|
|
|
*+ |
! |
|
|
|
|
|
|
||
Figure 12. Reminder alarm for large-display phone |
|
|
|
|
|||||||||
|
|
|
|
|
|
|
|
|
|
|
|
|
|
|
|
|
|
|
|
|
|
|
|
|
Alarm |
||
Alarm time |
|
|
|
|
|
|
|
|
|
|
|
||
|
|
|
|
|
|
|
|
indicator |
|||||
|
|
|
|
|
|
|
|
|
|
|
|
|
|
|
|
|
|
|
! # # |
|
|
|
|
|
|||
|
|
|
|
|
) # |
|
|
|
|
|
|||
|
|
|
|
|
! |
|
|
|
|
|
|
||
|
|
|
|
|
*+ |
! |
) |
|
|
|
|
|
|
|
|
|
|
|
*+ |
! |
|
|
|
|
|
|
|
16 |
Key Telephone User Guide |
|
|
|
|
1. Understanding Your Phone |
||||
Figure 13. Incoming outside call for large-display phone |
|
|
|
|||||
Incoming outside |
|
|
|
|
Outside line |
|||
! |
" |
|||||||
call |
|
|
|
|
number |
|||
|
|
|
|
|||||
! # #
) #
!
*+ ! ) *+ !
Figure 14. Outside call in progress for large-display phone
Outside call |
|
! #$ |
% & |
|
Call |
|
|
||||
in progress |
|
|
|
|
duration |
|
|
|
|
! # #
) #
!
*+ ! ) *+ !
Figure 15. Internal calling in use for large-display phone
Intercom call |
|
|
|
|
|
Called |
|
|
|
' |
( |
||||
|
|
|
|
|
|||
|
|
party |
|||||
|
|
|
|
|
|
||
! # #
) #
!
*+ ! ) *+ !
Key Telephone User Guide |
17 |

2. SETTING UP YOUR PHONE
You can use the procedures in this chapter to customize your phone for the following:
•Adjusting Volume and Display Settings (page 18)
•Setting Up Flexible Function Keys (page 19)
•Setting Up One-touch Keys (page 20)
•Setting Up Speed Dialling (page 22)
•Assigning and Deleting Personal Speed Dial (PSD) Numbers (page 22)
•Linking System Speed Dial Numbers (page 25)
•Assigning and Deleting Names for PSD Numbers (page 26)
ADJUSTING VOLUME AND DISPLAY SETTINGS
You can adjust the volume or display contrast of the following by pressing the
VOLUME key:
•Intercom and incoming ringer
•Handset
•Speaker
•Display contrast of your phone
To adjust the volume of your phone while it is in use
1.Press the VOLUME key:
a. During ringing to adjust the intercom or incoming ring tone.
a. During a call to adjust the handset or speaker volume.
To adjust the ringer volume of your phone while it is idle
1.Press the ON/OFF key.
2.Press the PROG key.
3.Enter 9, then 1 to adjust the incoming ring tone. (The phone produces a tone.)
OR
18 |
Key Telephone User Guide |

2. Setting Up Your Phone
Enter 9, then 2 to adjust the intercom ring tone. (The phone produces a tone.)
4.Press the VOLUME key.
5.Press the ON/OFF key.
To adjust the display contrast of your phone
Note: This task requires a display phone.
1.While the phone is idle, press the # key.
2.Press the VOLUME key several times as needed.
SETTING UP FLEXIBLE FUNCTION KEYS
You can set up Flexible Function (FF) keys to initiate system features or to assign specific extension numbers.
Note: You cannot set up FF keys that are dedicated to outside lines. Contact your system administrator or ICX dealer to make changes to dedicated FF keys.
 To set up FF keys
1.Pickup the handset or press the ON/OFF key.
2.Press the PROG key.
3.Press the FF key to be programmed.
4.Do one of the following:
|
If . . . |
Then . . . |
|
|
|
||
You want one-key assess to a certain fea- |
a. For a fixed dial code, press the REDIAL |
||
ture: |
key. For a flexible dial code, proceed to |
||
|
|
step b. |
|
Notes: |
b. Enter one of the dial codes listed in |
||
• |
You must enter a dial code when |
||
Appendix A, “Dial Code List.” |
|||
|
assigning features. (See Chapter A, |
||
|
|
||
|
“Dial Code List” on page 63.) |
Note: |
|
• |
Not all dial codes can be stored in FF |
||
|
|||
|
keys |
|
|
|
|
||
**You want one-key access to a specific |
Enter the extension number. |
||
extension number, plus the ability to pick up |
|
||
the extension’s calls and know when the |
|
||
extension is busy. |
|
||
|
|
|
|
Key Telephone User Guide |
19 |

2. Setting Up Your Phone
. . .If |
. . .Then |
|
|
**If you assign an extension number to an FF key, the FF key will light red when the extension is busy. It will light green when Do-Not-Disturb (DND)or Call Forwarding is set. In addition, you can pick up a call that is ringing or on hold at the extension by simply pressing the FF key when it is flashing.
5.Press the HOLD key.
6.Repeat steps 2-5 to program additional keys.
7.Replace the handset or press the ON/OFF key.
 To clear an FF key’s programming
1.Pick up the handset or press the ON/OFF key.
2.Press the PROG key.
3.Press the desired FF key.
4.Press the HOLD key.
5.Replace the handset or press the ON/OFF key.
 To check the FF key’s setup
Note: This task requires a display phone.
1.Pick up the handset or press the ON/OFF key.
2.Press the CONF key.
3.Press the FF key. The assigned function appears on the display.
4.Replace the handset or press the ON/OFF key.
SETTING UP ONE-TOUCH KEYS
You can set up one-touch keys on a non-display or small-display phone to store phone numbers, speed dial numbers, or feature access codes.
 To program a one-touch key for an outside phone number
1.Pickup the handset or press the ON/OFF key.
2.Press the PROG key.
3.Press the one-touch key to be programmed.
20 |
Key Telephone User Guide |
2. Setting Up Your Phone
4.Dial the phone number to be stored.
5.Press the HOLD key.
6.Replace the handset or press the ON/OFF key.
 To assign an SSD number to a one-touch key
1.Pickup the handset or press the ON/OFF key.
2.Press the PROG key.
3.Press the one-touch key to be programmed.
4.Press the MEMORY key.
5.Enter the SSD bin number to be programmed.
6.Press the HOLD key.
7.Replace the handset or press the ON/OFF key.
 To assign a feature code or extension number to a one-touch
Note: **When the system is set up for MCO Code level, one-touch keys automatically dial an outside line. (MCO Code level requires system programming.)
1.Pickup the handset or press the ON/OFF key.
2.Press the PROG key.
3.Press the one-touch key to be programmed.
4.**If the feature functions at the MCO Code level, press MEMORY * #.
5.Enter the desired feature code or extension number.
6.Press the HOLD key.
7.Replace the handset or press the ON/OFF key.
 To check a programmed one-touch key
Note: This task requires a display phone.
1.Pickup the handset or press the ON/OFF key.
2.Press the CONF key.
Key Telephone User Guide |
21 |

2.Setting Up Your Phone
3.Press the one-touch key to be checked. (Programmed data appears on the display.)
4.Replace the handset or press the ON/OFF key.
SETTING UP SPEED DIALLING
You can set up the following speed dial features using your phone’s one-touch or soft keys:
•Speed dial numbers
•Speed dial linking
•Speed dial names
Assigning and Deleting PSD Numbers
You can assign frequently called numbers (or System Speed Dial [SSD] numbers) to your phone’s one-touch or soft keys. These keys are preprogrammed to correspond to specific PSD codes or bins. You store your PSD numbers in these bins. When you press a one-touch or soft key containing a PSD number, the PSD bin associated with that key is accessed and the speed dial number is dialled.
You can assign up to 10 PSD numbers to the one-touch keys on a non-display or small-display phone (PSD bins 80-89) and up to 20 PSD numbers to the soft keys on a large-display phone (PSD bins 80-99).
When in the PSD Directory Mode, you can view the PSD bin numbers on the display. On a small-display phone, two bins are displayed at a time. To display the next two bins, press the # key. To display the previous two bins, press the * key. On a large-display phone, 10 PSD bins are displayed at a time. To display the next 10 bins, press the NEXT key. To display the previous 10 bins, press the PREV key.
For a list of corresponding PSD bin numbers and one-touch or soft keys, see Figure 16 and Table 4 on page 23.
Notes:
•On a small-display phone, you must be in the PSD Directory Mode to assign, access, or view numbers in PSD bins 90-99. On a non-display phone, you access or assign numbers to PSD bins 90-99 by pressing the MEMORY key and entering the PSD bin number. (To review the PSD numbers on nondisplay phones, refer to your customized list of PSD numbers in Appendix B “Customized PSD Bin Numbers” on page 66.)
•Until you assign a name or string of characters to a PSD number, the PSD bin number will display when you press the one-touch or soft key. For more information, see “Assigning and Deleting Names for PSD Numbers” on page 26.
22 |
Key Telephone User Guide |
Loading...