


Operating Manual
Document Scanner
Model No. KV-S2087
These instructions contain information on operating the scanner. Before reading these instructions, please read the Quick Installation Guide enclosed with this unit.
Keep all documentation in a safe place for future reference.
Current model availability depends on your country/area. Please contact your dealer.

Introduction
Introduction
Thank you for purchasing a Panasonic Document Scanner.
Feature Highlights
High-speed Double Sided Scanning
• This scanner can scan documents at high speed, regardless of the image type (monochrome / color).
Background Color Switch Function
• Using the software, you can switch the background color of scanned images between white and black.
Double Feed Detection Function
•This scanner contains an ultrasonic sensor for the detection of double feeding. Double feeding can be detected even if you scan documents that contain paper of various thicknesses.
Double Feed Skip (DFS) Function
•If scanning has been stopped because a double feed was detected, you can easily resume scanning by pressing the Skip button. When you scan documents that include items that you do not want to be detected as double feeding (for example, documents that have receipts attached, envelopes, etc.), the double feed detection function can be enabled and still scan these documents.
Push Scan
•This scanner has a push scan function to perform scanning without operating a computer. Scanning settings should be registered as Jobs in advance. You can start scanning by pressing the OK button or Start/Stop button after selecting a job with the cursor buttons. This scanner also has a function that starts scanning when documents are simply placed on the feed tray (Touch Free Scanning).
Other Features
•The paper feed path can be opened widely to easily remove jammed paper and perform maintenance.
•User Utility helps you perform maintenance for the scanner.
–You can configure and check the counters that indicate the approximate time for cleaning and replacement of the rollers.
–You can clear notification messages for the rollers after cleaning or replacing the rollers.
–You can enable Cleaning Mode. During Cleaning Mode, the conveyor rollers rotate a small amount every time the Start/Stop button on the scanner is pressed. You do not have to rotate the rollers by using your fingers in order to clean the entire surface of each roller.
–You can configure the time until the scanner enters sleep mode following a period of non-operation.
2

Introduction
Abbreviations
•Windows® refers to the Microsoft® Windows® operating system (hereafter Windows).
•Windows® XP refers to the Microsoft® Windows® XP operating system (hereafter Windows XP).
•Windows Vista® refers to the Microsoft® Windows Vista® operating system (hereafter Windows Vista).
•The explanations and screen shots in this manual are based on the Windows 7 operating system.
•The screen shots used in this manual may differ from the screens displayed on your computer.
•The illustrations in this manual are based on the KV-S2087.
Trademarks
•Microsoft, Windows, and Windows Vista are either registered trademarks or trademarks of Microsoft Corporation in the United States and/or other countries.
•ISIS is a registered trademark or trademark of EMC Corporation in the United States and/or other countries.
•IBM is a trademark of International Business Machines Corporation, registered in many jurisdictions worldwide.
•Intel and Intel Core are trademarks of Intel Corporation in the U.S. and/or other countries.
•Adobe and Reader are either registered trademarks or trademarks of Adobe Systems Incorporated in the United States and/or other countries.
•All other trademarks identified herein are the property of their respective owners.
3

Introduction
About the Documentation
The scanner documentation consists of 2 manuals: the Operating Manual (this manual), and the Quick Installation Guide.
Operating Manual |
This manual provides information about the operation of the unit. |
(this manual) |
|
|
|
Quick Installation Guide |
The Quick Installation Guide explains about safety precautions and |
|
other important information, and outlines brief installation procedures |
|
of the unit and software. |
|
|
About the Software Help
Each software contains help files.
For details about viewing the help files, see "3.4.2 To view the help" (page 21).
Software / Manual CD-ROM Contents
Drivers |
Device Driver |
|
|
|
TWAIN |
|
|
|
ISIS |
|
|
Applications |
Image Capture Plus*1 |
Utilities |
User Utility |
|
|
|
Scan Button Setting Tool |
|
|
Documents*2 |
Operating Manual |
|
Control sheet*3 |
|
|
*1 Image Capture Plus is a Panasonic original application for configuring advanced scanning settings.
*2 Each document is a PDF document. To view documents correctly, install Adobe® Reader®. *3 For details about the control sheet, see "4.4 Using Control Sheets" (page 38).
4

Introduction
System Requirements
Computer |
IBM® PC/AT or compatible machine with a CD-ROM drive |
CPU |
Intel® Core™ 2 Duo 1.8 GHz or higher |
Interface |
USB 2.0 / USB 3.0 |
|
|
Note
•For details about the system requirements, refer to [Read me first] in the Software / Manual CD-ROM.
•The scanning speed differs depending on the host computer’s operating environment or the application used.
•Due to the slower speed of USB 1.1, it is recommended to use a USB 2.0 / USB 3.0 interface.
•If you connect the unit to a USB hub, it is not guaranteed to work.
About Consumables and Optional Accessories
Consumables
Part Name |
Part Number |
Notes |
|
|
|
|
|
Roller exchange kit |
KV-SS063 |
See "6.3 Replacing the Rollers" |
|
(page 51). |
|||
|
|
||
|
|
|
|
Roller cleaning paper |
KV-SS03 |
See "Roller Cleaning Paper" |
|
(page 9). |
|||
|
|
||
|
|
|
|
|
|
See "7.1 Installing the Imprinter |
|
Ink cartridge |
KV-SS021 |
Unit and Ink Cartridge" (page |
|
|
|
57). |
|
|
|
|
|
Optional Accessories |
|
|
|
|
|
|
|
Part Name |
Part Number |
Notes |
|
|
|
|
|
|
|
See "7.1 Installing the Imprinter |
|
Imprinter unit |
KV-SS020 |
Unit and Ink Cartridge" (page |
|
|
|
57). |
|
|
|
|
|
Carrier sheet |
KV-SS076 |
See "4.1.2 Carrier Sheet" |
|
(page 25). |
|||
|
|
||
|
|
|
Note
• To purchase separately sold items, contact your dealer.
5

Table of Contents
Table of Contents
1 |
Before You Start ..................................................................................... |
8 |
|
1.1 |
|
Precautions ...................................................................................................................... |
8 |
1.2 |
|
Check the Accessories ................................................................................................. |
10 |
2 |
Location of Controls ............................................................................. |
11 |
|
2.1 |
|
Main Unit ........................................................................................................................ |
11 |
2.1.1 |
Front ............................................................................................................................. |
11 |
|
2.1.2 |
Rear .............................................................................................................................. |
12 |
|
2.2 |
|
Operation Panel ............................................................................................................. |
13 |
2.2.1 |
About LED .................................................................................................................... |
14 |
|
2.2.2 |
About LCD .................................................................................................................... |
15 |
|
3 |
Installation ............................................................................................. |
16 |
|
3.1 |
|
Required Space Around the Scanner .......................................................................... |
16 |
3.2 |
|
Installing the Software .................................................................................................. |
17 |
3.3 |
|
Installing the Unit .......................................................................................................... |
19 |
3.4 |
|
Viewing Operating Manual and Help Installed ............................................................ |
21 |
3.4.1 |
To view the Operating Manual ...................................................................................... |
21 |
|
3.4.2 |
To view the help ............................................................................................................ |
21 |
|
3.4.2.1 |
For Image Capture Plus ............................................................................................. |
21 |
|
3.4.2.2 |
For User Utility or Scan Button Setting Tool .............................................................. |
21 |
|
3.4.2.3 |
For TWAIN or ISIS ..................................................................................................... |
21 |
|
4 |
Operation ............................................................................................... |
22 |
|
4.1 |
|
Preparing Documents ................................................................................................... |
22 |
4.1.1 |
Compatible Paper ......................................................................................................... |
23 |
|
4.1.2 |
Carrier Sheet ................................................................................................................ |
25 |
|
4.1.3 |
Incompatible Documents .............................................................................................. |
26 |
|
4.1.4 |
Notes about Documents for Scanning .......................................................................... |
27 |
|
4.2 |
|
Scanning Documents .................................................................................................... |
28 |
4.2.1 |
Switching the Background Color of Scanned Images .................................................. |
30 |
|
4.2.2 |
Using the Straight path (rear exit) ................................................................................. |
30 |
|
4.2.3 |
Using Manual feeding ................................................................................................... |
31 |
|
4.2.4 |
Feeding method and paper path by document type ..................................................... |
32 |
|
4.2.5 |
When feeding stiff or thick documents .......................................................................... |
33 |
|
4.2.6 |
Using Carrier sheet ....................................................................................................... |
34 |
|
4.3 |
|
Using Push Scan ........................................................................................................... |
35 |
4.3.1 |
Setting the scanning conditions .................................................................................... |
35 |
|
4.3.2 |
Selecting the behavior of push scan ............................................................................. |
35 |
|
4.3.2.1 |
Performing push scan ................................................................................................ |
36 |
|
4.3.3 |
Checking events ........................................................................................................... |
37 |
|
4.4 |
|
Using Control Sheets .................................................................................................... |
38 |
4.4.1 |
Control sheet functions ................................................................................................. |
38 |
|
4.4.2 |
About Printing Control Sheets ...................................................................................... |
38 |
|
4.4.2.1 |
Printing control sheets ............................................................................................... |
39 |
|
5 |
Clearing Paper Jams ............................................................................ |
40 |
|
5.1 |
|
Clearing Paper Jams ..................................................................................................... |
40 |
6 |
Care and Maintenance ......................................................................... |
43 |
|
6.1 |
|
Cleaning the Outside of the Scanner .......................................................................... |
43 |
6.2 |
|
Cleaning the Inside of the Scanner ............................................................................. |
44 |
6

|
|
|
Table of Contents |
|
|
|
|
6.2.1 |
Cleaning the Conveyor and Scanning Glasses |
............................................................ 46 |
|
6.2.2 |
Cleaning the Sensors ................................................................................................... |
47 |
|
6.2.3 |
Cleaning the Rollers ..................................................................................................... |
48 |
|
6.2.3.1 |
Location of Rollers ..................................................................................................... |
49 |
|
6.2.4 |
Cleaning Mode ............................................................................................................. |
50 |
|
6.3 |
|
Replacing the Rollers .................................................................................................... |
51 |
7 |
Optional Imprinter Unit ........................................................................ |
57 |
|
7.1 |
|
Installing the Imprinter Unit and Ink Cartridge ........................................................... |
57 |
7.2 |
|
How to Remove the Ink Cartridge ................................................................................ |
62 |
7.3 |
|
Printing ........................................................................................................................... |
63 |
7.4 |
|
Cleaning the ink cartridge ............................................................................................ |
64 |
8 |
Appendix ............................................................................................... |
65 |
|
8.1 |
|
Troubleshooting ............................................................................................................ |
65 |
8.2 |
|
Error Messages ............................................................................................................. |
68 |
8.3 |
|
Uninstalling the Software ............................................................................................. |
69 |
8.4 |
|
Repacking Instructions ................................................................................................. |
70 |
8.5 |
|
Specifications ................................................................................................................ |
71 |
7

1 Before You Start
1 Before You Start
1.1 Precautions
Illegal Duplication
It is unlawful to make duplication of certain documents. Duplicating certain documents may be illegal in your country/area. Penalties of fines and/or imprisonment may be imposed on those found guilty. The following are examples of items that may be illegal to duplicate in your country/area.
•Currency
•Bank notes and checks
•Bank and government bonds, and securities
•Passports, licenses, official or private documents, identification cards, and the like
•Copyright materials, or trademarks without the consent of the owner
•Postage stamps, and other negotiable instruments
This list is not inclusive, and no liability is assumed for either its completeness or accuracy. In case of doubt, contact your legal counsel.
Notice
Install your machine near a supervised area to prevent illegal duplication from being made.
Installation
•Do not place the unit in direct sunlight, in a cold draft, or near heating apparatus.
•Do not place the unit near apparatus which generate electronic or magnetic noise.
•Protect the unit from static electricity.
•Do not move the unit immediately from a cold place to a warm place. It may cause dew.
•When the unit is not used over an extended period of time, turn the unit off, and unplug the power cord. The unit consumes approximately 0.5 W of electricity even when the main unit is turned off.
•Do not turn ON the unit’s power before installing the software.
CD-ROM
•Do not write or stick paper on the front and/or back of CD-ROM.
•Do not touch the data side of the CD-ROM. When handling the CD-ROM, be careful not to leave fingerprints or otherwise damage the CD-ROM.
•Do not leave the CD-ROM where it is directly exposed to sunlight or near a heater for extended periods.
•Do not throw or bend the CD-ROM.
8

1.1 Precautions
Roller Cleaning Paper
Using a pair of scissors, open the bag along the dotted line ( ), and take out the roller cleaning paper.
1
Notice
•Keep the roller cleaning paper out of reach of small children.
•Do not store the roller cleaning paper in direct sunlight or in a place with a temperature over 40 (104 ).
•Only use the roller cleaning paper to clean the rollers.
•For details about the roller cleaning paper, please refer to the Material Safety Data Sheet (MSDS). Please ask your Panasonic sales company about obtaining the Material Safety Data Sheet.
Note
•If the bag is left opened for a long period of time before using it, the alcohol will evaporate. Please use the roller cleaning paper immediately after opening the bag.
•To purchase the roller cleaning paper (KV-SS03), please contact your dealer, or call our Supplies and Accessories department at 1-800-726-2797 (U.S.A. only).
KEEP AWAY FROM FIRE.
Security Notice
The management of documents and scanned data is the responsibility of the user. In particular, pay attention to the following points.
•Make sure you have the same number of pages for important documents both before and after scanning, and take care not to leave any pages in the scanner.
•Periodically back up important data.
•When having your computer or hard disk serviced, or when disposing of your computer or hard disk, completely erase any stored image data.
Others
•Make sure to remove paper clips and staples from documents before scanning. Failing to do so can damage the unit, document, or both.
•Do not use thinner, benzine, or cleaners containing abrasives or surfactants, for cleaning the outside of scanner.
9

1.2 Check the Accessories
1.2 Check the Accessories
Check that all accessories are included before installing the unit. In the event that an item is missing, please contact your dealer.
Accessories |
Name |
Notes |
|
|
Two power cords may be |
|
Power cord |
included. Use the power cord |
|
appropriate for where you use |
|
|
|
|
|
|
the unit. |
|
USB cable |
— |
|
Software / Manual CD-ROM |
Drivers, Applications, Utilities, |
|
Documents |
|
|
|
|
|
Quick Installation Guide |
— |
Note
•It is highly recommended to keep the original carton and all packing materials. They are necessary when repacking.
10
2 Location of Controls
2 Location of Controls
2.1 Main Unit
2.1.1 Front
11 10 9 8
|
7 |
1 |
6 |
|
5
2 3 4
 Document guides
 Feed extension tray
 Feed tray
 ADF door
 Manual feed selector
You can select the document feeding method.  : Manual feeding
 : Automatic feeding
 Paper path selector
You can select the paper path for documents.
 : U-turn path (front exit)
 : Straight path (rear exit)
 Operation panel
For details, see "2.2 Operation Panel" (page 13).
 ADF door release
 Exit tray
 Exit extension tray 1
 Exit extension tray 2
11

2.1.2 Rear
2.1.2 Rear

 7 1
7 1 
2
3
4 5 6
 AC inlet
 Power cord
 Security slot
Use a commercially available security cable.
 USB cable
 USB connector
 Fan exhaust vent
 Imprinter door
You open this door when installing an imprinter unit (sold separately) or ink cartridge.
For details about installing an imprinter unit, refer to "7.1 Installing the Imprinter Unit and Ink Cartridge" (page 57).
12

2.2 Operation Panel
2.2 Operation Panel
1
2
3
4
5

6
7
8
 LCD
LCD
Selected jobs, error codes, notification messages, and the scanner status are displayed.
 Power button
Press the power button for more than one second to turn the unit off.
 LED (Red)
Lights when an error occurs.
 LED (Green)
Shows the scanner’s status.
 OK button
 Cursor button
If you are using the scanner with Image Capture Plus, you can perform a push scan using the LCD. You can start push scanning by pressing the OK button or Start/Stop button after selecting a job with the cursor buttons.
 Skip button
If you press this button after a double feed or a dog-eared document is detected and scanning has been paused, the document (or documents) detected as a double feed or the dog-eared document will be scanned, and then ejected from the scanner. Scanning will continue after the document is scanned and ejected.
 Start/Stop button
•During scanning, pushing this button stops scanning.
•If you press this button after a double feed or a dogeared document is detected and scanning has been paused, the document (or documents) detected as a double feed or a dog-eared document will be ejected from the scanner without being scanned. Scanning will stop.
•If you set [Wait Key] for "Manual Feed Mode" in your application software, pushing this button starts scanning. For details about "Manual Feed Mode", refer to the Image Capture Plus, TWAIN, or ISIS help.
13

2.2.1 About LED
2.2.1 About LED
The status of the scanner is displayed by the LED (Red) ( |
) and the LED (Green) ( ), as shown in the |
||
table below: |
|
|
|
|
|
|
|
LED (Red) |
LED (Green) |
Status |
|
|
|
|
|
OFF |
OFF |
Power OFF*1 |
|
OFF |
Blinking (Fast) |
Warming up |
|
|
|
|
|
OFF |
ON |
Ready mode or Scanning |
|
|
|
|
|
Blinking (Slow) |
ON |
Notification mode |
|
|
|
|
|
OFF |
Blinking (Slow) |
Sleep mode*2 or Cleaning mode |
|
|
|
|
|
Blinking (Slow) |
Blinking (Slow) |
Sleep mode*2 and Notification mode |
|
ON |
OFF |
Error*3 |
|
OFF |
Blinking (Fast, 2 times consecutively) |
Double feed skip mode |
|
|
|
|
|
OFF |
Blinking (Fast, 3 times consecutively) |
Dog-ear Detection Skip mode |
|
|
|
|
|
*1
*2
*3
If the power off feature in sleep mode is enabled, and if no operation is performed for a certain period of time, the scanner will be turned off automatically. Press the power button of the scanner to turn it on. You can enable/disable the power off feature, and change the time until the scanner turns off in User Utility.
If no operation is performed for 15 minutes or longer, the scanner will enter sleep mode automatically to conserve energy. Press any button (except the power button) on the scanner’s operation panel to return to ready mode. The time until the scanner enters sleep mode can be changed in User Utility.
For details about the error, refer to "8.2 Error Messages" (page 68) or check in User Utility.
14

2.2.2 About LCD
2.2.2 About LCD
The status of the unit is displayed on the LCD as follows.
LCD |
Status |
|
The scanner is warming up. |
The USB cable is not connected.
The Scanner status and scanning counter are displayed.
123
Examples of displays of scanner statuses are as follows.
G: nn |
Group number (two-digit) and Group name of job |
|
GROUP NAME |
||
|
||
J: nn |
Job number (two-digit) and Job name |
|
JOB NAME |
||
|
||
U: nn |
Error number (two-digit) and Error message |
|
MESSAGE |
||
|
15
3 Installation
3 Installation
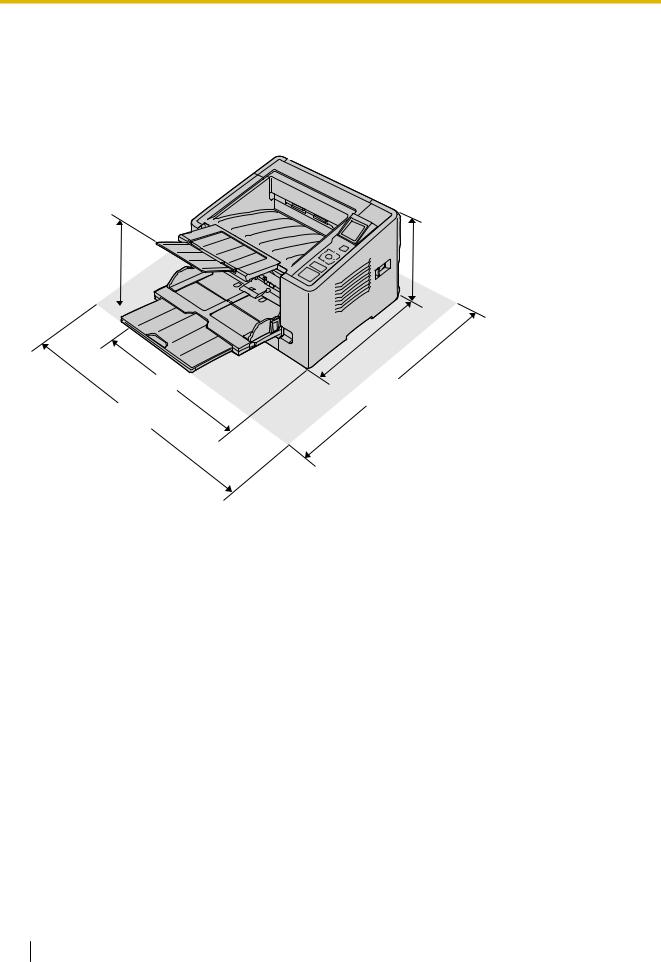
3.1 Required Space Around the Scanner
In order to ensure proper operation, install the unit maintaining the proper distances from surrounding objects, as shown in the following illustration.
320 |
MM |
242 MM |
||
(9.6 IN.) |
||||
(12.6 |
IN.) |
|||
|
||||
319 MM
(12.6 IN.)
350 MM |
810 MM |
|
(13.8 IN.) |
||
(31.9 IN.) |
||
|
750 MM
(29.5 IN.)
Notice
•Do not move the unit immediately from a cold place to a warm place. It may cause condensation, which may damage the unit.
•If you use the straight path (rear exit) for documents, space behind the unit is required for documents to exit.
16

3.2 Installing the Software
3.2 Installing the Software
Notice
•Make sure to connect the unit to your computer after installing the software. Connecting the unit to your computer and turning on the unit’s power before installing the software may influence the software installation. If you connect the unit to your computer and turn on the unit’s power before installing the software by mistake, install the software after disconnecting the unit from your computer.
•Make sure to log on as an administrator to install the software.
The software on the enclosed Software / Manual CD-ROM can be installed on your computer. You can select from the 2 installation methods below, depending on your needs.
a.Complete: Install all the drivers, applications, utilities and Operating Manual.
b.Custom: Install one of the software or Operating Manual.
Note
•Normally, it is recommended to select [Complete].
1.Check that the unit has been turned off.
•If the power is turned on, press and hold the power button for more than one second to turn the unit off.
2.Insert the Software / Manual CD-ROM into the CD/DVD drive on your computer.
•The setup window will appear.
Note
•If the AutoPlay dialog box is displayed, select [CDRun.exe].
•If the setup window does not appear, double-click [CDRun.exe] in the Software / Manual CDROM.
3.Check the [Read me first] file.
17

3.2Installing the Software
4.Select the desired installation methods from "Software" on the left side of the screen.
•If you selected [Complete], continue to step 6.
•If you selected [Custom], continue to step 5.
5.If you selected [Custom] for the installation type in step 4, select the item that you want to install.
Note
•If you select TWAIN or ISIS, Image Capture Plus will also be installed.
6.Follow the instructions on the screen and complete the installation.
•Restart your computer if you are prompted to do so.
18

3.3 Installing the Unit
3.3 Installing the Unit
1.Remove all packing tapes.
2.Open the feed tray.
3. Pull out the feed extension tray.
19

3.3 Installing the Unit
4. Pull out the exit extension tray 1.
5. Open the exit extension tray 2.
6.Plug in the power cord and connect the USB cable.
7.Press the power button to turn ON the unit’s power.
•The LED (Green) will flash and then turn on.
•If the hardware wizard appears, follow the on-screen instructions to complete installation.
20
3.4 Viewing Operating Manual and Help Installed
3.4 Viewing Operating Manual and Help Installed
You can view the Operating Manual and the software help installed on the computer.
3.4.1 To view the Operating Manual
1.Select [All Programs] → [Panasonic] → [Scanner Manuals].
2.Select the manual.
• The manual will open.
Note
•In Windows 8, select the [Panasonic Document Scanner] section on the Apps screen.
3.4.2To view the help
3.4.2.1 For Image Capture Plus
1. Select [All Programs] → [Panasonic] → [Image Capture Plus] → [Image Capture Plus Help].
3.4.2.2 For User Utility or Scan Button Setting Tool
1.Select [All Programs] → [Panasonic] → [Scanner Tools].
2.Select that item’s help.
Note
• In Windows 8, select the [Panasonic Document Scanner] section on the Apps screen.
3.4.2.3 For TWAIN or ISIS
1. Click the help button on any driver screen.
21

4 Operation
4 Operation
4.1 Preparing Documents
Notice
•Make sure to remove paper clips and staples from documents before scanning. Failing to do so can damage the unit, document, or both.
•Before feeding, ensure that the document is not creased or folded. If the document is creased or folded, a paper jam or damage to the document may occur.
•When scanning important documents, confirm that the number of scanned images matches the number of pages in the feed tray. Also, check the condition of the scanned documents.
•Remove documents from the exit tray after they have been scanned.
22
 Loading...