Olympus CAMEDIA MASTER 4.2 Operating Instructions

Software for Editing and Managing Images
CAMEDIA Master 4.2/Pro
Operating Instructions

Table of Contents |
|
Introduction ................................................................................... |
5 |
Note ............................................................................................................ |
5 |
Trademarks ................................................................................................. |
5 |
Intellectual property rights ........................................................................... |
5 |
Purchasing the Pro Version ........................................................................ |
6 |
Purchasing the Pro version and upgrading....................................... |
6 |
How to Use This Manual ............................................................................. |
8 |
Conventions used in this manual ...................................................... |
8 |
Terminology ...................................................................................... |
8 |
Help information................................................................................ |
8 |
Overview ........................................................................................ |
9 |
Features ...................................................................................................... |
9 |
Intuitive operation ............................................................................. |
9 |
Album creation functions ................................................................ |
10 |
Slide show ...................................................................................... |
10 |
Find function ................................................................................... |
10 |
Convenient editing functions........................................................... |
11 |
Correction functions ........................................................................ |
11 |
Filter functions ................................................................................ |
12 |
RAW Development Process Function ............................................ |
12 |
Support for movie and sound files .................................................. |
12 |
Full printing functions ...................................................................... |
13 |
Enjoying images with your computer .............................................. |
13 |
Starting and Closing ................................................................... |
14 |
System Requirements ............................................................................... |
14 |
Starting the Software ................................................................................ |
15 |
Automatic starting ..................................................................................... |
15 |
Closing the Software ................................................................................. |
15 |
Main Menu ................................................................................................ |
16 |
Main menu for version 4.2 .............................................................. |
16 |
Main menu for Pro version.............................................................. |
18 |
Changing the Background Color ............................................................... |
20 |
Changing the My Album location .............................................................. |
21 |
Quick Reference .......................................................................... |
22 |
Transferring Images.................................................................... |
23 |
Transferring Images from a Camera ......................................................... |
23 |
Connecting the camera to the computer (Windows)....................... |
23 |
Connecting the camera to the computer (Macintosh) ..................... |
24 |
Transferring images ........................................................................ |
25 |
Transferring Images from Media ............................................................... |
26 |
Specifying Where to Save the Images ...................................................... |
27 |
Saving to an album ......................................................................... |
27 |
Saving with the calendar................................................................. |
28 |
Saving to a folder ............................................................................ |
30 |
2

Browsing Images ........................................................................ |
31 |
Album Window .......................................................................................... |
31 |
Display Modes .......................................................................................... |
34 |
Browse mode and view mode......................................................... |
34 |
Album display and folder tree display ............................................. |
35 |
Viewing Files ............................................................................................. |
37 |
Thumbnail indications ..................................................................... |
37 |
To sort the files ............................................................................... |
38 |
Finding a File ............................................................................................ |
39 |
Viewing Images......................................................................................... |
41 |
Viewing images............................................................................... |
41 |
Watching movies ............................................................................ |
43 |
Playing Back Sound .................................................................................. |
45 |
Checking File Information ......................................................................... |
46 |
Checking file information ................................................................ |
46 |
Changing the shooting date ............................................................ |
49 |
Playing linked sound ....................................................................... |
50 |
Recording linked sound .................................................................. |
51 |
Organizing Files .......................................................................... |
52 |
Conventions for File Organization ............................................................. |
52 |
Creating a Group or Album ....................................................................... |
53 |
Creating a Folder ...................................................................................... |
55 |
Selecting Files ........................................................................................... |
57 |
Copying Files ............................................................................................ |
58 |
Copying an Image ..................................................................................... |
59 |
Moving Files .............................................................................................. |
60 |
Deleting Files ............................................................................................ |
60 |
Renaming a File ........................................................................................ |
62 |
Renaming Files in a Single Operation ...................................................... |
63 |
Converting Images to a Format Viewable on the Camera ........................ |
65 |
RAW Development Processing................................................................. |
67 |
Printing......................................................................................... |
70 |
Print Window ............................................................................................. |
70 |
Printer Settings ......................................................................................... |
72 |
Automatic compensation settings ............................................................. |
73 |
Photo Printing ........................................................................................... |
74 |
Making Index Prints .................................................................................. |
77 |
Creating and Printing a Calendar .............................................................. |
79 |
Creating and Printing a Postcard .............................................................. |
81 |
Creating and Printing an Album ................................................................ |
84 |
Creating and Printing a Contact Sheet ..................................................... |
88 |
3

Create and Share......................................................................... |
91 |
Sending Images by E-mail ........................................................................ |
91 |
Sending images by e-mail .............................................................. |
91 |
Setting up an e-mail account .......................................................... |
94 |
Saving e-mail addresses in the address book ................................ |
96 |
Creating an HTML Album ......................................................................... |
99 |
Setting an Image as the Wallpaper ......................................................... |
103 |
Watching a Slide Show ........................................................................... |
106 |
Using the whole screen ................................................................ |
106 |
Saving a slide show as a screen saver......................................... |
108 |
Making a movie............................................................................. |
109 |
Automatic Panorama Function ................................................................ |
110 |
Free Stitch Panorama Function .............................................................. |
112 |
Backing Up ................................................................................ |
115 |
Making a Backup Direct to Storage Media .............................................. |
115 |
Creating Temporary Folders ................................................................... |
116 |
Editing Images ........................................................................... |
117 |
Image Editing Window ............................................................................ |
117 |
Basic Operations ..................................................................................... |
120 |
Zooming the display...................................................................... |
120 |
Moving the image ......................................................................... |
120 |
Making a selection ........................................................................ |
121 |
Cutting and pasting part of an image ............................................ |
121 |
Copying and pasting part of an image .......................................... |
122 |
Undoing an operation ................................................................... |
122 |
Redoing an operation ................................................................... |
122 |
Saving an image ........................................................................... |
123 |
Editing Operations .................................................................................. |
125 |
Rotation ........................................................................................ |
125 |
Flipping ......................................................................................... |
126 |
Resizing ........................................................................................ |
127 |
Cropping ....................................................................................... |
128 |
Inserting text ................................................................................. |
130 |
Adding a template ......................................................................... |
131 |
Correcting distortion...................................................................... |
132 |
Using the filter functions ............................................................... |
133 |
Editing Movies ........................................................................... |
137 |
Movie Editing Window ............................................................................. |
137 |
Editing Operations .................................................................................. |
140 |
Rotating the movie ........................................................................ |
140 |
Saving a frame.............................................................................. |
141 |
Making a cut ................................................................................. |
142 |
Using the filter functions ............................................................... |
143 |
Appendixes ................................................................................ |
144 |
Technical Support ................................................................................... |
144 |
File Formats ............................................................................................ |
145 |
Functions Supported ............................................................................... |
146 |
Index ........................................................................................... |
148 |
4

Introduction
Thank you for purchasing this Olympus product.
Please read these instructions carefully in order to get the best results from it.
Note
The contents of this software and this manual may not be reproduced in whole or in part except for personal use. It may not be transferred without permission.
Olympus can accept absolutely no responsibility in respect of losses suffered by the customer or a third party as a result of use of this software.
While every care has been taken in the preparation of this manual, if you find any points which are unclear, errors, or omissions, please contact an authorized Olympus service center.
This software is only guaranteed to operate in the specified operating environment.
The software specification and the content of this manual are subject to change without notice. For the latest information, visit the Olympus web site at:
http://www.olympus.com
© 2003 OLYMPUS CORPORATION
Trademarks
•Windows is a registered trademark of Microsoft Corporation in the USA and other countries.
•QuickTime and the QuickTime logo are trademarks of Apple Computer Inc., and Macintosh is a registered trademark of the same company in the USA and other countries.
•Adobe and Acrobat are registered trademarks, and Acrobat Reader is a trademark of Adobe Systems Incorporated.
•Other company and product names appearing in this manual are trademarks or registered trademarks of their respective owners.
Intellectual property rights
This software supports “PRINT Image Matching”. This enables both the output to a printer supporting PRINT Image Matching or supporting PRINT Image Matching II and the screen image processing in this software to reflect faithfully the shooting conditions and user specifications.
Intellectual property rights in PRINT Image Matching and PRINT Image Matching II are owned by Seiko Epson Corporation.
5
Purchasing the Pro Version
There are two versions of this software:
• CAMEDIA Master 4.2
This provides a wide range of functions, allowing you to view images and movies, edit, get and print images, and use automatic panorama, wallpaper and other functions.
• CAMEDIA Master Pro
In addition to the functions in version 4.2, this version allows you to use extra functions, including movie editing, contact sheet printing, E-mail, HTML album, free stitch panorama, and slide show.
For Users of Version 4.2
If you are using version 4.2, you can upgrade to the Pro version.
We recommend upgrading to the Pro version, which gives you a wider range of functions.
For the differences between the versions, see the Appendix “Functions Supported” (page 146).
Purchasing the Pro version and upgrading
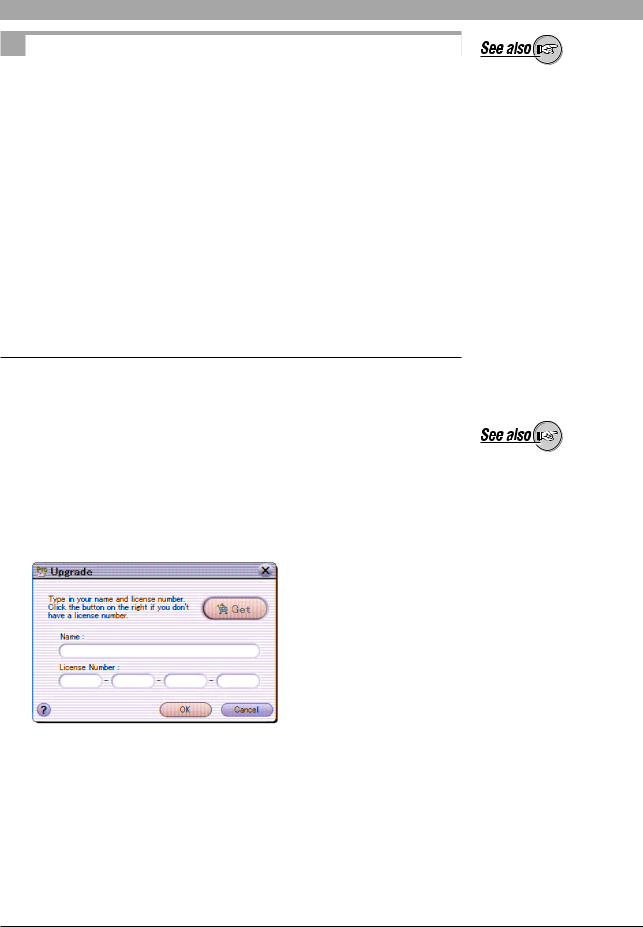
To purchase a license number of the Pro version and upgrade from version 4.2, use the following procedure. (If you purchased the Pro version separately, skip this section.)
1 Start this software (CAMEDIA Master 4.2).
2 In the version 4.2 main menu, click the [Get Pro Version] button  , or in any window click the [Help] button
  and select [Upgrade].
The [Upgrade] dialog box appears.
On how to start the software, see “Starting the Software” (page 15) under “Starting and Closing”.
3 Purchase a license number.
Using the Internet
In the [Upgrade] dialog box, click the [Get] button to start a web browser, and access the upgrade site.
Follow the directions on the web page.
When this process is completed, close the web browser and return to the [Upgrade] dialog box.
6

If you cannot access the Internet
Contact your authorized Olympus service center.
4 In the [Upgrade] dialog box, enter your name and the license number you have obtained, then click the [OK] button.
The upgrade to the Pro version is carried out automatically.
When the upgrade is completed, the software functions as the Pro version.
To check that the upgrade to the Pro version has completed successfully
Check that the title in the main menu has changed to “CAMEDIA Master Pro” and the extra icons have appeared.
Alternatively, click the [Help] button  in any window, and select [About], and check that “CAMEDIA Master Pro” appears.
See “Main menu for Pro version” (page 18) under “Main Menu”.
7

How to Use This Manual
This manual describes how to use the CAMEDIA Master 4.2/Pro software for editing and managing images. It is organized with a section for each function; you can read these independently, in order to understand particular functions. Once you have an overall understanding of the functions, you can use the Help information for reference while using the software.
Conventions used in this manual
The symbol 

 indicates functions which can only be used in the Pro version.
Functions indicated with this symbol are not available in version 4.2.
Terminology
The following terms appear throughout this manual.
File
A file is the unit in which data is handled on a computer or digital camera. In this software, this refers to the following file types.
•Image files
•Movie files
•Sound files
Thumbnail
This refers to the reduced images used as an index.
Help information
To access the help information, use any of the following methods:
•In the main menu, click the [Help] button  .
.
•In any window, click the tool button [Help]  and select [Index].
•In any dialog box, click the help button  .
.
8

Overview
Features
CAMEDIA Master 4.2/Pro is a software application providing a range of functions for enjoying digital photography using a computer.
Using this software for editing will also allow you to become more expert in using your digital camera.
The following are some of the features of this software.
Intuitive operation
The groups of functions are identified by easily recognizable icons, making individual functions easy to find. You can use the functions directly on images, without requiring complicated settings.
Example screen: the main menu
9

Album creation functions
You can capture images from a digital camera or storage media such as magnetooptical (MO) disks and CD-ROMs, to create an album.
The software provides a thumbnail display function, for easy access to images for organization or editing.
Using albums to organize images
•On how to transfer images, see “Transferring Images” (page 23)
•About albums, see also “Album Window” (page 31) under “Browsing Images”.
Slide show
You can select images from an album to create a slide show on the monitor screen.
Using a wipe transition in a slide show (The arrows are not part of the actual display.)
About slide shows, see also “Watching a Slide Show” (page 106) under “Create and Share”.
Find function
You can find images on the basis of recorded shooting date, or attached comments.
About the find function, see also “Finding a File” (page 39) under “Browsing Images”.
10
Convenient editing functions
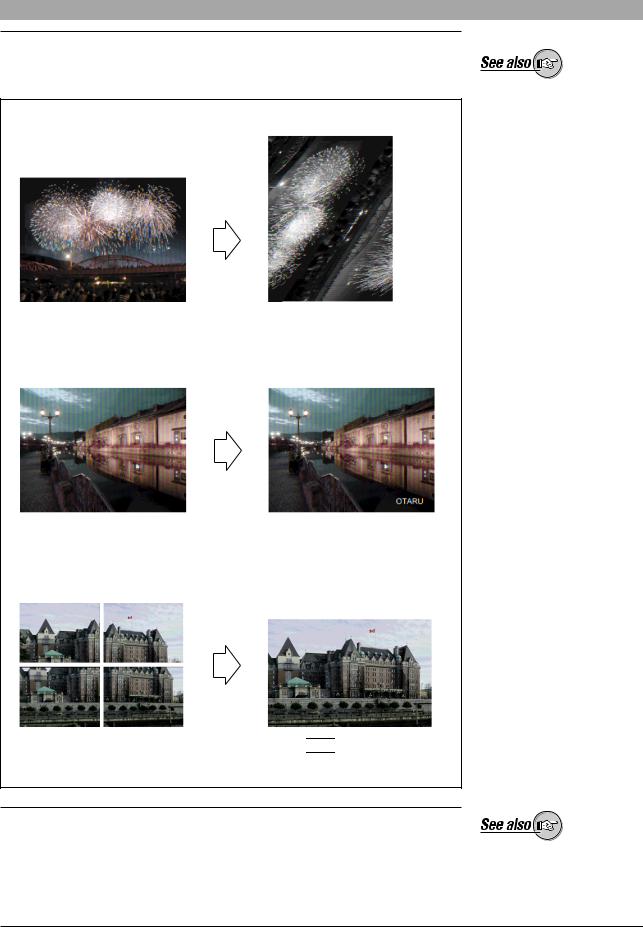
In addition to basic editing functions, you can insert text, superimpose templates, or stitch images together.
Rotation
Inserting text
Free stitch panorama function (

 )
)
Examples of editing
Correction functions
You can correct for variations in shooting conditions using the instant fix function, red-eye reduction function or other correction functions.
About the editing functions, see also the following:
•“Automatic Panorama Function” (page 110) under “Create and Share”
•“Free Stitch Panorama Function” (page 112) under “Create and Share”
•“Editing Images” (page 117)
•“Editing Movies” (page 137)
About the correction functions, see also “Using the filter functions” (page 133) under “Editing Images”.
11

Filter functions
You can apply various filter effects, adjusting the brightness and contrast, and applying sepia and other effects.
Example filter function: brightness adjustment
About the filter functions, see also “Using the filter functions” (page 133) under “Editing Images”.
RAW Development Process Function
Development processing is performed for a RAW image file and this is saved as a separate image file.
RAW image development process window
Support for movie and sound files
The software supports not only image files, but also movie and sound files. You can attach a sound file to an image to act as a memo (“sound link” function).
Playing a movie file
About the RAW development process functions, see also “RAW Development Processing” (page 67) under “Organizing Files”.
To use all of the sound functions, your computer must be equipped with a microphone, speaker and sound card. For more details, refer to the operating instructions provided with your computer.
About movies, see also the following:
•“Watching movies” (page 43) under “Browsing Images”
•“Editing Movies” (page 137)
About sound files, see also the following:
•“Playing Back Sound” (page 45) under “Browsing Images”
•“Recording linked sound” (page 51) under “Browsing Images”
12

Full printing functions
Standard layouts allow easy printing of standard photograph sizes, index prints, and other creative possibilities. You can also create original postcards and calendars.
About the printing functions, see also “Printing” (page 70).
Postcard |
Calendar |
Examples of print functions
Enjoying images with your computer
The software includes a function to attach images to e-mail, the HTML album function to help you create web sites, and a wallpaper function.
HTML album (


 )
)
About the creative computer functions, see “Create and Share” (page 91).
13

Starting and Closing
System Requirements
This software is designed to run in the following systems.
Windows version
OS
CPU
RAM
Hard disk capacity
Connector
Monitor
Windows 98/98SE/Me/2000 Professional/XP*
Pentium II or later (Pentinum III or later recommended)
128 MB or more (256 MB or more recommended)
120 MB or more (for installation)
USB port (USB interface)
RS-232C interface (serial interface)
Minimum 800 × 600 pixel resolution
Minimum 65,536 colors
*This software is compatible with Windows XP Professional and Home Edition.
Macintosh version
OS |
|
Mac OS 9.0 to 9.2.2/OS X 10.1 to 10.3 (USB interface) |
|
|
Mac OS 8.6 to 9.2.2 (serial interface) |
CPU |
|
Power PC G3 or later |
RAM |
|
128 MB or more (256 MB or more recommended) |
Hard disk capacity |
|
120 MB or more (for installation) |
Connector |
|
USB port (USB interface) |
|
|
Serial port Mini-DIN 8-pin connector (serial interface) |
Monitor |
|
Minimum 800 × 600 pixel resolution |
|
|
Minimum 32,000 colors |
•For information on support for the latest versions of operating systems, visit the Olympus web site (http://www.olympus.com).
•The functions for connecting a camera to the computer and directly transferring images are only available with an Olympus digital camera.
•Operation of the USB connection between computer and camera has been confirmed for Mac OS 8.6 with USB Mass Storage Support 1.3.5.
This software only operates on a computer with a preinstalled operating system.
Only a Macintosh with a builtin USB port can be used.
To access the online help, a web browser is required.
14
Starting the Software
You can use any of the following methods to start this software.
For Windows
•Double-click the [CAMEDIA Master] icon  on the desktop.
•Click the [Start] button, then click [Programs], [OLYMPUS CAMEDIA], and [CAMEDIA Master] in this order.
For Macintosh
•Double-click the [CAMEDIA Master] icon  on the desktop.
•Double-click the [CAMEDIA Master] icon  in the folder in which this software is installed.
The main menu (page 16) appears.
Automatic starting
When you connect an Olympus USB camera, the connection is recognized automatically, and this software starts.
For Windows XP
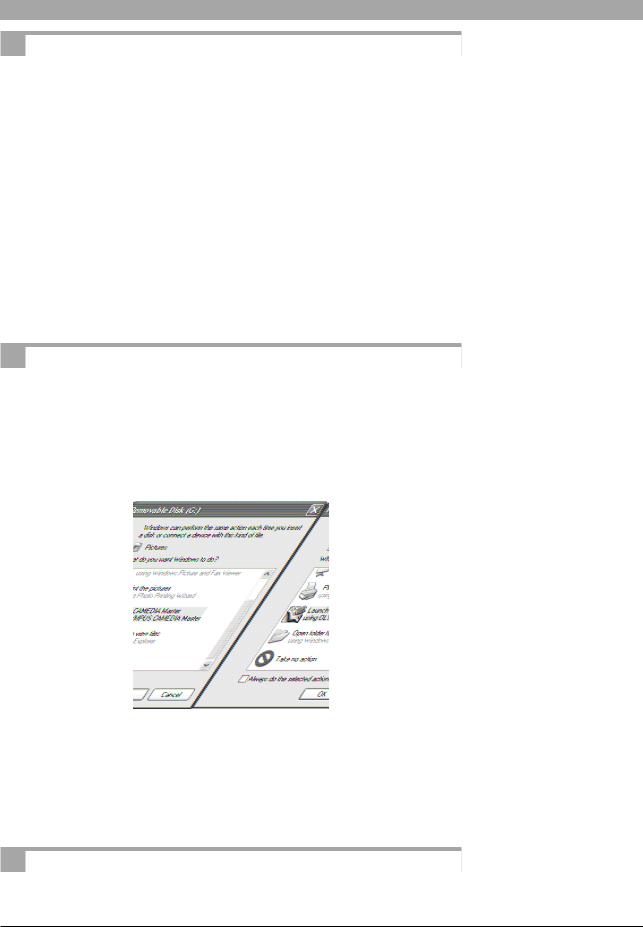
[Launch CAMEDIA Master] is added to the [Removable Disk] dialog box. Select from the list and click the [OK] button to start this software.
For Windows 98/98SE/Me/2000
A confirmation dialog box appears, asking if you want to start this software. Click the [OK] button to start this software.
Removing the software from the system tray
Right-click on the icon in the system tray, and select [Exit].
Closing the Software
In the main menu, click the [Close]  button.
In Mac OS X, no [CAMEDIA Master] icon appears on the desktop.
This function is not available in the Macintosh version.
For details of automatic playback settings, refer to the Windows XP Help.
15

Main Menu
Main menu for version 4.2
|
|
|
t OLYMPUS Web Site button |
q From Camera button |
y Get Pro Version button |
||
|
w From Media button |
r Help button |
|
|
|||
|
|
e Browse Images button |
u Wallpaper button |
|
|
|
|
|
|
|
|
|
|
|
|
|
|
|
|
|
|
|
|
|
|
|
|
|
|
|
|
|
|
|
|
|
|
|
!0Print Images |
|
|
|
|
|
|
|
|
|
|
||
|
|
|
|
|
|
||
|
|
|
|
!2Close button |
|||
|
|
|
buttons |
|
|
|
|
|
|
|
|
|
|
|
|
|
o Don’t show this screen |
!1Auto Panorama button |
|||||
i Options button |
|
|
|
||||
qFrom Camera button 
This displays the Transfer Images window (page 25).
wFrom Media button 
This displays the Transfer Images window (page 26).
eBrowse Images button 
This displays the album window (page 31).
rHelp button 
This displays Help information for this software.
16

tOLYMPUS Web Site button 
This launches a web browser, and displays the Olympus web site.
yGet Pro Version button 
This displays the [Upgrade] dialog box.
From the [Upgrade] dialog box, you can start a web browser, and access the site for purchasing the Pro version.
uWallpaper button 
This displays the Wallpaper window (page 103).
iOptions button 
This displays the [Options] dialog box (page 20).
oDon’t show this screen 
When this is checked, from the next time this software starts, it bypasses the main menu and goes directly to the album window.
You can also access the main menu from the album menu.
!0Print Images buttons
The [Photo]  , [Index]
  , [Calendar]
  , [Postcard]
  , and [Album]
  buttons give access to various specialized Print windows.
!1Auto Panorama button 
This displays the Auto Panorama window (page 110).
!2Close button 
This closes the software.
The computer you are using must be set up to automatically connect to the Internet.
On how to purchase the Pro version, see “Purchasing the Pro Version” (page 6) under “Introduction”.
17
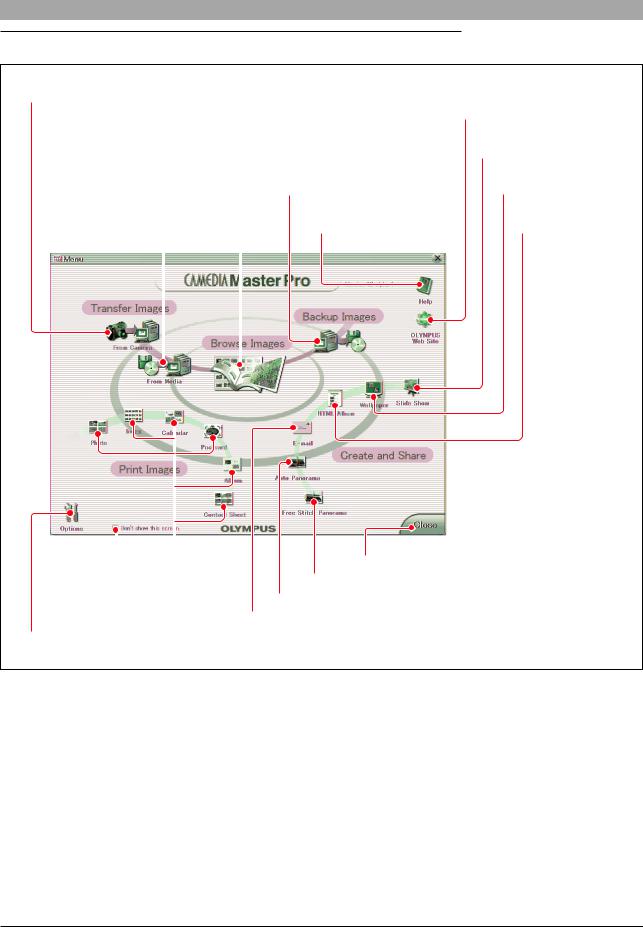
Main menu for Pro version
q From Camera button |
|
||
w From Media button |
y OLYMPUS Web Site button |
||
|
e Browse Images button |
u Slide Show button |
|
|
|
r Backup Images button |
i Wallpaper button |
|
|
t Help button |
o HTML Album |
|
|
|
button |
|
|
|
|
|
|
|
|
|
|
|
|
|
|
|
|
|
!2Print |
!6Close button |
|
|
|
Images |
!5Free Stitch Panorama button |
|
|
buttons |
|
|
|
!4Auto Panorama button |
|
!1Don’t show |
|||
|
this screen |
!3E-mail button |
|
!0Options button |
|
||
qFrom Camera button 
This displays the Transfer Images window (page 25).
wFrom Media button 
This displays the Transfer Images window (page 26).
eBrowse Images button 
This displays the album window (page 31).
rBackup Images button 
This displays the Backup window (page 115).
18

tHelp button 
This displays Help information for this software.
yOLYMPUS Web Site button 
This launches a web browser, and displays the Olympus web site.
uSlide Show button 
This displays the Slide Show window (page 106).
iWallpaper button 
This displays the Wallpaper window (page 103).
oHTML Album button 
This displays the HTML Album window (page 99).
!0Options button 
This displays the [Options] dialog box (page 20).
!1Don’t show this screen 
When this is checked, from the next time this software starts, it bypasses the main menu and goes directly to the album window.
You can also access the main menu from the album menu.
!2Print Images buttons
The [Photo]  , [Index]
  , [Calendar]
  , [Postcard]
  , [Album]
  and [Contact Sheet]
  buttons give access to various specialized
Print windows.
!3E-mail button 
This displays the E-mail window (page 91).
!4Auto Panorama button 
This displays the Auto Panorama window (page 110).
!5Free Stitch Panorama button 
This displays the Free Stitch Panorama window (page 112).
!6Close button 
This closes the software.
The computer you are using must be set up to automatically connect to the Internet.
19
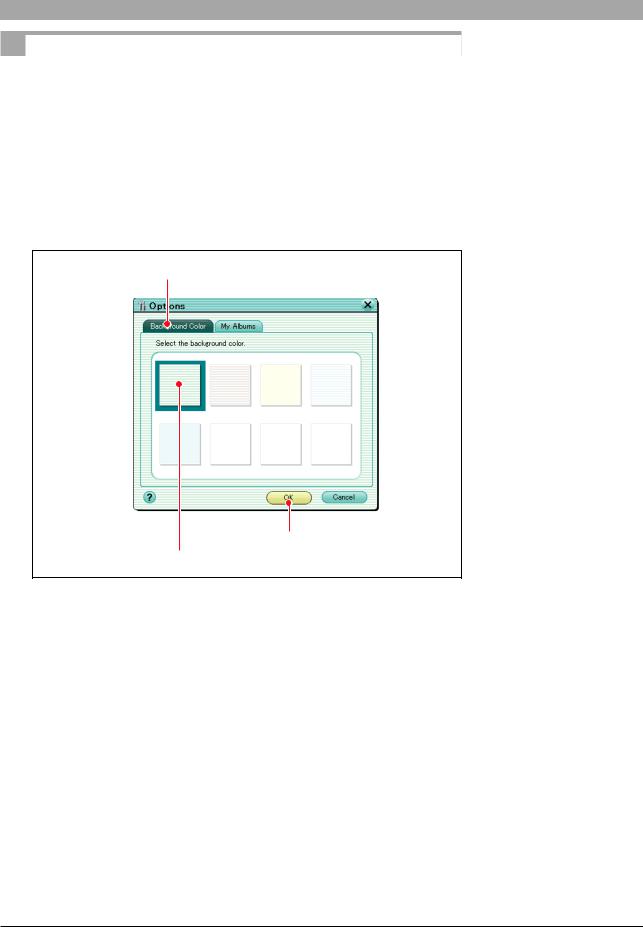
Changing the Background Color
You can select the background color used for all windows and dialog boxes in this software.
Use the following procedure to change the background color.
1
2
In the main menu click the [Options] button.
The Options dialog box appears.
Click the [Background Color] tab.
Background Color tab
OK button
Select one of the background colors.
3 Select one of the background colors, and click the [OK] button.
This changes the background color for all CAMEDIA Master windows and dialog boxes.
20
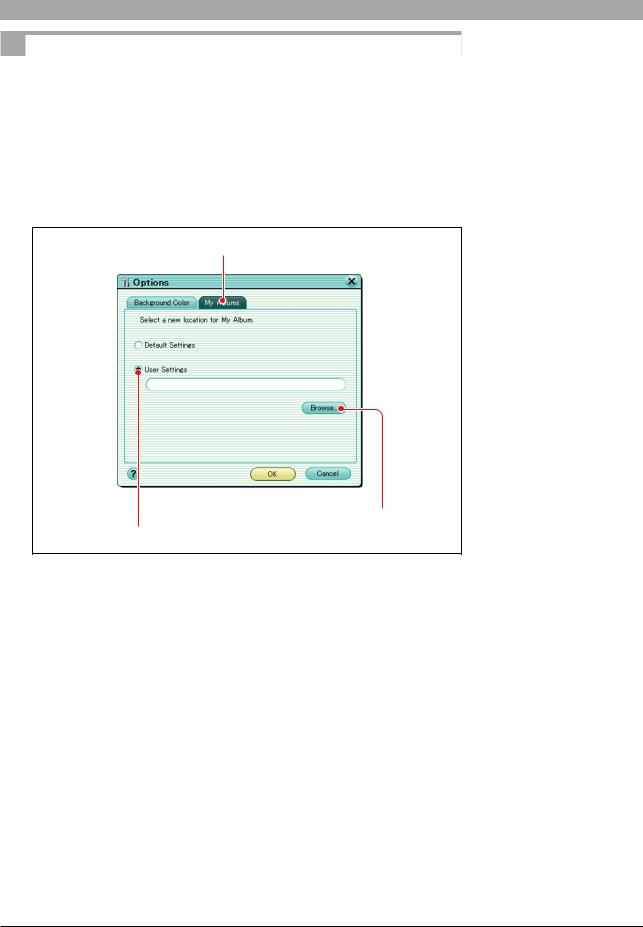
Changing the My Album location
You can change the location of the My Album folder used by this software. To change the location of the My Album folder, use the following procedure.
1 Click the [Options] button in the main menu.
The Options dialog box appears.
2 Click the [My Albums] tab.
My Albums tab
Browse button
User Settings
3
4
5
Check [User Settings], and click the [Browse] button.
The select folder dialog box appears.
In the select folder dialog box, select the new location for My Album, and click the [OK] button.
In the Options dialog box, click the [OK] button.
21
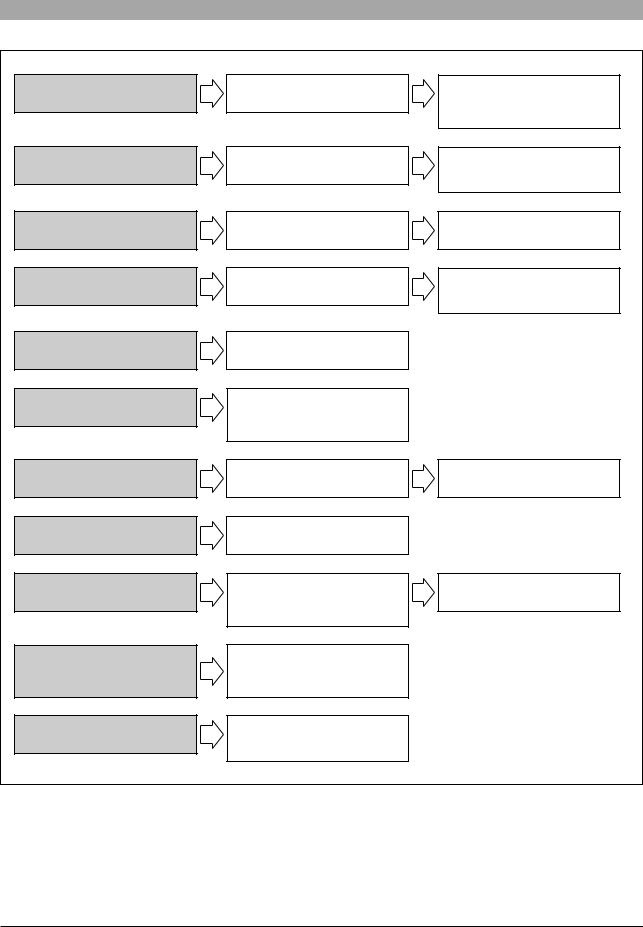
Quick Reference
Use this chart to find the relevant section of this manual for common situations.
To view images from your camera on the computer
To print images from your camera
To send images with e-mail
To use your images on a web site
To create a slide show of your images on a computer
To view a movie
To keep your images safe
When you have forgotten where you saved an image
To apply effects to images
To perform development processing for a shot RAW image
To create a panorama
“Transferring Images”
-“Transferring Images from a Camera” (page 23)
“Transferring Images”
-“Transferring Images from a Camera” (page 23)
“Transferring Images”
-“Transferring Images from a Camera” (page 23)
“Transferring Images”
-“Transferring Images from a Camera” (page 23)
“Create and Share”
-“Watching a Slide Show” (page 106)
“Browsing Images”
-“Display Modes” (page 34)
-“Viewing Files” (page 37)
-“Watching movies” (page 43)
“Organizing Files” (page 52)
“Browsing Images”
- “Finding a File” (page 39)
“Browsing Images”
-“Album Window” (page 31)
-“Viewing Images” (page 41)
“Organizing Files”
- “RAW Development
Processing” (page 67)
“Create and Share”
-“Free Stitch Panorama Function” (page 112)
“Browsing Images”
-“Display Modes” (page 34)
-“Viewing Files” (page 37)
-“Viewing Images” (page 41)
“Printing”
-“Printer Settings” (page 72)
-“Photo Printing” (page 74)
“Create and Share”
-“Sending Images by E-mail” (page 91)
“Create and Share”
-“Creating an HTML Album” (page 99)
“Backing Up” (page 115)
“Editing Images”
-“Using the filter functions” (page 133)
22
Transferring Images
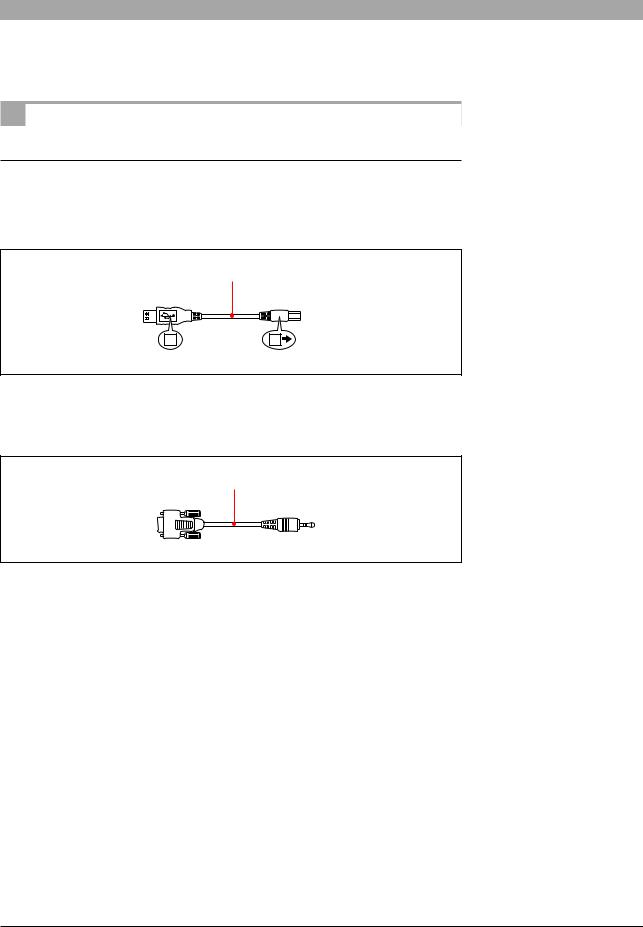
You can transfer images direct from an Olympus digital camera using a USB cable or serial cable, or from storage media such as Smart Media cards and magneto-optical (MO) disks .
Transferring Images from a Camera
Connecting the camera to the computer (Windows)
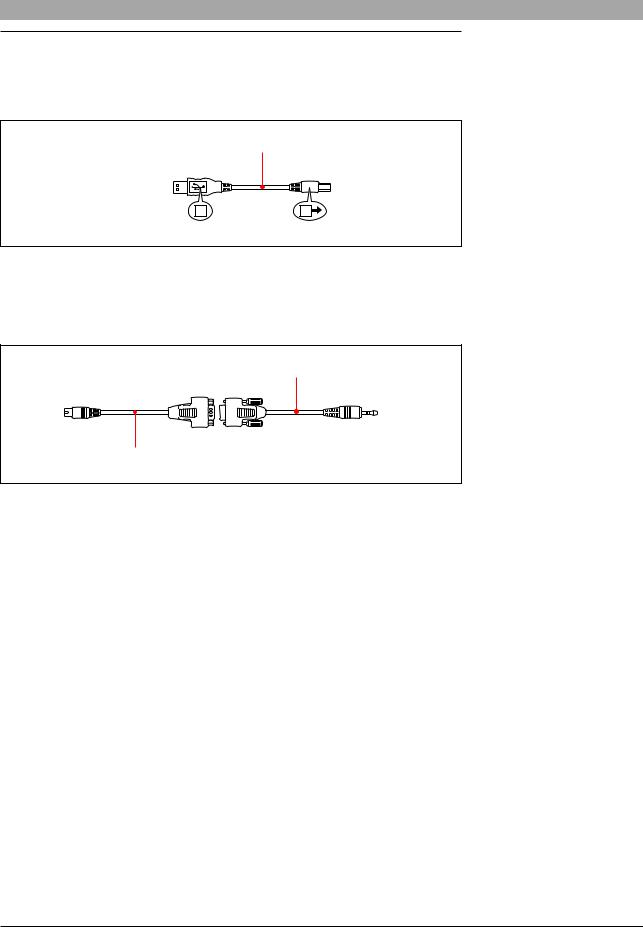
Using a USB interface
Plug the larger connector marked Å of the USB cable into the USB port of the computer, and connect the smaller connector marked ı to the camera.
|
USB cable |
to USB port of PC |
to camera |
A |
B |
Using a serial interface
Connect the serial ports on the computer (IBM/AT compatible) and camera with a serial cable.
Serial cable
to serial port of PC |
to camera |
23
Connecting the camera to the computer (Macintosh)
Using a USB interface
Plug the larger connector marked Å of the USB cable into the USB port of the computer, and connect the smaller connector marked ı to the camera.
|
USB cable |
to USB port of PC |
to camera |
A |
B |
Using a serial interface
Connect a serial cable to an adapter for conversion to Macintosh interface, then connect the 8-pin connector of the cable to the printer or modem port of the computer and the plug on the other end of the cable to the camera.
Serial cable
to printer or modem port of PC
to camera
Adaptor for Macintosh
For more details of the camera-to-computer connection, refer to the operating instructions supplied with the camera.
24

Transferring images
Thumbnails
My Albums and Media tabs
Refresh button
1
2
3
Start this software (page 15).
Connect the camera to the computer (page 23).
Do not power off the camera or disconnect the interface cable while the software is either starting up or running. This can cause a camera failure or software instability.
In the main menu, click the [From Camera] button.
The camera is detected automatically, and the Transfer Images window appears. This shows thumbnails of all of the images in the camera, with the file name and shooting date appearing below each thumbnail.
If you start this software without displaying the main menu, going directly to the album window
In the album window, click the tool button [Menu], to display the main menu.
To refresh the display
Click the [Refresh] button.
25

Transferring Images from Media
This section describes how to transfer images from media such as Smart Media cards and magneto-optical (MO) disks.
Thumbnails
Refresh button
1 Start this software (page 15).
2 In the main menu, click the [From Media] button.
The Transfer Images window and [Select Folder] dialog box appear.
3 In the [Select Folder] dialog box, select the folder from which you want to transfer the images and click the [OK] button.
This shows thumbnails of all of the images in the selected folder, with the file name appearing below each thumbnail.
If the image was taken with an Olympus or DCF-compliant digital camera, the shooting date is also shown.
Do not power off the camera or disconnect the interface cable while the software is either starting up or running. This can cause a camera failure or software instability.
If you start this software without displaying the main menu, going directly to the album window
In the album window, click the tool button [Menu] to display the main menu.
To refresh the display
Click the [Refresh] button.
26
Specifying Where to Save the Images
Saving to an album
Use the following procedure to copy images from a digital camera or from media to an album.
3 |
1 |
2 |
New Album button
Selected images
1 In the Transfer Images window, select the [My Albums] tab, and select [Album].
2 Select an album from the list of albums, or create a new album to hold the images and select that album.
3 Click the [Transfer Images] button.
This copies all images to the selected album.
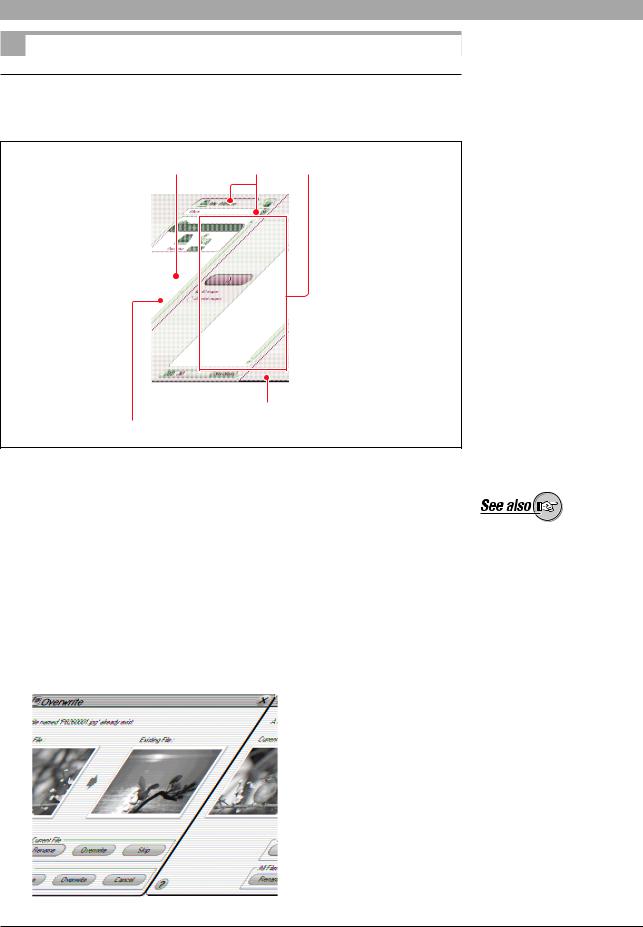
If an existing file has the same file name as one of the files to be transferred, the [Overwrite] dialog box appears. You can select [Rename], [Overwrite], or [Skip]/[Cancel] for each separate file, or for all files.
On how to create a new album, see “Creating a Group or Album” (page 53) under “Organizing Files”.
27
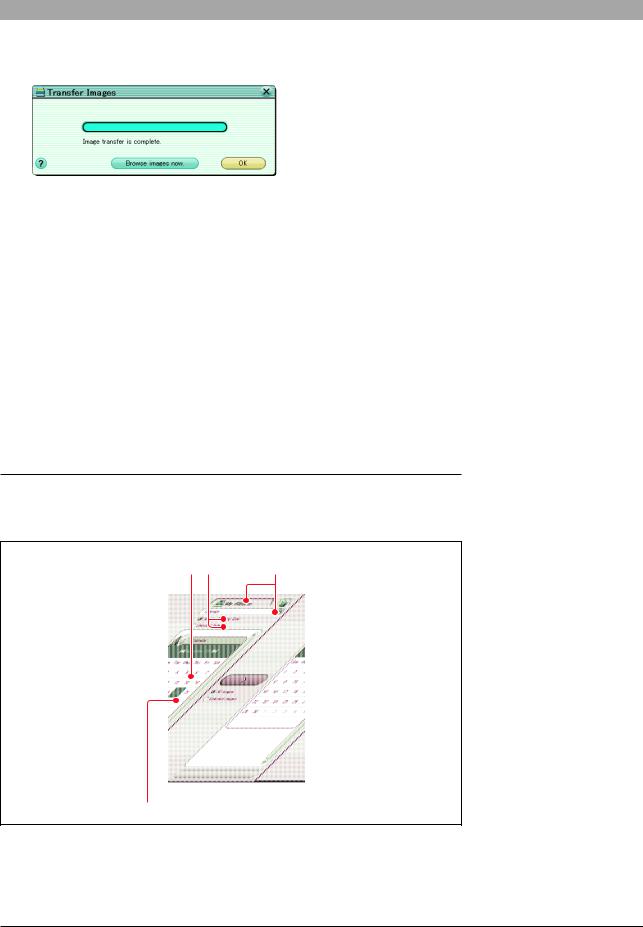
When all of the images have been transferred, the [Transfer Images] dialog box appears. Clicking [Browse images now] displays the album window, in which you can view the images that have been transferred.
To copy only selected images
Click [Selected Images], then select the thumbnails by any of the following methods, and click the [Transfer Images] button.
•To select a single image
Click on the image.
•To add an image to the selection
Hold down the Ctrl key (for Windows) or command key (for Macintosh), and click on the image.
• To select a range of images
Click the first or last image in the range (rectangular area), then holding down the Shift key, click the image at the other end of the range. Alternatively, drag the mouse to select the range.
A green frame appears around the selected image or images.
Saving with the calendar
Use the following procedure to transfer images from a digital camera or from media using the calendar to specify albums by shooting date.
3 2 |
1 |
Selected Images
28
1
2
3
In the Transfer Images window, select the [My Albums] tab, and select [Calendar].
Select [Sort by Shooting Date] or [Selected Date].
•Sort by shooting date: Create a new album for each date of shooting, and assign the images to the corresponding album.
The date setting must have been made on the camera before shooting the images.
•Selected date: Select a date on the calendar, and save the images in the album for that date.
Click the [Transfer Images] button.
This copies all images into albums as specified in step 2.
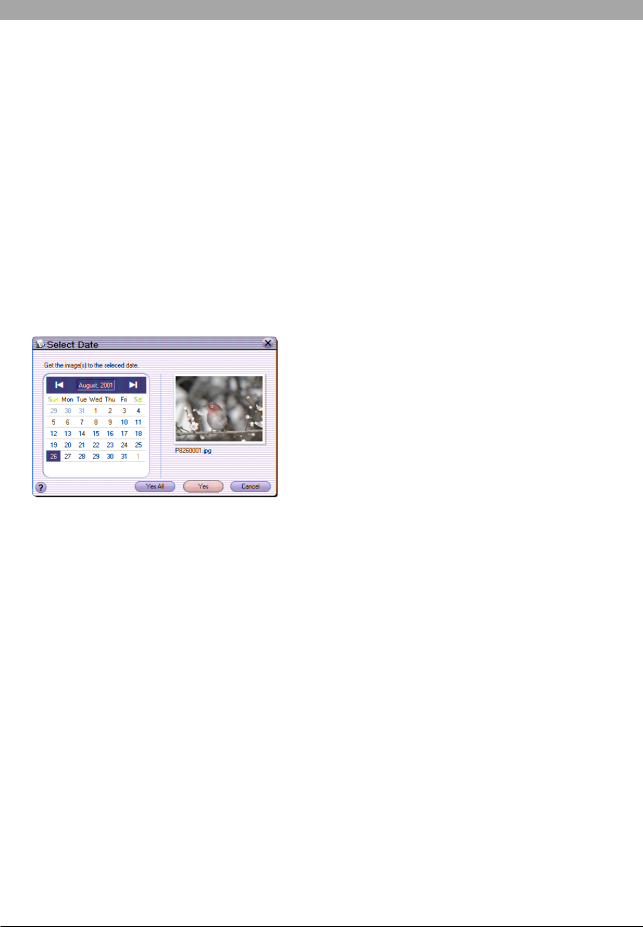
If an image has no recorded shooting date, the [Select Date] dialog box appears; specify the shooting date using the calendar.
If an existing file has the same file name as one of the files to be transferred, the [Overwrite] dialog box appears (page 27).
When all of the images have been transferred, the [Transfer Images] dialog box appears (page 28). Clicking [Browse images now] displays the album window, in which you can view the images that have been transferred.
To copy only selected images
See the description for saving to an album (page 27).
29
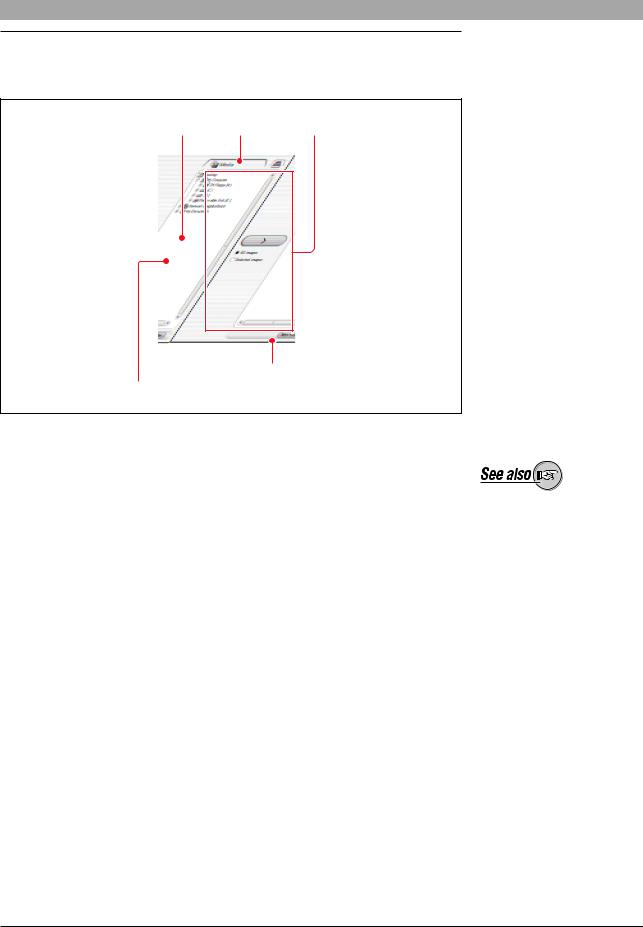
Saving to a folder
Use the following procedure to copy images from a digital camera or from media to a folder.
3 1 2
New Folder button
Selected Images
1 In the Transfer Images window, select the [Media] tab.
2 Select a folder from the folder tree, or create a new folder to hold the images and select that folder.
3 Click the [Transfer Images] button.
This copies all images into the folder.
If an existing file has the same file name as one of the files to be transferred, an [Overwrite] dialog box appears (page 27).
When all of the images have been transferred, a confirmation message appears (page 28). Clicking [Browse images now] displays the album window.
To copy only selected images
See the description for saving to an album (page 27).
On how to create a new folder, see “Creating a Folder” (page 55) under “Organizing Files”.
30
 Loading...