


ENGLISH
DIGITAL CAMERA
 APPAREIL PHOTO NUMÉRIQUE
FRANÇAIS
DIGITALKAMERA
CÁMARA DIGITAL
DEUTSCH
C-4000 ZOOM |
ESPAÑOL |
BASIC MANUAL/MANUEL DE BASE
EINFACHE ANLEITUNG/MANUAL BÁSICO
Before using your camera, read this manual carefully to ensure correct use.
We recommend that you take test shots to get accustomed to your camera before taking important photographs.
These instructions are only for quick reference. For more details on the camera functions described in this manual, refer to the camera Reference Manual on the CD-ROM enclosed in the camera package.
For more details on connecting the camera to a PC and installing the provided software, refer to the “Software Installation Guide” (included in the CD-ROM package).
Avant d’utiliser votre appareil photo, veuillez lire attentivement ce mode d’emploi, de manière à obtenir les meilleurs résultats possibles.
Avant d’effectuer des prises de vues importantes, nous vous conseillons par ailleurs de faire quelques essais afin de vous familiariser avec le maniement de l’appareil photo.
Ces instructions ne sont que pour une référence rapide. Pour plus de détails sur les fonctions de l’appareil décrites dans ce manuel, se référer au manuel de référence de l’appareil sur le CD-ROM inclus dans l’emballage de l’appareil.
Pour plus de détails sur le raccordement de l’appareil photo à un ordinateur personnel et sur l’installation du logiciel fourni, se référer au “Guide d’installation de logiciel” (inclus dans l’emballage du CD-ROM).
Bitte lesen Sie vor Gebrauch dieser Kamera sorgfältig diese Bedienungsanleitung, um optimale Ergebnisse beim Fotografieren zu erzielen.
Wir empfehlen, vor wichtigen Aufnahmen Probeaufnahmen durchzuführen, um sich mit der Bedienung und den Funktionen der Kamera vertraut zu machen.
Diese Kurzanleitung dient dem ersten Kennenlernen Ihrer Kamera. Weitere und ausführliche Angaben zur Funktionsweise dieser Kamera finden Sie im Referenzhandbuch auf der CD-ROM, die zum Lieferumfang der Kamera gehört.
Weitere Angaben zum Anschluss der Kamera an einen Personal Computer und zum Installieren der mitgelieferten Software siehe die „Software-Installationsanleitung“ (in der CD-ROM-Packung enthalten).
Antes de usar su cámara lea este manual detalladamente para asegurar el uso correcto.
Nosotros le recomendamos que tome fotografías de prueba para familiarizarse con su cámara antes de tomar fotografías importantes.
Estas instrucciones son sólo de referencia rápida. Para más detalles de las funciones de la cámara descritas en este manual, refiérase al manual de consulta del CD-ROM adjunto en el paquete de la cámara.
Para más detalles sobre la conexión de la cámara a un PC e instalación del software suministrado, refiérase a la “Guía de instalación del software” (adjunto en el paquete del CD-ROM).

Thank you for purchasing an Olympus digital camera. Before you start to use En your new camera, please read these instructions carefully to enjoy optimum performance and a longer service life. Keep this manual in a safe place for
future reference.
CONTENTS/TABLE DES MATIÉ/INHALT/CONTENIDO
ENGLISH .............................................................................. |
2 |
FRANÇAIS ........................................................................ |
46 |
DEUTSCH .......................................................................... |
90 |
ESPAÑOL ........................................................................ |
134 |
CONTENTS |
|
OF PARTS |
4 |
STARTED |
11 |
THE MENU |
16 |
BASICS |
23 |
SHOOTING |
31 |
|
33 |
SETTINGS |
38 |
PICTURES TO A COMPUTER |
39 |
ACCESSORIES |
41 |
CODES |
42 |
|
44 |
These instructions are only for quick reference. For more details on the camera functions described in this manual, refer to the camera Reference Manual on the CD-ROM enclosed in the camera package.
2
For customers in Europe
“CE” mark indicates that this product complies with the European |
En |
|
|
requirements for safety, health, environment and customer |
|
protection. “CE” mark cameras are intended for sales in Europe. |
|
For customers in North and South America
For customers in USA
Declaration of Conformity
Model Number |
: C-4000 ZOOM |
Trade Name |
: OLYMPUS |
Responsible Party |
: Olympus America Inc. |
Address |
: 2 Corporate Center Drive, Melville, New York |
|
11747-3157 U.S.A. |
Telephone Number |
: 1-631-844-5000 |
Tested To Comply With FCC Standards
FOR HOME OR OFFICE USE
This device complies with Part 15 of the FCC rules. Operation is subject to the following two conditions:
(1)This device may not cause harmful interference.
(2)This device must accept any interference received, including interference that may cause undesired operation.
For customers in Canada
This Class B digital apparatus meets all requirements of the Canadian Interference-Causing Equipment Regulations.
Trademarks
•IBM is a registered trademark of International Business Machines Corporation.
•Microsoft and Windows are registered trademarks of Microsoft Corporation. •Macintosh is a trademark of Apple Computer Inc.
•All other company and product names are registered trademarks and/or trademarks of their respective owners.
•The standards for camera file systems referred to in this manual are the “Design Rule for Camera File System/DCF” standards stipulated by the Japan Electronics and Information Technology Industries Association (JEITA).
3
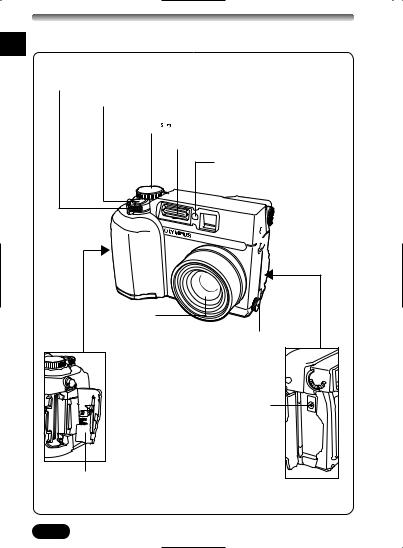
NAMES OF PARTS
Camera
En
Zoom lever (W/T)
Index display/Close-up playback lever (  /
/  )
)
Shutter button
Mode dial (  ,
, 


 ,
,  ,
, 
 ,
,  )
)
Flash
Self-timer lamp
 Strap eyelet
Lens
5-pin external flash socket
●Unscrew to remove the cover before connecting the bracket
cable.
Diopter adjustment dial 
DC-IN jack
VIDEO OUT jack 
USB connector 
Connector cover 
Card cover
4
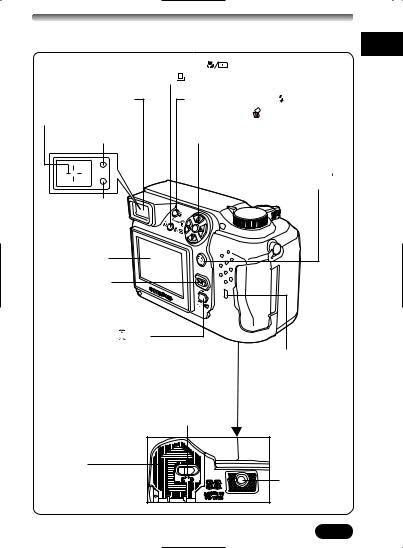
En
Macro/Spot button ( |
) |
|
Print button ( |
) |
|
Viewfinder |
Flash mode button ( ) |
|
AF target mark |
Erase button ( ) |
|
|
|
|
Orange lamp |
Arrow pad (ÑñÉí) |
|
OK/Menu button (  )
)
Manual focus button
Green lamp
Monitor
Quick |
View |
|
Monitor button (  )
)
Custom button ( 

 )
)
Protect button (  )
)
Rotation button
Battery compartment lock
Battery compartment cover
Card access lamp
Tripod socket
5
NAMES OF PARTS
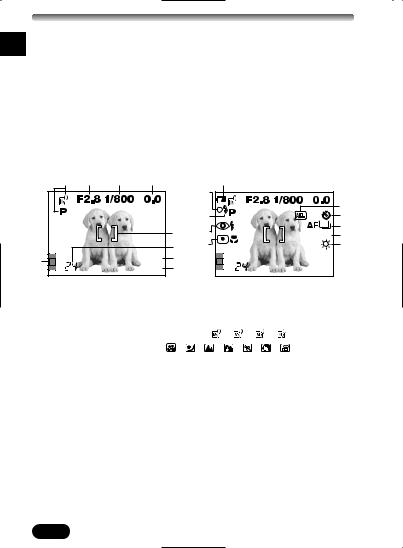
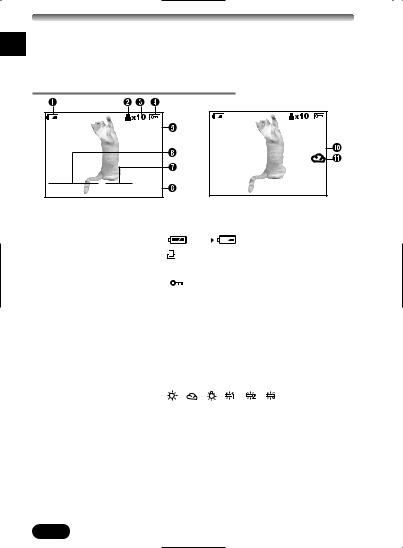
Monitor indications — Shooting information
En
The INFO setting on the menu allows you to select how much information to display.
The indications vary depending on the shooting mode.*
When INFO is set to OFF: The information below is displayed constantly in the shooting mode. (After operating the buttons or closing the menu, the information which appears in the ON mode (illustrated to the right) is displayed for approx. 1 second, then disappears.)
When INFO is set to ON: The information below is displayed constantly in the shooting mode.
1 |
2 |
3 |
4 |
|
^ |
0 |
|
1 |
|
|
|
|
1 |
|
|
|
|
|
|
|
! |
||
|
|
|
|
|
& |
SLOW1 |
@ |
|
|
|
|
5 |
* |
# |
|
|
|
|
|
ISO100 |
$ |
||
|
|
|
|
6 |
( |
HQ |
% |
9 |
|
|
HQ 7 |
|
|
||
|
|
2288x1712 |
8 |
|
2288x1712 |
|
|
*The illustrations show examples of indications displayed in the  1 mode.
Items |
|
|
Indications |
||
|
|
|
|
|
|
1Shooting mode |
P, A, S, M, |
1 , |
2 , |
3 , |
4 , |
|
, , |
, |
, |
, |
, |
|
|
|
|
|
|
2Aperture value |
F2.8 – F11 |
|
|
|
|
3Shutter speed |
16 – 1/1000 |
|
|
|
|
4Exposurecompensation |
–2.0 – +2.0 |
|
|
|
|
Exposure differential |
–3.0 – +3.0 |
|
|
|
|
5AF target mark |
|
|
|
– |
|
6Number of storable |
24 |
|
|
|
|
still pictures |
|
|
|
|
|
Seconds remaining |
24" |
|
|
|
|
|
|
|
|||
7Record mode |
TIFF/SHQ/HQ/SQ1/SQ2 |
|
|||
6

En
1 |
2 |
3 |
4 |
|
^ |
0 |
|
1 |
|
|
|
|
1 |
|
|
|
|
|
|
|
! |
||
|
|
|
|
|
& |
SLOW1 |
@ |
|
|
|
|
5 |
* |
# |
|
|
|
|
|
ISO100 |
$ |
||
|
|
|
|
6 |
( |
HQ |
% |
9 |
|
|
HQ 7 |
|
|
||
|
2288x1712 |
8 |
|
2288x1712 |
|
||
|
Items |
|
|
|
|
Indications |
|
8Number of pixels |
2288 x 1712, etc. |
|||
9Memory gauge |
|
|
|
|
0Battery check |
|
|
|
|
!AE lock |
AEL |
|
|
|
AE memory |
MEMO |
|
|
|
@Self-timer |
|
|
|
|
#Drive mode |
, |
, |
|
, BKT |
$ISO |
ISO100, ISO200, ISO400 |
|||
%White balance |
, |
, |
, |
, , |
^Green lamp |
O |
|
|
|
&Flash stand-by |
Lights. |
|
|
|
Camera movement |
Blinks. |
|
|
|
warning |
|
|
|
|
Flash charge |
Blinks. |
|
|
|
*Flash mode |
, |
, |
, |
SLOW1, |
|
SLOW2, |
|
SLOW1 |
|
(Spot metering/ |
, |
, |
|
|
Macro mode |
|
|
|
|
Super macro mode |
|
|
|
|
7
NAMES OF PARTS
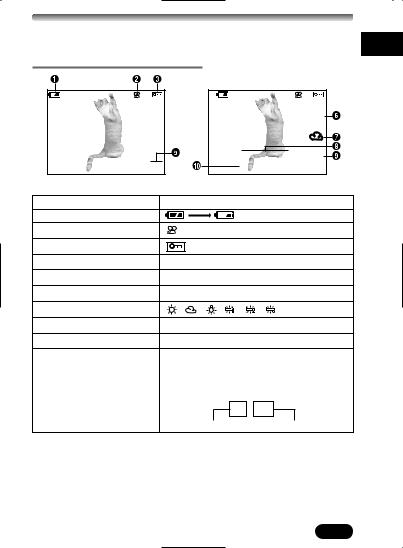
Monitor indications — Playback information
En
INFO setting on the menu allows you to select how much information to display.
 Still picture playback information
|
HQ |
’02.09.12 12:30 |
20 |
When INFO is set to OFF
HQ SIZE: 2288x1712
+2.0
ISO100 ’02.09.12 12:30 FILE: 100–0020
When INFO is set to ON
Items |
|
|
|
|
Indications |
|
|
|
|
|
|
|
|
1Battery check |
|
|
|
|
|
|
|
|
|
|
|
|
|
2Print reserve |
|
|
|
|
|
|
3Number of prints |
x2 – x10 |
|
||||
4Protect |
|
|
|
|
|
|
|
|
|
|
|
|
|
|
|
|
|
|
|
|
5Record mode |
TIFF, SHQ, HQ, SQ1, SQ2 |
|||||
6Date |
’02. 09. 12 |
|
||||
7Time |
12:30 |
|
|
|
||
8Frame number |
20 |
|
|
|
|
|
9Number of pixels |
2288x1712, etc. |
|
||||
(resolution setting) |
|
|
|
|
|
|
0Exposure compensation |
–2.0 – +2.0 |
|
||||
!White balance |
, , , , |
, |
||||
@ISO |
ISO100, ISO200, ISO400 |
|||||
#File number |
100 – 0020 |
|
||||
8
En
 Movie playback information
HQ
20
When INFO is set to OFF
HQ |
SIZE: 320x240 |
’02.09.12 12:30 |
FILE: 100–0020 |
When INFO is set to ON
Items |
|
|
Indications |
|
1Battery check |
|
|
|
|
2Movie mark |
|
|
|
|
3Protect |
|
|
|
|
4Record mode |
HQ, SQ |
|
|
|
5Frame number |
20 |
|
|
|
6Number of pixels |
320x240, etc. |
|
|
|
7White balance |
, |
, , |
, |
, |
8Date |
’02. 09. 12 |
|
|
|
9Time |
12:30 |
|
|
|
0File number |
FILE:100 – 0020 |
|
||
Recording time |
0"/15" |
|
|
|
|
During movie playback, the recording time |
|||
|
appears asfollows: |
|
||
|
|
|
0" / 15" |
|
|
|
Playing time |
Total recording time |
|


 Note
Note 


●The indications that appear on a movie picture that has been selected and displayed from the index display are different from those that appear when the movie picture is displayed using the movie play function.
9
NAMES OF PARTS
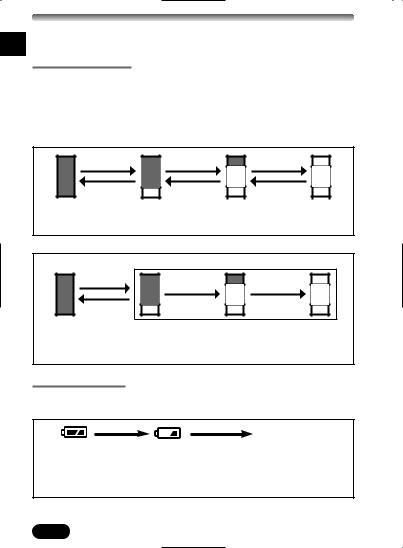
Monitor indications — Memory gauge & battery check
En
 Memory gauge
The memory gauge lights when you take a picture. When the gauge is lit, the camera is storing a picture on the SmartMedia card. The memory gauge indication changes as shown below depending on the shooting status. When the memory gauge is full, wait until the light goes out before you take any more shots.
When taking still pictures
Shoot. |
Shoot. |
Shoot. |
Wait. |
Wait. |
Wait. |
Before shooting |
One picture |
More than |
No more pictures |
(Gauge is off) |
taken |
two taken |
can be taken |
|
(Lit) |
(Lit) |
(Fully Lit) |
When recording movies
If you continue shooting
Shoot. |
Wait. |
Before shooting (Gauge is off)
During shooting (Gauge lit).
●Shooting is not possible until the light goes out completely.
●Movie recording finishes automatically when the memory gauge is fully lit.
 Battery check
If the remaining battery power is low, the battery check indication changes as follows when the camera is turned on or while the camera is in use.
Lights. |
Lights. |
|
(green) |
(red) |
|
Remaining power |
Remaining power level: |
|
low. Replace with new |
||
level: high |
||
batteries. |
||
|
No indication
(The green lamp and orange lamp next to the viewfinder blink.)
Remaining power level: exhausted. BATTERY EMPTY is displayed. Replace with new batteries.
10
GETTING STARTED
Attaching the strap
1
2 Loosen the strap in both stoppers. Pull out the ends of the strap from each stopper, then pull them out of each ring.
Ring
Stopper 
3
En
4 Thread the end of the strap back through the ring and stopper as indicated by the arrows.
Strap eyelet
5 

6 Attach the strap to the other strap eyelet following steps 3 – 5.


 Note
Note 


●Be careful with the strap when you carry the camera, as the strap can easily catch on stray objects, causing serious damage.
●Attach the strap correctly as shown so that the camera does not fall off. If the strap is attached incorrectly and the camera falls off the strap, Olympus is not responsible for any damages.
11
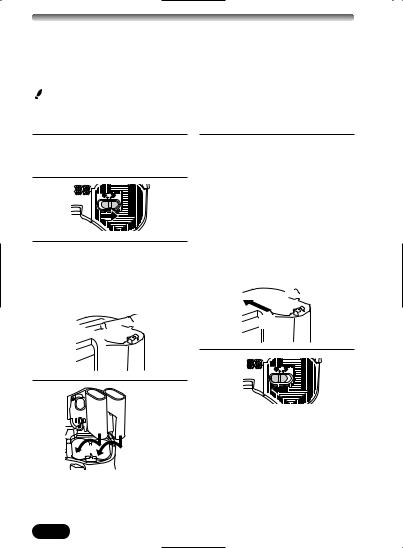
GETTING STARTED (Cont.)
En |
|
|
|
Loading the batteries |
|
|
|
|
|
|
This camera uses 2 CR-V3 lithium battery packs or 4 AA (R6) NiMH batteries, |
|
|
NiCd batteries, alkaline batteries or lithium batteries. |
Important:
●CR-V3 lithium battery packs cannot be re-charged.
●Do not peel the label on a CR-V3 lithium battery pack.
1 Make sure the camera is turned off (i.e. the mode dial is set to OFF).
2
3 Slide the battery compartment cover in the direction of the arrow (A) with your fingertip and open it (B).
●Do not use your fingernail, as this could result in injury.
A
 B
B
5 Close the battery compartment cover, then press it down (C) and slide it in the opposite direction of the arrow printed on it (D).
●When pressing the battery compartment cover shut, be sure to press the center of the cover, as it may be difficult to close properly by pressing the edge.
●Make sure the cover is completely closed.

 C
C
D
4
When using CR-V3 lithium battery packs
6
Using an AC power adapter (optional)
Use an AC adapter designed for the area where the camera is used. Consult your nearest Olympus dealer or Service center for details.
12
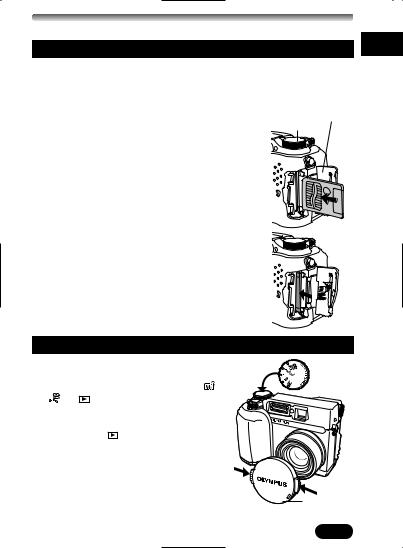
Inserting/Removing the memory card (SmartMedia) |
En |
|
This camera uses SmartMedia card to record pictures. This manual uses the term “card” when referring to SmartMedia.
Be sure to use a 3 V (3.3 V) card. Non-Olympus 3 V (3.3 V) cards must be formatted with the camera. Do not use a 5 V card or a 2 MB card.
1Make sure the camera is turned off (i.e. the mode dial is set to OFF). Open the card cover.
2Inserting the card
Insert the card fully with the contact area facing towards the monitor side. Insert until you feel it locked into place.
●Hold the card in a straight orientation to the card slot. Do not attempt to insert the card at an angle.
●Note the orientation of the card. If it is inserted incorrectly, it may become jammed.
Removing the card
Push in the card lightly to unlock it, then pull it out.
3 Close the card cover securely until it clicks.
Card cover Mode dial
Power on/off
1 Before turning the camera on, press |
Mode dial |
||
the tabs on the lens cap to remove it. |
|
||
2 Set the mode dial to P, A/S/M/ , |
|
||
or |
. |
|
|
● The camera turns on. |
|
||
● The lens moves out when the mode dial |
|
||
is not set to |
. |
|
|
3 Set the mode dial to OFF.
● The power turns off.
Lens cap
13

GETTING STARTED (Cont.)
En |
Date/time setting |
|
1 Set the mode dial to P.
2Press  .
.
●The monitor turns on automatically and the top menu appears.
3 Press í on the arrow pad to select MODE MENU. 4 Press ñ to select SETUP, then press í.
5 Press Ññ to select  , then press í.
6 When  is selected on the screen, press Ññ to select the date
format.
●Select any one of the following formats: D-M-Y (Day/Month/Year)
M-D-Y (Month/Day/Year) Y-M-D (Year/Month/Day)
●This step and the following steps show the procedure used when the date and time settings are set to Y-M-D.
7 Press í to move to the year (Y) setting.
8Press Ññ to set the year. When the year is set, press í to move to the month (M) setting.
●Repeat this procedure until the date and time are completely set.
●To move back to the previous setting, press É.
●The first two digits of the year cannot be changed.
●The camera can only display the time in “number of hours”, or what is commonly known as military time. Consequently, 2 p.m. would be 14:00 hours, or 12:00 hours + 2:00 hours =14:00 hours.
9Press  .
.
●If  is pressed again, the menu will disappear.
●For a more accurate setting, do not press  until the time is actually at 00 seconds. The camera’s built-in clock starts when you press this
button.
0 To turn the camera off, set the mode dial to OFF.


 Note
Note 


●The date setting will be canceled if the camera is left with no batteries for approximately 1 hour. If this happens, you will need to set the date again.
14
 Loading...