


DIGITAL CAMERA |
ENGLISH |
|
APPAREIL PHOTO NUMÉRIQUE |
||
|
||
DIGITAL-KAMERA |
FRANÇAIS |
C-3000ZOOM DEUTSCH
INSTRUCTIONS
MODE D’EMPLOI
BEDIENUNGSANLEITUNG
nBefore using your camera, read this manual carefully to ensure correct use.
nWe recommend that you take test shots to get accustomed to your camera before taking important photographs.
nAvant d’utiliser votre appareil photo, veuillez lire attentivement ce mode d’emploi, de manière à obtenir les meilleurs résultats possibles.
nAvant d’effectuer des prises de vues importantes, nous vous conseillons par ailleurs de faire quelques essais afin de vous familiariser avec le maniement de l’appareil photo.
nBitte lesen Sie vor Gebrauch dieser Kamera sorgfältig diese Bedienungsanleitung, um optimale Ergebnisse beim Fotografieren zu erzielen.
nWir empfehlen, vor wichtigen Aufnahmen Probeaufnahmen durchzuführen, um sich mit der Bedienung und den Funktionen der Kamera vertraut zu machen.

PREPARATION |
|
||
1 |
4 5 |
6 |
|
|
|
|
|
2 |
|
|
|
3 |
|
|
7 |
|
|
8 |
|
|
|
|
|
9 |
|
! |
|
0 |
|
||
|
|
|
|
|
|
@ |
|
|
^ |
# |
|
|
|
$ |
|
|
|
8 |
|
|
|
% |
|
Q |
Y U |
I O |
|
|
|
P |
|
W |
|
|
a |
|
|
s |
|
E |
|
|
|
R |
|
|
d |
T |
|
|
f |
g |
hj k |
|
|
|
D |
F |
G |
|
|
||
S |
|
|
H |
|
|
|
HQ |
|
|
|
J |
23.12.,00 21:56 10 |
|||
K |
L |
: |
|
2 |
|
|
|
& q |
w e |
* |
|
( |
2 |
|
r |
) |
t |
|
y |
u |
i o |
p |
;
l
A
z x c v
P F2.8 1/800 +2.0
b n

Names of parts
CAMERA |
|
1Control panel |
^Card compartment cover |
2Zoom lever |
&Flash button, Erase button |
3Flash |
*Spot/Macro button, Print button |
4Selftimer/Remote control signal |
(Viewfinder |
5Remote control window |
)LCD monitor |
6Diopter adjustment dial |
qJog dial |
7Strap hook |
wMode dial |
8Connector cover |
eShutter release button |
9Lens |
rOK button, MF button, Protect |
0Microphone |
button |
!Extension flash connector cover tLCD monitor ON/OFF button (The connector is located beneath yCard access lamp
the cover.) |
uMenu button |
@AC adapter connector |
iBattery compartment cover (bottom) |
#A/V output connector |
oBattery compartment open/close |
$USB connector |
switch (bottom) |
%Computer connector (RS-232C) |
pThreaded mount (bottom) |
CONTROL PANEL |
|
QFlash mode |
dExposure compensation |
WMacro mode |
fAuto bracket |
ESpot metering mode |
gRecording mode |
RSequential shooting |
hWriting |
TSelftimer/Remote control |
jSound record |
YManual focus |
kNumber of storable pictures |
USlow shutter synchronization flash |
|
IFlash exposure correction |
VIEWFINDER DISPLAY |
OBattery check |
lAutofocus mark/Backlighting |
PCard error |
correction mark |
aWhite balance |
;Orange lamp (flash) |
sISO |
AGreen lamp (focus) |
LCD MONITOR |
(Record mode) |
(Display mode) |
|
SBattery check |
zPhoto mode |
DRandom print |
xAperture |
FMovie picture |
cShutter speed |
GSound record |
vExposure compensation/ |
HProtect |
Exposure differential |
JRecording mode |
bImage memory blocks |
KDate |
nNumber of storable pictures |
LTime |
|
:Frame number |
|
3

Checking the contents
Camera
Lens cap
USB cable
A/V cable
Strap
Software CD’s (including instructions on CD-ROM)
Instructions (concise version)
Warranty card
CR-V3 lithium battery pack (2 packs)
SmartMedia (SSFDC-8MB)
Static-free case
Index labels (2 pieces)
Write-protect adhesive seals (4 pieces)
SmartMedia instructions
Optinal items |
|
• Special Function SmartMedia |
||
|
|
|
Cards |
|
• Photo Printers For Olympus |
||||
Template Card (4MB) |
||||
Digital Cameras |
|
|||
|
Calendar Card (4MB) |
|||
• AC Adapter |
|
|||
|
Title Card (4MB) |
|||
• Leather Camera Case |
|
|||
|
• FlashPath Floppy Disk Adapter |
|||
• Standard SmartMedia |
Card |
|||
• PC Card Adapter |
||||
(8/16/32/64MB) |
|
|||
|
• NiMH Batteries |
|||
• Leather SmartMedia Case |
|
|||
• NiMH Battery Charger
• SmartMedia Reader/Writer
4

Attaching the strap
Attach the strap to the strap hook on the camera.
Loading the batteries
This camera uses 2 CR-V3 lithium battery packs or 4 AA NiMH batteries, NiCd batteries, alkaline batteries or lithium batteries. Performance will be limited with alkaline batteries, especially in low temperatures. Lithium battery packs or NiMH batteries are recommended. Do not use zinc-carbon batteries; they may overheat and destroy the camera.
When pressing the battery cover shut, be sure to press the center of the cover since it may be difficult to close properly by pressing the edge.
Close the battery cover, then press it down and slide it in the opposite direction of the arrow printed on it. Slide the opening and closing switch on the battery cover in the direction of  .
.
P |
A/S |
|
I |
|
/ |
L |
|
|
M |
A |
|
OFF |
|
D |
|
|
E |
||
|
|
|
D |
|
|
RM |
O |
|
|
/ |
|
|
POWE |
|
|
2
|
3 |
6 |
4 |
1 |
|
||
To load the lithium battery packs, insert |
|||
OPEN |
them with the CAMEDIA labels facing |
5 |
|
outward and the concave terminals |
SHUT |
|
facing each other. |
||
|
Using the AC adapter (optional)
Use an AC220V power source. |
AC wall outlet |
 P
P
A/S/M
L
A
I
OFF
P
O
/M
WER
D
E D O
AC adapter |
AC adapter connector |
|
5
Inserting SmartMedia
Note:
•Use 3V (3.3V) cards only. 5V cards cannot be used.
•Olympus brand cards are recommended (already formatted). Non-Olympus brand cards must be formatted by the camera.
•When using a special function SmartMedia
card (optional), insert it in the same way.
Caution:
Insert
SmartMedia.
•NEVER open the card cover, eject the card, remove the batteries, or pull the plug while the camera is in operation. It may destroy the data in the card.
•The card is a precision instrument. Handle it carefully and do not subject it to physical shocks.
•Do not touch the contact area of the card.
Power on/off
Remove the lens cap, then set the Mode dial to P, A/S/M, 
 or
or  . If there are no pictures stored in the card when the Mode dial is set to
  , NO PICTURE will appear on the LCD monitor.
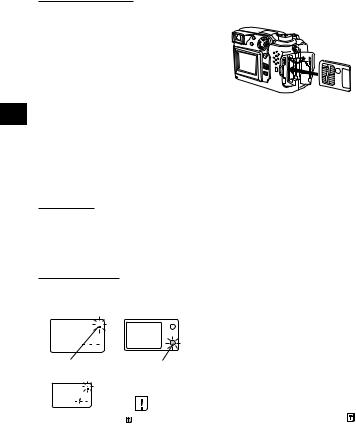
Checking the card
When the power is turned on in the Record mode, the camera checks the SmartMedia card.
Control panel |
Viewfinder |
When there is no SmartMedia card in |
|||||||
|
|
|
|
|
|
|
|
the camera / the card is protected: |
|
|
|
|
|
|
|
|
|
The Card error indicator on the control |
|
|
|
|
|
|
|
|
|
||
Card error |
|
|
|
|
|
|
panel and the Green lamp blink. |
||
Green lamp |
|||||||||
|
|||||||||
|
|
|
|
|
|
|
|
When the card needs to be formatted: |
|
|
|
|
|
|
|
|
|
The Card error indicator on the control |
|
|
|
|
|
|
|
|
|
panel lights, and the Card format |
|
|
|
|
|
|
|
|
|
confirmation screen appears. Select |
|
|
CARD |
|
|
NO [OFF] |
|||||
|
SETUP |
|
|
||||||
|
|
|
|
|
|
|
|
to enter the Card format mode. |
|
|
|
|
|
|
|||||
|
|
LCD monitor |
|
||||||
6

Card format
Press the Menu button, then press the top/bottom arrows on the Jog dial to select CARD SETUP. Press the right arrow to select  , and press the OK button to display

 YES NO . Press the OK button again with YES selected to format the card.
Note:
•Formatting the card erases the existing data, including pictures which have been write-protected from the camera. Be careful not to erase important data when formatting a recorded card.
Adjusting the date and time
Press the Menu button, then press the top/bottom arrows on the Jog dial to select MODE SETUP and press the right arrow. Press the OK button. Press the top/bottom arrows to select  , press the right arrow and press the OK button. Select the date order, and adjust the date and time using the Jog dial. Press the OK button. Press the OK button twice.
•When the Mode dial is set to  , the card must contain images in order to display the Menu.
LCD brightness
Press the Menu button, then press the top/bottom arrows on the Jog dial to select MODE SETUP and press the right arrow. Press the OK button. Press the top/bottom arrows to select 


 , press the right arrow and press the OK button. Select the brightness using the Jog dial. Press the OK button twice.
Beep sound
Press the Menu button, then press the top/bottom arrows on the Jog dial to select MODE SETUP and press the right arrow. Press the OK button. Press the top/bottom arrows to select 
 , press the right arrow and top/bottom arrows to make the selection. Press the left arrow to confirm the setting. Press the OK button twice.
7
RECORDING FUNCTIONS
How to use the mode dial
Aperture priority
Shutter priority
Manual
Program
Power off
A/ |
|
S/ |
|
P |
M |
|
|
|
F |
F |
|
O |
|
Movie picture recording
L |
|
|
AI |
|
|
D |
||
E |
||
|
D |
|
|
|
O |
|
|
M |
|
|
/ |
OW |
E |
R |
|
|
|
P |
|
|
Display
• P or A/S/M (Still picture recording)
•  (Movie picture recording)
• OFF (Power off)
•  (Display)
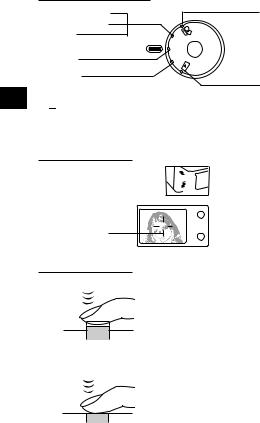
Adjusting the diopter
Diopter adjustment dial 

Viewfinder
•Turn the Diopter adjustment dial to see the Autofocus mark clearly.
Autofocus mark
Proper shutter relese
Press the Shutter release button halfway to lock the focus and exposure.
• The Green lamp next to the viewfinder
lights.
• If the Green lamp blinks, the focus or exposure is not locked. Check the working
distance.
Press the Shutter release button fully to release the shutter and take the picture.
• The camera emits a beep sound when the shutter is released.
• The Card access lamp blinks while the picture is being recorded.
8

Taking pictures
Press the Shutter release button halfway to lock the focus and exposure. Press the Shutter release button fully to take the picture. When the Green lamp stops blinking, the camera is ready to take the next picture.
A/S/M mode
Press the Menu button, then press the top/bottom arrows on the Jog dial to select A/S/M MODE. Press the right arrow on the Jog dial, then press the top/bottom arrows to select A (Aperture priority), S (Shutter priority) or M (Manual). Press the left arrow on the Jog dial to confirm the setting. If you take a picture without pressing the OK button, the setting will be valid until the Menu is canceled.
Quick view
To switch to the Display mode, quickly press the LCD monitor ON/OFF button twice in the Record mode. To return to the Record mode, press the LCD monitor ON/OFF button or the Shutter release button.
Recording movies
Press the Shutter release button halfway to lock the focus and exposure. The focus and exposure will be locked during the recording. Press the Shutter release button fully to start recording. Press the Shutter release button fully again to stop recording.
•During movie recording, focus is fixed at the point where focus is locked. Only Digital zoom is available. Because the image in the viewfinder is not affected by Digital zoom, use the LCD monitor to check results.The sound may not be recorded clearly if there is a distance of 1 m or more between subject and camera.
How to use the menu
Press the Menu button, then press the top/bottom arrows on the Jog dial to select the item to adjust. Press the right arrow to display further selections. Press the top/bottom arrows to adjust the item, and press the left arrow to confirm the adjustment. Press the OK button.
9

Checking the batteries
When the power is turned on in the Record mode, the remaining battery power will be displayed on the control panel.
lights and turns off automatically.
Batteries are OK. You can shoot.
blinks and other indicators on the control panel are displayed normally.
Battery power is low and batteries should be replaced. If NiMH batteries are used, the battery low warning will blink faster than when lithium battery packs are used.
blinks and other indicators on the control panel go out.
Batteries are dead and should be replaced immediately.
Note:
•When the camera is being operated on batteries that are running low, the camera may emit several short beeps and blink the number of storable pictures on the control panel after you take a shot or when you turn on the power. If this happens, the picture you have just taken will not turn out properly. Replace the batteries and take the picture again.
Checking the number of storable pictures
When the power is turned on in the Still Picture Record mode, the number of storable pictures will appear on the control panel. (For movie pictures, the seconds remaining will appear.)
Number or |
Seconds |
storable pictures |
remaining |
The Green lamp blinks and CARD FULL appears on the LCD monitor when the number reaches 0.
No more photographs can be taken. Replace the SmartMedia, erase unwanted pictures, or transfer the data
CARD FULL to a personal computer and free up space in the SmartMedia.
10
Number of Still Pictures that can be Taken
|
|
Number |
|
|
|
Memory capacity |
|
|
|
|||
Recording mode |
File |
|
(without sound/with sound) |
|
|
|||||||
of pixels |
|
|
|
|||||||||
|
|
|
|
2MB |
|
4MB |
8MB |
16MB |
32MB |
64MB |
|
|
|
|
2048 x 1536 |
|
0/0 |
|
0/0 |
0/0 |
1/1 |
3/3 |
6/6 |
|
|
|
|
1600 x 1200 |
|
0/0 |
|
0/0 |
1/1 |
2/2 |
5/5 |
11/11 |
|
|
|
TIFF |
1280 x 960 |
TIFF |
0/0 |
|
1/1 |
2/2 |
4/4 |
8/8 |
17/17 |
|
|
|
|
1024 x 768 |
|
0/0 |
|
1/1 |
3/3 |
6/6 |
13/13 |
27/27 |
|
|
|
|
640 x 480 |
|
2/1 |
|
4/4 |
8/8 |
17/16 |
34/33 |
68/66 |
|
|
|
|
|
|
|||||||||
|
|
|
|
|
|
|
|
|
|
|
|
|
|
SHQ |
2048 x 1536 |
|
1/1 |
|
2/2 |
4/4 |
8/8 |
17/17 |
35/34 |
|
|
|
HQ |
2048 x 1536 |
|
2/2 |
|
5/4 |
10/10 |
21/20 |
42/40 |
84/81 |
|
|
|
|
|
|
|
|
|
|
|
|
|
|
|
|
HIGH (High quality) |
1600 x 1200 |
|
1/1 |
|
3/3 |
6/6 |
12/12 |
25/25 |
51/50 |
|
|
|
NORMAL |
|
3/3 |
|
7/7 |
16/15 |
31/30 |
64/60 |
128/120 |
|
|
|
SQ1 |
|
|
|
|
|
|||||||
HIGH (High quality) |
|
|
2/2 |
|
5/4 |
10/10 |
21/20 |
42/40 |
84/81 |
|
|
|
|
1280 x 960 |
|
|
|
|
|||||||
|
NORMAL |
|
5/5 |
|
12/11 |
24/22 |
49/45 |
99/90 |
199/181 |
|
|
|
|
|
JPEG |
|
|
|
|||||||
|
|
|
|
|
|
|
|
|
|
|
|
|
|
HIGH (High quality) |
1024 x 768 |
|
3/3 |
|
6/6 |
13/12 |
26/25 |
53/51 |
107/102 |
|
|
|
NORMAL |
|
9/7 |
|
18/16 |
37/32 |
76/66 |
153/132 |
306/266 |
|
|
|
SQ2 |
|
|
|
|
|
|||||||
HIGH (High quality) |
|
|
7/6 |
|
16/14 |
32/28 |
66/58 |
132/117 |
266/234 |
|
|
|
|
640 x 480 |
|
|
|
|
|||||||
|
NORMAL |
|
20/15 |
|
40/30 |
82/61 |
165/123 |
331/248 |
665/498 |
|
|
|
|
|
|
|
|
|
|||||||
|
|
|
|
|
|
|
|
|
|
|
|
|
•Sound cannot be recorded with a picture in the TIFF mode, but it can be added later in the  mode.
mode.
Seconds that Movies can be Photographed
Recording |
|
Number of pixels |
|
|
|
Memory capacity |
|
|
|||||
|
|
|
|
|
|
|
|
|
|||||
mode |
|
|
|
|
|
2MB |
|
4MB |
8MB |
|
Over 16MB |
||
|
|
|
|
|
|
|
|
|
|
||||
HQ |
|
320 x 240 |
|
6 |
|
13 |
27 |
|
30 |
||||
|
|
|
|
|
|
|
|
|
|
||||
SQ |
|
160 x 120 |
|
25 |
|
53 |
108 |
|
120 |
||||
|
|
|
|
|
|
|
|
|
|
|
|
|
|
Working range |
|
|
|
|
|
|
|
|
|
|
|
|
|
|
|
|
|
|
|
|
|
|
|
|
|
|
|
Macro mode |
|
|
0.2 ~ 0.8 m |
|
|
|
|
|
|||||
Standard mode |
|
|
0.8 m ~ ∞ |
|
|
|
|
|
|||||
|
|
|
|
|
|
|
|
|
|
|
|
|
|
11

All reset
With ON selected, the settings of the following items will be canceled and reset to the default when the power is turned off.
|
Aperture priority mode |
Auto bracket |
|
Shutter priority mode |
Flash light volume correction |
|
Manual mode |
Slow shutter synchronization flash |
|
Zoom |
Flash select |
|
Exposure compensation |
Digital zoom mode |
|
Flash modes |
White balance |
|
Spot metering mode |
ISO setting |
|
||
|
Macro mode |
Picture effects |
|
Macro + Spot metering mode |
Recording mode |
|
Manual focus |
A/S/M mode setting |
|
Sequence mode |
Picture information |
|
Selftimer/Remote control |
|
File number
Press the Menu button, then press the top/bottom arrows on the Jog dial to select MODE SETUP and press the right arrow to select SETUP. Press the OK button. Press the top/bottom arrows to select FILE NAME, press the right arrow and top/bottom arrows to make the selection. Press the left arrow to confirm the setting. Press the OK button twice.
About the File No. and Folder No.
The file number and folder number used for each image are expressed as shown.
Folder No. |
|
File No. |
||
|
|
|
|
|
|
|
|
|
|
\ D C I M \ * * * O L Y M P \ P m d d * * * * . j p g
|
|
|
|
|
|
|
|
|
|
|
|
|
|
|
|
|
|
|
|
|
|
|
|
100~999 |
Month (1~C) |
0001~9999 |
|||||||||
|
|
|
|
|
|
Day |
(01~31) |
|
|
||
*Month: Jan. ~ Sep. = 1-9, Oct. = A, Nov. = B, Dec. = C
The File No. and Folder No. in Each Mode
• NAME RESET
When RESET is selected, the file number and folder number will be reset every time a card is inserted in the camera.
• AUTO FILE
When AUTO is selected, the same folder number and a continuing number from the last file number of the last card will be used, so that the same file number will not be used for pictures taken together and saved in multiple cards.
12

DISPLAYING FUNCTIONS
Displaying recorded pictures
Set the Mode dial to  . With each press of the right arrow on the Jog dial, you can view the succeeding picture. With each press of the left arrow, you can view the preceding picture.
[10-frame jump using the Jog dial]
•With each press of the bottom arrow, you can view the picture 10 frames ahead.
•With each press of the top arrow, you can view the picture 10 frames behind.
Playing movies
Display a picture with  on the LCD monitor using the Jog dial. Press the Menu button, then press the top/bottom arrows on the Jog dial to select
 PLAY and press the right arrow. Press the OK button to start the movie. Press the OK button during the movie to pause it. Pressing the Jog dial enables frame-by-frame playback of the movie. Press the OK Button again to restart. Press the Menu button during the movie to stop it. Press the Menu button twice when movie playback is finished. The movie playback mode is canceled. Sound cannot be played back by this camera. Connect it to a TV or personal computer for sound playback.
Picture information
Press the Menu button, then press the top/bottom arrows on the Jog dial to select INFO and press the right arrow. Press the top/bottom arrows on the Jog dial to select ON. Press the left arrow to confirm the setting. Press the OK button to save the setting and exit the Menu. When the LCD monitor displays a picture you selected, picture information appears. After 5 seconds, it disappears.
Index-display mode
Press the Zoom lever toward W to display several pictures on the monitor. Press the right arrow on the Jog dial to select succeeding pictures. Press the left arrow on the Jog dial to select preceding pictures. Press the bottom arrow on the Jog dial to select the succeeding group of pictures. Press the top arrow on the Jog dial to select the preceding group of pictures. Press the Zoom lever toward T to display the currently selected picture in one frame.
13
Close-up display mode (3X inspection)
With each press of the Zoom lever toward T, the picture is enlarged 1.5X, 2X, 2.5X, and 3X. Pressing the Zoom lever toward W returns to 1X. Use the Jog dial to select the section of the picture to view. To select another picture, select 1X and move the Jog dial.
Slide-show
Press the Menu button, then press the top/bottom arrows on the Jog dial to select  and press the right arrow. Press the OK button to start the slideshow. Press the Menu button to stop the Slide-Show.
Recording sound
Press the Menu button to display the Menu, then press the top/bottom arrows on the Jog dial to select  . Press the right arrow on the Jog dial to select START. Press the OK button to start recording. About 4 seconds of sound is recorded. A progress bar will be displayed on the LCD monitor.
The sound may not be recorded clearly if there is a distance of 1 m or more between subject and camera.
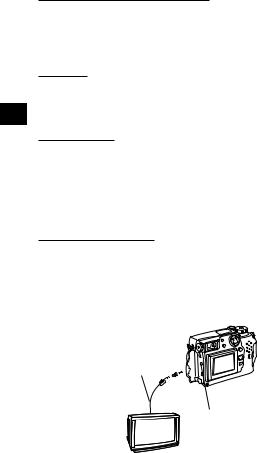
Connecting to a television
Recorded images can be viewed on a TV (PAL only). Make sure that the power of the TV and the camera are off before connecting.
Connect the AV cable to the camera’s A/V output connector, then connect it to the TV’s audio (white) and video (yellow) input connectors. Turn on the TV. Set the Mode dial to  . Select a picture using the Jog dial. If sound is recorded with pictures, sound is also played back.
A/V cable 


A/V output connector
14

Protection
Press the OK button to protect the currently displayed picture.
One-frame erase
Display the picture you want to erase and press the Erase button. Press the OK button with YES selected to erase the picture.
All-frame erase
Press the Menu button, then press the top/bottom arrows on the Jog dial to select CARD SETUP. Press the right arrow to select 


 , and press the OK button to display


 . Press the OK button again with YES selected to ease all the pictures in the card.
15

SOPHISTICATED FUNCTIONS
Autofocus
There are certain conditions where the autofocus may not work properly even when the Green lamp lights when the Shutter release button is pressed halfway. When this happens, try the procedure below or use Manual focus.
1Subjects with low contrast
Lock the focus on an object that is at the same distance from the camera as the subject, then aim at the subject to take the picture.
2Subjects with no vertical lines
Lock the focus on the subject by holding the camera vertically, then change it to the horizontal position to take the picture.
3Subjects in excessively bright light
Lock the focus on an object that is at the same distance from the camera as the subject, then aim at the subject to take the picture.
4Subjects at different distances
Lock the focus on an object that is at the same distance from the camera as the subject, then aim at the subject to take the picture.
5Fast-moving subjects at close distances
Lock the focus on an object that is at the same distance from the camera as the subject, then aim at the subject to take the picture.
Focus lock
Position your subject within the autofocus marks, and press the Shutter release button halfway. Recompose the picture while keeping the Shutter release button pressed halfway. Press the Shutter release button fully to take the picture.
AE lock
You can take a picture of a subject with a different exposure than that set with focus lock. While keeping the Shutter release button pressed halfway, recompose the picture and press the OK button. The exposure is metered and stored in memory. If the OK button is pressed again, the new exposure is stored in memory. If the Shutter release button is not released after being pressed halfway, a new exposure will be stored in memory with each press of the OK button.
16
Manual focus
Press the OK button to turn on the LCD monitor. Press the right arrow on the Jog dial to select the Manual focus mode. While looking at the LCD monitor, press the top/bottom arrows on the Jog dial to select the distance. When the cursor is moved below 0.8 m, shorter distances will appear on the LCD monitor. Press the OK button to save the setting.
Zoom
Press the lever to T to choose Telephoto shooting. Press the lever to W to choose wide-angle shooting. Only digital zoom is available in the  mode. Use the LCD monitor to check images that have been zoomed-in or -out.
•The image will be more grainy the more you zoom to a subject because only Digital zoom is available in the 
 mode.
mode.
•When movie recording while zooming, images may become jittery.
Digital zoom mode
Press the Menu button, then press the top/bottom arrows on the Jog dial to select DIGITAL ZOOM. Press the right arrow on the Jog dial, then press the top/bottom arrows to select ON or OFF. Press the left arrow on the Jog dial to confirm the setting. If you take a picture without pressing the OK button, the setting will be valid until the Menu is canceled.
Note:
•The setting will be canceled and only the optical zoom will be available when the LCD monitor is turned off.
•Images may be grainy in this mode.
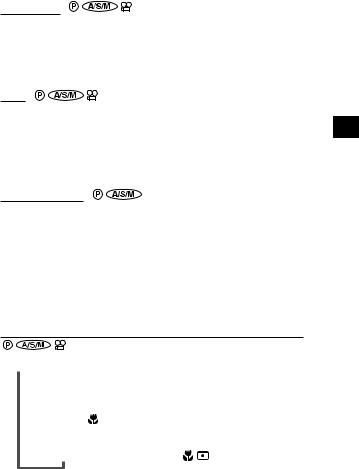
Spot metering mode/Macro mode/Macro mode +Spot metering mode
You can select the following modes with each press of the Spot/Macro button.
Digital ESP metering/Auto focus
Spotmetering mode 
Macromode
Shooting range: Approx 0.2 ~ 0.8m Macro mode + Spot metering mode
17

Sequence mode
Press the Menu button, then press the top/bottom arrows on the Jog dial to select DRIVE. Press the right arrow and press the top/bottom arrows to select  or AF
or AF  . Press the left arrow on the Jog dial to confirm the setting. If you take a picture without pressing the OK button, the setting will be valid until the Menu is canceled. This mode cannot be used in the TIFF/SHQ recording mode.
Selftimer/Remote control
Press the Menu button, then press the top/bottom arrows on the Jog dial to select DRIVE. Press the right arrow and press the top/bottom arrows to select  . Press the left arrow on the Jog dial to confirm the setting. If you take a picture without pressing the OK button, the setting will be valid until the Menu is canceled.
Taking a picture using the selftimer
When the shutter is released, the Selftimer/Remote control signal lights for approx. 10 seconds then blinks for approx. 2 seconds before the picture is taken. To stop the activated selftimer, press the Menu button.
Taking a picture using the remote control
Compose the picture, aim the remote control at the Remote control window on the camera, then press the Shutter release button on the remote control to take a picture.
Exposure compensation
Turn on the LCD monitor in the Record mode. Press the right arrow on the Jog dial for + adjustment and the left arrow for – adjustment.
White balance
Press the Menu button, then press the top/bottom arrows on the Jog dial to select WB. Press the right arrow on the Jog dial, then press the top/bottom arrows to select AUTO, 
 (Daylight),
  (Overcast),
  (Tungsten light) or

 (Fluorescent). Press the left arrow on the Jog dial to confirm the setting. If you take a picture without pressing the OK button, the setting will be valid until the Menu is canceled.
ISO
Press the Menu button, then press the top/bottom arrows on the Jog dial to select ISO. Press the right arrow on the Jog dial, then press the top/bottom arrows to select the sensitivity. Press the left arrow on the Jog dial to confirm the setting. If you take a picture without pressing the OK button, the setting will be valid until the Menu is canceled.
18

Sound record mode
Press the Menu button, then press the top/bottom arrows on the Jog dial to select  . Press the right arrow and press the top/bottom arrows to select ON. When the Shutter release button is released, sound is recorded for 4 seconds per picture. So be sure to for a while keep the camera’s microphone directed toward the subject for a while even after the shutter has been released. The sound may not be recorded clearly if there is a distance of 1 m or more between subject and camera. This is not possible in the TIFF mode.
Picture effects
Press the Menu button, then press the top/bottom arrows on the Jog dial to select FUNCTION. Press the right arrow on the Jog dial, then press the top/bottom arrows to select the desired picture effect. Press the left arrow on the Jog dial to confirm the setting. If you take a picture without pressing the OK button, the setting will be valid until the Menu is canceled.
Panorama mode
Turn on the LCD monitor. Press the Menu button, then press the top/bottom arrows on the Jog dial to select  and press the right arrow. Press the OK button. Select the connecting direction (right, left, up, down) using the Jog dial. Take pictures by overlapping the edges of the images. Press the Menu button to cancel the Panorama mode and Menu.
Selecting the recording mode
Press the Menu button, then press the top/bottom arrows on the Jog dial to select 


 . Press the right arrow on the Jog dial, then press the top/bottom arrows to select the recording mode. Press the left arrow on the Jog dial to confirm the setting. If you take a picture without pressing the OK button, the setting will be valid until the Menu is canceled.
TIFF setup
Press the Menu button, then press the top/bottom arrows on the Jog dial to select MODE SETUP and press the right arrow to select SETUP. Press the OK button. Press the top/bottom arrows to select TIFF, press the right arrow to select SETUP and press the OK button. Use the top/bottom arrows to make the selection. Press the OK button to confirm the setting. Press the OK button repeatedly until the Menu disappears.
19

SQ1/SQ2 setup
Press the Menu button, then press the top/bottom arrows on the Jog dial to select MODE SETUP and press the right arrow to select SETUP. Press the OK button. Press the top/bottom arrows to select SQ1 or SQ2, then press the right arrow to select SETUP and press the OK button. Press the top/bottom arrows to select the resolution and press the right arrow, then press the top/bottom arrows to select the picture quality. Press the left arrow to confirm the setting. Press the OK button repeatedly until the Menu disappears.
Full-time AF
Press the Menu button, then press the top/bottom arrows on the Jog dial to select MODE SETUP and press the right arrow. Press the OK button. Press the top/bottom arrows to select FULL–TIME AF, press the right arrow and top/bottom arrows to ON or OFF. Press the left arrow to confirm the setting. Press the OK button twice to close the Menu. ON keeps the image on the LCD monitor in focus at all times without having to press the Shutter release button.
Rec view
Press the Menu button, then press the top/bottom arrows on the Jog dial to select MODE SETUP and press the right arrow to select SETUP. Press the OK button. Press the top/bottom arrows to select REC VIEW, press the right arrow and top/bottom arrows to make the selection. Press the left arrow to confirm the setting. Press the OK button twice. When set to CHECK, it is possible to check the image and decide whether or not to save it. CHECK is not possible in the TIFF mode.
Index-display adjustment
Press the Menu button, then press the top/bottom arrows on the Jog dial to select MODE SETUP and press the right arrow to select SETUP. Press the OK button. Press the top/bottom arrows to select 

 , press the right arrow and top/bottom arrows to select the number. Press the left arrow to confirm the setting. Press the OK button twice.
Sharpness
Press the Menu button, then press the top/bottom arrows on the Jog dial to select MODE SETUP and press the right arrow to select SETUP. Press the OK button. Press the top/bottom arrows to select  , press the right arrow and top/bottom arrows to make the selection. Press the left arrow to confirm the setting. Press the OK button twice.
20
Meters/Feet selection
Press the Menu button, then press the top/bottom arrows on the Jog dial to select MODE SETUP and press the right arrow to select SETUP. Press the OK button. Press the top/bottom arrows to select m/ft, press the right arrow and top/bottom arrows to make the selection. Press the left arrow to confirm the setting. Press the OK button twice.
Using the flash
Flash working range:
|
|
|
|
Wide-angle |
Telephoto |
|
|
|
|
|
|
Approx. 0.8 ~ 3.8 m |
Approx. 0.2 ~ 3.8 m |
|
|
|
|
|
|
Auto-flash
In the Auto-Flash mode, the flash will fire automatically in low-light and backlight conditions. When you take a picture that is backlit, position the subject within the backlighting correction marks to fire the flash.
Red-eye reducing flash
This mode significantly reduces the phenomenon of “red-eye”.
Fill-in flash (forced activation)
In the Fill-In Flash mode, the flash fires regardless of available light. For example, this mode can be used to brighten up the subject’s shaded face. Another use of this mode is to correct the color shift produced by artificial lights (eg. fluorescent light).
Off (flash override)
In the Off mode, the flash does not fire even in low-light conditions. Use this mode in situations where flash photography is not desired or is prohibited, or in twilight/night scenes.
Selecting the flash mode
With each press of the Flash mode button, the flash mode will switch from Auto-Flash to  (Red-Eye Reducing Flash),
  (Fill-In Flash) and
  (Flash Off). If the Orange lamp lights when the Shutter release button is pressed halfway, the flash is ready to fire.
21

Slow shutter synchronization flash mode
Press the Menu button, then press the top/bottom arrows on the Jog dial to select SLOW . Press the right arrow on the Jog dial, then press the top/bottom arrows to select 1 or 2. Select 1 for capturing images at the beginning of the shutter release duration. The taillights of a moving car will have a forward streak. Select 2 for capturing images at the end of the shutter release duration. The taillights of a moving car will have a receding streak. When 2 is selected, the flash will fire a pre-flash before the regular flash. Press the left arrow on the Jog dial to confirm the setting. If you take a picture without pressing the OK button, the setting will be valid until the Menu is canceled.
Taking photographs using the FL-40 extension flash
If the FL-40 extension flash (optional) is used, the flash mode and exposure compensation are detected automatically, allowing the main flash and extension flash to function together. The FL-40 extension flash can be used to take various kinds of flash photographs, either by itself or together with the main flash. To connect the extension flash to the camera, the exclusive grip (optional) and bracket cable (optional) are required. Mount the FL-40 extension flash on the exclusive grip, then fasten it to the camera’s tripod hole and connect the exclusive grip and the camera’s extension flash connection terminal using the exclusive bracket cable.
When using the FL-40 extension flash only:
Press the Menu button, then press the top/bottom arrows on the Jog dial to select FLASH and press the right arrow on the Jog dial. Press the top/bottom
arrows to select |
. Press the left arrow on the Jog dial to confirm the |
|
setting. Press the OK button to save the setting and cancel the Menu. |
||
The extension flash is set to the TTL-AUTO mode. |
||
• The default setting is IN + |
. |
|
•Do not connect any cable other than the exclusive bracket cable to the camera’s extension flash connection
terminal.
Extension flash connection terminal
22

PRINTING PICTURES
Selected images can be reserved in a SmartMedia card for printing on a printer or at a photo lab that supports the DPOF (Digital Print Order Format) system.
Single-frame print reserve
Press the Print button (  ), press the top/bottom arrows on the Jog dial to select
  and press the OK button. To select the desired picture, press the arrows on the Jog dial, then press the OK button. Press the top/bottom arrows to select
  (no. of prints),
  (date/time),
  (trimming). To set each parameter, press the right/left arrows and press the OK button. To set print reserve for more pictures, press the arrows to select another image. To exit the print reserve mode, press the Print button (
  ).
).
All-frame print reserve
Press the Print button (  ), then press the top/bottom arrows on the Jog dial to select
 . Press the right arrow on the Jog dial, then press the top/bottom arrows to select ON.
Trimming print reserve
Lets you print an enlarged part of a recorded picture. Press the Print button (  ), press the top/bottom arrows on the Jog dial to select
  and press the OK button. To select the desired picture, press the arrows on the Jog dial, then press the OK button. Press the zoom lever toward T to display the Trimming mode screen. To set the top left corner of the picture, press the arrows to move the cursor and press the OK button at the desired point. To set the bottom right corner, press the arrows to move the cursor and press the OK button at the desired point. The trimming size is displayed. To set
  (no. of prints),
  (date/time) and
  (trimming) on the Single-frame print reserve screen, press the OK button.
Note:
•This camera cannot be directly connected to printers.
•If a card contains DPOF reservations set by another device, entering reservations using this camera may overwrite the previous reservations. Be sure to use this camera for reservations.
23

Resetting print reserve
Press the Print button (  ) to display the PRINT ORDER SETTING screen. If there are no pictures with print reserve settings in a card, this screen is not displayed. Press the right/left arrows on the Jog dial to select RESET, then press the OK button. RESET cancels the print reserve settings for all images in the card.
USING A PERSONAL COMPUTER
Computer system requirement
cWindows
CPU: Pentium or later
OS: Windows 98/98 Second Edition/2000 Professional (USB)
Windows 95/98/98 Second Edition/2000 Professional/NT 4.0 SP3 or later Available HD space: 100MB or more
RAM: 32MB or more (64MB or more recommended) Connectors:USB port (USB connection)
RS-232C port (serial connection)
D-SUB 9-pin connector (serial connection) Monitor: More than 32000 colors
Minimum monitor resolution: 800 x 600 pixels
•USB support is not available under the following environments, even for PCs equipped with a USB port.
Windows 98 upgrade (from Windows 95) Windows 95
Windows NT 4.0
•To record or play back sound, a sound card and a microphone are required.
cApple Macintosh
CPU: PowerPC
OS: Mac OS 8.6 to 9 (USB) Mac OS 7.6.1 to 9 (serial)
Available HD space: 100MB or more
RAM: 32MB or more (8MB or more free memory for the included application)
Connectors:USB port Serial port
Monitor: More than 32000 colors
Minimum monitor resolution: 800 x 600 pixels
•For USB connection, your Macintosh must have a USB port.
•To record sound, a microphone is required.
Note:
• QuickTime 4.0 must be installed to play back movies.
24

Connecting to a personal computer
Use the appropriate connector according to your computer’s specifications.
cFor USB-equipped computers (IBM PC/AT compatible, Apple Macintosh)
Connect the provided USB cable to the USB port on your computer.
USB port
Camera’s USB
connector
USB connection cable
cFor serial port-equipped computers (IBM PC/AT compatible)
Connect the optional RS-232C PC serial cable to the serial port (COM1, COM2, etc.) on your computer.
Serial port
Camera’s
Computer connector
RS-232C PC serial cable
•To connect to the serial port on your Macintosh using the RS-232C PC serial cable, use the optional conversion connector for Macintosh.
Using a personal computer
1.Make sure that the power of the personal computer and the camera are OFF.
2.Connect the provided USB cable or optional RS-232C PC serial cable to your computer. (See the previous page for details)
3.Remove the lens cap, and connect the cable to the camera’s USB connector or computer connector, then turn on your computer.
4.Set the Mode dial on the camera to  .
.
5.Start CAMEDIA Master on the computer.
25

Installing provided software
By installing the provided software (CAMEDIA Master), you can download images to a computer via the provided USB cable or serial cable and access the following functions. For installation and operation, refer to the software’s online manual.
• Image download
Image download via the provided USB cable or RS-232C cable, as well as support for adding/canceling Protection, picture erase, date set, and others.
• Image viewer
Single and Index display, Slide-Show, and easy image storage. It is also possible to pick up any frame from a movie.
• Format exchange
Image rotation, format exchange and file renaming can be done from the index window.
• Image processing
Rotation (90° clockwise, 90° counterclockwise, 180°, desired angle), changing the number of colors, size change, text insertion, and filtering (brightness, contrast, color balance, sharpness).
• Function support
[Panorama function]: Connection of images taken in the Panorama mode on the camera.
[Template function]: Joining of picture data with original Template images.
• Printing
Single print, Date print, print on split-sticker print paper.
26

Transferring data from SmartMedia
PC card adapter
The picture data in the SmartMedia can be directly transferred to a personal computer equipped with a PC card (PCMCIA) slot or an external PC card reader/writer, using the optional PC Card Adapter.
FlashPath floppydisk adapter
The picture data in the SmartMedia can be directly transferred to a personal computer equipped with a 3.5" FDD, using the optional FlashPath Floppydisk Adapter.
SmartMedia reader/writer
The picture data in the SmartMedia can be directly transferred to a personal computer (Windows 98/Mac OS 8.6) equipped with a USB port, using the optional SmartMedia Reader/Writer.
27

MISCELLANEOUS
Error codes
|
|
Control panel |
LCD monitor |
Error content |
Remedy |
|
|
|
CARD |
The card cover is |
Insert a card and close |
|
|
|
COVER |
open. |
the cover. |
|
|
|
OPEN |
|
|
|
|
|
|
|
|
|
|
|
NO CARD |
The card is not |
Insert a card. Or insert |
|
|
|
|
inserted, or it |
the card again. |
|
|
|
|
||
|
|
|
|
cannot be |
|
|
|
|
|
recognized. |
|
|
|
|
|
|
|
|
|
|
|
|
|
|
|
|
CARD |
No more pictures |
Replace the card or |
|
|
|
FULL |
can be taken. |
erase unnecessary |
|
|
|
|
|
pictures. |
|
|
|
|
|
|
|
|
|
WRITE |
Writing to the |
If you are taking pictures, |
|
|
|
PROTECT |
card is |
remove the write-protect |
|
|
|
|
prohibited. |
adhesive seal. |
|
|
|
|
|
|
|
|
|
CARD |
Cannot record, |
If the card is dirty, wipe it |
|
|
|
ERROR |
play back or |
with a clean tissue and |
|
|
|
|
erase pictures in |
insert it again. Or, format |
|
|
|
|
this card. |
the card. If the problem is |
|
|
|
|
|
still not corrected, this |
|
|
|
|
|
card cannot be used. |
|
|
|
|
|
|
|
|
(No display) |
PICTURE |
The recorded |
Load the image using |
|
|
ERROR |
image cannot be |
personal computer image |
|
|
|
|
|||
|
|
|
|
played back with |
processing software. If |
|
|
|
|
this camera. |
that cannot be done, the |
|
|
|
|
|
image file is partially |
|
|
|
|
|
damaged. |
|
|
|
|
|
|
28

Control panel |
LCD monitor |
Error content |
Remedy |
|
|
|
(Format |
The card is not |
Format the card. |
|
|
|
confirmation |
formatted. |
|
|
|
|
screen) |
|
|
|
|
|
|
|
|
|
|
|
NO |
There are no |
Insert a card which |
|
|
|
|||||
|
PICTURE |
pictures in the |
contains images. |
|
|
|
|
card, so there is |
|
|
|
|
|
|
|
|
|
|
|
nothing to play |
|
|
|
|
|
back. |
|
|
|
|
|
|
|
|
|
|
CARD |
There is no |
Replace the card or |
|
|
|
FULL |
empty space in |
erase unnecessary |
|
|
|
|
the card, so print |
pictures. |
|
|
|
|
data or sound |
|
|
|
|
|
cannot be |
|
|
|
|
|
recorded. |
|
|
|
|
|
|
|
|
|
29

Questions and answers
How long will the batteries last?
[Battery life is affected by many variables such as the amount of LCD monitor use, the frequency of flash use, as well as by the kind of battery used and the environmental conditions under which the camera is used. Using the LCD monitor frequently will use up your batteries quickly. Keep the LCD monitor turned off to save power. Use of the optional AC adapter is recommended.
How can I correct the clock in the camera that will be used to record the date on the image data?
[Date adjustment is not made when the camera is shipped. You can adjust the date either from the camera or from the computer.
How should I store the camera?
[Cameras are susceptible to damage caused by dust, moisture, and salt. Wipe and dry the camera thoroughly before storing it. After using it at the beach, wipe it with a cloth that has been moistened with fresh water and then wrung out. Do not store in an area where mothballs are used. Unload the batteries if you do not plan to use the camera for a long period.
Why do the subjects’ eyes sometimes appear red in pictures?
[This “red-eye phenomenon” occurs with all cameras when a flash is used. It is caused by light from the flash reflecting off the retina at the back of the eye. Red-eye varies depending on the individual and the shooting conditions such as ambient lighting. Use of the Red-Eye Reducing PreFlash mode significantly reduces this phenomenon.
Can I use a filter, hood or conversion lens?
[You cannot use a filter or a hood. A conversion lens adapter (optional) is required to attach a conversion lens to the camera.
Can I use an extension flash?
[Yes you can. You can use an extension flash with a grip.
For more information, please see our Internet home page (http://www.olympus.com).
30
 Loading...