


basic_e_x191_6.fm Page 1 Thursday, August 28, 2003 12:44 PM
DIGITAL CAMERA
APPAREIL PHOTO NUMÉRIQUE
DIGITALKAMERA
CÁMARA DIGITAL
C-5060 Wide Zoom
BASIC MANUAL MANUEL DE BASE EINFACHE ANLEITUNG MANUAL BÁSICO
ENGLISH.......... |
2 |
FRANÇAIS ..... |
52 |
DEUTSCH .... |
102 |
ESPAÑOL .... |
152 |
basic_e_x191_6.fm Page 2 Thursday, August 28, 2003 12:44 PM
CONTENTS
GETTING STARTED . . . . . . . . . . . . . . . . . . . . . . . . . . . . . 4 MENU FUNCTIONS. . . . . . . . . . . . . . . . . . . . . . . . . . . . . 19 MODE DIAL AND DIRECT BUTTON FUNCTIONS . . . . 26 SHOOTING BASICS . . . . . . . . . . . . . . . . . . . . . . . . . . . . 32
En
Taking still pictures . . . . . . . . . . . . . . . . . . . . . . . . . . . 32 If correct focus cannot be obtained (Focus lock) . . . . 33 Recording movies . . . . . . . . . . . . . . . . . . . . . . . . . . . . 34 Zooming in on a subject (optical zoom) . . . . . . . . . . . 35 Using the flash . . . . . . . . . . . . . . . . . . . . . . . . . . . . . . 35 Using the self-timer . . . . . . . . . . . . . . . . . . . . . . . . . . . 36
ADVANCED SHOOTING. . . . . . . . . . . . . . . . . . . . . . . . . 37 PLAYBACK . . . . . . . . . . . . . . . . . . . . . . . . . . . . . . . . . . . 39
Viewing still pictures . . . . . . . . . . . . . . . . . . . . . . . . . . 39 Viewing movies . . . . . . . . . . . . . . . . . . . . . . . . . . . . . . 40 Protecting pictures . . . . . . . . . . . . . . . . . . . . . . . . . . . 41 Erasing pictures . . . . . . . . . . . . . . . . . . . . . . . . . . . . . 41 Formatting (CARD SETUP). . . . . . . . . . . . . . . . . . . . . 42 Playback on a TV . . . . . . . . . . . . . . . . . . . . . . . . . . . . 43
PRINT RESERVATION/DIRECT PRINT . . . . . . . . . . . . . 44 DOWNLOADING PICTURES TO A COMPUTER . . . . . . 45 ERROR CODES. . . . . . . . . . . . . . . . . . . . . . . . . . . . . . . . 47 SPECIFICATIONS . . . . . . . . . . . . . . . . . . . . . . . . . . . . . . 49
These instructions are only for quick reference. For more details on the functions described here, refer to the “Reference Manual” on CD-ROM.
2 En
basic_e_x191_6.fm Page 3 Thursday, August 28, 2003 12:44 PM
Before using your camera, read this manual carefully to ensure correct use.
We recommend that you take test shots to get accustomed to your camera before taking important photographs.
These instructions are only a basic manual. For more details on the functions described here, refer to the Reference Manual on the CD-ROM. For connection to the PC or installation of provided software, refer to the Software Installation Guide included in the CD-ROM package.
For customers in North and South America
For customers in USA |
|
|
Declaration of Conformity |
|
|
Model Number |
: C-5060 Wide Zoom |
|
|
RM-2 (Romote control) |
|
Trade Name |
: OLYMPUS |
|
Responsible Party |
: Olympus America Inc. |
|
Address |
: 2 Corporate Center Drive, Melville, New York |
|
|
11747-3157 U.S.A. |
|
Telephone Number |
: 631-844-5000 |
|
Tested To Comply With FCC Standards |
En |
|
FOR HOME OR OFFICE USE |
|
|
This device complies with Part 15 of the FCC rules. Operation is subject to the following two conditions:
(1)This device may not cause harmful interference.
(2)This device must accept any interference received, including interference that may cause undesired operation.
For customers in Canada
This Class B digital apparatus meets all requirements of the Canadian Interference-Causing Equipment Regulations.
For customers in Europe
“CE” mark indicates that this product complies with the European requirements for safety, health, environment and customer protection. “CE” mark cameras are intended for sales in Europe.
Trademarks
•IBM is a registered trademark of International Business Machines Corporation.
•Microsoft and Windows are registered trademarks of Microsoft Corporation.
•Macintosh is a trademark of Apple Computer Inc.
•All other company and product names are registered trademarks and/or trademarks of their respective owners.
•The standards for camera file systems referred to in this manual are the “Design Rule for Camera File System/DCF” standards stipulated by the Japan Electronics and Information Technology Industries Association (JEITA).
En 3
basic_e_x191_6.fm Page 4 Thursday, August 28, 2003 12:44 PM
GETTING STARTED
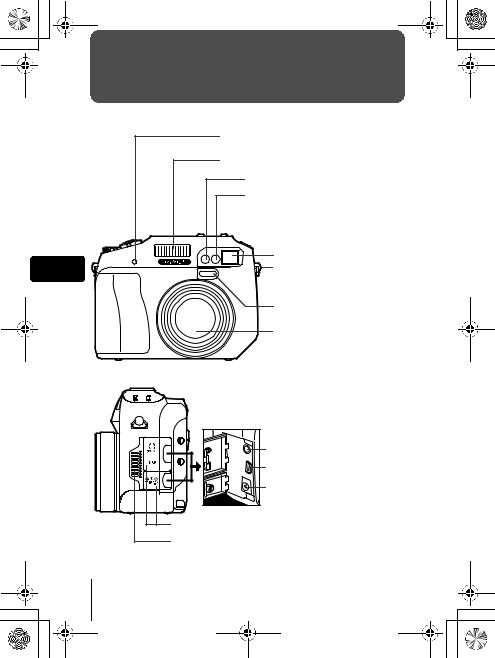
NAMES OF PARTS
|
Self-timer/Remote control lamp |
|
Flash |
|
AF illuminator |
|
Remote control receiver |
|
Viewfinder window |
En |
Strap eyelet |
 Microphone
AF sensor
Lens
A specified filter can be attached (optional).
A/V OUT jack (MONO) |
USB connector |
DC-IN jack |
Connector cover
Speaker
4 En

basic_e_x191_6.fm Page 5 Thursday, August 28, 2003 12:44 PM
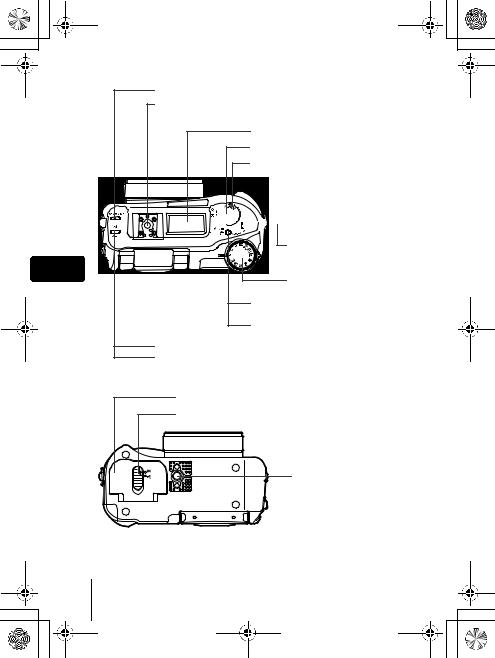
Flash mode button (#)
Exposure compensation button (F)
Viewfinder
Orange lamp
 AF target mark
Green lamp
Diopter adjustment dial |
|
AEL button (AEL) |
|
Erase button (S) |
|
Power switch |
|
Control dial |
|
QUICK VIEW button |
|
Monitor button (f) |
En |
Card access lamp |
|
Card cover |
|
Card button (CF/xD)
OK/Menu button (e)
Arrow pad (acbd)
Monitor
En 5
basic_e_x191_6.fm Page 6 Thursday, August 28, 2003 12:44 PM
AF/Macro/MF button (AF/&/MF)
Hot shoe
Control panel
Shutter button
Zoom lever (T/W·UG)


 Custom button (z)
Print button (<)
En
Mode dial
Self-timer/Remote control button (Z)
Rotation button (y)
Metering button (4)
Protect button (0)
Battery compartment cover
Battery compartment lock
Tripod socket
6 En

basic_e_x191_6.fm Page 7 Thursday, August 28, 2003 12:44 PM
CONTROL PANEL INDICATIONS
|
|
|
|
|
|
|
|
|
|
|
|
|
|
|
|
|
|
|
|
|
|
|
|
|
|
|
|
|
|
|
|
|
|
|
|
|
|
|
|
|
|
|
|
|
|
|
|
|
|
|
|
|
|
|
|
|
|
|
|
|
|
|
|
|
|
|
|
|
|
|
|
|
|
|
|
|
|
|
|
|
|
|
|
|
|
|
|
|
|
|
|
|
|
|
|
|
|
|
|
|
|
|
|
|
|
|
|
|
|
|
|
|
|
|
|
|
|
|
|
|
|
|
|
|
|
|
|
|
|
|
|
|
|
|
|
|
|
|
|
|
|
|
|
|
|
|
|
|
|
|
|
|
|
|
|
|
|
|
|
|
|
|
|
|
|
|
|
|
|
|
|
|
|
|
|
|
|
|
|
|
|
|
|
|
|
|
|
|
|
|
|
|
|
|
|
|
|
|
|
|
|
|
|
|
|
|
|
|
|
|
|
|
|
|
|
|
|
|
|
|
|
|
|
|
|
|
|
|
|
|
|
|
|
|
|
|
|
Item |
|
|
|
|
|
Indications |
|
|||||||||||||||
|
|
|
|
|
|
|
|
|
|
|
|
|
|
|
|
|
|
|
|
|
|
|
|
|
|
|
|
|
1 |
Battery check |
, |
|
|
|
|
|
|
|
|
|
|
|
|
|
|
En |
|||||||||||
|
|
|
|
|
|
|
|
|
|
|
|
|
|
|
|
|
|
|
|
|
|
|
|
|
|
|
|
|
2 |
Shutter speed |
|
2ooo (1/2000 sec.), 2.5" |
|||||||||||||||||||||||||
|
|
|||||||||||||||||||||||||||
|
Program shift |
|
S is displayed in the program shift mode. |
|
||||||||||||||||||||||||
|
|
|
|
|
|
|
|
|
|
|
|
|
|
|
|
|
|
|
|
|
|
|
|
|
|
|
|
|
3 |
Aperture value |
|
F2.8 to F8.0 |
|
||||||||||||||||||||||||
|
|
|
|
|
|
|
|
|
|
|
|
|
|
|
|
|
|
|
|
|
|
|
|
|
|
|
|
|
4 |
Exposure compensation |
+2.0, +1.0, 0.0, -1.0, -2.0 |
|
|
|
|
|
|
|
|
|
|
||||||||||||||||
|
Flash intensity control |
|
|
|
|
|
|
|
|
|
|
|
|
|
|
|
|
|
||||||||||
|
|
|
|
|
|
|
|
|
|
|
|
|
|
|
|
|
|
|
|
|
|
|
|
|
|
|
|
|
5 |
Accessory |
1 |
|
|
|
|
|
|
|
|
|
|
|
|
|
|
|
|||||||||||
|
|
|
|
|
|
|
|
|
|
|
|
|
|
|
|
|
|
|
|
|
|
|
|
|
|
|
|
|
6 |
Macro mode |
|
&(Lights) |
|
||||||||||||||||||||||||
|
Super macro mode |
|
&(Blinks) |
|
||||||||||||||||||||||||
|
|
|
|
|
|
|
|
|
|
|
|
|
|
|
|
|
|
|
|
|
|
|
|
|
|
|
|
|
7 |
Manual focus |
|
MF (Lights) |
|
||||||||||||||||||||||||
|
Super macro MF mode |
|
MF (Blinks) |
|
||||||||||||||||||||||||
|
|
|
|
|
|
|
|
|
|
|
|
|
|
|
|
|
|
|
|
|
|
|
|
|
|
|
|
|
8 |
Self-timer |
|
Y |
|
||||||||||||||||||||||||
|
|
|
|
|
|
|
|
|
|
|
|
|
|
|
|
|
|
|
|
|
|
|
|
|
|
|
|
|
9 |
Remote control |
< |
|
|
|
|
|
|
|
|
|
|
|
|
|
|
|
|||||||||||
|
|
|
|
|
|
|
|
|
|
|
|
|
|
|
|
|
|
|
|
|
|
|
|
|
|
|
|
|
10 |
Sound record |
|
R |
|
||||||||||||||||||||||||
|
|
|
|
|
|
|
|
|
|
|
|
|
|
|
|
|
|
|
|
|
|
|
|
|
|
|
|
|
11 |
Sequential shooting mode |
|
h, j, l, 7 |
|
||||||||||||||||||||||||
|
|
|
|
|
|
|
|
|
|
|
|
|
|
|
|
|
|
|
|
|
|
|
|
|
|
|
|
|
12 |
Flash intensity control |
|
w |
|
||||||||||||||||||||||||
|
|
|
|
|
|
|
|
|
|
|
|
|
|
|
|
|
|
|
|
|
|
|
|
|
|
|
|
|
En 7

basic_e_x191_6.fm Page 8 Thursday, August 28, 2003 12:44 PM
|
|
|
|
|
|
|
|
|
|
|
|
|
|
|
|
|
|
|
|
|
|
|
|
|
|
|
|
|
|
|
|
|
|
|
|
|
|
|
|
|
|
|
|
|
|
|
|
|
|
|
|
|
|
|
|
|
|
|
|
|
|
|
|
|
|
|
|
|
|
|
|
|
|
|
|
|
|
|
|
|
|
|
|
|
|
|
|
|
|
|
|
|
|
|
|
|
|
|
|
|
|
|
|
|
|
|
|
|
|
|
|
|
|
|
|
|
|
|
|
|
|
|
|
|
|
|
|
|
|
|
|
|
|
|
|
|
|
|
|
|
|
|
|
|
|
|
|
|
|
|
|
|
|
|
|
|
|
|
|
|
|
|
|
|
|
|
|
|
|
|
|
|
|
|
|
|
|
|
|
|
|
|
|
|
|
|
|
|
|
|
|
|
|
|
|
|
|
|
|
|
|
|
|
|
|
|
|
|
|
|
|
|
|
|
|
|
|
|
|
|
|
|
|
|
|
|
|
|
|
|
|
|
|
|
|
|
|
|
Item |
|
|
|
|
|
Indications |
|||||||||||||||
En |
|
|
|
|
|
|
|
|
|
|
|
|
|
|
|
|
|
|
|
|
|
|
|
|
|
|
|
|
13 |
Record mode |
|
RAW, TIFF, SHQ, HQ, SQ |
|||||||||||||||||||||||||
|
14 |
Noise reduction |
|
NR |
||||||||||||||||||||||||
|
|
|
|
|
|
|
|
|
|
|
|
|
|
|
|
|
|
|
|
|
|
|
|
|
|
|
|
|
|
15 |
AE lock |
|
AEL |
||||||||||||||||||||||||
|
|
AE memory |
|
AELE |
||||||||||||||||||||||||
|
|
|
|
|
|
|
|
|
|
|
|
|
|
|
|
|
|
|
|
|
|
|
|
|
|
|
|
|
|
16 |
Metering mode |
|
3, 2, MULTI3 |
||||||||||||||||||||||||
|
|
|
|
|
|
|
|
|
|
|
|
|
|
|
|
|
|
|
|
|
|
|
|
|
|
|
|
|
|
17 |
ISO |
|
ISO |
||||||||||||||||||||||||
|
|
|
|
|
|
|
|
|
|
|
|
|
|
|
|
|
|
|
|
|
|
|
|
|
|
|
|
|
|
18 |
White balance |
|
WB |
||||||||||||||||||||||||
|
|
|
|
|
|
|
|
|
|
|
|
|
|
|
|
|
|
|
|
|
|
|
|
|
|
|
|
|
|
19 |
Flash mode |
|
!, #, $, #SLOW, HSLOW |
||||||||||||||||||||||||
|
|
|
|
|
|
|
|
|
|
|
|
|
|
|
|
|
|
|
|
|
|
|
|
|
|
|
|
|
|
20 |
Card |
, |
|
|
|
|
|
|
|
|
|
|
|
|
|
|
|||||||||||
|
|
|
|
|
|
|
|
|
|
|
|
|
|
|
|
|
|
|
|
|
|
|
|
|
|
|
|
|
|
21 |
Number of storable still |
30 |
|
|
|
|
|
|
|
|
|
|
|
|
|
|
|||||||||||
|
|
pictures/Seconds |
|
|
|
|
|
|
|
|
|
|
|
|
|
|
|
|
||||||||||
|
|
remaining |
|
|
|
|
|
|
|
|
|
|
|
|
|
|
|
|
||||||||||
|
|
Error code |
|
-E- |
||||||||||||||||||||||||
|
|
|
|
|
|
|
|
|
|
|
|
|
|
|
|
|
|
|
|
|
|
|
|
|
|
|
|
|
8 En
basic_e_x191_6.fm Page 9 Thursday, August 28, 2003 12:44 PM
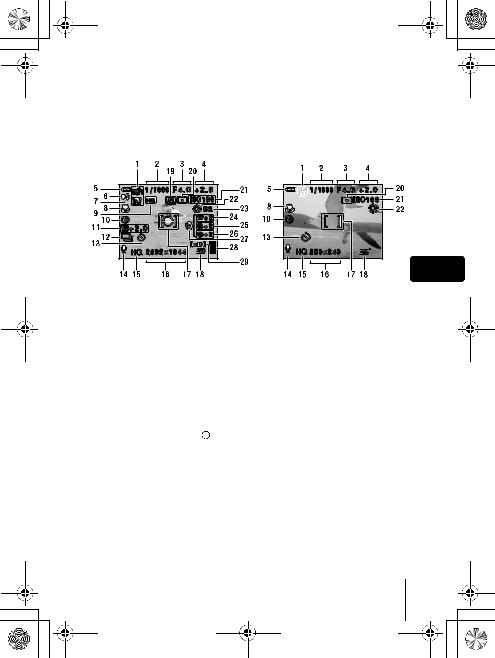
MONITOR INDICATIONS
Shooting mode
Turn the power on and the monitor turns on displaying the shooting information. Each time you press f, the information display changes.
En
|
Still picture |
Movie |
|
|
|
|
Item |
Indications |
|
|
|
1 |
Shooting mode |
P, A, S, M, s, N, m, L, K, J, I |
|
|
|
2 |
Shutter speed |
15" to 1/4000 |
|
|
|
3 |
Aperture value |
F2.8 to F8.0 |
|
|
|
4 |
Exposure compensation |
-2.0 to +2.0 |
|
Exposure differential |
-3.0 to +3.0 |
|
|
|
5 |
Battery check |
e, f |
|
|
|
6 |
Green lamp |
|
|
|
|
7 |
Flash stand-by |
#Lights |
|
Camera movement |
#Blinks |
|
warning/ |
|
|
Flash charge |
|
|
|
|
8 |
Macro mode |
& |
|
Super macro mode |
% |
|
Manual focus |
MF |
9 |
Noise reduction |
O |
|
|
|
10 |
Flash mode |
!, #, $, #SLOW1, HSLOW1, #SLOW2 |
|
|
|
En 9

basic_e_x191_6.fm Page 10 Thursday, August 28, 2003 12:44 PM
|
|
|
Item |
Indications |
|
|
|
|
|
|
|
11 |
Flash intensity control |
w-2.0 to +2.0 |
|
|
|
|
|
|
|
12 |
Drive |
o, i, j, k, 7 |
|
|
|
|
|
|
|
13 |
Self-timer |
Y |
|
|
|
Remote control |
< |
|
|
|
|
|
|
|
14 |
Sound record |
R |
|
|
|
|
|
|
|
15 |
Record mode |
RAW, TIFF, SHQ, HQ, SQ1, SQ2 |
|
|
|
|
|
|
|
16 |
Resolution |
2592×1944, 1600×1200, 640×480, 320×240 etc. |
|
|
|
|
|
|
|
17 |
AF target mark |
[ ] |
|
|
|
Metering target mark |
|
|
|
|
|
|
|
|
18 |
Number of storable still |
30 |
|
|
|
pictures |
|
|
|
|
Seconds remaining |
36" |
En |
|
|
|
|
19 |
AE lock |
B |
||
|
|
|
AE memory |
C |
|
|
|
|
|
|
|
20 |
Metering mode |
5, 4 |
|
|
|
|
|
|
|
21 |
ISO |
ISO 80, ISO 100, ISO 200, ISO 400 |
|
|
|
|
|
|
|
22 |
White balance |
2, 3, 5, 4, w- z, 1, C1 to C4, V |
|
|
|
|
|
|
|
23 |
White balance adjustment |
B1 to B7, R1 to R7 |
|
|
|
|
|
|
|
24 |
Saturation |
6-5 to +5 |
|
|
|
|
|
|
|
25 |
Sharpness |
N-5 to +5 |
|
|
|
|
|
|
|
26 |
Contrast |
J-5 to +5 |
|
|
|
|
|
|
|
27 |
Scene modes |
i, l, m |
|
|
|
|
|
|
|
28 |
Memory gauge |
a, b, c, d |
|
|
|
|
|
|
|
29 |
Card |
[xD], [CF] |
|
|
|
|
|
10 En
basic_e_x191_6.fm Page 11 Thursday, August 28, 2003 12:44 PM
Playback mode
Screens with the information display set to ON are shown below.
Still picture |
Movie |
|
Item |
|
Indications |
|
|
|
|
|
En |
1 |
Battery check |
e, f |
|
|
2 |
Card |
[xD], [CF] |
|
|
|
|
|
|
|
3 |
Print reservation, |
<×10 |
|
|
|
Number of prints |
|
|
|
|
Movie |
n |
|
|
|
|
|
|
|
4 |
Sound record |
H |
|
|
|
|
|
|
|
5 |
Protect |
9 |
|
|
|
|
|
|
|
6 |
Record mode |
RAW, TIFF, SHQ, HQ, SQ1, SQ2 |
|
|
|
|
|
|
|
7 |
Resolution |
2592×1944, 1600×1200, 640×480, 320×240 etc. |
|
|
|
|
|
|
|
8 |
Aperture value |
F2.8 to F8.0 |
|
|
|
|
|
|
|
9 |
Shutter speed |
15" to 1/4000 |
|
|
|
|
|
|
|
10 |
Exposure |
-2.0 to +2.0 |
|
|
|
compensation |
|
|
|
|
|
|
|
|
11 |
White balance |
WB AUTO, 2, 3, 5, 4, wto z, 1, V |
|
|
|
|
|
|
|
12 |
ISO |
ISO 80, ISO 100, ISO 200, ISO 400 |
|
|
|
|
|
|
|
13 |
Date and time |
’03.12.17 |
15:30 |
|
|
|
|
|
|
14 |
File number |
FILE : 100 - 0030 |
|
|
|
Playing time/Total |
0"/20" |
|
|
|
recording time |
|
|
|
|
|
|
|
|
En 11
basic_e_x191_6.fm Page 12 Thursday, August 28, 2003 12:44 PM
Memory gauge
The memory gauge lights up when you take a still picture. While the gauge is lit, the camera is storing the picture on the card. The memory gauge indication changes as shown below depending on the shooting status. The indication is not displayed during movie recording.
a |
|
Shoot |
|
b |
|
Shoot |
|
c |
|
Shoot |
|
|
d |
|
|
|
|
|
|
|
|||||||
|
|
|
|
|
|
Wait |
|
|
|||||
|
|
|
|
|
|
|
|
|
|
|
|
|
|
Before shooting |
One picture |
|
More than |
No more pictures |
|||||||||
(Gauge is off) |
|
taken |
|
two taken |
can be taken |
||||||||
|
|
|
|
(Lit) |
|
|
(Lit) |
|
(Fully lit) |
||||
Wait until the gauge returns to the status on the left to take the next shot.
En
Battery check
If the remaining battery power is low, the battery check indication on the control panel and monitor changes as follows when the camera is turned on or while the camera is in use.
Battery check |
Control panel |
Monitor |
Status |
|
|
|
|
e |
Lights |
Lights (green) |
Remaining power level: high |
|
|
(Goes off after a while) |
|
|
|
|
|
f |
Blinks |
Blinks (red) |
Remaining power level: low |
|
|
|
If you intend to use the |
|
|
|
camera for a long period of |
|
|
|
time, charge the battery as |
|
|
|
soon as possible. |
|
|
|
|
|
The green lamp and orange lamp at the |
Remaining power level: |
|
No indication |
side of the viewfinder blink. (The control |
exhausted |
|
|
panel turns off automatically.) |
Charge the battery. |
|
|
|
|
|
12 En

basic_e_x191_6.fm Page 13 Thursday, August 28, 2003 12:44 PM
|
ATTACHING THE STRAP AND LENS CAP |
1 |
2 |
3 |
4 |
5 |
En
CHARGING THE BATTERY
This camera uses one BLM-1 lithium ion battery. Other batteries cannot be used. The battery is not fully charged at the time of purchase. Before using the camera, charge the battery using the BCM-2 charger. For more details, read the instructions provided with the charger.
1
2
Plug the power cord into the charger and plug the other end of the power cord into a household electrical outlet.
Remove the protection cap from the battery.
3Place the battery on the
charger, making sure that it is correctly oriented as shown in the illustration.
• Align the battery with the guideline on
the charger ( |
), and insert the |
Charge indicator |
|
battery into the charger as far as it will |
|||
|
|||
go. |
|
|
|
• Meaning of the charge lamp |
|
||
indications: |
:Charging |
|
|
Lights red |
|
||
Lights green :Charging is completed. |
|
||
Blinks red |
: Charging failure |
|
|
•The battery charges in approximately 6 hours. The charging time may differ according to the amount of power left in the battery.
En 13

basic_e_x191_6.fm Page 14 Thursday, August 28, 2003 12:44 PM
LOADING THE BATTERY
1Make sure the power switch is set to OFF.
2Slide the battery compartment
lock from =to )and open the battery compartment cover.
3Insert the battery, making sure that it is correctly oriented as shown in the illustration.
• The lock secures the battery when correctly loaded.
En |
Battery lock |
|
4 Close the battery compartment cover.
5 Slide the battery compartment lock from )to =.
INSERTING A CARD
“Card” in this manual refers to the xD-Picture Card, CompactFlash and Microdrive. The camera uses the card to record pictures.
1
2
3
Make sure the power switch is set to OFF.
Open the card cover.
Notch
Insert a card.
xD-Picture Card
• Insert the card into the slot with the contact area toward you. Ensure the card is not
inserted diagonally.
• Insert the card as far as it will go until it clicks.
• If the card is inserted incorrectly oriented or it is inserted at an angle, the contact area
may be damaged or the card may become jammed.
• If the card is not inserted fully, it may not be able to record data.
14 En
basic_e_x191_6.fm Page 15 Thursday, August 28, 2003 12:44 PM
CompactFlash/Microdrive
• Hold the card straight and insert it correctly into the front slot, as shown.
4 Close the card cover securely until it clicks.
Removing the card
xD-Picture Card
•Push the card all the way in to unlock it, then let it return slowly. The card is ejected a short way and then stops. Hold the card straight and pull it out.
Note
Releasing your finger quickly after pushing the card all the way in may |
|
cause it to eject forcefully out of the slot. |
En |
CompactFlash/Microdrive
•Press the eject button gently and allow it to pop out, then press it again all the way in. The card will be ejected a short way to enable you to pull it out.
Switching cards
The card currently in use is displayed on the control panel or monitor. Choose the card you want to record the picture on before taking the picture.
The factory default setting is the xD-Picture Card. If only one card is inserted, that card is automatically selected. Card selection can also be made in Playback mode.
En 15

basic_e_x191_6.fm Page 16 Thursday, August 28, 2003 12:44 PM
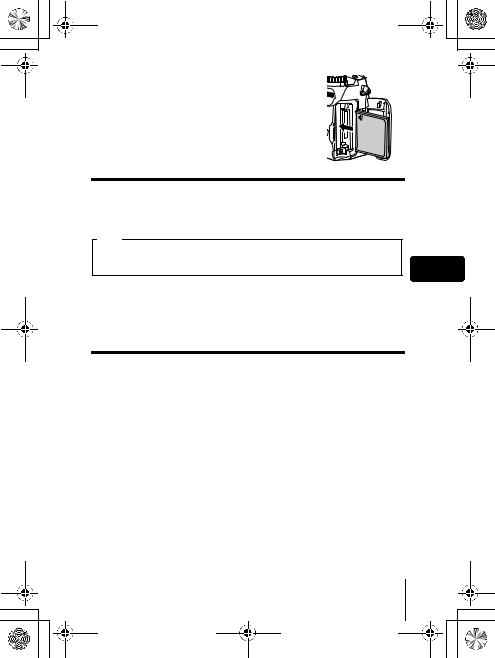
TURNING THE POWER ON/OFF
Power on
1Remove the lens cap.
2Pull the monitor out and rotate it.
•Some of the camera’s functions cannot be operated if the monitor is left closed. Be sure to open the monitor before shooting or playing back images.
•You can change the angle of the monitor.
En
3Turn the mode dial until the mode you want to use is aligned with the red line.
Mode |
dial |
4 Turn the power switch so that ON is aligned with the (mark.
• When the mode dial is set to a mode other |
|
than q, the camera turns on in the |
|
shooting mode. The monitor turns on and |
|
the lens extends. |
|
• When the mode dial is set to q, the |
Power |
camera turns on in the playback mode |
|
and the monitor turns on. |
switch |
|
|
• You can also change the mode with the |
|
camera turned on. |
|
16 En

En
3Press don the arrow pad to select MODE MENU.
4Press acto select the SETUP tab, then press d.
5Press acto select W, then press d.
6Press acto select a language, then press e.
7Press eagain to exit the menu.
8To turn the camera off, set the power switch to OFF.
SETTING THE DATE AND TIME
1Set the mode dial to Pand turn the camera on.
•You can set the date and time in all modes.
2Press e.
•The top menu is displayed.
3Press don the arrow pad to select MODE MENU.
4Press acto select the SETUP tab, then press d
5Press acto select X, then press d.
•The green frame moves to the selected item.
•Press crepeatedly to change the page until Xis displayed.
En 17

basic_e_x191_6.fm Page 18 Thursday, August 28, 2003 12:44 PM
6Press acto select one of the following date formats: Y- M-D (Year/Month/Day), M-D-Y (Month/Day/Year), D-M-Y (Day/Month/Year). Then press d.
•Move to the year setting.
•The following steps show the procedure used when the date and time settings are set to Y-M-D.
7Press acto set the year, then press dto move to the month setting.
•To move back to the previous setting, press b. The first two digits of the year are fixed.
8Repeat this procedure until the date and time are completely set.
•The time is displayed in the 24-hour format. For example, 2pm will be displayed as 14:00.
En 9 Press e.
•For a more accurate setting, press ewhen the time signal hits 00 seconds.
10 To turn the camera off, set the power switch to OFF.
• The date and time settings will be canceled if the camera is left
without the battery for approximately 5 days.
Note
18 En
basic_e_x191_6.fm Page 19 Thursday, August 28, 2003 12:44 PM
MENU FUNCTIONS
USING THE MENUS AND TABS
When you turn on the camera and press e, the top menu is displayed on the monitor. The functions of this camera are set from the menus. This chapter explains how the menus work, using the Pmode screens.
|
The top menu is displayed. |
|
|
DRIVE |
|
|
MODE MENU |
|
Press e. |
WB |
|
En |
||
|
||
|
Use the arrow pad |
|
|
to select a menu. |
SHORTCUT MENUS |
MODE MENU |
•Take you directly to the setting screens.
•Display operational buttons at the bottom of the screen.
•The functions registered in the shortcut menus can also be accessed from the MODE MENU.
•You can change the shortcut
menus in any mode other than nqmodes.
•Lets you access the menu selections to set the ISO, sharpness, etc.
•Categorizes the settings into tabs.
•Displays the associated menu items when a tab is selected by pressing ac.
How to use the menus
1Press eto display the top menu. Press d.
2Press acto select a tab, then press d.
3Press acto select the item you want to set, then press d.
4Press acto select a setting. Press eto complete setting.
Press eagain to exit the menu and return to shooting status.
En 19

basic_e_x191_6.fm Page 20 Thursday, August 28, 2003 12:44 PM
Shortcut menus
Shooting mode
DRIVE
Selects a shooting mode from o(single-frame shooting), i(high speed sequential shooting), j(sequential shooting), k(AF sequential shooting) and 7(auto bracketing).
 R(movies)
Selects whether to record sound when shooting a movie.
|
K |
|
|
En |
Sets the image quality and resolution. |
||
Still picture |
: RAW, TIFF, SHQ, HQ, SQ1, SQ2 |
||
|
|||
|
Movie |
: SHQ, HQ, SQ |
|
 WB
WB
Sets the appropriate white balance according to the light source.
Playback mode
 m
m
Runs through all saved pictures one after another.
MOVIE PLAY
MOVIE PLAYBACK |
Plays back movies. |
INDEX |
Creates an indexed view of a movie in 9 frames. |
|
|
EDIT |
Edits a movie. |
|
|
INFO
Displays all the shooting information on the monitor.
20 En
basic_e_x191_6.fm Page 21 Thursday, August 28, 2003 12:44 PM
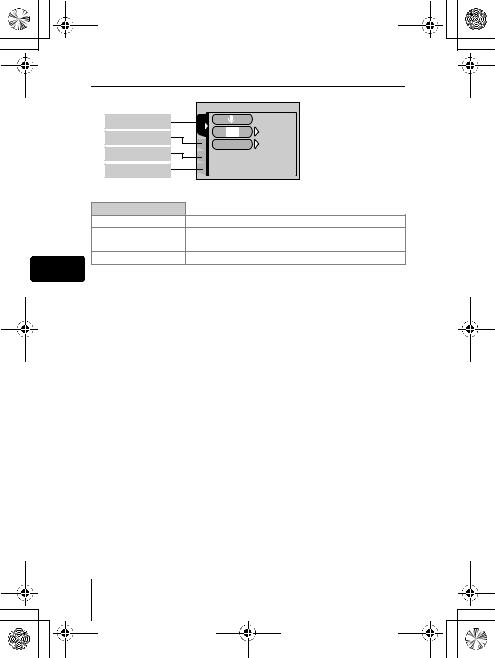
Mode menus
The MODE MENU functions are divided into tabs. Press acto select a tab and display the associated menu items.
These instructions are only for quick reference. For more details on the functions described here, refer to the “Reference Manual” on CD-ROM.
Shooting mode
CAMERA tab
PICTURE tab
CARD tab
SETUP tab
CAMERA |
ISO |
|
|
DRIVE |
|
PIC |
MY MODE |
|
CARD |
FLASH |
IN+ |
SEt |
SLOW |
SLOW1 |
En
|
|
CAMERA tab |
|
|
|
|
|
|
|
|
|
|
|
|
DRIVE |
Selects a shooting mode from o(single-frame |
|
|
|
|
|||||
|
|
|
|
shooting), i(high speed sequential shooting), |
|
|
||||||
|
|
|
|
j(sequential shooting), k(AF sequential |
|
|
||||||
|
|
|
|
shooting) and BKT (auto bracketing). |
|
|
||||||
|
|
ISO |
Selects the ISO sensitivity from AUTO, 80, 100, 200 |
|
|
|
|
|||||
|
|
|
|
and 400. |
|
|
||||||
|
|
MY MODE |
Selects a mode to be activated when taking pictures |
|
|
|
|
|||||
|
|
|
|
in rmode. |
|
|
||||||
|
|
QFLASH |
When using an external flash, selects from IN+Q, |
|
|
|
|
|||||
|
|
|
|
Qand SLAVE. When “SLAVE” is selected, adjusts |
|
|
||||||
|
|
|
|
the intensity of the built-in flash. |
|
|
||||||
|
|
#SLOW |
Selects from #SLOW 1 (1st curtain), HSLOW |
|
|
|
|
|||||
|
|
|
|
(1st curtain with red-eye reduction) and #SLOW 2 |
|
|
||||||
|
|
|
|
(2nd curtain) when the flash mode is set to #SLOW |
|
|
||||||
|
|
|
|
(slow synchronization). |
|
|
||||||
|
|
NOISE REDUCTION |
Reduces the noise that affects pictures during long |
|
|
|
|
|||||
|
|
|
|
exposures. |
|
|
||||||
|
|
DIGITAL ZOOM |
Digitally enhances the maximum optical zoom. |
|
|
|
|
|||||
|
|
FULLTIME AF |
Keeps the image in focus at all times without having |
|
|
|
|
|||||
|
|
|
|
to press the shutter button halfway. |
|
|
||||||
|
|
|
|
|
|
|
En |
|
21 |
|
||
|
|
|
|
|
||||||||
|
|
|
|
|
|
|
|
|
|
|
|
|
|
|
|
|
|
|
|
|
|
|
|
|
|
|
|
|
|
|
|
|
|
|
|
|
|
|

basic_e_x191_6.fm Page 22 Thursday, August 28, 2003 12:44 PM
En
22
AF MODE |
Selects the auto focus method (iESP or SPOT). |
|
ACCESSORY |
Set when using a conversion lens or underwater |
|
|
housing. |
|
R |
Records sound when taking a still picture. |
|
PANORAMA |
Allows panorama pictures to be taken with Olympus |
|
|
CAMEDIA-brand cards. |
|
2 IN 1 |
Combines two still pictures taken in succession and |
|
|
stores them as a single picture. |
|
FUNCTION |
Lets you add special effects to pictures (BLACK & |
|
|
WHITE, SEPIA, WHITE BOARD, BLACK BOARD). |
|
u |
Displays a histogram showing the luminance |
|
|
distribution of still pictures. |
|
8 |
Displays useful guidelines on the monitor for |
|
|
composing photos well. |
|
9REAL |
Displays the subject on the monitor at close to the |
|
|
actual exposure when taking pictures in Mmode. |
|
|
|
|
PICTURE tab |
|
|
K |
Sets the image quality and resolution. |
|
|
Still picture |
: RAW, TIFF, SHQ, HQ, SQ1, SQ2 |
|
Movie |
: SHQ, HQ, SQ |
WB |
Sets the appropriate white balance according to the |
|
|
light source. |
|
> |
Lets you make fine changes to the white balance. |
|
CUSTOM WB |
Stores your preferred white balance setting. |
|
SCENE MODES |
Lets you take pictures suited to the situation and the |
|
|
desired effect (I, L, m). |
|
SHARPNESS |
Adjusts the sharpness of the image. |
|
CONTRAST |
Adjusts the contrast of the image. |
|
SATURATION |
Adjusts the level of color depth without changing the |
|
|
tint. |
|
|
|
|
CARD tab |
|
|
CARD SETUP |
Formats a card. |
|
|
|
|
SETUP tab |
|
|
ALL RESET |
Selects whether to keep the current camera settings |
|
|
when you turn off the power. |
|
En

basic_e_x191_6.fm Page 23 Thursday, August 28, 2003 12:44 PM
EV STEP |
Selects whether to set the shutter speed, aperture |
|
value and exposure compensation, etc. in 1/3EV |
|
steps or in 1/2EV steps. |
W |
Selects a language for on-screen display. |
PW ON SETUP |
Set the picture and sound for when the power is |
|
turned on. |
PW OFF SETUP |
Set the picture and sound for when the power is |
|
turned off. |
REC VIEW |
Displays the picture on the monitor while recording |
|
it to a card. |
8 |
Sets the beep sound used for warnings and adjusts |
|
the volume. |
BEEP |
Sets the beep sound used for button operations and |
|
adjusts the volume. |
SHUTTER SOUND |
Sets the sound made when the shutter button is |
|
pressed and adjusts the volume. |
MY MODE SETUP |
Customizes settings which are activated in the r |
|
mode. |
FILE NAME |
Changes how file names are assigned. |
PIXEL MAPPING |
Checks the CCD and image processing functions |
|
for errors. |
s |
Adjusts the brightness of the monitor. |
X |
Sets the date and time. |
m/ft |
Sets the measurement unit (m/ft) used during |
|
manual focus. |
VIDEO OUT |
Selects NTSC or PAL according to your TV’s video |
|
signal type. TV video signal types differ depending |
|
on the region. |
SHORT CUT |
Lets you assign frequently used functions as |
|
shortcut menus. |
CUSTOM BUTTON |
Lets you assign a frequently used function to the |
|
camera’s custom button. |
DUAL CONTROL |
Displays the same information on the control panel |
PANEL |
as on the monitor. |
AF ILLUMINATOR |
Turns on the AF illuminator to illuminate a dark |
|
subject. |
USB |
Sets whether the camera is connected to a PC or a |
|
printer with the USB cable. |
En
En
23
basic_e_x191_6.fm Page 24 Thursday, August 28, 2003 12:44 PM
Playback mode
PLAY tab |
PLAY |
OFF |
|
|
|
||
EDIT tab |
EDIt |
FRAMEASSISt OFF |
|
CARD tab |
|||
CARD |
|
||
|
|
||
SETUP tab |
SEt |
|
|
|
|
PLAY tab* |
|
R |
Adds sound to a still picture already taken. |
uDisplays a histogram showing the luminance distribution of still pictures.
FRAME ASSIST |
Displays horizontal and vertical lines on the image. |
En * The PLAY tab is not displayed during movie playback.
EDIT tab |
|
RAW DATA EDIT |
Sets the image quality, white balance, etc. of |
|
pictures taken in RAW data format and saves them |
|
as new files. |
Q |
Makes the file size smaller and saves it as a new file. |
P |
Crops part of a picture and saves it as a new file. |
COPY |
Copies pictures to and from cards. Lets you select |
|
whether to copy all frames or only a selected frame. |
|
|
CARD tab |
|
CARD SETUP |
Erases all image data stored on the card or formats |
|
a card. |
|
|
SETUP tab |
|
ALL RESET |
Selects whether to keep the current camera settings |
|
when you turn off the power. |
W |
Selects a language for on-screen display. |
PW ON SETUP |
Set the picture and sound for when the power is |
|
turned on. |
PW OFF SETUP |
Set the picture and sound for when the power is |
|
turned off. |
SCREEN SETUP |
Registers a stored picture for use as the picture |
|
displayed when the power is turned on or off. |
24 En

basic_e_x191_6.fm Page 25 Thursday, August 28, 2003 12:44 PM
VOLUME |
Adjusts the sound volume during playback. Also |
|
adjusts the volume of the sound selected in PW ON |
|
SETUP and PW OFF SETUP. |
8 |
Sets the beep sound used for warnings and adjusts |
|
the volume. |
BEEP |
Sets the beep sound used for button operations and |
|
adjusts the volume. |
s |
Adjusts the brightness of the monitor. |
X |
Sets the date and time. |
VIDEO OUT |
Selects NTSC or PAL according to your TV’s video |
|
signal type. TV video signal types differ depending |
|
on the region. |
G |
Selects the number of frames in the index display. |
USB |
Sets whether the camera is connected to a PC or a |
|
printer with the USB cable. |
En
En 25
basic_e_x191_6.fm Page 26 Thursday, August 28, 2003 12:44 PM
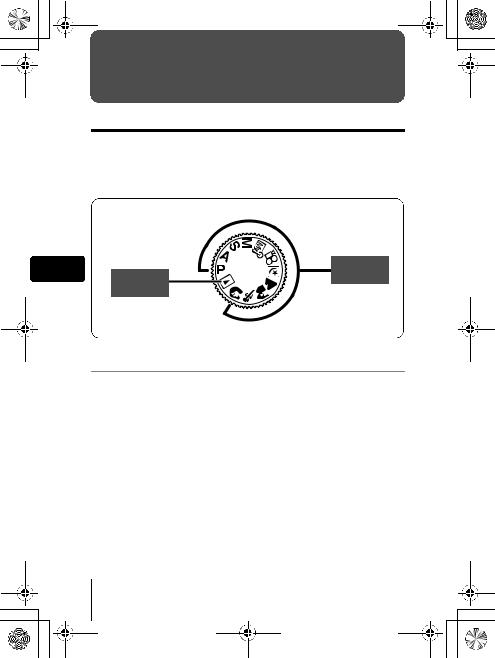
MODE DIAL AND DIRECT BUTTON FUNCTIONS
Mode dial
The shooting modes include modes where the optimal settings for the situation are automatically selected, and modes where you can select the settings best suited to the shooting conditions and the effect you wish to achieve.
You can change the mode with the camera turned on, or off.
En |
|
Shooting |
Playback |
modes |
|
|
mode |
|
P Program shooting
The camera automatically sets the optimum aperture value and shutter speed for the brightness of the subject. Other functions, such as flash modes and drive modes, can be adjusted manually.
(Program shift
Program shift allows you to change the combination of aperture value and shutter speed set by the camera without altering the exposure.
•Press acto change the shutter speed and aperture value.
•S is displayed on the control panel.
•Press dto cancel program shift.
•Changing the shooting mode also cancels program shift.
26 En

basic_e_x191_6.fm Page 27 Thursday, August 28, 2003 12:44 PM
A Aperture priority shooting |
|
Allows you to set the aperture manually. The camera sets the shutter speed |
|
automatically. |
|
Turn the control dial to set the aperture value. |
|
Turn to the left to decrease the aperture value (F number). |
|
Turn to the right to increase the aperture value (F number). |
|
S Shutter priority shooting |
|
|
|
Allows you to set the shutter speed manually. The camera sets the aperture |
|
automatically. |
|
Turn the control dial to set the shutter speed. |
|
Turn to the left to set a slower shutter speed. |
|
Turn to the right to set a faster shutter speed. |
|
M Manual shooting |
En |
|
|
Allows you to set the aperture and shutter speed manually. |
|
Set the aperture by turning the control dial while holding down F. |
|
Turn to the left to decrease the aperture value (F number). |
|
Turn to the right to increase the aperture value (F number). |
|
Turn the control dial to set the shutter speed. |
|
Turn to the left to set a slower shutter speed. |
|
Turn to the right to set a faster shutter speed. |
|
rMy Mode |
|
|
|
Allows you to save your favorite settings as your own personal mode and use |
|
these customized settings when taking pictures. Current settings can also be |
|
saved for retrieving by this mode. |
|
nMovie record |
|
|
|
This function allows you to record movies. The camera automatically |
|
determines the aperture and shutter speed. Sound is recorded at the same |
|
time. The focus and zoom are locked. If the distance to the subject changes, |
|
focus may be compromised. |
|
En 27
basic_e_x191_6.fm Page 28 Thursday, August 28, 2003 12:44 PM
mNight Scene shooting
Suitable for shooting pictures in the evening or at night. The camera sets a slower shutter speed than is used in normal shooting. For example, if you take a picture of a street at night in Pmode, the lack of brightness will result in a dark picture with only dots of light. In the Night Scene shooting mode, the true appearance of the street is captured. The camera automatically selects the optimal settings for this type of shooting condition. Since the shutter speed is slow, make sure you stabilize the camera by using a tripod.
lLandscape shooting
Suitable for taking pictures of landscapes and other outdoor scenes. Both the foreground and the background are in focus. Since blues and greens are vividly reproduced in this mode, it is excellent for shooting natural scenery. The camera automatically sets the optimal shooting conditions.
En kLandscape+Portrait shooting
Suitable for taking pictures of both your subject and the background. The picture is taken with the background as well as the subject in the foreground in focus. You can take pictures of your subject against a beautiful sky or landscape. The camera automatically sets the optimal shooting conditions.
jSports shooting
Suitable for capturing fast-moving action (such as sports) without blur. The camera automatically sets the optimal shooting conditions.
iPortrait shooting
Suitable for taking a portrait-style shot of a person. This mode features an infocus subject against a blurred background. The camera automatically sets the optimal shooting conditions.
• The available settings vary depending on the mode.
Note
28 En
basic_e_x191_6.fm Page 29 Thursday, August 28, 2003 12:44 PM
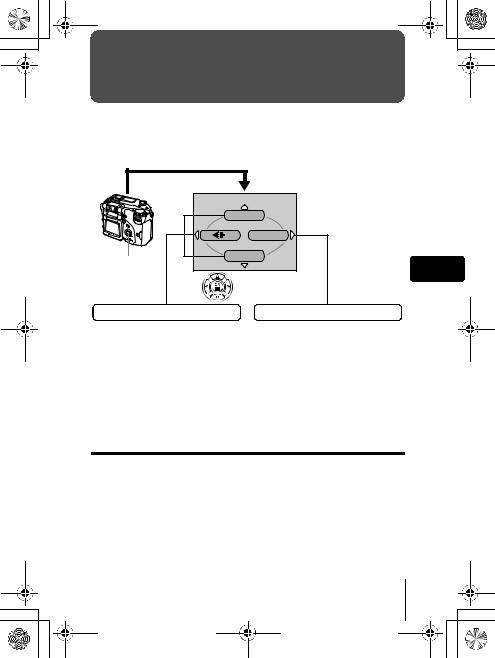
Direct buttons
This camera is equipped with direct buttons for quick operation and setting of various shooting and playback-related functions. The direct buttons have different functions in the shooting mode and in the playback mode. Holding down the direct buttons and turning the control dial allows you to make settings for each function (such as selecting menu items or changing setting values). Certain function settings require the direct button to be pressed repeatedly.
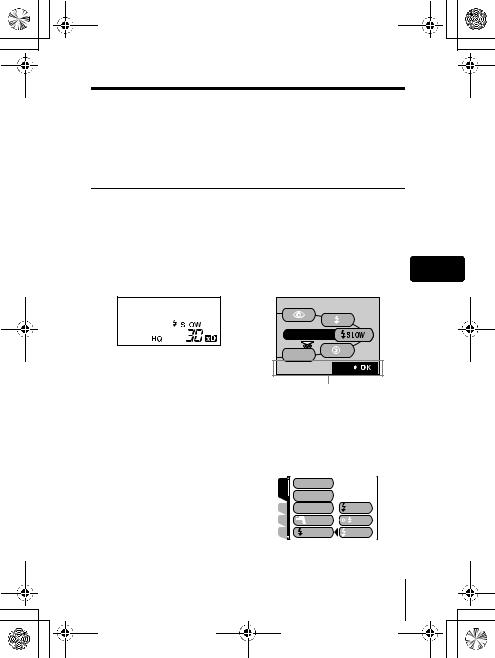
Flow of direct button operations
The procedure for making settings using the direct buttons and control dial is shown below. The setting screens are displayed on the monitor when pressing the direct button.
Ex: Using the flash mode button |
|
1 Turn the control dial while holding down #to select the |
En |
flash mode. |
|
• You can check the setting on the control panel. |
|
FLASH MODE |
|
AUtO |
|
SEt |
|
Operation guide |
|
2
3
•The setting screen is displayed on the monitor.
•At the moment you release your finger from the direct button, the flash mode setting is made.
•If the operation guide is displayed at the bottom of the screen, you can select further options.
Press ewhile holding down |
|
|
|
|
|
|
|
|
|
#to display the menu. |
CAMERA |
|
DRIVE |
|
|
|
|||
Release the direct button after |
|
ISO |
|
|
the menu is displayed. |
PIC |
|
MY MODE |
SLOW1 |
|
CARD |
|
FLASH |
SLOW |
Press acto select an item, |
SEt |
|
SLOW |
SLOW2 |
|
|
|
|
|
then press e. |
|
|
|
|
En 29

basic_e_x191_6.fm Page 30 Thursday, August 28, 2003 12:44 PM
Direct button functions
Holding down one or two direct buttons and turning the control dial allows you to make settings for each function.
11
Control dial
En |
12 |
|
Shooting mode
F(exposure compensation) button
Changes the exposure compensation value.
#(flash mode) button
Selects a flash mode from auto (no indication), red-eye reduction (!), fill-in flash (#), slow synchronization (#SLOW/ HSLOW) and flash off ($).
+
thePresssameat w(flash intensity control) button time
Adjusts the amount of light emitted by the flash.
AF/&/MF (AF/Macro/MF) button
Selects a focus mode from auto-focus (no indication), macro (&), manual focus (MF), super macro (& blinks) and super macro MF (MF blinks).
30 En
 Loading...