


INSTRUCTIONS
DIGITAL CAMERA
Before using your camera, read this
manual carefully to ensure correct
use.
We recommend that you take test
shots to get accustomed to your
camera before taking important
photographs.
1.Getting Started
2.
Shooting and Playback Basics
3.Focusing
4.Custom Photography
5.Using Flash
6.Displaying, editing and
erasing your pictures
7.Print settings
8.Mode setup
9.Downloading Images to a
Computer
10.Miscellaneous
P.27
P.51
P.75
P.87
P.125
P.139
P.159
P.171
P.195
P.207

2
Thank you for purchasing an Olympus digital camera. Before you start to use
your new camera, please read these instructions carefully to enjoy optimum
performance and a longer service life. Keep this manual in a safe place for
future reference.
Legal and other notices
•All contents of this publication are subject to change without notice.
•Although the contents of this publication have been carefully checked to avoid
errors, some may still occur. If you have a question about any points, or find
mistakes or omissions, please contact us.
•No part of this publication may be reproduced or reprinted except for personal use without prior written permission from Olympus.
•Olympus makes no representations or warranties regarding any damages, or
benefit expected by using this unit lawfully, or any request from a third person,
which are caused by the inappropriate use of this product.
•Olympus makes no representations or warranties regarding any damages or
any benefit expected by using this unit lawfully which are caused by erasing
picture data.
•Olympus reserves all rights to this manual.
Trademarks
Windows
®
is a registered trademark of Microsoft Corporation.
Macintosh
™
is a trademark of Apple Computer Inc.
All other brand names and product names are trademarks of their respective
owners.
The standards for camera file systems referred to in this manual are the
“Design Rule for Camera File System/DCF” standards stipulated by the Japan
Electronics Industry Development Association (JEIDA).

3
A guide to reading these instructions
These Instructions consist of the chapters listed below. You can also locate
information on camera operation using the index provided on page 224.
The Basics
Taking Pictures
Camera Settings
Using Images
Miscellaneous
Display
1.Getting Started
2.
Shooting and
Playback Basics
3. Focusing
4. Custom
Photography
5. Using Flash
6.
Displaying, editing and
erasing your pictures
7.Print settings
8.Mode setup
9.Downloading
Images to a
Computer
10. Miscellaneous
Describes the preparations required before
you can use the camera.
Describes the basic procedures for using
the camera to take pictures.
Describes various ways of focusing the camera.
Explains how to use the camera to control
the type of shot, the brightness and exposure, and the color and quality so that you
get exactly the shot you want.
Describes how to take pictures using the
built-in flash and external flash units.
Describes how to display pictures you have
shot and how to edit recorded movies.
Describes the settings used to print the pictures you have taken, using a printer or print
service that supports DPOF.
Describes the mode settings that are available on this camera.
Describes how to download your pictures
and movies to your computer.
Provides information on topics such as troubleshooting and cleaning the camera as
well as the camera specifications.
P.27P.51-
P.75-
P.87-
P.125P.139-
P.159-
P.171-
P.195-
P.207-
Conventions used in these instructions
In these Instructions, the icons described below are used to draw your attention to warnings or other useful information regarding the use of the camera.
This camera provides some functions that apply only to still
images, and others that apply only to movies. The icons at left
are used to show clearly the type of images with which a function can be used. The icon denotes a still image function,
while the icon indicates a movie function.
From Chapter 2 forward, these icons are shown at the beginning
of each procedure. Set the Mode dial to the icon shown.
This indicates information you need to be aware of when using a
particular function. Read this information before using the function.
Indicates information that will enable you to use the function
more effectively. Reading these notes will ensure that you get
the most out of your camera.
P
A/S/M

Important safety instructions
4
Radio and Television Interference
Change or modifications not expressly approved by the manufacturer may
void the user’s authority to operate this equipment. This equipment has been
tested and found to comply with the limits for a Class B digital device, pursuant
to Part 15 of the FCC Rules. These limits are designed to provide reasonable
protection against harmful interference in a residential installation. This equipment generates, uses, and can radiate radio frequency energy and, if not
installed and used in accordance with the instructions, may cause harmful
interference to radio communications.
However, there is no guarantee that interference will not occur in a particular
installation. If this equipment does cause harmful interference to radio or television reception, which can be determined by turning the equipment off and on,
the user is encouraged to try to correct the interference by one or more of the
following measures:
•Adjust or relocate the receiving antenna.
•Increase the distance between the camera and receiver.
•Connect the equipment to an outlet on a circuit different from that to which the
receiver is connected.
Only the RS-232C serial cable or USB cable should be used to connect the
camera to a personal computer (PC).
Declaration of Conformity
Model Number: C-3040Zoom
Trade Name: OLYMPUS
Responsible Party: Olympus America Inc.
Address: 2 Corporate Center Drive, Melville, New York 11747-3157
U.S.A.
Telephone Number: 631-844-5000
This device complies with Part 15 of the FCC rules. Operation is subject to
the following two conditions:
(1)This device may not cause harmful interference, and
(2) This device must accept any interference received, including interfer-
ence that may cause undesired operation.
This Class B digital apparatus meets all requirements of the Canadian
Interference-Causing Equipment Regulations.
5
Important safety instructions
CAUTION: TO REDUCE THE RISK OF ELECTRIC SHOCK, DO
NOT REMOVE COVER (OR BACK). NO USER-SERVICEABLE
PARTS INSIDE. REFER SERVICING TO QUALIFIED OLYMPUS
SERVICE PERSONNEL.
RISK OF ELECTRIC SHOCK
DO NOT OPEN
CAUTION
The lightning flash with the arrowhead symbol, within an
equilateral triangle, is intended to alert the user to the
presence of uninsulated “dangerous voltage” within the
product’s enclosure that may be of sufficient magnitude
to constitute a risk of electric shock to persons.
The exclamation point within an equilateral triangle is
intended to alert the user to the presence of important
operating and maintenance (servicing) instructions in the
literature accompanying the product.
WARNING:
TO REDUCE THE RISK OF FIRE OR SHOCK HAZARD, DO NOT
EXPOSE THIS EQUIPMENT TO RAIN, ANY LIQUID OR
MOISTURE.

6
Important safety instructions
1 Read All Instructions — Before you use the product, read all
operating instructions.
2 Save These Instructions — Save all safety and operating
instructions for future reference.
3 Heed Warnings — Read carefully and follow all warning labels on
the product and all warnings described in the instructions.
4 Follow Instructions — Follow all instructions provided with this
product.
5 Cleaning — Always unplug this product from the wall outlet before
cleaning. Use only a damp cloth for cleaning. Never use any type of
liquid or aerosol cleaner, or any type of organic solvent to clean this
product.
6 Attachments — For your safety, and to avoid damaging the product,
use only accessories recommended by Olympus.
7 Water and Moisture — Never use this product around water (near a
bathtub, kitchen sink, laundry tub, wet basement, or swimming pool).
8 Location — To avoid damage to the product and to avoid personal
injury, never place this product on an unstable stand, tripod, bracket,
table or cart. Mount only on a stable tripod, stand, or bracket. Follow
the instructions which describe how to safely mount the product, and
use only the mounting devices recommended by the manufacturer.
9 Power Sources — Connect this product only to the power source
described on the product label. If you are not sure about the type of
power supply in your home, consult your local power company.
Refer to your operating instructions for information on using the
product with batteries.
10 Grounding, Polarization — If this product can be used with an
optional AC adapter, the adapter may be equipped with a polarized
alternating current line plug, a plug with one blade wider than the
other. This safety feature allows the plug to fit into the power outlet
only one way. If you cannot insert the plug into the wall outlet, pull it
out, reverse it, and then insert it again. If the plug still fails to fit,
contact an electrician and have the receptacle replaced.
11 Protecting the Power Cord — The power supply cord should be
routed so it will not be walked on. Never place a heavy object on the
power cord and never wrap the power cord around the leg of a table
or chair. Keep the areas around the power cord connection points,
at the power outlet and at the product connection, free of all
obstacles.

7
Important safety instructions
12 Lightning — If a lightning storm occurs while using the optional AC
adapter, unplug the adapter power cord from the wall outlet
immediately. To avoid damage from unexpected power surges,
always unplug the AC adapter from the power outlet and disconnect
it from the camera when the camera is not in use.
13 Overloading — Never overload wall outlets, extension cords, power
strips, or other power connection points with too many plugs.
14 Foreign Objects, Spillage — To avoid personal injury from fire or
electrical shock from contact with internal high voltage points, never
insert a metal object into the product. Avoid using the product
where there is a danger of spillage.
15 Servicing — Refer all servicing to qualified personnel. Attempting to
remove the covers or disassemble the product, could expose you to
dangerous high voltage points.
16 Damage Requiring Service — While using the optional AC adapter,
if you notice any of the conditions described below, unplug the AC
adapter from the wall outlet and refer servicing to qualified service
personnel:
a) If liquid has been spilled, or any object has fallen into the
product.
b) If the product has been exposed to water.
c) If the product does not operate normally while following
operating instructions. Adjust only the controls described in the
operating instructions as improper adjustment of other controls
could damage the product, requiring extensive repair work by a
qualified technician to restore the product to normal operation.
d) If the product has been dropped or damaged in any way.
e) If the product exhibits a distinct change in performance, this
indicates a need for servicing.
17 Replacement Parts — When replacement parts are required, make
sure that the service center uses only parts recommended by the
manufacturer to ensure that the replacement parts have the same
characteristics as the originals. Unauthorized substitution of parts
could cause a fire, electrical shock, or create other hazards.
18 Safety Check — Upon completion of servicing or repairs, ask the
service technician to perform safety checks to determine that the
product is in good working condition.
19 Heat — Never use or store this product near a heat source such as
a radiator, heat register, stove, or any type of equipment or
appliance which generates heat, including stereo amplifiers.

8
Important safety instructions
WARNING!
• Keep batteries away from children.
• If a child swallows a battery, seek medical attention immediately.
• Dispose of lithium batteries promptly and safely in compliance with
local laws regarding the disposal of such items.
• To avoid causing a fire or minor burns, always handle lithium
batteries carefully.
• Never attempt to charge the lithium battery, disassemble it, heat it
above 212°F (100°C) or incinerate it.
• To ensure good contact, wipe the battery with a clean, dry cloth
before use.
• To avoid short circuiting the +/– sides of the battery, never handle a
lithium battery with a metal tool, tweezers, etc.
Handling Batteries
Follow these important guidelines to prevent the batteries from leaking,
overheating, burning, exploding, or causing electrical shock or burns.
DANGER
1 When using NiMH batteries, use only Olympus brand NiMH
batteries and charger.
2 Never load batteries with their +/– terminals reversed. Never force
batteries into the battery compartment.
3 To prevent causing battery leaks or damaging their terminals,
carefully follow all instructions regarding the use of batteries. Never
attempt to disassemble a battery or modify it in any way, with
soldering, etc.
4 Take precautions when carrying or storing batteries to prevent them
from coming into contact with any metal objects like jewelry, pins,
fasteners, etc.
Danger: If the product is used without observing the information
given under this symbol, serious injury or death may
result.
Warning: If the product is used without observing the information
given under this symbol, injury or death may result.
Caution: If the product is used without observing the information
given under this symbol, minor personal injury, damage to
the equipment, or the loss of valuable data may result.

9
Important safety instructions
WARNING
1 Keep batteries dry at all times. Never allow them to come into
contact with fresh water or salt water.
2 To prevent batteries from leaking, overheating, or causing a fire or
explosion:
• Use only batteries recommended for use with this product.
• Never heat batteries, incinerate them, or attempt to disassemble
them.
• Never mix batteries (old and new batteries, charged and
uncharged batteries, batteries of different manufacture or capacity,
etc.).
• Never attempt to charge alkaline or lithium batteries.
• Load batteries carefully as described in the operating instructions.
Never reverse their polarity when loading.
• Do not use batteries if their body is not covered by the insulating
sheet or if the sheet is torn as it may cause fluid leak, fire, or
injury. Do not use these batteries even if they are sold in stores.
3 If NiMH batteries are not charged within the specified time, stop
charging them and do not use them.
4 Before loading, always inspect batteries carefully for leaks,
discoloration, warping, or any other abnormality.
5 Always store batteries out of the reach of small children. If a child
accidentally swallows a battery, seek medical attention immediately.
6 If a battery leaks fluid onto your clothing or skin, remove the clothing
and flush the affected area with clean, running cold water
immediately. If the fluid burns your skin, seek medical attention
immediately.
7 Never attempt to modify the battery compartment on the camera,
never insert anything (other than the recommended battery) into the
battery compartment.
5 Never heat batteries or incinerate them.
6 Never attempt to connect a battery directly to a power outlet, or to a
cigarette lighter in a vehicle.
7 If battery fluid gets into your eyes, flush your eyes immediately with
clear, cold running water and seek medical attention immediately.

10
Important safety instructions
CAUTION
1 Olympus NiMH batteries are intended for use only with Olympus
digital cameras. Never use these batteries with any other device.
2 Never subject batteries to strong shocks or continuous vibration.
3 Never mix batteries (old and new batteries, charged and uncharged
batteries, batteries of different manufacture or capacity, etc.).
4 Always charge sets of batteries (2 or 4) together.
5 Always charge NiMH batteries before using them for the first time, or
if they have not been used for a long period.
6 While the camera is not in use, always remove the batteries to
prevent accidental leakage which could damage the battery
compartment.
7 If a battery leaks, becomes discolored or deformed, or in any other
way becomes abnormal during operation, stop using the camera
and consult your dealer or an authorized Olympus service center.
Continued use may result in fire or electric shock.
8 Never store batteries where they will be exposed to direct sunlight,
or subjected to high temperatures in a hot vehicle, near a heat
source, etc.
9 Batteries may become hot during prolonged use. To avoid minor
burns, never remove them immediately after using the camera.

11
Important safety instructions
Handling the Camera
WARNING
1 Use caution when taking flash pictures at close range. When you
fire the flash, you must be at least 3 ft. away from the faces of your
subjects, especially when taking pictures of infants and small
children. Firing the flash too close to the subject's eyes could cause
a momentary loss of vision.
2 To avoid damaging your eyes, never aim the camera directly into the
sun, or any other extremely bright light source.
3 To avoid causing a fire or explosion, never use the camera near
flammable or explosive gases.
4 Always use and store the camera out of the reach of young children
and infants to prevent the following dangerous situations which
could cause serious injury:
• Becoming entangled in the camera strap, causing strangulation.
• Accidentally swallowing a battery or small part.
• Accidentally firing the flash into their own eyes or into the eyes of
another child.
5 To avoid the hazards of fire or electrical shock, store the camera in a
cool, dry location where it will not be subjected to high humidity or
dust.
6 To avoid minor burns, never cover the flash with your hand when it
is fired. Never touch the flash unit after continuous use. The flash
unit becomes very hot during continuous operation.
7 If the camera is accidentally dropped in water, or if liquid is spilled
into the camera, stop using the camera, allow the camera to dry,
and then remove the batteries. Contact the nearest Olympus
authorized service center.

12
Important safety instructions
CAUTION
1 During operation of the camera, if you notice any unusual odors,
noise, or smoke around the camera, immediately switch the camera
off, disconnect the optional AC adapter (if it is connected), and allow
the camera to sit idle for a few minutes to allow it time to cool. Take
the camera outdoors, away from flammable objects, and carefully
remove the batteries to avoid burning your hands. Contact the
nearest Olympus service center immediately.
2 Never attempt to disassemble the camera. The internal circuits
contain high voltage points which could cause serious burns or
electrical shock.
3 To avoid dangerous electrical shock, never hold or operate the
camera with wet hands.
4 To avoid damaging the camera or causing a fire, never expose the
camera to excessive heat.
CAUTION
Camera Care and Storage
• Never store or use the camera for long periods in locations subject to
direct sunlight, high humidity, extreme variation in temperature, or
strong shocks and constant vibration. Protect the camera at all times
from dust and sand.
• Never store the camera near any type of appliance or equipment
which generates high temperatures, low temperatures, high or low
humidity, or a strong magnetic field. Never use the camera in a factory
or laboratory where flammable gases are present.
• Never shake the camera or subject it to shock or strong vibration.
• To avoid damaging its precision lens, never leave the camera pointing
directly into the sun.
• Before storing the camera for a long period, remove the batteries.
Select a cool, dry location for storage to prevent condensation or mold
from forming inside the camera. After storage, test the camera by
pressing the shutter release button to make sure that it is operating
normally.
• When the camera is mounted on a tripod, adjust the tripod head to reposition the camera; do not twist the camera.
• Never touch the flash after it has been fired. Avoid using the flash for
extended periods. Allow it to cool occasionally between shots.
• To avoid injury from electrical shock, never attempt to disassemble or
modify the camera in any way.

13
Important safety instructions
CAUTION
Selecting Batteries for Your Camera
•
This camera can use four AANiMH batteries, four AAAlkaline batteries,
four AAlithium batteries, four AANiCd batteries, or two CR-V3 lithium
battery packs. Use of Olympus brand batteries is strongly
recommended.
•
Alkaline battery performance is limited, especially at low temperatures.
And it may runs out extremely shorter period than CR-V3 or NiMH.
Using NiMH batteries is recommended.
• AA manganese batteries cannot be used with this camera.
• Always follow the battery recommendations and loading instructions.
Incorrectly loading the batteries could cause the batteries to leak or
overheating.
• When using the camera on battery power at low temperatures, try to
keep the camera and extra batteries as warm as possible. Batteries
which run down at low temperatures may be restored after they are
warmed at ambient temperature.
• Perspiration or oil from your hands on the battery contacts could
prevent them from operating. Before loading batteries, wipe the
terminals with a dry, clean cloth.
• Before going on a long trip, especially before traveling abroad,
purchase an ample supply of extra batteries. The recommended
batteries may be difficult to obtain while traveling.
• Always recharge NiMH or NiCd batteries with a charger
recommended for use with these batteries.
• Before using NiMH or NiCd batteries, always read the instructions
provided with purchase of these batteries.
• To avoid personal injury or damage to the camera, always inspect
batteries before loading. If you notice leaking, damage to the battery
cover or insulation, discoloration, warping or any other abnormality do
not use the batteries.
• Recommended temperature ranges for NiMH batteries:
Operation..................................... 32° ~ 104°F
Charge......................................... 32° ~ 104°F
Storage........................................ –4° ~ 86°F
• Using, charging, or storing the batteries outside these ranges could
shorten battery life or affect battery performance. Always unload the
batteries from the camera before storing the camera and batteries for
a long period.

14
Important safety instructions
NOTES
LCD Display and Backlight
● Do not point the viewfinder towards strong light like the sun, as this may
damage interior of the viewfinder.
● The backlight built into the monitor and control panel has a limited service
life. When the monitor gets dark or flickers, consult your nearest Olympus
dealer.
● In places subject to low temperatures, the backlight may take a long time to
turn on or its color may change temporarily. When using the camera in
extremely cold places, it is a good idea to occasionally place it in a warm
place. A backlight exhibiting poor performance due to low temperatures will
recover in normal temperatures.
● Do not push the monitor forcibly; otherwise the image may become vague,
resulting in a Display mode failure or damage to the monitor.
● When a subject is viewed diagonally in the camera, the edges may appear
zigzagged on the monitor. This is not a malfunction; It will be less noticeable
in Display mode.
● A strip of light may appear on the top/bottom of the monitor, but this is not a
malfunction.
● The LCD display is made with high-precision technology. However,
black spots or bright spots of light may appear constantly on the LCD
display .Due to its characteristics or the angle at which y ou are viewing
the monitor, the spot may not be uniform in color and brightness.This
is not a malfunction.

15
Contents
Legal and other notices............................................................................2
Trademarks...............................................................................................2
A guide to reading these instructions..............................................................3
Conventions used in these instructions....................................................3
Important safety instructions............................................................................4
Radio and Television Interference ............................................................4
Handling batteries ....................................................................................8
Handling the camera..............................................................................11
LCD Display and Backlight ....................................................................14
Contents.........................................................................................................15
Main features..................................................................................................20
Checking the package contents....................................................................21
Names of parts...............................................................................................23
Camera ...................................................................................................23
Viewfinder ...............................................................................................24
Control Panel Display .............................................................................25
Monitor Display.......................................................................................25
Getting Started .......................................................................27
Attaching the strap and lens cap ..................................................................28
Loading the batteries.....................................................................................29
Life of the lithium battery pack (Included) .............................................32
Using a domestic AC wall outlet ............................................................33
Inserting and removing SmartMedia cards...................................................35
Inserting a card.......................................................................................36
Removing a card ....................................................................................37
Setting the date and time...............................................................................38
Using the Mode dial.......................................................................................41
Using the menus............................................................................................42
Shooting menu options..................................................................................46
Still picture shooting menu.....................................................................46
Movie Record menu................................................................................47
Playback menu options..................................................................................48
Still picture playback menu....................................................................48
Movie playback menu.............................................................................49
1

16
Shooting and Playback Basics.............................................51
Switching on and off ......................................................................................52
Checklist before shooting..............................................................................54
Checking the remaining battery charge.................................................54
Checking SmartMedia card status (Card check)...................................55
Checking the available shots/time..........................................................56
Adjusting the viewfinder.................................................................................58
Holding the camera .......................................................................................58
Pressing the shutter button ............................................................................59
Shooting.........................................................................................................60
Taking still pictures .................................................................................60
Taking pictures using the monitor...........................................................63
Shooting movies .....................................................................................65
Checking and erasing photographed images...............................................67
Displaying pictures (Quick View)............................................................67
Playing movies........................................................................................69
Erasing pictures (One-frame erase).......................................................71
Using the zoom..............................................................................................72
Using the flash (Auto-Flash) ..........................................................................73
Focusing..................................................................................75
Focusing on difficult subjects (Subjects not suited to autofocus).................76
Working range................................................................................................77
Focusing on off-center subjects (Focus lock) ...............................................78
Focusing faster (Full-time AF) ........................................................................79
Selecting a focusing area (AF MODE)...........................................................81
Focusing manually (Manual focus) ................................................................82
Focusing on close-up subjects (Macro mode)..............................................84
Zooming in further (Digital Zoom mode) .......................................................85
Custom Photography .............................................................87
[Type of Shot]
Setting the "A/S/M" dial functions...................................................................88
Controlling the depth of field (Aperture Priority mode)..................................89
Capturing movement (Shutter Priority mode)................................................90
Selecting the aperture and shutter speed manually (Manual mode)............91
[Brightness and Exposure]
Shooting at stepped exposures (Exposure compensation)..........................92
Continuous shooting at stepped exposures (Auto Blacket)..........................93
Measuring the subject brightness (Spot Metering mode).............................95
Using Spot Metering in Macro mode .....................................................97
4
3
2
Contents

17
Taking pictures with pre-fixed exposure ........................................................98
Setting the [OK] button functions (Setting AE Lock)..............................98
Taking pictures with the exposure locked (AE lock) ..............................99
Measuring the average brightness (Multi-metering)............................101
Locking the ISO value (ISO setting) ............................................................103
[Color and Quality]
Selecting the color tone (Preset White Balance).........................................105
Setting the color tone (Quick Reference White Balance) ............................107
Adjusting the color tone (White Balance Correction)..................................109
Setting the recording quality (Quality setting).............................................111
[Other Types of Shots]
Taking sequential shots (Sequence mode) .................................................113
Using the self-timer and remote control ......................................................115
Using the self-timer to take pictures.....................................................116
Using the remote control to take pictures............................................117
Using special effects (Function mode)........................................................118
Panorama mode...........................................................................................120
Selecting Audio Record mode.....................................................................122
Adding voice comments when taking pictures ...........................................122
Selecting audio recording when shooting movies (Movie sound recording)
....124
Using Flash ...........................................................................125
Selecting the flash firing pattern..................................................................126
Firing the flash automatically (Auto-Flash) ...........................................127
Reducing red-eye (Red-Eye Reduction mode) ....................................127
Using flash for all shots (Forced Flash mode) .....................................128
Preventing flash firing in dark conditions (Flash Off mode) .................128
Setting the flash brightness (Flash intensity control)...................................129
Selecting the flash timing (Slow Synchro) ...................................................131
Using external flash ...............................................................................................133
Using the FL-40 external flash.......................................................................133
Using only the FL-40 external flash...............................................................135
Using a different external flash......................................................................136
Supported different flash units ......................................................................138
5
Contents

18
Displaying, editing and erasing your pictures ..................139
Displaying multiple images at one time (Index playback)....................................140
Selecting the number of images displayed concurrently (4, 9 or 16)...........141
Enlarging images (Close-up playback).................................................................142
Displaying images as a slide-show (Automatic playback)...................................143
Preventing unintentional erasing of images (Image protect) ................................144
Viewing images on a TV ........................................................................................145
Displaying image information ................................................................................147
Displaying image information for pictures.....................................................148
Displaying image information for movies ......................................................148
Adding voice comments to recorded pictures (Postrecording)............................149
Editing recorded movies (FUNCTION)..................................................................150
Creating an index ..........................................................................................150
Editing movies ...............................................................................................153
Erasing all images (All-frame erase).....................................................................155
Initializing cards (Formatting) ................................................................................157
Print settings ........................................................................159
Printing methods....................................................................................................160
Printing all the images on a card (All print order).................................................162
Printing only selected images (Single print order)................................................164
Printing some images enlarged (Trimmed print order).........................................167
Resetting print reserve ..........................................................................................169
Mode setup ...........................................................................171
MODE SETUP - Using function settings for easy camera operation....................172
List of mode settings .....................................................................................173
Restoring the original settings when the camera is switched off (ALL RESET)....
175
Selecting the settings when the camera is switched on (Custom settings) ....
177
Setting the image clarity (Sharpness)..........................................................179
Setting the image contrast (Contrast)..........................................................180
Setting the resolution for TIFF mode (TIFF Settings)...................................181
Setting the resolution and quality for SQ mode (SQ1/SQ2 Settings)
...........182
Changing the camera's warning tone (Beep) .............................................184
8
7
6
Contents

19
Contents
Displaying images during image recording (REC VIEW)............................185
Saving/erasing images right after shooting (CHECK).................................186
When you select CHECK......................................................................186
When you use Auto Bracket.................................................................189
Changing the way file names are assigned to recorded images (File Name setting)
....191
Folder names and file names...............................................................191
Assiging folder names and file names in each mode..........................191
Adjusting the Monitor brightness (Adjust monitor)......................................193
Changing the dis distance units (m/ft setting).............................................194
Downloading Images to a Computer..................................195
Downloading images to your computer.......................................................196
Connecting the camera to a computer to download pictures .............196
Downloading pictures directly from a card..........................................197
Connecting to a computer using the communication cable .......................198
Connecting via a USB cable ................................................................198
Connecting via a serial cable ...............................................................201
Downloading images using CAMEDIA Master............................................204
Overview of the CAMEDIA Master functions...............................................206
Miscellaneous.......................................................................207
Troubleshooting............................................................................................208
Camera operation problems.................................................................208
Problems with images...........................................................................212
Camera maintenance and storage..............................................................214
After-use camera care ..........................................................................214
Cleaning the camera ............................................................................214
Equipment that can be connected to this camera (System expansion chart)
...215
Error codes...................................................................................................216
Optional items..............................................................................................218
Compatibility of the picture data..................................................................218
Specifications...............................................................................................219
Glossary of terms.........................................................................................222
Index ............................................................................................................224
10
9

20
Main features
■
The camera has a high-resolution CCD with a total pixel
count of 3.34 million pixels and large-aperture lens (f/1.8)
which enable you to capture high quality images.
■
A 3x zoom lens and a digital zoom lens with a maximum
magnification of 5x (recording size of 640 x 480) allow
you to capture images of the same quality achievable
with a 15x zoom.
■
A maximum continuous shooting speed of 3.3 frames per
second is possible.
■
Quick Reference white balance and white balance correction have been added to the list of white balance functions.
As a result, you can carry out precise color correction.
■
The camera is equipped with a USB function. Simply connect the cable to easily download image data to your personal computer.*
■
Other Functions
– Multi-metering, which allows you to determine the exposure
based on metering values from as many as 8 points.
– Wide-angle TFT LCD monitor.
–
Exposure modes that can be selected to suit your shot.(Program,
Aperture Priority mode, Shutter Priority mode and Manual).
– A movie function is installed on the camera.
– Voice comment recordings (still pictures) and audio sound
recordings (movies) are available.**
– A/V output jack provided for viewing pictures on TV (NTSC).
– You can use either a USB cable or a serial cab le to connect the
camera to a personal computer.
– SmartMedia cards can be used as the recording media.
■
In addition to lithium battery packs, AA-size nickel-metal
hydride (NiMH) can also be used.
* Depending on your personal computer, it may be necessary to install a
USB driver.
**
It is not possible to play back audio recordings on this camera. Connect
the camera to a TV or a personal computer to play back audio recordings.

21
Checking the package contents
Camera Strap
Remote control A/V cable USB cable
Warranty and user registration card
Lens cap
Instructions and English Quick Start
Guide
Lens cap cord
CR-V3 Lithium Battery Pack (2)
Remote Control Instructions
Software CD’s
(including windows 98 USB driver
installer software)

22
Checking the package contents
SmartMedia card (1) Static-free SmartMedia case
SmartMedia labels (2) SmartMedia write-protect stick-
ers (4)
SmartMedia Instructions

23
Names of parts
Camera
Zoom lever
(P.72, 86, 140, 142)
Control panel (P.25)
Flash (built-in)
(P.73, 125)
Lens
Card cover (P.36)
Serial connector (RS-232C)
(P.201)
A/V output jack
(P.145)
Connector
cover
DC IN jack (P.33)
Diopter adjustment dial (P.58)
Self-timer/Remote control lamp
(P.116, 117)
Remote control receiver
(P.117)
5-pin external flash socket (P.133)
USB connector
(P.198)
Connector cover
Strap eyelet
(P.28)
Microphone (P.122, 149)

24
Names of parts
Monitor (P. 25)
Viewfinder
(P. 58, 60)
(Flash mode button / P. 73, 125)
(Erase button / P. 71)
(Spot/Macro button / P. 84, 97)
(Print button / P.160)
(OK button / P.44)
(AE lock button / P.98)
(Protect button / P.144)
AEL
Tripod socketBattery compartment lock
(P. 29)
Arrow pad
(P.43)
Viewfinder
Orange lamp
(P. 60, 73)
Green lamp
(P. 55, 59, 60)
AF target mark (P. 60, 74)
Mode dial (P.41)
Shutter button (P.59)
(Monitor button / P.63)
(Menu button / P. 42)
Card access lamp
(P. 61)
Battery compartment
cover (P. 29)
Bottom view

25
Names of parts
Control Panel Display
Monitor Display
1012.23.,00 21:56
HQ
Frame
number
Date
Protect
Battery
check
Movie picture
Time
Print reserve
Sound record
Record
mode
Spot Metering
mode (P. 95)
Flash intensity control (P. 129)
Sequence
mode (P. 113)
Flash mode
(P. 73, 125)
Exposure compensation
(P. 92)
Card error
(P. 55, 216)
Recording mode
(P. 111)
Number of storable pictures (P. 56)
ISO indicator
(P. 103)
Self-timer/
Remote control
(P. 115)
Macro mode
(P. 84)
Slow synchro (P. 131)
Card writing (P. 60, 63, 65)
Sound record (P. 122, 149)
Battery check (P. 54)
Auto bracket
(P. 93)
Manual focus (P. 82)
(During Playback)
Number of storable pictures
Memory gauge
Aperture
Shutter speed
Exposure compensation/Exposure differential
(During Shooting)
MF
16ft
10ft
5.5ft
2.6ft
P F2.8 1/800 +2.0
AEL
White balance
(P. 105)
Shooting mode
• Other data from when the shot was taken can also be displayed during
image playback. (P.147)
AF target
mark
AE lock
Manual
focus

26

1
OLYMPUS DIGITAL CAMERA
Chapter
Getting Started
• This chapter describes the things you need to
know before you can use your camera. These
include the procedures for loading the batteries
and SmartMedia card and for using the Mode
dial and menu screens.

Attaching the strap and lens cap
1
Getting Started
Use the procedure below to attach the strap and lens cap to the camera.
Thread the cord through
the lens cap in the direction indicated by the arrow
in the figure.
Thread the strap through
the lens cap cord.
Then thread the strap
through strap mount.
Thread the strap through
the loop and fastener as
indicated by the arrows in
the figure. Then check that
the strap does not loosen
or come undone when
pulled.
Repeat steps 3 and 4 to
attach the strap to the
mount on the other side of
the camera.
5
4
3
2
1
28
•
When the camera is hanging by its strap, ensure that it is not weighed down
by other objects. This could result in personal injury or damage to the camera.
• Take care to attach the strap correctly as described above. If the strap is
attached incorrectly in any way and the camera comes loose or is dropped
as a result, Olympus accepts no liability whatsoever for any injury or damage that may arise.
Strap eyelet
Fastener

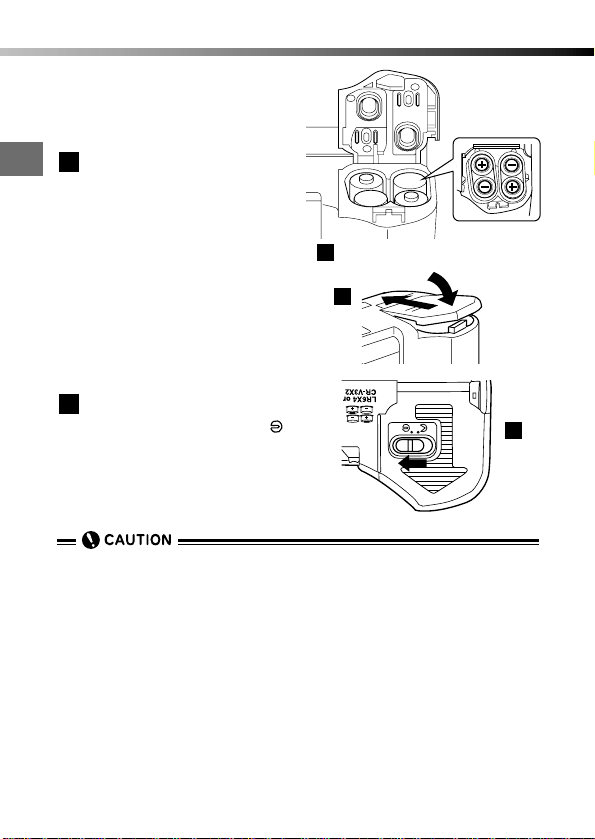
Loading the batteries
1
Getting Started
The camera uses 2 CR-V3 lithium battery packs or 4 AA-size nickel-metal
hydride (NiMH) batteries, nickel-cadmium (Ni-Cd) batteries, alkaline batteries
or lithium batteries.
Check that the Mode dial
to “OFF”.
Slide the battery compartment lock towards the
icon.
Slide the battery compartment cover in the direction
indicated by the arrow on
the cover.
Open the battery compartment cover.
Load the batteries.
●
If you are using lithium battery
packs, ensure that you load
the battery packs in the correct direction, as shown in the
figure at right. If you try to load
a battery pack backwards, it
will only go in partway.
5
4
3
2
1
29
2
43
If you are using lithium battery packs.
5
OFF
P
A
/
S
/
M
P
A
/S
/M
OFF
P
O
W
E
R
/
M
O
D
E
D
I
A
L
1
Getting Started
● If you are using AA-size batteries, ensure that battery
polarities (+ and -) are as
shown in the figure at right.
Close the battery compartment cover by pressing it
down onto the batteries and
sliding it in the opposite
direction to the arrow on the
cover.
● Pressing on the edge of the
battery compartment cover
will make it more difficult to
close.
● The cover is locked in the
closed position.
Slide the battery compartment lock towards the
icon.
7
6
30
Loading the batteries
• CR-V3 lithium battery packs cannot be charged.
• Do not attempt to remove the labels from CR-V3 lithium battery packs.
Where the terminals are covered with a protective sticker (insulating cover),
peel off that sticker only.
• The performance of alkaline batteries varies greatly and is particularly poor
at low temperatures. The use of lithium battery packs or NiMH batteries is
recommended.
• Do not use manganese batteries. Please read the notes on handling batteries. (P.8)
• Soiling on the terminals inside the battery compartment will shorten the life
of the batteries considerably. Take care not to touch the inside of the battery
compartment when removing the batteries.
• If the camera is left for 1 hour with the batteries removed, all the internal settings revert to the default settings.
7
If you are using AA-size batteries.
5
6

1
Getting Started
31
Loading the batteries
WARNING
Never use batteries from which the external seal (insulating cover) has
been partially or entirely removed, or batteries that are cracked or split.
Such batteries can leak battery fluid, overheat or burst if used. Some
commercially available batteries are sold with the external seal (insulating cover) partially or completely removed. Never use batteries of this
type.
Batteries of the type shown below must not be used.
Where the external seal (insulating cover) is
entirely removed (bare battery) or partially
removed.
Where the negative (-) terminal is flat and a part of the
terminal is covered by the external seal (insulating
cover).
Where part of the negative (-) terminal is raised but is not
covered by the external seal (insulating cover).
Where the negative (-) terminal is flat and is not covered
by the external seal (insulating cover).

1
Getting Started
Life of the lithium battery pack (included)
The table below provides an approximate guide to the number of shots that
can be taken and the available playback time using the CR-V3 lithium battery
pack supplied with the camera.
However,note that the battery life can vary greatly depending on the battery type and brand and the conditions under which the camera is used.
32
Loading the batteries
Photography/Display
Number of shots
Playback time
Conditions
q
w
Battery Life
Approx. 400
Approx. 360 minutes
* The figures in the table are for reference purposes only. Actual results may differ.
Conditions
q Two continuous shots repeated at 10-minute intervals at normal tempera-
ture (77°F). Flash used for 50% of the shots, with the zoom function used
in every shot, and full-time AF and digital zoom both switched off. (No
images displayed and no communication with a PC.)
w Continuous display in Automatic playback mode, repeatedly switching the
camera back on immediately after it automatically powers off and then
restarting Automatic playback.
• If the camera is connected to a computer, the optional AC adapter should
be used.
• In the situations listed below, the camera consumes power even without
shooting pictures or movies and the number of storable pictures decreases.
• If you hold the shutter button down halfway in a shooting mode so that
the autofocus mechanism operates repeatedly.
• If you repeatedly use the zoom.
• If full-time AF is switched on.
• If you leave the monitor switched on in Display mode for long periods.
• During communication with a computer.
Life of the CR-V3 lithium battery packs supplied with the camera
1
Getting Started
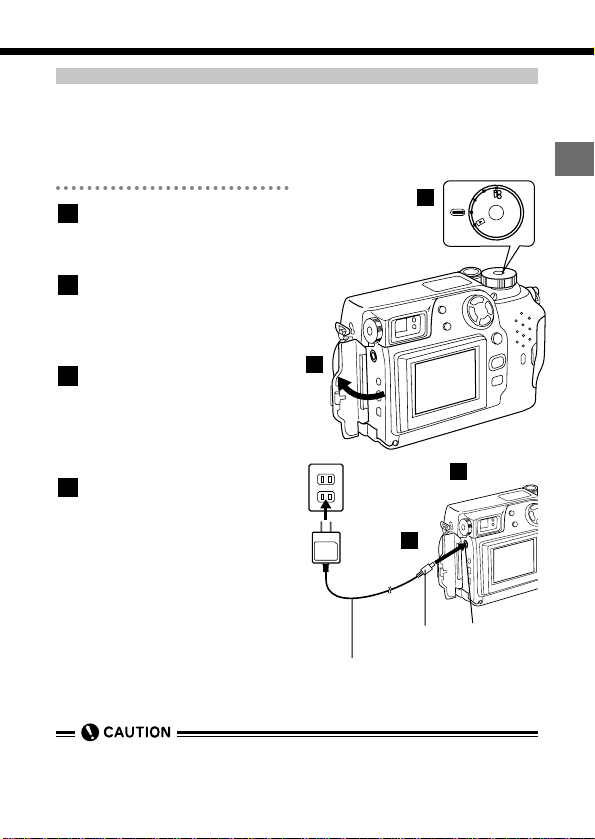
Using a domestic AC wall outlet
To connect your camera to an ordinary domestic AC wall outlet, you need the
optional AC adapter.
Use an AC adapter designed for the area where camera is used.
Consult your nearest Olympus dealer or service center for details.
Check that the Mode dial
to "OFF".
Plug the AC adapter
securely into a domestic
AC wall outlet.
Open the connector cover
on the camera and plug
the AC adapter connector
cable into the DC IN jack.
After using the AC adapter ,
always switch off the camera and unplug the AC
adapter cable first from the
camera and then from the
domestic AC wall outlet.
4
3
2
1
33
Loading the batteries
P
A
/S
/M
OFF
P
O
W
E
R
/
M
O
D
E
D
I
A
L
Domestic AC
wall outlet
Power
plug
2
3
AC adapter
DC IN jack
(black)
Connector
cable plug
•
When used for long periods, the AC adapter may become warm. This is normal.
1
3

1
Getting Started
WARNING
Incorrect use may cause a fire, electric shock or burns.
• Be sure to use only the Olympus AC adapter. The use of other AC adapters
could damage the camera or power supply and cause other unforeseeable
accidents.
• Use an AC adapter designed for the area where camera is used.
Consult your nearest Olympus dealer or service center for details.
• Ensure that the AC adapter is properly plugged into the power outlet before
use.
• Never connect or disconnect the AC adapter with wet hands.
• If the AC adapter cable is hot, smells scorched or is emitting smoke, unplug
it immediately and contact your nearest Olympus service center.
• Make sure that the camera is switched off before connecting or disconnecting the AC adapter.
• When unplugging the AC adapter from the AC wall outlet, always pull the
adapter itself, not the cable. Never unduly pull, bend, twist or bundle the
cable.
• If the cable is damaged or cut or if there is a loose connection in the plug,
contact your nearest Olympus service center immediately.
• Disconnect the AC adapter from the camera and the AC wall outlet when it
is not in use.
34
Loading the batteries

Inserting and removing SmartMedia cards
1
Getting Started
About SmartMedia card
SmartMedia card is the recording media used by the Olympus CAMEDIA Digital
Camera to record your pictures in the same way as film in a conventional camera.
However, the images r ecor ded on a SmartMedia card can be deleted or replaced
and can also be transferred to a personal computer for editing. In these
Instructions, SmartMedia cards are often referred to simply as "cards".
Compatible SmartMedia
• Enclosed 8 MB Standard Card (with Panorama Stitching function)
• Optional Olympus 4, 8, 16, 32 and 64 MB cards
• Third-party 3-volt (3.3 V) 4, 8, 16, 32 and 64 MB cards
35
q
q Contact area
Area used for electrical contact with the
camera.
w Write-protect area
To write protect the card, affix one of the
enclosed write-protect stickers here.
e Index area
Use this area to attach one of the enclosed
labels showing what is stored on the card.
Notes on handling SmartMedia
• Operating temperature: 32°F to 131°F; Storage temperature: -4°F to
149°F
• Keep the cards in its protective static-free case when it is being stored
or carried.
• Do not bend a card or subject it to impacts.
• Be sure to read the SmartMedia instructions (enclosed).
• Do not directly touch the card contact area with your hands.
• Third-party 5-volt cards cannot be used. Use an Olympus card or a
third-party 3-volt (3.3 V) card.
w
e
• If you use a non-Olympus brand commercially available card or card that
has been formatted on a personal computer or other device, it may not be
recognized by the camera. In this case, the card should be initialized (formatted) on the camera before use. (P.157)

1
Getting Started
36
Inserting and removing SmartMedia cards
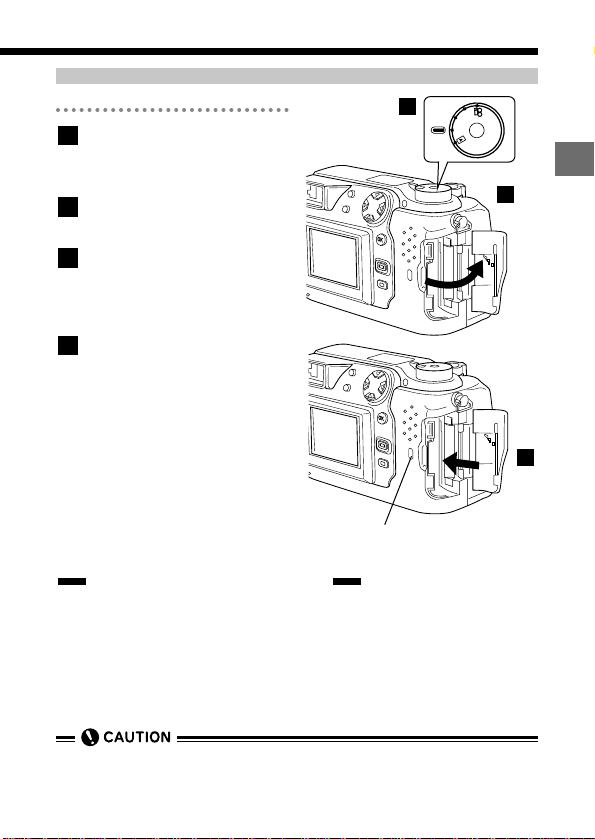
Inserting a card
Check that the Mode dial
to "OFF".
Open the card cover.
Insert the card in the direction shown in the figure.
●
Note the orientation of the
card. If it is inserted incorrectly ,
it may become jammed.
Close the card cover.
4
3
2
1
P
A
/S
/M
OFF
P
O
W
E
R
/
M
O
D
E
D
I
A
L
Insert the card.
2
3
1
1
37
Getting Started
Inserting and removing SmartMedia cards
Removing a card
Check that the Mode dial
to "OFF".
Open the card cover.
Push the card in.
● The card pops out for easy
removal.
Grasp the card and pull it
out.
4
3
2
1
P
A
/S
/M
OFF
P
O
W
E
R
/
M
O
D
E
D
I
A
L
Push the card
in to remove it.
2
3
1
• Destroyed data cannot be recovered.
Notes on Removing a Card
• Never open the card cover, eject the card, remove the batteries or unplug the AC adapter while the card access lamp is lit.
This could destroy the data stored on the card.
Card access lamp

1
Getting Started
38
Setting the date and time
Use the procedure below to set the date and time on the camera's internal
clock. The date and time can then be imprinted on your shots.
Remove the lens cap.
Set the Mode dial to "P",
"A/S/M", " " or " ".
● When no images are recorded
on the card, select a mode
other than " ".
Press the (Menu) button.
● The menu screen appears.
Press or on the
Arrow pad to select “MODE
SETUP”, then press .
● "SETUP" is displayed.
Press the [OK] button.
● The MODE SETUP screen
appears.
Press or to select
.
Press to select
“SETUP”, then press the
[OK] button.
● The date/time setting screen
appears.
7
6
5
4
3
2
1
P
O
W
E
R
/
M
O
D
E
D
I
A
L
P
A
/S
/M
O
F
F
10
98764
1211
75
3
[
3/3
]
A/S/M
MODE
CARD
SETUP
MODE
SETUP
SETUP
AE LOCK
Monitor
(This screen shows the still
picture shooting menu.)
1
2

1
Getting Started
39
When is selected, use
and to select the
date format.
● The available formats are as
follows:
DMY (Day-Month-Year)
MDY (Month-Day-Year)
YMD (Year-Month-Day)
Press to adjust the "M"
setting.
Press or to set the
month. Check that the
month is correct and then
press to move to the
Day setting.
● Repeat the procedure until
you have set the minutes.
Press the [OK] button.
● To set the clock precisely,
press the [OK] button when
the time is at 0 seconds.
● The MODE SETUP screen
reappears.
Press the [OK] button
repeatedly until the menu
disappers.
● The menu screen clears.
● These settings are retained
when you switch the camera
off.
12
11
10
9
8
Setting the date and time
[
4/4
]
m/ft
FILE NAME
SETUP

1
Getting Started
40
Setting the date and time
• The year 2000 is shown as '00.
• The adjusted date and time will revert to the default setting if the camera is
left without batteries for approximately 1 hour (based on Olympus test conditions). If this occurs, set the date and time again.
• We recommend that you check that the date and time are set correctly
before taking important pictures.
• If the card contains no recorded images when the Mode dial is set to " ",
the menu screen does not appear when you press the (Menu) button.
• If you switch the camera off, the camera retains date/time setting until the
setting is changed.

1
Getting Started
41
Using the Mode dial
The Mode dial settings are "P" (Program mode), "A/S/M" (Still shooting mode),
Still picture shooting mode is composed of these two modes, " " (Movie
record mode), "OFF" (camera off) and " " (Playback mode).
The Mode dial provides an easy way to switch the camera on and off or select
the mode.
Camera Modes
"P" and "A/S/M" (Still picture shooting mode)
Setting the Mode dial to "P" or "A/S/M" switches the camera on in Still picture shooting mode.
In "P" (Program mode), the camera automatically selects the optimal
aperture and shutter speed, allowing you to take properly exposed photographs simply by pressing the shutter button.
"A/S/M" (Still Shooting mode) allows you select "Aperture Priority mode",
"Shutter Priority mode" or "Manual mode" from the Still picture shooting
menu. (P.90-93) You can then select your own photography settings to
achieve the desired effect.
" " (Movie record mode)
Setting the Mode dial to " " switches the camera on in Movie record
mode. This mode allows you to shoot movies.
“OFF” (Camera off)
Setting the Mode dial to "OFF" switches the camera off.
" " (Playback mode)
Setting the Mode dial to " " switches the camera on in Playback mode
and allows you to view pictures recorded on a card.
P
O
W
E
R
/
M
O
D
E
D
I
A
L
P
A/S/M
OFF

1
Getting Started
42
Using the menus
You can use the menus to access and select a wide range of camera settings. The
menus are shown on the monitor and vary depending on the Mode dial setting.
Refer to the shooting menu and playback menu options (P.46-49) to select
the function you want to use. The Mode dial settings are determined by
the selected function.
Still picture shooting menu: P or A/S/M
Movie record menu:
Still picture playback menu:
Movie playback menu:
Press the (Menu) button.
● The menu appears on the
monitor.
Press or on the
Arrow pad to select the
desired menu option.
●
The green frame moves and the
option name appears in green.
● To select "MODE SETUP", see
P.172-174.
Press to view the settings for the selected option.
● The green frame moves right
and a list of settings for the
selected option appears.
3
2
1
[
1/3
]
DRIVE
O
ISO
WB
AUTO
AUTO
AF
AF/MF
Menu screen display
Indicates that there is a
preceding screen.
Current settings
Indicates that
this is the first of
3 pages.
Indicates that there is a
subsequent screen.
P
O
W
E
R
/
M
O
D
E
D
I
A
L
P
A
/S
/M
O
F
F
32
1

1
Getting Started
43
Using the menus
(Example) :
Selecting "400" as the ISO setting
● To save the current settings
and exit Menu mode, press
again at this point.
Pressing once merely
selects the settings.
● Some settings also allow you
to shoot pictures at the confirmation stage.
● Note that if you press the
(Menu) button instead of the
button to exit Menu mode,
the setting is not saved.
(Example) :
Moving to the second and subsequent menu pages
● You can move from page 1/3
to page 3/3 by pressing
on the Arrow pad.
[
1/3
]
DRIVE
O
ISO
WB
AUTO
AUTO
AF
AF/MF
[
1/3
]
DRIVE
ISO
WB
AF/MF
AUTO
100
200
400
[
1/3
]
DRIVE
O
ISO
WB
AUTO
AUTO
AF
AF/MF
[
2/3
]
OFF
OFF
OFF
OFF
DIGITAL
ZOOM
FUNCTION
SLOW
Selection
Confirm
or

Use or to select
the setting.
● The selected setting is displayed in green.
● If the selected setting has
additional options displayed
on the right, proceed to step
5. .If not, proceed to step 6 .
Where the selected setting
has additional options,
press to move to the
next set of options and
press or to select a
setting.
When you have finished
selecting the setting, press
the [OK] button or to
return to the previous
option.
● The green frame moves left
and the selected setting is
displayed on the right.
● In a shooting mode (the Mode
dial set to any setting other
than " "), the camera is
ready to shoot at this point.
Press the [OK] button.
● The selected setting is saved
and the menu screen is
replaced by the normal
screen.
7
6
5
4
1
Getting Started
44
Using the menus
54
76
BKT
[
1/3
]
AF
0.3
0.6
1.0
3
5
(Example) BKT setting

1
Getting Started
45
Tips
• When you want to return to the previous page (or proceed to the next page)
in a menu screen:
→ When the selection frame in the menu is at the bottom (or top) of the
screen, press (or ) on the Arrow pad to move to the next page.
If you are on the last page, pressing returns you to the first page.
Likewise, pressing on the first page moves you to the last page.
• When you want to cancel menu operations:
→ Press the (Menu) button. The settings are discarded and the nor-
mal screen reappears.
• When the menu screen does not appear in Playback mode:
→ If the card contains no images, the menu screen is not displayed.
• When you want to save the settings:
→ In “MODE SETUP”, set "ALL RESET" to "OFF". The settings are then
retained without being deleted even if you switch the camera off. (P.175)
The settings specified in “MODE SETUP” are saved when you switch the
camera off, regardless of whether "ALL RESET" is set to "ON" or "OFF".
• When the selected settings do not work:
→ You did not press the [OK] button after selecting the setting. Select the
setting again and then press the [OK] button to confirm the selection.
Using the menus
• If the card contains no images when the Mode dial is set to " ", the menu
screen is not displayed when you press the (Menu) button.
• In a shooting mode, you can select settings and then take pictures without
pressing the [OK] button. The settings remain valid until you press the
(Menu) button again.
• If you select settings and then press the (Menu) button without first
pressing the [OK] button, the settings are discarded and the camera exits
menu mode.
• If you set "ALLRESET" to "OFF", the settings are not discarded when you
switch the camera off. (P.175)

1
Getting Started
46
Shooting menu options
The table below shows the settings available on this camera. Select the settings that best suit your subject. For information on how to decide which
options are best for your purposes (P.46-49), refer to the menu operation
pages (P.42-45) or the pages covering the respective functions.
Still picture shooting menu
These options are displayed in the still picture shooting modes (P or A/S/M).
Menu
page
1/3
2/3
Setting
AF/MF
DRIVE
WB (White
Balance)
ISO
DIGITALZOOM
FUNCTION
Function
Selects Autofocus or
Manual Focus.
Select this option to use continuous shooting, the selftimer or Auto Bracket.
Sets the white balance for a
light source.
Sets the ISO setting.
Setting the intensity of the
flash.
Sets the flash timing to get
the best results in shots of
night scenes.
Allows you to zoom digitally
up to 5x.
Allows special photography
modes. (BLACK&WHITE,
SEPIA, WHITE BOARD and
BLACK BOARD.)
Allows you to record voice
comments on pictures you
have shot.
Card function for taking
panorama picture.
Default
setting
AF
Single
picture
shooting
AUTO
AUTO
± 0
OFF
OFF
OFF
OFF
–
See
P. 82
P. 93
P. 113
P. 115
P. 105
P. 107
P. 103
P. 129
P. 131
P. 85
P. 118
P. 122
P. 120

1
Getting Started
47
Shooting menu options
Menu
page
3/3
Setting
CARD SETUP
MODE SETUP
A/S/M MODE
AE LOCK
Function
Initializes (formats) the card.
Sets the camera mode to
suit the type of photography.
See the List of mode settings on P. 173.
Sets the Record mode.
(TIFF/SHQ/HQ/SQ1/SQ2)
Sets the functions available
when the Mode dial is set
to A/S/M.
Allows AE lock or multimetering to be used.
Default
setting
–
–
HQ
A
OFF
See
P . 155,157
P. 172
P. 111
P. 88
P. 98
Movie record menu
These menu options are displayed in Movie record mode ( ).
Menu
page
1/2
2/2
Setting
AF/MF
WB (White
Balance)
ISO
FUNCTION
CARD SETUP
MODE SETUP
HQ
SQ
Function
Selects Autofocus or
Manual Focus.
Allows you to take pictures
using the self-timer or
remote control.
Sets the white balance for a
light source.
Sets the ISO setting.
Allows black and white or
sepia photography.
Allows you to select whether
to record sound when you
are shooting a movie.
Initializes (formats) the card.
Sets the camera mode to
suit the type of photography.
See the List of mode settings on P.173.
Sets the image quality
mode (HQ or SQ).
Default
setting
AF
OFF
AUTO
AUTO
OFF
ON
–
–
HQ
See
P. 82
P. 115
P. 105
P. 107
P. 103
P. 118
P. 124
P. 155, 157
P. 172
P. 111

1
Getting Started
48
Playback menu options
Still picture playback menu
These menu options are displayed when still image frames are being displayed.
Menu
page
1/2
2/2
Setting
INFO
FUNCTION
CARD SETUP
MODE SETUP
Function
Automatically displays successive frames.
Allows you to view photography details for each image
(camera settings, date and
time, file name, etc.).
Adds recorded voice comments to pictures you have
shot.
Not available.
Erases all the frames on a
card or initializes (formats)
the card.
Sets the camera mode to
suit the type of photography. See the List of mode
settings on P.173.
Default
setting
–
OFF
–
–
–
–
See
P. 143
P. 147
P. 149
–
P. 155
P. 157
P. 172

1
Getting Started
49
Movie playback menu
These menu options are displayed when you are playing back a movie.
Playback menu options
Menu
page
1/1
Setting
MOVIE PLAY
INFO
FUNCTION
CARD SETUP
MODE SETUP
Function
Play back movie pictures.
Allows you to view photography details for the movie
(date and time, file name,
etc.).
Allows you to edit a movie or
create an index listing the
movie details.
Erases all the frames on a
card or initializes (formats)
the card.
Sets the camera mode to
suit the type of photography. See the List of mode
settings on P.173.
Default
setting
–
OFF
–
–
–
See
P. 69
P. 147
P. 150
P. 155
P. 157
P. 172

1
50

2
OLYMPUS DIGITAL CAMERA
Chapter
Shooting and
Playback Basics
• This chapter covers basic camera operation and
describes how to use the camera for simple
photography, how to display your pictures and
movies, and how to erase images. Familiarize
yourself with your camera by reading through
this chapter as you use the camera.

Switching on and off
2
Shooting and Playback Basics
By turning the Mode dial to any setting other than "OFF", the camera is
switched on.
Be sure to remove the lens cap.
Press in on each side of
the lens cap as shown in
the figure and remove the
lens cap.
Set the Mode dial to "P".
● The camera switches on.
● Setting the Mode dial to
"A/S/M", "P", or " " sets the
camera to a shooting mode.
The lens extends out from the
camera body and the remaining battery charge and number of storable pictures
appear on the control panel.
● When you set the Mode dial to
" " , the camera switches
on in playback mode and the
monitor lights up.
When you have finished
using the camera, set the
Mode dial to "OFF".
● The camera switches off.
● The lens retracts into the cam-
era body and the monitor and
control panel switches off.
● Always replace the lens cap
when the camera is not in
use.
3
2
1
52
P
O
W
E
R
/
M
O
D
E
D
I
A
L
P
A
/S
/M
O
F
F
2
1
3
A/S/M
P
OFF
L
A
I
D
E
D
O
M
/
R
P
E
O
W

53
Switching on and off
2
Shooting and Playback Basics
• Always remove the lens cap before you switch the camera on.
• Never open the card cover, eject the card, remove the batteries, or unplug
the AC adapter while the card access lamp is blinking. This could not only
prevent the recording of your current picture, but could also destroy the data
recorded on the card.
• If you do not operate the camera for three minutes, the Power Save mechanism automatically switches off the control panel (sleep mode). Press the
shutter button or zoom lever to switch the control panel display back on.
Though the camera automatically switches off after approximately four
hours in Standby mode, you should make a practice of switching the camera off as soon as possible when you are not taking pictures. (These times
may be longer if you are using new batteries and depend on the type of batteries used.)
• Photographed images are saved even if you switch the camera off or
replace the batteries.

Checklist before shooting
Checking the remaining battery charge
When you switch the camera on, the level of remaining battery charge is displayed on the control panel. When the remaining battery charge is low, load
new batteries. If you are using NiMH or Ni-Cd batteries, recharge the batteries.
lights (and turns off automatically).
The batteries have ample charge and you
can take pictures.
blinks and the other icons on the control panel are displayed nor-
mally.
The battery charge is low and the batteries should be replaced. You can still
take pictures, but the battery power may run out in mid-shot.
blinks (and disappears after 12 seconds) and the other icons on the
control panel disappear.
The batteries are fully depleted and should be replaced immediately.
54
2
Shooting and Playback Basics
• When taking pictures on long trips, on special occasions or in cold locations,
keep spare batteries handy.
• The length of time for which the different battery check indicators appear
varies depending on the type of batteries used.
• If you use NiMH batteries, the blinking battery low warning will appear sooner
than when lithium battery packs are used.
• When you are running the camera on batteries that are close the end of
their operating life, the camera may emit a rapid series of short beeps as a
warning after you take a shot or when you switch the camera on. The number of storable pictures shown on the control panel may also blink. If this
happens, your shot will not be taken correctly. Replace the batteries and
take the picture again.
Battery check
indicator

Checking SmartMedia card status (Card check)
When the camera is switched on in a shooting mode, the camera automatically
checks for a card.
55
Checklist before shooting
2
Shooting and Playback Basics
Displayed when there is no card in
the camera or when there is a card
fault.
The Card error indicator on the control panel and the green lamp beside
the viewfinder both blink. At the
same time, the "NO CARD" message
appears on the monitor.
→ Insert a card.
Displayed when there is a card error.
At the same time, the "CARD
ERROR" message appears on the
monitor.
→ Format the card or use a new
card.
Displayed when the card needs to
be formatted.
At the same time, the card formatting
screen appears on the monitor.
→ Format the card. (P.157) Use the
Arrow pad to select "FORMAT"
and then press [OK] to switch to
the card formatting menu. (P.157)
When formatting is completed,
the monitor display switches back
to the screen showing the subject
being photographed.
Control
panel
Control
panel
ENTER
OK
OFF
CARD SETUP
Control
panel
Monitor
View-
finder
Card error
icon
Green lamp

Number of available still shots
Checking the available shots/time
When you switch the camera on with the Mode dial set to "P" or "A/S/M", the
number of storable pictures is displayed on the control panel. (When you
switch the camera on with the Mode dial set to “ ”, the available shooting
time (in seconds) is displayed.)
56
Checklist before shooting
2
Shooting and Playback Basics
Still picture shooting mode
Number of storable pictures
Movie record mode
Available shooting time (sec.)
Recording mode
HIGH (quality)
NORMAL
HIGH (quality)
NORMAL
HIGH (quality)
NORMAL
HIGH (quality)
NORMAL
Number
of pixels
File
Memory capacity
(pictures without sound/pictures with sound)
8MB 16MB 32MB 64MB
2048x1536
1600x1200
1280x960
1024x768
640x480
2048x1536
2048x1536
1600x1200
1280x960
1024x768
640x480
0/0
1/1
2/2
3/3
8/8
3/3
10/9
5/5
16/15
8/8
24/22
13/12
38/32
32/29
82/61
1/1
2/2
4/4
6/6
16/16
6/6
20/19
11/11
31/30
17/16
49/45
26/25
76/66
66/58
165/123
3/3
5/5
8/8
13/13
33/32
13/13
40/39
22/22
64/60
34/33
99/90
53/51
153/132
132/117
331/248
6/6
11/11
17/17
27/26
67/65
27/27
81/78
45/44
128/120
69/67
199/181
107/102
306/265
265/234
664/498
TIFF
SHQ
HQ
SQ1
SQ2
TIFF
JPEG
• When Recording (image quality) mode is set to TIFF, sound cannot be
recorded in the photography modes. However, sound can be
postrecorded in Playback mode. (P.149)

57
2
Shooting and Playback Basics
Checklist before shooting
When the n
When the n
umber of storab
umber of storab
le pictures in Still
le pictures in Still
picture shooting mode reac
picture shooting mode reac
hes 0.
hes 0.
• When the number of storable pictures reaches 0, the camera emits a
warning beep, the green lamp beside the viewfinder blinks and the
"CARD FULL" message appears on the monitor. The same thing occurs
the next time you switch the camera on. (P.216)
When this happens, load a new card or one that is not full. Alternatively,
erase unwanted images on the card to create some free space. (P.71,
155)
Available shooting time (seconds)
• This table shows the maximum times for movies with sound shot by
pressing the shutter button down fully once and shooting continuously.
The available shooting time shown on the control panel and monitor is
the remaining time for which you can record data on the current card.
Recording
Number of pixels
Memory capacity
mode
4MB 8MB 16MB Over 32MB
HQ 320 x 240 11 23 46 75
SQ 160 x 120 46 93 186 300
• The number of storable pictures varies depending on the selected recording (image quality) mode and the card capacity.
• See P.111 for information on setting the record quality (quality setting).
•
All the tables given here are rough guides only. Actual performance may vary.
• The counter may not decrease by 1 each time a shot is taken or increase
by 1 each time an image is erased.
• The number of storable pictures may vary slightly since the amount of data
recorded varies depending on the subject photographed.
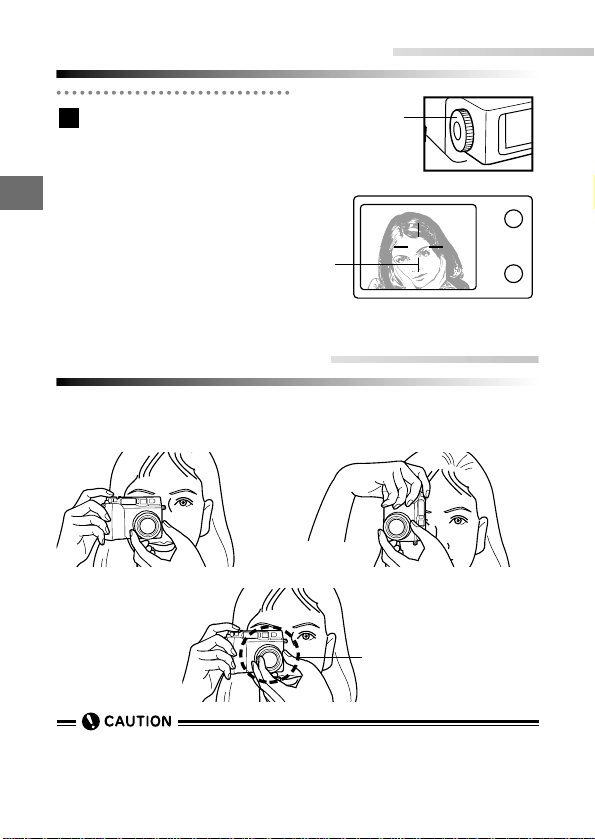
2
Shooting and Playback Basics
58
Holding the camera
Hold the camera firmly with both hands and brace your elbows against your
sides to prevent the camera from moving.
Landscape position
Portrait position
Incorrect
•
Do not apply excessive force to the lens.
•
Keep your fingers and the strap away from the lens and flash.
•
When holding the camera in the landscape position, hold the camera so that
the flash is at the top.
Keep your fingers away from
the lens.
Adjusting the viewfinder
Turn the diopter adjustment dial until you can see
the AF target mark clearly.
1
Diopter adjustment dial
Viewfinder
AF target mark

2
59
Pressing the shutter button
Shooting and Playback Basics
The shutter button has a 2-step operation. Practice using the shutter button
before you take pictures.
Press the shutter button
lightly (press halfway down).
● The focus and image brightness (exposure) are locked.
● The green lamp beside the
viewfinder lights.
●
T o focus on a subject that is not
inside the AF target mark, use
focus lock. (P.78)
Press the shutter button
the rest of the way down
(press fully).
●
The camera takes the picture
and emits a short double-beep.
●
The card access lamp blinks
while the picture is being
recorded onto the card.
If the green lamp blinks
To take a picture of a subject that is a distance
of 2.6 ft (31.5") or less from the camera, use
Macro mode. (P.84) For some subjects, the camera may not be able to lock the focus or exposure. (See "Focusing on difficult subjects (subjects not suited to autofocus)" on P.76.)
2
1
•
Press the shutter button gently. Using sudden movements or too much force
can cause the camera to move and result in blurred pictures (camera shake).
Shutter button
Viewfinder
Green lamp (blinks)

60
2
Shooting
Taking still pictures
Set the Mode dial to "P".
● You can also take pictures
with the Mode dial set to
"A/S/M". (P.88-91)
Compose the picture by
looking through the
viewfinder and using the
zoom lever.(P.72)
● Compose the shot so that the
subject is in the center of the
AF target mark.
● The actual shot is slightly larger than the area visible in the
viewfinder.
Press the shutter button
down halfway.
● The focus and exposure are
locked and the green lamp
beside the viewfinder lights.
● To focus on a subject that is
not in the center of the shot,
use focus lock. (P.78)
● If the green lamp blinks, the
focus or exposure is not
locked. See "Focusing on difficult subjects (subjects not
suited to autofocus)" on P.76.
● If you have selected full-time AF
(P.79), the camera constantly
focuses even when the shutter
button is not pressed down
halfway, making focusing times
shorter.
3
2
1
A/S/M
P
Shooting and Playback Basics
P
O
W
E
R
/
M
O
D
E
D
I
A
L
P
A
/S
/M
O
F
F
2
3
Viewfinder
Orange
lamp
AF target mark Green lamp
1
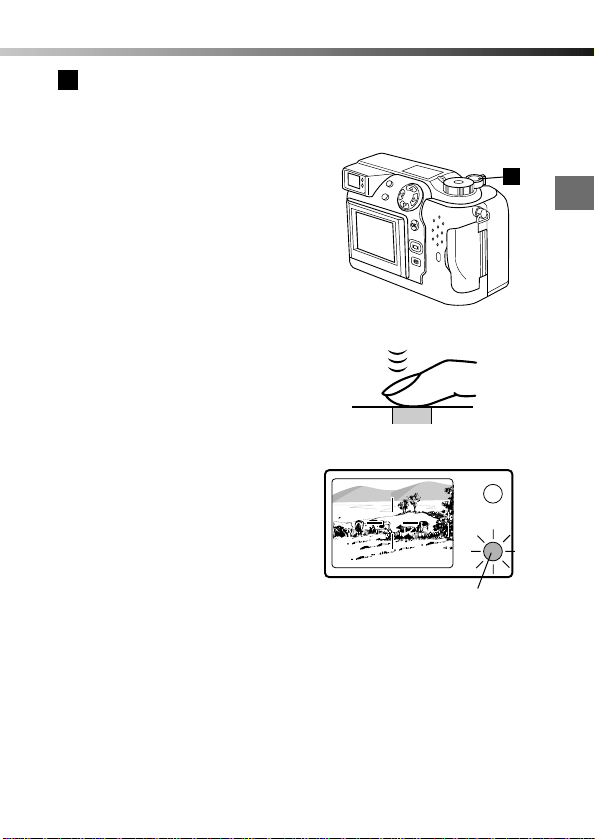
Press the shutter button
the rest of the way down
(press fully).
● When the camera emits a
short double-beep, it has finished taking the picture.
● The green lamp blinks as the
camera starts recording the
picture onto the card.
● The card access lamp blinks
while the data is being
recorded onto the card.
● To check the picture you’ve
just taken, you can view it on
the monitor. → REC VIEW
(P.185)
● When the green lamp beside
the viewfinder stops blinking,
the camera is ready for the
next shot.
● If you press the shutter button
while the green lamp is blinking, the shutter does not operate. (The time for which the
green lamp blinks varies
depending on Recording
(image quality) mode, but
should last between 0.5 and
43 seconds.)
● You can check the camera
memory status by using the
monitor to take pictures.
(P.63)
● You can also record a voice
comment when taking a picture. (P.122)
4
61
2
Shooting
Shooting and Playback Basics
4
Green lamp

62
2
Shooting
Shooting and Playback Basics
When the orange lamp lights
The flash fires automatically. (See "Using the flash (Auto-Flash)" on P.73.)
• Depending on the working distance, the picture that is actually taken and
the picture that you see in the optical viewfinder may be different.
In that case, use the monitor to take the picture.
•
Never open the card cover, eject the card, remove the batteries, or unplug the
AC adapter while the card access lamp is blinking. This could not only prevent
the recording of your current picture, but could also destroy the images recorded on the card.
•
If the orange lamp beside the viewfinder is blinking, this indicates that the flash
is charging. Wait until the orange lamp goes out before pressing the shutter
button.

63
2
Taking pictures using the monitor
Using the monitor allows you to check the actual field of view in your shot as
you are shooting.
Set the Mode dial to "P"
● You can also take pictures
with the Mode dial set to
"A/S/M". (P.88-91)
Press the (Monitor) button to switch the monitor
on.
● Press the button again to
switch the monitor off.
● In A/S/M mode, the monitor
switches on automatically.
Compose the picture by
looking at the image on the
monitor.
Take the picture using the
same procedure as for the
viewfinder.
● The bottom of the memory
gauge lights and the camera
starts storing the image onto
the card.
● Unless the card is full, you can
continue shooting pictures
during image recording until
the memory gauge is completely lit.
● When you shoot 2 or more
pictures, the center of the
memory gauge lights.
4
3
2
1
A/S/M
P
Shooting
Shooting and Playback Basics
P
O
W
E
R
/
M
O
D
E
D
I
A
L
P
A
/S
/M
O
F
F
2
P F2.0 1/800 0.0
Memory gauge
Shutter button
Monitor
number of storable
pictures
3
1
4
AF target mark

64
2
● When the buffer memory is
full, the top of the memory
gauge lights and no more
shots can be taken.
● If “REC VIEW” is set to “OFF”
(P .185), photographed images
are not shown on the monitor.
● Selecting “CHECK” (P.186)
allows you to choose whether
to record or discard the picture
you have just shot.
Shooting
Shooting and Playback Basics
P F2.0 1/800 0.0
1 shot
taken
2 or more
shots takenNophotography
possible
Memory gauge
No shots
taken
Monitor
•
Do not apply excessive force to the monitor.
•
Use the image on the monitor only to compose the shot. The monitor is not
designed to show details such as the focus or exposure.
•
Using the monitor to take pictures increases the time required to write pictures
to the card.
•
When the subject is at an angle to the camera, the edges of the image may
appear jagged on the monitor. This is not a malfunction.
•
Light may appear in bands at the top and bottom of the monitor. This is not a
malfunction.
• When you are shooting in bright conditions, such as in sunlight, vertical
streaks (or smears) may appear on the monitor. If the image is difficult
to see, use the optical viewfinder.
•
Though you can take pictures using the monitor, using the optical viewfinder
tends to reduce camera movement and makes shooting easier. Switching the
monitor off also reduces battery consumption, allowing you to take pictures for
longer.
• The actual image shot is slightly larger than the image you see in the
viewfinder or on the monitor.

65
2
Shooting movies
Use this mode to record pictures and sound at the same time. You can also
set the camera not to record sound. (P.124)
Set the Mode dial to " ".
Compose the shot by looking
at the image on the monitor.
Press the shutter button down
halfway. The camera locks the
focus and exposure and the green
lamp beside the viewfinder lights.
● To focus on a subject that is
not in the center of the shot,
use focus lock. (P.78)
● If the green lamp blinks, the
focus and exposure are not
locked. See "Focusing on difficult subjects (subjects not
suited to autofocus)" on P.76.
To begin shooting,press the
shutter button down fully.To
stop shooting, press the
shutter button again.
●
The remaining seconds display on the monitor shows the
available shooting time.
●
The bottom of the memory
gauge on the monitor lights
and the camera starts recording the movie to the card.
●
Once you have been shooting
for more than 1 second, the center of the memory gauge lights.
●
When the memory buffer
becomes full, the top of the
memory gauge lights and you
can no longer shoot.
4
3
2
1
Shooting
Shooting and Playback Basics
P
A
/S
/M
O
FF
P
O
W
E
R
/
M
O
D
E
D
I
A
L
Memory gauge
Available shooting time
Shutter button
4
32
AF target mark
43
2
1
F2.0 1/800 0.0

66
2
Shooting and Playback Basics
● Selecting “CHECK” allows
you to choose whether to
record or discard the picture
you have just shot before it is
recorded. (P.186)
●
When you are shooting a movie
and recording sound at the
same time, the focus is fixed at
the point where the focus was
locked. If you are shooting a
subject that changes position
markedly (e.g. from background to foreground), stop
shooting briefly to allow the
camera to refocus. To keep the
camera focused all the time
during shooting, set sound
record mode to “OFF”. (P.124)
When the card access lamp starts blinking, recording of the
card has begun.
●
Even if the gauge displays available memory, you cannot shoot the next picture until the recording of the card is completed.
●
When the card access lamp stops blinking, recording of the card has
finished. If memory is available in the card, the number of possible
shots is displayed on the LCD monitor, and you can begin shooting.
5
Shooting
F2.0 1/800 0.0
• When “CHECK” is selected, the monitor may go blank for a few moments
after you have been shooting for a long period. This is because the camera
is processing the images and is not a malfunction.
• The image quality for movies may be lower than that for still images.
• The image actually shot is slightly smaller than the image you see on the
monitor.
• Do not apply excessive force to the monitor.
• Use the image on the monitor only to compose the shot. The monitor is not
designed to show details such as the focus or exposure.
• When the subject is at an angle to the camera, the edges of the image may
appear jagged on the monitor. This is not a malfunction.
• Light may appear in bands at the top and bottom of the monitor. This is not
a malfunction.
• When you are shooting in bright conditions, such as in sunlight, vertical
streaks (or smears) may appear on the monitor or the picture you shoot.
5

67
2
Checking and erasing photographed images
Displaying pictures (Quick View)
When you want to view your shots right after you take them, you can display
the images even in Still Shooting mode simply by pressing the (Monitor)
button. You can also switch quickly back to the shooting mode if you want to
take a picture while you are viewing your shots.
Press the (Monitor)
button twice in quick
succession.
● The monitor switches on and
the most recent picture is displayed.
● You can also view shots you
have taken by selecting " "
on the Mode dial. (Single-frame
playback)
You can use the Arrow pad
to view other pictures
stored on the card.
: Displays the next picture.
:
Displays the previous picture.
: Jumps back 10 pictures.
: Jumps forward 10 pictures.
● See P.147 for information on
displaying the image information (date and time settings,
file name, etc.).
● To play a movie, select an
image with the " " icon.
(P.69)
2
1
A/S/M
P
Shooting and Playback Basics
1
P
O
W
E
R
/
M
O
D
E
D
I
A
L
P
A
/S
/M
O
F
F
2
645312.23.,00 21:56
HQ
Date
Time Frame
number
Battery check
Record mode

To return to the shooting
mode, press the
(Monitor) button again or
press the shutter button
down halfway.
3
68
Checking and erasing photographed images
2
Shooting and Playback Basics
• When you connect the camera to a TV to view your pictur es, you can r otate
pictures that were taken with the camera on its side so that they are easier
to see. (P.145)
• The camera cannot display pictures with file or folder names not automatically
assigned by the camera itself. (P.191)
• When you turn it on, the monitor flashes briefly and the picture appears 0.5
to 2 seconds later. This is not a malfunction.
• Do not press strongly on the monitor . This not only leaves stains on the screen
and makes the images difficult to see, it also risks cracking the monitor.
• Sound cannot be played back on the camera. Connect the camera to a TV
for audio playback or to view pictures rotated. (P.145)
3
3

69
2
Shooting and Playback Basics
Playing movies
Use the procedure below to view your movies.
Use Quick View (P.67) or
set the Mode dial to " "
to display the movie you
have shot. (P.140)
Use the Arrow pad to
select an image with the
icon.
Press the (Menu) button.
● The menu screen appears.
Use the Arrow pad to select
"MOVIE PLAY" and then
press to select "START".
● To cancel movie playback,
press the (Menu) button.
Press the [OK] button.
● The card access lamp blinks
and the movie starts playing
when the camera has finished
reading it from the card.
To pause the movie...
Press the [OK] button during
playback. Press it again to
resume the playback.
5
4
3
2
1
Checking and erasing photographed images
P
A
/S
/M
O
FF
P
O
W
E
R
/
M
O
D
E
D
I
A
L
3
42
MOVIE
PLAY
CARD
SETUP
START
[
1/1
]
MODE
SETUP
FUNCTION
INFO
5
1

70
2
Shooting and Playback Basics
You can use the Arrow pad to
advance the movie frame by
frame once playback has finished or while the movie is
paused.
: Displays the start of the
movie.
: Displays the end of the
movie.
:
Advances the movie by one
frame each time it is pressed.
The movie plays for as long
as the button is held down.
:
Moves back through the
movie by one frame each
time it is pressed. The movie
plays in reverse for as long
as the button is held down.
If you press the [OK] button when
movie playback ends, the movie
starts again from the beginning.
Press the (Menu) button
to exit Movie Playback
mode.
●
When you want to select
another frame, press the
(Menu) button again to exit the
menu screen and then select
the frame using the Arrow pad.
To quickly return from Quick View mode to shooting mode
Press the shutter button down halfway. If you are viewing a movie or using the
menus, the viewfinder switches on immediately and your subject is displayed.
If the Mode dial is set to " ", this function cannot be used.
6
Checking and erasing photographed images
23.12.,00 21:56
0" / 15"
5
6
Date and time of shooting
(displayed for approximately
4 seconds)
Current playback position (sec.)
Total movie time (sec.)
5

71
2
Shooting and Playback Basics
Erasing pictures (One-frame erase)
You can use this function to erase unwanted images. The same procedure
can also be used to erase movies. Before you erase a picture or movie, check
that there is no write-protect sticker on the card or protection setting (P.144)
on the image you want to erase. To erase all the images on a card, see
"Erasing all images (all-frame erase)" on P.155.
Use the Arrow pad to display the picture you want
to erase.
● Immediately after you set the
Mode dial to " ", the last
picture you shot is displayed.
Press the (Erase) button.
●
A confirmation screen appears
asking whether you want to
erase the picture.
Use or on the
Arrow pad to select "YES".
● To cancel, select "NO" and
press the [OK] button or the
(Erase) button.
Press the [OK] button to
erase the displayed picture.
* You can also erase single
frames in Index playback
mode (P.140) and Close-up
playback mode (P.142).
4
3
2
1
Checking and erasing photographed images
• Take great care never to open the card cover, eject the card, remove the
batteries or unplug the AC adapter while a picture is being erased. This
could destroy the data stored on the card.
P
A/S/M
O
F
F
P
O
W
E
R
/
M
O
D
E
D
I
A
L
4
31
2
YES
NO
YES
OK
NO
Monitor

2
Shooting and Playback Basics
72
You can use the camera's 3× zoom for telephoto or wide-angle shots. If
"DIGITAL ZOOM" is set to "ON" in the shooting menu (P.85), you can zoom
in to even higher magnifications.
TTo enlar
o enlargg
e the subject in the
e the subject in the
shot (telephoto)
shot (telephoto)
Turn the lever toward T.
TTo widen the field of vie
o widen the field of vie
w in the
w in the
shot (wide-angle)
shot (wide-angle)
Turn the lever toward W.
• If Sound record mode is ON (P.124) when the
mode dial is set to " " (Movie record mode),
only the digital zoom can be used. The image in
the optical viewfinder does not change when
you use the zoom. Use the monitor to check the
image. Note also that when you use the digital
zoom, the image appears coarser as the magnification increases.
• When you use the digital zoom in Movie record
mode, the image may waver slightly during
zooming.
Using the zoom
• In "P" and "A/S/M" (Still picture shooting mode), you can use both the optical zoom and the digital zoom to zoom in by the equivalent of up to 15x (at
a resolution of 640 × 480). (P.85)
• Unless you select "OFF" in the "ALL RESET" setting (P.175), this setting will
be cancelled when you switch the camera off.
A/S/M
P

73
2
Shooting and Playback Basics
Using the flash (Auto-Flash)
When flash is needed, the orange lamp beside the viewfinder lights when
you press the shutter button down halfway. If the flash mode is set to
"AUTO", the flash automatically fires in low-light and backlit conditions. See
P.126 for information on the other flash modes. The default flash mode is
"AUTO".
Check that the control
panel does not show the
, or icon.
● If any of these modes is
shown, use the (Flash
mode) button to cancel it.
(See "Selecting the flash firing
pattern" on P.126.)
Press the shutter button
down halfway.
● When the orange lamp beside
the viewfinder lights, this indicates that the flash is ready to
fire.
● A flashing orange lamp indicates that the flash is charging. Wait until the lamp stops
flashing before you press the
shutter button.
Press the shutter button
down fully.
● The flash fires.
3
2
1
A/S/M
P
P
O
W
E
R
/
M
O
D
E
D
I
A
L
P
A
/S
/M
O
F
F
1
32
Orange lamp

74
2
Shooting and Playback Basics
TTo photograph a bac
o photograph a bac
klit subject
klit subject
When photographing a backlit subject, position
the subject inside the AF target mark.
Effective flash range
• Wide-angle: Approx. 2.6 ft to 18.4 ft
• Telephoto: Approx. 7.9" to 12.5 ft
Using the flash (Auto-Flash)
Viewfinder
AF target mark
• The intensity of the flash can be set to suit the picture subject. (P.129)
• When you are using the flash in Macro mode, especially for wide-angle
shooting, the flash may fail to illuminate part of the subject, resulting in
uneven lighting. Always check the result on the monitor.
• See P.133 for information on using external flash.
• The flash cannot be used in Sequence mode. (P.113)
• Unless you select "OFF" in the "ALLRESET" setting (P.175), this setting will
be cancelled when you switch the camera off.

3
OLYMPUS DIGITAL CAMERA
Chapter
Focusing
• This chapter describes how to use some of the
camera features, such as focusing and zooming, that are essential to taking effective shots.
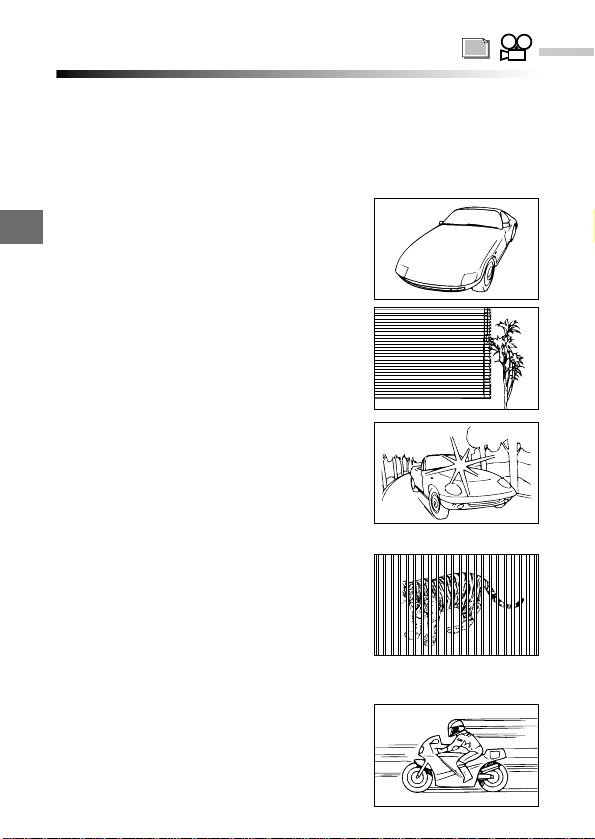
Focusing on difficult subjects (Subjects not suited to autofocus)
3
Focusing
The camera's autofocus function can be used effectively for most subjects.
However, in situations such as 1, 2 and 3 below, the camera may be unable
to focus automatically and the green lamp blinks. In situations 4 and 5, the
camera will not focus even though the green lamp lights and the shutter
releases. When this happens, use the procedure described below or use
Manual focus. (P.82)
1 Subjects with little or no contrast
• Lock the focus on an object with good
contrast that is the same distance from
the camera as the subject (P.78). Then
recompose the shot and take the picture.
2 Subjects with no vertical lines
• Lock the focus on the subject (P.78) by
holding the camera on its side. Then return
the camera to the normal position and take
the picture.
3 Shots where an object in the center of the
shot is excessively bright
• Lock the focus on an object with good
contrast that is the same distance from
the camera as the subject (P.78). Then
recompose the shot and take the picture.
4
Shots that include both near and distant objects
• In this type of shot, your subject may still be out
of focus even though the camera's autofocus
operates and the green lamp lights. In this event,
lock the focus on an object that is the same distance from the camera as the subject (P.78).
Then recompose the shot and take the picture.
5 Fast-moving subjects
• Lock the focus beforehand on an object that
is the same distance from the camera as the
intended subject (P.78). Then recompose the
shot and take the picture.
76
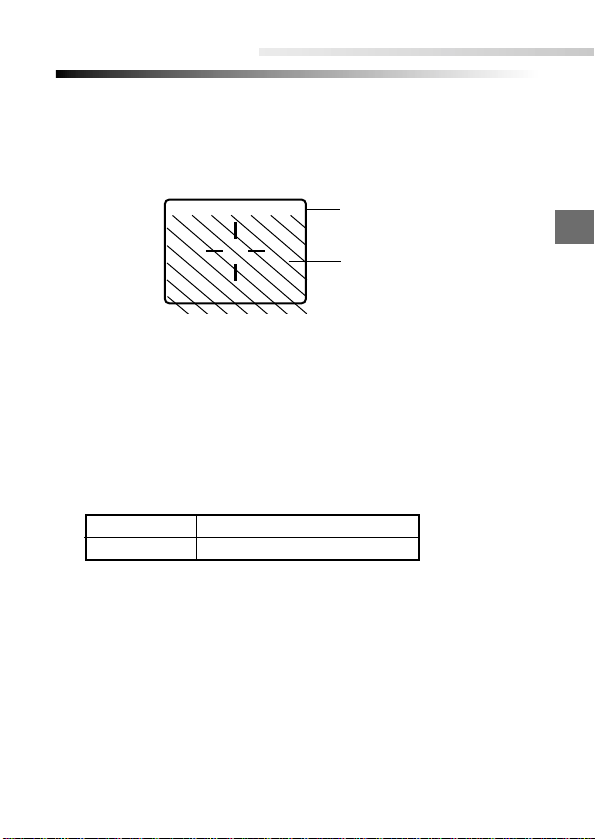
Working range
3
Focusing
The picture frame in the viewfinder shows the area that is shot for subjects at
infinity. However, the picture frame moves lower down in the viewfinder as you
get closer to the subject. (This is particularly pronounced when the zoom is
set to telephoto.)
Take pictures at distances between 7.9" and
∞
(infinity).
• While the shutter will release for subjects closer than 7.9", the resulting
image may be out of focus and incorrectly exposed.
• Using the monitor as a viewfinder is a better way to take close-up pictures.
Shot composition is easier as the monitor shows the actual area photographed.
• Note that the camera uses battery power faster when the monitor is used.
Working range
Macro mode 7.9" to 31.5" (2.6 ft) (P.84)
Normal mode 2.6 ft (31.5") to
∞ (infinity)
77
Picture frame
Picture frame for close-up shots
Viewfinder
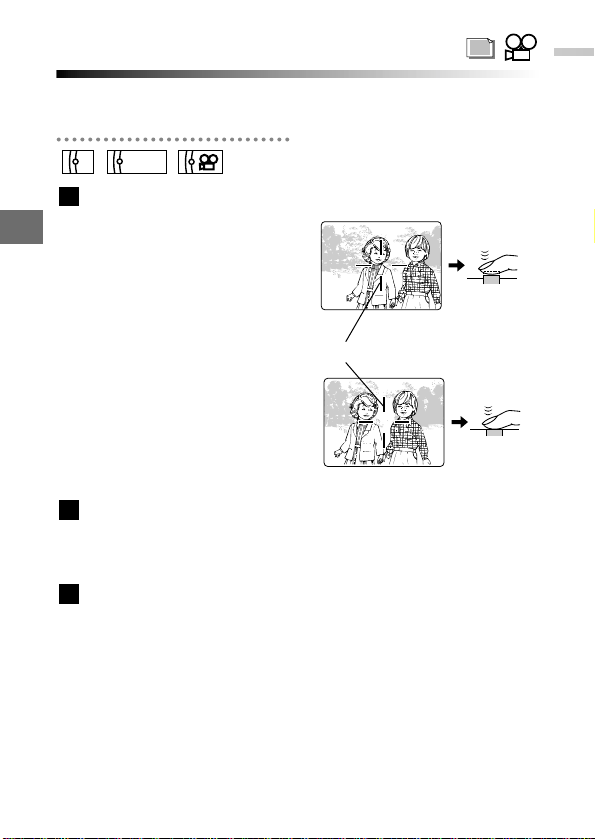
3
Focusing
78
Focusing on off-center subjects (Focus lock)
If your main subject is not within the AF target mark when you compose your
shot, use the procedure below to focus. This is called focus lock.
Position your main subject
inside the AF target marks,
and press the shutter button
down halfway.
● The exposure for the shot is
locked at the same time and
the green lamp beside the
viewfinder lights.
If the green lamp beside the
viewfinder is blinking, the focus
and exposure are not locked.
Release the shutter button and
move the focusing point slightly.
Then repeat step 1 until the
green lamp stays lit.
Recompose the picture
while holding the shutter
button down halfway.
Press the shutter button
down fully to take the picture.
3
2
1
A/S/M
P
AF target mark
Viewfinder

79
3
Focusing
Focusing faster (Full-time AF)
Full-time AF is a mode in which the camera repeatedly focuses on the object
in front of the camera lens even when the shutter button is not being pressed.
This eliminates the need to press the shutter button down halfway and
reduces the time lag between the shutter button being pressed down fully and
the shutter releasing.
Select the "OFF" setting if you do not want to use this feature. When "OFF" is
selected, the camera does not focus until you press the shutter button down
halfway.
Press the (Menu) button.
● The menu screen appears.
Use or on the
Arrow pad to select "MODE
SETUP" and then press
to select "SETUP".
Press the [OK] button.
● The MODE SETUP screen
appears.
Press or to select
"FULL-TIME AF" and then
press .
4
3
2
1
A/S/M
P
P
O
W
E
R
/
M
O
D
E
D
I
A
L
P
A
/S
/M
O
F
F
1
3
42
[
3/3
]
F2.0 1/800 0.0 P
A/S/M
MODE
CARD
SETUP
MODE
SETUP
SETUP
AE LOCK

80
3
Focusing
Press or to select
"ON" or "OFF".
"ON": When the camera is set to
a shooting mode, it repeatedly
adjusts the focus so that it is
always focused.
"OFF": The camera does not
focus until the shutter button is
pressed down halfway.
Press the [OK] button to
save the setting and return
to the MODE SETUP
screen.
Press the [OK] button
repeatedly until the menu
disappears.
7
6
5
Focusing faster (Full-time AF)
76
[
3/4
]
OFF
ON
AF
MODE
REC VIEW
FULL-TIME AF
•
The camera uses battery charge faster when full-time AF is selected.
•
Full-time AF only operates when the monitor is switched on. Be sure that the
monitor is on.
•
The selected setting is retained until changed, even when the camera is
switched off.
5

81
3
Focusing
Selecting a focusing area (AF MODE)
Use the procedure below to select the area used for focusing on the subject.
NORMAL : In this mode, the camera looks at almost the entire screen and
automatically selects the subject to be used for focusing. Use
this mode for normal photography. (Default setting)
SPOT : In this mode, the camera focuses on the center of the object in
the AF target mark in the viewfinder.
Press the (Menu) button.
● The menu screen appears.
Use or on the
Arrow pad to select "MODE
SETUP" and then press
to select "SETUP".
When you press the [OK]
button, the MODE SETUP
screen appears.
Press or to select
“AF MODE” and then press
.
Press or to select
"NORMAL" or "SPOT".
Press the [OK] button to
save the setting and return
to the Menu screen.
Press the [OK] button
repeatedly until the menu
disappears.
7
6
5
4
3
2
1
A/S/M
P
P
O
W
E
R
/
M
O
D
E
D
I
A
L
P
A
/S
/M
O
F
F
763
542
1
[
3/3
]
F2.0 1/800 0.0 P
A/S/M
MODE
CARD
SETUP
MODE
SETUP
SETUP
AE LOCK
[
3/4
]
AF
MODE
REC VIEW
FULL-TIME AF
SPOT
NORMAL
• The selected setting is retained until changed, even when the camera is
switched off.

82
3
Focusing manually (Manual focus)
Manual focus allows you to select a focal distance in advance that matches
the distance to the subject. This mode can be used for subjects that are not
suited to autofocus and for focusing when you use the monitor to compose
the shot.
Press the (Menu) button.
● The menu screen appears.
Use or on the Arrow
pad to select "AF/MF" and
then press .
● The menu disappears and the
shooting distance selection
screen is displayed.
Press to select “MF”.
● " " appears on the control
panel and a distance indicator
with a movable cursor appears
on the monitor.
● To cancel manual focus,
press on the Arrow pad to
select "AF". When " " is no
longer displayed, press the
[OK] button.
Press
or
to select
the distance.
● The image on the monitor is
enlarged during manual
focusing to make focusing
easier to check.
4
MF
MF
3
2
1
A/S/M
P
Focusing
P
O
W
E
R
/
M
O
D
E
D
I
A
L
P
A
/S
/M
O
F
F
432
1
P F2.0 1/800 0.0
AF MF
16ft
10ft
6.5ft
2.6ft
Control panel
Manual focus

83
3
● If you move the cursor to 2.6 ft
(31.5") or less, the indicator
scale automatically changes
to 7.9" - 31.5".
● You can take a picture by
pressing the shutter button at
this point.
Press the [OK] button.
● The setting is saved and "MF"
appears in red on the screen.
●
To cancel manual focusing,
repeat steps 1 and 2 . When
the AF/MF selection screen
appears, press to select
"AF" and then press the [OK]
button.
5
Focusing manually (Manual focus)
Focusing
• When you are using the flash, ensure that the subject for focusing is within
the effective range of the flash.
• Unless you select "OFF" in the "ALLRESET" setting (P.175), this setting will
be cancelled when you switch the camera off.
• The distance indicator on the monitor is only intended as a guide. The
actual distance may vary slightly.
• You cannot change the focus while you are shooting a movie.
AF MF
31inch
24inch
16inch
8inch
P F2.0 1/800 0.0
5

3
84
Focusing on close-up subjects (Macro mode)
Focusing
Use Macro mode to shoot close-up subjects.
When the camera is set to telephoto (at the T setting), you can shoot at distances of as little as 7.9" so that a business card fills the entire frame.
Because the area actually photographed differs slightly from the area visible
through the viewfinder in this mode, use the monitor as the viewfinder.
Press the (Spot/Macro)
button repeatedly until " "
(Macro mode) appears on the
control panel.
● To cancel Macro mode, press
the (Spot/Macro) button until the icon on the control panel disappears.
Take the shot.
Working range
7.9" to 31.5"
2
1
A/S/M
P
P
O
W
E
R
/
M
O
D
E
D
I
A
L
P
A
/S
/M
O
F
F
1
2
Control panel
Macro mode
•
Using the flash in Macro mode may produce a very noticeable shadow.
•
Unless you select "OFF" in the "ALL RESET" setting (P.175), this setting will
be cancelled when you switch the camera off.
• When you are using manual focus (P.82), you cannot select Macro mode.

85
3
Zooming in further (Digital Zoom mode)
The camera's digital zoom function provides an additional 5× magnification
over and above the optical zoom (for 640 × 480 resolution). The optical and
digital zooms used together deliver a combined maximum magnification
equivalent to 15x.
Press the (Menu) button.
● The menu screen appears.
Use or on the Arrow
pad to select "DIGITAL
ZOOM" and then press .
Press or to select
"ON" and then press the
[OK] button.
● You can still take pictures at
this point.
Press the [OK] button.
● The setting is saved and you
exit Menu mode.
4
3
2
1
A/S/M
P
Focusing
P
O
W
E
R
/
M
O
D
E
D
I
A
L
P
A
/S
/M
O
F
F
32
1
[
2/3
]
F2.0 1/800 0.0 P
DIGITAL
ZOOM
FUNCTION
SLOW
OFF
ON
43

86
3
Turn the zoom lever
towards "T" to enlarge the
image (zoom in).
● A zoom bar is displayed on
the monitor. The white portion
of the bar indicates the optical
zoom, and the red portion
indicates the digital zoom.
● If you switch the monitor off
while using the digital zoom,
Digital Zoom mode is automatically cancelled.
Resolution and Digital Zoom Ma
Resolution and Digital Zoom Ma
gnification
gnification
5
Zooming in further (Digital Zoom mode)
Focusing
5
Resolution
2048
×1536
1600
×1200
1280
×960
1024
×768
640
×480
Digital zoom magnification
1x to 2.5x
1x to 3.2x
1x to 4.0x
1x to 5.0x
•
Unless you select "OFF" in the "ALL RESET" setting (P.175), this setting will
be cancelled when you switch the camera off.
•
If you switch the monitor off, Digital Zoom mode is cancelled and the image
scale reverts to normal (100%).
•
The quality of images shot using the digital zoom is coarser.
Zoom bar
P F2.0 1/800 0.0
W
T

4
OLYMPUS DIGITAL CAMERA
Chapter
Custom Photography
• This chapter describes how to select camera
settings such as the field of view, brightness,
exposure, color tones and quality so that you
achieve the desired result. Read the instructions
for each of the settings so that you can get the
results you want for all types of shots.

4
Custom Photography
88
Setting the "A/S/M" dial functions
The "A/S/M" Mode dial setting allows you to select Aperture Priority mode (A),
Shutter Priority mode (S) or Manual mode (M). In Aperture Priority mode you
can set the aperture, in Shutter Priority mode you can set the shutter speed,
and in Manual mode you can set both.
Press the (Menu) button.
● The menu screen appears.
Use or on the
Arrow pad to select "A/S/M
MODE" and then press .
Press or to select
"A", "S" or "M" and then
press the [OK] button.
● Refer to the descriptions of
the respective modes for
information on how to use the
modes. (P.88-91)
● You can still take pictures at
this point.
Press the [OK] button.
● The setting is saved and you
exit the menu screen.
4
3
2
1
A/S/M
P
P
A/S/M
O
F
F
P
O
W
E
R
/
M
O
D
E
D
I
A
L
32
A
S
M
[
3/3
]
F2.0 1/800 0.0 P
A/S/M
MODE
CARD
SETUP
MODE
SETUP
AE LOCK
1
43
• When you have set the Mode dial to "A/S/M", use the monitor to check
which shooting mode is actually selected.
• Unless you select "OFF" in the "ALLRESET" setting (P.175), this setting will
be cancelled when you switch the camera off.

89
4
Custom Photography
Controlling the depth of field (Aperture Priority mode)
This mode allows you to set the aperture yourself. The camera automatically
selects the correct shutter speed. By changing the aperture setting, you can
change the appearance of the background.
In the menu screen, set the
"A/S/M MODE" setting to "A"
(Aperture Priority mode).
● Use the menu screen to
select the shooting mode.
See P.88 for more information
on setting the A/S/M.
● The aperture setting is
displayed in green.
Press the Arrow pad to
select the Aperture (F
value) setting.
Press to increase the
Aperture (F value) setting.
Press to decrease the
Aperture (F value) setting.
2
1
A/S/M
P
A/S/M
O
F
F
P
O
W
E
R
/
M
O
D
E
D
I
A
L
2
A F2.0 1/800 0.0
Aperture (F value) setting
• When you set the Mode dial to "A/S/M", the ISO setting is automatically set
to 100. You can select 100, 200 or 400 as the ISO setting. (P.103)
• If the flash is set to fire automatically, you cannot set a slower shutter speed
than 1/30 seconds.
• If the correct exposure cannot be achieved for the selected setting, the
aperture setting is displayed in red. If " " is displayed, decrease the
aperture setting. If " " is displayed, increase the aperture setting.
• Unless you select "OFF" in the “ALLRESET” setting (P.175), this setting will
be cancelled when you switch the camera off.
Aperture Priority mode

4
Custom Photography
90
Capturing movement (Shutter Priority mode)
By using fast shutter speeds, you can freeze movement. Conversely, you can
use a slow shutter speed to give the impression of flowing movement.
In the menu screen, set the
"A/S/M MODE" setting to
"S" (Shutter Priority mode).
● Use the menu screen to select
the shooting mode. See P.88
for more information on setting
the A/S/M.
● The shutter speed is displayed.
Press the Arrow pad to
select the shutter speed.
Press to increase the
shutter speed.
Press to decrease the
shutter speed.
2
1
A/S/M
P
A/S/M
O
F
F
P
O
W
E
R
/
M
O
D
E
D
I
A
L
2
S F2.0 1/800 0.0
Shutter speed
• When you set the Mode dial to "A/S/M", the ISO setting is automatically set
to "100". You can select ISO settings of 100, 200 or 400 (P.103). The available shutter speeds are not affected by the ISO setting.
Available shutter speeds: 4 sec. to 1/800 sec.
•
If the correct exposure cannot be achieved for the selected setting, the shutter speed appears in red on the monitor. If " " is displayed, decrease the
shutter speed. If " " is displayed, increase the shutter speed.
•
Unless you select "OFF" in the "ALL RESET" setting (P.175), this setting will
be cancelled when you switch the camera off.
Shutter Priority mode

4
91
Custom Photography
Selecting the aperture and shutter speed manually (Manual mode)
Manual mode allows you to select the aperture and shutter speed yourself to
achieve the desired effect. You can use the exposure status indicator in the
viewfinder to check whether the image is correctly exposed.
In the menu screen, set the
"A/S/M MODE" setting to
"M" (Manual mode).
● Use the menu screen to select
the shooting mode. See P.88
for more information on setting
the A/S/M.
● The aperture and shutter
speed are displayed in green.
Press the Arrow pad to
select the aperture (F
value) and shutter speed.
Press to decrease the
aperture size (increase the
Aperture (F value) setting)
and to increase the aperture size (decrease the
Aperture (F value) setting).
Press to increase the
shutter speed and to
decrease the shutter speed.
● The available shutter speeds
are 16 sec. to 1/800 sec.
2
1
A/S/M
• When you set the Mode dial to "A/S/M", the ISO setting is automatically set
to 100. You can select 100, 200 or 400 as the ISO setting. (P.103)
• The exposure indicator in the top-right corner of the viewfinder shows the
difference between the exposure calculated from the selected aperture and
shutter speed and the camera's correct exposure. The difference is shown
in a range from -3.0 EV and +3.0 EV.
• If the image is underexposed by more than -3.0 EV or overexposed by more
than +3.0 EV, the exposure indicator turns red.
• Unless you select "OFF" in the "ALLRESET" setting (P.175), this setting will
be cancelled when you switch the camera off.
P
A/S/M
O
F
F
P
O
W
E
R
/
M
O
D
E
D
I
A
L
2
M F2.0 1/800 –3.0
Aperture
(F value) setting
Shutter speed
Exposure
differential
Manual
mode

4
Custom Photography
92
Shooting at stepped exposures (Exposure compensation)
The camera automatically sets the correct exposure for your shots, but you
can also adjust the exposure by plus or minus 2 steps in increments of 1/3 of
a step. Select a positive compensation value to show white objects more
brightly or a negative value to show black objects more intensely black.
If you select "P", switch
the monitor on.
●
If you select "A/S/M", set the
camera to Aperture Priority mode
or Shutter Priority mode. (P.88)
● The monitor switches on automatically when you select
"A/S/M" or " ". The exposure
compensation value is shown
at the top of the screen.
Press to increase the
exposure compensation
value and to decrease
the exposure compensation value.
● When you select a setting
other than "0", appears on
the control panel.
2
1
A/S/M
P
•
Unless you select "OFF" in the "ALL RESET" setting (P.175), this setting will
be cancelled when you switch the camera off.
•
While exposure compensation changes the brightness of the image on the
monitor, it may not change the appearance of dimly lit subjects. For this type
of subject, check the shot on the monitor.
•
Exposure compensation may not work properly for shots taken using flash.
P
O
W
E
R
/
M
O
D
E
D
I
A
L
P
A
/S
/M
O
F
F
2
P F2.0 1/800 +2.0
Exposure compensation
1

93
4
Custom Photography
Continuous shooting at stepped exposures (Auto Bracket)
Auto Bracket provides a way of recording multiple images with different
brightness settings from a single shot. The focus and white balance are set
for the first shot and remain fixed during continuous shooting. You can also
specify the number of continuous shots.
Press the (Menu) button.
● The menu screen appears.
● If you select "A/S/M", set the
camera to Aperture Priority
mode or Shutter Priority
mode. (P.88)
Use or on the Arrow
pad to select "DRIVE" and
then press .
Press or to select
"BKT" and then press .
Press or to select
the brightness (exposure)
levels and then press .
4
3
2
1
A/S/M
P
P
O
W
E
R
/
M
O
D
E
D
I
A
L
P
A
/S
/M
O
F
F
432
[
1/3
]
AF
1.0
F2.0 1/800 0.0 P
3
DRIVE
ISO
WB
AF/MF
BKT
Control panel
1
Auto Bracket

94
4
Custom Photography
Continuous shooting at stepped exposures (Auto Bracket)
Press or to select
the number of shots.
Press twice to confirm
the setting.
Press the [OK] button
repeatedly until the menu
disappears. The setting is
saved.
● If you take the shot without
pressing the [OK] button, the
setting remains valid until you
press the the (Menu)
button again.
Take the shot.
● When you release the shutter
button during shooting, the
camera stops shooting even if
the job is not completed.
Shooting ends when the
specified number of frames
have been shot.
8
7
6
5
BKT
[
1/3
]
AF
0.3
F2.0 1/800 0.0 P
0.6
1.0
3
5
8
•
The focus and white balance are determined for the first shot.
•
Auto bracket can be used in Program mode, Aperture Priority mode or Shutter
Priority mode.
•
Auto bracket cannot be used in the TIFF quality mode.
•
If there is insufficient buffer space available for the selected number of shots,
the camera cannot take the next shot.
•
Flash cannot be used.
•
Unless you select "OFF" in the "ALL RESET" setting (P.175), this setting will
be cancelled when you switch the camera off.
65
7

95
4
Measuring the subject brightness (Spot Metering mode)
In Spot Metering mode, the camera measures the brightness of the subject.
The camera provides two light metering modes: Digital ESP metering and
spot metering. The camera's default light metering mode is Digital ESP.
In Digital ESP light metering mode, the camera measures the light at the
center of the picture and around the periphery of the picture separately
and then selects the optimal exposure.
Spot metering, because it only measures the light levels at the center of
the image, allows you to obtain the correct exposure for backlit subjects
since the exposure is not affected by the background light. The light
metering mode changes in the cycle shown below each time you press
the (Spot/Macro) button.
Setting Function and Purpose
Normal Digital ESP metering.
Used for normal autofocus photography.
Spot metering mode Measures light only at the center of the
shot.
Macro mode Used for close-up shots. (P.84)
Macro + Spot metering Used for spot metering in close-up
mode shots. (P.97)
Custom Photography
➠
➠
➠
➡

96
4
Measuring the subject brightness (Spot Metering mode)
Custom Photography
Press the (Spot/Macro)
button until " " (Spot
Metering mode) appears on
the control panel.
● To cancel Spot Metering
mode, press the
(Spot/Macro) button repeatedly until the icon on the
control panel disappears.
Take the shot.
2
1
A/S/M
P
P
O
W
E
R
/
M
O
D
E
D
I
A
L
P
A
/S
/M
O
F
F
2
Control panel
1
Spot Metering mode
•
Unless you select "OFF" in the "ALL RESET" setting (P.175), this setting will
be cancelled when you switch the camera off.

97
4
Measuring the subject brightness (Spot Metering mode)
Custom Photography
Using Spot Metering in Macro mode
Using Spot Metering with Macro mode allows you to obtain the correct exposure for backlit subjects that are within the macro photography range.
Press the (Spot/Macro)
button until " " (Macro
+ Spot Metering mode)
appears on the control panel.
● To cancel Macro + Spot
Metering mode, press the
(Spot/Macro) button
repeatedly until the icons on
the control panel disappear.
Take the shot.
2
1
A/S/M
P
P
O
W
E
R
/
M
O
D
E
D
I
A
L
P
A
/S
/M
O
F
F
2
Control panel
1
Macro + Spot Metering mode
• Unless you select "OFF" in the "ALLRESET" setting (P.175), this setting will
be cancelled when you switch the camera off.

98
4
Custom Photography
Taking pictures with pre-fixed exposure
Setting the [OK] button functions (Setting AE
lock)
Use the procedure below to select the AE lock-related function performed
when you press the [OK] button. If you select "SINGLE", the camera applies
the AE lock. If you select "MULTI", the camera switches to multi-metering
mode. If you select "OFF", neither function is performed.
If the aperture (F value) is not fixed even when setting on the menu, the aperture (F value) when setting (AE lock, multi-metering) to "OFF" is fixed by pressing the shutter button down halfway.
Press the (Menu) button.
● The menu screen appears.
Use or on the
Arrow pad to select "AE
LOCK" and then press .
Press or to select
"OFF", "SINGLE" or "MULTI"
and then press the [OK]
button.
● See P .99 for information on AE
lock (SINGLE).
● See P.101 for information on
multi-metering (MULTI).
Press the [OK] button.
● The setting is saved and you
exit the menu screen.
4
3
2
1
A/S/M
P
•
Unless you select "OFF" in the "ALL RESET" setting (P.175), this setting will
be cancelled when you switch the camera off.
P
O
W
E
R
/
M
O
D
E
D
I
A
L
P
A
/S
/M
O
F
F
32
1
43
[
3/3
]
F2.0 1/800 0.0 P
A/S/M
MODE
CARD
SETUP
MODE
SETUP
OFF
SINGLE
MULTI
AE LOCK

99
4
Taking picture with pre-fixed exposure
Custom Photography
Taking Pictures with the exposure locked
(AE lock)
Pressing the [OK] button locks the exposure for the camera's current image.
You can use this featur e when you want to set the exposur e for one scene and
then recompose the shot and use the same exposure settings for the new
scene. Set the "AE LOCK" setting to "SINGLE" beforehand. (P.98)
Compose the shot with the
exposure settings you
want to use and press the
[OK] button.
● The monitor switches on and
" " appears while the
camera stores the exposure
settings.
● If "MULTI" is selected as the "AE
LOCK" setting, the light meter is
displayed. Change the setting
to "SINGLE". (P.98)
To change the locked
exposure:
Recompose the shot and press
the [OK] button again. The
exposure settings are updated
each time you press the [OK]
button.
To cancel AE lock:
Press on the Arrow pad.
" " disappears.
To ensure that the stored
exposure settings are
retained after you take the
shot (AE Memory):
Press . " " is displayed.
MEMO
AEL
AEL
1
A/S/M
P
P
O
W
E
R
/
M
O
D
E
D
I
A
L
P
A
/S
/M
O
F
F
1
Lock the exposure differential
you want to use.
Compose the
shot you want
to take.
Monitor
OK
AEL
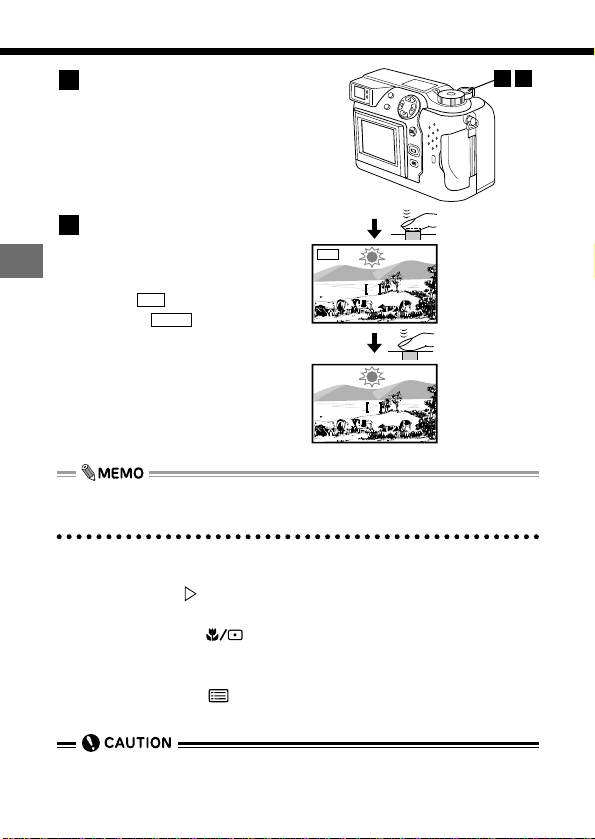
100
4
Taking picture with pre-fixed exposure
Custom Photography
Align the AF target mark
with the subject of the shot
and press the shutter button
down halfway.
● The green lamp lights.
● Focusing and white balancing
are locked.
Press the shutter button
down fully.
● When you finish taking the
shot, the AE lock is released
and " " disappears.
● When " " is displayed,
the locked exposure settings
are retained after you take the
shot and remain valid for the
next shot also.
● You can also use the AE lock
after you press the shutter
button down halfway.
• AE lock can also be used in Spot Metering mode.
AE lock is released when...
The AE lock is released and the AE memory is cleared in the following
situations:
- When you press .
- When you change the Mode dial setting.
- When you press the (Spot/Macro) button to change the light metering mode.
- When you change the drive mode.
- When you press the (Menu) button to view the menu screen.
- The monitor switches off.
MEMO
AEL
3
2
32
AEL
•
You cannot use AE lock while the menu screen is displayed.
•
You cannot use exposure compensation and AE lock at the same time.
 Loading...