Native Instruments Maschine MK2 Quick Start Guide v2.6.8
GETTING STARTED

Disclaimer
The information in this document is subject to change without notice and does not represent a commitment on the part of Native Instruments GmbH. The software described by this document is subject to a License Agreement and may not be copied to other media. No part of this publication may be copied, reproduced or otherwise transmitted or recorded, for any purpose, without prior written permission by Native Instruments GmbH, hereinafter referred to as Native Instruments.
“Native Instruments”, “NI” and associated logos are (registered) trademarks of Native Instruments GmbH.
ASIO, VST, HALion and Cubase are registeredtrademarks of Steinberg Media Technologies GmbH.
All other product and company names are trademarks™ or registered® trademarks of their respective holders. Use of them does not imply any affiliation with or endorsement by them.
Document authored by: David Gover, Nicolas Sidi Software version: 2.6.8 (08/2017)
Hardware version: MASCHINE MK2
Special thanks to the Beta Test Team, who were invaluable not just in tracking down bugs, but in making this a better product.

Contact
NATIVE INSTRUMENTS GmbH
Schlesische Str. 29-30
D-10997 Berlin
Germany
www.native-instruments.de
NATIVE INSTRUMENTS North America, Inc.
6725 Sunset Boulevard 5th Floor
Los Angeles, CA 90028 USA www.native-instruments.com
NATIVE INSTRUMENTS K.K.
YO Building 3F
Jingumae 6-7-15, Shibuya-ku,
Tokyo 150-0001
Japan
www.native-instruments.co.jp
NATIVE INSTRUMENTS UK Limited
18 Phipp Street London EC2A 4NU UK
www.native-instruments.co.uk
© NATIVE INSTRUMENTS GmbH, 2017. All rights reserved.

Table of Contents
Table of Contents
1 |
Welcome to MASCHINE ............................................................................................. |
10 |
||
|
1.1 |
Documentation Overview ............................................................................................................ |
11 |
|
|
|
1.1.1 |
MASCHINE Getting Started Guide .............................................................................. |
11 |
|
|
1.1.2 |
MASCHINE Manual ..................................................................................................... |
11 |
|
|
1.1.3 |
MASCHINE Hardware Control Reference ..................................................................... |
12 |
|
|
1.1.4 |
Controller Editor Manual ............................................................................................ |
12 |
|
|
1.1.5 |
Support Channel Videos ............................................................................................ |
12 |
|
|
1.1.6 |
Other Online Resources ............................................................................................. |
12 |
|
|
1.1.7 |
In This Document ....................................................................................................... |
13 |
|
|
1.1.8 |
Document Conventions .............................................................................................. |
14 |
|
1.2 |
Labeling on your MASCHINE Controller ....................................................................................... |
17 |
|
2 |
First Steps ................................................................................................................ |
|
19 |
|
|
2.1 |
Loading a Drum Kit from the Factory Library .............................................................................. |
20 |
|
|
2.2 |
Playing with the Pads ................................................................................................................. |
25 |
|
|
2.3 |
Recording Your First Pattern ....................................................................................................... |
26 |
|
|
2.4 |
Playing with Your Pattern ........................................................................................................... |
28 |
|
|
|
2.4.1 |
Using Solo and Mute .................................................................................................. |
28 |
|
|
2.4.2 |
Using Note Repeat ..................................................................................................... |
30 |
|
2.5 |
Save Your Work! ......................................................................................................................... |
31 |
|
|
2.6 |
To Sum Up… .............................................................................................................................. |
32 |
|
3 Building Your Own Drum Kit ....................................................................................... |
33 |
|||
|
3.1 |
Opening Your Project .................................................................................................................. |
33 |
|
|
3.2 |
Customizing Your Drum Kit ......................................................................................................... |
36 |
|
|
|
3.2.1 |
Selecting another Snare Sample ................................................................................ |
36 |
|
|
3.2.2 |
Loading a Drumsynth ................................................................................................ |
41 |
MASCHINE - Getting Started - 4

|
|
|
Table of Contents |
|
|
|
|
|
|
3.2.2.2 Loading a Drumsynth into a Plug - in List on the Hardware ........................ |
45 |
|
3.2.3 |
Adjusting Volume, Swing and Tempo ......................................................................... |
46 |
|
3.2.4 |
Changing the Color of a Group or Sound .................................................................... |
48 |
|
3.2.5 |
Moving your Sounds and Groups ................................................................................ |
50 |
3.3 |
Save Your Work! ......................................................................................................................... |
51 |
|
3.4 |
To Sum Up… .............................................................................................................................. |
52 |
|
4 Creating Beats |
.......................................................................................................... |
53 |
|
4.1 |
Fine-tuning .....................................................................................................your First Pattern |
53 |
|
|
4.1.1 ...................................................................................... |
Your Pattern in the Software |
54 |
|
4.1.2 ................................................................................................. |
Doubling the Pattern |
55 |
|
4.1.3 .............................................................................................. |
Quantizing the Rhythm |
56 |
4.2 |
Adding a ............................................................................................................Second Pattern |
59 |
|
|
4.2.1 ............................................................................................. |
Selecting a Pattern Slot |
59 |
|
4.2.2 ..................................................................................... |
Adjusting the Pattern Length |
60 |
|
4.2.3 ............................................................. |
Recording a new Pattern using the Count - in |
62 |
|
4.2.4 .................................................................................................... |
Switching Patterns |
63 |
4.3 |
Editing Patterns .................................................................................................in the Software |
63 |
|
4.4 |
Save Your .........................................................................................................................Work! |
64 |
|
4.5 |
To Sum Up… .............................................................................................................................. |
65 |
|
5 Adding a Bass ....................................................................................................Line |
66 |
||
5.1 |
Selecting .............................................................................................................another Group |
67 |
|
5.2 |
Renaming ..............................................................................................and Coloring the Group |
68 |
|
5.3 |
Loading a .................................................................................Plug-in Instrument for the Bass |
70 |
|
|
5.3.1 .................................................................................. |
Browsing the MASSIVE Presets |
70 |
|
5.3.2 ................................................................................................ |
Using Keyboard Mode |
74 |
|
5.3.3 .............................................. |
Adjusting the Base Key of the Pads on Your Controller |
77 |
MASCHINE - Getting Started - 5

|
|
|
Table of Contents |
|
|
|
|
5.4 |
Recording a Bass Line ................................................................................................................ |
78 |
|
|
5.4.1 |
Creating a Bass Pattern ............................................................................................ |
78 |
|
5.4.2 |
Creating a Second Bass Pattern ................................................................................ |
78 |
|
5.4.3 |
Loading an Additional Bass Sound ............................................................................ |
79 |
5.5 |
Accessing the Plug-in Parameters .............................................................................................. |
80 |
|
5.6 |
Save Your Work! ......................................................................................................................... |
84 |
|
5.7 |
To Sum Up… .............................................................................................................................. |
84 |
|
6 Applying Effects |
........................................................................................................ |
86 |
|
6.1 |
Loading Effects .......................................................................................................................... |
87 |
|
|
6.1.1 |
The Plug-in List ......................................................................................................... |
87 |
|
6.1.2 |
Loading an Effect into a Plug-in List ......................................................................... |
88 |
6.2 |
Playing with Effects .................................................................................................................... |
93 |
|
|
6.2.1 |
Adjusting the Effect Parameters ................................................................................ |
93 |
|
6.2.2 |
Practice Makes Perfect! ............................................................................................. |
94 |
|
6.2.3 |
Bypassing Effects ...................................................................................................... |
95 |
6.3 |
Modulating Effect Parameters .................................................................................................... |
97 |
|
|
6.3.1 |
Recording Modulation ................................................................................................ |
97 |
|
6.3.2 |
Editing Modulation .................................................................................................... |
99 |
6.4 |
Save Your Work! ......................................................................................................................... |
99 |
|
6.5 |
To Sum Up… .............................................................................................................................. |
100 |
|
7 Creating Beats with the Step Sequencer ..................................................................... |
101 |
||
7.1 |
Building Up a Beat in Step Mode ................................................................................................ |
102 |
|
|
7.1.1 |
Using Step Mode ........................................................................................................ |
102 |
|
7.1.2 |
Adjusting the Pattern Length in Step Mode ............................................................... |
103 |
|
7.1.3 |
Recording Modulation in Step Mode .......................................................................... |
104 |
|
7.1.4 |
A Few Notes on Step Mode ......................................................................................... |
104 |
MASCHINE - Getting Started - 6

|
|
|
|
Table of Contents |
|
|
|
|
|
|
7.2 |
Adjusting the Step Grid .............................................................................................................. |
105 |
|
|
7.3 |
Save Your Work! ......................................................................................................................... |
107 |
|
|
7.4 |
To Sum Up… .............................................................................................................................. |
107 |
|
8 |
Creating Scenes ........................................................................................................ |
108 |
||
|
8.1 |
Working with Scenes ................................................................................................................... |
108 |
|
|
8.2 |
Assigning Patterns to Scenes ..................................................................................................... |
109 |
|
|
8.3 |
Managing Scenes ....................................................................................................................... |
112 |
|
|
|
8.3.1 |
Renaming and Coloring Scene Slots .......................................................................... |
113 |
|
|
8.3.2 |
Duplicating and Deleting Scenes ............................................................................... |
113 |
|
8.4 |
Playing Live ................................................................................................................................ |
115 |
|
|
|
8.4.1 |
Jumping to Other Scenes ........................................................................................... |
115 |
|
8.5 |
To Sum Up… .............................................................................................................................. |
117 |
|
|
8.6 |
Save Your Work! ......................................................................................................................... |
118 |
|
9 |
Creating an Arrangement ........................................................................................... |
119 |
||
|
9.1 |
Accessing Arranger View ............................................................................................................ |
119 |
|
|
|
9.1.1 |
Creating your First Section ........................................................................................ |
121 |
|
|
9.1.2 |
Assigning a Scene to a Section .................................................................................. |
122 |
|
9.2 |
Managing Sections ..................................................................................................................... |
123 |
|
|
|
9.2.1 |
Adjusting the Length of a Section .............................................................................. |
123 |
|
|
|
9.2.1.1 Adjusting the Length of a Section Using the Software ............................... |
124 |
|
|
|
9.2.1.2 Adjusting the Length of a Section Using the Controller ............................. |
125 |
|
|
9.2.2 |
Duplicating and Removing Sections .......................................................................... |
126 |
|
9.3 |
Selecting a Loop Range .............................................................................................................. |
128 |
|
|
9.4 |
Save Your Work! ......................................................................................................................... |
129 |
|
|
9.5 |
To Sum Up… .............................................................................................................................. |
130 |
|
MASCHINE - Getting Started - 7

|
|
|
|
Table of Contents |
|
|
|
|
|
10 |
Using Advanced Features |
........................................................................................... |
131 |
|
|
10.1 |
Changing the Sound, Group, and Master Channel Properties ..................................................... |
131 |
|
|
|
10.1.1 |
Creating Custom Sets of Parameters with the Macro Controls .................................. |
132 |
|
|
10.1.2 |
Macro Control Overview ............................................................................................. |
132 |
|
|
10.1.3 |
Assigning Macro Controls .......................................................................................... |
133 |
|
10.2 |
Using Other Sound Sources ........................................................................................................ |
137 |
|
|
|
10.2.1 |
Using Sounds and Groups as Sound Source .............................................................. |
138 |
|
|
10.2.2 |
Using an External Sound Source ................................................................................ |
141 |
|
10.3 |
Sampling |
|
144 |
|
|
10.3.1 ........................................................................................................... |
How to Sample |
144 |
|
|
10.3.2 ............................................................... |
Editing, Slicing and Mapping Your Sample |
147 |
|
10.4 |
The Mix View ............................................................................................................................... |
|
148 |
11 |
Quick Reference ........................................................................................................ |
|
151 |
|
|
11.1 |
Using Your ................................................................................................MASCHINE Controller |
151 |
|
|
|
11.1.1 .......................................................................... |
Controller Modes and Mode Pinning |
151 |
|
|
11.1.2 ................................................. |
Controlling the Software Views from Your Controller |
153 |
|
11.2 |
MASCHINE ........................................................................................................Project Overview |
155 |
|
|
|
11.2.1 ........................................................................................................... |
Sound Content |
155 |
|
|
11.2.2 .............................................................................................................. |
Arrangement |
157 |
|
11.3 |
MASCHINE ..................................................................................................Hardware Overview |
160 |
|
|
|
11.3.1 ................................................ |
Hardware Overview of the MASCHINE MK2 Controller |
160 |
|
|
....................................................................................... |
CONTROL Section |
162 |
|
|
......................................................................................... |
MASTER Section |
164 |
|
|
........................................................................................ |
GROUPS Section |
165 |
|
|
................................................................................... |
TRANSPORT Section |
166 |
|
|
............................................................................................. |
PADS Section |
168 |
MASCHINE - Getting Started - 8

|
|
|
|
Table of Contents |
|
|
|
|
|
|
11.4 |
MASCHINE Software Overview ..................................................................................................... |
171 |
|
|
|
11.4.1 |
Header ....................................................................................................................... |
172 |
|
|
11.4.2 |
Browser ..................................................................................................................... |
174 |
|
|
11.4.3 |
Arranger .................................................................................................................... |
176 |
|
|
11.4.4 |
Control Area ............................................................................................................... |
179 |
|
|
11.4.5 |
Pattern Editor ............................................................................................................ |
180 |
12 |
Troubleshooting |
........................................................................................................ |
182 |
|
|
12.1 |
Knowledge Base ......................................................................................................................... |
182 |
|
|
12.2 |
Technical Support ....................................................................................................................... |
182 |
|
|
12.3 |
Registration Support .................................................................................................................. |
183 |
|
|
12.4 |
User Forum ................................................................................................................................. |
183 |
|
13 |
Glossary ................................................................................................................... |
|
184 |
|
|
Index |
........................................................................................................................ |
|
192 |
MASCHINE - Getting Started - 9

Welcome to MASCHINE
1Welcome to MASCHINE
Thank you for buying MASCHINE!
MASCHINE is essentially the synergy of the MASCHINE controller hardware and the MASCHINE software combining the advantages of both worlds for making music, live as well as in the studio. The intuitive, hands-on qualities of a dedicated Instrument, the MASCHINE controller, with the advanced editing features and the versatility of the MASCHINE software turn it into the creative center of your musical productions.
You can create tight rhythms, harmonies and melodies — the highly enjoyable instrument combines a pattern-based sequencer, professional sampler, multiple studio and creative effects, and VST/AU plug-in host. Everything is intuitively controllable via the fully integrated hardware — once you touch the tactile controller the fun and intuitive workflow takes over, allowing you to stay focused on your music.
Since you can integrate it in any DAW that supports VST, Audio Units or the AAX format with multiple instances, you can profit from its abilities in almost any software setup or use it as a stand-alone application. You can sample your own material, slice loops and rearrange them easily turning your ideas into full productions.
However, MASCHINE is a lot more than an ordinary drum machine or sampler: It comes with an 8-gigabyte Library programmed and created by well-known artists and a sophisticated, yet easy to use tag-based Browser to give you instant access to the sounds you are looking for. But it doesn’t stop there! You can create your own sounds and samples or use MASCHINE EXPANSION packs, available for purchase from the Native Instruments website to further enhance your library of sounds.
You can also control your external MIDI Hardware and Software with the MASCHINE controller and customize the functions of the pads, knobs and buttons to your needs, utilizing the Controller Editor Application.
We hope you enjoy the MASCHINE playground as much as we do. Now let’s get going!
MASCHINE - Getting Started - 10
Welcome to MASCHINE
Documentation Overview
1.1Documentation Overview
Native Instruments provide many information sources regarding MASCHINE. The main documents should be read in the following sequence:
1.MASCHINE Getting Started (this document)
2.MASCHINE Manual
Additional documentation sources provide you with details on more specific topics:
▪MASCHINE Hardware Control Reference
▪Controller Editor Manual
▪Online Support Videos
Hereafter is a quick description of each of these documentation sources.
MASCHINE documents are available in PDF. You can also access these documents from the application’s Help menu or the following location:
www.native-instruments.com.
Please check the Native Instruments website regularly for up-to-date and localized versions of these documents.
1.1.1MASCHINE Getting Started Guide
This document provides a practical approach to MASCHINE via a set of tutorials covering easy and more advanced tasks in order to help you familiarize yourself with MASCHINE.
1.1.2MASCHINE Manual
The MASCHINE Manual provides you with a comprehensive description of all MASCHINE software and hardware features.
MASCHINE - Getting Started - 11

Welcome to MASCHINE
Documentation Overview
1.1.3MASCHINE Hardware Control Reference
The MASCHINE Hardware Control Reference provides an overview of a MASCHINE Project, the quick access options performed using the MASCHINE hardware controller, and lots of keyboard shortcuts.
1.1.4Controller Editor Manual
Besides using your MASCHINE hardware controller together with its dedicated MASCHINE software, you can also use it as a powerful and highly versatile MIDI controller to pilot any other MIDI-capable application or device. This is made possible by the Controller Editor software, an application that allows you to precisely define all MIDI assignments for your MASCHINE controller. The Controller Editor was installed during the MASCHINE installation procedure. For more information on this, please refer to the Controller Editor Manual available as a PDF file via the Help menu of Controller Editor.
1.1.5Support Channel Videos
You can find a number of support videos on The Official Native Instruments Support Channel under the following url: https://www.youtube.com/NIsupportEN We recommend that you follow along with these instructions while the respective application is running on your computer.
1.1.6Other Online Resources
If you are experiencing problems related to your Native Instruments product that the supplied documentation does not cover, there are several ways of getting help:
▪Knowledge Base
▪User Forum
▪Technical Support
▪Registration Support
You will find more information on these subjects in the chapter ↑12, Troubleshooting.
MASCHINE - Getting Started - 12
Welcome to MASCHINE
Documentation Overview
1.1.7In This Document
What you are reading now is the MASCHINE Getting Started. This document consists of a set of tutorials that will guide you through common workflows in MASCHINE. Please follow these tutorials in the described order. You will learn a little something in each of them which will be essential later on. On the way, you will get to know the main objects and concepts of MASCHINE. After reading this, you should have the basic know-how allowing you to make music with MASCHINE!
Even if you’re already familiar with MASCHINE, all tutorials are worth a read as every chapter may have little workflow hints of which you weren’t aware. Should you wish to revise a specific task covered in a later tutorial, be sure to check the prerequisites listed at the beginning of each chapter!
This document is structured as follows:
▪The first part is this introduction.
▪The second part (Chapter 2 to 10) holds the tutorials:
◦Chapter ↑2, First Steps: Load a drum kit from the factory library via the Browser, play this kit with the pads and use it to record a simple rhythmic pattern — all this using your MASCHINE controller only.
◦Chapter ↑3, Building Your Own Drum Kit: Customize your drum kit by quickly exchanging some of its sounds via the Browser and by adjusting some of the sounds’ basic settings.
◦Chapter ↑4, Creating Beats: Record a second pattern and discover how to fine-tune your patterns.
◦Chapter ↑5, Adding a Bass Line: Add a bass line to your song using a VST/AU instrument plug-in in MASCHINE.
◦Chapter ↑6, Applying Effects: Add effects to the various instruments in your song and quickly automate the effect parameters.
◦Chapter ↑7, Creating Beats with the Step Sequencer: Create a Pattern, this time with the step sequencer — another great way of creating grooves from your controller.
◦Chapter ↑8, Creating Scenes: Arrange your Patterns into Scenes and play them live.
MASCHINE - Getting Started - 13
Welcome to MASCHINE
Documentation Overview
◦Chapter ↑9, Creating an Arrangement: Assign your Scenes to Sections and Arrange your song.
◦Finally, Chapter ↑10, Using Advanced Features lets you take a glimpse at some advanced tasks and workflows covered in the MASCHINE Manual: changing Sound, Group, and Master Channel properties; using advanced routings; sampling and the Mix view.
▪The third and last part (Chapter 11 to 13) consists of useful global information on MASCHINE to be used at any time:
◦Chapter ↑11, Quick Reference provides you with a quick reference of the MASCHINE hardware controller and the MASCHINE software. It gives you a good overview of the main concepts and features of MASCHINE, along with lists of hardware shortcuts for various tasks. You can use it as a quick reminder before you dive into the MASCHINE Manual.
◦Chapter ↑12, Troubleshooting gathers useful information for troubleshooting and getting help.
◦Chapter ↑13, Glossary holds definitions of all the important terms and concepts used in MASCHINE.
1.1.8Document Conventions
This section introduces you to the signage and text highlighting used in this document. This document uses particular formatting to point out special facts and to warn you of potential issues. The icons introducing these notes let you see what kind of information is to be expected:
Whenever this exclamation mark icon appears, you should read the corresponding note carefully and follow the instructions and hints given there if applicable.
This light bulb icon indicates that a note contains useful extra information. This information may often help you to solve a task more efficiently, but does not necessarily apply to the setup or operating system you are using; however, it’s always worth a look.
Furthermore, the following formatting is used:
MASCHINE - Getting Started - 14

Welcome to MASCHINE
Documentation Overview
▪Text appearing in (drop-down) menus (such as Open…, Save as… etc.) and paths to locations on your hard drive or other storage devices is printed in italics.
▪Text appearing elsewhere (labels of buttons, controls, text next to checkboxes etc.) is printed in blue. Whenever you see this formatting applied, you will find the same text appearing somewhere on the screen.
▪Text appearing on labels of the MASCHINE controller is printed in orange. Whenever you see this formatting applied, you will find the same text on the controller.
▪Important names and concepts are printed in bold.
▪References to keys on your computer’s keyboard are in square brackets (e.g., “Press [Shift] + [Return]”).
►Single instructions are introduced by this play button type arrow.
→Results of actions are introduced by this smaller arrow.
Naming Convention
Throughout the documentation we will refer to MASCHINE controller (or just controller) as the hardware controller and MASCHINE software as the software installed on your computer.
The term “effect” is sometimes be abbreviated as “FX” when referring to elements in the MASCHINE software and hardware. These terms have the same meaning.
Button Combinations and Shortcuts on Your Controller
Most instructions will use the “+” sign to indicate buttons (or buttons and pads) that must be pressed simultaneously, starting with the button indicated first. E.g., an instruction such as:
“Press SHIFT + PLAY” means:
1.Press and hold SHIFT.
2.While holding SHIFT, press PLAY and release it.
3.Release SHIFT.
MASCHINE - Getting Started - 15
Welcome to MASCHINE
Documentation Overview
Displayed Products
Some images displayed in this document include products from the KOMPLETE and KOMPLETE ULTIMATE series. These products are not included with MASCHINE.
As an introduction to this range please install your free copy of KOMPLETE Selection. You will find the serial number in the DVD booklet. For more information please refer to the Setup Guide. For more information on KOMPLETE and KOMPLETE ULTIMATE please visit the Native Instruments website.
Unlabeled Buttons and Knobs on the Controller
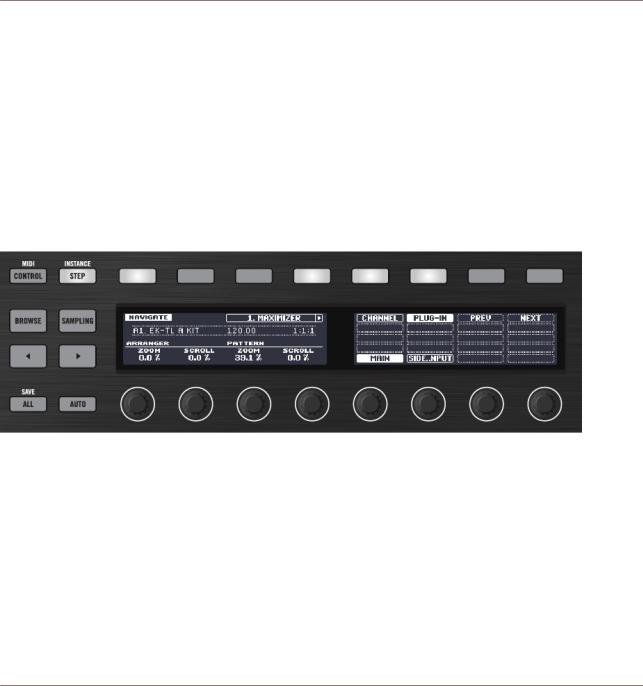
The buttons and knobs above and below the displays on your MASCHINE MK2 controller do not have labels (all other elements on the controller do).
The unlabeled buttons and knobs on the MASCHINE MK2 controller.
For better reference, we applied a special formatting here: throughout the document, the elements are capitalized and numbered, so the buttons are written Button (1–8), while the knobs are written Knob (1–8). For example, whenever you see an instruction such as “Press Button 2 to open the EDIT page,” you’ll know it’s the second button from the left above the displays.
MASCHINE - Getting Started - 16
Welcome to MASCHINE
Labeling on your MASCHINE Controller
1.2Labeling on your MASCHINE Controller
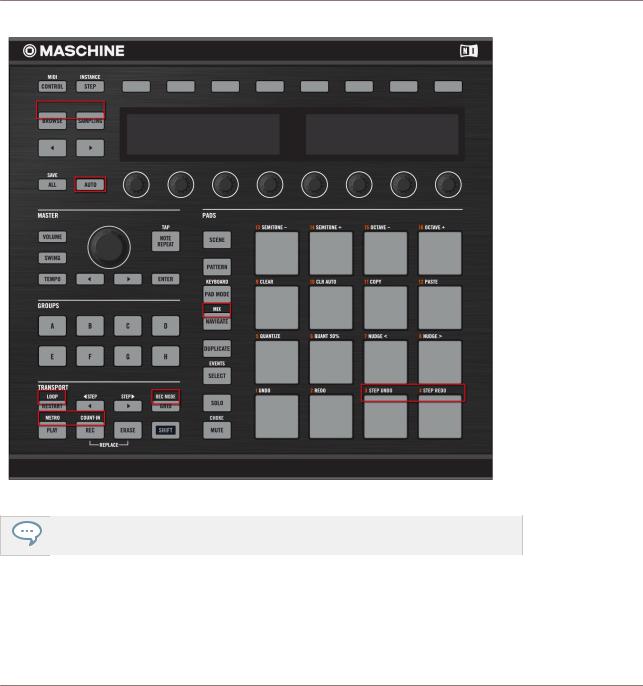
Since its initial release the labels of the MASCHINE MK2 controller have been revised. The instructions in this document will only refer to the 2nd generation controller labels. If you have a first generation MASCHINE MK2 controller, please use the table below to reference the equivalent labels of the first and second generation controllers.
MASCHINE MK2 Controller |
MASCHINE MK2 Controller |
1st Generation |
2nd Generation |
|
|
BROWSE (MODULES) button |
BROWSE button |
|
|
SAMPLING (EDIT) button |
SAMPLING button |
|
|
AUTO WR. button |
AUTO button |
|
|
RESTART button |
RESTART (LOOP) button |
|
|
PLAY (METRONOME) |
PLAY (METRO) button |
|
|
REC (COUNT IN) button |
REC (COUNT-IN) button |
|
|
GRID button |
GRID (REC MODE) button |
|
|
NAVIGATE button |
NAVIGATE (MIX) button |
|
|
COMPARE pad 3 |
STEP UNDO pad 3 |
|
|
SPLIT pad 4 |
STEP REDO pad 4 |
|
|
Labels in brackets refer to the secondary function, available by pressing and holding
SHIFT when pressing the button or pad.
MASCHINE - Getting Started - 17
Welcome to MASCHINE
Labeling on your MASCHINE Controller
Label changes since first generation MASCHINE MK2
If you have the original MASCHINE MK1 controller please download the relevant documentation for that controller from the Native Instruments website.
MASCHINE - Getting Started - 18
First Steps
2First Steps
In this first tutorial, you will load a drum kit from the factory library, play it with the pads and record a simple rhythmic pattern.
For a complete overview of MASCHINE and its controls, please see section ↑11, Quick
Reference.
Prerequisites
Please carefully follow the instructions of the Setup Guide which can be downloaded in PDF format from the Native Instruments website. Once you have followed the Setup Guide, MASCHINE should be installed on your computer, its basic audio settings correctly configured, and the hardware controller connected to your computer. If this is not the case, please return to the Setup Guide for more information before going any further.
►Please start MASCHINE via one of the usual ways on your operating system — for example, by double-clicking the alias placed on your desktop during the installation procedure.
A Project in MASCHINE
In MASCHINE, your whole song (or track) is called Project. A Project consists of all sounds, instruments, effects, settings, along with all arrangement information you will create — in other words, a Project holds everything defining your song.
►If you already started testing MASCHINE, please start again with a blank, new Project by clicking the File menu and choosing New or by using the shortcut [Ctrl] + [N] ([Cmd] + [N] on Mac OS X).
First you will learn how to load a drum kit using the MASCHINE software and then use your hardware controller to carry out the same procedure.
For a complete overview of a MASCHINE project, please see section ↑11.2, MASCHINE
Project Overview.
MASCHINE - Getting Started - 19
First Steps
Loading a Drum Kit from the Factory Library
2.1Loading a Drum Kit from the Factory Library
First you will choose a complete drum kit from the huge factory library included with MASCHINE, and load it using the MASCHINE Browser. The Browser is your tool for finding, tagging and categorizing all types of objects used in MASCHINE.
A drum kit basically consists of several instruments — called Sounds in MASCHINE terminology. Those Sounds are put together into a Group, which represents the complete kit. In addition, A MASCHINE Project can have any number of Groups which are organized into Banks. The first Group bank is labeled A1 to H1 in the MASCHINE software and the second is labeled A2 to H2, the third A3 to H3, and so on. So let’s look for a nice kit and load it into Bank 1 Group A which is selected by default when you start a new project.
2.1.1Loading a Drum Kit from the Factory Library in the MASCHINE Software
In the MASCHINE software, the Browser is found in the left part of the window.
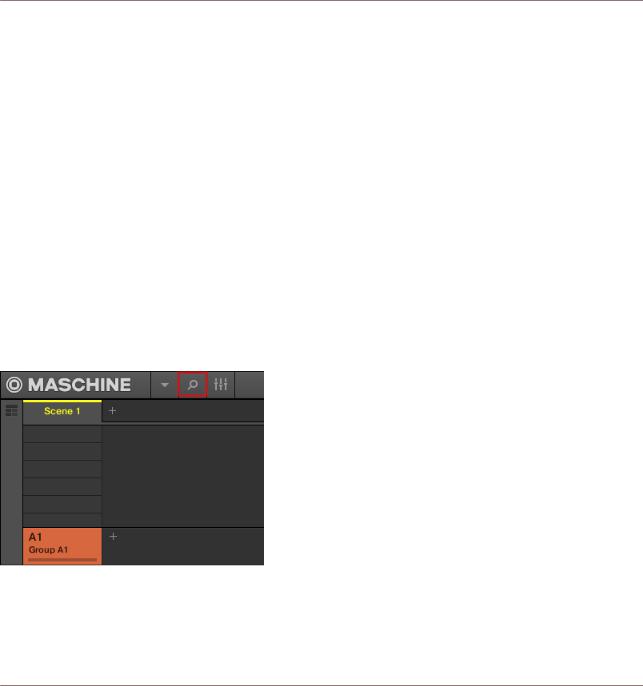
If you cannot see the Browser in the MASCHINE software, click the magnifying glass icon in the Header at the top of the MASCHINE window in order to show the Browser:
Enable the magnifying glass to display the Browser.
To load a drum kit, do the following:
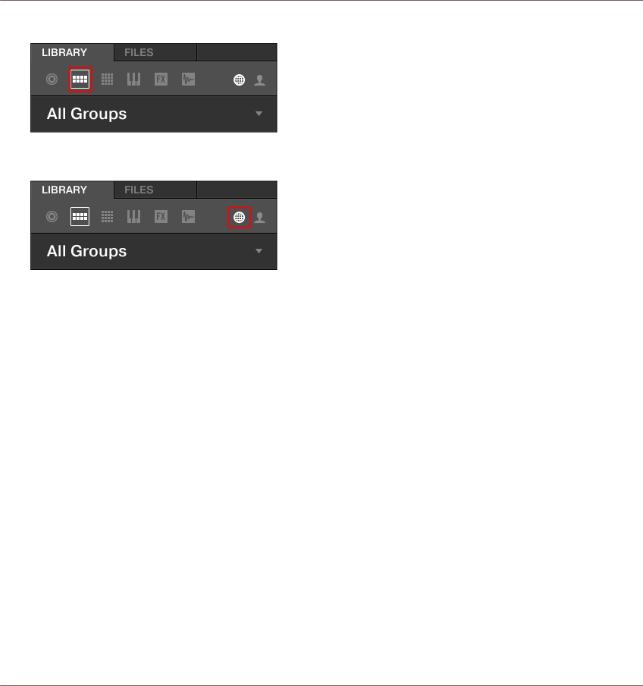
1.Click the LIBRARY tab to open the LIBRARY pane.
MASCHINE - Getting Started - 20
First Steps
Loading a Drum Kit from the Factory Library
2.Click the Group icon to get a list of all available drum kits in the Library:
3.In the Content selector to the right, click the NI icon to select only Native Instruments factory content:
MASCHINE - Getting Started - 21
First Steps
Loading a Drum Kit from the Factory Library
4.In the TYPES filter, select the Kits.
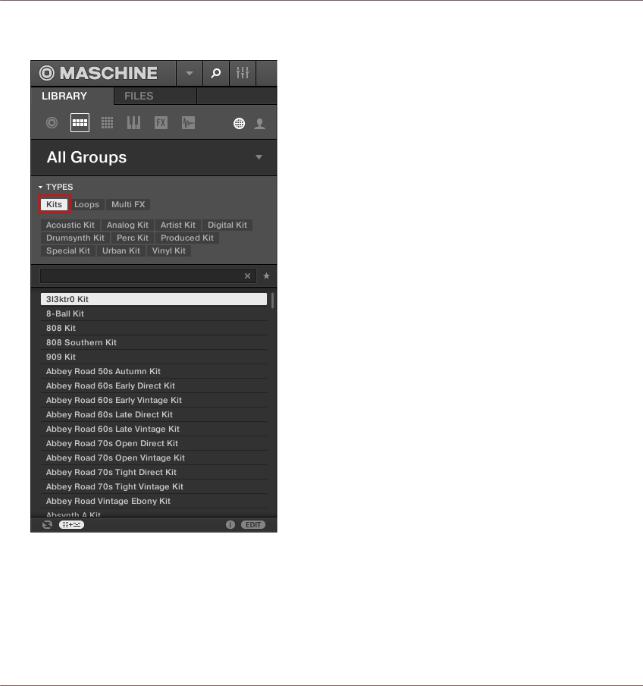
The Browser will then display only kits in the Result list.
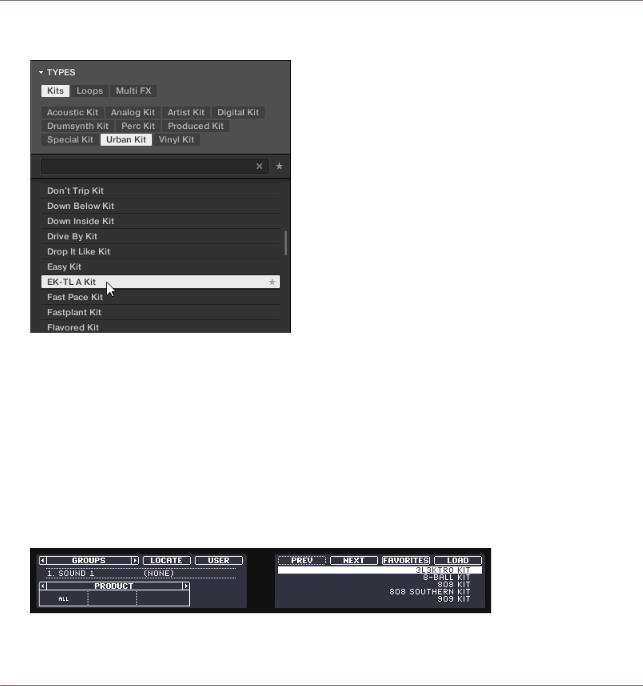
5.Select the Urban Kit sub-type tag below to further refine your search.
MASCHINE - Getting Started - 22
First Steps
Loading a Drum Kit from the Factory Library
6.Scroll down the Result list and double-click EK-TL A Kit to load this drum kit into Group A.
2.1.2Loading a Drum Kit from the Factory Library using the Controller
On your controller, do the following:
1.Press button A on the left of your controller to select the first Group slot. This is where you are going to load our drum kit. Button A should be lit in blue to indicate that it is selected.
2.Press the BROWSE button at the top left of your controller.
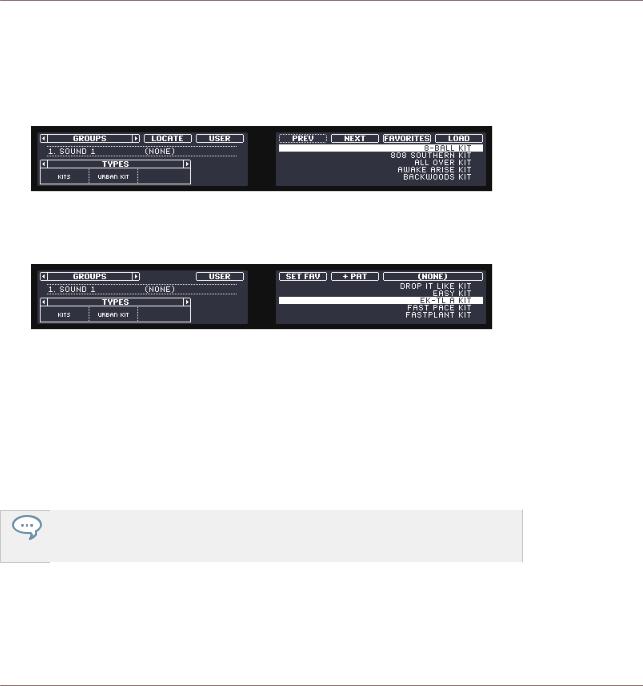
The BROWSE button lights up. In the left display, you now are presented with a selection of choices.
3.Press Button 1 or 2 above the displays to select GROUPS.
Now you can browse Groups only on the right display.
MASCHINE - Getting Started - 23
First Steps
Loading a Drum Kit from the Factory Library
4.Press the right Page button to change the filter from PRODUCT to TYPES.
5.Turn Knob 1 until KITS is selected. This will reduce the results list on the right to display only kits.
6.Turn Knob 2 until URBAN KIT is selected. This will further reduce the results list on the right display to the kits of that type.
7.Under the right display, turn Knob 8 to scroll down the list until EK-TL A KIT is selected.
8.Now press SHIFT + Button 4 above the displays so that +PAT is deselected (the Button must be off — this will be explained in more detail later).
9.Press the Control encoder or Button 8 (above the displays) to load the selected entry.
→The drum kit is loaded into the first Group slot.
As last step, let’s leave the Browser and get back to the default Control mode of your controller:
►Press the lit BROWSE button to leave the Browser (the button is unlit).
That’s it! You just loaded a drum kit into a Group slot of MASCHINE. It is now ready to be played from the pads, as you will see in the next section.
The process of loading from the Browser is the same for all kinds of objects: In the Browser, after choosing the desired object, select the desired content, type, and subtype, then scroll through the result list and select an object for loading.
MASCHINE - Getting Started - 24
First Steps
Playing with the Pads
2.2Playing with the Pads
As soon as a Group is loaded (here the EK-TL A Kit) and the corresponding Group slot selected (here Group slot A), this Group can be played from the pads on your controller. Each pad triggers one of the Sounds included in the Group.
►Play the pads to get the feel of your controller: reactivity, sensitivity to the force you apply while playing (called velocity), etc.
If you don’t hear any sound when playing on your pads, check that none of the buttons in the column to the left of the pads is accidentally lit (if any button is lit, press it to disable it).
While playing, take a look at your pads. You will note the following:
▪When you press a pad, it flashes and then stays fully lit.
▪At any time, only one pad is fully lit. This is the pad you pressed last.
▪All other pads are half lit to indicate that they are loaded with a Sound ready to be played.
▪An unlit pad would indicate that it has no Sound loaded — hence, pressing it would not have any effect.
While playing on the pads, focus now on the eight Group buttons on the left of your controller. You will note the following:
▪All Group buttons except the button A are off, indicating that they are not loaded with anything.
▪Button A is fully lit, indicating that Group A is selected. This means that the pads currently trigger the Sounds of this Group.
▪Group button B is lit in white indicating it is the next group to be created when selected.
As you can see, MASCHINE communicates in both directions: The commands you give via the pads and buttons control the software, but the software also communicates information back to you via the display and the LEDs.
MASCHINE - Getting Started - 25
First Steps
Recording Your First Pattern
►Select Group A again by pressing button A and continue playing on the pads to get familiar with them.
When you feel ready, move on to the next section, where you can record a little rhythmic pattern using this drum kit!
2.3Recording Your First Pattern
Now that you feel comfortable with the pads, let’s use them to live record some rhythm into a Pattern. A Pattern is a recorded sequence of notes played on the Sounds of the current Group. In each Group you can have an unlimited number of Patterns which are grouped into Pattern banks containing up to 16 Patterns each.
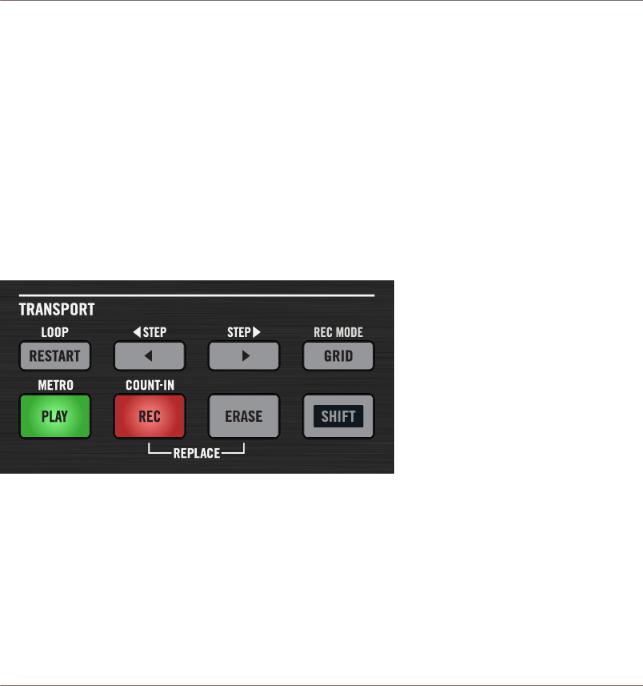
You can now use the transport controls, which are located at the bottom left of your controller:
The TRANSPORT section on your controller (here while recording).
1.Press PLAY to start the sequencer.
The PLAY button lights up green. You won’t hear anything yet because nothing has been recorded.
2.Press SHIFT + PLAY to activate the metronome so you get a rhythmical reference.
You now hear the metronome indicating each beat, the first beat of each bar being indicated by a different note.
3.Play along to the metronome to get a feel for the tempo.
MASCHINE - Getting Started - 26
First Steps
Recording Your First Pattern
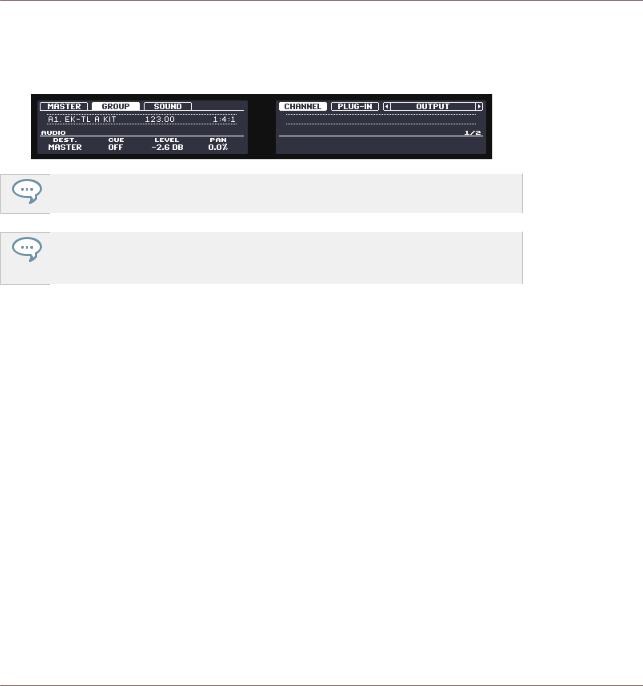
4.If you’d like to increase or decrease the tempo to make your playing feel more comfortable, press the TEMPO button at the left of the controller (the button lights up), turn the Control encoder, and press TEMPO again to deactivate it (the button turns off).
The tempo value is indicated in the left display.
You can also adjust the volume of the metronome by pressing SHIFT + GRID and turning knob 1.
It is recommended that you start with a simple sequence using a few Sounds only (e.g., the kick and the snare on pads 1 and 2). You will have the possibility to enrich your Pattern later!
When you feel ready, start recording:
1.With the sequencer playing, press REC to enter recording mode. REC lights up red.
2.Play the desired rhythm on the pads. By default, the recorded Pattern is one bar long. Your playing is recorded and directly played in a loop. As long as you don’t press PLAY again, the new Pattern keeps playing.
3.Press REC again to stop recording.
→You just created your first Pattern!
You can now deactivate the metronome by pressing SHIFT + PLAY again and listen to your newly created rhythm.
►To stop the sequencer, press PLAY again.
Quick Edits on Your Pattern
At any time, you can undo your last action by pressing SHIFT + pad 1 — whether you are currently recording or not. You can redo it by pressing SHIFT + pad 2.
MASCHINE - Getting Started - 27
First Steps
Playing with Your Pattern
The undo and redo commands are global in MASCHINE: Almost any action in MA-
SCHINE can be undone/redone!
At any time, you can enrich your Pattern by activating PLAY and REC again, and playing the pads. This way, you can progressively build up a complex Pattern step by step.
2.4Playing with Your Pattern
Now that you have a nice Pattern, let’s introduce a few powerful tools for playing your Pattern live.
2.4.1Using Solo and Mute
Muting is used to bypass a Sound or a Group, whereas Solo is pretty much the opposite: Soloing a Sound or a Group mutes all other Sounds in that Group or all other Groups, respectively, so that you can listen to the selected Sound or Group alone. The combination of both is a useful means to play live and to test different sequences together.
When used on Sounds, the Solo only applies to the current Group: The Sounds in other Groups won’t be affected.
2.4.1.1Using Solo and Mute in the MASCHINE Software
Soloing a Sound
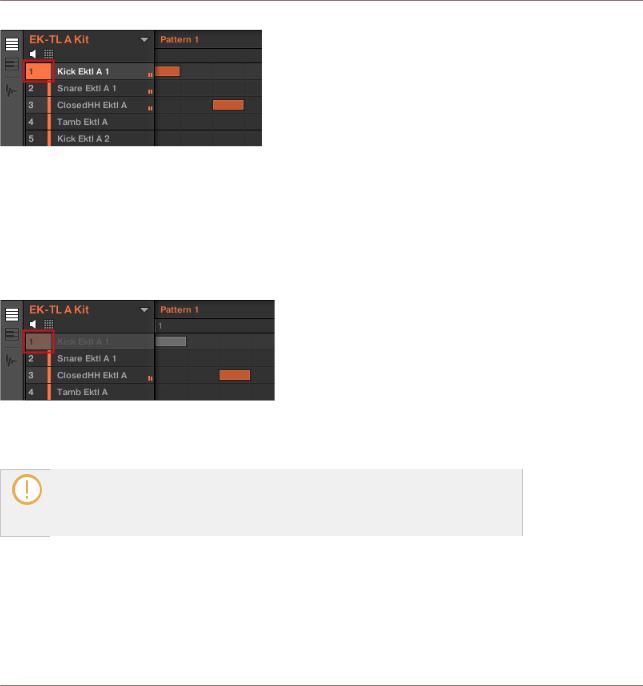
►To solo a Sound, right-click (on Mac OS X: [Ctrl]-click) the number on the left side of the Sound slot in the Pattern Editor.
MASCHINE - Getting Started - 28
First Steps
Playing with Your Pattern
Soloing the first kick Sound.
►To unsolo a Sound, right-click (on Mac OS X: [Ctrl]-click) the number again.
Muting a Sound
►To mute a Sound, click the number on the left side of the Sound slot in the Pattern Editor.
Muting a Sound.
►To unmute the Sound, click the number again.
By default, the Mute on Sounds is an event mute: events for muted Sounds are not triggered, but the audio coming from previous events might still be audible (reverb tail, etc.). You can also activate audio mute for Sounds to mute both events and audio — see the beginning of this section for more information.
2.4.1.2Solo and Mute Sounds using the MASCHINE Controller
1.Press PLAY to start the sequencer.
Your Pattern starts playing. You see each pad flashing as the corresponding drum is triggered.
MASCHINE - Getting Started - 29
First Steps
Playing with Your Pattern
2.Press and hold the MUTE button at the bottom of your controller. All pads become fully lit. They continue flashing with the rhythm.
3.While holding MUTE, press pad 1.
The pad turns half lit and you don’t hear the kick drum anymore.
4.While holding MUTE, press a few other pads to mute their Sound to your liking.
5.While holding MUTE, press pad 1 again.
The pad returns to being fully lit and the kick drum is playing again.
6.While holding MUTE, press again the pads you just muted to bring their Sounds back.
7.Release MUTE.
8.Now press and hold the SOLO button (just above MUTE).
Again, all pads turn fully lit and continue flashing with the rhythm.
9.While holding SOLO, press pad 1.
Pad 1 stays fully lit while all other pads turn half lit and you can’t hear their Sounds anymore.
10.Now release SOLO and hold MUTE again.
11.Press the half-lit pads one by one, progressively bringing each drum back in the mix.
→The combination of muting and soloing Sounds allows you to create effective breaks on the fly!
You can also solo and mute whole Groups by holding SOLO or MUTE and pressing the desired Group button — since you have only have one Group loaded, it would not make much sense yet.
2.4.2Using Note Repeat
Note Repeat is a really handy way to play and program beats: it plays the selected Sound or note repeatedly at a given rate. You just need to hold a pad and its Sound/note will be steadily repeated until you release the pad.
▪When using Note Repeat all pads will be both velocity and pressure sensitive, allowing for expressive drum rolls or dynamic basslines.
MASCHINE - Getting Started - 30
 Loading...