


 Loading...
Manual

Disclaimer
The information in this document is subject to change without notice and does not repre sent a commitment on the part of Native Instruments GmbH. The software described by this document is subject to a License Agreement and may not be copied to other media. No part of this publication may be copied, reproduced or otherwise transmitted or record ed, for any purpose, without prior written permission by Native Instruments GmbH, herein after referred to as Native Instruments.
“Native Instruments”, “NI” and associated logos are (registered) trademarks of Native In struments GmbH.
Mac, Mac OS, GarageBand, Logic, iTunes and iPod are registered trademarks of Apple Inc., registered in the U.S. and other countries.
Windows, Windows Vista and DirectSound are registered trademarks of Microsoft Corpora tion in the United States and/or other countries.
All other trade marks are the property of their respective owners and use of them does not imply any affiliation with or endorsement by them.
Document authored by: musicandtext.com, Holger Brauns, Native Instruments Translation by: Michael Lockman
Document version: 1.0 (04/2011)
Special thanks to the Beta Test Team, who were invaluable not just in tracking down bugs, but in making this a better product.

Contact
Germany
Native Instruments GmbH Schlesische Str. 28 D-10997 Berlin
Germany info@native-instruments.de www.native-instruments.de
USA
Native Instruments North America, Inc. 5631 Hollywood Boulevard
Los Angeles, CA 90028 USA
sales@native-instruments.com www.native-instruments.com
© Native Instruments GmbH, 2011. All rights reserved.

Table of Contents
Table of Contents
1 |
Introduction |
.............................................................................................................. |
6 |
|
2 |
Quick Start ................................................................................................................ |
|
8 |
|
|
2.1 |
Preset ..........................................................................................................................Structure |
8 |
|
|
2.2 |
The User ...................................................................................................Interface at a Glance |
11 |
|
|
|
2.2.1 ............................................................................................................. |
Main Window |
11 |
|
|
2.2.2 ....................................................................................................... |
Animator Window |
12 |
|
|
2.2.3 ..................................................................................................... |
Keyswitch Window |
14 |
|
|
2.2.4 ................................................................................................... |
Articulation Window |
16 |
|
|
2.2.5 ................................................................................................................. |
FX Window |
19 |
3 The User Interface .......................................................................................in Detail |
21 |
|||
|
3.1 |
Main Window .............................................................................................................................. |
21 |
|
|
|
3.1.1 ............................................. |
Volume Area — Section1 and Section 2 Control Knobs |
22 |
|
|
3.1.2 .............................................................................................................. |
Contour Area |
22 |
|
|
3.1.3 ............................................................................................................ |
Envelope Area |
24 |
|
3.2 |
Animator ........................................................................................................................Window |
26 |
|
|
|
3.2.1 ................................................................................ |
Animator Switch and Step LEDs |
26 |
|
|
3.2.2 ................................................................................................... |
Step Control Sliders |
27 |
|
|
3.2.3 .......................................................................... |
Retrigger/Continuous Toggle Switch |
27 |
|
|
3.2.4 ................................................................................................ |
Pattern Toggle Switch |
28 |
|
|
3.2.5 .................................................................................................. |
Steps Toggle Switch |
28 |
|
|
3.2.6 ............................................................................................... |
Dynamic Control Knob |
29 |
|
|
3.2.7 .................................................................................................. |
Groove Control Knob |
29 |
|
|
3.2.8 ................................................................................................... |
Swing Control Knob |
30 |
|
|
3.2.9 .................................................................................................. |
Length Control Knob |
30 |
|
|
3.2.10 ........................................................................................... |
Phrase Drop - Down Menu |
31 |
|
|
3.2.11 .................................................................................... |
Articulation Drop - Down Menu |
32 |
Session Strings Pro - Manual - 4

|
|
|
|
Table of Contents |
|
|
|
|
|
|
|
3.2.12 |
Animator Mode Drop - Down Menu ............................................................................... |
33 |
|
3.3 |
Keyswitch Window ...................................................................................................................... |
35 |
|
|
|
3.3.1 |
Round Robin On/Off Switch ....................................................................................... |
36 |
|
|
3.3.2 |
Articulation Drop - Down Menus .................................................................................. |
36 |
|
|
3.3.3 |
Key Fields .................................................................................................................. |
36 |
|
|
3.3.4 |
The Articulation Types Available in the Keyswitch Window ........................................ |
37 |
|
|
3.3.5 |
Velocity ...................................................................................................................... |
40 |
|
3.4 |
Articulation Window .................................................................................................................... |
42 |
|
|
|
3.4.1 |
Articulation Types Available in the Articulation Window ............................................ |
43 |
|
|
3.4.2 |
Main Drop - Down Menu and Additional Controllers .................................................... |
48 |
|
|
3.4.3 |
Round Robin On/Off Switch ....................................................................................... |
48 |
|
|
3.4.4 |
Velocity Control Drop - Down Menu and the Value and Key Control Knobs ................... |
49 |
|
|
3.4.5 |
Sustain Control Drop - Down Menu and Animator Articulation Control Knob ............... |
50 |
|
|
3.4.6 |
Expression Control Drop - Down Menu and Short Notes Control Knob .......................... |
51 |
|
|
3.4.7 |
Pitchbend Mode Toggle Switch .................................................................................. |
52 |
|
|
3.4.8 |
Velocity ...................................................................................................................... |
53 |
|
3.5 |
FX Window .................................................................................................................................. |
55 |
|
|
|
3.5.1 |
Equalizer ................................................................................................................... |
56 |
|
|
3.5.2 |
Compressor ............................................................................................................... |
57 |
|
|
3.5.3 |
Reverb ....................................................................................................................... |
58 |
4 |
Practical Tips |
........................................................................................................... |
60 |
|
|
4.1 |
How the ........................................................................................Operating Elements Function |
60 |
|
|
4.2 |
Emergencies ............................................................................................................................... |
62 |
|
5 |
FAQ .......................................................................................................................... |
|
|
63 |
6 |
Credits |
...................................................................................................................... |
|
66 |
|
Index ........................................................................................................................ |
|
|
67 |
Session Strings Pro - Manual - 5

Introduction
1Introduction
Thank you for choosing to work with Session Strings Pro.
With Session Strings Pro you now have command of a top-notch string ensemble that of fers a diverse number of playing styles, sound varieties, and outstanding sound quality. Two factors were of particular importance to us during the development of Session Strings Pro:
Firstly, the simple and intuitive operation of the software and secondly an expressive, warm, and direct string timbre, which is suitable for the production of pop music as well as classical and film music.
The string players that participated in the Session Strings Pro recordings are some of Eu rope's top string musicians and each individual tone was recorded at the highest level of expression and perfection. We made absolutely no compromises, even with the selection of instruments. All instruments used in Session Strings Pro are crafted by Italian instrument makers of the 18th and 19th centuries. The warmth and balance of the ensemble is in deed the result of this meticulous selection of instruments.
Session Strings Pro is composed of four string groups, each with four violins, three violas, two celli, and two double basses. The volume of each group can be adjusted so that the instrumentation can be changed with a simple turn of a knob.
Bow noises are a natural component of all string performances. However there are often musical situations, where one might want to control the amount of these bow noises. For the first time in sample-based music production, the Bow Noise control included in Ses sion Strings Pro allows the user to have direct control over the amount of bow noise in the ensemble's sound.
The fully programmable Animator transforms chords into rhythmical staccato, spiccato, or pizzicato phrases and is thus an excellent tool for quick and creative composition.
The enormous selection of string articulations can be accessed directly in Session Strings Pro. This does not require you to first load various presets. Depending on your specific uti lization of the software, you can assign articulations to free controls so that they can be directly integrated in a live performance or so that you can access them by simply pushing a definable key!
Session Strings Pro - Manual - 6

Introduction
An entire team of musicians, sound designers, and software developers participated in the development of Session Strings Pro. We are convinced that we did more than simply cre ate a string library; our product is a living instrument that offers musicians the possibility to concentrate on what really matters — the music.
We hope you enjoy working with Session Strings Pro and we would be delighted to hear your feedback and ideas! You can find e-instruments online at http://www.e-instru ments.com.
Yours,
Thomas Koritke e-instruments
Session Strings Pro - Manual - 7

Quick Start
Preset Structure
2Quick Start
This chapter contains a short description of the functions of Session Strings Pro for a quick start. Chapter ↑3, The User Interface in Detail contains a more detailed description of all the functions.
The user interface of Session Strings Pro provides you with a number of program windows with various functions. These can be accessed by simply clicking on the tabs on the bot tom margin of the program window.
The number of program windows available on the user interface depends on the preset type you are utilizing.
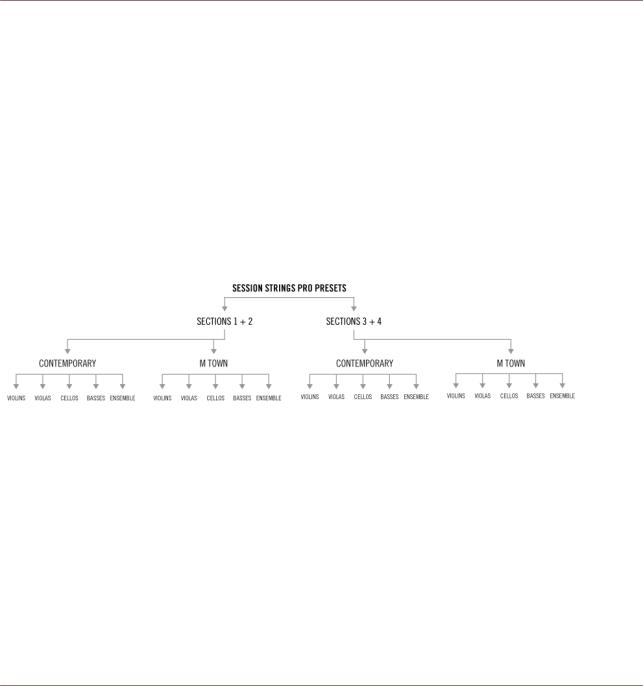
2.1Preset Structure
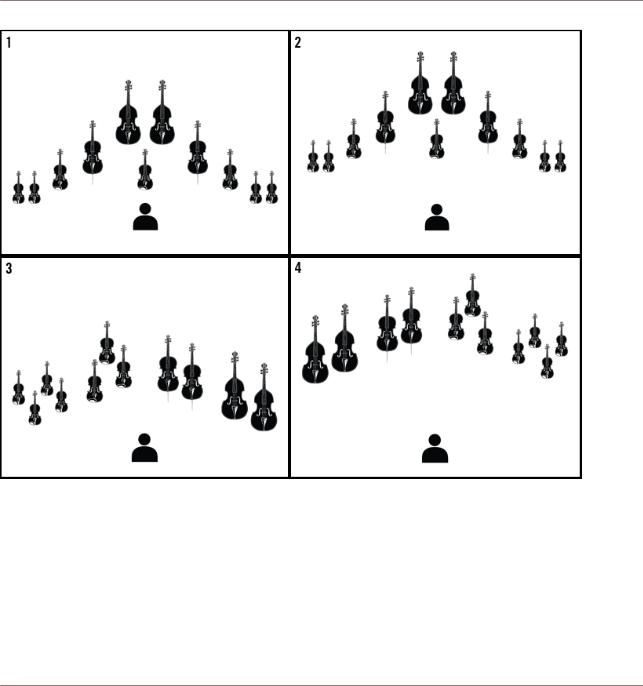
Session Strings Pro is composed of four string sections, each with four violins, three vio las, two celli, and two double basses. Section 1 and 2, and section 3 and 4 make the two top level preset groups in the KONTAKT Instrument browser. In the next lower level you'll find Contemporary and M-Town preset groups. On the lowest level of the structure, there are Performance, Production, and Animator presets.
Sections
▪Section 1 and 2 are characterized by a direct, rather dry sound. The recording was opti mized for Pop/Rock production, with section 1 nearer to the listening position than section 2.
▪Section 3 and 4 have more of a spacial, "classical" sound to them. They were recorded in slightly greater distance from the listening position, with section 3 in a traditional orchestral seat.
Session Strings Pro - Manual - 8
Quick Start
Preset Structure
Fig. 2.1 Depiction of the String Arrangements in Sections 1-4
Contemporary and M-Town
▪The Contemporary presets were recorded in a recording room with neutral acoustics, and the original sound was retained as far as possible. The result is a modern string sound, suitable for a wide variety of musical styles.
▪The M-Town presets reflect the sonic characteristics of Soul and Disco music from the 60s and 70s, in which the strings had a very present mid-tone sound.
Session Strings Pro - Manual - 9
Quick Start
Preset Structure
Performance, Production, and Animator Presets
▪Performance presets are particularly suitable for live performances. This preset type is accompanied by the four program windows Main (see ↑2.2.1, Main Window), Animator (see ↑2.2.2, Animator Window), Articulation (see ↑2.2.4, Articulation Window), and FX (see ↑2.2.5, FX Window).
▪Production presets are particularly suitable for recording and production. This preset type utilizes the three program windows Main (see ↑2.2.1, Main Window), Keyswitch (see ↑2.2.3, Keyswitch Window), and FX (see ↑2.2.5, FX Window).
▪Animator presets come with a pre-set Animator function, which lets you turn chords into grooving phrases — staccato, spiccato, or pizzicato — seamlessly.
Chapter ↑2.2, The User Interface at a Glance contains a short description of all available program views for a quick start. Chapter ↑3, The User Interface in Detail provides a more detailed description of all program functions.
Fig. 2.2 Schematic depiction of the presets available in Session Strings Pro
Session Strings Pro - Manual - 10
Quick Start
The User Interface at a Glance
2.2The User Interface at a Glance
2.2.1Main Window
Fig. 2.3 The Main window in Session Strings Pro
The Main window is a component of both preset types (see also ↑2.1, Preset Structure). In the Main window you can configure important overall program functions:
▪In the Volume area, you can control the volume of the entire string ensemble. The con trol knobs Section1 and Section2 are used to control the volumes of both available string ensembles. Details regarding the instrumentation of these two ensembles can be found in Chapter ↑3.1.1, Volume Area — Section1 and Section 2 Control Knobs.
Session Strings Pro - Manual - 11
Quick Start
The User Interface at a Glance
▪In the Contour area, you can control the sound's consistency and its physical perception. This includes the amount of bow noise in the overall string ensemble sound as well as their acoustic positioning. Further details can be found in Chapter ↑3.1.2, Contour Area.
▪The Envelope area allows the user to set the attack response speed and release time. Further details can be found in Chapter ↑3.1.3, Envelope Area.
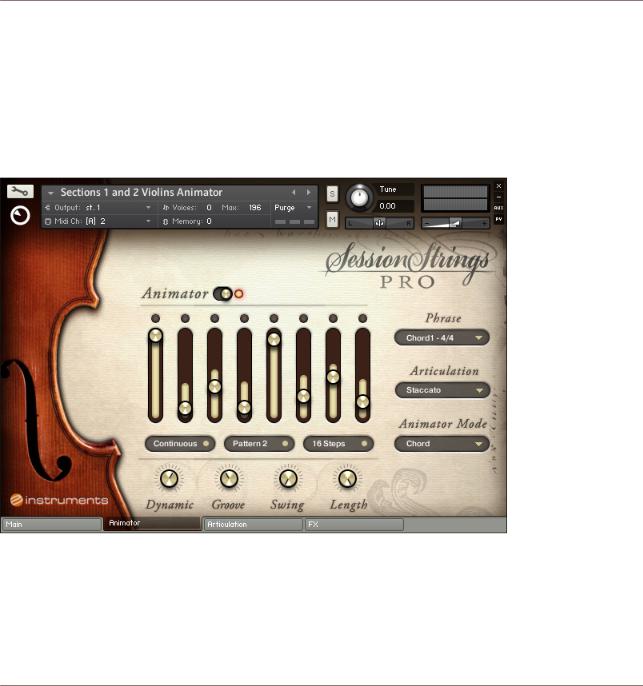
2.2.2Animator Window
Fig. 2.4 The Animator window in Session Strings Pro
The Animator window is included in the performance presets (see also ↑2.1, Preset Struc ture). This window contains the Animator, a step-sequencer/arpeggiator, with which you can transform chords into rhythmic staccato, spiccato, or pizzicato phrases. The dynamics and number of steps can be quickly and flexibly configured. The Animator can also be used
Session Strings Pro - Manual - 12

Quick Start
The User Interface at a Glance
while you play in addition a legato melody or another chord. You have the option of utiliz ing a number of predefined presets as well as memory slots for your own presets. A com plete description of these functions can be found in Chapter ↑3.2, Animator Window.
▪In the Animator window, you can turn the Animator on and off (see ↑3.2.1, Animator Switch and Step LEDs).
▪The vertical step control sliders are used to configure the dynamics of the individual steps. A more in-depth description can be found in Chapter ↑3.2.2, Step Control Slid ers.
▪The three toggle buttons below the control slider area (Retrigger/Continuous, Pattern 1/2, 8/16 Steps) can be used to select the starting mode, to display and manually switch to one of the two possible patterns, as well as to specify whether a single pattern should be played or both patterns successively. It is possible to configure these while you are playing. A more in-depth description can be found in Chapter ↑3.2.3, Retrigger/Contin uous Toggle Switch.
▪With the Dynamic control knob, you can restrict the dynamics utilized within the scope of an Animator phrase and thereby cancel out the settings of the step control sliders. A more in-depth description can be found in Chapter ↑3.2.6, Dynamic Control Knob.
▪The Groove control knob serves to configure the metric values of the notes played by the Animator. You can use values between a quarter note and a sixteenth note, as well as the corresponding triplet values. A more in-depth description can be found in Chapter ↑3.2.7, Groove Control Knob.
▪With the Swing control knob, you can transform a rhythmically even phrase into a swing or shuffle phrase. A more in-depth description can be found in Chapter ↑3.2.8, Swing Control Knob.
▪With the Length control knob, you can configure the number of steps – in other words, the length of the phrase — for both available patterns. There is a minimum of 5 steps and a maximum of 16 steps. A more in-depth description can be found in Chapter ↑3.2.9, Length Control Knob.
▪The Phrase drop-down menu allows you to load Animator factory presets as well as your own presets. A more in-depth description can be found in Chapter ↑3.2.10, Phrase Drop-Down Menu.
▪In the Articulation drop-down menu, you can choose the playing styles used by the Ani mator. A more in-depth description can be found in Chapter ↑3.2.10, Phrase DropDown Menu.
Session Strings Pro - Manual - 13
Quick Start
The User Interface at a Glance
▪By making a selection in the Animator Mode drop-down menu, you can decide if the Ani mator should play chords or one of the various arpeggio patterns. A more in-depth de scription can be found in Chapter ↑3.2.12, Animator Mode Drop-Down Menu.
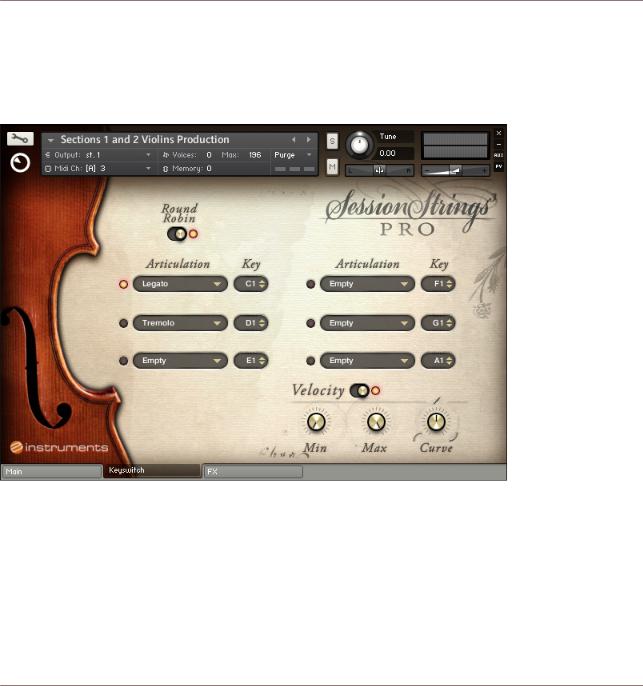
2.2.3Keyswitch Window
Fig. 2.5 The Keyswitch window in Session Strings Pro
The Keyswitch window is a component of the production presets (see also ↑2.1, Preset Structure).
In this window, you have access to all articulations that are available to create rich and diverse arrangements. By using specific keys on your keyboard, you can switch between the articulation types you have chosen. You can also decide here which keyboard shortcuts you would like to use to switch articulations.
Session Strings Pro - Manual - 14

Quick Start
The User Interface at a Glance
▪By activating the Round Robin switch, the overall sound of the music can be brought to life. This function implements the use of up-bow and down-bow samples. It conveys the feeling of a real performance and contributes to the extremely realistic and true sound characteristics of Session Strings Pro. A more in-depth description can be found in Chapter ↑3.3.1, Round Robin On/Off Switch.
▪In the six Articulation drop-down menus, you can select one of the 29 available articula tion types. A complete listing can be found in Chapter ↑3.3.4, The Articulation Types Available in the Keyswitch Window.
▪In the Key fields, you can configure the keys you wish to use as shortcuts by using your mouse or your computer keyboard. This is described in detailed in Chapter ↑3.3.3, Key Fields.
▪In the Velocity area — bottom-right in the window — you can limit the entire available dynamic range and thereby decide how you want Session Strings Pro to react to dy namic changes in your keyboard playing. This area can be activated or deactivated with the Velocity switch.
If you deactivate Velocity, you can control the attack dynamics with the modulation wheel of your keyboard!
▪By configuring the Min and Max control knobs, you can determine how large of a dynam ic range you would like to use while playing with varying velocity dynamic levels.
▪The Curve knob control influences the touch sensitivity of the master keyboard you are using.
Detailed information regarding the Velocity area and its elements can be found in Chapter ↑3.3.4, The Articulation Types Available in the Keyswitch Window.
Session Strings Pro - Manual - 15
Quick Start
The User Interface at a Glance
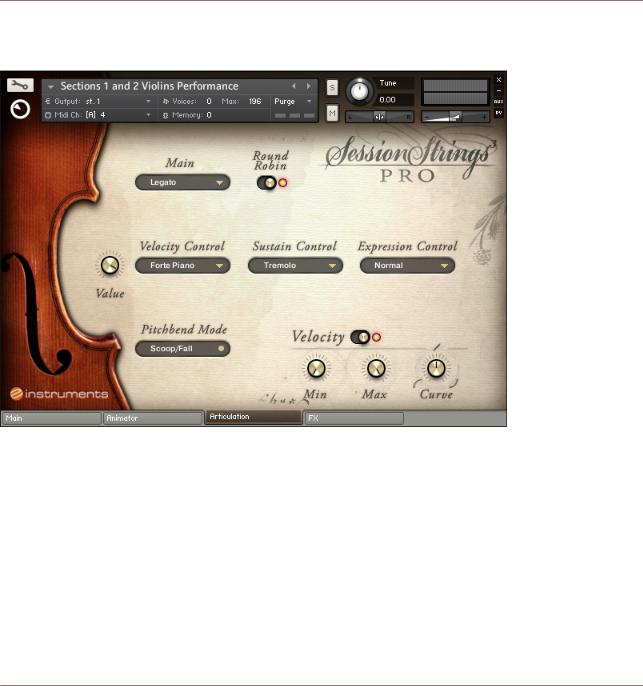
2.2.4Articulation Window
Fig. 2.6 The Articulation window in Session Strings Pro
The Articulation window is included in the performance presets (see also ↑2.1, Preset Struc ture). In this window you have access to all the fundamental playing style factors that are available — the so-called articulation. Furthermore, in this window you can also assign various articulations or modes to the various playing aid controls of your keyboard (Veloci ty, Sustain, Pitchbend, and Expression). Using this myriad of combination possibilities, you can hereby create a particularly expressive playing style during a live performance or in the studio. Furthermore, three additional velocity control knobs are located in this win dow, with which you can limit and control the overall dynamics of Session Strings Pro.
Session Strings Pro - Manual - 16

Quick Start
The User Interface at a Glance
▪In the Main drop-down menu, you can find all available playing styles. Information re garding all the available articulations can be found in Chapter ↑3.4.1, Articulation Types Available in the Articulation Window.
▪By activating the Round Robin switch, the overall sound of the music will be brought to life. This function implements the use of up-bow and down-bow samples. It conveys the feeling of a real performance and contributes to the extremely realistic and true sound characteristics of Session Strings Pro. A more in-depth description can be found in Chapter ↑3.4.3, Round Robin On/Off Switch.
▪The Velocity Control drop-down menu allows you to choose one of the available articula tion types that will be used when a certain velocity value is exceeded. A more in-depth description can be found in Chapter ↑3.4.4, Velocity Control Drop-Down Menu and the Value and Key Control Knobs.
▪With the Value control knob to left of the Velocity Control drop-down menu, you can deter mine the velocity value, at which the articulation chosen in the Velocity Control drop-down menu replaces the articulation chosen in the Main drop-down menu.
▪The Sustain Control drop-down menu allows you to choose articulation variants, which you can then employ during playing by means of a sustain controller. More information can be found in Chapter ↑3.4.5, Sustain Control Drop-Down Menu and Animator Articula tion Control Knob.
▪The Expression Control drop-down menu also has a large number of available articulations, which can be employed by means of an expression controller — e.g. a pedal. More in formation can be found in Chapter ↑3.4.6, Expression Control Drop-Down Menu and Short Notes Control Knob.
▪The Pitchbend Mode defines how Session Strings Pro responds to the pitch bend con trol. Options are Scoop/Fall and Normal. More information can be found in Chapter ↑3.4.7, Pitchbend Mode Toggle Switch.
▪A complete list of all available articulations can be found in Chapter ↑3.4.1, Articula tion Types Available in the Articulation Window.
It is not possible to select two identical articulation variants in the drop-down menus of the
Articulation Window.
Session Strings Pro handles your computer's memory resources as frugally as possible. For this reason, the last voice must have finished before you can select a new articulation variant in the drop-down menus.
Session Strings Pro - Manual - 17

Quick Start
The User Interface at a Glance
▪In the Velocity area — bottom-right in the window — you can limit the entire available dynamic range and thereby decide how you want Session Strings Pro to react to dy namic changes in your keyboard playing. This area can be activated or deactivated with the switch.
If you deactivate Velocity, you can control the attack dynamics with the modulation wheel of your keyboard!
▪By configuring the Min and Max control knobs, you determine how large of a dynamic range you would like to use while playing with varying velocity dynamic levels.
▪The Curve control knob influences the touch sensitivity of the master keyboard you are using.
Detailed information regarding the Velocity area and its elements can be found in Chapter ↑3.4.8, Velocity.
Session Strings Pro - Manual - 18

Quick Start
The User Interface at a Glance
2.2.5FX Window
Fig. 2.7 The FX window in Session Strings Pro
This window is included in both preset types (see also ↑2.1, Preset Structure). In the FX window you will find three important elements for editing sounds: an equalizer for the ed iting of the desired frequency levels, a compressor for leveling peaks, and a high-end con volution reverb for creating the desired spatial-auditory effect. All three can be switched on or off with their respective switches and can be used, among other things, to increase the assertiveness of Session Strings Pro during a playback.
▪The Equalizer has a semi-parametric design. It has the controllers Lo Freq (low frequen cies), Mid Freq (medium frequencies), and Hi Freq (high frequencies). By using these con trol knobs you can select the fundamental frequency within the respective frequency band for each of the three frequency ranges. You can then configure an amplitude
Session Strings Pro - Manual - 19

Quick Start
The User Interface at a Glance
change — a peak increase or decrease — for the selected frequency range by means of the Lo Gain, Mid Gain, and Hi Gain control knobs. More information regarding this can be found in Chapter ↑3.5.1, Equalizer.
▪The Compressor is particularly easy to operate, as it only has one controller — the Amount control knob. This is used to decide how strongly peaks should be lowered in the signal before the sound is emitted. The idea behind this is as follows: if there are large dy namic jumps within an overall signal, the compressor can be used to level off peaks, which thereby increases the overall volume and produces a greater volume effect. The extent to which you decide to utilize this function is a matter of taste. Modern pop mu sic often compresses its music so heavily that the dynamics — which are certainly an important element of music — are almost completely lost. On the other hand, com pressing an instrument can significantly increase the instrument's assertiveness within an ensemble. Allow your ears to decide what kind of compression is necessary for each case.
▪In the Reverb area of the FX window, you will find the Type drop-down menu and the Mix control knob. In the drop-down menu you can select the desired type of hall or room. By using the Mix control knob, you can control the volume ratio between processed and unprocessed signals. Further information regarding the Compressor and Reverb can be
found starting in Chapter ↑3.5.2, Compressor.
We now would like to wish you much fun while experimenting and playing with Session Strings Pro!
Detailed information regarding all of the functions described in this chapter can be found in Chapter ↑3, The User Interface in Detail.
Session Strings Pro - Manual - 20
The User Interface in Detail
Main Window
3The User Interface in Detail
In this chapter you will find detailed information regarding all program elements.
With the exception of drop-down menus, all Session Strings Pro controllers and switches can be automated.
3.1Main Window
This program window can be found in both the performance and production presets.
Fig. 3.1 The Main window in Session Strings Pro
Session Strings Pro - Manual - 21

The User Interface in Detail
Main Window
3.1.1Volume Area — Section1 and Section 2 Control Knobs
The two Section control knobs in the Volume area allow you to control the volume of both string ensemble groups. The available value range is between -∞ dB and +3 dB. When you are adjusting the knob, the current value is displayed below.
Fig. 3.2 The Section control knobs in the Volume area of the Main window
Both string ensemble groups are each composed of 4 violins, 3 violas, 2 celli, and 2 dou ble basses. If you use both sections, you can thus employ a string orchestra with a total of 8 violins, 6 violas, 4 celli, and 4 double basses.
3.1.2Contour Area
Bow Noise Control Knob
Fig. 3.3 The Bow Noise control knob in the Contour area of the Main window
By using the Bow Noise control knob, you can now, for the first time in the history of samplebased music production, alter the levels of bow noise in the overall sound of the instru ments. Bow noise is created by string instruments, when the horsehair of the bow is bowed across the strings, which causes the strings to vibrate. The frictional resistance results in a type of scratchy noise, which is a natural element of the string instrument's sound during musical passages played piano (quiet) or mezzoforte (middle-loud). The Bow Noise control knob can be used in combination with the following articulation types:
Session Strings Pro - Manual - 22
Loading...