


 Loading...
MANUAL

Disclaimer
The information in this document is subject to change without notice and does not represent a commitment on the part of Native Instruments GmbH. The software described by this document is subject to a License Agreement and may not be copied to other media. No part of this publication may be copied, reproduced or otherwise transmitted or recorded, for any purpose, without prior written permission by Native Instruments GmbH, hereinafter referred to as Native Instruments.
“Native Instruments”, “NI” and associated logos are (registered) trademarks of Native Instruments GmbH.
All product and company names are trademarks™ or registered® trademarks of their respective holders. Use of them does not imply any affiliation with or endorsement by them.
All specifications are subject to change without notice.
Document authored by: Native Instruments GmbH
Software version: 1.5.5 (07/2018)
Special thanks to the Beta Test Team, who were invaluable not just in tracking down bugs, but in making this a better product.

Contact
NATIVE INSTRUMENTS GmbH
Schlesische Str. 29-30 D-10997 Berlin Germany
www.native-instruments.de
NATIVE INSTRUMENTS K.K.
YO Building 3F
Jingumae 6-7-15, Shibuya-ku, Tokyo 150-0001
Japan www.native-instruments.co.jp
NATIVE INSTRUMENTS FRANCE SARL
113 Rue Saint-Maur
75011 Paris France
www.native-instruments.com
NATIVE INSTRUMENTS North America, Inc.
6725 Sunset Boulevard 5th Floor
Los Angeles, CA 90028 USA www.native-instruments.com
NATIVE INSTRUMENTS UK Limited
18 Phipp Street London EC2A 4NU UK
www.native-instruments.co.uk
SHENZHEN NATIVE INSTRUMENTS COMPANY Limited
5F, Shenzhen Zimao Center
111 Taizi Road, Nanshan District, Shenzhen, Guangdong
China www.native-instruments.com
© NATIVE INSTRUMENTS GmbH, 2019. All rights reserved.

Table of Contents
Table of Contents
1 |
Welcome to MASSIVE ................................................................................................ |
7 |
||
2 |
Quick Start ................................................................................................................ |
|
8 |
|
|
2.1 |
First Steps .................................................................................................................................. |
8 |
|
|
|
2.1.1 |
Setting up MASSIVE ................................................................................................... |
8 |
|
|
2.1.2 |
Finding a Sound ........................................................................................................ |
9 |
|
|
2.1.3 |
Playing a Sound ......................................................................................................... |
11 |
|
2.2 |
Creating Your Own Sound ........................................................................................................... |
13 |
|
|
|
2.2.1 |
Controlling the Wavetable Oscillators ........................................................................ |
13 |
|
|
2.2.2 |
Configuring the Filters ............................................................................................... |
15 |
|
|
2.2.3 |
Setting up MIDI Assignments and Modulation Sources .............................................. |
17 |
|
|
2.2.4 |
Saving Your Sound .................................................................................................... |
20 |
3 |
Reference ................................................................................................................. |
|
21 |
|
|
3.1 |
Signal Flow and Voicing ............................................................................................................. |
21 |
|
|
3.2 |
Interaction with the User Interface ............................................................................................. |
23 |
|
|
|
3.2.1 |
Section Headers and Popup Menus ............................................................................ |
24 |
|
|
3.2.2 |
Faders and Knobs ...................................................................................................... |
25 |
|
|
3.2.3 |
Modulation Controls .................................................................................................. |
26 |
|
|
3.2.4 |
The Center Window .................................................................................................... |
31 |
|
|
3.2.5 |
Macro Controls Automation and MIDI ........................................................................ |
33 |
|
3.3 |
Standalone Menus and Navigation Bar ...................................................................................... |
36 |
|
|
|
3.3.1 |
The Standalone Menus .............................................................................................. |
36 |
|
|
3.3.2 |
The Navigation Bar .................................................................................................... |
37 |
|
3.4 |
Oscillator Section ....................................................................................................................... |
40 |
|
|
|
3.4.1 |
Wavetable oscillators ................................................................................................ |
41 |
|
|
3.4.2 |
Wavetable Controls .................................................................................................... |
41 |
MASSIVE - Manual - 4

|
|
|
Table of Contents |
|
|
|
|
|
3.4.3 |
Amplification and Routing ......................................................................................... |
45 |
|
3.4.4 |
Modulation oscillator ................................................................................................. |
46 |
|
3.4.5 |
Noise Section ............................................................................................................. |
48 |
|
3.4.6 |
Feedback Section ....................................................................................................... |
49 |
3.5 |
Filter Section .............................................................................................................................. |
51 |
|
|
3.5.1 |
Routing ...................................................................................................................... |
52 |
|
3.5.2 |
Filter Types ................................................................................................................ |
54 |
3.6 |
Insert Effects .............................................................................................................................. |
56 |
|
|
3.6.1 |
Routing ...................................................................................................................... |
56 |
|
3.6.2 |
Delay ......................................................................................................................... |
57 |
|
3.6.3 |
Sample & Hold ........................................................................................................... |
58 |
|
3.6.4 |
Bitcrusher .................................................................................................................. |
58 |
|
3.6.5 |
Frequency Shifter ....................................................................................................... |
59 |
|
3.6.6 |
HPLP .......................................................................................................................... |
59 |
|
3.6.7 |
Sine Shaper ............................................................................................................... |
60 |
|
3.6.8 |
Parabolic Shaper ....................................................................................................... |
60 |
3.7 |
Output Sections .......................................................................................................................... |
60 |
|
|
3.7.1 |
Amp Section .............................................................................................................. |
61 |
|
3.7.2 |
Bypass Section .......................................................................................................... |
62 |
|
3.7.3 |
Master Effects Section ............................................................................................... |
63 |
|
3.7.4 |
Master Volume Section .............................................................................................. |
65 |
3.8 |
The Center Window ..................................................................................................................... |
66 |
|
|
3.8.1 |
General Pages ........................................................................................................... |
67 |
|
3.8.2 |
Modulation Pages ...................................................................................................... |
80 |
3.9 |
Macro Control Section ................................................................................................................. |
96 |
|
3.10 |
The Browser and Attributes Views .............................................................................................. |
98 |
|
MASSIVE - Manual - 5

|
|
Table of Contents |
3.10.1 |
The Attributes Concept and the Sound ...................................................................... |
98 |
3.10.2 |
Searching and Loading Sounds with the Browser ...................................................... |
98 |
3.10.3 |
Defining Attributes and Saving Sounds ..................................................................... |
106 |
Index ........................................................................................................................ |
|
108 |
MASSIVE - Manual - 6

Welcome to MASSIVE
1Welcome to MASSIVE
Thank you for choosing MASSIVE! This new software instrument combines a unique synthesis engine with unparalleled ease of use –- but most of all it is focused on sound creation. MASSIVE is your solution for punchy bass lines and cutting leads, while at the same time it is also capable of beautiful atmospheric pads and funky rhythmic grooves.
This manual will show you how to use MASSIVE and all of its features. To help you take full advantage of the creative possibilities of MASSIVE, it will explain the innovative wavetable engine that is at the heart of the synthesizer’s sound, as well as the unique filters that give MASSIVE its characteristic, analog sound. It will describe all internal effects, the internal feedback circuit and the wide variety of advanced routing capacities that give MASSIVE its power and flexibility. And, last but not least, the manual will show how to set up modulation routings within MASSIVE, one of its most powerful yet also most intuitive features.
The manual itself consists of two major parts. Chapter ↑2, Quick Start contains two introductory tutorials. These will guide your first steps with MASSIVE, introducing you to its parts and features and how to begin using them. This is the point to start from if you are completely new to MASSIVE. Chapter ↑3, Reference is a systematic reference of all functions of this synthesizer. It covers all aspects of MASSIVE and provides usability hints as well as technical information. If you need more information about a specific part of MASSIVE, here is where you will find it.
But most of all, we hope that you will enjoy the sound of MASSIVE!
MASSIVE - Manual - 7

Quick Start
First Steps
2Quick Start
This chapter is the place to start getting acquainted with MASSIVE’s main features. It will guide you through loading and creating sounds with this exciting new synthesizer. Section ↑2.1, First Steps will focus on how to find and load a sound from MASSIVE’s sound library using the powerful Browser View, so you can start playing right away. Section ↑2.2, Creating Your Own Sound will show you how to begin using MASSIVE’s vast sound design capacities to sculpt your own new sounds.
2.1First Steps
In this section, you will learn how to set up MASSIVE, use the Browser to search the sound library, load a sound, tweak some Macro Controls, and have a look at the Range Knobs and see how they can be controlled by the Macro Controls.
2.1.1Setting up MASSIVE
Before first working with MASSIVE, you should check its Audio and MIDI Settings. Assuming that MASSIVE has been properly installed and activated on your computer (see the separate Setup Guide for more on this), start the standalone version of MASSIVE. To set up the audio and MIDI interface options, choose File > Audio and MIDI Settings from the menus at the top.
On the Soundcard Tab, you should select ASIO on Windows for best results. (On a Mac this will be set to CoreAudio, your only choice in Mac OSX.) Then use the Output Device field to select the audio interface. We recommend setting the sample rate to 44100 and setting the output latency to about 10 ms. (Note that in some cases you may need to adjust the latency/buffer size in the software control panel for your soundcard; you may need to quit MASSIVE first to do this.) These are recommended settings that should work well on most computer systems; for information on what these settings mean, please refer to our Setup Guide where this is explained in more detail.
On the Routing Tab, check that the two virtual outputs of MASSIVE are properly routed to the audio interface’s outputs. If “Not Connected” is displayed here, you won’t hear anything!
MASSIVE - Manual - 8

Quick Start
First Steps
On the MIDI Tab, check that the MIDI interface or device you are using is turned on. If you see your interface listed but it is off, click on the “off” label to turn it on. If your MIDI device does not appear here, there may be a problem with the installation of the device itself (or its software drivers). If you don’t have a MIDI controller available, you can still play MIDI notes by using the computer’s keyboard. We have assigned the four rows of alphanumeric keys in a similar pattern to that of a piano keyboard. For example, the bottom row of keys on your computer keyboard (from Z on the left to / on the right) is assigned to the white keys of the piano keyboard, with the Z key being assigned to C. The row of keys above that (from S to ;) covers the corresponding black keys, with S assigned to C#. The two rows of keys above are assigned in a similar pattern, but one octave higher.
Please note that there is also another MIDI Setup Tab within the Options Dialog, found in File > Options; this deals with some additional MIDI setup options, but we don’t need to worry about this just yet. (More information about this additional setup dialog can be found in section ↑3.3.1, The Standalone Menus.)
Now let’s close the Audio/MIDI Settings dialog and begin working with MASSIVE!
2.1.2Finding a Sound
First let’s take a look at the Browser and see how to find and load a sound from the built-in sound library.
Switch to the Browser View by clicking the Browser button towards the right side of the Navigation Bar.
MASSIVE - Manual - 9

Quick Start
First Steps
You’ll see the Database View of the Browser at the lower left, and the Search Result List to the right. Above, you will see the eight Macro Control knobs (see section ↑3.2.5, Macro Controls Automation and MIDI) as well as the Master Volume Control (see section ↑3.7.4, Master Volume Section). The Browser itself is described in detail in section ↑3.10.1, The Attributes Concept and the Sound.
When you first open the Browser View, the Search Result List at the lower right will show the list of all sounds available in MASSIVE. Now let’s try using the Attributes at the lower left of the Database View to limit the Search Results:
1.Click on one or more Attributes in any column and they will be highlighted.
2.The Search Results List will update automatically to display only those Sounds that match the set of active Attributes.
3.Click a selected Attribute again to deselect it.
MASSIVE - Manual - 10
Quick Start
First Steps
4.When no Attributes are selected, the Search Results List will display the list of all available Sounds.
5.Try selecting one or more Attributes from each column left to right and watch how the list gradually narrows; for example, try selecting (from left to right) “Massive Factory”, “Bass”, “Distorted Bass”, “Synthetic” and “Lead” and find the sound “Attack Disto” on the right.
6.Now load this patch from the Search Results List by simply double-clicking on its name.
Using the Attributes is a very convenient and powerful way to quickly find the sound you want to use!
2.1.3Playing a Sound
Now that you have loaded “Attack Disto,” try playing some notes with your MIDI keyboard and you should hear the sound. You might try playing in the lower range of the keyboard, as Attack Disto is a bass sound. Try modifying the output with one of the Macro Control knobs, arranged in a row 1-8 just above the Browser: while holding down a MIDI key and sustaining a sound, click on the third Macro Control and drag the mouse upwards. The Macro Control knob will follow the movement, and you should hear some effect, depending on what the Macro Control is assigned to in the particular patch you are using. (For more on the Macro Controls and how they are commonly assigned, see section ↑3.2.5, Macro Controls Automation and MIDI).
Now try using a different sound. In the bar between the Macro Controls and the Database View, click the Reset Button (the circle-like icon within the illustration below) and all attributes are deactivated.
You will see all the sounds in MASSIVE reappear at the right. Now let’s try searching for sounds another way:
1.Click with the mouse in the Search Term field to the right of the Reset Button.
2.Type “pad” in the Search Term field.
3.You will see the Search Results again automatically update and narrow to include only those Sounds that contain your search term in their names or other Meta Information fields (see section ↑3.10.3, Defining Attributes and Saving Sounds).
MASSIVE - Manual - 11
Quick Start
First Steps
4.Double-click one of the matching Sounds you see to load it.
5.Play and hold a MIDI note.
6.Try tweaking the various Macro Controls 1-8 and listen to the variety of sounds that can be created by different settings.
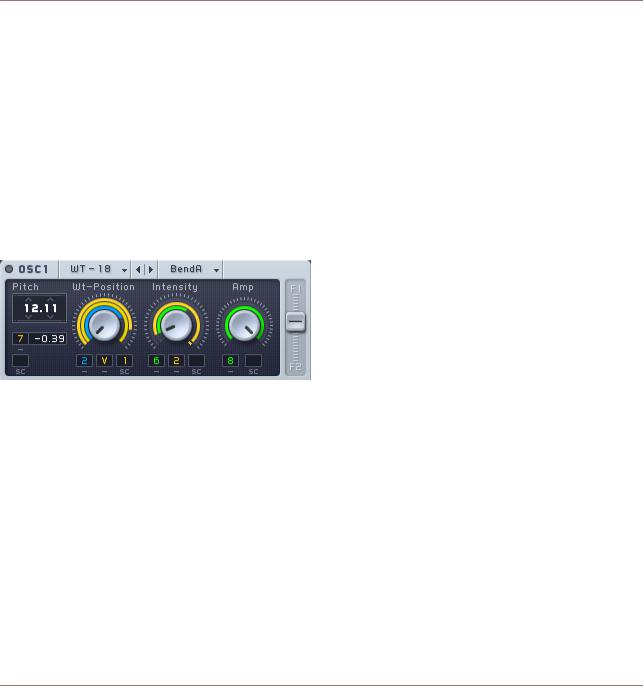
How are these Macro Controls affecting the sound? Let’s change to the Synth View now to get an idea of how this works. Click the Synth Button towards the right side of the Navigation Bar to switch to the Synth View. You will see the same eight Macro Control knobs 1-8 in the lower right corner of the window. However, in the Synth View you can see how each control is modifying the sound, and you can create your own control assignments. For example, in the image below (displaying the Rampage sound loaded previously), the small yellow numbers beneath the control knobs indicate that the knobs are being controlled by Macro Controls 1 and 2, respectively.
The range of influence of the Macro Control over the control it is affecting is proportional to the corresponding yellow ring around the control. For example, in the image above we can see that the influence of Macro Control 2 on the Intensity knob is greater than that of the green modulation source indicated by the numeral “6”. The different color reflects that this modulation source is not a Macro Control, but an LFO. The blue “2”, finally, denotes an envelope generator.
For more on MASSIVE’s modulation sources, see section ↑3.8.2, Modulation Pages. For a practical example of how to route modulation, see ↑2.2, Creating Your Own Sound.
MASSIVE - Manual - 12

Quick Start
Creating Your Own Sound
2.2Creating Your Own Sound
This section explains how to create a lead synth sound and introduces you to some of the fundamental sound design techniques of MASSIVE. If you are new to MASSIVE, we recommend to read section --- MISSING LINK --- first.
In the following tutorial you will learn how to select a wavetable for each oscillator and tweak the controls to modify the sound. We’ll also see how to configure MASSIVE’s filters and control them with a modulation source.
2.2.1Controlling the Wavetable Oscillators
First, create a new, empty sound for editing by selecting File > New Sound from the File menu in the Navigation Bar. Now look at the Oscillator Section in the upper left corner of MASSIVE: it should look like the left-hand image below. In the following instructions, we will adjust the various knobs and faders step-by-step until they match the settings in the right-hand image instead, and explain why.
MASSIVE - Manual - 13

Quick Start
Creating Your Own Sound
First, let’s start with some synthesis basics: in most synthesizer designs, oscillators of some kind are used to generate the raw sound material that is manipulated afterwards by filters (see section ↑3.5, Filter Section), effects (see sections ↑3.6, Insert Effects and ↑3.7.3, Master Effects Section), and other controls. One of the most unique features of MASSIVE is that the individual oscillators generate sound by using wavetables, rather than just simple waveforms as in many other subtractive synthesizers. This gives it the ability to create dense, unique, morphing sounds that would be impossible to produce using other synthesis techniques. For detailed information about MASSIVE’s wavetable synthesis engine, see section ↑3.4.1, Wavetable oscillators.
For now, we’re just going to look at how you can creatively work with some of the controls here without worrying too much about what is actually going on under the hood.
The most fundamental parameter affecting the sound in MASSIVE is the choice of which wavetable to use for each oscillator. The other parameters here in the Oscillator Section allow you to modify how that wavetable is used. You can select a wavetable to use for each of MAS-
MASSIVE - Manual - 14

Quick Start
Creating Your Own Sound
SIVE’s oscillators independently, by using the popup menus in their headers: click where you see the indication “WT-0” for each oscillator in turn and set them to “WT-68”, “WT-71”, and “WT-70” respectively.
Now let’s try adjusting the wavetable position, i.e. which part of the wavetable is to be used: try adjusting the Wavetable Position Control of the topmost oscillator with the mouse while holding down a MIDI note, and listen to the effect this has on the sound. After playing with this control a bit to get a feel for it, set this control to a position of about 10%, just like in the right-hand image above. Now try adjusting the Wavetable Position Control of the third oscillator; do you hear any change in the sound? You will not hear any change because its Amplitude Control (marked Amp in the image) is turned all the way down.
In order to match the image above, increase the Amplitude Control of Oscillator 3 to the maximum (all the way to the right). Similarly, set the Amplitude Control of Oscillator 2 to about 70%. Finally, set all three oscillators’ Routing Faders (the sliders on the right edge) controlling the Filter Routing to their top position. The filters will be explained next.
2.2.2Configuring the Filters
MASSIVE provides two filter busses to shape your sounds, with exceptionally flexible routing capabilities. Here you can insert a variety of different filter types to manipulate the raw sound from the oscillators.
When you start working on a new sound, the Filter Section should look like the left-hand image below. In the following instructions, we will again adjust the knobs and faders step-by-step until they match the settings on the right.
MASSIVE - Manual - 15

Quick Start
Creating Your Own Sound
First, set the Filter Input Fader (labeled F2 and marked “Ser<>Par”) all the way to the top. This sets up a serial filter routing, such that the second filter takes the first filter’s output signal as its input signal. In this example, we want the two filters to process the signal subsequently one after another, not parallel/simultaneously.
MASSIVE - Manual - 16

Quick Start
Creating Your Own Sound
Then, choose the first filter’s type by clicking the header (where “None” is written) and selecting the entry from the list in the popup menu. Let’s choose the Daft filter type for this example.
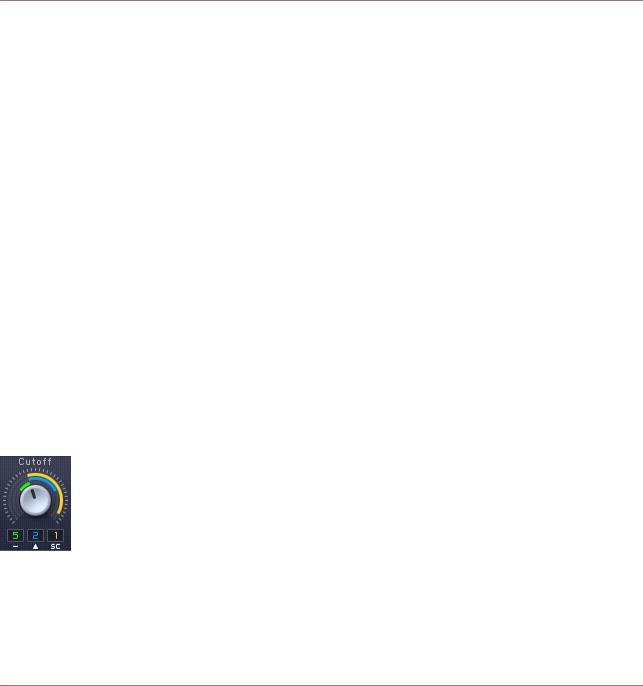
Now play a MIDI note: you should hear no sound at first, because by default the Filter Cutoff control is turned all the way down (to the left). Hold the note on your MIDI controller and turn the Cutoff knob up to the maximum (to the right) by clicking and dragging with the mouse. As you increase the cutoff, the filter gradually opens and you will hear the sound revealed bit by bit.
For this example, also turn up the Resonance control to about 60%; tweak the Cutoff again a bit to listen to the difference it makes in the sound.
Now slide the Output Fader (at the right-hand edge of the Filter Section) all the way to the bottom. This fader sets the output mix of the complete Filter Section, between Filter 1 and Filter 2. When it is set to the bottom of its range, we will hear only the output of Filter 2 and no direct output from Filter 1.
Now play a note again: you should hear no difference yet. Although the sound is passing through Filter 2, we haven’t selected any filter to use. Change this by clicking on the popup menu in the header of Filter 2 and selecting the Scream filter. Now hold a note and gradually increase the Cutoff control to its maximum value (all the way to the right) by clicking and dragging with the mouse; you should hear the sound gradually change as the cutoff is increased.
Now set the Resonance Control to a middle position, approximately 50% of its total range. If you play a note, the sound should sound a bit different than without Filter 2, but the difference is still marginal. (Remember, you can compare the sound with and without Filter 2 in the signal chain by moving the Output Fader up and down with the mouse.)
In order to make more complex and interesting sounds with MASSIVE, we need to add a few more techniques to our sound design toolkit. In the next section, we’ll look at how to use modulation sources to change the parameters of the oscillators and filters over time.
2.2.3Setting up MIDI Assignments and Modulation Sources
There are basically two different types of modulation that you can use in MASSIVE: you can set up MIDI assignments that allow you to change the parameters manually (or by sending MIDI automation commands from a host sequencer), or you can set up modulation sources within MASSIVE that automatically change over time, such as envelopes, LFOs and sequencers.
MASSIVE - Manual - 17

Quick Start
Creating Your Own Sound
In the first case, to set up control via MIDI, first drag the cursor to the Macro Control Section in the lower right corner of MASSIVE’s interface. Here, click on the Modulation Handle of Macro Control 4, i.e. the small cross in the upper right corner. You will see a small numeral “4” appear, which will be attached to the mouse pointer and follow it. Now, move the cursor to the rightmost Modulation Slot of the second filter’s Scream Control, i.e. the small dark rectangle just below the knob. Click here in the Modulation Slot and the 4 attached to the mouse cursor will disappear, and you will see the 4 visible in the Modulation Slot instead. This indicates that you have assigned Macro Control 4 to control this parameter, the Scream parameter of the filter. (Note: if you hold down the Alt key and double-click the Modulation Slot holding the 4, you can remove the assignment. You can also access a context menu to edit your assignments by right-clicking the Modulation Slot; select the Off entry here to remove an assignment.)
Having made this assignment to the Scream Control, now try tweaking Macro Control 4 with the mouse while playing a note. You will hear no effect from this assignment yet, because the amount of effect of Macro Control 4 on the Scream parameter has not been set. Do this by clicking on the small “4” in the Modulation Slot and dragging the mouse up: you will see a yellow ring appear, becoming longer as you move the mouse upwards. (You can also shorten it again by moving the mouse back downwards.) The longer the ring segment, the greater the influence of the source set in the Modulation Slot, i.e. Macro Control 4. Let’s set this to a length of about 60% around the knob, and then try moving the Macro Control while playing a note. Now you should be able to hear the effect of the assignment!
To control the Scream parameter with a MIDI device, right-click Macro Control 4 and select “MIDI Learn” from the context menu. Then move your MIDI controller’s knob or fader that you want to use - the assignment will take place automatically, assuming that your device is connected correctly. Now you can change Macro Control 4 and the Scream parameter with your MIDI device.
Let’s look at how you can add an automatic modulation source to modify another parameter in MASSIVE. First, we’ll try assigning one of the envelopes. Click on the blue tab of the first envelope (labeled “1Env”) within the Center Window and you will see something like this:
MASSIVE - Manual - 18

Quick Start
Creating Your Own Sound
This page shows us the controls of one of MASSIVE’s four envelope generators. Envelopes are signals that first rise when a note is played, stay at some fixed level as long as the key is held (usually), and then fall back to zero when the note is released. Envelopes are often used to define the volume of a note, becoming louder when a key is pressed, holding that volume, and decaying when the note is released.
For our example, we want to use the envelope to modulate the Cutoff of Filter 1. First we will set up the envelope shape we want. Try increasing the Attack Control value to about 70% of its full value so that the initial ramp of the envelope becomes much longer (as in the image above). Then, click on the Modulation Handle of the envelope (the small blue cross within the envelope’s Header Tab, just to the right of the label “1Env”). Assign it to the Cutoff of Filter 1 by clicking into the first Modulation Slot under the Cutoff knob; you will see the small blue “1” appear in the slot when it has been assigned. Once again, the modulation amount needs to be set before you will hear any effect from the assignment. Click the Modulation Slot again and drag the mouse downwards. You will see a blue ring start from where the controller is (i.e., at the right) and move “inversely” to the left. Set this to about 10% of maximum value, as in the right-hand image in the previous section. This inverse modulation means that high envelope values will actually lower the Cutoff value instead of increasing it. Try playing a note on your MIDI controller: the sound will become duller in the time after you hit the key, as the envelope signal increases and turns down the Cutoff control. If you try adjusting Macro Control 4 again, its influence is now also audibly much stronger because of the added influence of the envelope on the filter cutoff.
For more on envelopes and other modulation sources, see section ↑3.8.2, Modulation Pages.
MASSIVE - Manual - 19

Quick Start
Creating Your Own Sound
2.2.4Saving Your Sound
Congratulations: you have just created your first sound in MASSIVE! Now let’s save it in our sound library for future reference.
You can save your sound by switching to the Attributes View. Do this by clicking the Attributes View Button within the Navigation Bar, between the buttons for the Browser View and the Synth View.
Here in the Attributes View you can set the attributes for your sound so that you can find it in the database in the future, just as explained in section ↑2.1, First Steps. As we saw, there are many different attributes available for you to use in categorizing your sounds. (Note: you can find a complete definition of each one in Appendix B and several examples in Appendix A.) For this first sound, let’s just quickly select a few Attributes to index our sound. Click on Bass, Distorted and Sweep/Filter Mod by clicking their labels here.
At this time, you can also add your name in the Author field of the Meta Information at the right, along with any other descriptive details you might choose to enter to help you find the sound again when you need it.
When you’re done, click the Save As button within the Navigation Bar and enter the name of your new sound; clicking OK then saves it to the database. You will now be able to find your sound from the Browser by using the Attributes or by entering terms in the Search field.
If you would like to hear an example of what could be done to further modify this sound, go to the Browser, enter “propeller” into the Search Term field and load the Sound “Propeller Saw.” Switch to the Synth View and you should be able to see some similarities with the example we have been working with here. If you start looking at what makes this Sound different from our example, you’ll find a lot of inspiration and techniques for your own creations.
MASSIVE - Manual - 20
Reference
Signal Flow and Voicing
3Reference
3.1Signal Flow and Voicing
This section explains the exact routing of the Signal Flow in MASSIVE. We recommend reading this part if you really want to understand how MASSIVE works, as it shows exactly how all of the various parts of the synthesizer are connected and can affect each other.
The signal flow in MASSIVE is relatively easy to understand, as it follows the well-known paradigm of a subtractive synthesizer. It is extremely flexible and contains some powerful additional features as well. The Signal Flow is pictured in the Routing Page of the Center Window:
Here is a basic description of how it works.
Three wavetable oscillators and a noise oscillator generate four audio signals to form the basis of the sound. There is also an additional modulation oscillator that does not mix its signal into the audio signal, but is used to modulate the three main oscillators. Various modulation modes (phase modulation, ring modulation, position modulation) can be selected. Besides these modes, the modulation oscillator can also be used to modulate the filters’ frequencies. In addition, there is also a feedback bus (explained further below) that brings back part of the signal from later in the chain and mixes it back in as an input source. Have a look at section ↑3.4, Oscillator Section for more information about these initial stages of sound generation.
MASSIVE - Manual - 21

Reference
Signal Flow and Voicing
These source signals are mixed down to two individual filter busses using the Routing Faders on each source. The Input Fader (labeled Ser <> Par at the top) mixes the second filter bus signal with the output of the first filter; in other words, you can crossfade between a parallel filter routing (the second filter uses an individual input bus) and a serial filter routing (the second filter uses the output of the first filter). Note that if this is set to serial and all the oscillators are routed to the f2 bus, you will hear no sound! The Filter Section outputs one combined signal to the next section, a mix of f1 and f2. See section ↑3.5, Filter Section for details and examples of different filter routings.
After the filters, the signal is routed to the Amp Section (see section ↑3.7.1, Amp Section) and the Master Effects (see section ↑3.7.3, Master Effects Section). It goes first through an amplification envelope in the Amp Section, then through a pan control; then parallel voices are downmixed (more on this below). Then the signal passes through the Master Effects one at a time, then a final EQ, and finally through a Master Volume to set the global output volume.
Note that there are also a few parts of the signal flow that can be moved or changed: the Insert Effects, the Bypass Section, and the Feedback Section. The role of these modules in the signal flow is controlled in the Routing Page (see section ↑3.8.1, General Pages).
The inserts are effects that can be inserted into the signal flow at various places to manipulate an audio signal. They could be applied to both filter busses individually, or between the filters with a serial setup, or to the filtered signal before it is amplified, or to feedback signal only. See section ↑3.6, Insert Effects for more on how this works.
The Bypass control selects the output from one of the three main oscillators or the noise oscillator and routes this signal directly to the Amp Section at the end of the signal chain, where it is added to the downmixed signal at various places: after the Pan, or after FX1 or FX2 in the Master Effects Section. This can be used to keep a direct, raw signal mixed in the output, such as a subbass. There is more information about this in section ↑3.7.2, Bypass Section.
The Feedback control lets you route an audio signal from a number of different points in the chain (selectable in the Routing Page) and route it back to the Feedback Section. Feedback can be used to alter a filter’s frequency characteristics, to saturate/distort the sound, or to use feedback with delay signals and so on. (See section ↑3.4.6, Feedback Section for details.)
Tightly linked to signal flow is the voicing structure of MASSIVE, which specifies how the synthesizer’s voices are handled. If you want to play chords, you need several voices, one per note, just as when playing a chord on a keyboard, you need multiple fingers to press all keys simul-
MASSIVE - Manual - 22

Reference
Interaction with the User Interface
taneously. Each of MASSIVE’s voices can generate one of the notes within the chord, i.e. each voice can have its individual pitch and starting point. However, all voices share the same structure and general settings as adjusted in the User Interface.
You can see the number of voices when looking at the Navigation Bar: the number of voices currently being used is displayed first, and the maximum number of voices available is displayed second. (You can adjust this maximum number within the Voicing Page of the Center Window.)
The sound of each voice is computed independently from all others until the signal is downmixed to generate a stereo output signal (like a downmix in a multi-track sequencer). This downmix process takes place just before the signal is routed through the Master Effects. This is particularly important as the tube effects, for example, would sound different and less interesting if the downmix took place after the effect.
In the Voicing Page you can also find the Unisono Control. This can enable you to trigger several internal voices when triggering one note with the MIDI keyboard. This is analogous to the situation in an orchestra when several violins are playing the same notes, or when several singers sing the same part in a choir. If all singers sang exactly similarly, the sound would only become louder, but as each singer actually sings just a bit differently, the actual sound becomes richer and more complex when more singers are added. This is also true for MASSIVE: you can use multiple voices for one note, and can, for instance, detune each voice slightly to create a choir-like effect. All this can be adjusted within the Voicing Page of the Center Window (see section ↑3.8.1, General Pages).
Please note that each voice used needs to be computed independently by the computer: the more voices you use, the heavier the CPU load. Also note that due to internal optimizations, the CPU load is minimized when the number of voices can be exactly divided by four, i.e. it is preferable to use 4, 8, 12 etc. voices.
3.2Interaction with the User Interface
This section will describe the conventions of MASSIVE’s graphical user interface (GUI) and explain how to work with its controls. Note that operating MASSIVE on Mac or Windows machines is largely identical, with some slight differences due to the way the two operating systems handle file systems and keyboards. While key commands are given for Windows, they are parallel on the Mac. When the text says “right-click,” use ctrl-click on Macs.
MASSIVE - Manual - 23

Reference
Interaction with the User Interface
Please note that this section is concerned mainly with the mechanics of using the interface and controls so you can get straight to work with them. It will not provide detailed explanations about what all these controls actually do or how they work; see the Reference chapters for that information.
3.2.1Section Headers and Popup Menus
Each section of MASSIVE’s interface has a header that describes it; for example, OSC1 is oscillator 1 and so on. There are also Mute switches for each section. Click the Mute switch with the mouse to deactivate a particular section; click again to return to the active state.
It can often be useful to turn off a particular section of the signal chain when you are creating sounds in MASSIVE. For instance, imagine a filtered sound where you want to check the raw oscillator signal - simply click the Mutes for both of the filters to turn off the filters. This preserves all the settings of the filters while temporarily making their effect inaudible. Note that turning a module off will also save CPU power on your system, so keep this in mind if you are running into CPU overload issues!
Many of these sections also have some kind of popup menu to the right of the section header. These are used to select from a range of different choices for that section, such as wavetables and oscillator modes, filter types and effects. These popup menus are easy to use. Clicking one of them brings up a list of choices you can scroll through; clicking again on one of these entries selects it and automatically closes the list.
MASSIVE - Manual - 24

Reference
Interaction with the User Interface
Note that the oscillator modules also feature Previous and Next buttons in the header (see image above), which will load the wavetables one after another in the order of their menu listing. This is a great way to scroll through and find the appropriate wavetable for your own sound quickly and conveniently. (For more on wavetables and how they form the basis of your sound in MASSIVE, see section ↑3.4.1, Wavetable oscillators.)
3.2.2Faders and Knobs
Faders and knobs are used to control most of MASSIVE’s major functions. In general these work the same way as faders and knobs you may be used to in other audio software: simply click a knob with the mouse and drag up and down (while holding down the mouse button) to alter the knob’s value.
Please note that in most cases the numerical value of the knob’s parameter is not displayed: a strictly analog approach. We hope that you will trust your ears while working with MASSIVE, in the same way as the pioneers of electronic music, who had no digital readouts to assist them!
A number of control conventions have been implemented throughout MASSIVE for quick and accurate editing of its various parameters:
1.Click with the right mouse button to open a context menu providing a list of commands concerned with MIDI and modulation. The latter point will be explained in section ↑3.2.3, Modulation Controls below, while MIDI is covered in section ↑3.2.5, Macro Controls Automation and MIDI.
2.Hold the keyboard’s shift key while changing the knob’s value with the left mouse button to make finer adjustments to a control.
3.You can also use the mouse wheel to change the value of a control; if you hold down the shift key while using the mouse wheel, the value will change in coarser steps.
4.Double-click with the left mouse button to reset the knob to its default position.
There are also a couple significant general points about the knobs and faders that you should be aware of.
▪For one thing, all of the controls in MASSIVE have been made to function as much as possible like their physical counterparts in an analog hardware synthesizer. In some cases this significantly affects the sound that is produced. For example, if you turn up the Amp knob on one of the oscillators, this will increase the output level of the oscillator into the filter
MASSIVE - Manual - 25

Reference
Interaction with the User Interface
busses, just as you would expect. However, it may also change the quality of the sound coming out of the filter as well, as you drive the filter input hotter, just as with real analog circuitry!
▪The other important point to understand about the knobs and faders in MASSIVE is how they are used to map modulation destinations and ranges; this is described further in the next section.
3.2.3Modulation Controls
One of the most important innovations in the design of MASSIVE is the way we have made use of Range Knobs to map and control modulation effects. Colored rings around each knob are used to indicate which modulation targets are routed to this parameter. Many of the parameters in MASSIVE can be controlled with this technique.
It is important to understand how to assign modulation sources in MASSIVE, as this is one of the main sound design techniques you have available. Here’s how it works:
▪The available Modulation Sources are listed across the top of the Center Window. These include four independent ADSR envelopes as well as four more sources that can be switched between LFO, Performer, and Stepper modes (more on these modulation sources below in section ↑3.8.2, Modulation Pages).
▪To assign a modulation source to a destination, first simply click on the Modulation Handle: the small cross following the name of the Modulation Source you want to use. You will then see the source’s number attached to the mouse as it moves. Then move the mouse towards the destination you want to modulate and click again on one of the Modulation Slots, the small black boxes near each knob or fader available for modulation.
MASSIVE - Manual - 26
Reference
Interaction with the User Interface
▪As you make the assignment, you will see the small colored numeral appear in the Modulation Slot. Obviously, the numeral indicates which modulation source (1-8) has been assigned to the slot, while the color indicates the type of modulation source: blue indicates an envelope, green indicates an LFO or step sequencer, and orange indicates a Macro Control assignment.
▪Now you can adjust the modulation amount by clicking on the assigned modulator slot and dragging up or down. As you do so, you will see a colored ring appear around the knob to indicate the active range of the modulator. A small break at the limit of the modulation range serves as a clipping indicator to show if the limit of a modulation range is higher or lower than the knob or fader’s minimum/maximum value.
Note that you can also access and change modulation settings in a context menu that appears when you right-click one of the modulation slots (see image). Through this menu you can mute, unmute, delete (use the OFF menu choice), or create new modulation assignments with any of the modulation sources in MASSIVE. (See section ↑3.8.2, Modulation Pages for more information on the modulation sources.)
Also, the additional editing options available for the main controls (such as making finer adjustments by using the Shift key and dragging) are also available for modulation amount changes.
Sidechain modulation
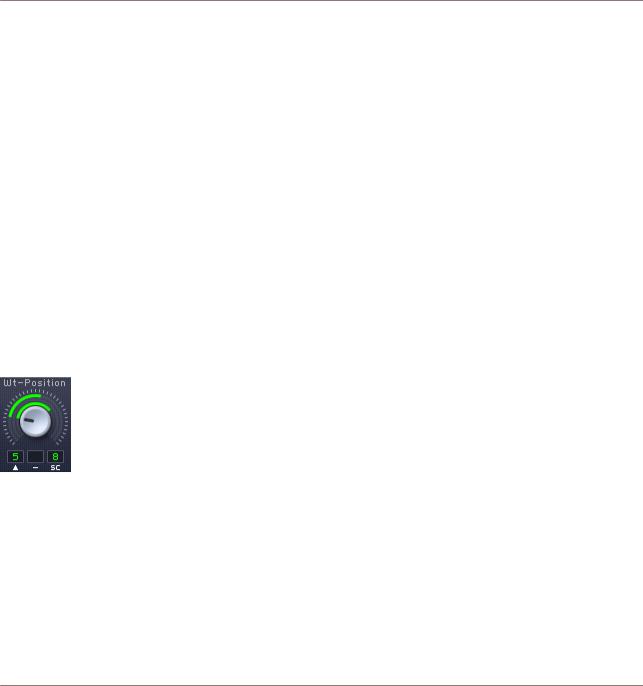
If you look closely at the three modulation slots under one of the Wavetable Position knobs in the Oscillator Section (for example), you will notice that there are two standard modulation slots (marked with a hyphen beneath them) as well as a third slot marked “SC.”
This third slot can be used to set up sidechain modulation. This is a type of modulation in which a modulation source can be assigned which will affect the value of other assigned modulation sources. Here’s how this works:
MASSIVE - Manual - 27

Reference
Interaction with the User Interface
Normally, unless you activate the sidechain modulation, all three of these modulation slots will allow you to assign modulation sources to change the value of the control, and the range of the modulation will be set by the Range Knobs as described above. If you assign more than one modulation source to a single control by using more than one of these slots, their values will be added together to calculate the total amount of modulation.
However, if you click the small “SC” under the third slot, the sidechain modulation will be activated and the modulation will work somewhat differently. In this case, the third slot will act as a sidechain modulation slot and its value will be used as a multiplier changing the value of the other modulation sources. In this case there is no modulation range set for the sidechain modulator; rather, the value of the sidechain modulation source will be read as a multiplier between 0% and 100%, changing the range of effect of the other modulators.
Sidechain modulation allows you to set up quite dramatic effects with the other available modulation slots, and then vary those effects by a percentage of effect, somewhat similar to using a wet/dry control to vary the amount of an insert effect.
Try assigning a Macro Control to the sidechain modulation destination to enable the use of an external MIDI control as a wet/dry control, you can set this up like this:
1.First, set up a modulation routing between one of MASSIVE’s LFOs and the Wavetable Position knob (for example), as described earlier in this section.
2.Then click the tiny “SC” label under the third Modulation Slot under the Wavetable Position knob to activate sidechain modulation. You also need to click the small line below the modulation slot you want to influence; it then becomes a small arrow.
3.Moving our attention to the lower-right corner of the screen, click on the modulation handle of Macro Control 1; then drag the mouse back to the upper-left corner of the screen and release it over the sidechain modulation slot under the Wavetable Position knob.
Set up like this, the LFO is causing the Wavetable Position knob to sweep back and forth, while moving Macro Control 1 will change the amount of influence the LFO has over the position of the knob, from 0 to 100% of effect. If Macro Control 1 is turned all the way to the left (minimum), then the LFO will not move the knob at all. Conversely, if Macro Control 1 is turned all the way to the right, the LFO will cause the knob to sweep back and forth over the entire range you have assigned.
MASSIVE - Manual - 28
Reference
Interaction with the User Interface
To add an external MIDI controller to control this, simply right-click on Macro Control 1; you will see a small MIDI Learn dialog box pop up. Now move a control on your external MIDI controller and the assignment is made. (For more on how to use the Macro Controls, see below and also in section ↑3.9, Macro Control Section.)
You can also use one of MASSIVE’s other modulation sources as a way to vary the amount of active modulation instead of using a Macro Control. Still following the example above, try using the Stepper instead of a Macro Control to modulate the amount of effect the LFO has over the Wavetable Position knob:
1.Click the modulation handle next to the Stepper modulation source in the Center Window, then drag the cursor to the same sidechain modulation source under the Wavetable Position Knob, where you had previously assigned Macro Control 1.
2.The small orange numeral 1 representing the Macro Control, replaced by a small green numeral representing the Stepper.
3.Now the control signals from the Stepper will determine how wide an effect the LFO will have over the Wavetable Position knob.
Presuming that the Stepper modulator is in tab 8 of the Center Window (this is the default, although it can be changed if you select a different modulation source in tab 8), your assignments will now look something like this:
Again, don’t worry too much yet about what all this means or how it will sound as we are just learning how the controls function here. For more detailed information about how to use the various modulation sources in MASSIVE in particular, see section ↑3.8.2, Modulation Pages.
Faders in MASSIVE are assigned in the same way as knobs. Some of the fader controls (such as the Input Fader on the filter bus, labeled “Ser>Par” on the interface) can accept modulation sources in the same fashion as knobs, and have the same small black boxes near them to serve as modulation slots. After making assignments and dragging up or down to set the modulation range, you will see colored lines along the side of the fader indicating the range you have set, as in this image:
MASSIVE - Manual - 29

Reference
Interaction with the User Interface
Note that just as with knobs, some faders in MASSIVE have sidechain modulation slots as well, with similar functionality.
Bipolar Modulation
Please note the positive/negative polarity of the modulation source. LFOs are bipolar, i.e., they oscillate between positive and negative values. For example, if you assign an LFO to an oscillator’s pitch and set the modulation depth to one semitone (a strong vibrato effect), the pitch will actually oscillate between +1 and –1 semitones. On the other hand, if you assign an envelope to the pitch and apply the same amount of modulation (one semitone), the envelope will cause the pitch to rise from 0 to +1, then falling back to 0.
This bi-polarity is of importance when you use high modulation amounts around an extreme general setting. For instance, let’s say you have the Intensity control at about 90% to the right. Assign an envelope to it and cause it to modulate the control by about -25%. Thus, with high envelope signals the Intensity is lowered to about 65%:
MASSIVE - Manual - 30
Loading...