


Table of Contents
1. Disclaimer .................................................................................................................. 8
2. Welcome to TRAKTOR ............................................................................................... 9
2.1. Document Conventions ..................................................................................... 9
3. New in TRAKTOR PRO 3 .......................................................................................... 10
4. The TRAKTOR Workflow ........................................................................................... 11
5. Setting Up TRAKTOR ............................................................................................... 13
5.1. Importing Your Data from a Previous TRAKTOR Version ................................... 14
5.2. Pre-Configuring TRAKTOR using the Setup Wizard .......................................... 14
5.3. Configuring TRAKTOR to Use with an External Audio Interface ......................... 14
5.4. TRAKTOR Layouts and Layout Switching ........................................................ 15
6. TRAKTOR Overview ................................................................................................. 16
6.1. Application Menu ............................................................................................ 17
6.2. Header .......................................................................................................... 17
6.3. Global Section ................................................................................................ 18
6.3.1. Master Control Panel ............................................................................ 19
6.3.2. FX Units ............................................................................................... 21
6.3.3. Audio Recorder .................................................................................... 22
6.3.4. Loop Recorder ..................................................................................... 23
6.4. Decks and Deck Types ................................................................................... 24
6.4.1. Common Deck Controls ........................................................................ 24
6.4.2. Track Deck ........................................................................................... 29
6.4.3. STEM Deck .......................................................................................... 29
6.4.4. Remix Deck ......................................................................................... 31
6.4.5. Live Input ............................................................................................. 32
6.4.6. Advanced Panel ................................................................................... 33
6.4.7. Advanced Panel on the Remix Deck ...................................................... 36
6.5. Mixer ............................................................................................................. 37
6.5.1. Mixer Channel ...................................................................................... 38
6.5.2. Crossfade Controls ............................................................................... 39
6.6. Browser ......................................................................................................... 39
7. Automatic Synchronization of Decks .......................................................................... 41
7.1. Tempo Master and Master Clock ..................................................................... 41
7.2. Beatgrid ......................................................................................................... 41
7.3. Automatic Syncing .......................................................................................... 41
7.4. Automatic Tempo Master Mode ....................................................................... 41
8. Basic Usage Tutorials ............................................................................................... 42
8.1. Importing Music to the Track Collection ............................................................ 42
8.2. Browsing for Music ......................................................................................... 42
8.2.1. Navigating through Folders in the Browser Tree ..................................... 42
8.2.2. Performing a Text Search ...................................................................... 43
2

8.2.3. Previewing Tracks in the Browser .......................................................... 43
8.3. Loading Music into Decks ............................................................................... 43
8.3.1. Loading Tracks from Your iTunes Library ............................................... 44
8.4. Mixing Your First Two Tracks ........................................................................... 45
8.4.1. Prerequisites ........................................................................................ 45
8.4.2. Loading the First Track into Deck A ....................................................... 45
8.4.3. Starting Playback of Deck A .................................................................. 45
8.4.4. Loading the Second Track into Deck B ................................................... 46
8.4.5. Syncing the Track Tempos .................................................................... 46
8.4.6. Starting Playback of the Second Track ................................................... 46
8.4.7. Mixing in the Audio Signal ..................................................................... 46
8.5. Adjusting Gain Levels for Incoming Audio Signals ............................................. 47
8.5.1. Dynamic Range .................................................................................... 47
8.5.2. Clipping ............................................................................................... 47
8.5.3. Headroom ............................................................................................ 48
8.5.4. Always Level Incoming Audio Signals .................................................... 48
8.6. Using the Equalizer ......................................................................................... 48
8.6.1. EQing the Bass Frequencies of Tracks during Transition ......................... 49
8.7. Working with Mixer FX .................................................................................... 49
8.7.1. About Mixer FX .................................................................................... 49
8.7.2. Enabling Mixer FX ................................................................................ 50
8.7.3. Selecting Mixer FX .............................................................................. 50
8.7.4. Applying Mixer FX ................................................................................ 51
8.7.5. Pre-Selecting Mixer FX ......................................................................... 51
8.8. Working with Hotcue buttons and Flux Mode .................................................... 51
8.8.1. Accessing the Cue Page in the Advanced Panel ..................................... 51
8.8.2. Storing Cue Points using Hotcue buttons ............................................... 52
8.8.3. Storing Loops using Hotcue buttons ...................................................... 52
8.8.4. Triggering Stored Hotcues ..................................................................... 52
8.8.5. Remapping Stored Hotcues .................................................................. 52
8.8.6. Using Flux Mode and Reverse Mode ..................................................... 53
8.9. Locking Key of Tracks ..................................................................................... 53
8.10. Working with the Waveform and the Stripe ..................................................... 54
9. Advanced Usage Tutorials ......................................................................................... 56
9.1. Working with Cue Points ................................................................................. 56
9.1.1. About Cue Points ................................................................................. 56
9.1.2. Cue Point Types ................................................................................... 56
9.1.3. Accessing the Cue Page in the Advanced Panel ..................................... 57
9.1.4. Setting Cue Points ................................................................................ 57
9.1.5. Storing Cue Points ................................................................................ 58
9.1.6. Jumping to Cue Points .......................................................................... 58
9.1.7. Renaming Cue Points ........................................................................... 58
9.1.8. Changing the Cue Point Type ................................................................ 58
9.1.9. Deleting Cue Points .............................................................................. 59
9.1.10. Setting Fade Out and Fade In Cue Points in Tracks for Automated Mix-
ing ................................................................................................................ 59
9.2. Working with Loops ........................................................................................ 60
3

9.2.1. About Looping ...................................................................................... 60
9.2.2. Enable Looping with a Predefined Loopsize ........................................... 60
9.2.3. Enable Looping with a Customized Loop Size ........................................ 61
9.2.4. Disable Looping ................................................................................... 61
9.2.5. Storing Loops ....................................................................................... 61
9.2.6. Moving the Loop ................................................................................... 62
9.2.7. Moving Loop In Points and Loop Out Points ........................................... 62
9.3. Working with FX Units ..................................................................................... 63
9.3.1. Assigning FX Units to Mixer Channels ................................................... 63
9.3.2. Using the FX Unit in Single FX Mode ..................................................... 63
9.3.3. Switching between Single FX Mode and Goup FX Mode ......................... 64
9.3.4. Using FX Unit in Group FX Mode ........................................................... 64
9.3.5. Saving a Snapshot of FX Parameter Settings ......................................... 65
9.4. Using the Cue Channel for Mixing .................................................................... 65
9.5. Working with STEM Decks .............................................................................. 66
9.5.1. About STEM Files ................................................................................ 66
9.5.2. Loading a STEM File ............................................................................ 67
9.5.3. Playing Back the STEM File .................................................................. 67
9.5.4. Adjusting STEM Parts Volumes ............................................................. 67
9.5.5. Applying Filter FX to STEM Parts .......................................................... 68
9.5.6. Applying FX Send to STEM Parts .......................................................... 68
9.6. Working with Remix Decks .............................................................................. 69
9.6.1. About Remix Sets ................................................................................. 69
9.6.2. Loading Remix Sets ............................................................................. 69
9.6.3. Enabling and Adjusting the Remix Deck's Quantize Mode ....................... 69
9.6.4. Triggering Samples ............................................................................... 70
9.6.5. Switching Sample Grid Pages ............................................................... 71
9.6.6. Adjusting the Volume and Muting Sample Slots ...................................... 71
9.6.7. Applying Filter Effects the Sample Slots ................................................. 71
9.6.8. Locking Key for Sample Slots ................................................................ 72
9.6.9. Sending Sample Slots to FX Units ......................................................... 72
9.6.10. Routing Sample Slots into the Headphones Cue Channel ..................... 73
9.6.11. Enabling Punch Mode for the Sample Slot ............................................ 73
9.7. Creating Remix Sets ....................................................................................... 73
9.7.1. Importing Samples to the Track Collection .............................................. 74
9.7.2. Creating an empty Remix Set ................................................................ 74
9.7.3. Loading Samples into Samples Cells ..................................................... 74
9.7.4. Capturing Samples from Tracks ............................................................. 74
9.7.5. Changing Sample Colors ...................................................................... 74
9.7.6. Adjusting Sample Parameter Settings .................................................... 75
9.7.7. Saving a Remix Set .............................................................................. 76
9.7.8. Exporting Remix Sets ........................................................................... 77
9.8. Correcting Beatgrids ....................................................................................... 77
10. Working with Playlists .............................................................................................. 80
10.1. Creating Playlists .......................................................................................... 80
10.2. Adding Tracks to Playlists .............................................................................. 80
10.3. Sorting Tracks in Playlists .............................................................................. 80
4

10.4. Organizing Playlists in Folders ....................................................................... 81
10.5. Exporting Playlists ........................................................................................ 81
10.6. Importing Playlists ......................................................................................... 82
10.7. Importing iTunes Playlists .............................................................................. 82
10.8. Using Preparation Playlist ............................................................................. 82
10.9. History Playlists ............................................................................................ 83
10.10. Track Status Icons in the Track List .............................................................. 83
10.11. Playlist Maintenance ................................................................................... 83
10.11.1. Renaming a Playlist .......................................................................... 84
10.11.2. Removing Tracks from Playlists ......................................................... 84
10.11.3. Restore Auto GAIN value .................................................................. 84
10.11.4. Resetting Played State of Tracks ....................................................... 84
10.11.5. Deleting Playlists .............................................................................. 84
10.11.6. Removing Duplicates from Playlists .................................................... 84
10.11.7. Saving Playlists as Webpage File ....................................................... 85
10.11.8. Search Tracks in Playlists .................................................................. 85
10.11.9. Clearing Playlists .............................................................................. 85
11. Managing Your Track Collection ............................................................................... 86
11.1. About the Track Collection ............................................................................. 86
11.2. Compatible Audio File Formats ...................................................................... 86
11.3. Importing Music Files from the Local Music Folder .......................................... 86
11.4. Adding Music from Other Folders ................................................................... 87
11.5. Importing iTunes Tracks into Your Track Collection .......................................... 87
11.6. Importing Remix Sets .................................................................................... 87
11.7. Show Tracks on Your Local Drive ................................................................... 87
11.8. Editing Track Metadata in the Track List ......................................................... 88
11.9. Editing Track Metadata using the Edit Dialog .................................................. 88
11.10. Editing Track Cover Artwork ......................................................................... 89
11.11. Assigning Playlists and Folders to the Favorites ............................................ 90
11.12. Track Collection Maintenance ...................................................................... 90
11.12.1. Checking Consistency of your Track Collection ................................... 90
11.12.2. Analyzing Tracks Manually ................................................................ 92
11.12.3. Relocating Missing Tracks ................................................................. 93
11.12.4. Deleting Tracks from the Track Collection ........................................... 94
11.12.5. Saving Your Track Collection ............................................................. 94
11.12.6. Exporting Your Track Collection ......................................................... 94
11.12.7. Restoring the Track Collection from an Automatic Backup ................... 95
11.12.8. Clearing Your Track Collection ........................................................... 95
12. Advanced Operation of TRAKTOR ........................................................................... 96
12.1. Synchronization using Ableton Link ................................................................ 96
12.1.1. Connecting to a Network ..................................................................... 96
12.1.2. Joining and Leaving a Link Session ..................................................... 96
12.1.3. Synchronizing TRAKTOR Decks to the Link Timeline ............................ 97
12.2. Syncing TRAKTOR via MIDI Clock ................................................................. 99
12.2.1. Syncing TRAKTOR to External MIDI Clock Signal ................................. 99
12.2.2. Using TRAKTOR as Master Clock ....................................................... 99
5

12.2.3. Syncing two Instances of TRAKTOR ................................................... 100
12.3. Recording Your Mix with the Audio Recorder ................................................. 100
12.4. Broadcasting Your Mix ................................................................................. 101
12.4.1. Streaming Protocol ............................................................................ 102
12.5. Using Cruise Mode for Automatic Mixing ...................................................... 103
12.6. Enabling FX Unit 3 and FX Unit 4 ................................................................. 104
12.7. Configuring the FX Units to be used in Send FX Mode ................................... 104
12.8. Additional Mouse Controls for Faders and Knobs ........................................... 105
13. Setting up TRAKTOR for SCRATCH Control ............................................................ 107
13.1. Connecting Audio Interface to Computer ....................................................... 107
13.2. Connecting Audio Interface to DJ Mixer ......................................................... 107
13.3. Connecting Turntables to Audio Interface ...................................................... 108
13.4. Connecting CD Players to Audio Interface ..................................................... 108
13.5. Connecting Amplification System to DJ Mixer ................................................ 108
13.6. Connecting Headphones to DJ Mixer ............................................................ 108
13.7. Final Hardware Preparations ........................................................................ 108
13.8. Configuring TRAKTOR for SCRATCH Control ............................................... 109
13.9. Control TRAKTOR using Timecode Media ..................................................... 110
13.10. Switching to Scratch Playback Mode ........................................................... 111
13.11. The Control Zones on CD ........................................................................... 111
13.12. The Control Zones on Vinyl ........................................................................ 111
13.13. Tracking Modes ......................................................................................... 112
14. Common TRAKTOR Setups ................................................................................... 113
14.1. Using TRAKTOR with an External Mixer ........................................................ 113
14.2. Using TRAKTOR with an Add-On Controller .................................................. 113
14.3. Integrating a Microphone to Your TRAKTOR Setup ........................................ 114
15. Configuring MIDI Controller for Controlling TRAKTOR .............................................. 115
15.1. Importing Controller Mapping ........................................................................ 115
15.2. Controller Manager Overview ....................................................................... 115
15.2.1. Device Setup Section ......................................................................... 116
15.2.2. Assignment Table Section .................................................................. 117
15.2.3. Device Mapping Section ..................................................................... 118
15.2.4. Mapping Details Section ..................................................................... 118
15.2.5. Available Controller Types .................................................................. 119
15.3. Available Controller Types ............................................................................ 121
15.4. Assignment Table Section ............................................................................ 123
16. Preferences ........................................................................................................... 125
16.1. Preferences Dialog Overview ....................................................................... 125
16.2. Preferences – Audio Setup Page .................................................................. 127
16.3. Preferences – Output Routing Page .............................................................. 128
16.4. Preferences – Input Routing Page ................................................................ 131
16.5. Preferences – External Sync Page ................................................................ 132
16.6. Preferences – Timecode Setup Page ............................................................ 133
16.7. Preferences – Loading Page ........................................................................ 135
6

16.8. Preferences – Transport Page ...................................................................... 136
16.9. Preferences – Decks Layout Page ................................................................ 139
16.10. Preferences – Track Decks Page ................................................................ 141
16.11. Preferences – Remix Decks Page ............................................................... 143
16.12. Preferences – Mixer Page .......................................................................... 145
16.13. Preferences – Global Settings Page ............................................................ 147
16.14. Preferences – Effects Page ........................................................................ 149
16.15. Preferences – Mix Recorder Page ............................................................... 151
16.16. Preferences – Loop Recorder Page ............................................................ 152
16.17. Preferences – Broadcasting Page ............................................................... 153
16.18. Preferences – Browser Details Page ........................................................... 155
16.19. Preferences – Layout Manager Tab ............................................................. 156
16.20. Preferences – File Management Page ......................................................... 157
16.21. Preferences – Analyze Options Page .......................................................... 159
16.22. Preferences – Controller Manager Page ...................................................... 161
17. Effect Reference .................................................................................................... 162
17.1. Delay .......................................................................................................... 162
17.2. Reverb ........................................................................................................ 163
17.3. Flanger ....................................................................................................... 163
17.4. Flanger Pulse .............................................................................................. 164
17.5. Flanger Flux ................................................................................................ 164
17.6. Gater .......................................................................................................... 165
17.7. Beatmasher 2 .............................................................................................. 165
17.8. Delay T3 ..................................................................................................... 166
17.9. Filter LFO .................................................................................................... 167
17.10. Filter Pulse ................................................................................................ 167
17.11. Filter .......................................................................................................... 168
17.12. Filter:92 LFO ............................................................................................. 169
17.13. Filter:92 Pulse ........................................................................................... 169
17.14. Phaser ...................................................................................................... 170
17.15. Phaser Pulse ............................................................................................. 171
17.16. Phaser Flux ............................................................................................... 171
17.17. Reverse Grain ........................................................................................... 172
17.18. Turntable FX .............................................................................................. 172
17.19. Iceverb ...................................................................................................... 173
17.20. Reverb T3 ................................................................................................. 173
17.21. Ring Modulator .......................................................................................... 173
17.22. Digital LoFi ................................................................................................ 174
17.23. Mulholland Drive ........................................................................................ 174
17.24. Transpose Stretch ...................................................................................... 175
17.25. BeatSlicer Buffer ........................................................................................ 175
17.26. Formant Filter ............................................................................................ 176
17.27. Peak Filter ................................................................................................. 176
17.28. Tape Delay ................................................................................................ 177
17.29. Ramp Delay .............................................................................................. 177
17.30. Auto Bouncer ............................................................................................. 178
17.31. Bouncer .................................................................................................... 179
7

1. DISCLAIMER
The information in this document is subject to change without notice and does not represent a
commitment on the part of Native Instruments GmbH. The software described by this document is
subject to a License Agreement and may not be copied to other media. No part of this publication
may be copied, reproduced or otherwise transmitted or recorded, for any purpose, without prior
written permission by Native Instruments GmbH, hereinafter referred to as Native Instruments.
“Native Instruments”, “NI” and associated logos are (registered) trademarks of Native Instruments
GmbH.
Mac, macOS, GarageBand, Logic and iTunes are registered trademarks of Apple Inc., registered
in the U.S. and other countries.
Windows and DirectSound are registered trademarks of Microsoft Corporation in the United States
and/or other countries.
Ableton Live™ and LINK™ are a trademarks of Ableton AG.
All other trademarks are the property of their respective owners and use of them does not imply
any affiliation with or endorsement by them.
Document authored by: Christian Schulz
Software version: 3.0 (10/2018)
Special thanks to the Beta Test Team, who were invaluable not just in tracking down bugs, but in
making this a better product.
Disclaimer
8
2. WELCOME TO TRAKTOR
Thank you for choosing TRAKTOR PRO 3 — it is because of customers like you that we can continue developing groundbreaking music software and hardware. TRAKTOR is the most powerful
and versatile DJ software on the market. With TRAKTOR, you can mix your tracks traditionally as
well as combine your tracks and loops in a non-linear way using it as a powerful live remixing tool.
This documentation provides you with all the information you need to make use of TRAKTOR’s
features to their full capacity.
2.1. Document Conventions
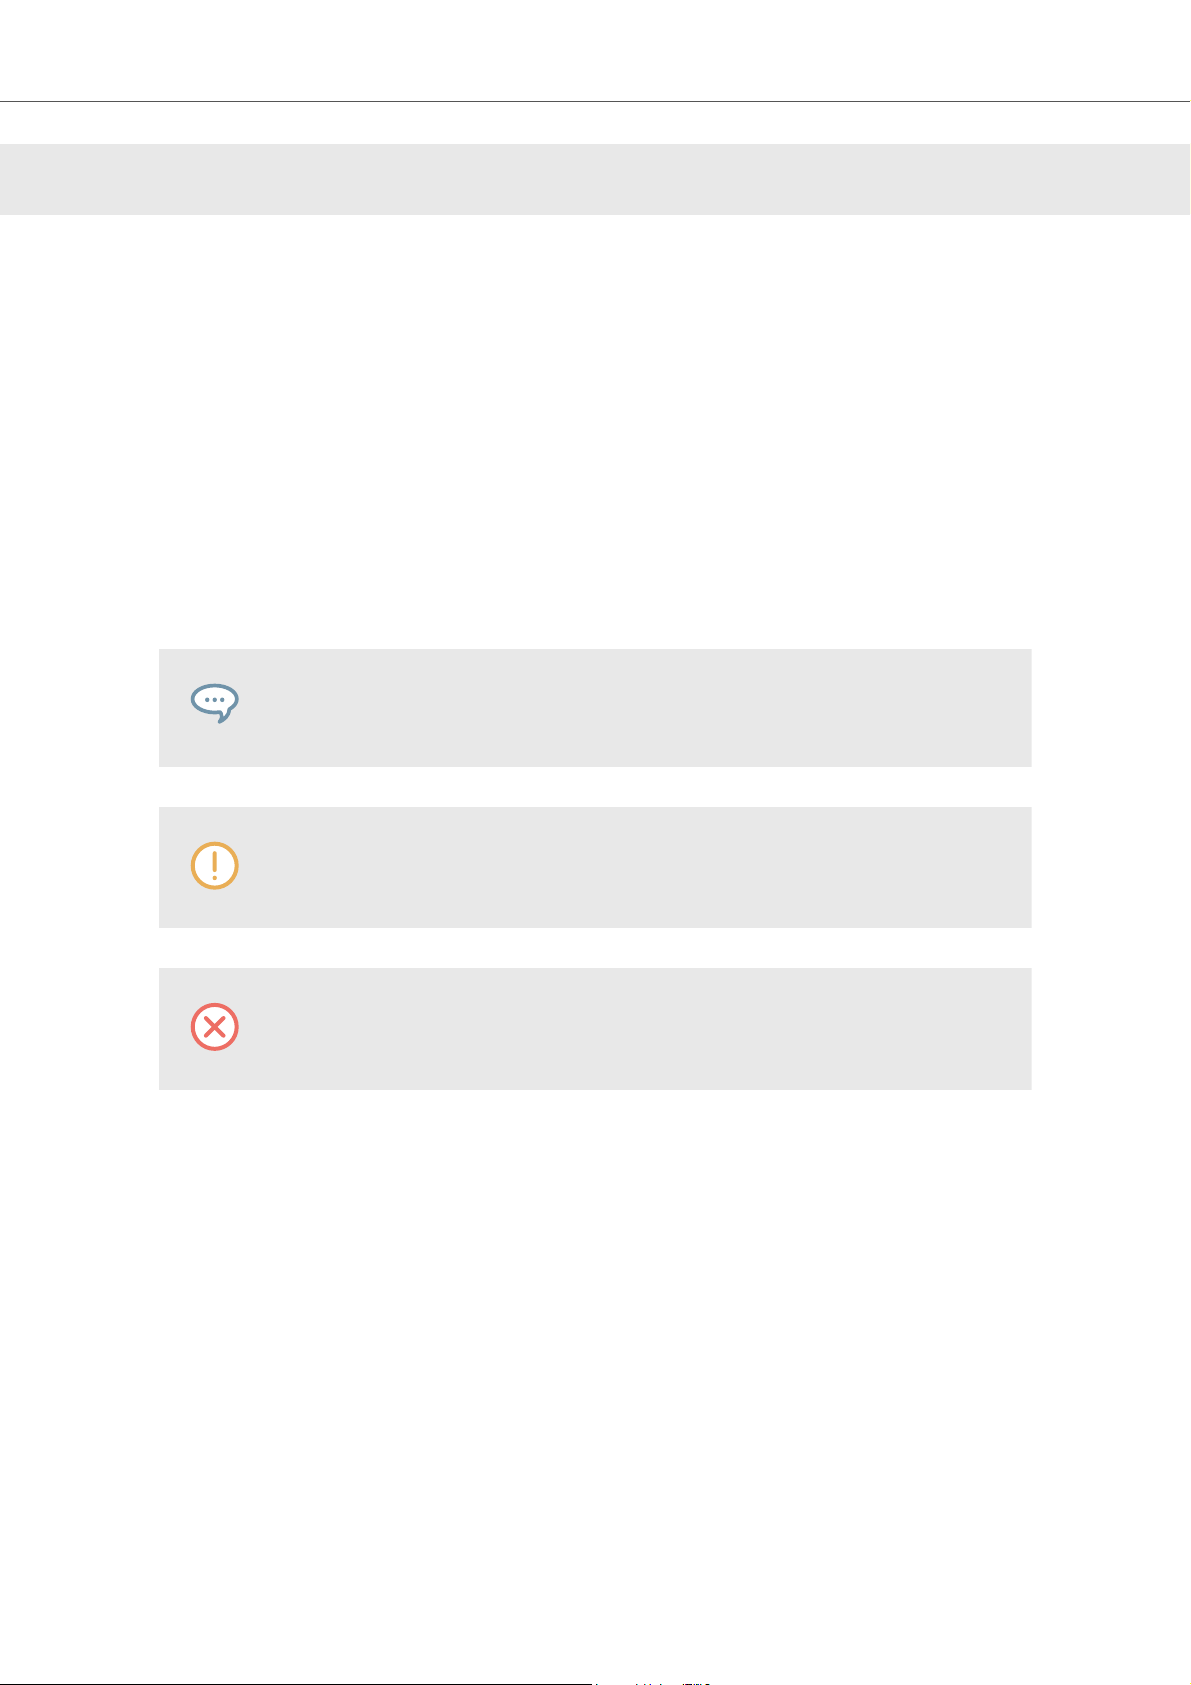
This document uses particular formatting to point out special facts and to warn you of potential issues. The icons introducing the following notes let you see what kind of information can be expected:
The speech bubble icon indicates a useful tip that may help you to solve a task more
efficiently.
The exclamation mark icon highlights important information that is essential for the
given context.
The warning icon warns you of serious issues and potential risks that require your
full attention.
Furthermore, the following formatting is used:
• Paths to locations on your hard disk or other storage devices are printed in italics.
• Important names and concepts are printed in bold.
• Square brackets are used to reference keys on a computer’s keyboard, e.g., Press [Shift] +
[Enter].
Welcome to TRAKTOR
9

3. NEW IN TRAKTOR PRO 3
TRAKTOR PRO 3 preserves most of the workflows of TRAKTOR PRO 3. It will install alongside
TRAKTOR PRO 2 and offer you to copy your collection.
All controllers and setups supported with TRAKTOR PRO 2 remain supported with TRAKTOR
PRO 3.
With the release of TRAKTOR PRO 3 you get plenty of new features and improvements, including:
Fully Overhauled User Interface
We have overhauled TRAKTOR’s user interface for extra clarity by flattening and sharpening it.
Now you can see everything you need at a glance, also in challenging environments. New Master
and Channel level metering means you can accurately control your mix with full visual feedback.
Improved information hierarchy, consistency in design and colours throughout all panels of the application, drop-down menus, dialogs, full width Hotcue buttons.
New Mixer Effects
Whether it’s heavy drops or smooth transitions that define your style, the new Mixer FX are designed for one-knob modulation with big-sounding results. Choose from eight extra effects and
three new filters to assign to each channel, in addition to TRAKTOR’s famous Deck FX.
Traktor Pro 3 introduces the concept of easy to use, one-knob Mixer Effects located in the mixer
channels. The new type of effects will be launched with a selection of eight standard effects: Reverb, Dual Delay, Dotted Delay, Flanger, Time Gater, Noise, Crush and Barber Pole.
Scratch right out of the box
TRAKTOR SCRATCH is now included in TRAKTOR PRO 3, right out of the box.
Use any soundcard
DJs using timecode vinyl can now use any soundcard they like, in addition to tried and tested,
TRAKTOR SCRATCH Certified soundcards and mixers. So if there’s a model that does it for you,
or if you’re playing back-to-back with somebody on a different setup, TRAKTOR can adapt.
Additional master limiter
Alternative, additional Master Limiter provides a more transparent sound.
New in TRAKTOR PRO 3
10

4. THE TRAKTOR WORKFLOW
The following steps outline the key workflow of using TRAKTOR. Each milestone step is briefly introduced and provides links with further information:
1. Importing Your Music: At first, you need to import your music into TRAKTOR. When you im-
port your music, all music files get stored in the Track Collection. The Track Collection uses
the track-specific metadata for categorizing the tracks by certain criteria. For more information, refer to Importing Music to the Track Collection.
2. Browsing for Music: Once your music imported in TRAKTOR, you can use the Browser to
find the tracks you are looking for your mix. The Browser lets you search for your music by
either performing a text search or by navigating the Browser Tree. The Track List shows the
tracks of the selected folder with its metadata sorted inside a table. For more information, refer to Browsing for Music.
3. Loading Tracks into Decks: When loading a track from the Track List, TRAKTOR calculates
its exact tempo and key the information. This analysis of each track can be done also before
loading tracks. While analyzing, TRAKTOR creates the Beatgrid and the Waveform for each
imported track. This information is then stored for each track in the Track Collection. For more
information, refer to Loading Music into Decks.
4. Start Playback of a Deck: In order to hear music from the Deck you need to adjust the Mixer
controls of the respective Mixer channel and set the crossfader accordingly. Then you can
start the Playback and the Waveform will start moving. For more information, refer to Mixing
Your First Two Tracks.
5. Finding and loading another Track: While the first track is playing you can browse for the
next track in your Track Collection and load it into another Deck. For more information, refer
to Mixing Your First Two Tracks.
6. Syncing the Tracks: Since TRAKTOR has calculated the tempos and the Beatgrids for both
tracks, you can sync the next track with the track that is currently playing by using the SYNC
button on the stopped Deck. Now when playing back the next track, the beats of both tracks
will perfectly match. You can also sync the tracks manually by using the tempo and synchronization controls provided on any Deck. For more information, refer to Mixing Your First Two
Tracks.
7. Previewing the transition: The Mixer provides you with the controls to preview the next
track when preparing the transition, using your headphones. This allows you to find the right
position for starting playback, and you can then fade the track in using the crossfader. For
more information, refer to Using the Cue Channel for Mixing.
8. Using Equalizer and adding Effects: To make transitions more flawless, the Mixer is equip-
ped with equalizer controls for tweaking frequency bands in the audio signals. Furthermore,
TRAKTOR provides FX Units and Mixer FX for modulating the audio signals. For more information, refer to Using the Equalizer, Working with FX Units, Working with Mixer FX
9. Cueing using Hotcue buttons: You can create Cue points and store them on Hotcue but-
tons. When later loading the track, you can trigger the Hotcues and the playback will instantly
continue from the stored cue point position. For more information, refer to Working with Hot-
cue buttons and Flux Mode, Working with Cue Points.
The TRAKTOR Workflow
11

10. Looping: TRAKTOR provides you with Loop controls for enabling Loops in pre-defined sizes.
As with Cue points, Loops can be stored using the Hotcue buttons and triggered at a later
time. For more information, refer to Working with Hotcue buttons and Flux Mode, Working
with Loops.
11. Remixing: Using the STEM Decks, you can perform your music by taking out entire musical
elements in STEM Files. You can also remix your music using Loops and One-shot Samples
in Remix Decks. For more information, refer to Working with STEM Decks Working with Re-
mix Decks.
The TRAKTOR Workflow
12
5. SETTING UP TRAKTOR
This section assumes you have already installed TRAKTOR PRO 3 using NATIVE ACCESS, and
that you can start to configure TRAKTOR for its first use. If this is not the case, follow the instructions using this link Registering and Installing a Native Instruments Product using NATIVE AC-
CESS.
TRAKTOR can be used in various setups. Besides using TRAKTOR with a dedicated TRAKTOR
KONTROL hardware controller, it can also be used with an external audio interface (with or without
an external DJ Mixer).
It can also be used with a MIDI controller of another manufacturer. In this case, you need to load
the specific controller mapping file or you create a custom controller mapping yourself.
TRAKTOR with External Audio Interface
This section and so this documentation assumes you are using TRAKTOR with at least an external audio interface with one stereo output and a stereo headphone output. This way we can make
sure the workflows explained also apply to TRAKTOR setups using any other external audio
equipment or controller with an integrated audio interface.
Of course you can use TRAKTOR with your the built-in sound card. However, you
are then only using the stereo output.
The steps in this section will guide you through the process of configuring TRAKTOR using an external audio interface.
TRAKTOR Configuration Steps
When starting TRAKTOR for the first time, you need to configure TRAKTOR so that it works in
your specific setup. The following steps for configuring TRAKTOR are required:
1. Importing Data from previous installations: If you have installed a previous TRAKTOR in-
stallation, TRAKTOR asks you to import the data. For more information, refer to Importing
Your Data from a Previous TRAKTOR Version [14].
2. Configuring TRAKTOR using the Setup Wizard: The Setup Wizard helps to you configure
TRAKTOR step-by-step. For more information, refer to Pre-Configuring TRAKTOR using the
Setup Wizard [14].
3. Configuring TRAKTOR for using the external audio interface: When connecting an exter-
nal audio interface, TRAKTOR automatically sets the Mixing Mode to External Mixing. For
more information on setting up TRAKTOR with an external audio interface, refer to Configur-
ing TRAKTOR to Use with an External Audio Interface [14]
4. TRAKTOR Layouts and Layout Switcing: TRAKTOR provides several Layouts that display
more or less elements, depending on use case. For more information, refer to TRAKTOR
Layouts and Layout Switching [15].
Setting Up TRAKTOR
13

5.1. Importing Your Data from a Previous TRAKTOR Version
When you start TRAKTOR for the first time, TRAKTOR will ask if you want to import your previous
data by copying the existing user content to a new folder in your user folder. Your previous data
will not be altered if you copy it to the new default folder.
5.2. Pre-Configuring TRAKTOR using the Setup Wizard
When starting TRAKTOR for the first time, you are provided with the Setup Wizard. In a few steps,
the Setup Wizard guides you through the process of configuring TRAKTOR. It can also be used to
reset TRAKTOR to an out-of-the-box setup.
Setup Wizard Pages
1. The WELCOME page asks you to connect any controllers and devices to your computer.
2. The MIXER SETUP page asks you to select whether or not you want to use TRAKTOR with a
controller different than TRAKTOR KONTROL. If yes, on the next page you can choose the
controller manufacturer and model from the drop-down lists.
3. On the DECK LAYOUT page you can select whether or not you are using Timecode vinyls or
CDs to externally control TRAKTOR's Decks. Furthermore, you can select how many Decks
and the Flavors you want to use. This can also be changed from within the software.
4. The SUMMARY Page shows you the configuration of TRAKTOR. You can click Back to
change the settings made, Cancel to close the Setup Wizard completely, or Finish, which
confirms your configuration.
Starting the Setup Wizard
You can start the Setup Wizard in two ways:
1. Select Start Setup Wizard in the Help menu of the Application Menu bar (not visible in Full-
screen mode).
2. Or click the Setup Wizard button at the bottom left corner of the Preferences dialog window.
5.3. Configuring TRAKTOR to Use with an External Audio Interface
To use TRAKTOR’s preview feature, you need to have an audio interface with two independent
stereo outputs, one for the Master Out and one for the Headphones CUE channel. Refer to the
manufacturer’s manual for installing and connecting your external audio interface.
In TRAKTOR, do the following:
1. Click the Preferences button in the Header to open the Preferences.
2. Select the Audio Setup page.
3. Select your external audio interface from the Audio Device drop-down menu.
4. Open the Output Routing page.
5. Select Internal under Mixing Mode.
6. Select an output pair for Output Master and one output pair for Output Monitor.
Setting Up TRAKTOR
14

7. If your audio device provides another output, you can assign this to the Output Record.
8. Close the Preferences.
TRAKTOR is now configured.
5.4. TRAKTOR Layouts and Layout Switching
TRAKTOR uses a set of user interface layouts to organize its graphical user interface. These are
called Layouts. You can access them from TRAKTOR's Layout selection drop-down menu in the
software's Header. Depending on which Layout you select, certain elements of the user interface
will be displayed while others will remain hidden.
Available Layouts
The following Layouts are available:
• Mixer: The Mixer Layout is optimized for using TRAKTOR with the computer keyboard and the
mouse. This Layout shows all available controls of the internal Mixer, the crossfade controls,
and the Headphone Cue controls. The Decks provide all the required controls for adjusting
tempo and syncing.
• Extended: The Extended view shows TRAKTOR's Global Section with the FX Units, and extends the Decks with more controls and further track information. You are also provided with
the buttons and knobs for assigning the FX Units to the Mixer channels and for applying MIXER FX.
• Essential: The Essential Layout shows TRAKTOR in a reduced appearance with the most important control elements for basic mixing. This Layout is optimized for mixing using an external
controller, as the internal Mixer is not displayed. The Browser takes up the majority of the application window and the Decks only show the Waveform displays, the Stripe-view, and the transport controls.
• Browser: The Browser Layout maximizes the Browser and minimizes the Decks to only the
Stripe view. The Mixer is not visible.
Besides the provided Layouts, you can adjust a graphical user interface to your needs and save it
in a custom Layout that you can also select from the Layout selection drop-down menu. For more
Information about creating Layouts, refer to Preferences – Layout Manager Tab [156].
Switching Layouts
To switch to another Layout:
• Select the Layout from the Layout selection drop-down menu in the Header.
Setting Up TRAKTOR
15
6. TRAKTOR OVERVIEW
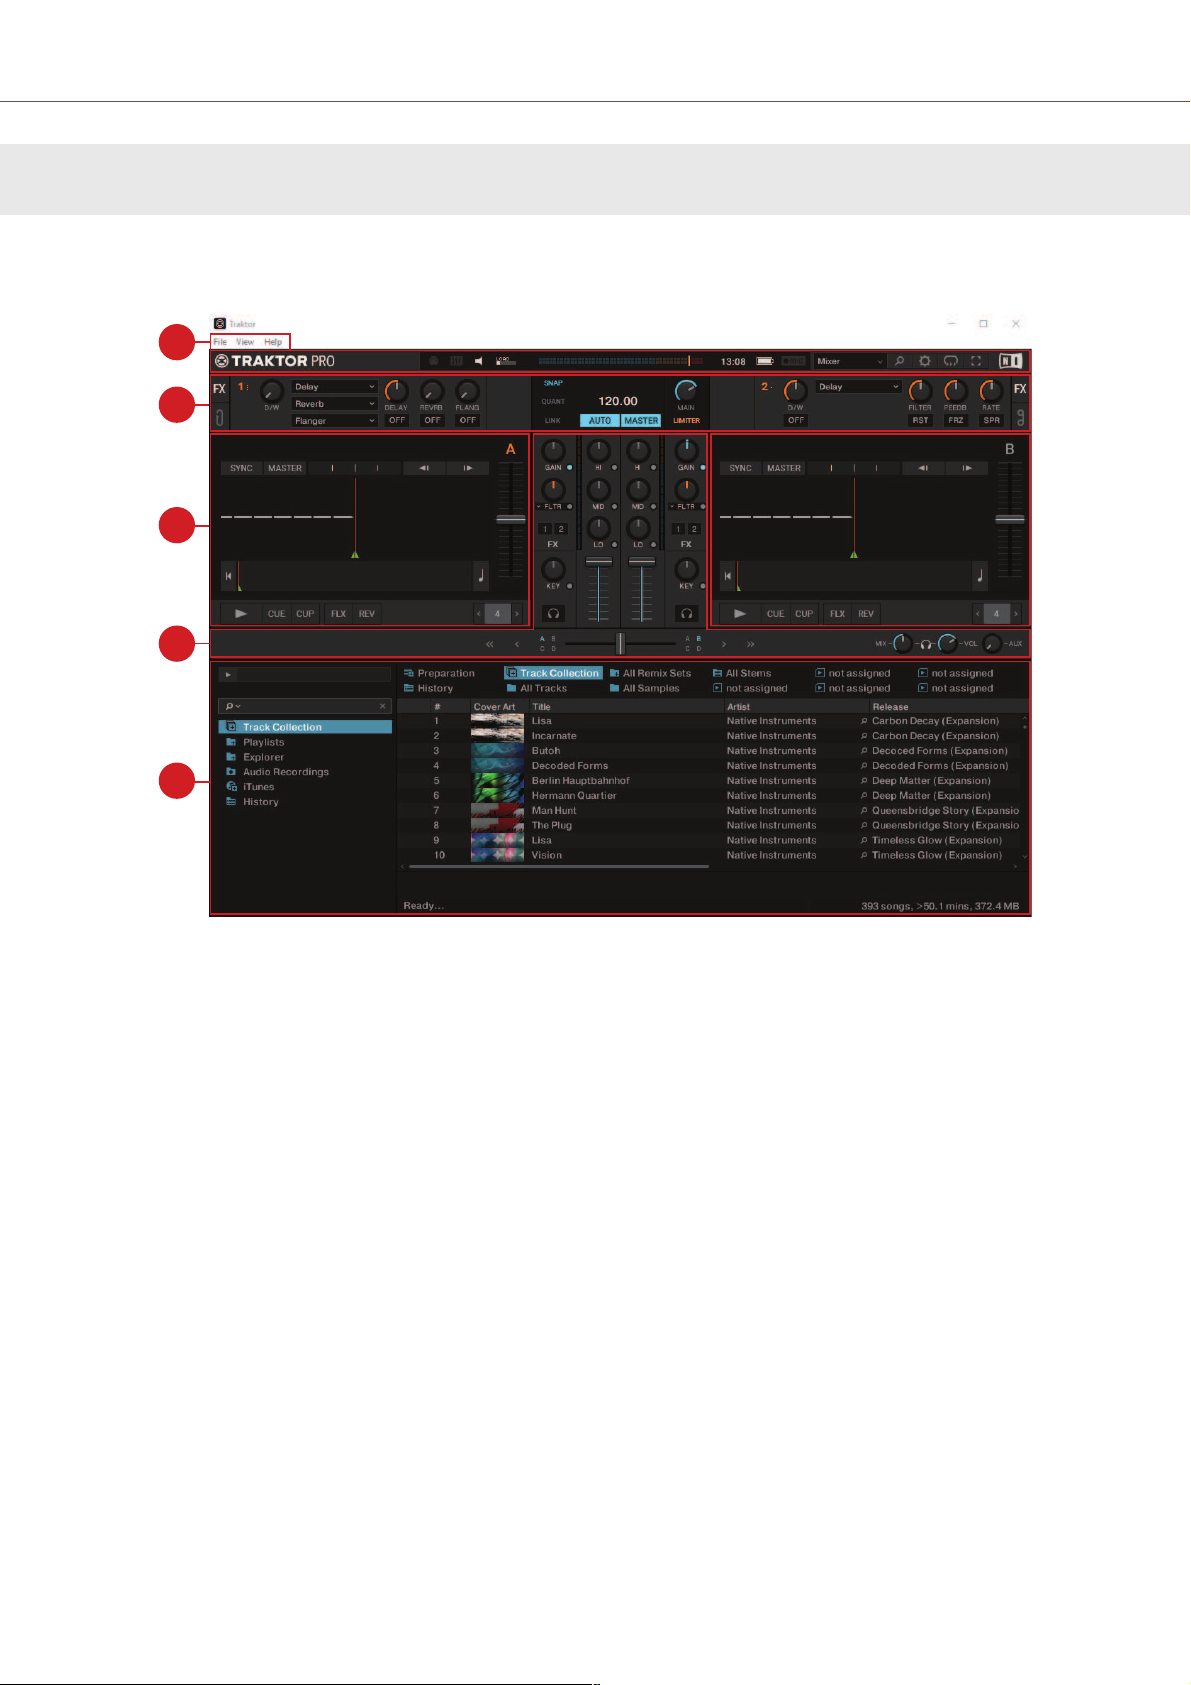
The picture below shows the interface of TRAKTOR.
1
3
2
4
5
TRAKTOR PRO 3 user interface.
(1) Application menu: Provides access to basic functions and information about the software. For
more information, refer to Application Menu.
(2) Header: Here you can find various status indicators and useful functions and buttons, e.g., the
Preferences button. For more information, refer to Header.
(3) Global section: The Global section contains the FX Units, the Master Control panel, the AUDIO RECORDER, and the LOOP RECORDER. For more information, refer to Global Section.
(4) Decks: TRAKTOR provides you with the four virtual Decks A, B, C, and D. The Decks are
where tracks, Stem files, and Samples are played back. If you previously selected to use only two
Decks A and B from the Setup Wizard, you can enable the lower Decks C and D in the Preferences. For more information, refer to Decks and Deck Types [24].
(5) Mixer: The Mixer receives audio signals on its four Mixer channels, coming from the four
Decks. The Mixer’s basic purpose is to adjust the relative level of each Mixer channel, to control
the channels’ frequency content, possibly routing them into the FX Units, before sending the overall result to the master output. For more information, refer to Mixer [37].
(6) Browser: Lets you manage all your tracks in the Track Collection. You can group tracks in
Playlists, sort them according to various attributes, and search within Playlists as well as in the entire Track Collection. For more information, refer to Browser.
TRAKTOR Overview
16
6.1. Application Menu
The Application menu provides access to File, View , and Help menus.
Application menu.
File: Contains options for setting up TRAKTOR:
• Preferences: Opens the Preferences dialog.
• Audio Setup: Directly calls up the Audio Setup page in the Preferences dialog.
• Controller Manager: Directly calls up the Controller Manager page in the Preferences dialog.
• Exit: Closes the TRAKTOR application.
View: Contains options for the TRAKTOR Layout:
• Layouts: Shows the list of available TRAKTOR Layouts you can select.
• Fullscreen: Switches the TRAKTOR application into Fullscreen view.
Help: Contains options for updating TRAKTOR and getting help:
• Check for Updates on Native Access: Calls up the Native Access application that is checking
for available software updates.
• Downloads: Opens the web browser on your computer and directs you to the download page
on the Native Instruments website.
• Get Started with TRAKTOR: Opens the web browser on your computer and directs you to the
TRAKTOR video tutorials page on the Native Instruments website.
• Online TRAKTOR documentation: Opens the web browser on your computer and directs you
to the Online TRAKTOR documentation page on the Native Instruments website.
• Start Setup Wizard: Launches the Setup Wizard for configuring TRAKTOR.
• Buy Upgrades and Accessories: Opens the web browser on your computer and directs you
to the TRAKTOR products page on the Native Instruments website.
• About: Opens the about screen.
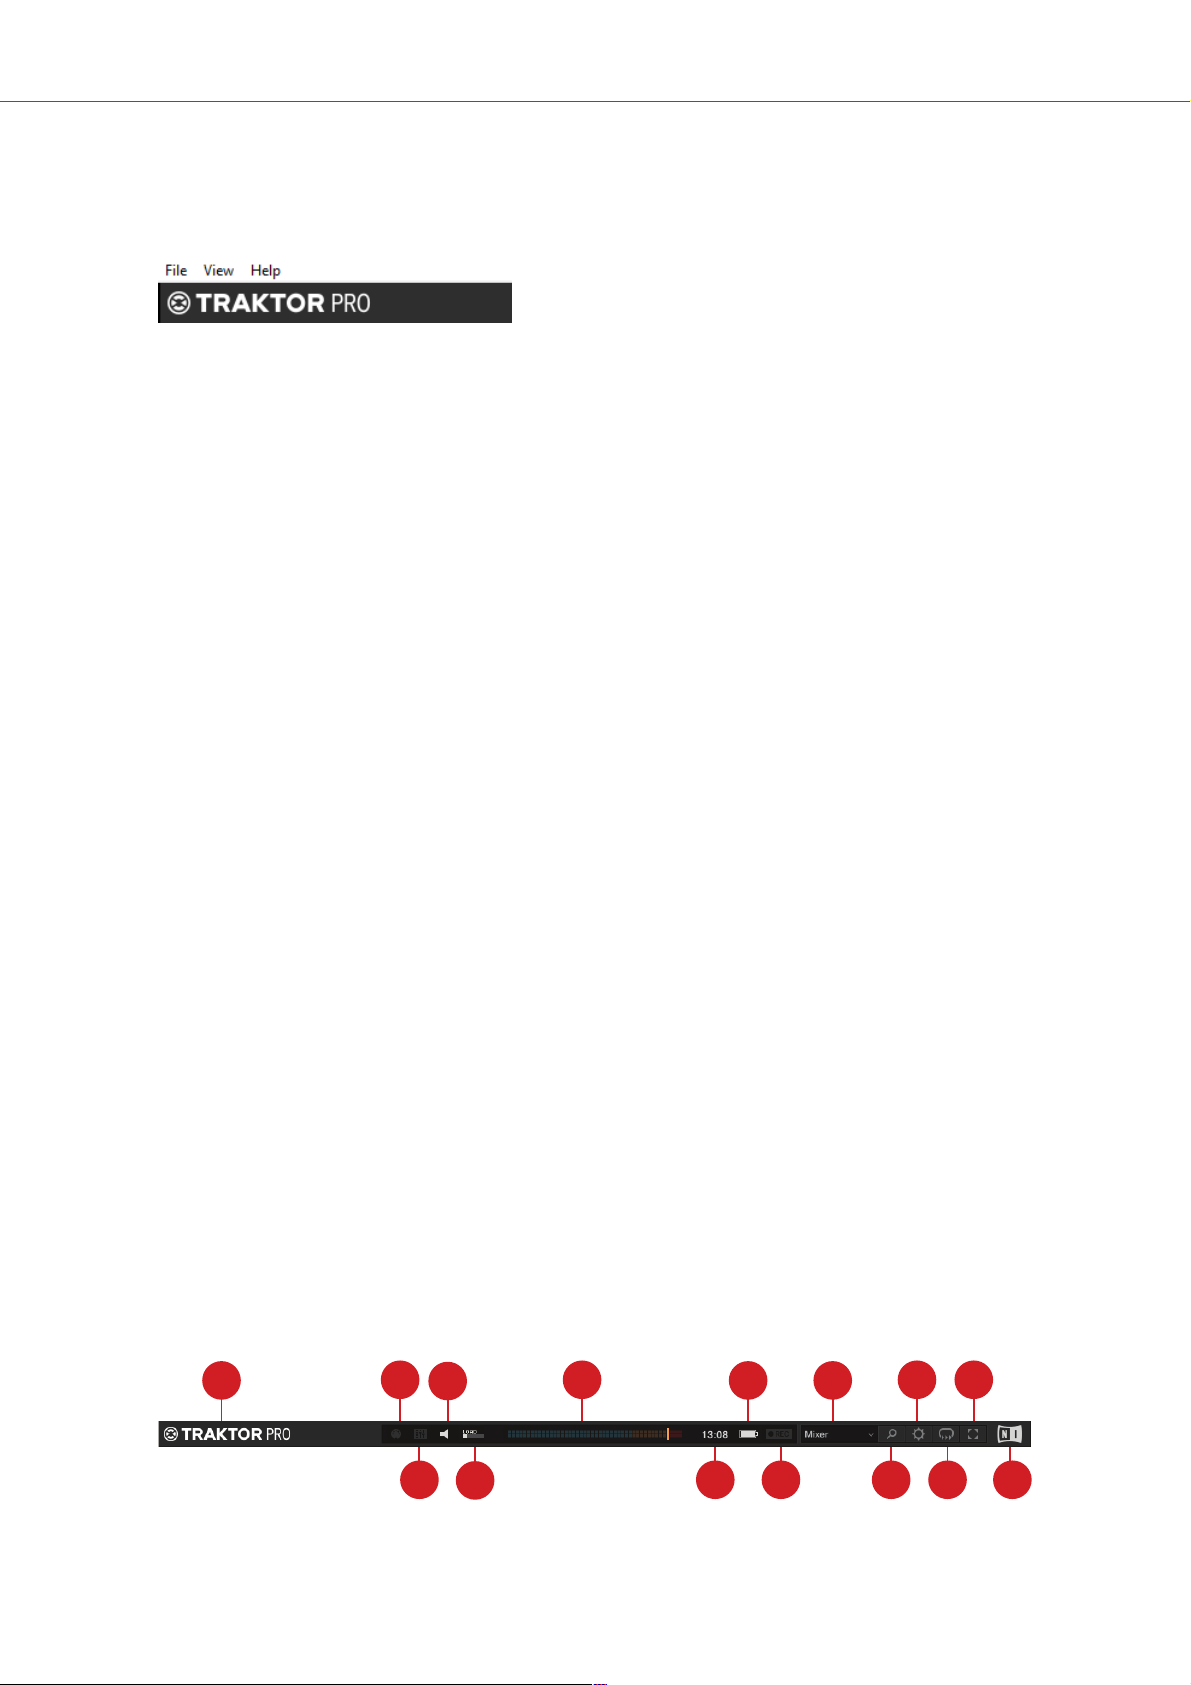
6.2. Header
The Header is located at the very top of TRAKTOR’s user interface and contains various status
indicators, and useful functions and buttons.
2
1
3
4
5
6
7
8
9
10
1112131415
Header.
TRAKTOR Overview
17

(1) TRAKTOR Logo: Clicking the TRAKTOR logo displays the about screen with the current version number of the TRAKTOR software, the credits, and some additional information.
(2) MIDI indicator: Indicates the incoming MIDI and Native (NHL) signals. The indicator lights blue
while a signal is received.
(3) Connection indicator: Indicates if all listed controllers are connected. The indicator lights blue
if all controllers are connected, orange if some controllers are connected, unlit if no controller is
connected.
(4) Audio indicator: Indicates the connection to your audio interface. It lights up blue if an audio
interface is connected, red if no audio interface is connected, orange if the internal soundcard selected. For more information, refer to Preferences Audio setup.
(5) LOAD indicator: Indicates how much computing time available per audio buffer is currently
used by TRAKTOR to process audio data contained in one buffer. This value shows how much
CPU load the audio processing requires and how much headroom is left before audio starts dropping out. The system should be kept at values below the LOAD indicator turning red.
(6) Master Output level meter: Displays the Master Output level. For more information, refer to
GAIN.
(7) System Clock: Displays the time of day derived from the system time of your computer.
(8) Battery indicator: Indicates how much power remains in your computer's battery. It lights up
blue if a power supply is connected and red when running out of battery power.
(9) Recording indicator: Indicates the status of the AUDIO RECORDER. It lights up red when recording. For more information, refer to Recording Your Mix with the Audio Recorder.
(10) Layout selector: Provides you with a list of default TRAKTOR Layouts. For more information,
refer to... Layouts TRAKTOR Layouts and Layout Switching.
(11) Maximize Browser button: Maximizes the Browser view by minimizing the sizes of the
Decks, the Mixer, and the Global section.
(12) Preferences button: Opens the Preferences dialog. All TRAKTOR settings are made here.
For more information, refer to Preferences.
(13) Cruise Mode button: Enables Cruise mode allowing you to automatically play one track after
the other from a Playlist or your Track Collection. Cruise mode seamlessly takes over playback
control. For more information, refer to Using Cruise Mode for Automatic Mixing .
(14) Fullscreen button: Enables Fullscreen mode. When enabled, none of the operating system’s
controls are visible.
(15) NI Logo: Displays the about screen with the current version number of the TRAKTOR software, the credits, and some additional information.
6.3. Global Section
The Global section contains five distinct panels with global controls and recording functions: FX
Unit 1 and FX Unit 2, AUDIO RECORDER, LOOP RECORDER, and the Master Control panel. Not
all of the panels can be displayed at once. The Master Control panel is always visible. In the left
panel you can display FX Unit 1 or the LOOP RECORDER, and on the right side you can display
either FX Unit 2 or the AUDIO RECORDER. The panels can be selected using the corresponding
buttons at the far left and right of the Global section.
TRAKTOR Overview
18
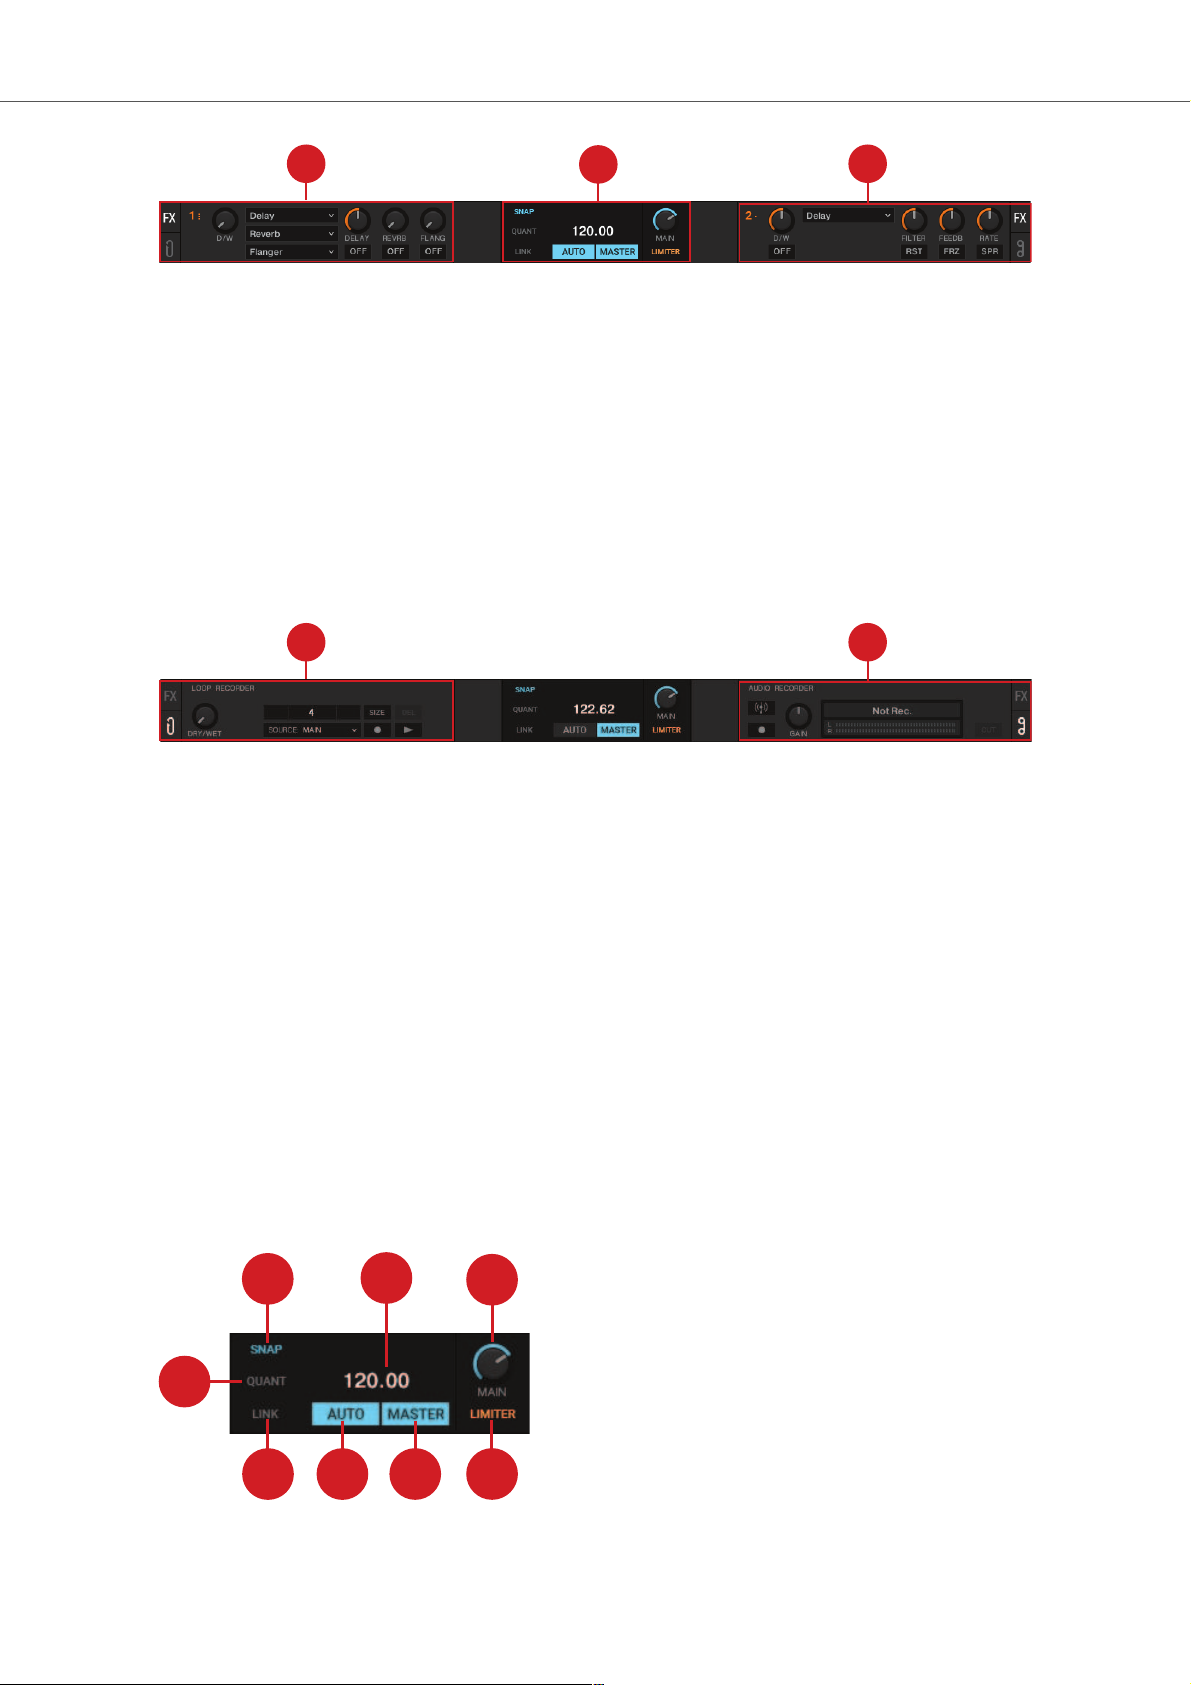
1
2
1
Global Section with FX Unit 1 and 2 displayed.
(1) FX Unit 1 and FX Unit 2: TRAKTOR offers four FX Units for tweaking the audio signals in the
Mixer. By default, only FX Unit 1 and FX Unit 2 are enabled. All FX Units can be freely assigned to
any of the Mixer channels A - D. For more information, refer to Section 6.3.2: FX Units.
(2) Master Control panel: The Master Control panel is a central component of TRAKTOR. It lets
you control the MAIN volume, and defines the behavior for setting Cue Points and Loops as well
as enabling and disabling the Master Limiter. It also contains the Master Clock and works as a
tempo reference for the Sync function and the effects. Here you can also join or start network sessions via Ableton Link, or send a MIDI Clock signal to external hardware and software. For more
information, refer to Master Control Panel.
1 2
Global Section with the LOOP RECORDER and AUDIO RECORDER displayed.
(1) LOOP RECORDER: The LOOP RECORDER allows you to instantly create Loops from the
Mixer’s main output signal, from a particular Deck, or from an external audio input. For more information, refer to Loop Recorder.
(2) AUDIO RECORDER: The AUDIO RECORDER enables you to record your mix from the main
output as well as from other a physical audio inputs. For more information, refer to Audio Record-
er.
6.3.1. Master Control Panel
The Master Control panel is a central component of TRAKTOR. It allows you control the MAIN volume, and defines the behavior for setting Cue Points and Loops. It also contains the Master
Clock and works as a tempo reference for the Sync function and for the effects. Here you can also
join or start network sessions via Ableton Link, or send a MIDI Clock signal to external hardware
and software.
1
2
3
6
8
45
7
Master Control panel.
TRAKTOR Overview
19
(1) SNAP: Enables SNAP mode. When SNAP mode is enabled, Cue Points or Loops are always
set to the closest beat. The button lights up blue when enabled.
(2) MASTER CLOCK TEMPO display: Displays the current tempo and offset of the Master Clock.
You can enter a new tempo with a double-click.
(3) MAIN knob: Controls the main output volume.
(4) LIMITER: Enables the Limiter for the main output signal. When enabled, the main output level
meter shows the Limiter position right before the red LEDs. For more information, refer to Adjust-
ing Gain Levels for Incoming Audio Signals.
(5) MASTER: When enabled you can play on four Decks with a stable tempo reference. It is also
the mode to be used when TRAKTOR is sending out the master tempo via MIDI Clock messages
to another application or hardware being slaved to TRAKTOR.
(6) AUTO: When enabled TRAKTOR automatically selects one of the Decks as Tempo Master.
The Master Clock then automatically syncs to the Master Deck.
(7) LINK: Syncs TRAKTOR to an Ableton Link session and gives additional status information. For
more Information, refer to Synchronization using Ableton Link. When the Enable MIDI Clock setting is enabled in the External Sync Page in the Preferences, LINK is replaced by EXT. For more
information on, refer to Syncing TRAKTOR via MIDI Clock.
(8) QUANT: Enables Quantize mode. Quantize mode lets you jump between Cue Points and Stored Loops seamlessly and without losing sync. Skipping in the track in Quantize mode brings the
playhead position to the next destination without losing sync. The button lights up blue when enabled.
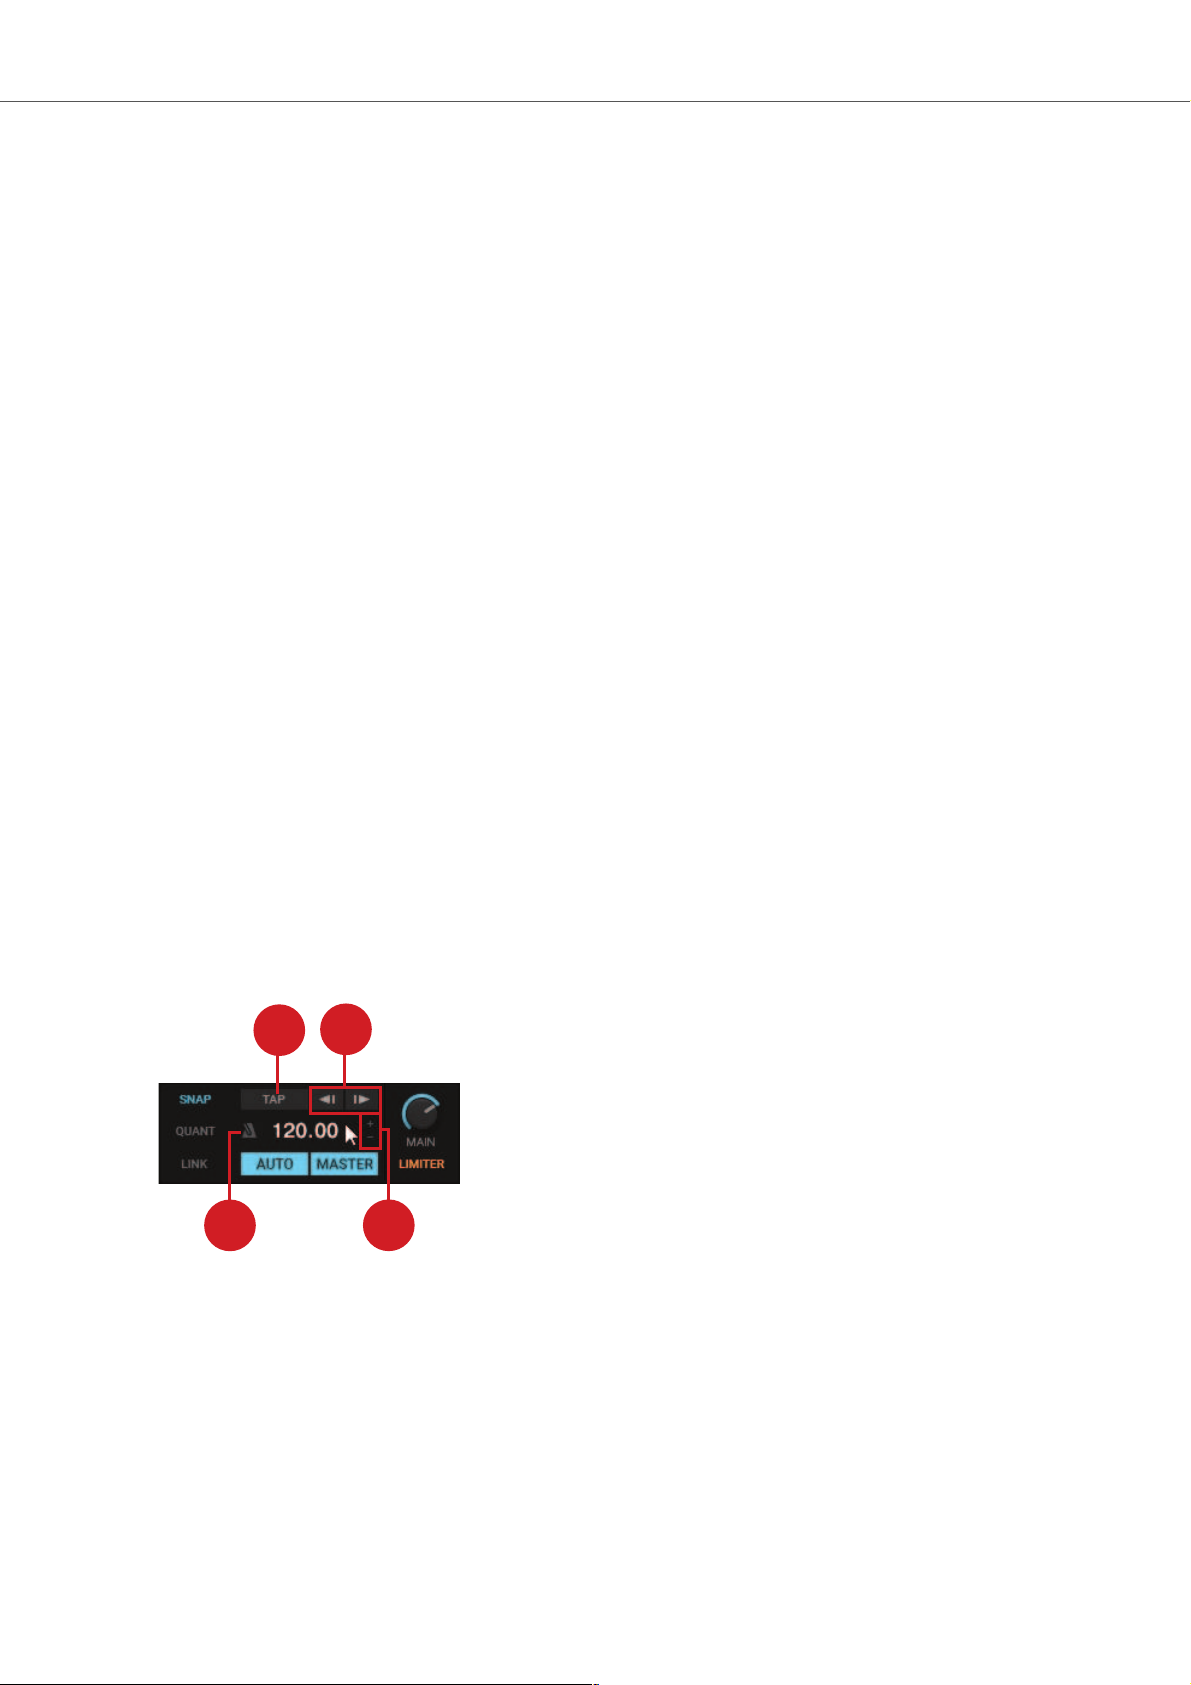
Further Master Clock Controls
When hovering the mouse over the MASTER CLOCK display you are provided with additional
Master Clock controls.
1
2
4
3
Master Control panel.
(1) TAP button: With this button you can tap in the desired Master Clock tempo.
(2) Master Clock Bend buttons: Slows down or speeds up the Master Tempo momentarily.
(3) MASTER CLOCK Tempo Up / Down buttons: Decreases or Increases the Master tempo
step-wise.
(4) Metronome (Master Clock Tick): Toggles an audible metronome beat tick with the Master
Clock as source on or off.
TRAKTOR Overview
20
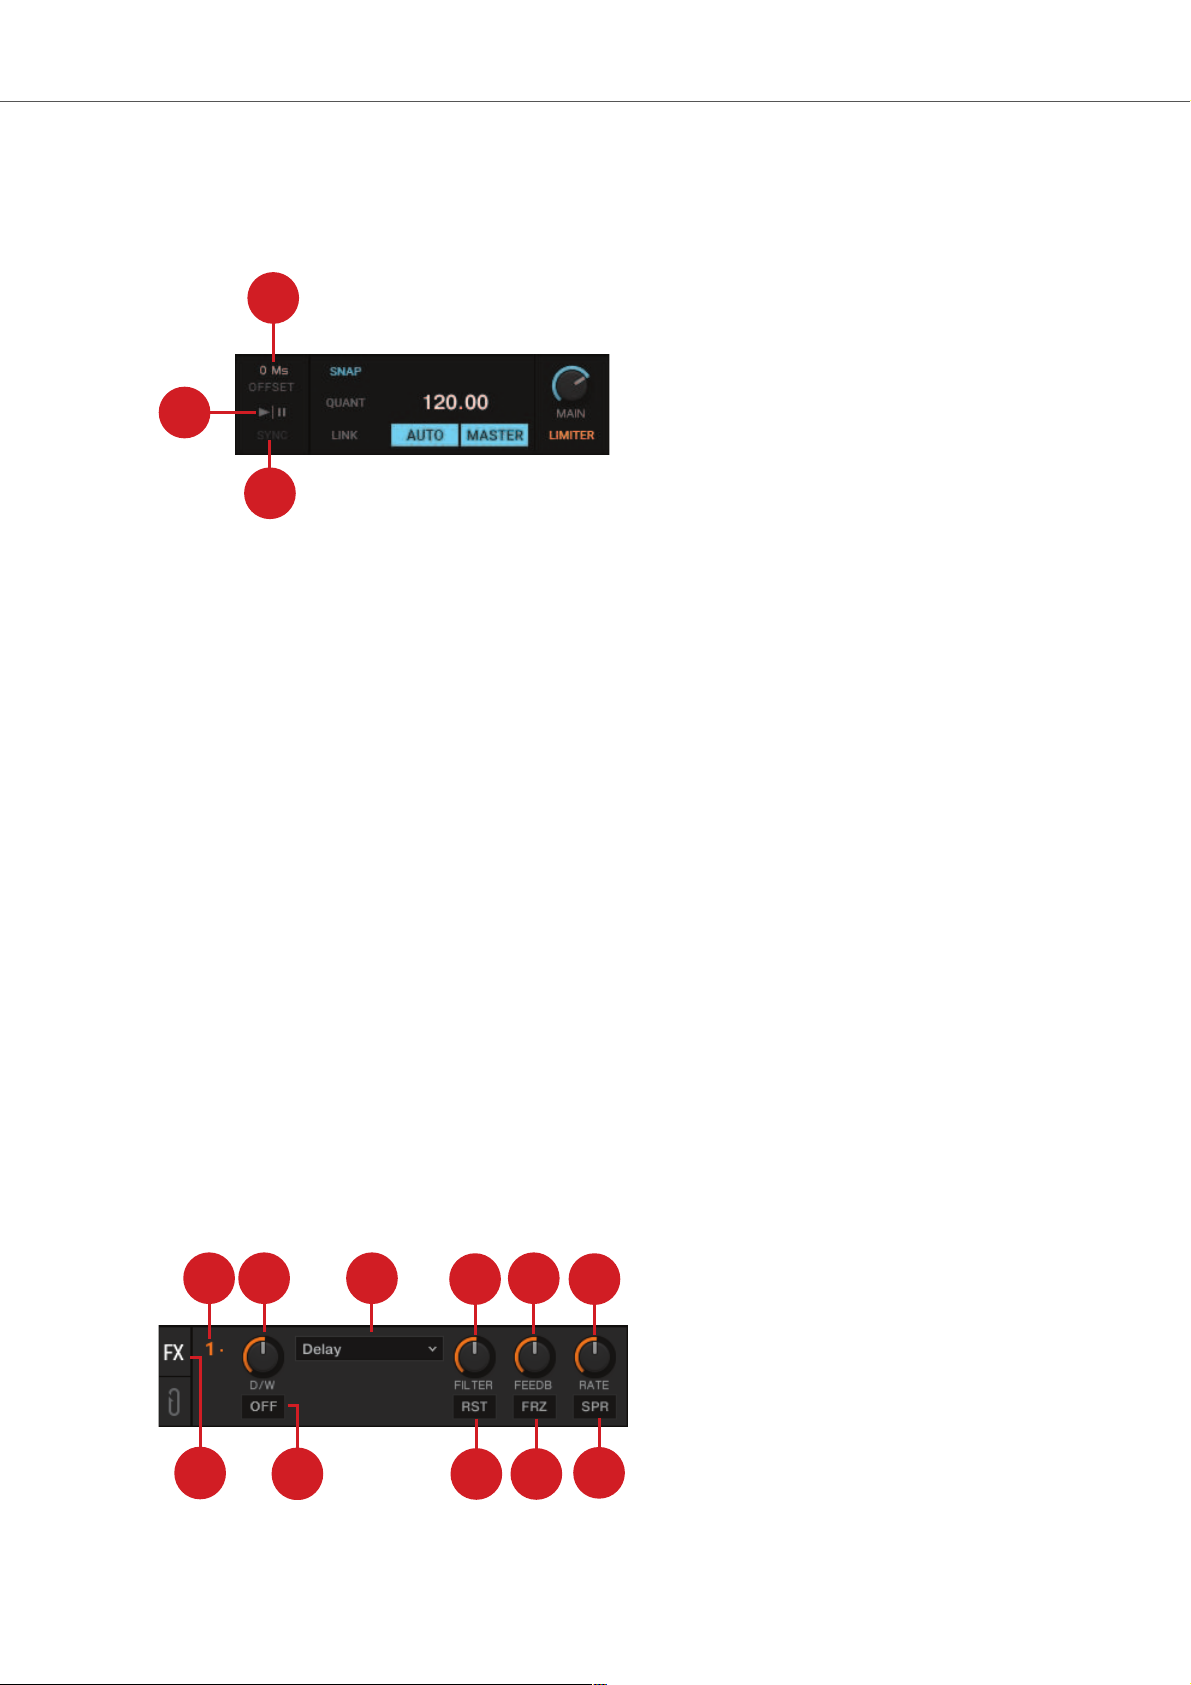
Further MIDI Clock Sync Controls
When the MIDI Clock is enabled in the Preferences, the Master Control panel expands providing
further MIDI Clock controls. For more information, refer to Preferences – External Sync Page.
1
2
3
Master Control panel.
(1) Offset display: Indicates the offset for the synchronization.
(2) MASTER CLOCK START: Enables or disables MIDI Clock for external synchronization.
(3) MASTER CLOCK SYNC: Resets the external devices (slaves) connected via MIDI clock.
6.3.2. FX Units
TRAKTOR offers four FX Units which give you the control of adding FX to your mix. By default
there are only two FX Units enabled - FX Unit 1 and FX Unit 2. Each FX Unit can be assigned to
any Mixer channel individually or to more than one Mixer channel at a time. The FX Units are located on the left and the right side in the Global section. A click on the FX Unit buttons labeled FX on
either end of the Global section shows the corresponding FX Unit.
The FX Units are used as insert effects by default, but you can also use them as post-fader effects
and as Send effects. The FX Units are freely configurable.
Additionally, you can choose from two different FX Unit modes in TRAKTOR: Either Single FX
mode, where four buttons and four knobs control one effect, or Group FX mode, where you can
use chain of three three effects. For more Information on using the FX Units, refer to Working with
FX Units.
FX Units in Single FX Mode
In Single FX mode you get full control over all parameters of a single effect.
1 3
4
9 8
7
2
6
5
11
10
FX Unit 1 in Single FX Mode.
TRAKTOR Overview
21
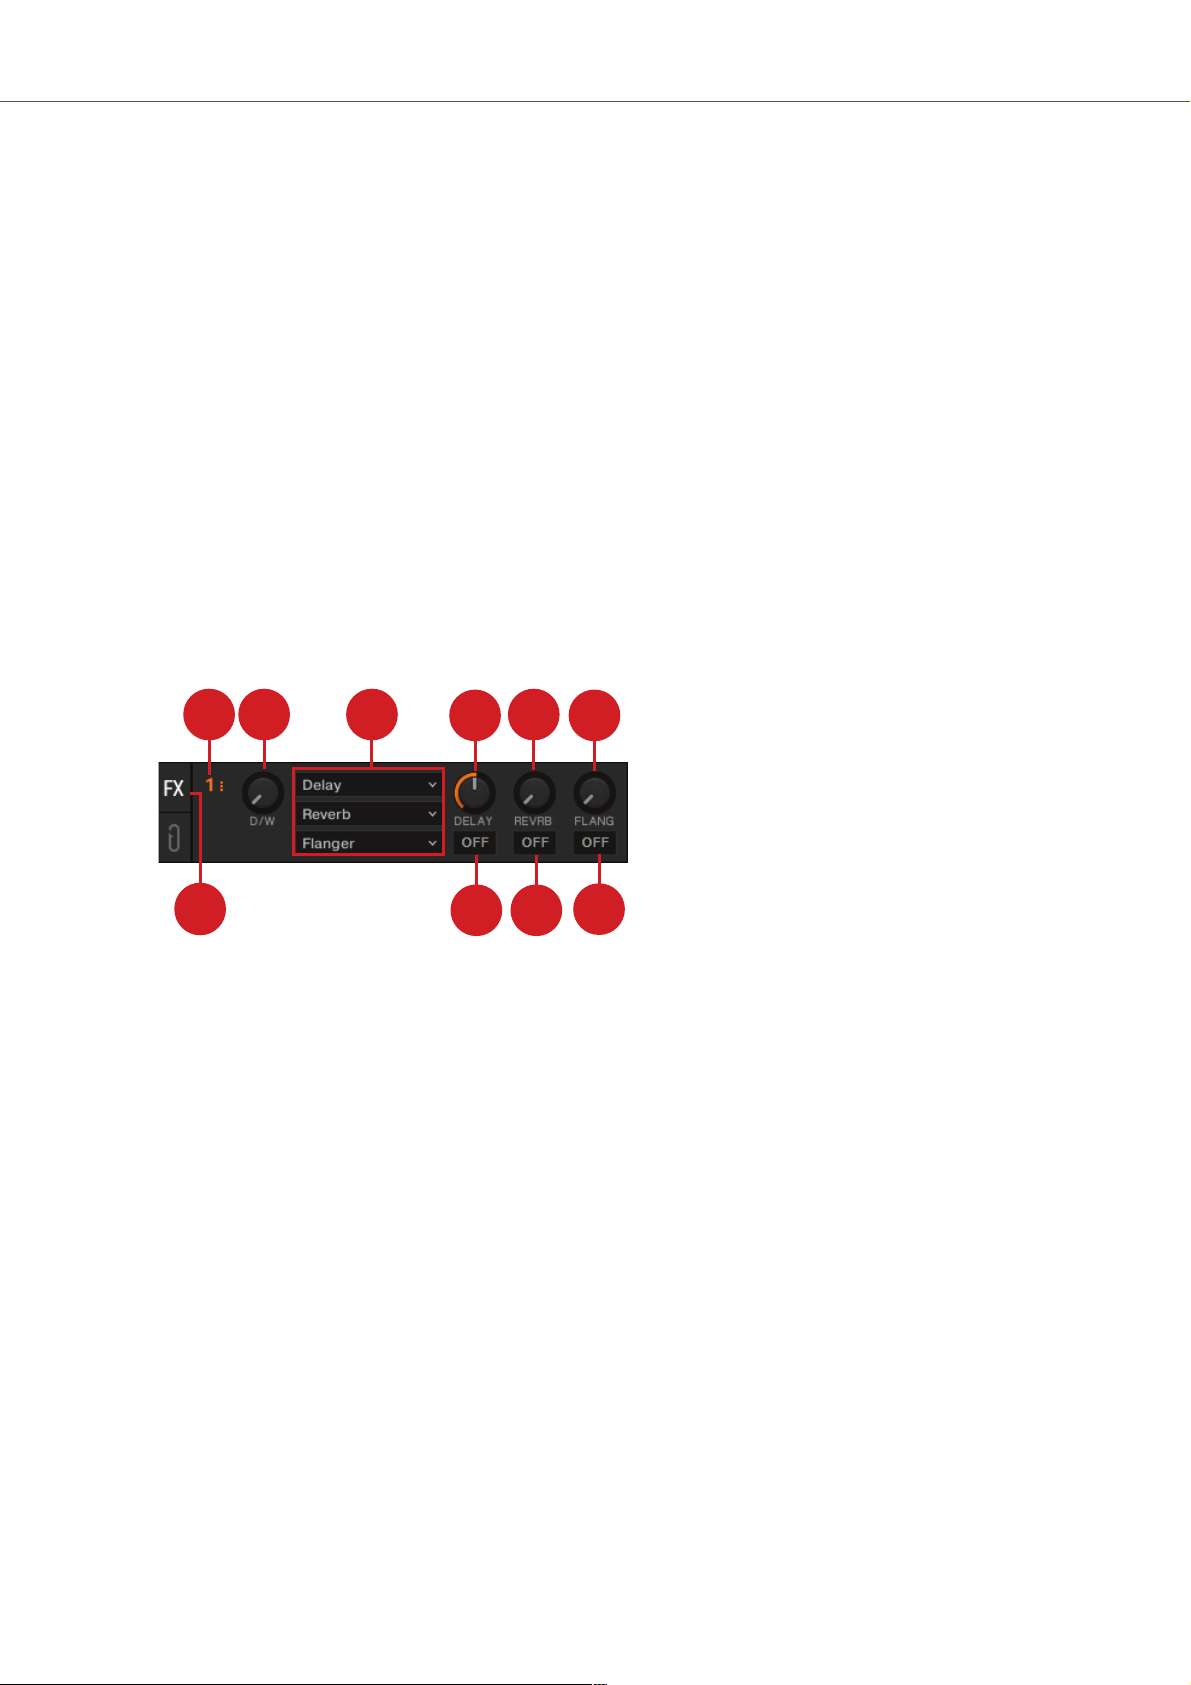
In Single FX mode you get full control over all parameters of a single effect.
(1) FX Unit Config drop-down menu: Opens a drop-down menu for configuring the FX Unit and
taking snapshots. Additionally, the number identifies the FX Unit and the selected FX mode.
(2) D/W knob: Controls the direct-to-processed signal mix.
(3) FX Selector: Selects the effect to be controlled in the FX Unit.
(4) - (6) FX Parameter control 1 - 3: Modulates the parameters for the selected effect.
(7), (8) FX buttons 1 - 2: Controls the selected effect. The exact function depends on the selected
effect.
(9) RST button: Resets all parameters for the selected effect. This button is not available for all
effects.
(10) FX On button: Switches the effect on and off. If on, the buttons light up yellow.
FX Unit 1 in Group FX Mode
In Group FX mode you can control up to three FX at once in one FX Unit.
1 3
4
9 8
7
2
6
5
10
FX Unit 1 in Group FX Mode.
(1) FX Unit Config drop-down menu: Opens a drop-down menu for configuring the FX Unit and
taking snapshots. Additionally, the number identifies the FX Unit and the selected FX mode.
(2) D/W knob: Controls the direct-to-processed signal mix for the entire effect chain.
(3) FX Selector 1 - 3: Selects the effect to be controlled in the FX Unit.
(4) - (6) Effect Amount knob 1 - 3: Controls the individual effect amount.
(7) - (9) Effect On buttons 1 - 3: Switches every effect in the effect chain on and off.
(10) FX On button: Switches the effect on and off.
6.3.3. Audio Recorder
The Audio Recorder in TRAKTOR is used for recording your mixes or audio from an external
source e.g. your mix with an external mixer, a microphone, or a turntable. It is also used for broadcasting your mix. A click on the Tape icon displays the AUDIO RECORDER in the Global Section.
TRAKTOR Overview
22
1
2
3
5
7
4
6
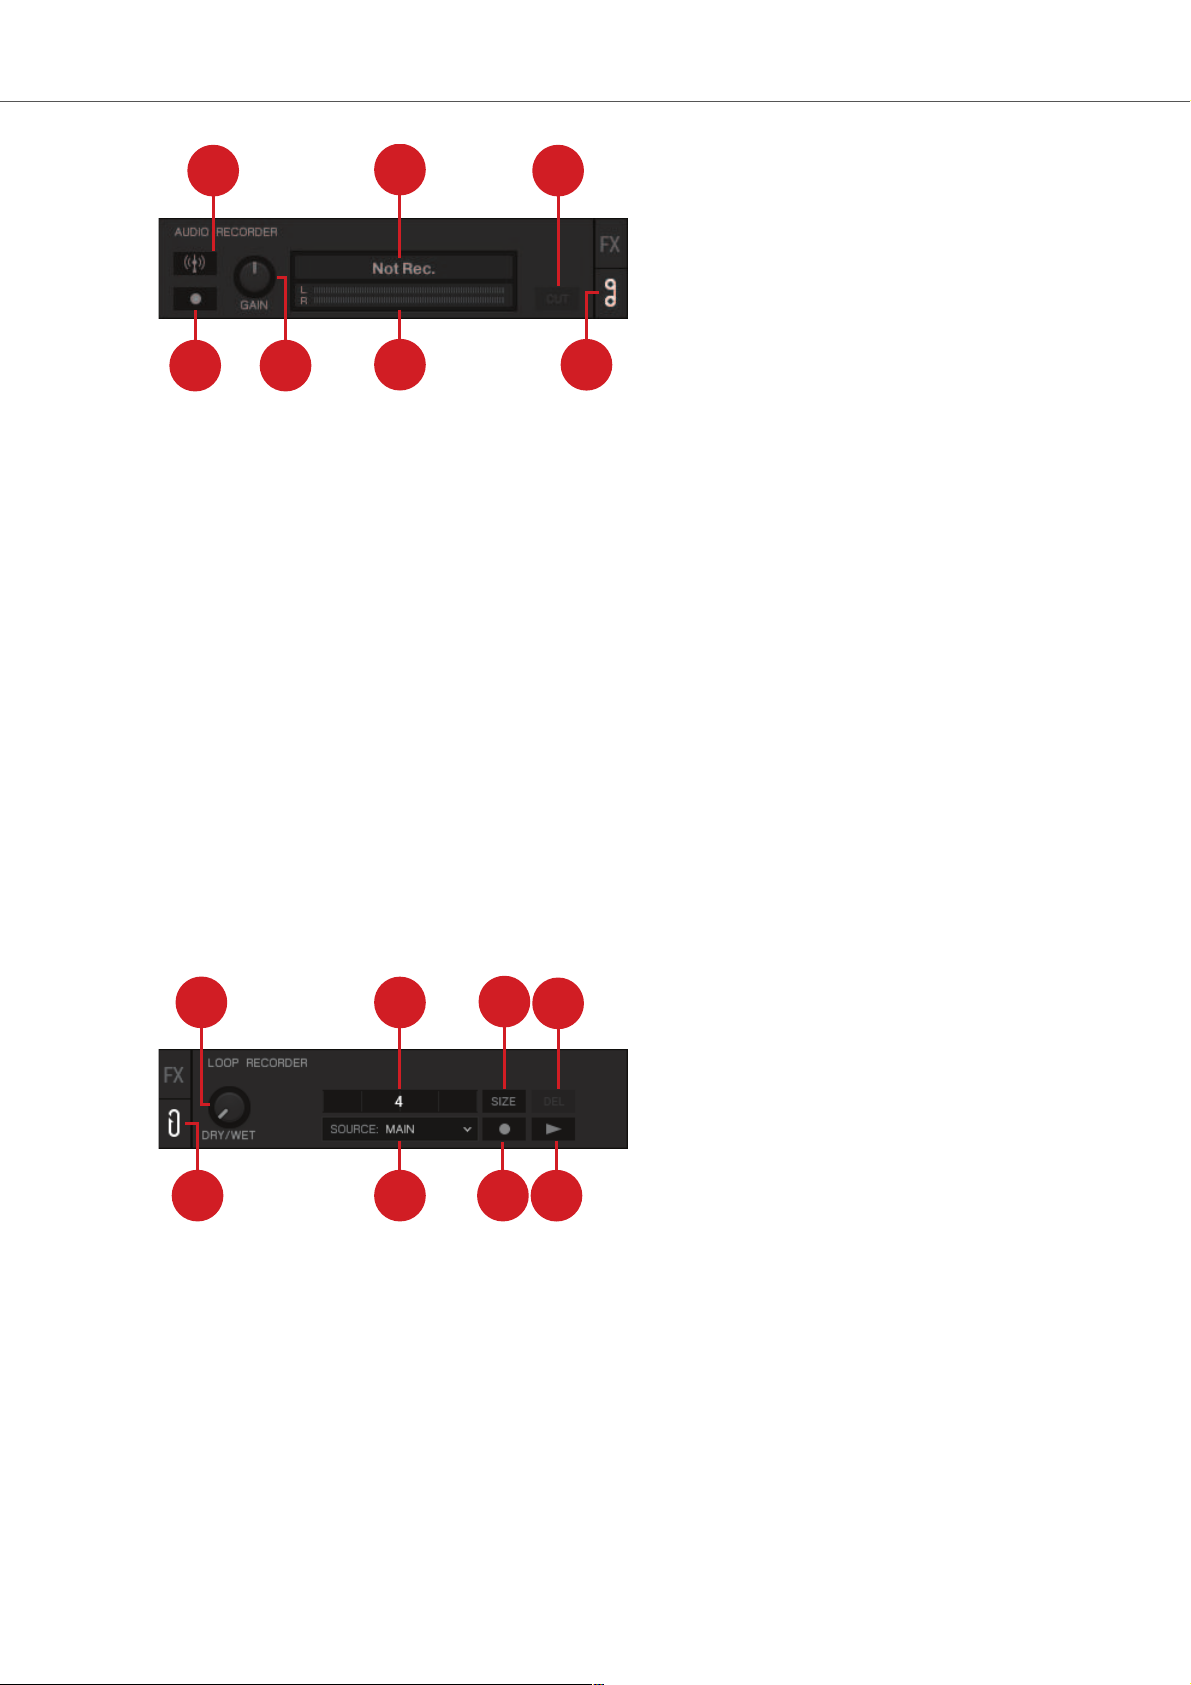
AUDIO RECORDER.
(1) Broadcast button: Starts broadcasting your mix once a server has been installed and configured.
(2) Display: Shows the actual file size and recorded time.
(3) CUT button: Saves the recording until the current recording time and seamlessly starts a new
file for recording.
(4) AUDIO RECORDER button: Opens the AUDIO RECORDER.
(5) Recording meter: Indicates the current recording level.
(6) Record GAIN knob: Adjusts the level for the incoming audio signal.
(7) Record button: Starts and stops recording and saves the recorded file in the Recordings folder.
6.3.4. Loop Recorder
The LOOP RECORDER allows you to record Loops from several sources on the fly. A click on the
LOOP RECORDER button on the left side of the Global section displays the LOOP RECORDER.
3
4
8
7
2
6
5
1
LOOP RECORDER.
(1) DRY/WET knob: Adjusts the ratio of main-to-recorded signal.
(2) Progress bar: Displays the current length of the recording.
(3) SIZE button: Determines the initial length of the recording.
(4) Delete / Undo / Redo: Deletes the recorded Loop, undoes the last overdubbing, and restores
last undo.
(5) Play button: Starts and stops playback of the recording.
(6) Record button: Starts and stops the recording and the overdubbing.
TRAKTOR Overview
23

(7) Source drop-down menu: Selects the source for the recording.
(8) LOOP RECORDER button: Opens the LOOP RECORDER.
If you’re using TRAKTOR with the SCRATCH feature and are therefore in External
Mixing mode, the only available recording source to select is EXT.
6.4. Decks and Deck Types
TRAKTOR provides you with four virtual Decks. These Decks can be operated in different Deck
Types which are Track Deck, STEM Deck, Remix Deck, and Live Input:
The Decks contain common Deck elements and as well contain their own specific Deck elements.
For more information, refer to Common Deck Controls.
• Track Deck: The Track Deck in TRAKTOR represents the equivalent of a turntable or a CD
player used to play back conventional tracks in a classic mixing setup. For more information,
refer to Track Deck.
• STEM Deck: The STEM Deck is capable of playing back and remixing STEM Files
(.stem.mp4). The functionality is basically identical to the Track Deck, but features additional
sub-mix controls for the four Slot Volumes, Filters, and FX Sends for the STEM Parts. For more
information, refer to STEM Deck.
It is mandatory that STEM Files have to be analyzed before loading them into a
STEM Deck. It is not possible to load and play a STEM File before it has been
analyzed.
• Remix Deck: The Remix Deck provides you with four Sample Slots, for adding Samples and
loops to your mix. You can load, create and save complex Remix Sets, and arrange Samples
live in your mix. The Remix Deck comes with a variety of Sample-related features. For more
information, refer to Remix Deck.
• Live Input: The Live Input is not a Deck, but it allows you to include live audio from an external
source in your mix. This can be from any audio input, i.e. a turntable, a microphone, or a synthesizer. For more information, refer to Live Input.
6.4.1. Common Deck Controls
Besides the Live Input, any Deck provides the same synchronization, trigger, and track modification controls. The following image shows a full Deck:
TRAKTOR Overview
24
4
5
7
9
8
1
2 3
6
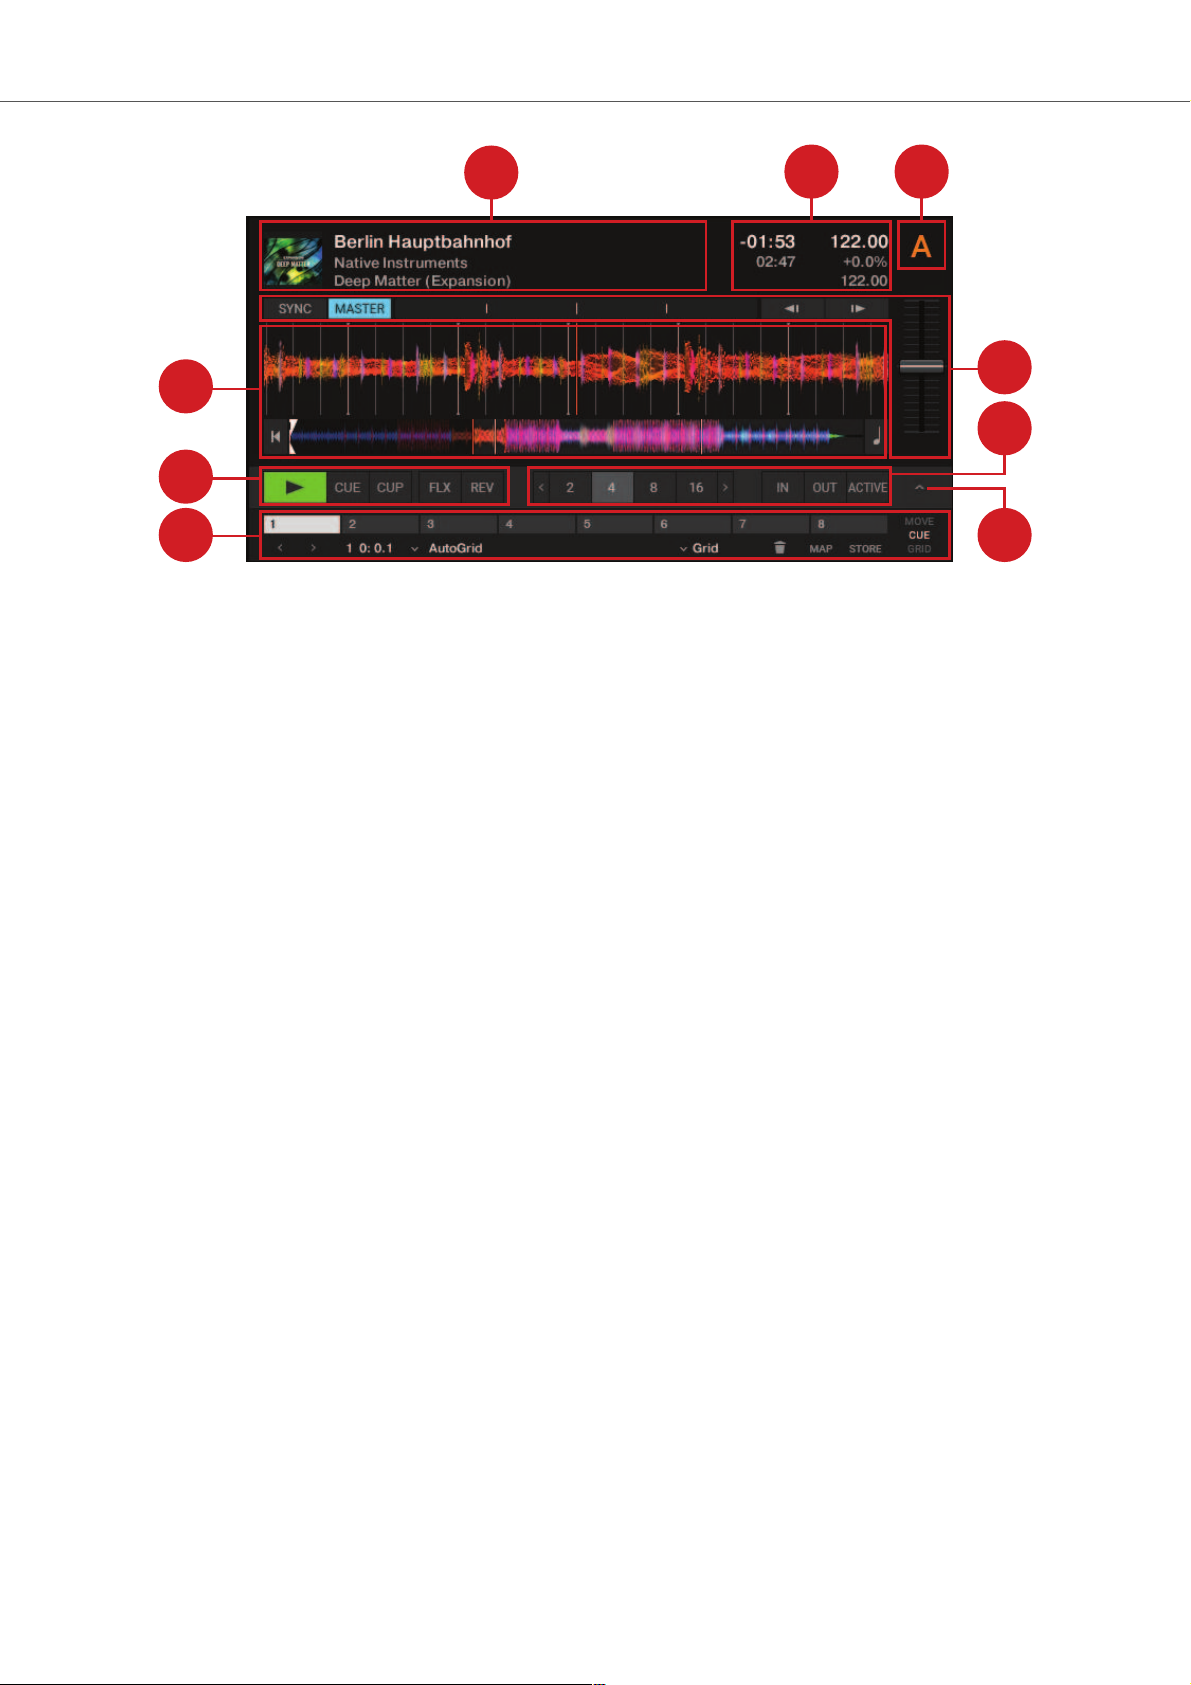
Common Deck controls.
(1) Deck Header: Displays information about the loaded track, like the artist name or track title. By
double-clicking the Deck Header, you can switch the Deck layout between five different views from
minimized to full layout. For more information, refer to Deck Header.
(2) Deck Tempo display: Contains information about the track tempo. Depending on Deck Type,
the contained elements and controls slightly differ. For more information, refer to Deck Tempo Dis-
play on the Remix Deck.
(3) Deck Focus: Identifies the Deck and holds a menu for selecting the Deck Flavor and the playback mode for the Deck. Each Deck is named by a letter A, B, C and D. The letter of the focused
Deck is highlighted in orange.
(4) Synchronization and Tempo controls: Define if the Deck is the Tempo Master or if it is
synced to the Tempo Master. The controls visualize if the track is out of sync, and they contain
tempo bend controls. For more information, refer to Synchronization and Tempo Controls.
(4) Deck center: Hosts the elements and controls the characteristic of the selected Deck Flavor.
For more Information, refer to Track Deck,STEM Deck,Remix Deck, and Live Input.
(5) Loop controls: Activate looping and define the loop size. For more information, refer to Loop
Controls.
(6) Advanced panel: On the Track Deck and on the Stem Deck, the Advanced panel contains advanced control options for Cue Point and Loop management. On the Remix Deck the Advanced
panel gives you access to the parameter settings of the individual Sample Cells. For more information, refer to Advanced Panel [33] and Advanced Panel on the Remix Deck.
(7) Advanced panel button: Shows and hides the Advanced panel below the Loop controls for
Deck A and B, and for Deck C and D, respectively. It also shows and hides the Panorama controls
in the Mixer for Deck A and B, and for Deck C and D, respectively.
(8) Transport controls: Contain the usual transport controls Play/Pause and CUE as well as the
Flux mode and Reverse mode buttons. For more information, refer to Transport Controls.
TRAKTOR Overview
25

Deck Header
The Deck Header displays information about the loaded track, Remix Set, or STEM File such as
the artist name, track title and tempo. The displayed information can be customized in the Preferences.
1
4
72
5
96 8
3
Deck Header.
(1) Track Cover Artwork: Displays the cover artwork of the track.
(2) Track title: Displays the track title.
(3) Artist name: Displays the artist name.
(4) Album title: Displays the album title.
(5) Track time: Displays the track time.
(6) Remaining track time: Displays the time remaining until the track ends.
(8) Current tempo: Displays the current tempo value in BPM, determined by the Tempo Fader position.
(7) Tempo fader position: Reflects the current Tempo fader position as a percentage.
(9) Base tempo: Represents the original track tempo.
Deck Tempo Display on the Remix Deck
The Deck Tempo display in the Remix Deck's Header contains further controls for the Remix Deck.
7 6
4
1
2
3
5
8
Deck Tempo display on the Remix Deck.
(1) Quantize value drop-down menu: Selects the quantize value.
(2) Quantize value: Shows current quantize value for the Remix Deck.
(3) Quantize enable: The dot enables or disables Quantize mode on the Remix Deck. Quantize is
enabled when the dot is lit blue.
(4) Remix Deck Tempo: Shows the current Tempo of the Deck. Dragging this value up and down
changes the Tempo. A double-click resets it to the base tempo.
TRAKTOR Overview
26
(5) Tempo fader position: Represents the current Tempo fader position.
(6) Base tempo: Represents the original Remix Deck tempo. You can enter a new value by double-clicking.
(7) Capture source: Represents the selected source for capturing Samples when using hardware
controllers. The triangle that appears when hovering with the mouse, opens a drop-down menu
where you can select the source.
(8) Beat Count: Represents the current internal Beat Count position of the Remix Deck. Synchronization and quantize functions are based on this value.
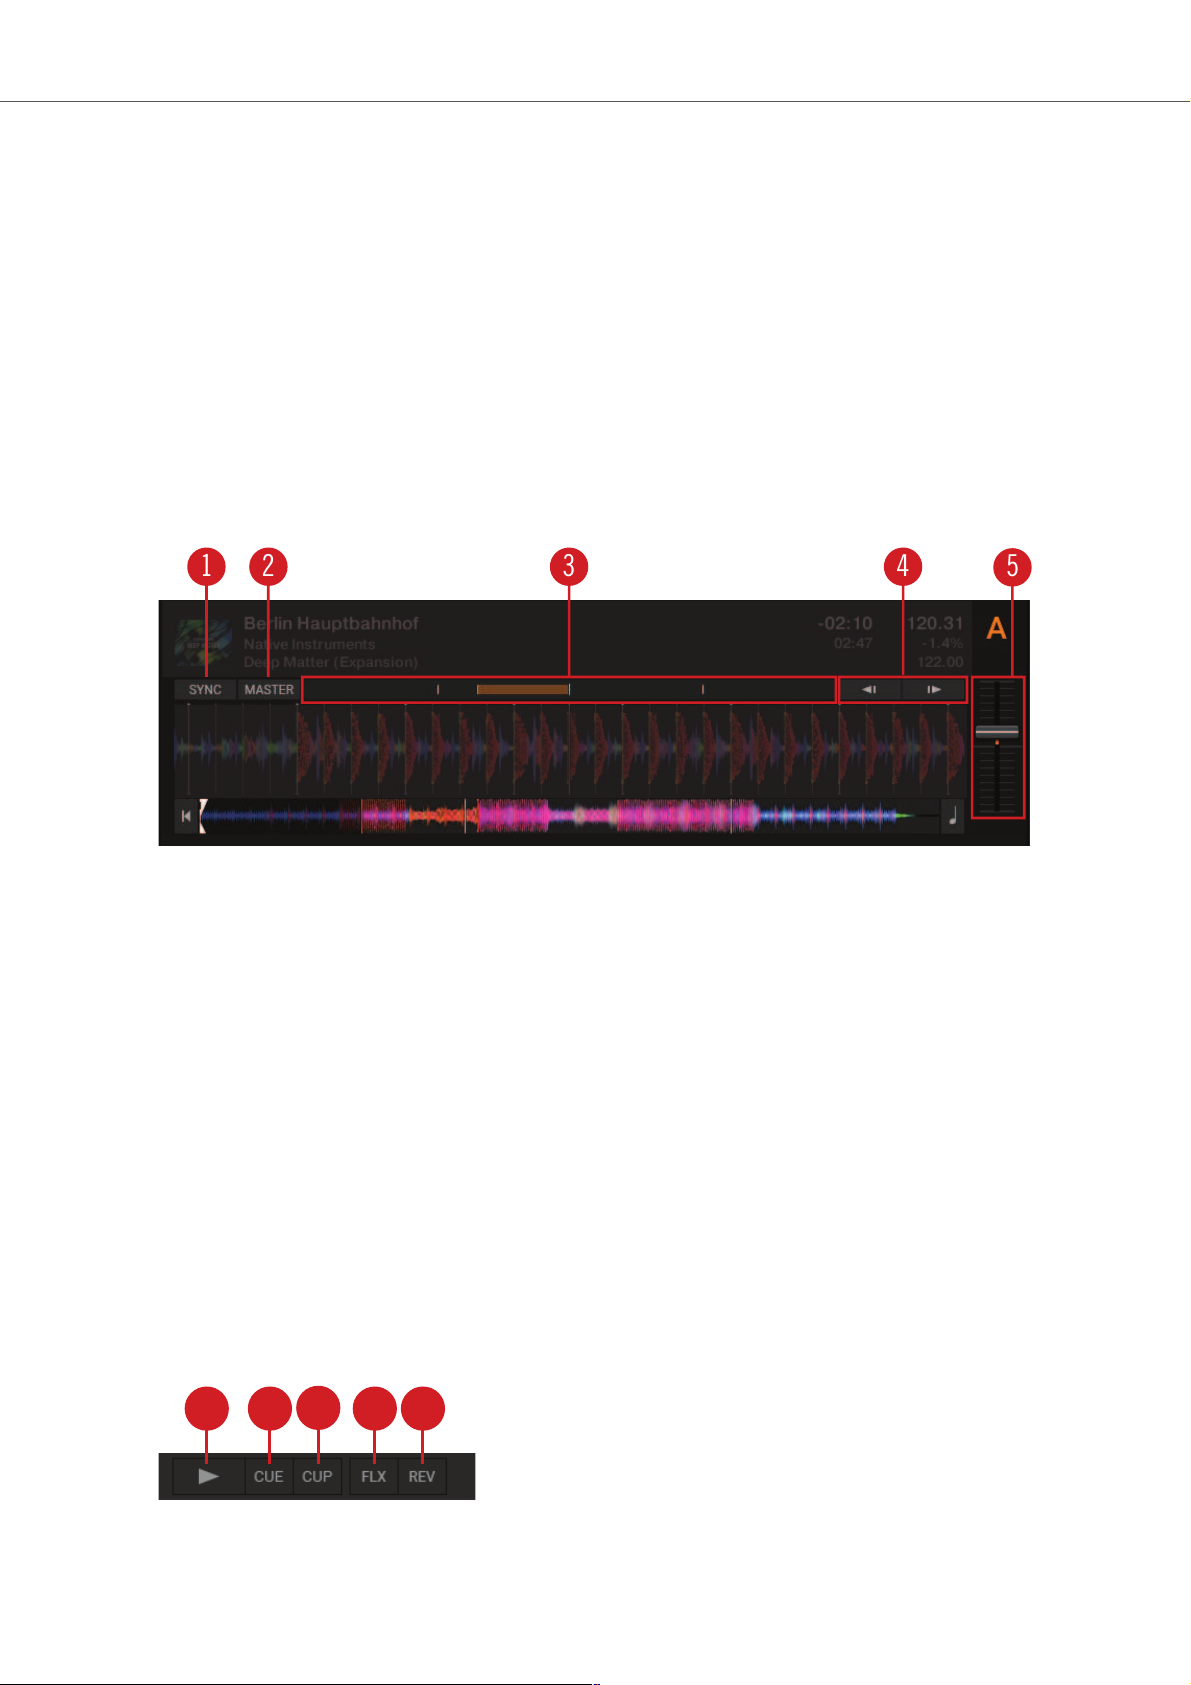
Synchronization and Tempo Controls
Any Deck Type contains the same controls for syncing and for adjusting the tempo manually.
1 2 3 4
5
Synchronization and Tempo controls.
(1) SYNC button: Synchronizes the current track to the Tempo Master.
(2) MASTER button: Sets the Deck to the Tempo Master.
(3) Phase meter: Visually indicates the offset of the beats when manually syncing a track to the
Tempo Master or the Master Clock.
(4) Tempo bend buttons: Correct the offset of the beats when manually syncing a track to the
Tempo Master or the Master Clock. The left arrow slightly slows down the tempo and the right arrow speeds it up.
(5) Tempo fader: Decreases or increases the tempo of the playing track, Remix Set, or STEM File
in the respective Deck.
Transport Controls
All Deck Types contain the same transport controls, which are used for playing back tracks with
TRAKTOR’s internal playback mode.
1 2
3
4 5
Transport controls.
TRAKTOR Overview
27
(1) Play/Pause button: Starts or pauses playback of the Deck.
(2) CUE button: Depending on the playback state, this button either sets a new Floating Cue Point
or jumps to the previously set Floating Cue Point. For more information on Cue points, refer to.
(3) CUP button (CUE/Play): Jumps to the current cue point and starts playback upon release.
(4) Flux Mode button: Enables Flux mode for the Deck. For more information on Flux Mode, refer
to Working with Hotcue buttons and Flux Mode.
(5) Reverse Mode button: Enables Reverse mode and Flux Mode for the Deck. For more information on Reverse mode, refer to Working with Hotcue buttons and Flux Mode.
Scratch Controls
When setting the Deck’s playback mode to Scratch Control, the CUE and CUP buttons are replaced by the Absolute Mode button and the Relative Mode button.
1
2
Transport controls in Scratch Playback mode.
(1) Relative Mode button: Enables Relative mode for controlling the Deck with Timecode vinyl or
CD.
(2) Absolute Mode button: Enables Absolute mode for controlling the Deck with Timecode vinyl
or CD.
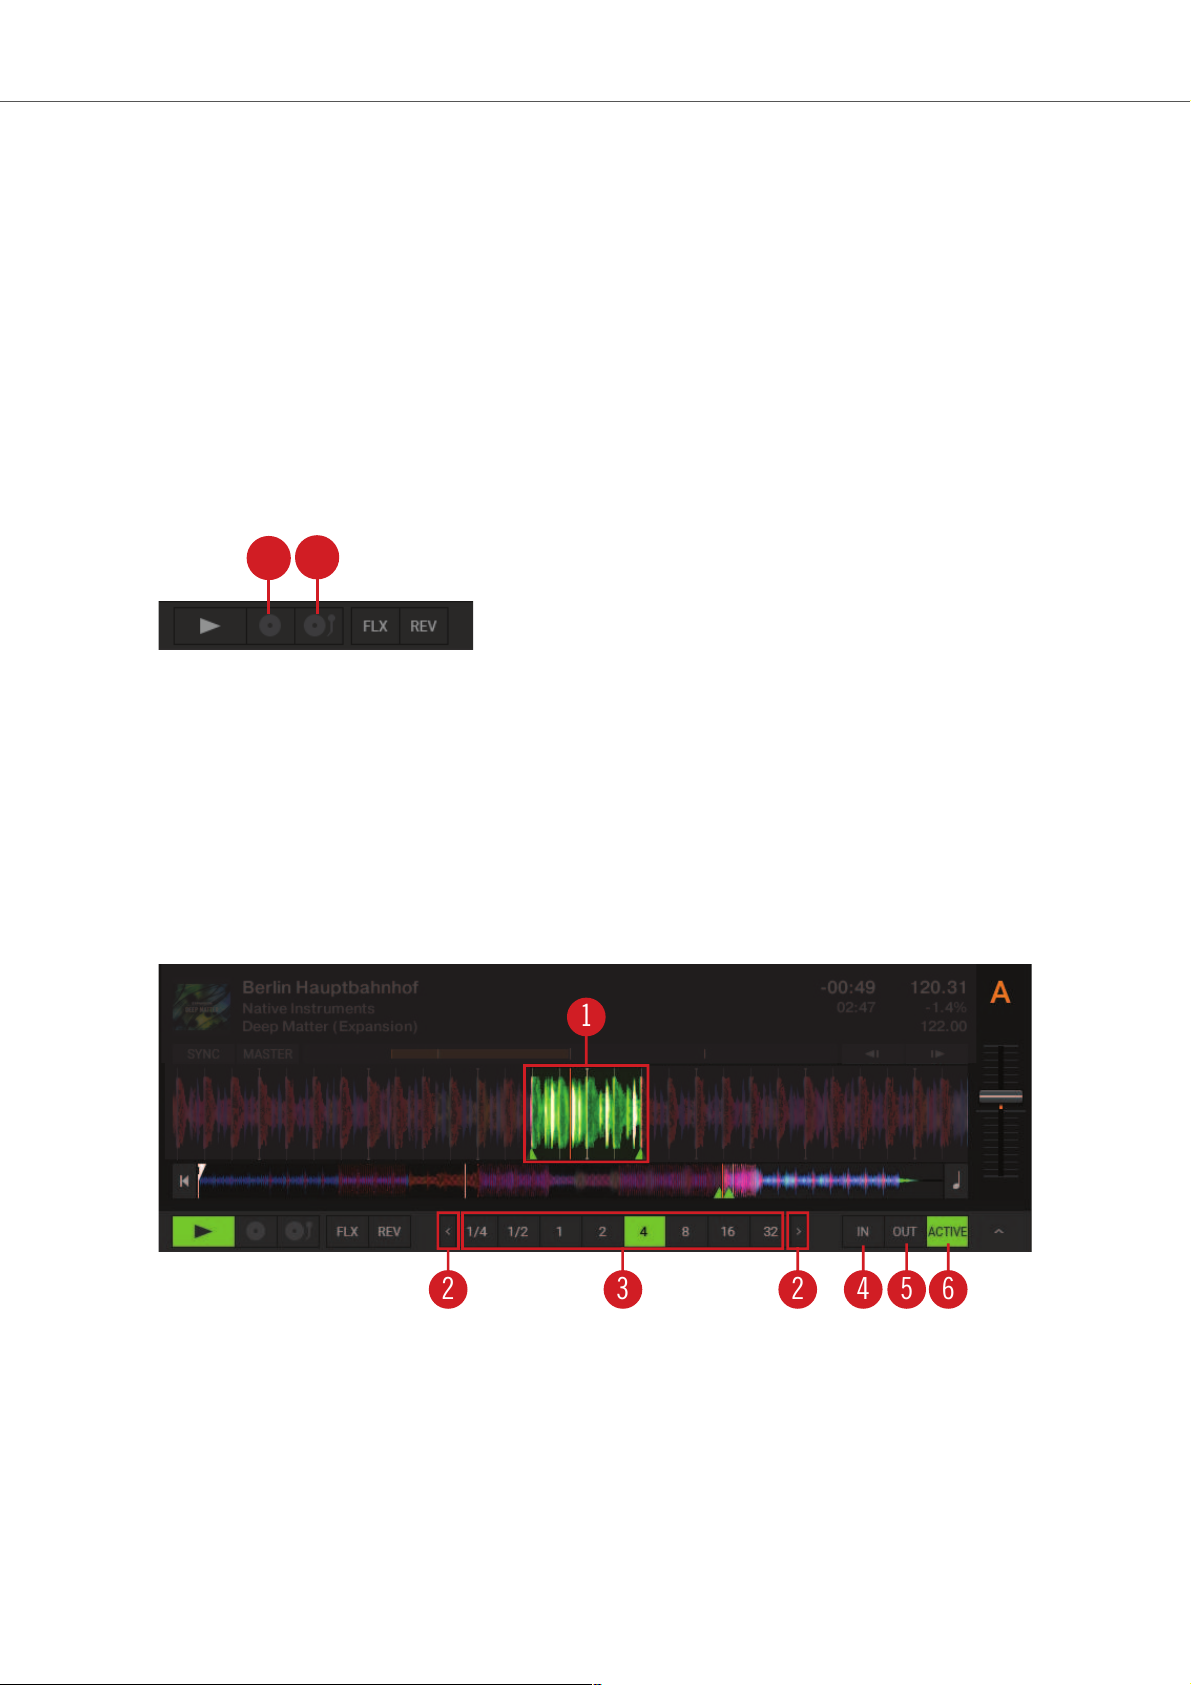
Loop Controls
The Loop controls offer the functions required for the creative usage of Loops in your mix.
1
2 3 2 4 65
Loop controls.
(1) Active Loop: When a Loop is enabled it is highlighted in green in the Waveform display and in
the Stripe view.
(2) Arrow buttons: Clicking the left and right arrows of the Loop Size control will scroll through the
list of Loop values. The Arrow buttons flash if the selected size is out of range.
(3) Loop size control: Determine the size of the enabled or disabled Loop.
TRAKTOR Overview
28
(4) Loop In button: Sets the start point for the Loop.
(5) Loop Out button: Sets the end point for the Loop. The Loop will be enabled when the playback position reaches these two points and the ACTIVE button will be highlighted.
(6) ACTIVE button: Enables/disables Looping. The button lights up green when Looping is enabled.
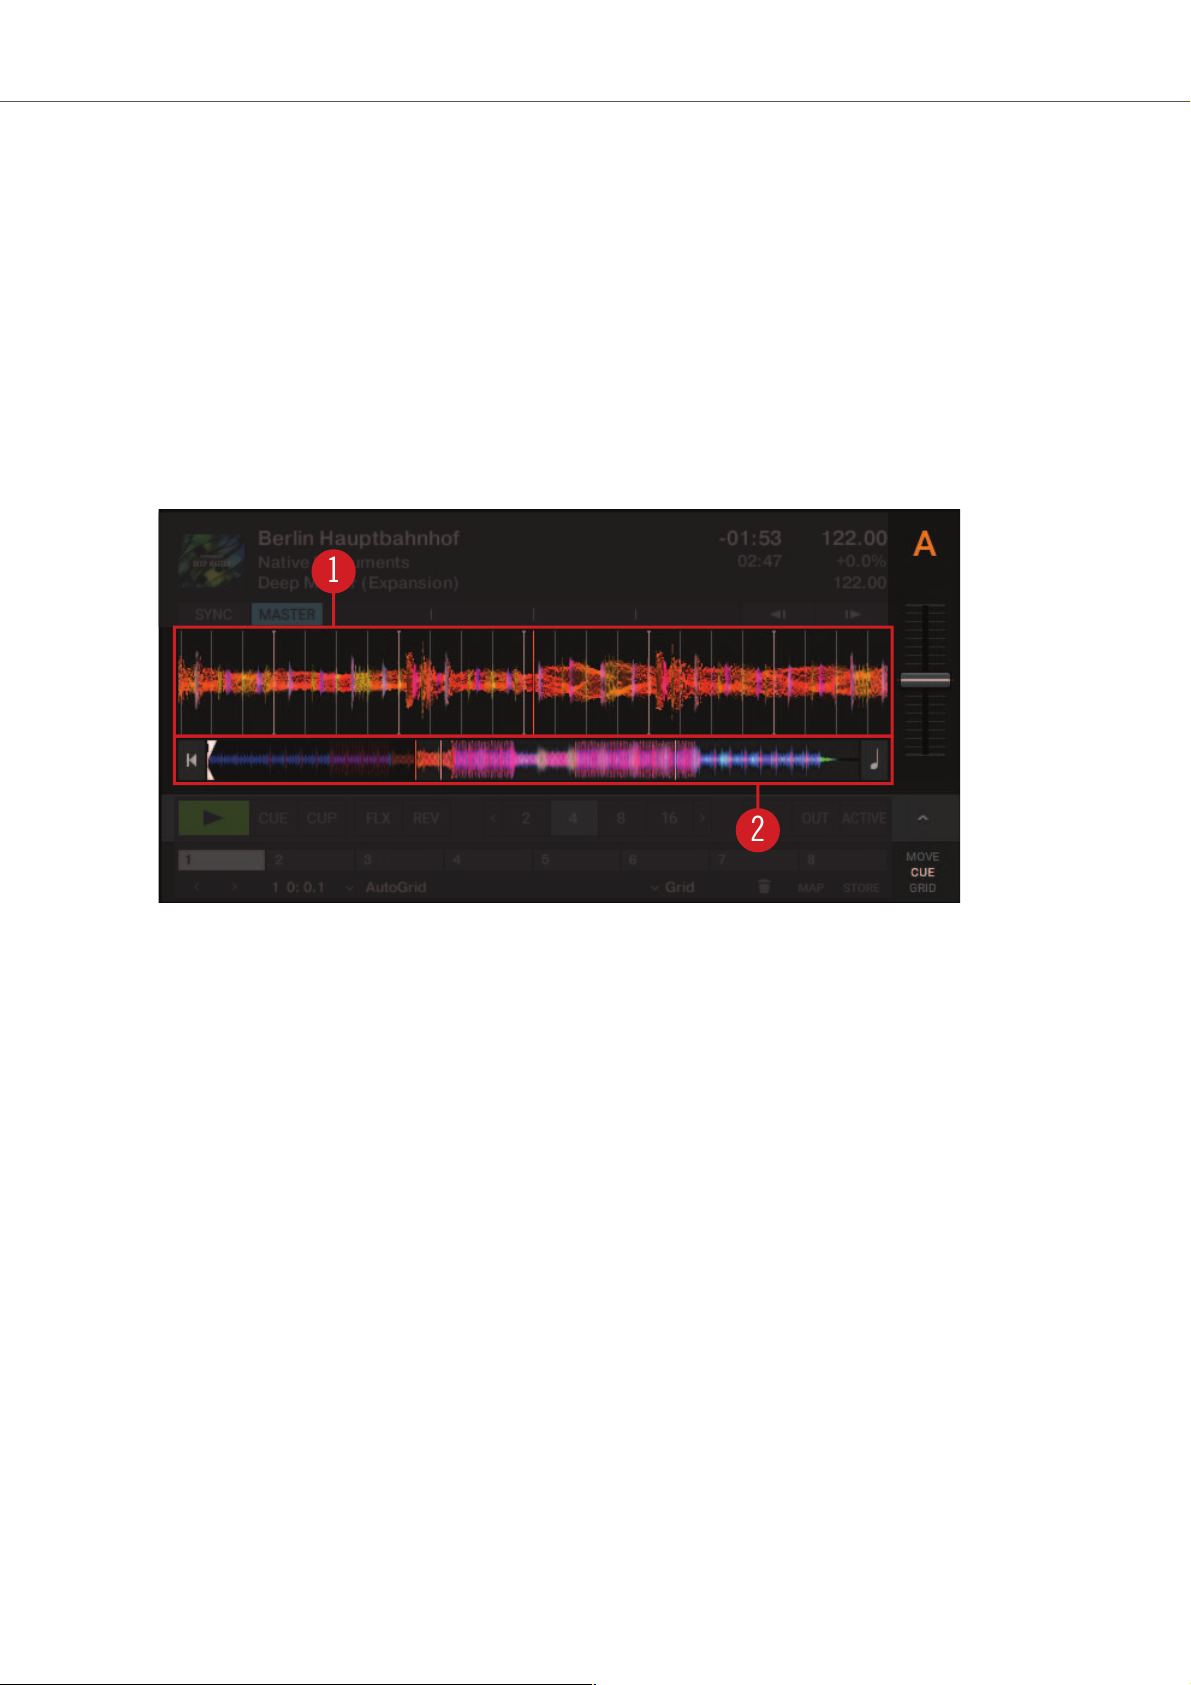
6.4.2. Track Deck
The Track Deck in TRAKTOR is the equivalent to a turntable or a CD player in a classic mixing
setup, used to play back conventional tracks. Besides the Common Deck controls, the Track
Deck's center contains the following elements:
1
2
Track Deck.
(1) Waveform display: Visually represents a localized view of the loaded track. The brighter color
shade represents higher frequencies, while the darker color shade represents lower frequencies. It
also shows the Beatgrid markers, and shows zoom controls when hovering the mouse over the
Waveform display.
(2) Stripe view: The Stripe view shows the entire waveform of the track including all Cue Point
markers and Loop markers. You can jump back to the start of the track or directly jump within the
track by clicking inside the Stripe view. You can also activate Keylock for the track.
6.4.3. STEM Deck
The STEM Deck operates in a similar way to the Track Deck, however instead of the Waveform
display it provides the Multi-Track Waveform:
TRAKTOR Overview
29
1
2
STEM Deck.
(1) Multi-Track Waveform: Visually represents a localized Multi-Track Waveform of the individual
STEM Channels including STEM controls of the loaded STEM File. The brighter color shade represents higher frequencies, while the darker color shade represents lower frequencies.
For more information on the Multi-Track Waveform, refer to section Section : Multi-Track Wave-
form.
(2) Stripe view: Shows the entire Waveform of the STEM File including all Cue Point markers and
Loop markers. You can jump back to the start of the track or directly jump within the track by clicking inside the Stripe view. You can also activate Keylock for the STEM file.
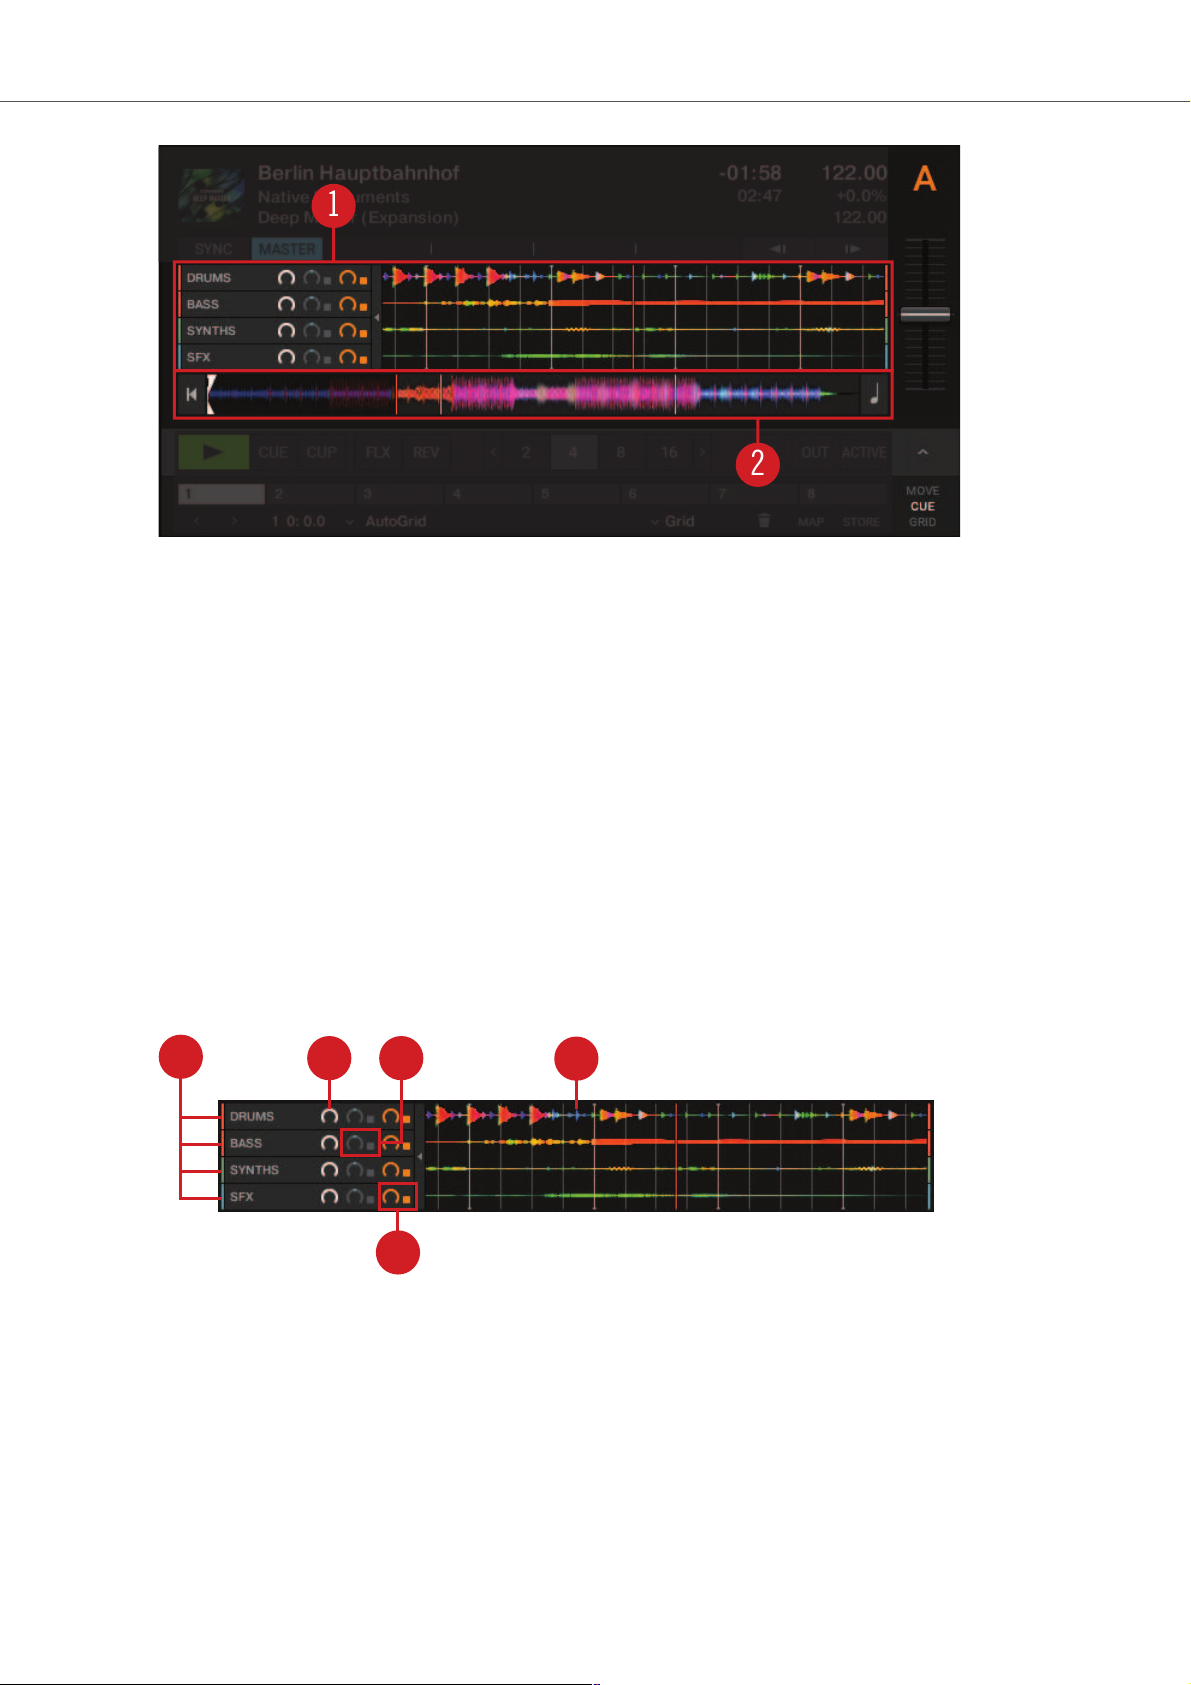
Multi-Track Waveform
The Multi-Track Waveform shows the waveforms of the STEM Parts, and provides controls to adjust volumes and apply effects individually.
2 3
4
1
5
Multi-Track Waveform.
(1) STEM channel 1 - 4: Each of the four rows represents one STEM Channel, including the individual STEM Part name.
(2) Volume control: Every STEM Channel provides a Volume control for adjusting the volume individually. All STEM controls can be hidden using the small arrow button.
(3) Filter controls: Every STEM Channel provides Filter controls. The Filter button enables the Filter, whereby the Filter knob determines the Filter amount.
TRAKTOR Overview
30

(4) FX Send control: Every STEM channel provides FX Send controls. The FX Send button enables FX Send mode for the individual STEM Channel, whereby the FX Send knob determines the
FX Send amount.
(5) Waveform: Each STEM Channel displays the waveform of the contained STEM Part in a different color, as well as the Beatgrid.
6.4.4. Remix Deck
Besides the Common Deck controls, the Remix Deck's center contains the following elements:
1
2
Remix Deck.
(1) Sample Slot: The Remix Deck shows four Samples Slots containing the Samples, trigger controls other elements. For more information, refer to Sample Slot.
(2) Advanced panel: The Advanced panel on the Remix Deck contains options for i.e. adjusting
Sample Grids. For more information, refer to Advanced Panel on the Remix Deck.
Sample Slot
A Sample Slot contains the following elements:
1 2
4
3
5
6
Sample Slot.
TRAKTOR Overview
31

(1) Sample title: Displays the title of the Sample loaded in the Slot Player.
(2) Slot Player: Displays the waveform of the Sample currently loaded. A moving red playhead
indicates the current playback position within the Sample. Hovering the mouse over the Slot Player
shows a Mute button, which mutes/unmutes the Sample.
(3) Volume control: Controls the Sample Slot's volume. This control is applied after the individual
Gain control of a Sample Cell, which is accessible from the Advanced panel.
(4) Filter control: Applies a low-pass or high-pass filter to the Sample Slot by moving the bar
downwards or upwards, respectively.
(missing) Sample Cell: Represents the container for Samples in the Sample Slot.
(5) Play Type indicator: Indicates whether the Sample Cell is set to Loop or One-shot mode.
Clicking this symbol also triggers the Sample.
(6) Page Selector: Selects the current Page with Samples for the Remix Set.
1
2
Sample Slot hovered.
(1) Sample Slot parameters: Each Sample Slot has a set of parameters. Hovering the mouse
over the Sample Slot Player or Sample title displays the relevant parameters:
• Keylock button: Separates the playback key from the playback speed. This control needs to
be activated to adjust the Sample Cell's pitch in the Advanced panel. Otherwise, the Sample
Cell's pitch directly relates to the Remix Deck's tempo.
• FX button: Routes the Sample Slot through the FX Unit(s) currently assigned to the Mixer
channel for the Remix Deck.
• Monitor button: Routes the Sample Slot to the Mixer’s Monitor Output (which can be monitored in headphones).
• Punch mode: When a Sample is triggered, the position of that Sample is fixed to the Remix
Deck's internal timeline.
(2) Sample Mute: Mutes/un-mutes the Sample Slot.
6.4.5. Live Input
When selecting the Deck Flavor Live Input, you can route the audio signal from an external audio
source into TRAKTOR and add it to your mix. The Live Input does not provide any control elements apart from the Deck focus.
TRAKTOR Overview
32

Live Input.
6.4.6. Advanced Panel
On the Track Deck and on the STEM Deck, the Advanced panel contains advanced control options for Cue Point and Loop management, and for correcting the Beatgrids for your tracks. On the
Remix Deck, the Advanced panel gives you access to the parameter settings of the individual
Sample Cells. For more information on the Advanced panel on the Remix Deck, refer to Ad-
vanced Panel on the Remix Deck.
1
2
Advanced panel.
(1) Advanced panel button: Shows and hides the Advanced panel below the Loop controls for
Deck A and B, and for Deck C and D, respectively. It also shows and hides the Panorama controls
in the Mixer for Deck A and B, and for Deck C and D, respectively.
The Advanced panel can only be displayed when the Deck is displayed in full Deck
layout and in advanced Deck layout.
(2) Advanced panel page selector: Selects one of three Advanced panel pages; MOVE, CUE,
and GRID containing individual control and editing elements.
TRAKTOR Overview
33

• CUE: Provides direct access to 8 user-definable Cue/Loop In Points per track, as well as further Cue Point management controls. For more information, refer to Working with Cue Points.
• MOVE: Provides options for moving the active Loop within the track as well as jumping the current playhead position within the track by beats. For more information, refer to Working with
Loops.
• GRID: Provides control over the Beatmarker, the Beatgrid, and the stored tempo of a track. For
more information, refer to Correcting Beatgrids.
Advanced Panel – Cue Page
Provides direct access to eight user-definable Cue/Loop In Points per track, as well as further Cue
Point management controls. For more information, refer to Section 8.8: Working with Hotcue but-
tons and Flux Mode, Section 9.1: Working with Cue Points, and Section 9.2: Working with Loops.
1
82 43 5 6 7
Advanced Panel – CUE page.
(1) Hotcue 1-8: Allows you to directly set or access eight Hotcue or Loop In Points per track.
(2) Prev Cue / Next Cue: Skips backward or forward to the previous or next stored Cue Point in
the track.
(3) Cue Point Position: Displays the position of the selected Cue Point or Loop in minutes : seconds : milliseconds.
(4) Cue Point List: Selects the Cue Point.
(5) Cue Point Type menu: Provides a list of several Cue Point Types.
(6) Delete Cue Point: Deletes the selected Cue Point or Loop In Point.
(7) MAP: Enables Hotcue Mapping mode. When enabled, pressing a Hotcue button will map the
displayed Cue Point or Loop In Point to it.
(8) STORE: Stores the selected Cue Point and maps it to the next free Hotcue button.
Advanced Panel – MOVE Page
The Move page provides options for moving the active Loop within the track, as well as for jumping
the current playhead position withig the track by beats. For more information, refer to Working with
Loops.
TRAKTOR Overview
34
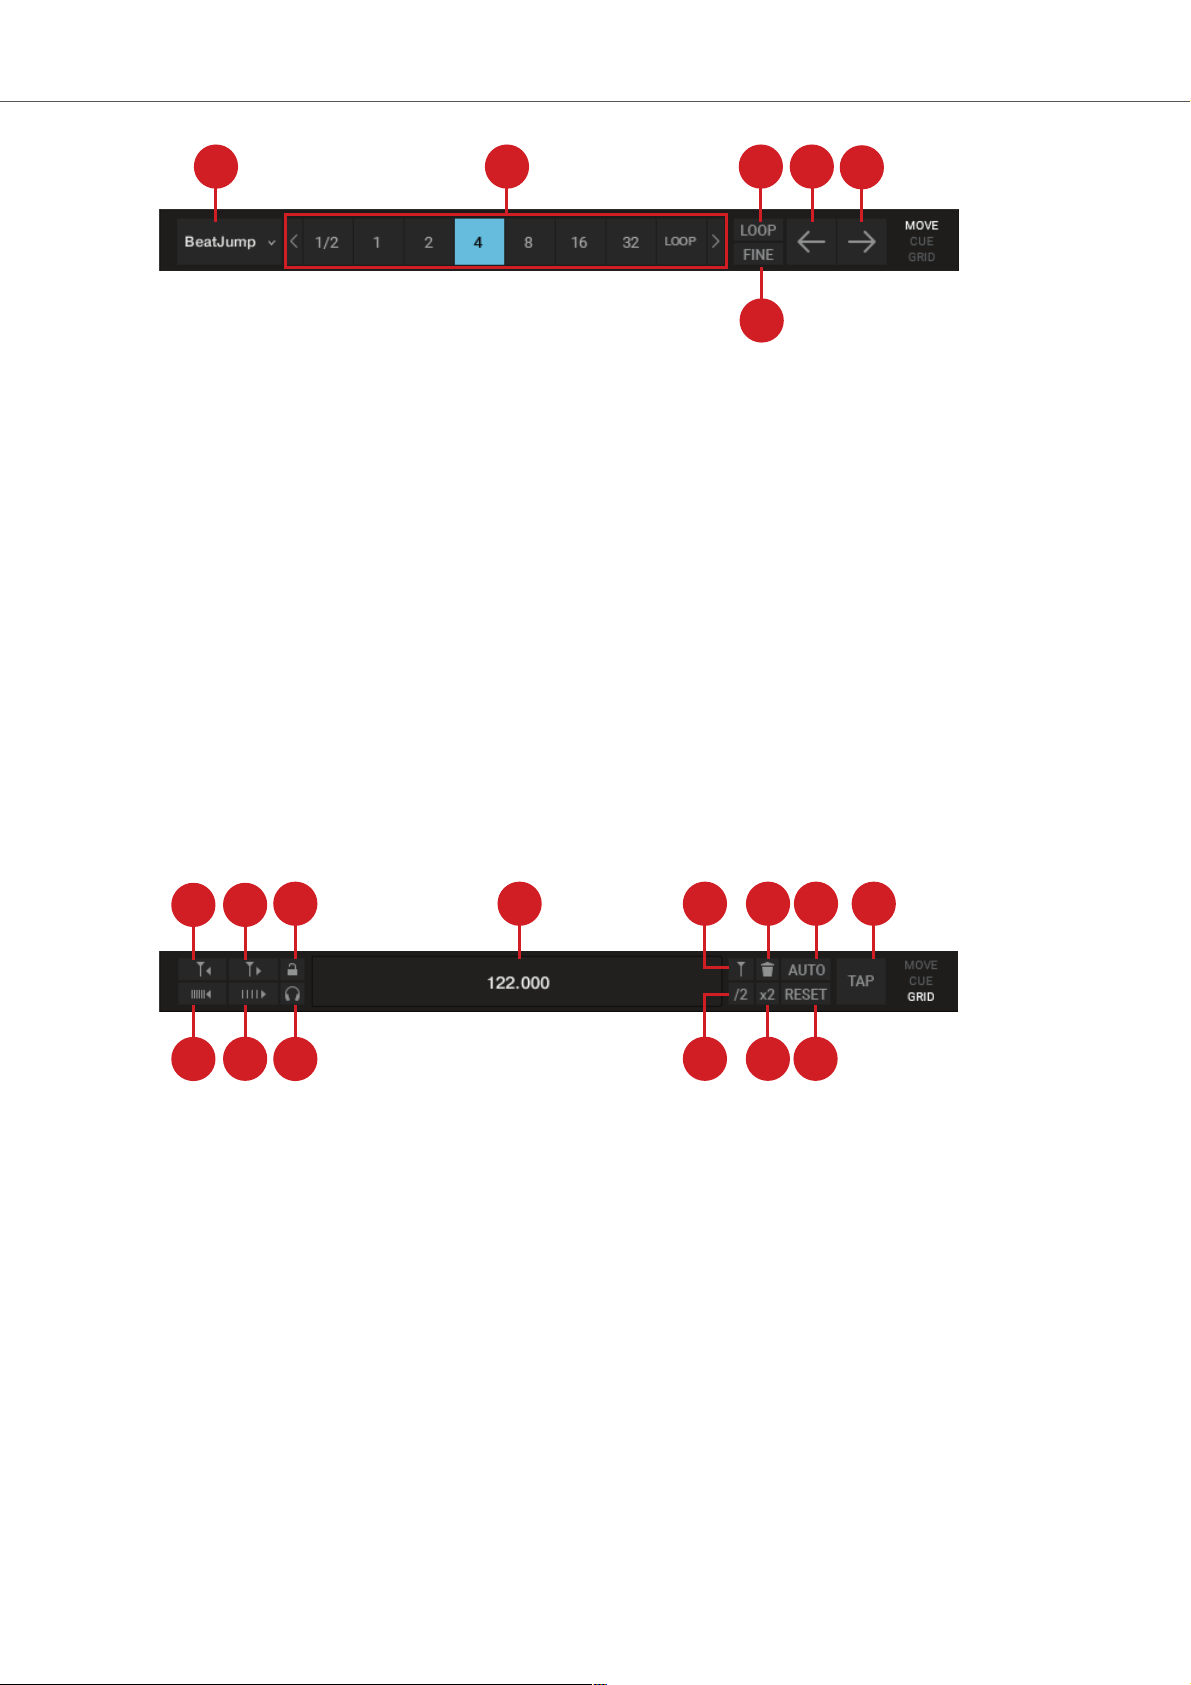
1 2 43
5
6
Advanced Panel – MOVE page.
(1) Move Mode menu: Selects one of the Move modes BeatJump, Loop, Loop In, and Loop
Out.
(2) Move Size control: Selects the step size in beats.
(3) LOOP mode: Selects a step size that is based on the current Loop size for the movement.
(4) Cue Move BWD: Depending on the selected Move mode, the selected issue is moved backwards at the selected step size.
(5) Cue Move FWD: Depending on the selected Move mode, the selected issue is moved forward
at the selected step size.
(6) FINE mode: Selects a fine step size for the movement. Use this for fine adjustments.
Advanced Panel – GRID Page
Provides control over the Beatmarker, the Beatgrid, and the stored tempo of a track. For more information, refer to Correcting Beatgrids.
1 2
3 4 7 85
9
14
13
12
6
1011
Advanced Panel – GRID page.
(1) Move Grid BWD: Moves the Grid backward.
(2) Move Grid FWD: Moves the Grid forward.
(3) BPM INC (Increase): Precisely increases the BPM in minor steps. As a result the Beatgrid gets
narrower=.
(4) BPM DEC (Decrease): Precisely decreases the BPM in minor steps. As a result the Beatgrid
gets expanded.
(3) Analysis Lock button: Locks all values against future changes by the track analysis and by
the user.
(4) Beat Tick: Enables an audible beat tick (metronome) to help align the Beatgrid during playback. In Internal Mixer mode, the Beat Tick is only audible on signals cued over the headphones. In External Mixer mode, the tick is laid over the Deck's Mixer channel signal when Headphone Cue on the Internal Mixer is active.
TRAKTOR Overview
35

(5) BPM Edit Display: Shows the current BPM value of the track. A double-click enables manual
tempo adjustment.
(6) Set Gridmarker: Sets a Gridmarker at the current playback position.
(7) Delete Gridmarker: Deletes the last set Gridmarker.
(8) BPM /2: Halves the BMP Edit Display.
(9) BMP x2: Doubles the BMP Edit Display.
(10) AUTO Grid: Calculates the BPM of the current track and sets a Gridmarker next to the current playback position. This function is only available for previously analyzed tracks.
(11) RESET Gridmarker: Resets the set BMP and recalculates it.
(12) TAP: Sets the BPM based on how fast or slow the button is tapped. The BPM will be adjusted
after the fourth tap.
6.4.7. Advanced Panel on the Remix Deck
Each Sample Cell has a set of individual parameters, which are accessible from the Remix Deck's
Advanced Panel. The Advanced panel can only be displayed when in Full Deck Layout or Advanced Deck Layout.
1 2
3 4 7 85
9
13
6
1012 11
Advanced Panel on the Remix Deck.
(1) SAMPLE PITCH control: Sets the pitch for the selected Sample in semitone steps.
(2) SAMPLE GAIN control: Sets the Gain level for the selected Sample.
(3) BPM x2: Doubles the tempo of the Sample.
(4) BPM Edit Display: Shows the current BPM value for the Sample. A Double-click enables manual tempo adjustment.
(5) Move Grid Left: Moves the Sample Cell's Beatgrid to the left.
(6) Move Grid Right: Moves the Sample Cell's Beatrgid to the right.
(7) Trigger Type: When enabled (Latch mode), a Sample will continue to play after you release
the mouse button, either until the end of the Sample is reached (for One-shot Samples) or until it is
stopped by some other method (like triggering a new Sample in the same Slot).
The alternative Type is Gate mode, where a Sample will only play while you’re holding down on
the mouse button. Upon releasing the mouse button, the Sample will stop playing.
(8) Reverse Playback: Enables reverse playback for the Sample Cell currently being played in the
Slot Player.
(9) Play Type: This property determines whether a Sample stops after reaching its end or if it continuously loops. When set to One-Shot (arrow symbol), a Sample will stop playing when it gets to
TRAKTOR Overview
36

its end. When set to Loop (ellipse symbol), the Sample will automatically return to its start and continue playing indefinitely.
(10) Sync Type: This property determines if the Sample should be synchronized to the Remix
Deck’s Tempo or not. When SYNC is on, the Sample’s BPM will match the Remix Deck’s BPM.
When SYNC is off, the Sample will play at its original speed.
(11) BPM Increase: Precisely decreases the BPM in minor steps. As a result the Beatgrid is expanded.
(12) BPM Decrease: Precisely increases the BPM in minor steps. As a result the Beatgrid becomes narrower.
(13) BPM /2: Halves the tempo of the Sample.
6.5. Mixer
The Mixer is the center of TRAKTOR , used to control and modulate the audio signals coming from
the Decks before they are sent to the master output.
3
4 5
1
2
Mixer.
(1) Mixer channel: Contains the controls to adjust the Mixer channels’ volume and to modulate
the audio signals’ frequency. Furthermore, you can assign the FX Units to the Mixer channel and
route the audio signal to the Headphone Cue channel. For more information, refer to Mixer Chan-
nel.
(2) Crossfade controls: These controls allow you to make seamless transitions between various
Mixer channels. For more Information, refer to Crossfade Controls
(3) Headphone Cue Mix: Let you adjust the Headphone Cue volume.
(4) Headphone Cue Vol: Determine the ratio of the cue-signal-to-master-signal in your headphones.
(5) AUX control: Controls the volume of the AUX input, which can be fed by an external signal like
a microphone. For more inforamtion, refer to AUX Control.
The available Mixer controls differ depending on the current Mixing mode and the
selected TRAKTOR Layout. If TRAKTOR is used in External Mixing mode, the channel faders, the crossfader, as well as Heaphone Cue controls are disabled.
TRAKTOR Overview
37

6.5.1. Mixer Channel
The Mixer channel contains the controls to adjust the Mixer channels’ volume and to modulate the
audio signals’ frequency. Furthermore, you can assign the Mixer channel to the FX Units and rout
the audio signal to the Headphone Cue channel.
2
1
10
9
4
5
6
7
8
12
11
3
13
Mixer channel.
(1) GAIN knob: Controls the pre-fader input level. GAIN is only visible when full size Deck Layouts
are activated.
(2) GAIN View button: Enables/disables visibility of the GAIN button. When disabled, the the prefader input level cannot be adjusted manually.
(3) Channel Level Meter: Indicate the current volume of the audio signal in the Mixer channel. It
also indicates if the signal is clipping.
(4) HI, MID, LOW EQ knobs: Adjusts the high frequencies in the audio signal.
(5) HI, MID, LOW Kill buttons: Complete takes out (kills) high frequencies from the audio signal.
(6) Mixer FX On button: Enables/disables the Mixer FX.
(7) Channel fader: The channel fader adjust the channel volume.
(8) CUE channel button: Sends the audio signal to the Headphone Cue channel for preview. For
using the Cue function a multi-channel audio device is required. The Cue channel button is only
visible when full size Decks Layout is enabled. For more information, refer to...Using the Cue
Channel for Mixing.
(9) KEY button: Locks the key for the Deck.
(10) KEY knob: Controls the key of a playing track without affecting its tempo.
(11) FX Assign buttons: Assigns the individual FX Unit to the Mixer channel.
(12) Mixer FX drop-down menu: Adjusts the middle frequencies in the audio signal.
(13) Mixer FX Amount knob: The Mixer FX Amount knob controls the selected Mixer FX.
(17) PAN knob: Controls the balance between the left and right stereo channel for any Mixer
channel individually. The PAN knobs are only visible when the Advanced Panels are opened.
TRAKTOR Overview
38

6.5.2. Crossfade Controls
These controls allow you to make seamless transitions between various Mixer channels.
1
4
33
42
2
Crossafde controls.
(1) Crossfader: Enables transitions between Decks by dragging it from one side to the other. The
crossfader curve can be adjusted individually in the Preferences.
(2) Crossfader assign buttons: Allow to assign the Mixer channels to be audible either on the left
or right crossfader position.
(3) Fade left / right buttons: Let the crossfader move to the dedicated direction step by step.
(4) Auto fade left / right button: Let the crossfader automatically move from one side to the other.
6.6. Browser
TRAKTOR’s Browser lets you load tracks into Decks and provides you with tools to organize your
Track Collection.
1
3
4
5
6
7
2
Browser.
(1) Preview Player: Allows you to preview tracks before loading them into a Deck. For more information, refer to Previewing Tracks in the Browser.
(2) Search field: Provides a live search based on the tags of the tracks in the Collection. For more
information, refer to Browsing for Music.
(3) Browser Tree: Displays the content of the selected folder:
• Track Collection: Contains all tracks imported to your Track Collection. They are automatically
sorted by Artist, Release, Label or Genre.
• Playlists: Contains all your TRAKTOR Playlists.
TRAKTOR Overview
39

• Explorer: Lets you browse your hard drives for tracks. It also contains an Archive folder containing History Playlists.
• Audio Recordings: Contains all recordings created with the AUDIO RECORDER.
• iTunes: Provides direct access to your iTunes Library including all iTunes Playlists.
• History: Contains latest history playlists.
Each History Playlist is time-stamped and contains the additional columns Start-Time, Dura-
tion, Deck for more information about when and how you have played the tracks.
(4) Cover Artwork: Displays the Cover Artwork of the selected track in the Track List.
(5) Status bar: Displays the progress of track analysis, error messages, and the overall status of
TRAKTOR.
(6) Track List: Shows tracks depending on the source that is selected (folder, Playlist, search results or tag-based).
(7) Favorites: Provides direct access to favorite Playlists and favorite folders.
TRAKTOR Overview
40

7. AUTOMATIC SYNCHRONIZATION OF DECKS
This section introduces you the principles of the automatic synchronization features offered by
TRAKTOR.
7.1. Tempo Master and Master Clock
The Tempo Master represents the reference tempo to which all other elements can synchronize.
The Tempo Master can either be TRAKTOR's internal Master Clock, or one of the Decks. The
Tempo Master does not have to be the same throughout your mix, but there can only be one Tempo Master. When activating the Sync function on a Deck, TRAKTOR synchronizes the Deck to the
Tempo Master.
7.2. Beatgrid
For a Deck to provide reliable tempo and beats as a Tempo Master or for syncing, the loaded track
must first be analyzed by TRAKTOR. This analysis will determine the tempo (BPM) as well as the
position of the beats; the result is the so-called Beatgrid. There is a specific Beatgrid for each of
your tracks.
7.3. Automatic Syncing
Samples playing in Looped mode and time-evolving FX are always automatically synced to the
current tempo master.
For Track Decks, you can decide whether to use the automatic Sync function or not — for example
if you want to beat match tracks manually, or if you don’t want any beat matching at all.
7.4. Automatic Tempo Master Mode
With AUTO mode activated in the Master Control panel, TRAKTOR can automatically switch the
Tempo Master between Track Decks. This happens when the Track Deck currently set as Tempo
Master is stopped or when you load a new track onto it. This way, you don’t have to worry about
setting the Tempo Master yourself. If there is no other Track Deck playing, the Master Clock would
automatically become the Tempo Master indicated by the MASTER button in the Master Control
panel.
The AUTO mode is activated by default.
Automatic Synchronization of Decks
41

8. BASIC USAGE TUTORIALS
This section introduces you to the basics of importing, browsing and previewing tracks as well as
loading music to the Decks. The tutorials also guide you through the fundamentals of mixing your
tracks, using Equalizer and Hotcues as well as using Mixer FXs.
8.1. Importing Music to the Track Collection
The most convenient way to get your tracks into TRAKTOR's Track Collection is using drag and
drop:
• Drag the music files from the location on your computer and drop them on the Track Collec-
tion folder in TRAKTOR's Browser Tree.
TRAKTOR now analyzes the metadata of the music files and stores the files in the Track
Collection.
8.2. Browsing for Music
The Browser lets you conveniently find the tracks you are looking for. You can navigate along the
subfolders of the Track Collection in the Browser Tree or you can perform a text search in the
Search field.
8.2.1. Navigating through Folders in the Browser Tree
To navigate the Browser Tree:
1. In the Browser Tree expand the Track Collection folder to show the subfolders.
2. Expand the subfolder of the metadata category by which you want to search a track, i.e. Ar-
tists.
3. Select the subfolder named by the artist to your liking, i.e. Native Instruments.
The Track List now shows all the music according to the selected artist.
4. In the Track list browse for a track to your liking.
5. Load the track into Deck A by using drag and drop.
TRAKTOR now analyzes the entire track for calculating the tempo (BPM) to create the Beatgrid and the Waveform.
Basic Usage Tutorials
42
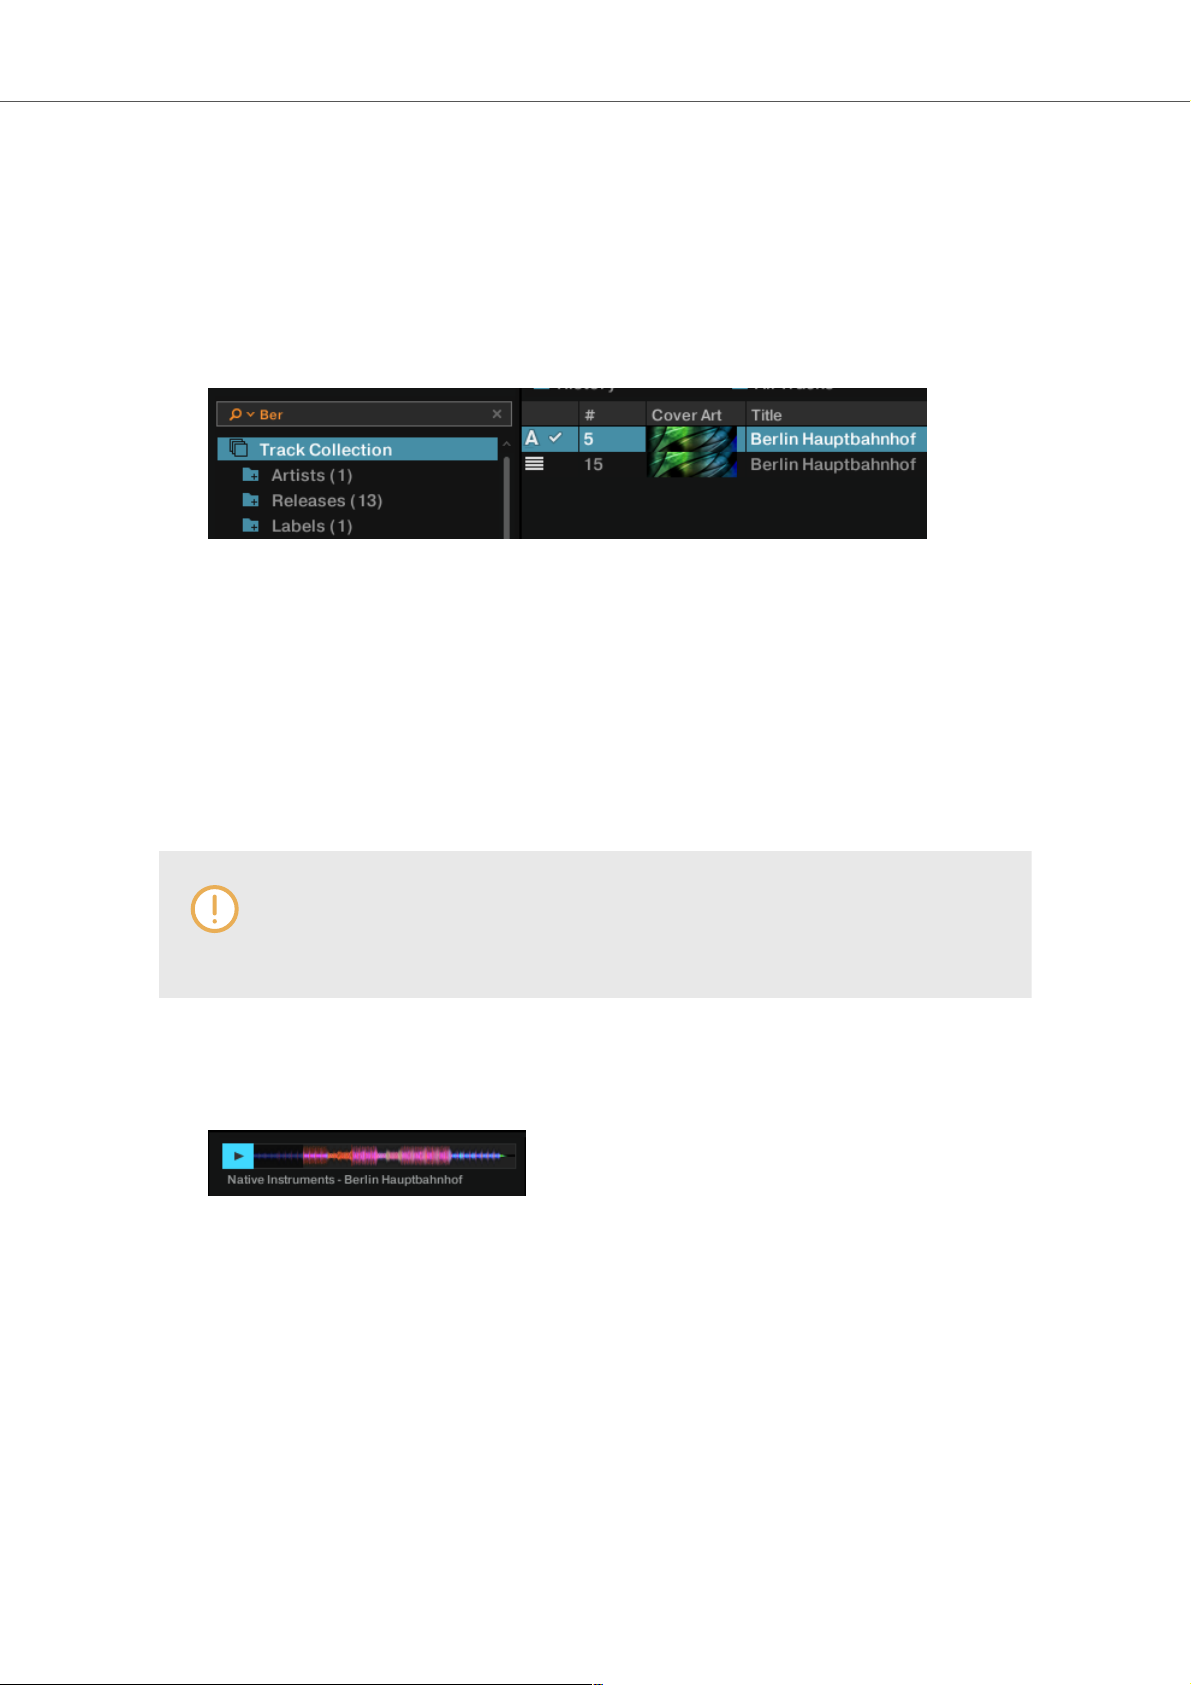
8.2.2. Performing a Text Search
You can perform a text search for the current playlist or in the Track Collection:
1. Click in the Search field.
2. Start typing the characters in relation to the track you are looking for. This can either be the
track name, the artist, or another category.
Upon typing the Track List instantly filters the selected playlist.
3. Press [Enter] on your computer keyboard.
The Track list now provides you with all the music in the Track Collection matching your
search query.
8.2.3. Previewing Tracks in the Browser
TRAKTOR’S Browser provides a Preview Player to preview tracks without loading them into a
Deck and without changing the played stated and play count.
To use the Preview Player you need to assign an output to "Output Preview" (for External Mixer mode) or "Output Monitor" (for Internal Mixer mode). Find these settings
on the Output Routing page in the Preferences.
To preview a track in the Preview Player:
1. Drag-and-drop a track from the Browser List onto the Preview Player.
The Stripe view is visible
2. Click the play button to start preview.
3. Click inside the Stripe view to skip within the track.
4. Click the play button again to stop preview.
8.3. Loading Music into Decks
To load a track, STEM file, or Remix Set into a Deck, you may use one of the following methods:
using drag and drop or using the context menu.
Basic Usage Tutorials
43

Loading Music via Drag and Drop
• Drag the selected music from the Track List and drop it into the Deck to your liking.
TRAKTOR now analyzes the track for its tempo (BPM) to create the Beatgrid and the Waveform. Depending on the selected track, the Deck flavor switches, i.e to a STEM Deck. The
Track information are visible in the Deck Header.
Loading Music via Browser Context Menu
1. Right-click the track in the Track list to open the context menu.
2. Select the entry for the Deck you want to load the track in to, i.e Load into Track Deck A.
TRAKTOR now analyzes the track for calculating its tempo (BPM) to create the Beatgrid and
the Waveform.
The entries in the context menu differ according to the selected music. When rightclicking a Remix Set, the entries change to i.e. Load into Remix Deck A. If none of
the Decks is currently a Remix Deck, the corresponding entries are not available in
the Browser context menu. This also applies to STEM files.
8.3.1. Loading Tracks from Your iTunes Library
You can load tracks from your iTunes Library and Playlists directly from TRAKTOR. The iTunes
folder in the Browser Tree directly accesses your iTunes Library and its Playlists. Editing functions
are not available.
To load a track from your iTunes Library:
1. Select the iTunes folder in the Browser Tree to display its content in the Track List. A double-
click expands the iTunes folder.
2. Browse for a track in the Track List or in the Playlists.
3. Drag the track and drop it into a Deck to load it.
Basic Usage Tutorials
44

8.4. Mixing Your First Two Tracks
In this section you learn to mix your first two tracks using Track Deck A and Track Deck B. At first
you prepare the Mixer by adjusting the control elements for mixing from Deck A to B. Then you
load the first track into Deck A, and begin to perform step by step.
8.4.1. Prerequisites
1. Set the crossfader to the left-most position.
2. Assign Mixer channel A to the left crossfader position.
3. Assign Mixer channel B to the right crossfader position.
4. Set Channel fader A to maximum position.
5. Set Channel Fader B to maximum position.
6. Set the MAIN knob to center position at 0.0 dB.
7. Set the volume of your audio system or active speakers to minimum level.
8.4.2. Loading the First Track into Deck A
1. Browse for a track to your liking in the Track Collection, i.e. the demo track Berlin Haupt-
bahnhof by Native Instruments.
2. Drag and drop the track into Deck A to load it.
TRAKTOR now analyzes the Track for its tempo and to create the Beatgrid and the Waveform.
8.4.3. Starting Playback of Deck A
To start playback on Track Deck A:
1. Click the Play button.
The waveform starts moving and the Channel Volume meter LEDs and the MAIN Volume
Level meter LEDs start to illuminate.
2. Slowly increase the volume of your audio system or active speakers to a moderate listening
level.
You now hear the audio of the track in your speakers.
Basic Usage Tutorials
45

8.4.4. Loading the Second Track into Deck B
1. Browse for a track with a similar tempo to your liking in the Track Collection, i.e. Lisa.
2. Drag and drop the track into Deck B to load it.
TRAKTOR now analyzes the Track for its tempo and to create the Beatgrid and the Waveform.
8.4.5. Syncing the Track Tempos
In order to Sync the tempos both both tracks:
• Click the SYNC button on Deck B.
The tempos of both tracks are now in sync, indicated by the equal tempo value in the Deck
Header. The Tempo fader on Deck B has also moved accordingly and the SYNC button
lights up.
8.4.6. Starting Playback of the Second Track
When the playback time of the Track in Deck A is almost over you can start the playback of Deck
B:
• Click the Play button on Deck B.
The waveform starts moving and the Channel Volume meter LEDs in Mixer channel B illuminate. The tracks in Deck A and Deck B play beat-accurate in sync.
8.4.7. Mixing in the Audio Signal
You can now mix in the audio signal of Mixer channel B into the main signal:
1. Drag the crossfader and slowly move it towards center position and hold for a moment.
The audio signal of the track in Mixer channel B is fading into the main signal.
2. While the track in Deck A reaches its end, slowly move the crossfader to the right-most posi-
tion.
Basic Usage Tutorials
46

The audio signal of Mixer channel A slowly fades out of the main signal. Only Mixer Channel
B is now audible. Alternatively to the crossfader you can also use the Fade left and Fade
right buttons to move the crossfader step-wise, or you can even use the Autofade buttons to
let the crossfader automatically move to the opposite side. You have mixed your first two
tracks.
With the end of the playback of Deck A, Deck B automatically becomes the new Tempo Master
and is ready for the next transition to another Deck.
• To mix another track repeat the aforementioned steps.
8.5. Adjusting Gain Levels for Incoming Audio Signals
In this section you briefly learn about the importance of adjusting or leveling the GAIN levels for
incoming audio signals in the mixer as well as adjusting the outgoing master volume level to the
connected sound system or active speakers.
Adjusting the levels at the several stages the DJ controls not only supports the audio quality of the
mix and ensures the best possible dynamic range. It also prevents damaging ears of the audience
and protects audio equipment, i.e. power amplifiers and speakers.
8.5.1. Dynamic Range
Each track has its own dynamic range. This means the maximum volume level of a single musical
element in a track can be way louder than the average volume of all musical elements together.
Besides different average audio levels, also the dynamic ranges can be different between tracks.
That is why it is important to align the levels of the incoming audio signals to prevent them from
clipping.
The normal dynamic range for an audio signal is between -∞ to ±0 dB.
8.5.2. Clipping
If an audio signal clips, the GAIN of the audio signal is too high. An audio signal clips if it exceeds
the nominal level and also the headroom – normally at +6 dB. Then the audio signal starts to distort and looses dynamics and punch. Although the audio signal then seems louder, the entire audio quality decreases significantly. This critical audio signal can damage ears and audio equipment. That is why it is important to as well adjust the GAIN levels to protect ears and electronics.
To protect the audio equipment connected to the MAIN output stage, TRAKTOR uses an integrated Limiter. The purpose of the limiter is to prevent the signal from clipping by reducing the dynamic range.
However, the Limiter in TRAKTOR can be switched off.
Basic Usage Tutorials
47

Switching off the Limiter is not recommended.
8.5.3. Headroom
Before an audio signal starts to clip there is still a reserve to buffer transient audio speaks - the so
called headroom. The headroom starts where where nominal level ends – at +0 db. It normally
ends before +6dB.
However, the available Headroom in TRAKTOR can be adjusted in the Preferences or entirely
switched off.
Switching off the Limiter is not recommended.
8.5.4. Always Level Incoming Audio Signals
When you mix using the Auto Gain function, the incoming audio signals from the Decks are always
leveled by TRAKTOR automatically. This ensures none of your tracks dominate over the others.
The Auto Gain function is active by default. However, if you prefer to adjust the GAIN level by
yourself, i.e. when using an external Mixer or a controller with integrated Mixer, you can also deactivate this feature in the Preferences. In this case you always have to make sure the audio levels
always stay in the area before clipping.
Each Channel Meter of the blue LEDs in the Channel Level Meters.
8.6. Using the Equalizer
The EQ knobs and EQ Kill buttons are used for making sound adjustments to tracks while cueing
and while mixing.
• The EQ knobs adjust the high, middle, or low frequencies in the audio signal.
• The Kill buttons completely take out (kill) high, middle, or low frequencies from the audio signal.
Using the EQs while cueing a track can support to manually align the tempos of the tracks. For
more information, refer to cuing tracks.
Using the EQs can make transitions more flawless. The following example outlines a procedure on
how to use the Equalizer during a transition.
Basic Usage Tutorials
48

8.6.1. EQing the Bass Frequencies of Tracks during Transition
The most common EQing technique is to take out the bass of the next track before the transition
and to gradually bring it back in during the transition.
Assuming you want to transition tracks from Deck A to Deck B:
1. Before starting the transition, turn the LOW knob on Mixer channel B to minimum position for
taking out the bass frequencies of the track in Deck B.
2. Progressively mix in Mixer channel B by gradually moving the crossfader from the left to the
center position.
Both tracks are audible in the Master signal but the track on Deck B has no bass.
3. When you want to bring the bass back in, gradually increase the bass amount of Mixer chan-
nel B while simultaneously decreasing that of Mixer channel A using the LOW knobs on both
Mixer channels.
Both tracks are still audible in the Master signal but the track on Deck A has no bass.
4. Complete the transition by gradually moving the crossfader all the way to the right.
You mixed two tracks in conjunction with the Equalizer.
Alternatively to the EQ knobs, you can also use the EQ Kill buttons. These buttons
are used for immediate killing the respective the frequency band of the audio signals
during transitions as well as for performances in between.
Using the EQs during a transition to take out frequencies can avoid clipping that can
easily occur when two tracks play together with full volume.
8.7. Working with Mixer FX
In this section you learn how to apply Mixer FX to your mix.
8.7.1. About Mixer FX
A Mixer FX is a grouped effect which can be applied to the audio signal in the Mixer channel by
just using the Mixer FX Amount knob. Besides the Filter you can choose one of four Mixer FX from
the Mixer FX drop-down menu below the Mixer FX Amount knob. In total TRAKTOR provides you
with eight Mixer FX of which you can pre-select four in the Preferences.
Available MIXER FX
Always when you start TRAKTOR, the Filter is selected by default. However, you can pre-select
four of eight available MIXER FX:
Basic Usage Tutorials
49

• Reverb
• Dual Delay
• Noise
• Time Gater
• Flanger
• Barber Pole
• Dotted Delay
• Modern Krush
Pre-Selected Mixer FX
By default the following Mixer FX are pre-selected:
• Filter: The pointer color of the Mixer FX Amount knob is white. The Filter is not removable from
the drop-down menu.
• Reverb: The pointer color of the Mixer FX Amount knob is red.
• Dual Delay: The pointer color of the Mixer FX Amount knob is green.
• NOISE: The pointer color of the Mixer FX Amount knob is blue.
• Time Gater: The pointer color of the Mixer FX Amount knob is orange.
8.7.2. Enabling Mixer FX
To enable the Mixer FX for the Mixer channel:
• Click the Mixer FX On button.
The button lights up blue, indicating the Mixer FX is enabled.
8.7.3. Selecting Mixer FX
To select another Mixer FX from the pre-selection:
1. Click the label next to the Mixer FX On button to open the Mixer FX drop-down menu.
2. Select the Mixer FX you want to use.
Basic Usage Tutorials
50

The pointer color of the Mixer FX Amount knob changed according to the selected Mixer FX.
8.7.4. Applying Mixer FX
You can apply the Mixer FX by turning the Mixer FX Amount using With having the Mixer FX enabled for the Mixer channel:
1. Apply a low-pass Filter FX by turning the Mixer FX Amount knob counter-clockwise.
The higher and middle frequencies get progressively filtered out from the audio signal and
you noticeably hear the low-pass Filter FX.
2. Apply a high-pass Filter FX by turning the Mixer FX Amount knob clockwise.
The middle and lower frequencies get progressively filtered out from the audio signal and
you noticeably hear the high-pass Filter FX.
8.7.5. Pre-Selecting Mixer FX
To change the pre-selection for the Mixer FX drop-down menu:
1. Open the Preferences and select the Mixer page.
2. Under Mixer FX select the the Mixer FX in the drop-down menus for the individual Mixer FX
Slot 1 - 4.
8.8. Working with Hotcue buttons and Flux Mode
In TRAKTOR, you can store Cue Points and Loops to the eight Hotcue buttons (Hotcues) on
the CUE Page in the Advanced Panel. This allows instant access to your most important Cue
Points and Loops.
8.8.1. Accessing the Cue Page in the Advanced Panel
To manage your Cue Points in a track, you need to open the CUE page in the Advanced Panel
first:
1. Click on Advanced Panel button to display the Advanced Panels of Deck A and B, and Deck
C and D, respectively.
Basic Usage Tutorials
51

2. In the Advanced Panel select CUE to the show CUE page.
8.8.2. Storing Cue Points using Hotcue buttons
1. Playback the track or scroll to the position in the track where you want to set a Cue Point.
2. Click a Hotcue button to set a Cue Point at the current playback position and to store it on
the Hotcue button.
The Cue Point is stored to the Hotcue button. The Hotcue button lights up blue.
8.8.3. Storing Loops using Hotcue buttons
1. Playback the track or scroll to the position in the track where you want to activate a Loop.
2. Activate a Loop with a size of your liking using the Loop control bar.
3. Click a Hotcue button to store the Loop on the Hotcue button.
The Loop is stored to the Hotcue button. The Hotcue button lights up green.
8.8.4. Triggering Stored Hotcues
The behavior of a Hotcue button depends on the playback status of the track.
When the Deck is playing:
• Click a Hotcue button to jump to the stored Cue Point or Loop and for continuing playback.
When the Deck is stopped, the Hotcue buttons behave in the same manner as the CUE button in
the Transport Controls:
• Click and hold a Hotcue button to jump to the stored Cue Point or Loop.
Holding the Hotcue button continues playback until it is released. Upon release the playback
position will jump back to the Cue Point or Loop and remain paused.
8.8.5. Remapping Stored Hotcues
The MAP button on allows you to remap stored Cue Points and Loops to other Hotcue buttons:
Basic Usage Tutorials
52
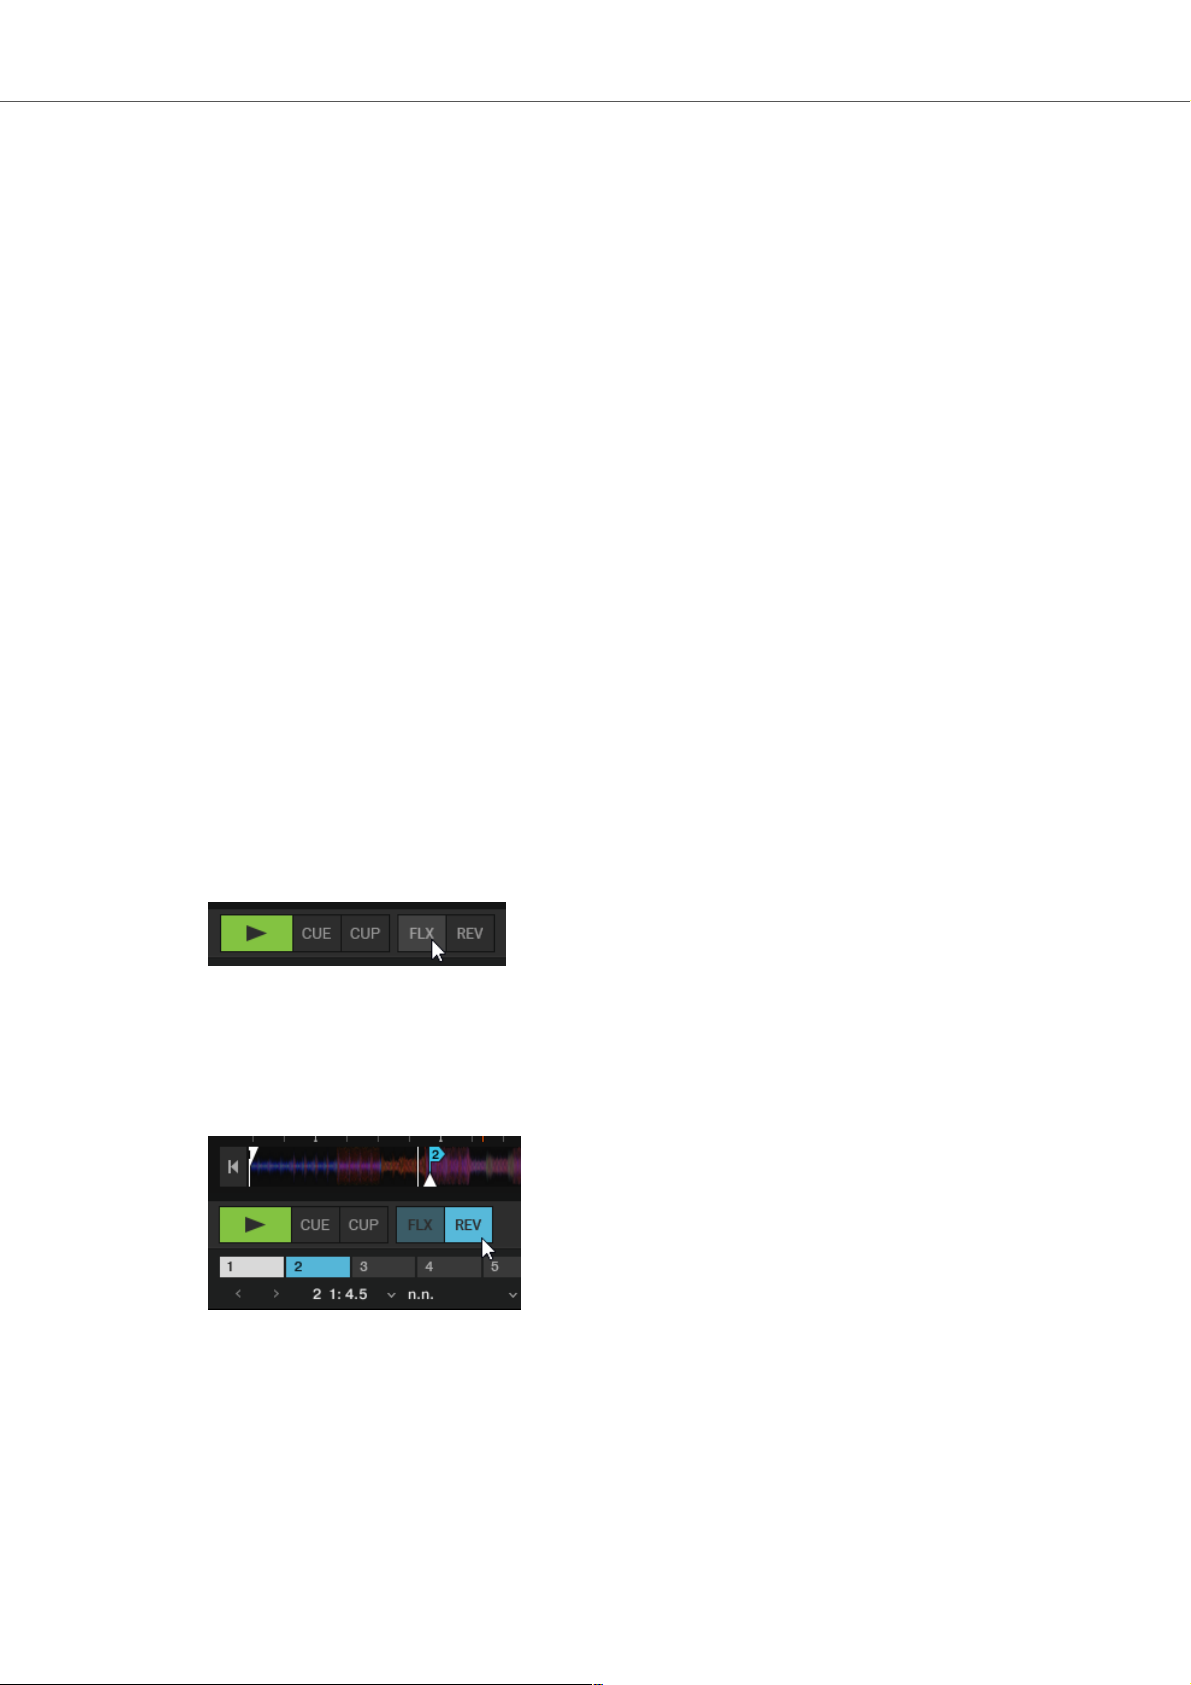
1. Click the Hotcue button with the Cue Point or Loop you want to remap.
2. Click the MAP button to enable MAP mode.
3. Click the Hotcue button to which you want to map the Cue Point or Loop.
The Cue Point or Loop is mapped to the Hotcue button. The Hotcue button is now empty.
8.8.6. Using Flux Mode and Reverse Mode
Flux mode lets you jump to Cue Points and Loops without loosing the phrasing of your tracks. It is
a timeline-based transport technique that lets you interact with TRAKTOR's transport controls and
then immediately jump back to the position of the timeline where the track would have been if the
transport action had not been used in the first place. In other words, it is as if a second, virtual
playhead continues forward in your track while TRAKTOR loops or jumps to a Cue Point.
When you release the Loop or Cue Point—by releasing the relevant Hotcue button—playback resumes at this playhead position. The longer you loop, the farther ahead the playhead position will
move and therefore the farther ahead playback will jump to when you release Hotcue button. The
virtual Flux mode timeline is represented by a green playhead in the Waveform view.
Additionally, a Flux Mode indicator will flash in the Deck Header.
In addition you can enable the Reverse mode, which lets the track playback reversely from the
current playhead position.
Enabling Flux Mode
To enable Flux mode for the Deck:
• Click the Flux mode button.
Enabling Reverse Mode
To enable Reverse mode for the Deck:
1. Click and hold the Reverse mode button.
The track plays back reversely.
2. Release the Reverse mode button to resume playback to normal.
8.9. Locking Key of Tracks
When synchronizing tracks, you alter their tempo and, consequently, their pitch (or key). Slowing
down a track will cause its pitch to drop while speeding up the track will cause its pitch to rise. This
Basic Usage Tutorials
53

is not problematic for small tempo adjustments. But when the tempo is changed more drastically,
the resulting pitch shift might sound unnatural - especially for vocals.
To avoid this, TRAKTOR provides you with the Keylock feature that uncouples the pitch (key) and
the tempo (BPM) of a track. This means if the you lock the key of a track at the normal tempo, and
you then drag the tempo fader up or down, the the tempo changes but the key remains at its original level.
Locking at Original Key
1. Load a track into any Deck.
2. Set the tempo fader to the original tempo position.
3. Click the Key Lock switch in the Stripe view or click the Key switch in the Mixer channel to
lock the key for the track.
When now changing the tempo, you will notice the key remains at its original pitch.
Changing Key Without Tempo
You can change the key of a track without changing the tempo:
1. Load a track into any Deck.
2. Click the Key Lock Switch in the Stripe view or click the Key switch in the Mixer channel to
lock the key for the track.
3. Turn the Key knob clockwise or counter-clockwise to change the key accordingly.
The key changes without affecting the tempo.
8.10. Working with the Waveform and the Stripe
The Waveform and the Stripe are visual representations of the loaded track. Once a track has
been analyzed, the Waveform and the Stripe will be displayed.
The mouse hovering the Waveform Display to display additional controls.
Waveform
The Waveform gives a detailed overview of the loaded track and its transient, and Beatgrid information.
Basic Usage Tutorials
54

• The Waveform is only visible in Essential, Full, and Advanced Deck Layouts. It is not available
when using the Micro or Small Deck Layouts. You can change the Deck Layout in the Preferences. For more information, refer to Preferences – Decks Layout Page.
• The Waveform Display has color-coded transients; Lighter colors represent high frequency
content while darker colors represent low frequency content.
• The Waveform provides a visual reference for BeatJumps, Cue Points, Loops and Beatmarkers. Zoom in the Waveform Display to precisely place markers.
• The Waveform and Stripe share the same Color Mode (color scheme). There are four Color
Modes available: Ultraviolet, Infrared, X-Ray and Spectrum. You can change the Color Mode in
the Preferences. For more information, refer to Preferences – Decks Layout Page.
• The behavior of dragging the waveform with the mouse depends on the Mouse Control mode.
There are two Mouse Control modes available: Vinyl and Snap. You can change the behavior
in the Preferences. For more information, refer to Preferences – Transport Page.
Waveform View Interactions
1. You can zoom in and out on a waveform by clicking the + and - buttons.
2. A click on the = symbol resets the zoom view.
3. Dragging the Waveform: The behavior of dragging the waveform with the mouse depends on
the Mouse Control mode. There are two Mouse Control modes available: Vinyl and Snap.
Stripe
The Stripe View gives an overview of the entire track. It also displays the current playback position
as well as all of the Cue Points and Loops.
• The Stripe is visible in all Deck Layout modes.
• The Stripe provides a visual overview of BeatJumps, Cue Points, Loops and Beatmarkers.
• The Stripe flashes red when the configured Track End Warning Time is reached.
Stripe Interactions
• When clicking inside the Stripe, the consequent behavior depends on the SNAP mode and
QUANTIZE mode.
Basic Usage Tutorials
55

9. ADVANCED USAGE TUTORIALS
This section guides you trough more advanced workflows of TRAKTOR PRO 3 such as using effect units, creating remix sets, working with cue points and managing your track collection.
9.1. Working with Cue Points
In this section you learn how to work with Cue points. At first you learn what exactly a Cue Point is
and about the different available types. Then you learn where in TRAKTOR you can store and
manage your Cue Points.
9.1.1. About Cue Points
Starting from a particular point in a track (for mixing in, triggering, etc.) is called “cueing”. TRAKTOR lets you mark points for cueing and for directly jumping to particular positions—so called Cue
Points. Cue Points can be stored for each track which allows you to re-use them at a later stage or
in a later session. With the eight Hotcue buttons on the CUE page in the Advanced panel, you can
store your most important Cue Points (and Loops) and trigger them any time with a click. Besides
jumping to particular positions of a track e.g., beginning vocals, instrumentals or breaks, Cue
Points can also be used for creative techniques such as remixing parts of a track or beat-juggling
performances.
You can store up to 32 Cue Points (and Loops) for each track using the Advanced Panel.
9.1.2. Cue Point Types
TRAKTOR provides several Cue Point types for several purposes. This section gives a detailed
description of the different Cue Point Types available in the Cue Type drop-down menu in the CUE
page in the Advanced Panel:
Cue Point types in the Waveform display and Stripe.
• Floating Cue Point: The Floating Cue Point is always your starting point for working with cue
points and for storing loops. The Floating Cue Point is displayed in white.
• Cue Point: The regular Cue Points used to jump to particular positions in the track. Cue Points
are displayed in blue.
Advanced Usage Tutorials
56

• Load: A track with a Load Cue Point will automatically jump to this point when loaded. Load
Cue Points are displayed in yellow. For more information, refer to...
If you want to make use of Load Cue Points, you need to enable the Initially cue
to Load Marker option in the Preferences > Loading > Loading.
• Fade Out and Fade In: The Fade Out and Fade In Cue Points are used for the automated
Cue/Play of tracks. For this to work, you have to set a Fade Out Cue Point in one Deck and a
Fade In Cue Point in the other. Fade In and Fade Out Cue Points are displayed in orange. For
more information on, refer to Setting Fade Out and Fade In Cue Points in Tracks for Automated
Mixing.
• Grid (Beatmarker): This is a special Cue Point from which the regularly spaced Beatgrid is created. The Beatmarker sets the starting point for the Beatgrid. Beatmarkers are displayed in
white. For more information, refer to Beatgrids, and Correcting Beatgrids.
• Loop (Loop In point ): When selecting Loop from the menu, this changes the selected Cue
Point into a Loop In marker. Loop markers are displayed in green. For more information, refer
to Working with Loops.
9.1.3. Accessing the Cue Page in the Advanced Panel
To manage your Cue Points in a track, you need to open the CUE page in the Advanced Panel
first:
1. Click on Advanced Panel button to display the Advanced Panels of Deck A and B, and Deck
C and D, respectively.
2. In the Advanced Panel select CUE to the show CUE page.
9.1.4. Setting Cue Points
Setting Cue Points is straight forward. On a paused Deck:
1. Scroll to the position in the track where you want to set a Cue Point.
2. Click the CUE button in the Transport Controls to set the Cue Point at the current position.
When you now playback the tack and you click the CUE button in the transport controls, the playhead jumps directly to the Cue Point.
Advanced Usage Tutorials
57

9.1.5. Storing Cue Points
Cue Points can be stored to the CUE List.
1. Scroll to the position in the track where you want to set a Cue Point.
2. Click the CUE button in the Transport Controls to set the Cue Point at the current position.
3. Click the STORE button on the CUE page in the Advanced Panel to store the Cue Point.
The Cue Point is stored in the Cue List.
9.1.6. Jumping to Cue Points
When you have stored a number of Cue Points in the CUE List you can select them individually to
jump to the respective position in the track.
Skipping to the Next/Previous Stored Cue Point
• Use the Next/Previous Cue Point buttons to skip from one Stored Cue Point to the next.
The Playhead jumps to the respective position in the Waveform display and Stripe view. The
Cue Position display shows the position of the stored Cue Point within the track.
Selecting Cue Points from the CUE List
You can jump to Cue Point positions in the track by selecting the Cue Point directly from the CUE
list:
1. Click on the arrow button to open the CUE list.
2. Click one of the entries to select the stored Cue Point.
The Playhead jumps to the respective position in the Waveform display and Stripe view. The
Cue Position display shows the position of the stored Cue Point within the track.
9.1.7. Renaming Cue Points
You can rename any stored Cue Point in a Track:
1. Select the stored Cue Point you want to rename.
2. Click in the Cue Name display to enable editing.
3. Enter the name to your liking.
9.1.8. Changing the Cue Point Type
You can change the Cue Point Type using the Cue Type menu on the CUE page in the Advanced
Panel.
The following Cue Point Types are available in the Cue Point drop-down menu:
• Cue (Cue Point).
• Fade-In (Fade In Cue Point)
• Fade-Out (Fade Out Cue Point)
• Load (Load Cue Point)
Advanced Usage Tutorials
58

• Grid (Gridmarker)
• Loop (Loop In Point)
Procedure
1. Select the stored Cue Point for which you want to change the Cue Type.
2. Click on the Cue Type menu button to open the menu
3. Select the Cue Type to which you want to change the Cue Point.
The Cue Point Type and the color of the Cue Point marker in the Waveform display and the
Stripe view changed accordingly.
9.1.9. Deleting Cue Points
If you want to delete a stored Cue Point permanently, perform the following:
1. Select the stored Cue Point you want to delete.
2. Click on the Bin icon to delete the Cue Point.
The Cue Point is permanently deleted.
9.1.10. Setting Fade Out and Fade In Cue Points in Tracks for
Automated Mixing
This section explains how you set Fade Out Points and Fade In Cue Points for tracks to be mixed
automatically. For this to work, you have to set a Fade Out Cue Point in one Track and a Fade In
Cue Point in the other track. While a Fade Out Cue Point always triggers the playback of the next
track, a Fade In Cue Point triggers no action. Fade In and Fade Out Cue Points also work when
using Cruise Mode.
You have to enable the Activate Fade In & Fade Out Markers option in the Preferences > Loading > Loading.
Defining the Fade Out Point in the First Track in Deck A
1. On a track Deck open the Advanced Panel and select the CUE tab.
2. Load a track into Deck A.
3. Scroll to the position where you want the track to fade out for the transition.
4. Click CUE to set the Cue Point to this position.
5. Click STORE to convert the Cue Point into a stored Cue Point.
6. Open the Cue Point Type drop-down menu and and select Fade-Out.
An orange Fade Out Cue Point appears in the Waveform Display and the Stripe View.
Advanced Usage Tutorials
59

Defining the Fade In Point in the Second Track in Deck B
1. Load a track into Deck B.
2. Scroll to the position where you want the track to fade for the transition.
3. Click CUE to set the Cue Point to this position.
4. Click STORE to convert the Cue Point into a stored Cue Point.
5. Open the Cue Point Type drop-down menu and and select Fade-In.
An orange Fade In Cue Point appears in the Waveform display and the Stripe view.
When you start the playback of the track in Deck A and the playhead crosses the Fade Out Cue
Point, the track in Deck B will automatically begin playing from its Fade In Cue Point.
9.2. Working with Loops
In this section you learn how to work with Loops using TRAKTOR’s dedicated Loop controls.
9.2.1. About Looping
A Loop is a snippet of audio that repeats (loops). Loops are used as tools for remixing parts of
tracks and to extend track transitions. The length or size of Loops differ but are always beat-accurate. This means Loops always stick to the beat.
Available Auto-Loop Sizes
In TRAKTOR you can trigger a loop using one of the following predefined loop sizes automatically:
• 1/32 of a beat
• 1/16 of a beat
• 1/8 of a beat
• 1/4 of a beat
• 1/2 of a beat
• 1 beat
• 2 beats
• 4 beats
• 8 beats
• 16 beats
• 32 beats
You can also define the loop start and loop end manually with the help of dedicated Loop IN and
OUT buttons.
9.2.2. Enable Looping with a Predefined Loopsize
To enable looping on a playing track:
• Click one of the Auto Loop buttons with the predefined size on the Deck.
Advanced Usage Tutorials
60

This automatically enables Looping at the current playback position in the track. The Loop is
marked in green in the Waveform display. Also, the ACTIVE button lights up in green.
By pressing the ACTIVE button when no Loop is enabled, this will enable the next Loop stored in
the track.
9.2.3. Enable Looping with a Customized Loop Size
You can also enable Looping with a customized Loop size:
On a playing Deck:
1. Click the IN button to set the Loop In Point at the current position in the Waveform display.
2. Wait as long as you want the loop size to be.
3. Click the OUT button to set the Loop Out Point.
Looping is enabled using a customized Loop size.
9.2.4. Disable Looping
To disable Looping:
• Click the ACTIVE button.
Looping stops and playback continues as normal. The Loop In and Out markers remain at
their positions in the Waveform dsplay. The ACTIVE button is unlit.
9.2.5. Storing Loops
As with Cue Points you can also store Loops and return to them at a later point. Loops are stored
on the CUE page in the Advanced Panel.
Advanced Usage Tutorials
61

To store the active Loop:
1. Open the Advanced Panel.
2. Select the CUE page.
3. Click an empty Hotcue button to store the current Loop.
The Loop is stored on the Hotcue button. The Hotcue button lights up green. You can return
to the Loop by pressing the same Hotcue button again.
Besides using the Hotcue buttons you can alternatively use the STORE button in the CUE to store
loops in the CUE list.
9.2.6. Moving the Loop
You can also quickly move the current Loop across your track by using the MOVE page in the Advanced Panel:
1. Open the MOVE tab in the Advanced Panel.
2. Select Loop from the drop-down menu.
3. Select a Move Size from the MOVE Size Control bar.
4. Move the Loop forward or backward by clicking the Loop Move buttons (arrow buttons).
9.2.7. Moving Loop In Points and Loop Out Points
The Loop In and Loop out modes allow you to move the Loop In Point and the Loop out Point of
the enabled Loop. This will change the Loop size making it smaller or larger by a set amount when
the Cue Move BWD/FWD are used.
Moving only Loop In or Loop Out point can be used for tension-building drum roll effects with the active loop.
Advanced Usage Tutorials
62

Procedure
1. Select Loop In from the Move Mode menu.
2. Choose a move size in the Move Size Control bar.
3. Use the Cue Move BWD/FWD buttons to move the Loop In Point or by the chosen amount.
4. To move the Loop Out Point, repeat the aforementioned steps with selecting the Loop In
entry from the Move Mode menu.
• By using the LOOP Mode button, you select a move size that is based on the current Loop
size for the movement.
• By using FINE Mode button, you select a fine step size for the movement. The MOVE Size
Control bar automatically switches to FINE. Use xFNE to make even finer changes.
9.3. Working with FX Units
In this section you learn how to work with the FX Units. You learn to assign FX Units to Mixer
channels and to control individual Effect paramters in the FX Units. The FX units can be operated
in different modes and are freely configurable.
9.3.1. Assigning FX Units to Mixer Channels
Assigning FX Units to Mixer channels is straight forward
In order to assign an FX Unit to a Mixer channel:
• Click the FX Unit On button for the corresponding FX Unit in the Mixer channel.
The FX Unit is assigned and the FX Unit On button lights up orange.
Any FX Unit can be assigned to all Mixer channels simultaneously.
9.3.2. Using the FX Unit in Single FX Mode
In Single FX mode you get full control over all parameters of one effect:
Advanced Usage Tutorials
63
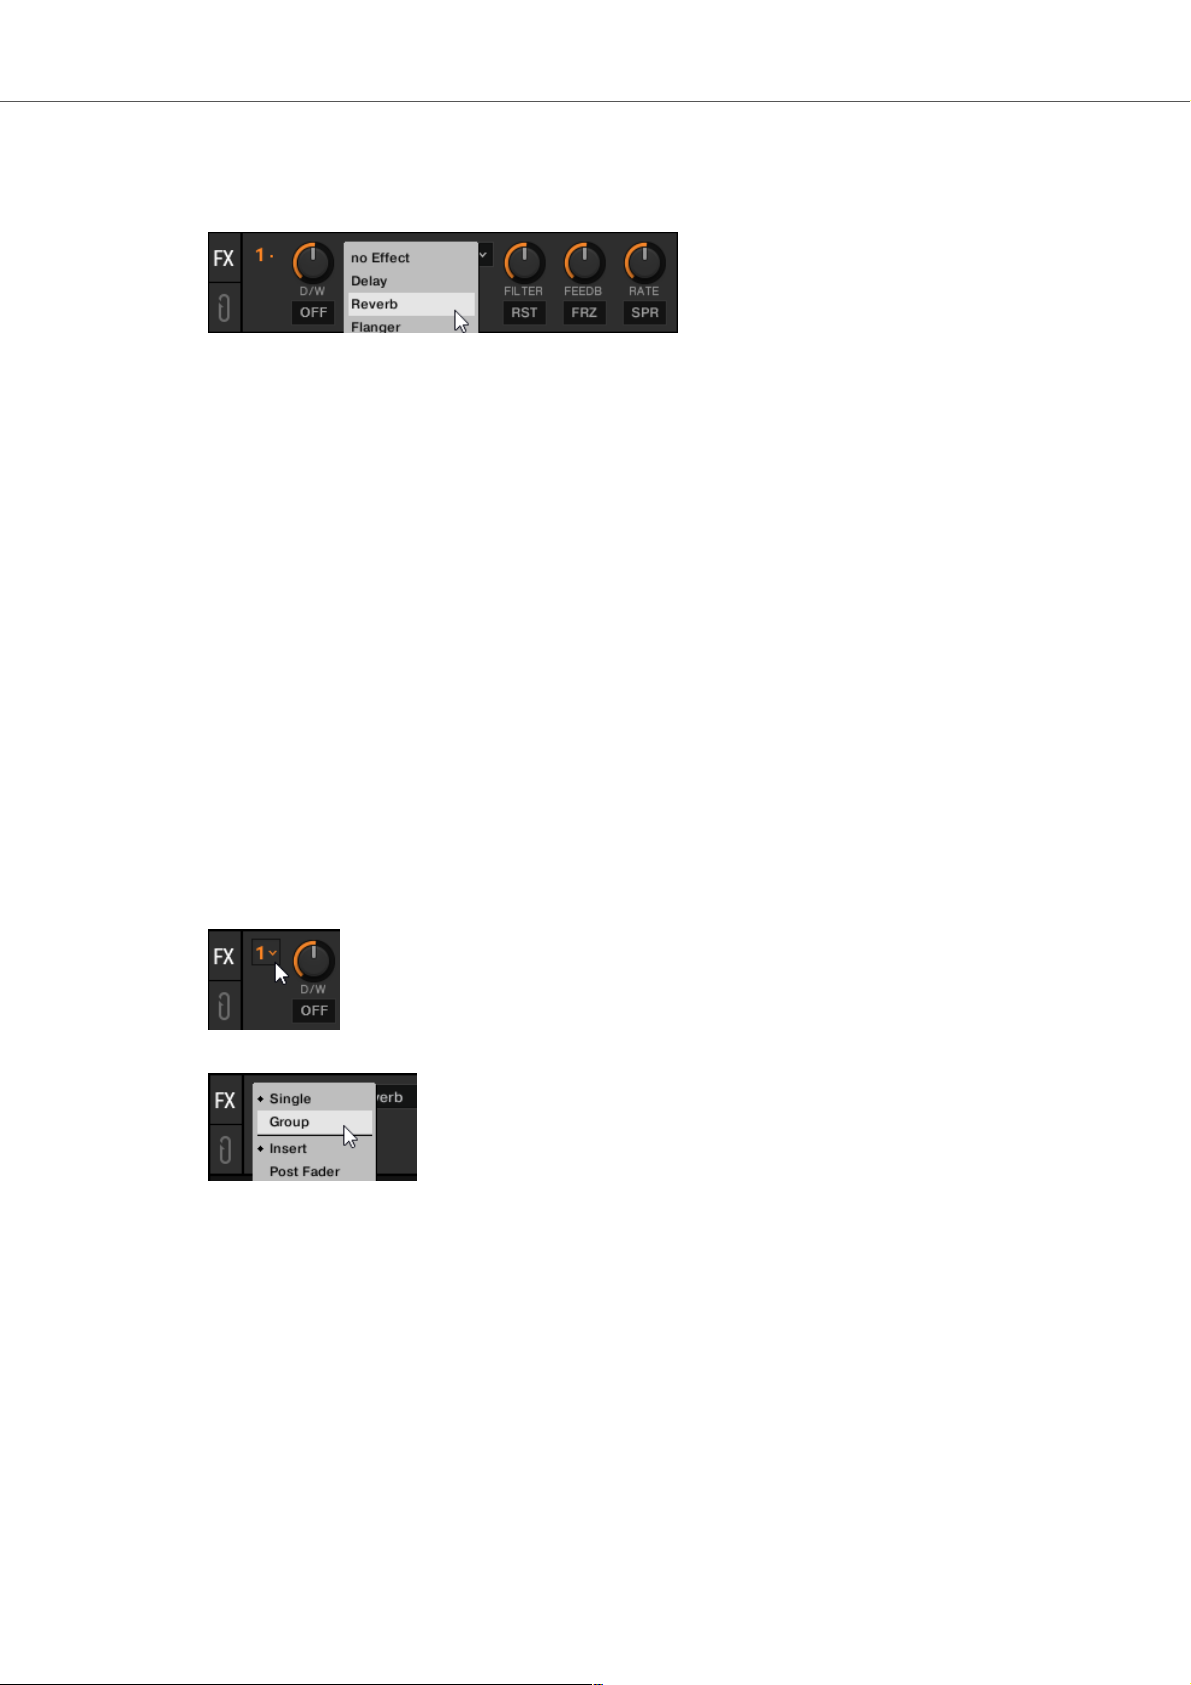
Selecting an Effect
• Select an effect in the Effect selector.
Modulate the Effect Behavior
• Modulate the behavior of the selected effect with the Effect Parameter knobs and Effect but-
tons.
Control the Mix between the Effect Signal and the Original Signal
1. Turn the D/W knob to control the direct-to-processed signal mix.
2. Switch the effect on and off by clicking the Effect On button.
Resetting the Parameter Settings
• Click the RST button to reset all effect settings inside the panel to the default value.
9.3.3. Switching between Single FX Mode and Goup FX Mode
In order to select Single FX mode or Group FX mode for an FX Unit:
1. Click the FX Unit number to open the context menu.
2. Select Group or Single.
The FX Unit switched to the selected FX mode.
An FX Unit in Single FX mode can be recognized on the single dot next to the FX Unit number. An
FX Unit in Group FX mode shows three dots.
9.3.4. Using FX Unit in Group FX Mode
In Group FX mode you can use and control up to three effects in one FX Unit:
Selecting Effects
• Select the effects you want to use in the Effect selectors.
Advanced Usage Tutorials
64

Switching Effects On and Off
• Switch on and off every effect in the effect chain with the three FX On buttons.
Controlling the Effect Amounts
• Control the effect amounts with the Effect Amount knobs.
Controlling the Mix of the Effect Signal and the Original Signal
• Turn the D/W knob to control the direct-to-processed signal mix for the eintire effect chain.
Resetting the Effect Settings
• Double-click an effect knob to reset the individual setting to the default value.
9.3.5. Saving a Snapshot of FX Parameter Settings
You can save the current parameter settings in the FX unit in a snapshot:
1. Click the FX Unit number to open the context menu.
2. While holding select Save Snapshot and release.
The parameter settings are saved. The next time you select the Effect in an FX Unit will set
the parameters to the saved settings.
9.4. Using the Cue Channel for Mixing
Any Mixer channel has the Cue button to send the audio signal to mixer the Headphones Cue
channel. This way you can prepare the transition to the next track, preview tracks, or preview effect behavior in a live situation. In order to use the Headphone Cue channel, you ideally use a
TRAKTOR KONTROL DJ controller providing the dedicated Headphone Cue channel. However,
you can also use an external audio interface with a monitor output channel and configure it in the
Preferences. For more information on, refer to Configuring TRAKTOR to Use with an External Au-
dio Interface [14].
To cue the next track in the Headphones Cue Channel:
1. Switch the TRAKTOR Layout to Mixer by selecting it from the Layout drop-down menu in the
header.
Advanced Usage Tutorials
65

The Headphone Cue controls and the Cue buttons on the Mixer channels are now displayed.
2. Click the Cue button on the Mixer channel with the audio signal you want to mix next.
The button lights up, indicating that the audio signal of the Mixer channel is sent to the Headphone Cue channel which you will hear in your headphones.
3. Turn the VOL knob to adjust the volume of the Headphones Cue channel to a moderate lis-
tening level.
4. Turn the MIX knob to adjust the balance between the cued track and the main mix in your
headphones. Turn it counter-clockwise when you want to concentrate on the cued track and
turn it clockwise when you want to hear more of the main mix.
9.5. Working with STEM Decks
In this section you learn how to load and play back a STEM file, how to adjust volumes and apply
FIlter FX on individual STEM parts in the STEM Decks.
STEM files allow you to interact with four different musical elements of a track independently while
DJing. The four STEM parts of a track can be modified individually to create spontaneous instrumentals, remixes, or mashups. You can create transitions between elements STEM-by-STEM, or
apply effects and EQ to just to a specific STEM part instead of the entire track. To get really creative, mix musical elements across multiple STEM Decks, for example, you could take the vocals
from one track and mix it with the beat from another.
9.5.1. About STEM Files
A STEM File is a track in the file format stem.mp4 that contains four audio tracks (STEM Parts).
Each STEM Part represents one of the key elements e.g. drums, percussions, synths, vocals, of
the entire track. By default when a STEM File is played back in TRAKTOR all STEM Parts are audible and summarize to an entire track.
STEM Files have to be Analyzed Before they can be Loaded
Due to the large amount of data that must be read from a STEM File, it is necessary that STEM
Files are analyzed before loading into a STEM Deck. It is not possible to load and play a STEM
File before it has been analyzed.
Advanced Usage Tutorials
66

For more information on how to analyze tracks or STEM files, refer to Section 11.12.2: Analyzing
Tracks Manually.
9.5.2. Loading a STEM File
To load a STEM File from the Track Collection:
1. In the Browser navigate to Track Collection > All Stems.
2. Select a STEM File from the Track List.
3. Drag and drop the STEM File into the desired Deck.
The Deck Type automatically switches to STEM Deck. The Waveform display shows the four
individual STEM Part Waveforms. The Stripe view shows the Waveform for the entire STEM
File.
9.5.3. Playing Back the STEM File
In order to play back a STEM File:
• Click on the Play button on the STEM Deck.
The STEM Deck plays back the STEM File similar to a track. The individual waveforms start
moving.
9.5.4. Adjusting STEM Parts Volumes
In order to adjust the volumes for the individual STEM Parts or take them completely out:
• Drag the Volume knob and turn it clockwise or anti-clockwise in any of the STEM Channels.
The volume of the musical element in the STEM Part decreases or increases accordingly.
Resetting STEM Part Volumes
In order to reset STEM Part volumes:
Advanced Usage Tutorials
67

• Double-click the respective volume knob.
The volume is set back to default.
9.5.5. Applying Filter FX to STEM Parts
In order to apply a Filter effect to key elements of the music:
1. In any Stem Channel, click the Filter button to activate the Filter effect.
2. Drag the respective Filter knob and turn it clockwise or anti-clockwise to change the Filter
amount.
You hear a high-pass or a low-pass filter applied to the key elements of the music.
Resetting Filter FX in STEM Parts
In order to reset Filter FX:
• Double-click the respective Filter knob.
The parameter is set back to default.
9.5.6. Applying FX Send to STEM Parts
In order to apply FX Send to key elements of the music:
1. In any STEM Channel, click the FX Send on button to apply the FX Send.
2. Drag the respective FX Send knob and turn it clockwise or anti-clockwise to change the FIL-
TER amount.
You will hear a high-pass or a low-pass filter applied to the key element of the music.
Resetting FX Send Parameters in STEM Parts
In order to reset Filter adjustments:
• Double-click the respective Filter knob.
The FX Send parameter is set back to default.
Advanced Usage Tutorials
68

9.6. Working with Remix Decks
With Remix Decks you can load collections of Samples (Remix Sets) and trigger the individual
Samples to add them to your mix. As with Track Decks and Stem Decks, Remix Decks can be
synchronized to the Tempo Master ensuring the Samples always play in sync with other tracks.
You can also create your own Remix Sets by directly capturing Samples from tracks in Track
Decks or from the LOOP RECORDER, and saving them in your Track Collection. For more information on creating new Remix Sets, refer to Section 9.7: Creating Remix Sets.
9.6.1. About Remix Sets
A Remix set is a collection of Samples to be loaded into a Remix Deck at once. A Remix Set can
contain up to 64 Samples organized in the Sample Grid. The Sample Grid consists of four Columns containing 16 Sample Cells each. When a Remix Set is loaded into a Remix Deck, the first
16 Samples are visible in the four Sample Slots, 4 Samples per Sample Slot.
9.6.2. Loading Remix Sets
To load a Remix Set from your Track Collection:
1. Select the Folder All Remix Sets in the Browser Tree to display all Remix Sets in the Track
List.
2. Drag the Remix Set to your liking and drop it in any Deck.
The Deck loads the Remix Set and switches the Deck Type to Remix Deck.
9.6.3. Enabling and Adjusting the Remix Deck's Quantize
Mode
The Remix Deck provides an internal Quantize mode in order to let the Samples trigger at the right
beat in the internal timeline. The Quantize value can be determined in the Deck Tempo display in
the Deck Header:
To enable Quantize mode for the Remix Deck:
1. Click gray dot to enable Quantize mode for the Remix Deck.
Advanced Usage Tutorials
69

The dot lights up blue, indicating Quantize mode is enabled for the Remix Deck.
2. Click on the triangle next to the blue dot to open the Quantize value menu.
3. Select the Quantize value at which you want the Samples to trigger, i.e. 1 (one beat).
The Quantize mode is enabled and the Quantize value is set for the Remix Deck. The Samples will now trigger always to the downbeat.
9.6.4. Triggering Samples
In order to trigger Samples in Sample Cells, proceed as follows:
1. Click the Play button on the Remix Deck.
The Remix Deck starts playing and is ready for triggering Samples. The Beat counter starts
counting the beats according the internal timeline of the Remix Deck.
2. Click the Sample Trigger buttons in the Sample Cells in each Sample Slot one by one.
The Sample Trigger buttons flash until the next down beat (Quantize value set to 1 beat) of
its internal timeline is reached, and then starts playing. The playheads move in the Slot Players.
3. Anytime, trigger other Samples in the Sample Slots, by clicking its Sample Trigger buttons in
the Sample Cells.
The Sample Trigger buttons flash until the next down beat is reached, and then starts playing. The former Samples stop playback immediately.
Stopping Samples
To stop the Samples and reset the playheads to start positions:
Advanced Usage Tutorials
70

• Hold [Shift] + click the individual Sample Trigger button.
The Sample stops playback according to the setting of the Quantize value.
9.6.5. Switching Sample Grid Pages
The Sample Grid can contain up to 64 Samples over four pages with 16 Samples each.
To scroll through the Sample Grid pages:
• Click the Page Selector to switch to the individual page on the Sample Grid.
9.6.6. Adjusting the Volume and Muting Sample Slots
The Volume level of any Sample Slot can be adjusted and muted individually:
Adjusting Sample Slot Volume
• Drag the Volume fader up or down.
Resetting Sample Slot Volume
• Double-click the Volume fader.
Muting Sample Slots
• Hover the mouse over the Slot Player.
9.6.7. Applying Filter Effects the Sample Slots
Any Sample Slot contains a Filter control for applying a high-pass or low-pass filter immediately:
• Drag the Filter control up or down to apply a high-pass or low-pass Filter Effect to the Sam-
ple Slot.
Advanced Usage Tutorials
71

Resetting the Filter
To reset the Filter:
• Double-click the Filter control.
9.6.8. Locking Key for Sample Slots
When adjusting the Remix Deck's tempo or syncing the Remix Deck to the Tempo Master, you can
prevent the Sample changing their pitch by locking the key for the individual Sample Slots:
1. Hover the mouse over the Slot Player.
Additional Slot parameters appear.
2. Click on the Slot Keylock control to lock the key for the Sample Slot.
When now changing the Remix Deck's tempo, the key of the Samples in the Sample Slot remains.
9.6.9. Sending Sample Slots to FX Units
Using the FX Unit(s) assigned to the Remix Deck's Mixer channel has no effect by default. In order
to use the FX Units the Sample Slots need to be send to the FX Units individually.
1. Hover the mouse over the Slot Player.
Additional Slot parameters appear.
2. Click on the Slot FX enable control to send the Sample slot to the FX Unit(s) assigned to the
Mixer channel.
When now adjusting the parameters in the FX Unit(s), the sound of the Sample Slot gets
modulated accordingly.
Advanced Usage Tutorials
72

9.6.10. Routing Sample Slots into the Headphones Cue
Channel
To route individual Sample Slots into the Headphone Cue channel:
1. Hover the mouse over the Slot Player.
Additional Slot parameters appear.
2. Click on the Slot Monitor control to route the Sample Slot to the Headphone Cue channel.
When now changing the Remix Deck's tempo, the key of the Samples in the Sample Slot do
not change.
9.6.11. Enabling Punch Mode for the Sample Slot
When triggering another Sample in the Sample Slot, the new Sample starts playback from its start
position, independently from the playhead position of the previous Sample. When Punch mode is
enabled for the Sample Slot, the triggered Sample will start the playback from the playhead position of the previous Sample.
To enable Slot Punch Mode:
1. Hover the mouse over the Slot Player.
Additional Slot parameters appear.
2. Click on the Slot Punch Mode button to enable Slot Punch mode for the Sample Slot.
When now triggering another Sample in the Sample Slot, the triggered Sample will start the
playback from the playhead position of the previous Sample.
9.7. Creating Remix Sets
In this section you learn to create Remix Sets using the Remix Deck. You learn to capture Samples from different sources and to make further refinements and adjustments for the Samples.
When your edits are final, you save the Remix Set into your Track Collection.
Advanced Usage Tutorials
73

9.7.1. Importing Samples to the Track Collection
When Importing tracks into the Track Collection TRAKTOR recognizes tracks shorter than 10 seconds and categorizes them as Samples. You can find the Samples in the All Samples subfolder in
the Track Collection.
9.7.2. Creating an empty Remix Set
Before you can load Samples into a Remix Deck, you need to create an empty Remix set. This is
done by assigning a Deck to a Remix Deck:
1. Click on the Deck Focus to open the context menu.
2. Select Remix Deck.
The Deck is switched to the Deck Flavor Remix Deck. The Remix Deck is empty. You can
now load or capture Samples into the Sample Cells.
9.7.3. Loading Samples into Samples Cells
You can load Samples into Sample Cells directly from TRAKTOR’s Track Collection:
1. In the Browser Tree select the folder All Samples to display all samples in your Track Col-
lection.
2. Drag a Sample from the Track list and drop it into any Sample Cell in the Sample Slot.
The Sample is now loaded and ready to play.
3. To load more Samples to Sample Cells, repeat the aforementioned steps.
When a Sample Cell already contains a Sample, loading another Sample to the Sample Cell replaces the Sample.
9.7.4. Capturing Samples from Tracks
You can capture Samples directly from Track Decks on the fly:
1. Activate SNAP mode in the Master Control panel.
2. Load and Playback a track in a Track Deck.
3. Activate a Loop with the desired size at the playback position to your liking.
4. Drag the track title in the Track Deck Header and drop into a Sample Cell in the Remix Deck.
The Loop is copied as a Sample in the Sample Cell.
If the Track Deck you captured from was not playing a Loop, the Remix Deck will still capture a
Sample from it, but it will instead take it from the current playback position. The Sample will automatically be cut to the length of the selected Loop size in the Loop control bar in the Track Deck.
9.7.5. Changing Sample Colors
When loading or capturing Samples, TRAKTOR randomly assigns a color to the Samples. However, you can change the color of Samples in Sample Cells to your liking:
Advanced Usage Tutorials
74

1. Right-click the Sample Trigger button to display the 16 color palette.
2. Select the desired color.
The Sample color is changed.
9.7.6. Adjusting Sample Parameter Settings
This section introduces you to the several parameter settings for adjusting your Samples in your
Remix Set.
Defining Sample Cells Playback Behavior
The following options let you define how the sample plays back hen it is triggered:
1. Click the Sample Play Type button to define the Sample to be played back as Loop or One-
shot.
2. Click the Reverse mode button, if you want the Sample to be played back reversely.
3. Click the Samples Sync mode button to let the Sample to be played backe in sync to the Re-
mix Deck.
4. Click the Sample Trigger Type button to let the Sample be played back either until its end or
only as long as you keep the Sample Trigger button clicked.
When enabled (Latch mode), a Sample will continue to play after you release the mouse button, either until the end of the Sample is reached (for One-shot Samples) or until it is stopped
by some other method (like triggering a new Sample in the same Slot). Latch mode is enabled by default.
When disabled (Gate mode), a Sample will play only while you are keeping the mouse button
depressed. Upon releasing the mouse button, the Sample will stop playing immediately.
Adjusting Sample Gain and Pitch
As recorded or captured Samples can have different recording levels, it can be mandatory to adjust the GAIN level for individual Samples in the Remix Set.
1. Click the name of the Sample you want to edit.
2. Drag the Sample GAIN knob to adjust the GAIN level to your liking.
Advanced Usage Tutorials
75

As recorded or captured Samples can have different pitches and might not suit to other Samples in
the Remix Set, it can be mandatory to adjust the pitch for individual Samples:
1. Click the name of the Sample you want to edit.
2. Drag the Sample Pitch knob to adjust the pitch to your liking.
Adjusting Sample Base Tempo
As recorded or captured Samples can have different base tempos, it can be mandatory to adjust
the base tempo for individual Samples in the Remix Set.
1. Click the name of the Sample you want to edit.
2. Click in the Sample Tempo display and enter the desired tempo in BPM.
You can halve or double the current tempo using the x2 or /2 buttons to adjust the base tempo
accordingly.
Correcting Sample Beatgrid
As the Beatgrid of recorded or captured Samples might not be calculated correctly, it can be mandatory to correct the Beatgrid for individual Samples in the Remix Set.
1. Click the name of the Sample you want to edit.
2. Use the Move Grid Left and Move Grid Right buttons to moves the Samples Beatgrid to the
left or to the right.
3. Use the BPM Decrease and BPM Increase buttons to make minor corrections to the base
tempo.
As a result the Beatgrid gets expanded or compressed.
9.7.7. Saving a Remix Set
1. Double-click the current title New Remix Set in the Deck Header to enable renaming.
Advanced Usage Tutorials
76

2. Type in a new name for the Remix Set.
3. In the Browser Tree select the folder All Remix Sets to display all Remix Sets in the Track
List.
4. Click and hold the Remix Set title in the Deck Header and drag it down into the Track List.
The Remix Set is saved and stored in the Track Collection. Additionally, all contained Samples are stored as individual Samples in the All Samples folder.
9.7.8. Exporting Remix Sets
To export Remix Sets:
1. Expand the Track Collection folder in the Browser Tree.
2. Select the All Remix Sets folder to display its Remix Sets in the Track List.
3. Right-click the Remix set you want to export to open the context menu.
4. Select Export Remix Set.
5. In the dialog navigate to the destination you want to export to.
6. Confirm.
TRAKTOR now exports the Remix Set.
9.8. Correcting Beatgrids
When TRAKTOR calculates the track tempo it also creates the Beatgrid for the track. However,
when a track contains a complex rhythm or an uneven timing it can happen the Beatgrid does not
match precisely.
Incorrect beatgrid.
To correct mismatching Beatgrids, TRAKTOR provides you with the tools to do so:
Step 1 - Opening the GRID page
1. Load the track with the mismatching Beatgrid into a Deck.
2. Click Play to start playback.
3. On the Deck click the Advanced Panel button to open the Advanced Panel.
4. Click on GRID to select the GRID page.
Advanced Usage Tutorials
77

Step 2 - Enabling Beat Tick
• Click the Beat Tick button to enable the beat tick for the Deck.
You now hear a constant tick on every beat of the calculated tempo and Beatgrid. If the Beatgrid is incorrect, you notice the beat tick is off the track's beat.
Step 3 - Correcting the Beatgrid
You can now correct the Beatgrid by using the following buttons:
1. Click the MOVE GRID BWD and MOVE GRID FWD buttons to move the Beatgrid backward
or forward.
2. Click the BPM INC or BPM DEC buttons to compress or enlarge the beatgrid slighty.
These buttons change the tempo value accordingly.
Alternative Step - Creating a new Beatgrid
If the aforementioned steps do not lead to the expected results you can also create a new Beatgrid
manually:
1. Click the Delete Beatgrid marker button to delete the current Beatgrid.
2. Skip to a beat in the track.
3. Click the Set Beatgrid marker button to set a Beatgrid marker at that position.
Advanced Usage Tutorials
78

Outgoing from that position a new Beatgrid is created throughout the track according to the
base tempo.
You can also define a new base tempo by either tapping in the Tempo using the TAP button or by
entering the tempo in the tempo edit display.
Advanced Usage Tutorials
79

10. WORKING WITH PLAYLISTS
In this section you learn about Playlists and how work with them. Playlists are effective tools of
organizing your tracks for different purposes. Generally, a Playlist is a collection of tracks to be
used for preparing for DJ sets.
• One track can be contained in multiple Playlists.
• A Playlist can be re-ordered or reset to the original state rapidly.
• Additional functions are saving, loading and exporting Playlists.
10.1. Creating Playlists
To create a new Playlist you either do it in the Browser Tree or directly of selected tracks:
Creating a New Playlist in the Browser Tree
1. Right-click the Playlists folder in the Browser Tree.
2. Select Create Playlist from the context menu.
3. Type a name for your new Playlist in the dialog.
4. Click OK to confirm.
Your new Playlist appears under the Playlists folder.
Creating a New Playlist from Selected Tracks
1. Select one or more tracks in the Browser List.
2. Drag these tracks onto the Playlists folder in the Browser Tree.
3. Type a name for your Playlist in the dialog.
4. Click OK to confirm.
Your new Playlist appears under the Playlists folder.
10.2. Adding Tracks to Playlists
1. Click and hold the track(s) in the Track List.
2. Drag the selection onto any Playlist in the Browser Tree.
The tracks are added to the Playlist. New tracks will be added at the last position in the Playlist.
Additionally, you can directly add the tracks at the desired position inside the Playlist by moving
the mouse over to the Track List and dropping it at the position to your liking. The orange line indicates where the track(s) will be inserted when releasing the mouse button.
10.3. Sorting Tracks in Playlists
There are several ways to sort tracks in Playlists:
Working with Playlists
80

Sorting Tracks by Original Order
• Click on the header of the #-column to sort the Playlist by original track order.
Sorting Tracks by Category
• Click on the name of the column header to sort the Playlist by this category. A second
click inverts the sorting order.
After restarting TRAKTOR all Playlists will reset to their original Track order.
Consolidating a Categorized Track Sorting
To make a categorized Track sorting permanent:
1. Right-click the Playlist in the Browser Tree to open the context menu.
2. Select the option Consolidate.
Changing the Original Track Sorting Order
This is only possible when the Tracks are sorted in original order:
1. Click on the header of the #-column to sort the Playlist by original track order.
2. Select one or more track(s) and drag them up or down in the Playlist. The orange line indi-
cates where the selection will drop when releasing the mouse button.
10.4. Organizing Playlists in Folders
You have the option to further organize your Playlists by creating Playlist folders:
1. Right-click on the Playlist folder in the Browser Tree to open the context menu.
2. Select Create Folder.
3. Type in the name for the Playlist folder in the dialog.
4. Click OK to confirm.
Your new Playlist folder will appear under the Playlist folder. You can now add Playlists to
this folder via drag-and-drop.
10.5. Exporting Playlists
You can export your Playlists including the tracks to import and playing them on other computers
with TRAKTOR. Exporting a Playlist creates a folder containing the tracks in the Playlist as well as
the Playlist file.
To export a Playlist:
1. Right-click the Playlist in the Browser Tree to open the context menu.
2. Select Export Playlist.
3. Enter a name for the Playlist to be exported in the dialog.
4. Enter a destination path.
Working with Playlists
81

5. Click OK to confirm.
TRAKTOR now exports the Playlist including the tracks to the destination on your computer.
10.6. Importing Playlists
Importing Playlists including tracks on another computer with TRAKTOR can be done in several
ways.
Importing Playlists using the Context Menu
1. Right-click on the Playlists folder or a Playlist sub-folder in the Browser Tree to open the
context menu.
2. Select Import Playlist.
The Playlist and all contained tracks will be added to your Track Collection.
Importing Playlists using Drag and Drop
1. Locate the Playlist file (*.nml) on your computer.
2. Drag-and-drop the Playlist file onto the Playlists folder in the Browser Tree or onto a Playlist
folder you have created.
The Playlist and all contained tracks will be added to your Track Collection.
10.7. Importing iTunes Playlists
You can directly import iTunes Playlists into your TRAKTOR Playlists folder:
1. Double-click the iTunes folder in the Browser Tree to display the iTunes Playlists.
2. Right-click a Playlist to open the context menu.
3. Select Import to Playlists.
4. In the dialog enter the name for the new Playlist.
5. Click OK to confirm.
10.8. Using Preparation Playlist
The Preparation Playlists is used to prepare your next mix. When adding tracks to the Preparation
Playlist, they show a diamond icon in the first column in the Track List. Any existing Playlist can be
used as the Preparation Playlist.
Selecting a Playlist as the Preparation Playlist
1. Right-click a Playlist in the Browser Tree to open the context menu.
2. Select Select as Preparation List.
The Playlist icon changes to the Preparation Playlist icon.
Appending Tracks to the Preparation Playlist
1. Right-click any track(s) in the Track List to open the context menu.
Working with Playlists
82

2. Select Append to Preparation Playlist to add the selection to the Preparation Playlist.
3. Alternatively, select Add as Next to Preparation Playlist to insert the selection after the last
loaded track into the Preparation Playlist.
Each track is displayed with a diamond icon indicating it appends the Preparation Playlist.
10.9. History Playlists
It can be useful to have a record of which tracks were played in a specific session. TRAKTOR automatically lists the tracks you have played in the History Playlist which will be stored in a History Playlist file when TRAKTOR gets closed. When opening TRAKTOR again the History Playlist in
the Browser Tree is cleared.
You can then find all History Playlists labeled with date and time in the Explorer > Archive folder
in the Browser Tree.
History Playlist Storage Location on your Computer
You can find the History Playlists labeled with date and time also in the following location on your
computer:
• Windows: My Documents\Native Instruments\Traktor\History
• macOS: Users/~/Native Instruments/Traktor/History
10.10. Track Status Icons in the Track List
When loading and playing tracks, TRAKTOR records the status of the individual tracks in the icon
column in the Track List:
• Deck Letters A, B, C and D: Identify the tracks currently loaded into the Decks.
• Check mark: Identifies tracks that have already been played.
• Exclamation mark: Identifies tracks which are not found at the file’s previous location. Some
possible reasons for this could be that a storage medium is unavailable (external hard drive for
example), the location of the track has been changed or the track has been renamed.
• Lock icon: Identifies tracks with a locked Beatgrid.
• Triangle(only available in the History and Archive folders): Identifies tracks that have already
been played. Tracks that have been previewed will not be marked.
Sorting the Track List by Track Status
When sorting the Track List by Track Status, the Tracks are listed by the following order:
• Already played tracks on top.
• Currently playing tracks in the center.
• Unplayed tracks below.
• Missing tracks at the bottom.
10.11. Playlist Maintenance
To maintain you Playlists TRAKTOR provides you with several functions and commands to do so.
Working with Playlists
83

10.11.1. Renaming a Playlist
To rename a Playlist:
1. Right-click the Playlist in the Browser Tree to open the context menu.
2. Select Rename.
3. Enter the new name for the Playlist.
10.11.2. Removing Tracks from Playlists
To remove tracks from a Playlist:
1. Right-click the track(s) in the Playlist to open the context menu.
2. Select Delete.
The track is removed.
10.11.3. Restore Auto GAIN value
If you changed the GAIN values for tracks in the Playlist you can restore them to the Auto GAIN
values:
1. Right-click the track(s) in the Track List of the Playlist to open the context menu.
2. Select Restore AutoGain.
The GAIN value is restored to original.
10.11.4. Resetting Played State of Tracks
To reset the status of played tracks in your Playlist:
1. Right-click the track in the Playlist to open the context menu.
2. Select Reset Played State.
The play count and the status are reset.
10.11.5. Deleting Playlists
To delete a Playlist from th Browser Tree:
1. Right-click the Playlist in the Browser Tree to open the context menu.
2. Select Delete Playlist.
The Playlist is deleted.
10.11.6. Removing Duplicates from Playlists
To remove tracks which are more than one time in your Playlist:
1. Right-click the Playlist in the Browser Tree to open the context menu.
2. Select Remove Duplicates.
All double entries in the Playlist are removed.
Working with Playlists
84

10.11.7. Saving Playlists as Webpage File
You can save a Playlist to a webpage file (HTML file) which allows you to create an overview of the
running order of tracks.
1. Right-click the Playlist in the Browser Tree to open the context menu.
2. Select Save as Webpage.
3. Enter a name for the Playlist.
4. Enter a destination for the exported file.
5. From the List Options select the columns you want to add to the Playlist file.
6. Click OK to confirm.
The Playlist is saved as HTML file.
10.11.8. Search Tracks in Playlists
To find out if tracks are already added to a Playlist:
1. Right-click the track(s) in the Track List to open the context menu.
2. Select Search in Playlists.
TRAKTOR now searches for the selected track(s) and returns with a report showing all Playlists containing the selected track(s).
10.11.9. Clearing Playlists
To clear a Playlist from all tracks:
1. Right-click the Playlist in the Browser Tree to open the context menu.
2. Select Clear Playlist.
All tracks are removed from the selected Playlist.
Working with Playlists
85

11. MANAGING YOUR TRACK COLLECTION
In this section you learn how to manage your Track Collection.
11.1. About the Track Collection
The Track Collection represents all the music you use in TRAKTOR. With the Track Collection you
can organize, tag, and prepare your tracks for being played as part of your mix.
A benefit of the Track Collection is that reads the metadata of the tracks, like track title, artist
name, tempo, genre, key etc. It also stores TRAKTOR-specific information about your tracks.
11.2. Compatible Audio File Formats
TRAKTOR supports the following music file formats:
• MP3
• M4A (AAC)
•WAV
• AIFF
• FLAC
• OGG Vorbis
DRM-protected music files cannot be played back in TRAKTOR. This affects for example AAC-tracks bought in the iTunes store.
WMA files are not supported in TRAKTOR.
To use M4A files in TRAKTOR you have to install QuickTime.
11.3. Importing Music Files from the Local Music Folder
You can import the music contained in the local music folder of your operating system:
1. Right-click the Track Collection folder in the Browser Tree to open the context menu.
2. Select Import Music Folders.
Managing Your Track Collection
86

TRAKTOR now imports the music files from the local music folder.
11.4. Adding Music from Other Folders
If you have stored tracks in other folders or on external storage devices, you can add these folders
to the list of TRAKTOR Music Folders as follows:
1. Open the File Management page in the Preferences.
2. Under Music Folders click Add…
3. In the dialog navigate to a folder you want to add.
4. Confirm your selection.
5. Repeat to add all of your music folders.
6. Click Close to apply the changes.
When now selecting the folder Music Folders in the Explorer folder in the Browser Tree,
TRAKTOR scans the respective folders and update the Track List accordingly. Subfolders
are automatically included in the scan. Hence, you don’t need to add them to this list.
11.5. Importing iTunes Tracks into Your Track Collection
You can import tracks from your iTunes Library into the Track Collection:
1. Select the iTunes folder in the Browser Tree to display its content in the Track List. A double-
click expands the folder in the Browser Tree.
2. Select the track(s) you want to import into the Track Collection.
3. Right-click on the selection to open the context menu.
4. Hover the mouse over Import to Collection to display further importing options.
5. Select either as Tracks, as Looped Samples, or as One-Shot-Samples to load the selec-
tion into the Track Collection accordingly.
11.6. Importing Remix Sets
To import Remix Sets into your Track Collection:
1. Expand the Track Collection folder in the Browser Tree.
2. Select the All Remix Sets folder.
3. Drag the Remix Sets (*.trak) file on your computer and drag it into the Track List.
The new Remix Sets are now added and appear in the Track List.
11.7. Show Tracks on Your Local Drive
To open the destination of tracks stored on your local drive:
1. Right-click the track(s) in the Track List to open the context menu.
2. Select Show in Explorer/Finder.
Your operating system opens a dialog with track stored on your local drive.
Managing Your Track Collection
87

11.8. Editing Track Metadata in the Track List
Each track in your Collection can contain track metadata properties such as track title, artist name,
album name, cover artwork, etc. TRAKTOR gives you the option to edit these metadata properties
in two ways.
If you are using iTunes for collection management we recommend that you only edit
tag metadata in iTunes.
1. Select a track in the Track List to highlight it.
2. Click in the property field with the metadata information you want to edit, e.g. the artist name.
A cursor appears in the property field.
3. Edit the artist's name.
4. If you want to edit further property fields, repeat the aforementioned steps.
5. Press the Enter key on your keyboard to exit Inline Editing mode and confirm your entries, or
press the Esc key to abort editing.
11.9. Editing Track Metadata using the Edit Dialog
Not all properties of a track are visible in the Browser List. To get access to all available properties
of a track, use the Edit Dialog. This dialog allows simultaneous editing of a selection of tracks.
Edit dialog Overview
The dialog contains the following elements:
Edit dialog.
Editing a Single Track
Select a track in the Track List.
1. Right-lick a track to open the context menu.
Managing Your Track Collection
88

2. Select Edit.
The Track List turns into the Edit dialog.
3. Edit the individual information for your track.
4. Use the drop-down menu in any track property field to select a previously stored tag from
your Track Collection.
5. To apply the changes, click the button labeled Apply or OK. Use the Restore button to undo
any changes you have made, or use Cancel to abort editing and to close the Edit dialog.
Editing a Selection of Tracks
If you want to edit a selection of tracks (e.g., all tracks of an album),
1. Select the tracks in the Track List.
2. Right-click to open the context menu.
3. Select Edit to open the Edit dialog.
The Edit dialog appears. Checked checkboxes indicate which of the attributes share the
same value across the selected tracks. The checks also indicate that anything written into
the related field will be saved to the metadata tag upon applying changes. Unchecked checkboxes indicate the the tracks do not have identical values for this field.
4. To change an attribute globally for all selected tracks, make sure that the box is checked.
5. To edit your selected tracks one by one, use the Previous and Next buttons at the bottom of
the dialog.
6. To apply the changes, click the button labeled Apply or OK.
Use the Restore button to undo any changes you have made, or use Cancel to abort editing and
to close the Edit dialog.
11.10. Editing Track Cover Artwork
TRAKTOR allows you to either import or delete .jpeg cover artwork for tracks in your track collection.
Importing Cover Artworks
To import or replace Cover Artwork for tracks:
1. Right-click a track or several tracks in the Track List to open the context menu.
2. Select Import Cover.
3. In the dialog select the cover artwork file on your computer and confirm.
The cover artwork is now stored within the track file(s).
Deleting Cover Artworks
To delete Cover Artwork from tracks:
1. Right-click a track or several tracks in the Track List to open the context menu.
2. Select Delete Cover.
The cover artwork(s) are deleted for the track(s).
Managing Your Track Collection
89

11.11. Assigning Playlists and Folders to the Favorites
The Favorites area is the navigational tool located at the top of the Browser.
Pre-assigned Favorites
• Preparation
• History
• Track Collection
• All Tracks
• All Remix Sets
• Demo Tracks
• Demo Remix Sets
Assigning Folders and Playlists to the Favorites
You can assign any folder or any Playlists in the Browser Tree to the favorites:
• Drag the folder or Playlist name from the Browser Tree and drop is onto a free (not assigned)
Favorite slot.
Now you can access the Playlist quickly by clicking on the relevant Favorite.
11.12. Track Collection Maintenance
In this section you learn to maintain your Track Collection in terms of consistency and security
backups. There are many things to keep track of such as removing obsolete tracks or relocating
tracks that have been moved to another folder on your local drive, etc. These maintenance processes can be time consuming, so we recommend to not perform these tasks during live situations.
11.12.1. Checking Consistency of your Track Collection
Importing tracks without analysis, reorganization of local music folders, and deleting tracks from
from local music folders lead to an inconsistent Track Collection. To keep track of your changes
you can execute a Consistency Check on your Track Collection and get a detailed result in the
Consistency Check Report. Furthermore, you can then directly
The Consistency Check Report Dialog
The Consistency Check Report provides an overview of your Track Collection and provides options for immediately solving problems.
Managing Your Track Collection
90

Consistency Check Report dialog.
• Tabs: Selects the individual tab with detailed information about the Consistency Check Report.
• Relocate button: Opens the Relocate dialog to start relocation of missing tracks. For more information on, refer to...
• Remove Missing button: Removes references to not existing tracks from the Track Collection.
• Analyse button: Starts analysis of tracks to be analyzed or to be re-analyzed, respectively.
• Lists all missing tracks in the Track Collection.
• Lists all tracks in the Track Collection that need to be analyzed or re-analyzed, respectively.
Show Overview Tab
• Total Tracks: The total number of tracks in your Track Collection.
• Tracks Missing: The total number of tracks that have been deleted from your hard drive or
moved from their original location.
• Tracks Not Analyzed: The total number of tracks that have not been analyzed.
• Tracks Missing Stripe: The total number of tracks that have been imported and analyzed but
their Stripe view information has been moved or deleted.
• Total Tracks To Analyze: The total number of tracks that need to be analyzed or re-analyzed,
respectively.
• Lists all missing tracks in the Track Collection.
Missing Tracks Tab
• Lists all missing tracks in the Track Collection.
Tracks to Analyze Tab
• Lists all tracks in the Track Collection that need to be analyzed or re-analyzed, respectively.
Managing Your Track Collection
91

Executing Consistency Check
1. Right-click the Track Collection folder in the Browser Tree to open the context menu.
2. Select Check Consistency to execute it.
Once TRAKTOR has run the check, the Consistency Check Report will appear showing the
results.
Executing Consistency Check on TRAKTOR Startup
To execute the Consistency Check and show its Report when starting TRAKTOR:
1. Open the File Management page in the Preferences.
2. Check the box labeled Show Consistency Check Report on Startup.
3. Close the Preferences.
The Consistency Check will now be executed each time you start TRAKTOR.
Executing the Consistency Check on startup can increase TRAKTOR’s startup time.
11.12.2. Analyzing Tracks Manually
In a live situation, analyzing tracks or even collections of tracks can be very time consuming when
importing them into the Track Collection or when loading tracks into Decks. The moment for the
analysis can be determined on the File Management page in the Preferences. You can also
switch it off entirely. In this case, you can analyze your Tracks manually when not in a live situation.
STEM files always need to be analyzed before loading them into a Deck.
Executing the Analysis
1. Right-click a track or a selection of tracks in the Track List to open the context menu. You
can also right-click a Playlist in the Browser tree.
2. Select Analyze (Async).
The Analyze dialog opens.
3. Select the options for the analysis.
4. Click OK to start the analysis.
Analysis Dialog Options
The dialog box provides two options:
Managing Your Track Collection
92

• All: When selected, this analyzes tracks according to the default settings selected in Analyze
Options page in the Preferences.
For locked tracks the All option does not permit the BPM, Beatgrid markers,
Gain, or Key to be overwritten.
• Special: When selected, you are provided with a more detailed range of analysis settings that
can be performed on tracks:
• BPM: When selected TRAKTOR analyzes the track to calculate the tempo. In the drop-
down menu below you can pre-define the tempo range you want TRAKTOR to analyze.
In case you are analyzing a large number of tracks with very different tempos,
select either a wide range or leave it to automatic. However, narrowing down
the tempo range will provide more accurate results.
• Set Beatgrid: Sets the Beatgrid on the track and aligns it to the nearest downbeat. If the
track already contains a Beatgrid, TRAKTOR will move it accordingly.
Beatgrids cannot be set without checking the BPM, as the two options are interlinked.
• Key: Detects the track’s Key.
• Gain: Removes the current Gain values of the selected tracks, and replace them with an AutoGain value during Analysis.
• Replace Locked Values: Momentarily unlocks tracks for letting the options selected above apply to locked tracks as well.
• Parallel Processing: Enables parallel analysis of tracks.
This option increases CPU load and should be be used in live situation.
11.12.3. Relocating Missing Tracks
If you have restructured a music folder on your local drive, the references to the contained tracks
in the Track Collection lead to missing tracks. This can be corrected by relocating the missing
tracks:
1. Right-click the track(s) in the Track List to open the context menu.
2. Select Relocate.
Managing Your Track Collection
93

3. In the browse dialog navigate to the destination where your missing track have been
moved. To find multiple tracks in different folders, navigate to the top-level folder where they
are stored. You can even select your main hard drive folder.
4. Confirm your edits.
The track is now relocated.
11.12.4. Deleting Tracks from the Track Collection
To delete tracks from your Track Collection:
1. Right-click the track(s) in the Track List to open the context menu.
2. Select Delete from Collection.
3. From the security dialog select one of the following options:
• delete from collection: Deletes the track(s) from the Track Collection and from all Play-
lists.
• additionally remove TRAKTOR tags (may take some time): Deletes the track(s) from
the Track Collection and from all Playlists, and all TRAKTOR specific tags will be removed from the music files.
• additionally delete file(s) from hard drive:Deletes the track(s) from the Track Collection
and from all Playlists, and deletes the music file(s) from your computer.
The tracks are deleted from your Track Collection.
11.12.5. Saving Your Track Collection
The Track Collection will be automatically saved each time when you close TRAKTOR. However,
you can also save your edits in the Track Collection manually:
1. Right-click the Track Collection folder in the Browser Tree to open the context menu.
2. Select Save Collection.
11.12.6. Exporting Your Track Collection
You can export your entire Track Collection for a backup on another hard drive.
1. Right-click the Track Collection folder in the Browser Tree to open the context menu.
2. Select Export the Collection to open the Export Tracks dialog.
3. Enter the title for the Backup in the Playlist Title field. Do not remove the $ symbol in the
beginning.
4. Select the path to store the backup in the Destination field.
5. Select the file format in the Export Format drop-down menu.
6. Select Copy Tracks To Destination.
7. Click OK to confirm.
TRAKTOR now exports your Track Collection.
Managing Your Track Collection
94

11.12.7. Restoring the Track Collection from an Automatic
Backup
Each time when you change something in your Track Collection and close TRAKTOR, a backup of
your Track Collection is created in the Backup folder in TRAKTOR's Root folder on your local
drive. If you delete something in your Track Collection by mistake, you can restore to an earlier
version:
1. Right-click the Track Collection folder in the Browser Tree to open the context menu.
2. Select Import another Collection to open the browser dialog.
3. Double-click the Backup folder to open it.
4. Double-click the Collection folder to open it.
5. Select the backup version to which you would like to restore.
6. Click OK to confirm.
The Track Collection is now restored to a previous version.
11.12.8. Clearing Your Track Collection
You can clear your Track Collection
1. Right-click the Track Collection folder in the Browser Tree to open the context menu.
2. Select Clear Collection.
3. From the security dialog select one of the following options:
• clear collection: Deletes the tracks from the Track Collection and from all Playlists.
• additionally remove Traktor tags (may take some time): Deletes the tracks from the
Track Collection and from all Playlists, and all TRAKTOR specific tags will be removed
from the music files on your local drive.
• additionally delete file(s) from hard drive:Deletes the tracks from the Track Collection
and from all Playlists, and deletes the music files from your computer.
All tracks are deleted from your Track Collection.
Managing Your Track Collection
95

12. ADVANCED OPERATION OF TRAKTOR
This section explains you the advanced features of TRAKTOR PRO 3 such as using MIDI and
master clocks, recording and broadcasting mixes and using Cruise Mode.
12.1. Synchronization using Ableton Link
Ableton Link is a protocol that synchronizes beat, phase and tempo of Link-enabled applications
on the same computer or over a shared network. This means you can conveniently keep applications synchronized across different devices or join a group jam with others with minimal setup.
Connecting applications via Link provides you with the ability to synchronize them to a shared
timeline and change the tempo globally from each of the connected applications.
12.1.1. Connecting to a Network
Applications that support Ableton Link can join a Link session when connected to the same network. To enable Link within TRAKTOR, simply make sure the computer running TRAKTOR is connected to the same local network as the other applications you want to link to. This can either be a
local network or an ad-hoc (computer-to-computer) connection.
To ensure maximum security and reliability while using Link, there are several things you may want
to consider:
• For reliability, connect to the local network using a router via an Ethernet cable.
• If you do use a Wi-Fi network, be sure to use a password to prevent excluded users from joining your session.
• For the most secure and reliable connection, create a Link session via a direct connection from
one computer to another using a Thunderbolt or Ethernet cable.For more general information
on setting up and using Link, please refer to the Link FAQs article located on the Ableton website:
12.1.2. Joining and Leaving a Link Session
LINK MIDI CLOCK NOTE GENERAL
When Link is active, it is not possible to synchronize TRAKTOR to incoming MIDI
Clock as a slave. Link will take priority. Sending MIDI Clock from TRAKTOR as a
master is still possible.
It is possible to join a Link session at any time by clicking the LINK button. When another Linkenabled application is connected, a moving bar within the LINK button is displayed even though
TRAKTOR’s Decks are stopped. This bar represents the global phase of Link that all participating
applications lock into.
Advanced Operation of TRAKTOR
96

After clicking the Play button on a SYNC-enabled Deck, playback will resume on the downbeat
once the progress bar within the LINK button is filled. The first participant to join the session sets
the initial tempo, from then on any participant in the session can change the tempo in their respective application. If multiple participants change the tempo at the same time, the last tempo change
will take effect.
The option LINK must be enabled under External Clock Source on the External
Sync page in the Preferences in order LINK to be visible in the in the Master Control
panel.
To start or join a Link session, proceed as follows:
1. Click the LINK button located in the Master Control panel.
TRAKTOR will either join an existing Link session or begin a new session.
2. Start playback on a SYNC-enabled Deck.
The Deck is now synchronized with the Link timeline. For more information about synchronizing TRAKTOR Decks to the Link timeline, see section Synchronizing TRAKTOR Decks to the
Link Timeline.
3. To stop using Link, and leave the session, click LINK again.
While connected, the LINK button displays how many other Link-enabled applications are connected via Link. The example below indicates that there are four other applications connected.
Image caption: Active Link session with four other instances connected.
12.1.3. Synchronizing TRAKTOR Decks to the Link Timeline
Most applications supporting Ableton Link have a unique timeline that is automatically synced as
long as Link is enabled. In TRAKTOR, enabling Link synchronizes the Master Clock to the common Link timeline. The Master Clock is automatically set as the tempo master in TRAKTOR and
can serve as a SYNC reference for the Decks.
When using External Sync, the automatic Tempo Master assignment mode AUTO is
disabled and the Master Clock is forced to always be the Tempo Master. The tempo
of such session cannot be changed from the Decks but only from the Master Clock
controls.
The Deck’s behavior when synchronized to the Master Clock, and thus the Link timeline, is defined
by the Sync Mode, which can be set in TRAKTOR’s Preferences under Sync Mode on the Trans-
port Page.
BeatSync Mode
BeatSync mode is recommended when using Link. It synchronizes both tempo and phase of a
Deck to the tempo master, in this case the Link timeline. The phase of the Deck is aligned when
Advanced Operation of TRAKTOR
97

the SYNC button is turned on. SYNC turns dim when the phase of the Deck is shifted manually
(i.e. when scratching or holding a Deck in the stopped position), but TRAKTOR will re-align the
phase when the Deck plays normally again (i.e. when you release the record or jog wheel).
The Beatgrids of your tracks need to be properly set for BeatSync to function correctly.
TempoSync Mode
TempoSync maintains tempo-only synchronization to the tempo master, in this case the Link time-
line. The phase of the Deck is aligned when the SYNC button is turned on. SYNC turns dim if the
phase of a Deck is shifted. The tempo always remains synchronized in this mode.When using
TempoSync with Link, drifts in tempo and phase may occur.
You can quickly re-align the tempo and phase by pressing the Deck’s SYNC button
twice.
In order to keep drifts in tempo and phase to a minimum:
• Avoid large and sudden tempo changes.
• Use an Ethernet cable instead of a wireless connection.
• Increase the buffer size (latency) for your audio driver in the Audio Setup page of the Preferences to avoid buffer underruns. For example, if you normally set your buffer size to 256 samples, set it to 512 samples.
On macOS, you can use the Latency slider in the Audio Setup page to adjust the
buffer size. On Windows, click on Settings in the Audio Setup page to change the
buffer size in the control panel of your audio driver.
Matching the Downbeat
Since TRAKTOR’s playback is not automatically synchronized to the first downbeat of a bar (beat
1 of 4), you may have to correct this manually. You can use the blue bar below the LINK button as
an indicator. It shows the phase of the Link timeline relative to the current bar.
• Release the downbeat of your track when the bar is empty.
Resetting the Downbeat
Occasionally, for example due to tempo offsets or when resuming playback after having stopped,
TRAKTOR’s Master Clock may be out of phase in relation to the Link timeline. To quickly reset the
Advanced Operation of TRAKTOR
98

phase, you can use TRAKTOR's Reset Downbeat function. It is available as a mapping command
in the Controller Managerpage in the Preferences under Add In… > Master Clock > Ableton Link
> Reset Downbeat.
Resetting the downbeat may cause skip by one or two beats backwards in the Link
timeline.
12.2. Syncing TRAKTOR via MIDI Clock
TRAKTOR allows you to sync external hard- and software using MIDI Clock Signals to be controlled in the Master Controls panel in the Global section.
Enabling in the External Sync page in the Preferences.
12.2.1. Syncing TRAKTOR to External MIDI Clock Signal
TRAKTOR is able to receive MIDI Clock Signals (Clock Slave) from another computer running
TRAKTOR, from other applications, or from MIDI hardware sending MIDI Clock:
1. Open the Controller Manager page in the Preferences.
2. Click Add....
3. Select Generic MIDI from the drop-down menu to create a new generic MIDI device.
4. In the In-Port drop-down menu, select the port from which you want the device to receive the
incoming MIDI Clock signal.
5. Select the External Sync page in the Preferences.
6. Click EXT to select the External Clock Source.
7. Close the Preferences.
8. In the Master Control Panel click EXT.
The TRAKTOR Master Clock now follows the external MIDI Clock signal once it is started.
9. Press the start button on the sending device, to sync the clock to the phase of the application
or hardware sending the MIDI Clock signal,
In case of an offset between the sending hard- or software and TRAKTOR, the offset has to be
adjusted in the sending (Master) device.
12.2.2. Using TRAKTOR as Master Clock
To use TRAKTOR as the tempo source using its Master Clock, TRAKTOR has to send the MIDI
Clock Signal to the external hard- or software:
1. Open the Controller Manager page in the Preferences.
2. Create a new generic MIDI device.
3. Assign the Out-Port to the device you want to send the MIDI Clock signal to.
4. Open the External Sync page in the Preferences.
Advanced Operation of TRAKTOR
99
5. Tick Enable MIDI Clock.
The additional MIDI Clock functions are now displayed in the Master Control panel.
6. To start sending a MIDI Clock signal, click the Start/Stop button. Clicking it again stops send-
ing.
When MIDI Clock is enabled, the Start/Stop button is lit blue. The Tempo Display shows the
tempo of the MIDI Clock signal in BPM.
By clicking the SYNC button, TRAKTOR triggers a MIDI Clock Stop Message immediately followed by a MIDI Clock Start Message to re-sync the external hard- or software.
It may be required to adjust the offset between TRAKTOR and the receiving hard- or software.
For syncing external hardware with the MIDI Clock, the Master Clock has to be set
as Master Tempo Source.
12.2.3. Syncing two Instances of TRAKTOR
These are the steps to sync two versions of TRAKTOR running on different computers:
1. Connect the two computers via MIDI in order to transmit the MIDI Clock signals.
2. Decide which of the two computers should be the Clock Master and click MASTER button in
the Master Control panel.
3. On the other computer follow click the AUTO button in the Master Control panel.
4. For syncing both computers, press the TICK button in the Master Control panel.
5. Once the two ticks are audible, press the SYNC button in the Master Control panel on the
sending computer in order to reset the receiving computer.
6. Now start tweaking the MIDI Clock Sending Offset until the two Ticks are in perfect sync by
clicking the Offest button.
7. You can then turn off the Ticks.
12.3. Recording Your Mix with the Audio Recorder
In order to record your mix with the AUDIO RECORDER you at first need to make some adjustments in the Preferences and also to the AUDIO RECORDER to record audio from TRAKTOR's
Master Output.
Adjusting AUDIO RECORDER Preferences
Before you start recording you have to adjust the settings on the Mix Recorder page in the Preferences to define the audio source and the file settings:
1. Open the Mix Recorder page in the Preferences.
2. Select the Source option Internal.
3. Set the directory you want to save the recordings file(s).
4. Select the file size at which TRAKTOR will automatically split the recordings file.
Advanced Operation of TRAKTOR
100
 Loading...