

Kontakt Script Language Manual
1
The Kontakt Script Language

Kontakt Script Language Manual
2
Copyright © 2006 Native Instruments Software Synthesis GmbH. All rights reserved.
Manual written by: Nicki Marinic, Josef Natterer, Wolfgang Schneider
Last updated: April 26, 2006
Ple as e not e:
Wh e n v iew i ng th is man ual w i t h Acr ob at R e a d er , t he u nd ers cor e ( " _" ) m a y not
be v is i b l e .
It i s r ec o m
men d ed to vi ew t hi s m a nu al at a hi gh e r z oo m f a cto r a n d / or to pri n t
it o u t , s i n ce t h e u nd ers cor e is a
ve r y i mp o rt a nt ch a ra c t er i n th e p ro g r a m mi n g
lan g ua ge.
Als o , w e i n c lud e d a c opy of th is man u al as a r
aw t ex t f ile , s i n c e wh en co p yi n g
and pa s ti n g p or t ion s of t hi s te x t ( e . g. cod e e xa m pl es) yo u m i ght l o o
se lin e
bre aks wh ich res ult s in i nc o rr e ct cod e . Ple as e us e t he r aw t e x t f il e fo r c opy in g
and pa s ti n g
th e sc r ip t e x a m pl e s .

Kontakt Script Language Manual
3
Tab le o f Con t en t s
Introduction................................................................................................................... 5
Getting Started - the Kontakt Script Processor ..................................................................6
Working with KSP and Scripts ....................................................................................... 10
Basic Scripting Tutorial ................................................................................................12
Generating MIDI notes: a simple accompanist .............................................................12
Built-in variables: Building a simple Octaver................................................................ 14
UI Control variables and the init callback: Creating a simple Harmonizer ........................ 15
Debugging and customizing: finishing your script ......................................................... 18
Fundamentals ..............................................................................................................25
General rules concerning the syntax............................................................................ 25
Callbacks ................................................................................................................. 26
Variables..................................................................................................................26
Script Call Order ....................................................................................................... 31
Tempo- and time-based scripting ................................................................................... 32
The wait() function.................................................................................................... 32
Polyphonic Variables ................................................................................................. 33
Control Statements.......................................................................................................34
if…else…end ...........................................................................................................34
select() ....................................................................................................................34
while() ..................................................................................................................... 35
Operators ....................................................................................................................36
Boolean Operators..................................................................................................... 36
Arithmetic Operators ................................................................................................. 36
Bit Operators ............................................................................................................ 37
Array Functions ........................................................................................................ 37
Random Generator ....................................................................................................37
Group Management ......................................................................................................38
Events and Note ID's ................................................................................................. 40
Changing Events ....................................................................................................... 41
Grouping Events .......................................................................................................43
Assigning Event Parameters .......................................................................................44

Kontakt Script Language Manual
4
User Interface Controls .................................................................................................45
Buttons.................................................................................................................... 45
Knobs...................................................................................................................... 45
Menus .....................................................................................................................46
Text Labels ..............................................................................................................47
Value Edit ................................................................................................................47
Table .......................................................................................................................48
Positioning of ui elements..........................................................................................48
Hiding GUI elements................................................................................................. 49
UI Callbacks............................................................................................................. 49
Naming of GUI elements ...........................................................................................49
Performance View .....................................................................................................50
Usage of Midi Controllers .............................................................................................. 51
The Controller Callback .............................................................................................51
Controller variables and arrays.................................................................................... 51
Working with RPN and NRPN messages...................................................................... 53
Advanced Concepts ......................................................................................................55
Preprocessor............................................................................................................. 55
Engine Parameter .....................................................................................................57
Loading IR Samples .................................................................................................. 69
Specifying when persistent variables are read ..............................................................70
Reference....................................................................................................................72
1. Callback types ...................................................................................................... 72
2. Declaration of variables and ui elements .................................................................72
3. Functions............................................................................................................. 74
4. Group and array functions...................................................................................... 77
5. Built-in Variables .................................................................................................. 78
6. Slice functions ..................................................................................................... 81
7. Preprocessor......................................................................................................... 82
8. Engine Parameters ................................................................................................ 83

Kontakt Script Language Manual
5
Introduction
Welcome to KSP – the Kontakt Script Processor.
The Kontakt Script Processor is a unique feature in Kontakt 2. You can use it as an effect or
composition tool, you can build custom instruments with intelligent processing through
algorithms, create sequencers, exotic tunings and much more. But the best part of it is, you
can program script modules yourself, share them with others, or modify and personalize
existing scripts. This manual describes the usage of the script processor and the programming
of scripts in the Kontakt Script language.
A p r ogr am min g l an g ua g e? Bu t I ' m a m u s i c i a n a n d n ot a co m put er g e e k!
Don't be afraid of such terms as "programming language" or "scripting"; this manual will give
you a step by step approach, even (or especially) for the novices in computer programming. In
fact you don't need to know anything about programming languages in order to benefit from
KSP; even if you don't want to program yourself, you'll get an insight into the structure of KSP
and can modify certain scripts to fulfill your needs.
As a serious musician, you will find yourself in situations where you need to solve a problem
in a very specific way, whether you're a performer, composer or producer. A "problem" is
anything where your imagination and creativity are restricted by the boundaries of a specific
music program. With KSP, you can extend the already numerous possibilities in Kontakt2 and
tailor your own modules.
But I A M a c omp
ut e r gee k – do I n ee d t o r e ad th e w h ol e m a nu al?
If you do have experience in programming languages or in a programming environment like
Reaktor, you'll probably want to step through the whole manual as fast as possible and start
scripting. That's fine but please remember that certain commands are unique to KSP; you
might want to have a quick look at the Reference and then read the chapters which look
unfamiliar to you.
So I ' m re ady t o st a r t – w h at e l s e d o I n e ed b e
si d es t hi s m anu al ?
Of course, you must have Kontakt2 installed on your computer, together with the proper
Audio/Midi configuration. There's really nothing else you need, but you might find it
convenient to use an external text editor to type in your scripts. This of course can also be
done in Kontakt (and is much faster for small scripts), but for larger scripts we recommend
using a text editor, e.g. BBEdit on OS X or Ultraedit on Windows.

Kontakt Script Language Manual
6
Getting Started - the Kontakt Script Processor
To begin with, we should clarify a couple of things so you know exactly what you're dealing
with.
So w h a t is th e K on t a k t S cr i p t Pro c es s or an yw a y ?
The Kontakt Script Processor is one part of the architecture of Kontakt, i.e. it constitutes one
element in the signal flow. As you'll recall from the Kontakt manual, from the point of hitting
a key on the keyboard to actually hearing the sound, the audio signal goes through various
stages (this is somewhat simplified):
Play a note → Source (sample is triggered) → Group FX → Amplifier → Instrument FX → Output
KSP is situated between the incoming midi information and the source:
Play a note → KKSP → Source (sample is triggered) → Group FX → Amplifier → Instrument FX → Output
However, KSP is not a simple MIDI processor which takes in MIDI, processes it and spits it
out again; if that were the case, you could use any MIDI processing utility and patch it
between your keyboard and Kontakt. KSP, on the other hand, is able to retrieve Kontaktspecific parameters like the naming of the groups in an instrument, for example. It also can
pass Kontakt-specific parameters to the source module, like the tuning of the triggered zone.
Please note: the KSP operates on the instrument level of a Kontakt instrument, just like the
instrument send and instrument insert effects.
Don't worry if think you're already lost - you'll grasp the principle quite soon.
S
So w h a t a bo u t t he Ko n ta k t S cr i p t L an gu a ge ?
Not so fast…in order for KSP to do anything, a module must be plugged in (just like if you
want to have a delay effect on your audio, you must plug in the delay effect in the effect
chain). We refer to such a module as a sscr ipt, and a script is a program written in the
Kontakt Script Language.
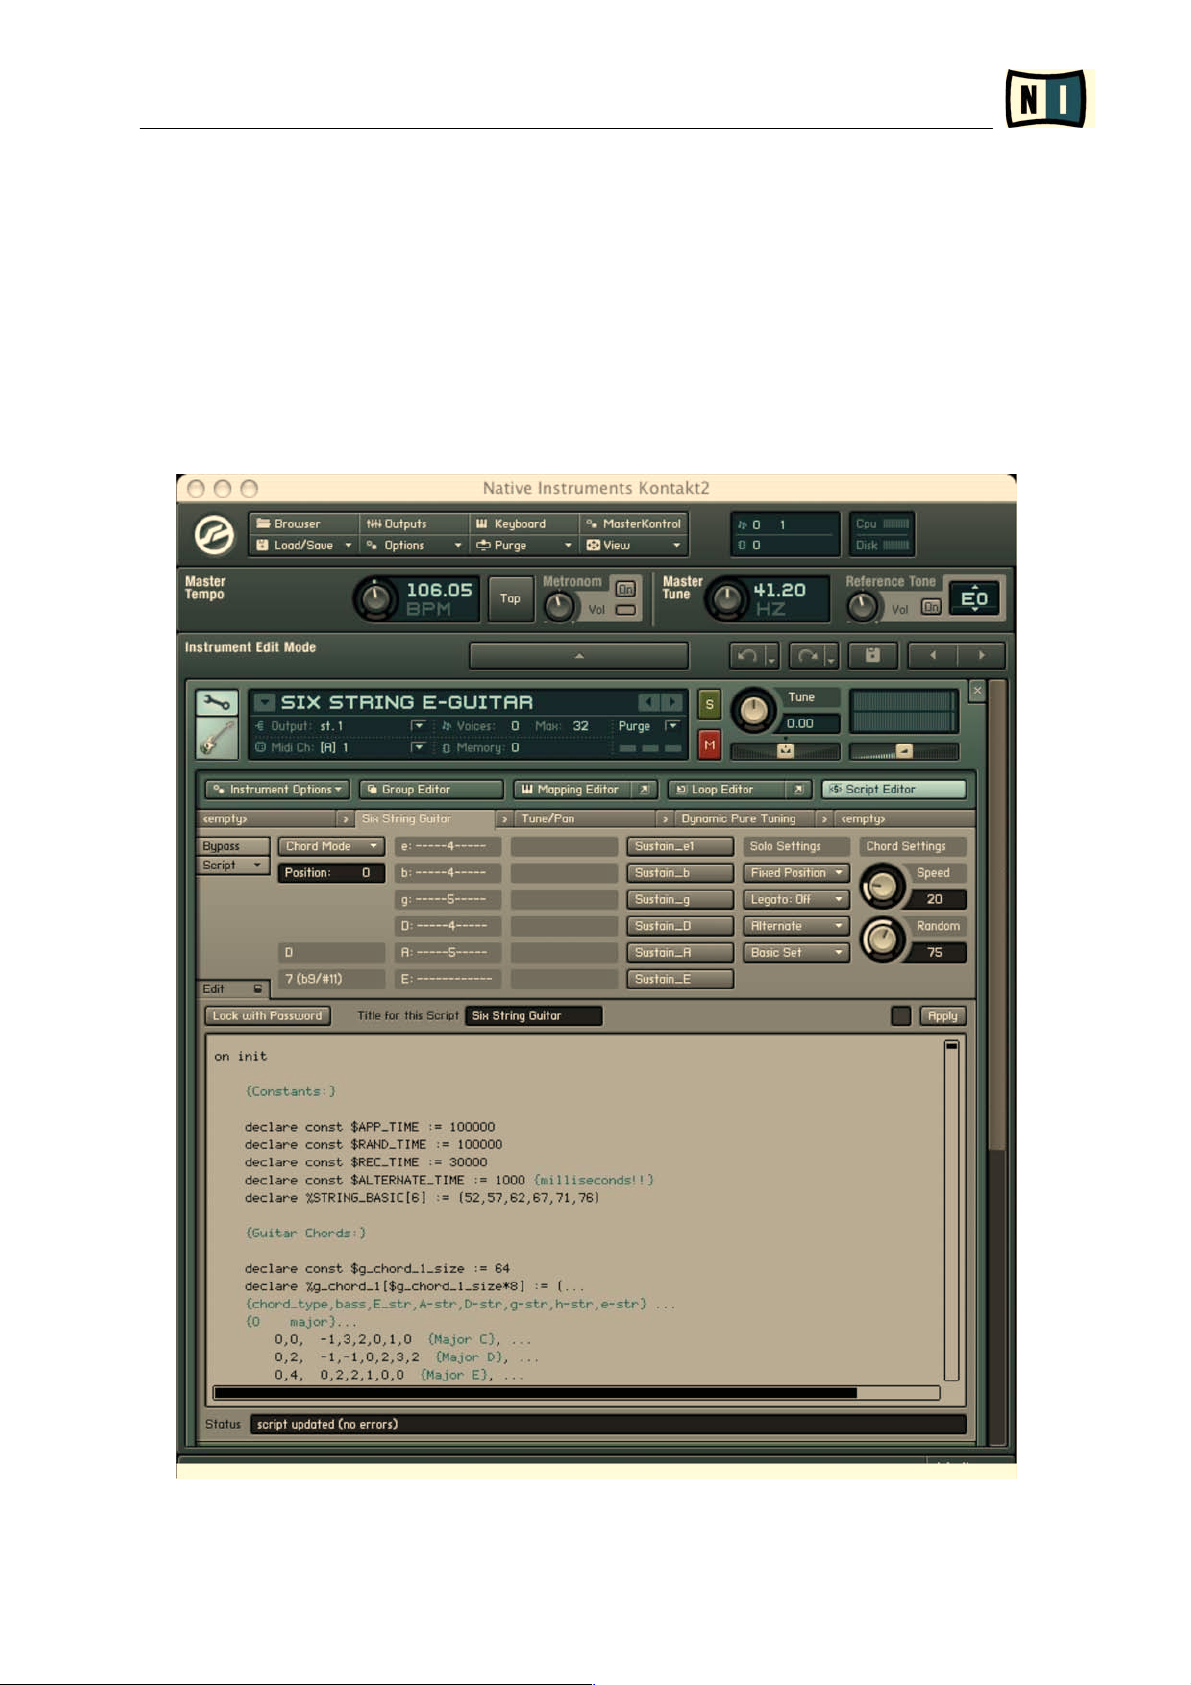
Let's illustrate this in Kontakt:
• Open Kontakt, load an instrument, and click the wrench icon to access the edit mode
• Click on the SScr i pt Ed i to r tab in the top area to open the script module pane
• Click on the SScr i pt icon. A pop up menu appears
• Click on HHar m on iz a t
ion /H a rm o ni z e
• The module appears in the script module pane:
Kontakt Script Language Manual
7
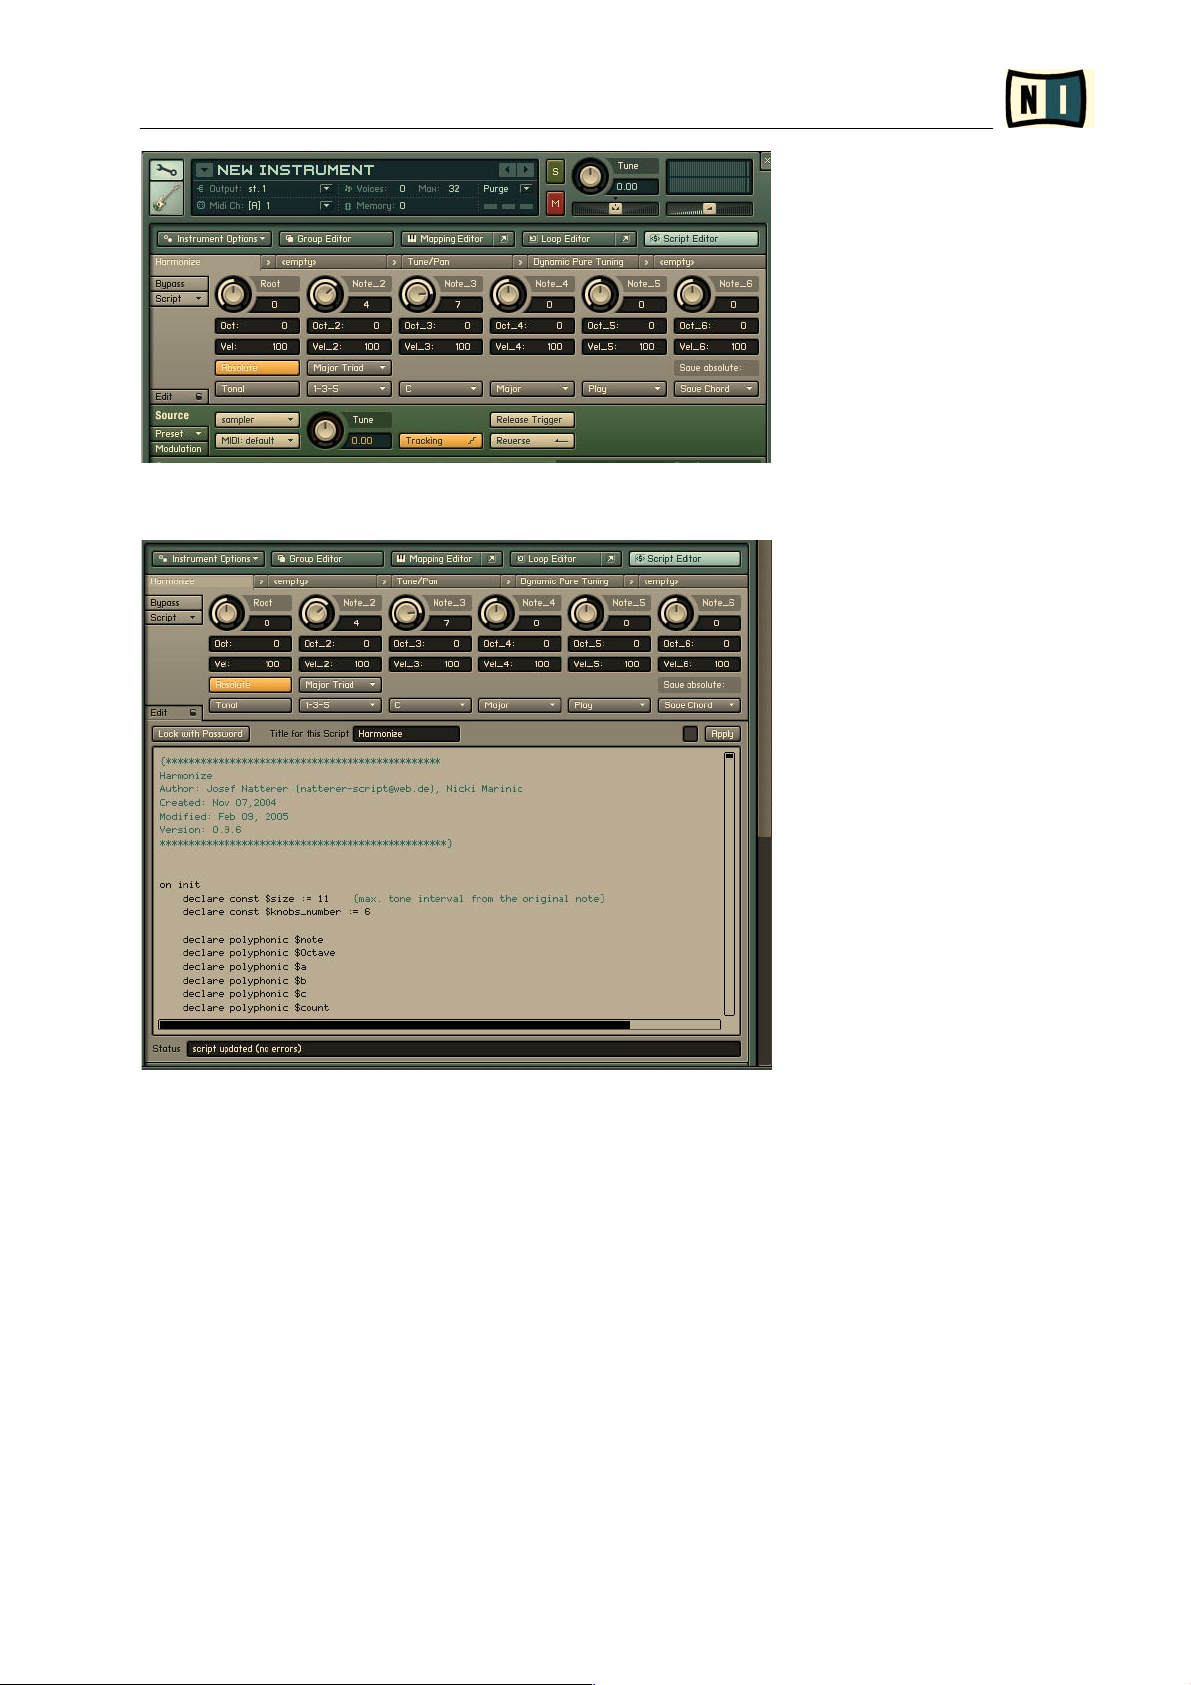
Now click on the EEdit button in the bottom left corner of the module:
Magic, huh?
What you see is the actual code of the module. If you keep on reading this manual soon you'll
be able to read and access the code, modify it to make it suitable for your own genius musical
style, copy parts of it to use in your own scripts and so forth.
Kontakt Script Language Manual
8
Let's move on:
• Click the EE d it button to close the edit area
• Click on the SScr i pt icon and choose -- E mp t y - from the pop up menu. This removes the
script from the module pane.
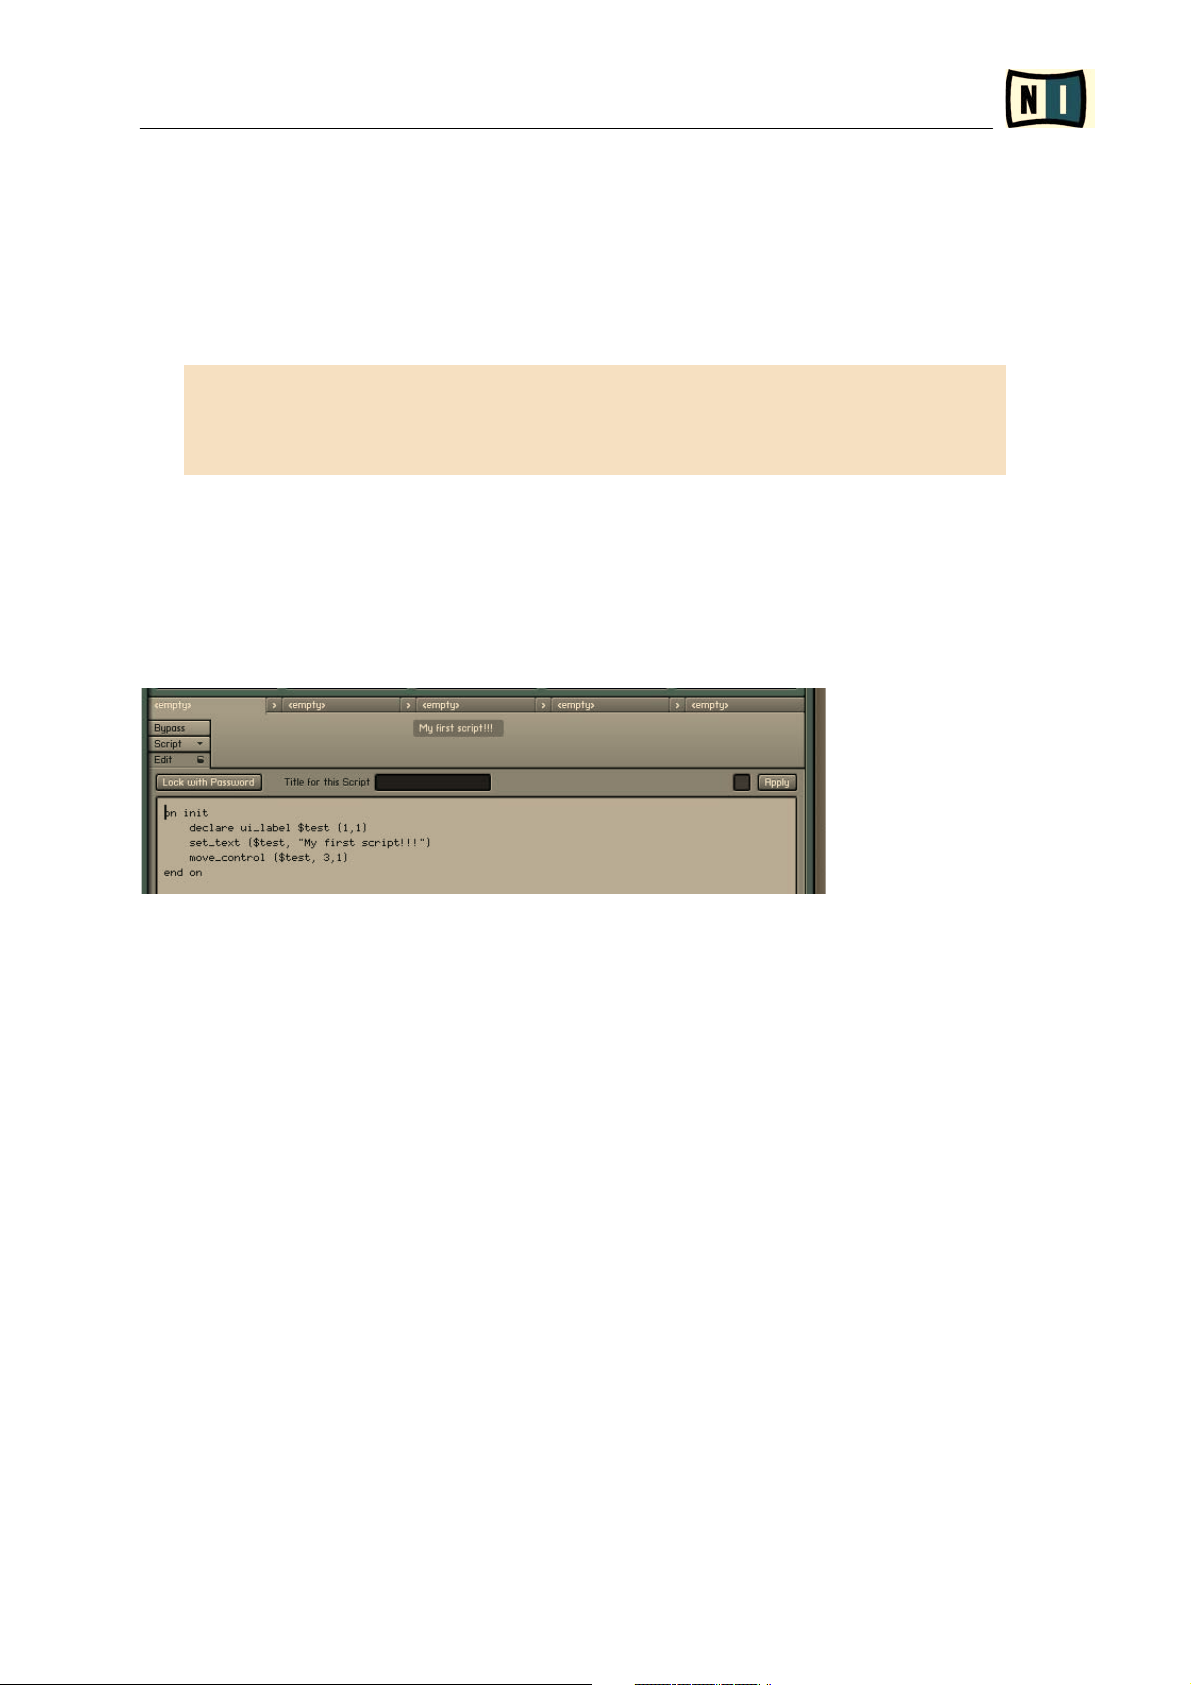
• Select the following text and copy it to the clipboard:
on init
declare ui_label $test (1,1)
set_text ($test, "My first script!!!")
move_control ($test, 3,1)
end on
• In Kontakt, click the E
Edit button to access the script edit area. You'll see a blinking
cursor waiting for your masterpiece.
• Paste the text from the clipboard into the script edit area. Notice how the LED next to the
“Apply” button turns orange, indicating that you've done something to the script.
• Click on “Apply”.. You should end up with the following:
Congratulations! You have taken the first step in becoming a programming geek!
But our work of art is not finished yet; let's be thorough and bring it to an end:
• Next to where it says TT i tl e fo r t h is s cr ipt enter a nice, descriptive and boring title like
My f ir s t s cr i p t and hit Return.
• Click on EEd i t to close the edit area and select ss av e p r es e t … from the SS cri p t pop-up
menu. A standard SSav e dialog box appears.
• Type in a name for the file (be sure to keep the extension .nkp) and save it.
• Assume we want to finish our session for today, so close the instrument and quit Kontakt
(no need to save anything).
• Assume we've changed our mind, so open up Kontakt, load an instrument and bring the
script module pane to the front (you should know by know how that works).
• From the SScr i
pt pop up menu, select your script and voilá: you brought your masterpiece
back.
At this point, you've basically already learned all the necessary steps in script production
(well, all except for actually writing the scripts yourself, but we'll deal with that).

Kontakt Script Language Manual
9
Let's recap:
• The KKo n ta kt S cr ipt Pr o ce s so r (KSP) is an element in Kontakt's flowchart.
• In order for KSP to do anything, a mmod ul e has to be loaded.
• We refer to such a module as a ss c r ipt .
• A script is a small ppr ogr am, which is executed by KSP.
• This program is basically nothing more than pure text, written in the KK ont akt Sc r ip t
Lan gu a ge.
Here's what the normal workflow looks like:
• Write some code, either in an external text editor or in the script edit area.
• If you've written the code in an external text editor, copy it to the script edit area.
• Click on “Apply” to initialize the script.
•
Save the script. It now becomes an encoded file with the extension .nkp (like all Kontakt
presets).
The scripts are stored on your hard drive in the Kontakt application folder:
Kontakt 2/presets/scripts/
This concludes our getting started session. Next we'll learn a little bit more about the general
user interface of KSP before we finally start to write our own scripts.
In case you're wondering…the script you saved a couple of minutes ago does not do anything
glorious. Actually, it does nothing; but don't worry, this will change.
Kontakt Script Language Manual
10
Working with KSP and Scripts
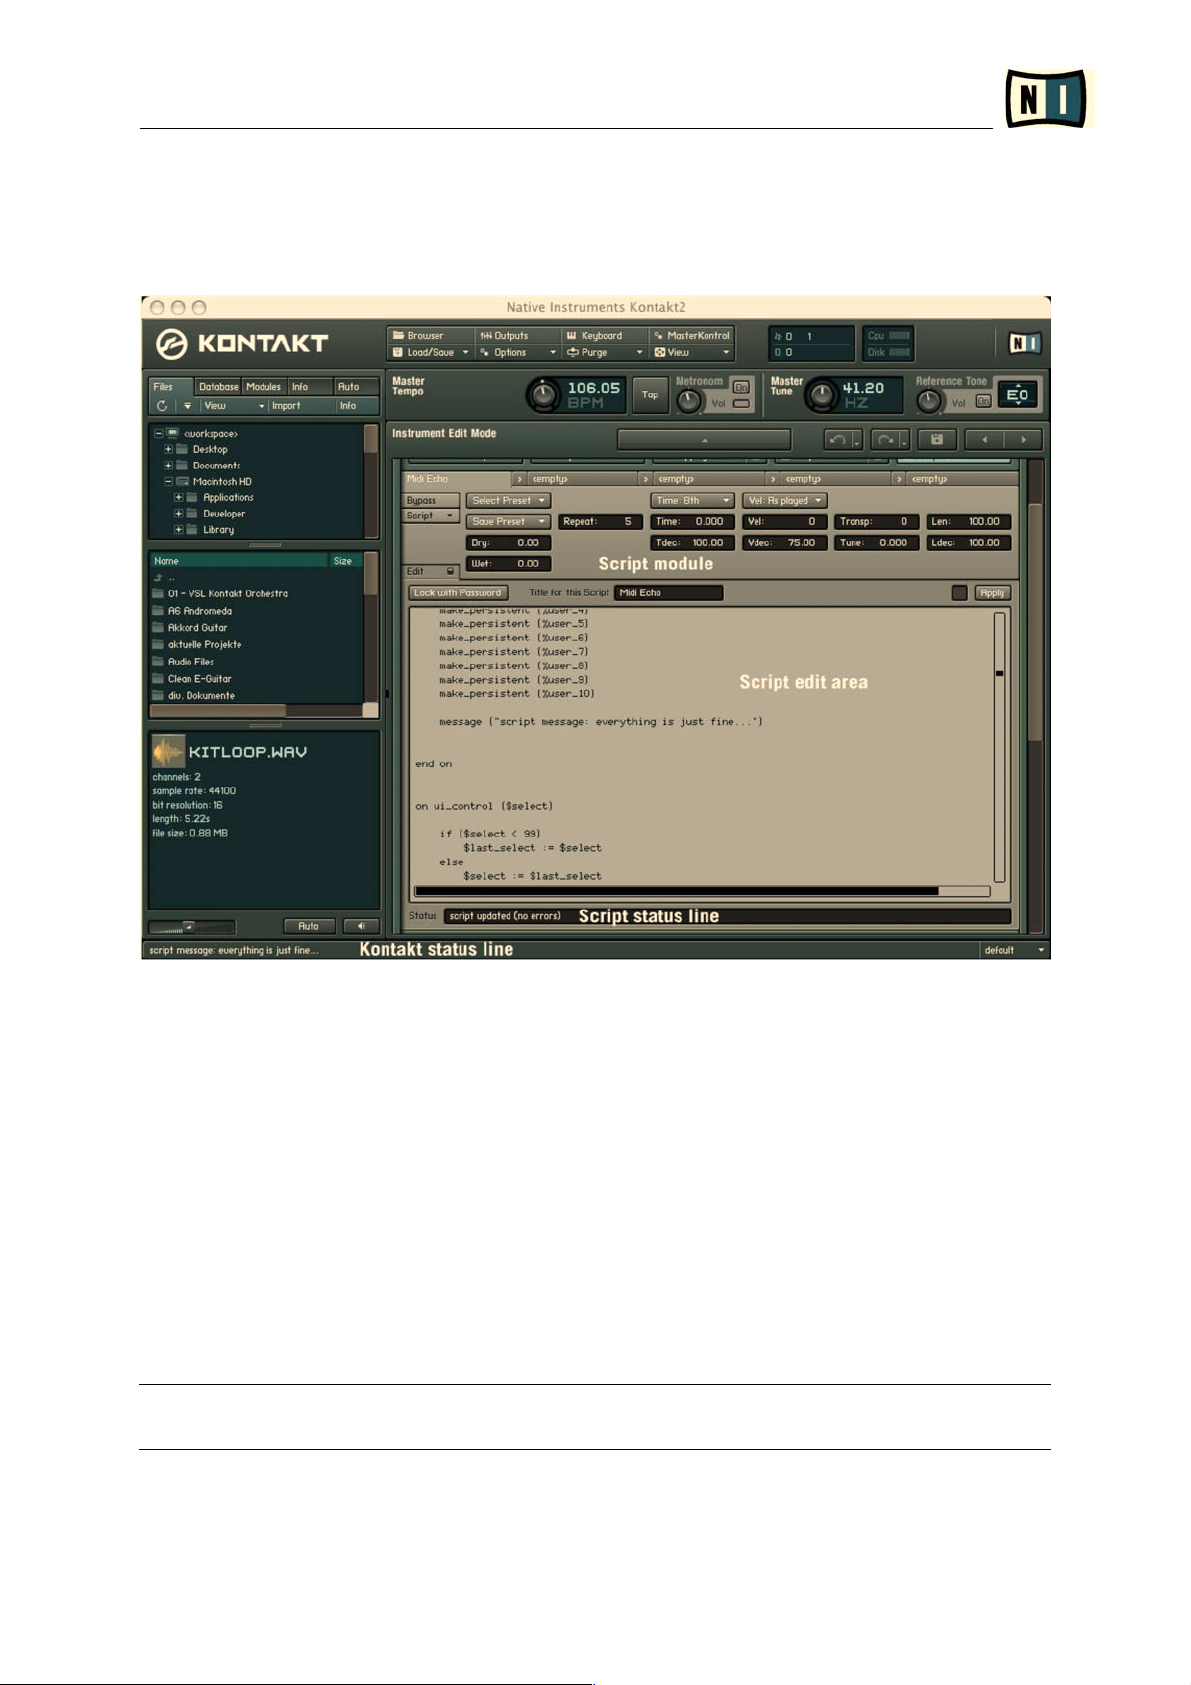
Let's have a look at the general user interface elements of KSP:
Scr i pt mo d ul e: This area is similar to a normal Kontakt module. At the top you'll find five
tabs to switch from one script to the other (you can load up to five script modules per
instrument). A script module need not necessarily contain any GUI elements; a script can
have a specific function and have a blank interface. Later you'll learn how to create UI
elements.
Byp ass : Activates/deactivates the script
Scr i pt: Use this pop-up menu to load and save scripts.
Ed i t : Click this button to open the script edit area. The lock indicates if the script is editable
or not (see below).
Scr i pt ed i t a r e a : This area opens up if you click on EEd it in the script module. Here you
can write, paste and view the actual code of the script.
Only have the script edit area open if you need to view or edit the code, otherwise keep it
closed to conserve CPU power.
L
Lo c k w i th P a s sw ord : Click this button to type in a password in order to prevent others from
viewing or changing your scripts.

Kontakt Script Language Manual
11
Titl e f or thi s S cri p t : You can enter a title for the script in this field. The title will then
appear in the tab. Note that scripts can have different names for titles and file names.
App ly : Click on "Apply" to activate the script. KSP checks the syntax of the code, and if
there are no error messages you're ready to go. The LED left of the "Apply" button turns orange
whenever you make changes to a script and the script is not yet activated.
Scr i pt s t a t u s l i ne : If you've made a mistake while typing a script, KSP will output an error
message in this line and highlight the incorrect line in the edit area.
Kont a k t s t at u s l in e : This line will output all script messages generated from a message()
function as well as errors which occur during playback of a script. Don't know what a function
is? Don't worry, you'll see.

Kontakt Script Language Manual
12
Basic Scripting Tutorial
Generating MIDI notes: a simple accompanist
Now we're ready to jump right into programming. This chapter will introduce you to the most
basic (yet very important) procedures while programming. Also, you will get an insight into
many topics which will be covered later in this manual.
We'll start with a simple script demonstrating one important and powerful feature of the script
engine: the ability to generate "artificial" MIDI events. So let's get started!
Open Kontakt, load an instrument of your choice, open the script editor and copy the
following text into the script editor:
on note
play_note(60,120,0,-1)
end on
After pressing "Apply" the script is analyzed and (if you did not make any mistakes while
copying...) ready to use. Play some notes on your keyboard; each played note will be
accompanied by the note C3 with a velocity of 120.
C
Coo l! I A L WA YS wa n te d ev ery n o te th at I p lay t o be ac com pan i ed by C 3 …
Yeah, I know, maybe you think it's silly but let's stick to this example and really see what's
going on.
So how does it work?
Whenever you play a note, KSP processes a specific part of the script. These parts are called
cal lb a c ks. What you've written above is a so-called nno te cal lb a c k. A note callback is a
section in the script which is executed whenever you play a note. "Executed" means that each
and every line is interpreted by KSP from top to bottom.
So let's analyze what we've done line by line:
on note: this marks the beginning of a note callback, i.e. it tells KSP to interpret the
following lines of code whenever a note is played.
play_note(60,120,0,-1): this is the first command KSP executes (it's also the only
one in this case). We'll refer to such a command as a ffu n c t io n . This function generates midi
notes. In this case it generates a C3 (note number 60) with a velocity of 120. See below for a
complete definition of this function.
end on: this marks the end of the callback.
Again, keep in mind that this callback is only triggered by notes (since it's a note callback), so
it will not generate any notes when you move the mod wheel for example. KSP recognizes
more than this type of callback of course. You'll learn one more in this chapter and the
remaining in the section labeled "Callbacks".

Kontakt Script Language Manual
13
You'll probably have understood everything except for the those fancy numbers in the
play_note() statement. These numbers are called ppar a m eter s and each function needs
parameters to work properly. Functions can have one, two, three or more parameters. In this
case play_note() has four parameters and it always needs four parameters to work with.
Here's a complete definition of the play_note()function (you'll come across many
definitions of functions in this manual so we'll introduce you also to the general format of
such a definition):
play_note(<note-number>,<velocity>,<sample-offset>,<duration>)
play a note, i.e. generate a note on message followed by a note off message
<note-number>
the note number to be generated (0 -127)
<velocity>
velocity of the generated note (1 -127)
<sampleoffset>
this parameter specifies an offset in the sample in microseconds
Plea s e not e : this parameter does not work in DFD mode - only in
sampler mode!
<duration>
specifies the length of the generated note in microseconds
this parameter also accepts two special values:
-1: releasing the note which started the callback stops the sample
0: the entire sample is played
Now we can fully understand what our script does:
• it plays a note with note number 60: play_note(60,120,0,-1)
• with a velocity of 120: play_note(60,120,0,-1)
• the sample will be played from the beginning: play_note(60,120,0,-1)
• and the sample will have the same duration as the note which triggered the callback:
play_note(60,120,0,-1 )
Maybe now it is a good time to take a break and play around with what you've learned so far;
explore the play_note() function by entering other values, or even adding more
play_note() functions to the script.
Don't forget: it's wise to read the manual but as with any programming language…learning by
doing is the key to success!
S
Su m ma r y
The statement "on note" marks the beginning of a nno t e c al l b a ck. A callback is a section
within a script that is being "called back" (i.e. executed) at certain times. In our example, the
callback is executed whenever the program receives a note-on message, since it's a note
callback. The script processor then interprets each line of the script from top to bottom until
it reaches the "end on" statement, which defines the end of the callback. The function
play_note() generates artificial MIDI notes.

Kontakt Script Language Manual
14
Built-in variables: Building a simple Octaver
If you've played around with the script mentioned above you will have noticed that you can
enter various numbers for the note and velocity of the MIDI note to be generated, but it's
always static - the script always generates the same notes.
Now, this really should change, right?
Please input the following script:
on note
play_note($EVENT_NOTE - 12,$EVENT_VELOCITY,0,-1)
end on
Play some notes on the keyboard, every note you play will be accompanied by the octave
below with the same velocity of the original note; you've just built a simple octaver!
So how did we do that?
This little script introduces you to two new elements: v
var iab l es and oop e rat ors .
You will find detailed information about these two concepts later in this manual, for now let's
stick to the following:
$EVENT_NOTE is a bbu ilt- in v ar ia b le, it carries the note number of the original played
note. So when you play C3 (60) on your keyboard, $EVENT_NOTE will be 60.
$EVENT_VELOCITY is also a bb u ilt - in va ri a b le, it carries the velocity number of the
original played note. So when you play a note with a velocity of 110, $EVENT_VELOCITY
will be 110.
You'll also find the operator "-". And yes, it performs exactly as you would expect: it subtracts
a value. So the first parameter in the play_note function() – which denotes the note
number of the generated note – is: $EVENT_NOTE - 12; so when you play C3 (60), the
script will output C2 (48) (since 60 - 12 = 48) with the same velocity as the note you played!
Again, it's time to experiment: fool around with different transpositions (i.e. other numbers
instead of 12), alter the velocity of the generated note (e.g. $EVENT_VELOCITY - 20),
use more than one play_note() function; you'll get the idea.
Su m ma r y
Built-in variables are very important and powerful things. They cannot be declared, but "are
always there". We looked at two important built-in variables here: $EVENT_NOTE and
$EVENT_VELOCITY. KSP provides many different built-in variables. A complete list of all
built-in variables can be found in the reference section of this document.

Kontakt Script Language Manual
15
UI Control variables and the init callback: Creating a simple Harmonizer
Now let's extend our little script:
Wouldn't it be great if you had some sort of knob with which you could specify the distance
between the generated note and the original note; maybe a knob labeled "Interval"?
Please input the following script:
on init
declare ui_knob $Interval (-12,12,1)
$Interval := 7
end on
on note
play_note($EVENT_NOTE + $Interval,$EVENT_VELOCITY,0,-1)
end on
Play a few notes, each note will be accompanied a fifth above, perfect for scoring a Ben Hurlike movie…
But something else happened, take a look at the script module area:
A cute knob appeared, labeled "Interval". Now play a few notes and set the knob to different
values: you can now specify the amount of transposition yourself, so you've changed your
octaver into a simple harmonizer!
But how did we do that?
To put it in a simplified manner, we declared a GUI element (in this case a knob), we told
KSP that this knob has a range from -12 to 12 and that its initial value should be 7, and
finally we told KSP that it should add this number to the note number we play and generate a
new note.
This script introduces you to three new elements: the iin it ca l lb a ck , the dde clar ati on of
UI c on t ro l v a ri a bl e s and the aass ign m en t o f v alu e s t o v ar i ab l es .
Let's dig into it:
on init ... end on
initial callback, executed when the script was successfully analyzed

Kontakt Script Language Manual
16
The ii nit ca l lb ack is a callback which is executed when you click on "Apply”. It contains all
initializations, variable declarations, UI elements and much more. The ii n it c a l lb ack is thus
interpreted only once, whereas the note callback is interpreted whenever you play note. It's
obvious that when you want to have a GUI element like a knob in your module, this knob
needs to be created, but it needs to be created only once. That's why all GUI elements, for
example, can only be declared ("created") in the init callback. The beginning of an init
callback is marked with on init and its end is marked with end on (like the note
callback).
A UUI c o n t r ol v ar i ab le is a type of uus er def in e d v ar i a bl e. The Kontakt Script Language
distinguishes between bbu ilt -in v a r ia bl e
s and uus e r d efin ed variables.
In our example we created a knob which in principle is a user defined variable, where you can
change the value of the variable by changing the knob in the script module area.
Here's how we define a UI element like a knob:
declare ui_knob $<variable-name> (<min>,<max>,<display-ratio>)
create a user interface knob
Don't worry about the various parameters for now. You'll learn them later.
So in our script we've created a knob and given it the name Interval. What's missing in
our discussion is the third line:
$Interval := 7
":=" denotes an assignment. In our example it says "Assign the value 7 to the variable called
Interval".
So when the init callback is executed (upon clicking on "Apply"
"), a knob is created and the
knob initializes itself to 7. When you play a note, this value is then added to the note number
you've played, so when you set Interval to -12 and play C3 (60), the accompanying note will
be C2 (48) since $EVENT_NOTE + $Interval equals 60 + (-12) equals 48!
We finish with a subtle variation. By now you should have the chops to understand what it's
doing:
on init
declare ui_knob $Interval (-12,12,1)
$Interval := 7
declare ui_knob $Velocity (1,127,1)
$Velocity := 60
end on
on note
play_note($EVENT_NOTE + $Interval,$Velocity,0,-1)
end on

Kontakt Script Language Manual
17
Su m ma r y
The ii nit ca l lb ack is called as soon as the script is successfully analyzed. That happens
exactly when you press the "Apply" button in the script editor window.
A knob is a UI Control variable which is a type of user defined variable. UI elements are
created in the init callback.
":=" marks an assignment, the value at the right gets assigned to the variable at the left of
this sign.
Kontakt Script Language Manual
18
Debugging and customizing: finishing your script
In this last part of the chapter we'll begin with a slight variation on the preceding script:
on init
declare ui_knob $Interval (-12,12,1)
declare ui_knob $Velocity (-64,64,1)
$Interval := 7
$Velocity := 20
end on
on note
play_note($EVENT_NOTE+$Interval,$EVENT_VELOCITY+$VELOCITY,0,-1)
end on
With the knob labeled V
Ve loc ity you can now modify the velocity of the generated note; if set
to -10 for example, when you play a note with a velocity of 100 the generated note will have a
velocity of 90.
No b ig d e a l , why d on't w e j u st go on wi t h s o m e th i ng ne w ?
Now, you think we're done with our little script. Alas, we're not…
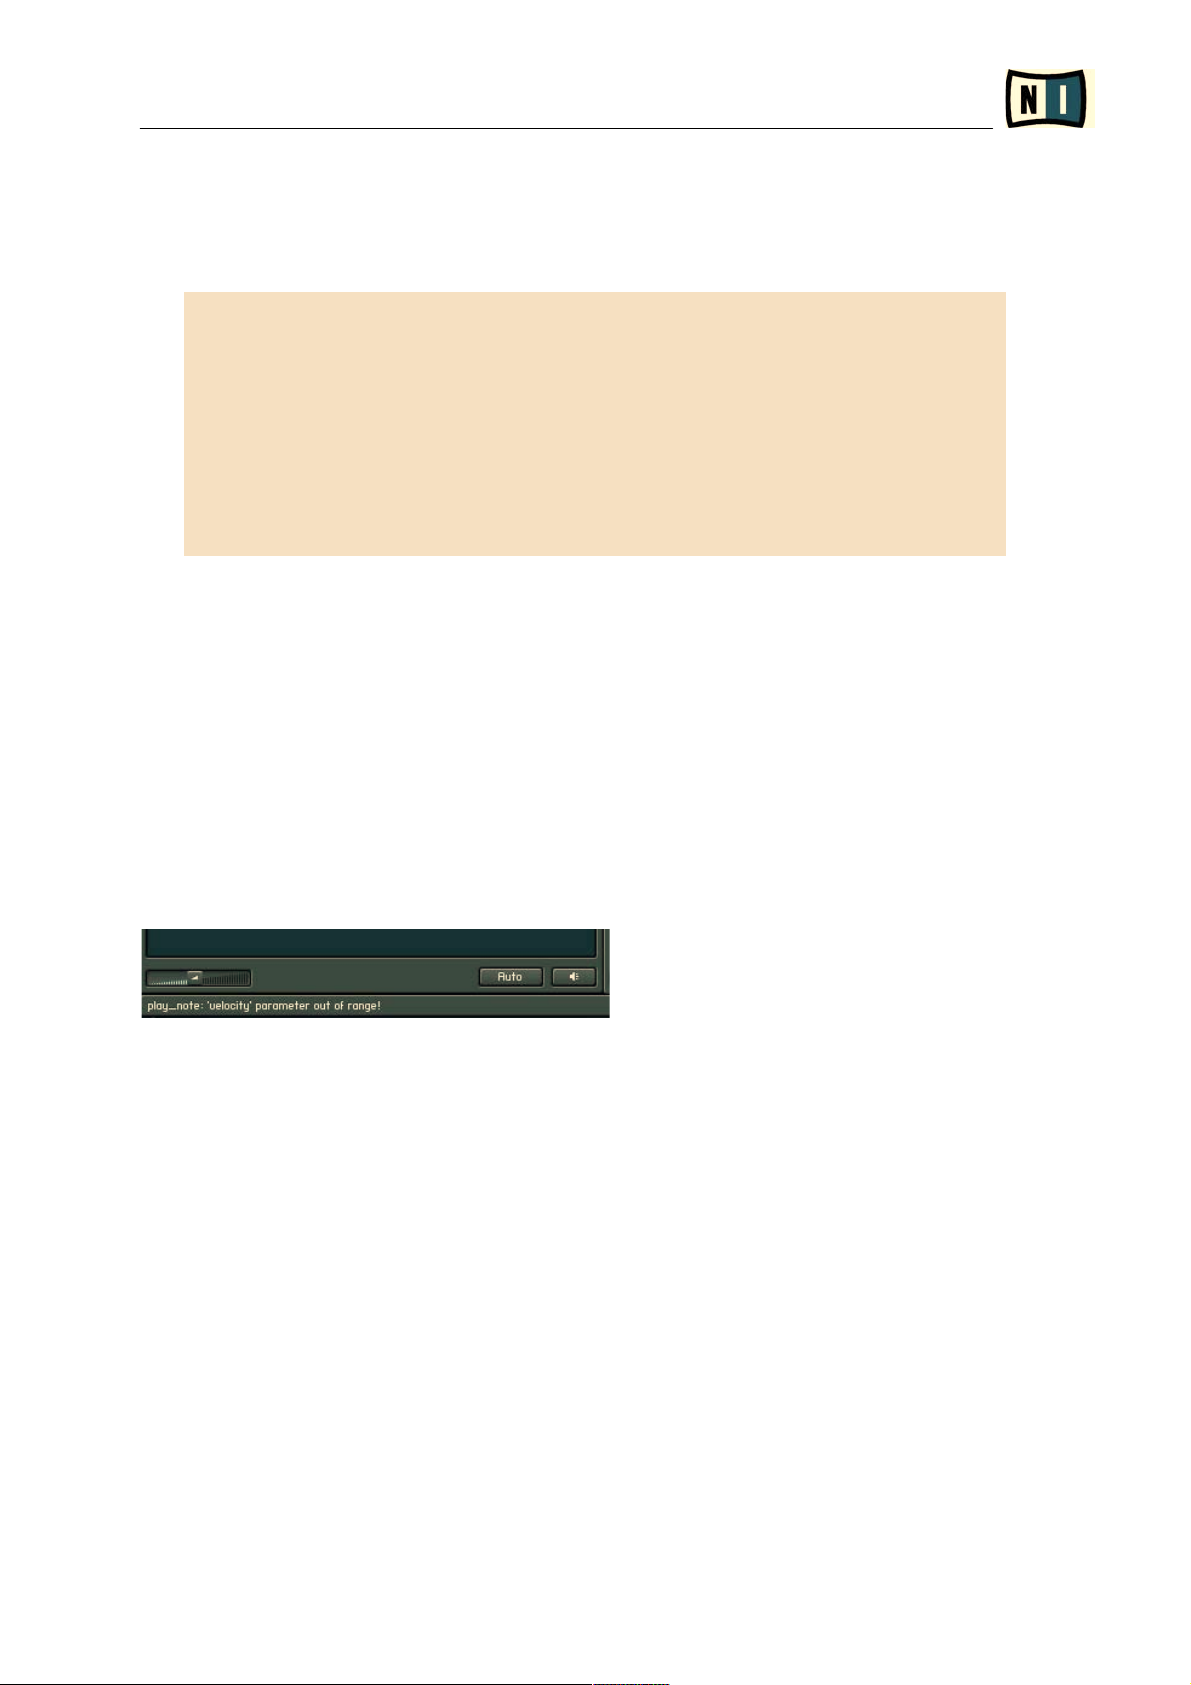
Try this: set VVel ocit y to the maximum value of 64 and play a note on your keyboard as loud
as possible. Then take a look at the status of Kontakt (in the lower left corner of the Kontakt
window):
Oops, we have a problem. What happened?
Well, probably you've played a note with a velocity of 100 or more, the VV elo cit y knob value
of 64 got added to this velocity and you end up with a velocity value well beyond 127 which
does not exist in MIDI. So KSP is so friendly to remind you that it was told to play a note with
a velocity that is simply not possible. In this case, KSP will process the play_note()
function with a velocity of 127 and output an error message.
An error message does not necessarily lead to a catastrophe; in our script we actually could
live with such an error message since the harmonizer does its job. However, make it a habit to
watch out for those messages and program your scripts in such a way that no errors are
produced.

Kontakt Script Language Manual
19
Take a look at the following:
on init
declare ui_knob $Interval (-12,12,1)
declare ui_knob $Velocity (-64,64,1)
$Interval := 7
$Velocity := 20
message ("")
end on
on note
if ($EVENT_VELOCITY+$VELOCITY > 127)
play_note($EVENT_NOTE+$Interval,127,0,-1)
else
play_note($EVENT_NOTE+$Interval,$EVENT_VELOCITY+$VELOCITY,0,-1)
end if
end on
Again, set the V
Ve loc ity knob to 64 and play a loud note; no error message will be produced.
So let's go through this script. It contains two new elements: the message() function and
the if…else…end if control statement.
The message function writes text into the Kontakt status line. Here's the complete definition.
message(<number,variable or text>)
display numbers, variable values and text in the status line in Kontakt
<number>
display single numbers: message(2), message(128)
<variable>
display the value of a variable: message($EVENT_VELOCITY)
<text>
display text: message("script info") – you must put the text string in
quotation marks
Remarks
you can also use combinations of the above:
message("Velocity: " & $EVENT_VELOCITY)
you must use the & operator in order to concatenate elements
The message() function can be extremely helpful in scripts when you run into problems
and need to retrieve specific information. Please note that only one message can be displayed
in the Kontakt status line, so you will always see the last output of message().
If you want to output a message to the user, please do not use the message() function.
There is a GUI label (explained later), which is more useful for those purposes.
Imagine having 16 instruments loaded, each with 5 scripts: if every scripts outputs messages
(something like: this script was created by xxx, master of scripting!), it can get VERY
annoying.
In our example we wrote: message("") (i.e. nothing) in the init callback; this is helpful if
you want to clear previous error messages.

Kontakt Script Language Manual
20
Make it a habit to write message("") in the init callback. You can then be sure that all
previous messages (by the script or by the system) are deleted and you see only new
messages.
The next new element is the if…else…end if control statement.
If the condition $EVENT_VELOCITY + $Velocity > 127 is t
tru e (i.e. the sum is larger
than 127), the script will output:
play_note($EVENT_NOTE+$Interval,127,0,-1)
If nnot (i.e. the sum is equal or less 127), the script will output:
play_note($EVENT_NOTE + $Interval, $EVENT_VELOCITY+$VELOCITY,0,-
1)
An if statement is closed by the term end if.
So now we can be sure that the play_note() function will always process correct velocity
values (i.e. in the range of 1 - 127).
Coo l… e n ou gh s m art ta l k. Ar e w e fi na l l y f in ish ed n ow ?
No.
Are you really sure this script will not produce any error messages? We were talking about
velocities exceeding 127, but did we talk about velocities below 1, which are also not
possible?
Right, turn the VVe loc ity knob to -40 and play a soft note, you will get the same error
message since the velocity in the play_note() function was below 1.

Kontakt Script Language Manual
21
Without any further comments, take a look at the following script:
on init
declare ui_knob $Interval (-12,12,1) {transposition amount}
declare ui_knob $Velocity (-64,64,1) {Vel amount for new note}
$Interval := 7 {initialize to a perfect fifth}
$Velocity := 20 {initialize to 20: all generated notes are louder}
message (" ") {clear Kontakt status line}
end on
on note
{check if Vel is higher than 127}
if ($EVENT_VELOCITY+$VELOCITY > 127)
play_note($EVENT_NOTE+$Interval,127,0,-1)
else
{check if Velocity is lower than 1}
if ($EVENT_VELOCITY+$VELOCITY < 1)
play_note($EVENT_NOTE+$Interval,1,0,-1)
else
play_note($EVENT_NOTE+$Interval,$EVENT_VELOCITY+$VELOCITY,0,-1)
end if
end if
end on
Now your script should work as expected and will not produce any error messages.
By the way, the above announcement "
Without any further comments
" is not quite true. In
fact, our script now has many comments indeed…
Take a look at the script editor:
Everything you write between curly brackets: {........} is a comment; it is not
interpreted by KSP (in the script editor, comments are highlighted). The purpose of comments
is just to help you structure your code so at every point you're know what you're doing.

Kontakt Script Language Manual
22
Be s m a rt , us e c om men t s!
You might find it silly to comment every command of code, but when working on larger scripts
this might become extremely helpful. Let's say you work on a larger script, take a break for a
couple of weeks and then come back to your script; without comments it is very hard to "get
back into the code".
Also, do not expect anybody to help you with your scripts when you encounter problems if your
script has no comments; it is just too difficult to look at 500 lines of code from somebody
else without any comments.
S
So m y s cr ipt is up an d r u nn i ng . A n yt h in g e lse ?
Yep, one more thing and we're done for today.
Load the script and find a nice combination of IIn t er v al and VVe l o c i t y for your upcoming
musical masterpiece. Save the patch (or your project if you're working in a host sequencer)
and reopen it: all your settings in the script module are lost!
How come?
Whenever you load a script or a patch that contains a script, the init callback is executed.
Thus all variables (in our script the two knobs) are reset to their initial value (i.e. the values
they were assigned to in the init callback).
Now th at' s j u st gr e at –
no t o t al re c al l w i th scr i pt s a t a ll?
You're right. It would be pretty useless to load a script into a patch, tweak it, save the patch
and lose your settings. The only workaround would be to always write the parameter values
into the init callback, but that's not really how a musician works.

Kontakt Script Language Manual
23
Therefore it is possible to make variables pp er s is t e n t. Try this script:
on init
{----- GUI elements -----}
declare ui_knob $Interval (-12,12,1) {transposition amount}
declare ui_knob $Velocity (-64,64,1) {Vel amount for new note}
{----- Inits -----}
$Interval := 7 {initialize to a perfect fifth}
$Velocity := 20 {initialize to 20: all generated notes are louder}
{----- Recall -----}
make_persistent ($Interval) {save the state of the knob Interval}
make_persistent ($Velocity) {save the state of the knob Velocity}
message ("") {clear Kontakt status line}
end on
on note
{check if Vel is higher than 127}
if ($EVENT_VELOCITY+$VELOCITY > 127)
play_note($EVENT_NOTE+$Interval,127,0,-1)
else
{check if Velocity is lower than 1}
if ($EVENT_VELOCITY+$VELOCITY < 1)
play_note($EVENT_NOTE+$Interval,1,0,-1)
else
play_note($EVENT_NOTE+$Interval,$EVENT_VELOCITY+$VELOCITY,0,-1)
end if
end if
end on
Load the script, make some changes to it, save the patch and reload the patch: everything in
its right place!
This is achieved by using the function
make_persistent(); this function has to be written in
the init callback and must contain the variable name.
make_persistent(<variable-name>)
retain the value of a variable when a patch is loaded
All variable types (e.g. arrays, user defined variables) can be made persistent, not just UI
control variables.
So that's it - the script is finally complete. Congratulations!
Now give it a nice title, save it, and…most important of all…make music with it!
S
Su m ma r y
You can execute commands under certain conditions with if…else…end if. By using the
message() function, you can display numbers, variable values or text in the Kontakt status
line. If you want all variables (e.g. knobs) to be saved with the patch, use the
make_persistent() function.

Kontakt Script Language Manual
24
Comments are written in curly brackets: {this is a comment}. They are an
immeasurable help for you and others in understanding the code.
This concludes our little BB a s ic Scr ipt in g chapter. From now on, we'll move on at a slightly
faster pace with more complete definitions. Be sure to always play around with everything as
you learn it. This is the only way to really grasp the full potential of the Kontakt Script
Language. Don't be afraid to make mistakes. You cannot ruin Kontakt with any script…

Kontakt Script Language Manual
25
Fundamentals
General rules concerning the syntax
Let's start by laying down some basic rules about the syntax of the script language (e.g. the
way scripts have to be written in order to be properly executed):
• each command has to be written in one line
• there can be an infinite number of spaces between the command lines
• there can be an infinite number of spaces between single words
• the script language is case sensitive, so the command
play_note() would not be
recognized when spelled
Play_Note()
• if one command line is too long and therefore is difficult to read, you can break it by
typing "
... "at the end of the line. Since a script statement must always be contained
within a single line, we need a special mechanism to tell the processor that our line is not
yet finished, should we want to break it.
So the following two scripts are identical:
on note
if($EVENT_VELOCITY > 100)
message ("Script message: key struck HARD")
else
message("Script message: key struck SOFT")
end if
end on
is the same as
on note
if( $EVENT_VELOCITY > 100)
message(...
"Script message: key struck HARD")
else
message("Script message: key struck SOFT")
end...
if
end on
• syntax errors are reported in the script status line. The line containing the error is marked
in red.
• errors during a running script are reported in the Kontakt status line below Kontakt's
browser.

Kontakt Script Language Manual
26
Callbacks
Callbacks are programs which are executed at certain times. If you press and hold a note, the
note callback is executed, but releasing the note triggers the release callback and so forth.
There are five different types of callbacks:
on init ... end on
initial callback, executed when the script was successfully analyzed
on note ... end on
note callback, executed whenever a note on message is received
on release ... end on
release callback, executed whenever a note off message is received
on ui_control (<variable-name>) ... end on
ui callback, executed whenever the user changes the respective UI element
on controller ... end on
controller callback, executed whenever a cc or pitch bend message is received
(actually there's two more callbacks used for rpn/nrpn messages, but those two callbacks can
be seen as "special" controller callbacks).
You can stop a callback with the statement exit:
exit
immediately stops a callback
Variables
Let's go back to our first script:
on note
play_note(60,120,0,-1)
end on
As we said – having each note accompanied by middle C3 is not very spectacular. So if we
want each played note to be accompanied by a newly generated note which has the same
velocity and sounds an octave higher we write:
on note
play_note($EVENT_NOTE + 12,$EVENT_VELOCITY,0,-1)
end on

Kontakt Script Language Manual
27
Instead of a specific note number we write $EVENT_NOTE + 12, instead of specifying a
velocity we type
$EVENT_VELOCITY. $EVENT_NOTE and $EVENT_VELOCITY are so-called
bui lt-i n v ar i abl es;
they contain the note number and the velocity of the note which
triggered the callback.
Variables are the most important part of the script language. Speaking in computer terms,
they are named storage spaces for numbers. We have several types of variables which we'll
discuss in a moment, but for now it's important that we distinguish between uu s er- def in e d
vari ab l es and bbu i l t- i n v ar iab l es.
Both user-defined and built-in variables can have two states:
• normal variables, marked by a dollar sign (
$my_variable or $EVENT_VELOCITY) or an "at"
sign (
@my_text)
• array variables, marked by a percent sign (%my_array[]or %KEY_DOWN[<note-number>])
or an exclamation mark (
!my_text_array[])
A normal variable can store a single integer value or a text string. An array variable is similar
to a normal one, but it can store several values/text strings at once. An array is an indexed list
of numbers, similar to a table with each index x pointing to an address y. An array can have 1
to 512 indices.
De c l ar ati o n o f v ar i ab l es
All user-defined variables must be declared. Declaring a variable means that its name is
registered for subsequent use and its value is initialized to a certain value. Let's look at some
examples of variable declarations:
on init
declare $first_variable
declare $second_variable := 12
declare const $third_variable := 24
declare %first_array[4]
declare %second_array[3] := (3,7,2)
end on
So what does this script do?
• The first line marks the beginning of an init callback (you'll recall that an init callback is
executed immediately after the script has been successfully analyzed).
• In the second line, a normal variable called first_variable is declared by using the
statement declare. It has no value assigned to it by the user so it is initialized to zero.
• The third line declares a normal variable called second_variable and assigns it the value
12 with the operator
:=
• The fourth line declares a special normal variable: a constant called third_variable. A
constant is pretty much the same thing as a normal variable, except that its value cannot
be changed and it's a little more efficient (since it need not be evaluated at runtime).
• The fifth line declares an array called first_array with four elements, all initialized to zero.
• The sixth line declares an array called second_array with three elements, which are
initialized to 3, 7 and 2.
• The seventh line marks the end of the init callback.

Kontakt Script Language Manual
28
We can see that variables have certain naming conventions: non-array variables must start
with a dollar sign, whereas arrays must start with a percent sign. The syntax is always the
same as in the example; constant declarations must always include the initial value, which
gets assigned by the := operator.
Now we'll take the script from above (which does not do anything yet) and try to extend it.
Wor k in g w ith v a r ia b l e s
Copy the following script and play a note on the keyboard:
on init
declare $first_variable
declare $second_variable := 12
declare const $third_variable := 24
declare %first_array[4]
declare %second_array[3] := (3,7,2)
end on
on note
play_note ($second_variable + 48,$third_variable + 96,...
%first_array[2] + $first_variable,%second_array[0] - 4)
end on
This (rather useless) script generates the same note as our very first script: each played note
will be accompanied by the note C3 with a velocity of 120…
Its purpose is to show an extremely basic idea of manipulating variables. The above
play_note() function is identical to play_note (60, 120, 0, -1):
•
$second_variable + 48 equals 60
•
$third_variable + 96 equals 120
•
%first_array[2] equals 0 since index number 2 points to the value 0
•
%second_array[0] - 4 equals -1, since index number value points to value 3 which is
subtracted by 4
The built-in variables are very important and powerful things. They cannot be declared but
"are always there". We take a look at two important built-in variables here (a complete list of
all built-in variables can be found in the appendix of this document):
$EVENT_NOTE
note number of the event which triggered the callback
$EVENT_VELOCITY
velocity of the note which triggered the callback
$EVENT_NOTE contains the note value of the MIDI event that triggered the containing
callback and $EVENT_VELOCITY is its corresponding velocity. It's pretty obvious that both
variables may not be used within an init callback (since the init callback doesn’t get triggered
by a key and thus has no note or velocity value!).

Kontakt Script Language Manual
29
Valid note values go from 0 – 127 which correspond to C-2 – G8 obviously.
$EVENT_VELOCITY can contain values from 1 to 127. As you can see, built-in variables are
spelled with capitals, so it's a good idea if you stick to small letters for your own variables.
Let's look at some examples that contain both types of variables.
on init
declare $new_note
end on
on note
$new_note := $EVENT_NOTE + 12
play_note($new_note,$EVENT_VELOCITY,0,-1)
end on
And again, this script accompanies each and every note you play with C3 and a velocity of
120…
The variable $new_note is declared and has the value zero, since it was not assigned to a
value. By hitting a note, the note callback is processed, where the value of $new_note is
replaced by the expression $EVENT_NOTE+12. (remember: by using the operator := the
value of the left variable is replaced by the value of the right variable).
CCa n w e PL E A SE m a ke a scri p t th a t doe s no t a cc o m p any eac h not e I pla y wi t h C?
Sure we can. Check out the following:
on init
declare %addNote[12] := (4, 6, 3, 6, 3, 4, 6, 4, 6, 3, 6, 3)
declare $keyClass
end on
on note
$keyClass := $EVENT_NOTE mod 12
play_note($EVENT_NOTE + %addNote[$keyClass],$EVENT_VELOCITY,0,-1)
end on
Play a few notes – magic, huh? Each note you play will be accompanied by note which really
fits well in the key of C major…
Before we start analyzing this script, let's first direct our attention to the modulo operator
mod. A modulo operator divides two numbers and outputs the remainder of the division, so for
example 14 mod 12 equals 2, 128 mod 10 equals 8 and so on.
In our example we can see a very common use for the modulo operator: by writing
$EVENT_NOTE mod 12 we can retrieve the pitch class (i.e. the pitch independent of the
octave) of the played note. So whenever you hit any D, $keyClass will always be 2.
Let's assume you've played D3 (62): now this variable is used as an index in the array
%addNote[12] which results in the new note number 62 + 3 = 65, which equals F3.

Kontakt Script Language Manual
30
Stri ng Var ia b les
There are two variable types which store text strings instead of integers:
• string variables, which are declared with a
@ prefix
• string arrays, which are declared with a
! prefix
See the following script for a simple example:
on init
declare @text
@text := "note played: "
declare !list[12]
!list[0] := "C"
!list[1] := "C#"
!list[2] := "D"
!list[3] := "D#"
!list[4] := "E"
!list[5] := "F"
!list[6] := "F#"
!list[7] := "G"
!list[8] := "G#"
!list[9] := "A"
!list[10] := "A#"
!list[11] := "B"
end on
on note
message(@text & !list[$EVENT_NOTE mod 12])
end on
Per s ist en t v a r i abl e s
In the Basic Scripting chapter, the command
make_persistent() was already introduced:
make_persistent(<variable-name>)
retain the value of a variable when a patch is loaded
Whenever you load a patch or a script, the init callback is processed and the persistent
variables are set to their saved state. Additionally, the value of persistent variables is also
saved when clicking on Apply. So when you load for example the Arpeggiator, make some
changes to the rhythm in the gui and then decide to edit the code of this particular script, you
will not loose the changes you've made before.
Please note: if you load a script from the script menu, the value of persistent variables is NOT
buffered. This is necessary, since for example you could have more than one script with the
same variable name.
So if you load a script which contains the variable name
$Time (say for example a delay
script), make some changes and then load a different script which contains the same variable
name (say for example sequencing script), you would not want the changes of the first script
to be applied to the second script.

Kontakt Script Language Manual
31
Script Call Order
There are five scripts that are called in ascending order. The first script receives MIDI signals
from the keyboard or a sequencer, while the other scripts receive the MIDI signals from the
script preceding them.
If one event is ignored in script 1, it will then not appear in the following scripts. If for
example you generate notes in script 1, script 2 will receive these notes as if they were being
played on the keyboard.
Variables are only valid in the script in which they appear, so you could for example use the
variable $tune_amount independently in different scripts. That's why you can safely insert
scripts after each other, for example:
Midi Latch -> Harmonize -> Arpeggiator -> Microtuning
Take a look at the patch AA mb ien t H ar m on i za t io n .n k i which is part of the Kontakt 2
library. The patch can be found at:
Kontakt 2 Library/02 - KSP Instruments/06 - Harmonizer/Ambient Harmonization.nki.
• The first script latches incoming MIDI notes.
• The second script retriggers these notes at a specific rate.
• The third script creates chords out of the repeating notes.
• The fourth script constrains these chords to a specific scale.

Kontakt Script Language Manual
32
Tempo- and time-based scripting
The wait() function
So far, all artificially generated notes have been played together with the played note. But
what if we want to delay that generated note - for example, in a delay or arpeggiator situation?
It's time to say hello to a very important statement in the script engine: the wait() function.
wait(<wait-time>)
pauses the callback for the specified time
<wait-time>
wait time in microseconds
wait() stops the callback at the position in the script for the specified time. In other words,
it freezes the callback (although other callbacks can be accessed or processed). After the
specified time period the callback continues.
All timing information (except $ENGINE_UPTIME) in the Kontakt Script Language is
measured in microseconds (µsec), so 1000000 µsec equal 1 sec.
Let's see wait() in action:
on init
declare %addNote[12] := (4, 6, 3, 6, 3, 4, 6, 4, 6, 3, 6, 3)
declare $keyClass
end on
on note
$keyClass := $EVENT_NOTE mod 12
wait(500000)
play_note($EVENT_NOTE + %addNote[$keyClass],$EVENT_VELOCITY,0,-1)
wait(500000)
play_note($EVENT_NOTE + 12,$EVENT_VELOCITY,0,-1)
end on
Play C3 and hold the note. After 0.5 seconds you'll hear E3, followed by C4 0.5 seconds
later. Because of the wait() function, the callback is not processed right away but within
the time period of one second (two wait() functions, each is 0.5 seconds long).
Now release C3 and play and hold E3. You'll hear a similar result, G3 and E4 are being
played. So far, everything is fine.
But now hit both keys, C3 and E3 together. The result is… well it's not the same as before
when we played the notes one after the other.

Kontakt Script Language Manual
33
What happened?
First of all, we need to know that since each callback lasts one second, a second note played
shortly after ( < 1 sec) will produce a second callback, which is running parallel to the first
callback! In this case, the two callbacks are running simultaneously, one after the other.
The second callback (triggered by E3) will assign a new value to $keyClass, but this
variable is also needed by the first callback (triggered by C3) resulting in a wrong
$keyClass variable for the first callback. So what we need is a variable for every note,
which brings us to a new variable type: the pp o l y ph on i c v a ri a bl e .
Polyphonic Variables
Try the following:
on init
declare %addNote[12] := (4, 6, 3, 6, 3, 4, 6, 4, 6, 3, 6, 3)
declare polyphonic $keyClass
end on
on note
$keyClass := $EVENT_NOTE mod 12
wait(500000)
play_note($EVENT_NOTE + %addNote[$keyClass],$EVENT_VELOCITY,0,-1)
wait(500000)
play_note($EVENT_NOTE + 12,$EVENT_VELOCITY,0,-1)
end on
Now $keyClass is a polyphonic variable. If you want to declare a polyphonic variable, you
must write polyphonic between declare and the variable name.
declare polyphonic $<variable-name>
declare a user -defined polyphonic variable to store a single integer value
Play C3 and E3 together. You should hear a more "correct" arpeggio. This is because each
callback has its own $keyClass variable. Please note that these variables need more
memory (4 KB per instance) and can only be used in note and release callbacks.
A polyphonic variable retains its value in the release callback of the corresponding note.

Kontakt Script Language Manual
34
Control Statements
A lot of times, we (or, better said, KSP) need to make decisions based on certain conditions.
KSP knows three types of control statements: if, select and while.
if…else…end
The if…else…end control in the next example is quite easy to grasp:
on note
if($EVENT_VELOCITY > 80)
play_note($EVENT_NOTE+12,$EVENT_VELOCITY,0,-1)
message("loud " & $EVENT_VELOCITY)
else
message("soft " & $EVENT_VELOCITY)
end if
end on
If the condition $EVENT_VELOCITY > 80 is true, the script processes the if branch; if
the condition is false the else branch is processed. The else branch is optional - it may
also be omitted.
An if() statement is closed by the term end if.
select()
select is an elaborated version of if..else..end:
on note
select($EVENT_VELOCITY)
case 1 to 40
message("Script message: key struck SOFT")
case 41 to 100
message("Script message: key struck MEDIUM")
case 101 to 126
message("Script message: key struck HARD")
case 127
message("Script message: key struck BRUTAL")
end select
end on
The select statement is similar to the if statement, except that it has an arbitrary number
of branches. The expression after the select keyword is evaluated and matched against the
single case branches. The first case branch that matches is executed. The case branches
may consist of either a single constant number or a number range (expressed by the term "x
to y").
A select() statement is closed by the term end select.

Kontakt Script Language Manual
35
while()
In principle, while is a continuous if statement. Therefore it can be referred to as wwh il e
loop . In the next example we make use of the while statement to simulate a mandolin
tremolo.
on note
wait(70000)
while($NOTE_HELD = 1)
play_note($EVENT_NOTE,$EVENT_VELOCITY,0,70000)
wait(70000)
end while
end on
The built-in variable $NOTE_HELD is 1 if the key which triggered the callback is still
pressed. Otherwise it is 0. As long as you hold a note, KSP will run through the while loop,
meaning it will play a note, wait, play a note and so forth.
When you release the key, the while condition is not true anymore since $NOTE_HELD will
output 0, so everything inside while will be ignored and the callback comes to an end.
A while() statement is closed by the term end while.

Kontakt Script Language Manual
36
Operators
Boolean Operators
Boolean operators are used in if and while statements, since they return if the condition is
either true or false. Below is a list of all Boolean operators. x, y and z denote numerals, a and
b stand for Boolean values.
Boolean Operators
x > y
greater than
x > y
less than
x >= y
greater than or equal
x <= y
less than or equal
x = y
equal
x # y
not equal
in_range(x,y,z
)
true if x is between y and z
not a
true if a is false and vice versa
a and b
true if a is true and b is true
a or b
true if a is true or b is true
Arithmetic Operators
The following arithmetic operators can be used in the script language:
Arithmetic operators
x + y
addition
x - y
subtraction
x * y
multiplication
x / y
division
x mod y
modulo
-x
negative value
abs(<expression>
)
returns the absolute value of an expression
inc(>expression>
)
increments an expression by 1
dec(<expression>
)
decrements an expression by 1

Kontakt Script Language Manual
37
Bit Operators
The following bit operators can be used:
Bit operators
x .and. y
bitwise and
x .or. y
bitwise or
.not. x
bitwise negation
sh_left(<expression>,<shift-bits>)
shifts the bits in <expression> by the
amount of <shift-bits> to the left
sh_right(<expression>,<shift-bits>)
shifts the bits in <expression> by the
amount of <shift-bits> to the right
Array Functions
To facilitate the usage of arrays, the following functions can be used:
sort(<array-variable>,<direction>)
sort an array in ascending or descending order:
With direction = 0, this function sorts in ascending order, with a value other than 0, it sorts in
descending order
num_elements(<array-variable>)
returns the number of elements in an array
With this function you can, e.g., check how many groups are affected by the current event by using
num_elements(%GROUPS_AFFECTED) .
search(<array-variable>,<value>)
searches the specified array for the specified value and returns the index
Example: $a := search(%array, 10) searches the array for the value 10 and return the first
position of that value to $a. If the value is not found, the function returns -1.
array_equal(<array1-variable>,<array2-variable>)
check the values of two arrays, true if values are equal
Random Generator
Finally there is the random() function, which generates random numbers between
<min-value> and <max-value>:
random(<min>,<max>)
generate a random number

Kontakt Script Language Manual
38
Group Management
If there are multiple groups in one instrument, it is possible to access them in the script
engine by using the following four functions:
disallow_group(<group-index>)
turn off the specified group, i.e. make it unavailable for playback
allow_group(<group-index>)
turn on the specified group, i.e. make it available for playback
find_group(<group-name>)
returns the group-index for the specified group
group_name(<group-index>)
returns the group-name for the specified group
Each group has an index number assigned to it. The indices are numbered from 0 to the
number of groups minus 1. If you don't know the index of a group, you can recall it by using
find_group(). Just type the name of the group in quotation marks and the index will be
returned. The function group_name() works the opposite way.
By default, all groups are allowed (they all play back). If you want to allow only one group, it's
best to disallow all groups by using disallow_group($ALL_GROUPS). $ALL_GROUPS is
a built-in variable that addresses all groups. As soon as all groups are disallowed you can, for
example, allow the first group by typing allow_group(0).
$ALL_GROUPS
addresses all groups in a disallow_group() and allow_group() function
on note
disallow_group($ALL_GROUPS)
allow_group(find_group("piano_1"))
end on
The groups can only be changed if the voice is not running.
Another helpful built-in array is %GROUPS_AFFECTED:
%GROUPS_AFFECTED
an array with the group indexes of those groups that are affected by the current Note On or Note Off
events
With this function you can, e.g., check how many groups are affected by the current event by
using num_elements(%GROUPS_AFFECTED).

Kontakt Script Language Manual
39
And yet another helpful built-in variable is $NUM_GROUPS:
$NUM_GROUPS
total amount of groups in an instrument
This built-in variable returns the amount of groups in an instrument. It is very useful when
declaring a generic drop-down menu with all group names:
on init
declare $count
declare ui_menu $group_menu
while ($count < $NUM_GROUPS)
add_menu_item ($group_menu,group_name($count),$count)
inc($count)
end while
end on
Of course, if you make any changes to the amount of groups in your instrument, or if you
change the names of the groups in your instrument, the changes to the menu are not reflected
right away. Either click on apply again, or save and reload the instrument (remember, the init
callback is processed when you click on Apply, or open a script from the Script menu, or
when you load an instrument).

Kontakt Script Language Manual
40
Event Management
Events and Note ID's
Each note is an event, regardless of whether the note comes from outside (keyboard,
sequencer) or from the script engine itself. For as long as the note decays after the note-off,
this event is existent, which means that most of the time many events exist simultaneously. In
order to access them, each event gets a unique number.
It's important to note that a callback and an event are two different things. A callback is a
program which is being interpreted by the computer, while an event could be seen as a virtual
voice.
The ID number of the note which started the callback is stored in the built-in variable
$EVENT_ID. The ID number of artificially generated notes can be accessed through
play_note():
on init
message ("")
declare $new_note_id
declare $original_note_id
end on
on note
$original_note_id := $EVENT_ID
wait(500000)
note_off($original_note_id)
$new_note_id := play_note($EVENT_NOTE + 12,$EVENT_VELOCITY,0,500000)
wait(500000)
note_off($new_note_id)
end on
on release
if ($EVENT_ID = $new_note_id)
message("note off new note")
wait (200000)
message ("")
end if
if ($EVENT_ID = $original_note_id)
message("note off original note")
wait(200000)
message ("")
end if
end on
By pressing a key the note callback is executed once. The release callback, however, is
executed twice as you can see in the Kontakt status line.
Why?
The play_note() function can be thought of as a virtual finger pressing a key, and since
every key has to be released sometime this artificial note-on generates a note-off, which then
triggers a release callback.

Kontakt Script Language Manual
41
Actually, play_note() should also execute a note callback in theory. However, this is not
the case, since one would get an infinite loop. So a play_note() function never executes
a note callback, even if started from a different callback.
Related to play_note() is note_off(), since this command also generates a note-off:
note_off(<ID-number>)
note_off() has the same impact on an event as releasing the note. note_off() will always trigger a
release callback
Actually the duration parameter in play_note() could be replaced by a combination of
wait() and note_off(). But since play_note() is used a lot, the duration parameter
is available in play_note().
And finally, if you want to get rid of an event altogether, use ignore_event()
on note
ignore_event($EVENT_ID)
play_note($EVENT_NOTE,$EVENT_VELOCITY,400000,-1)
end on
The original note which triggered the callback is available, as if the key were never pressed.
The note number and velocity however can still be used in the callback. play_note() plays
back the note, but the sample has an offset of 400 msec. A release callback can also be
ignored with ignore_event.
ignore_event(<ID-number>)
ignore an event in a callback
Changing Events
The values of $EVENT_NOTE und $EVENT_VELOCITY can be changed by using the
following functions:
change_note(<ID-number>,<new-note-number>)
change the note value of a specific note event
change_velo(<ID-number>,<new-velocity-number>)
change the velocity value of a specific note event
If the two functions are applied before the first wait(), the change occurs for the sounding
voice. If the voice is already running, only the value of the variable changes.
Until now, it was only possible to simulate MIDI signals (play_note() and note_off()),
or to ignore them (ignore_event()) or to change their value (change_note() and
change_velo()). With the following commands you can also alter the sample:

Kontakt Script Language Manual
42
change_pan(<ID-number>,<panorama>,<relative-bit>)
change the pan position of a specific note event
<ID-number>
the ID number of the event to be changed
<panorama>
pan position, values go from -1000 (left) to 1000 (right)
<relative-bit>
If the relative bit is set to 0, the change occurs relative to the start value of
the event. If it is set to 1, it occurs relative to the actual pan value.
The different implications are only relevant when there is more than one
change_pan() statement applied to the same event.
change_vol(<ID-number>,<volume>,<relative-bit>)
change the volume of the sample of a specific note event in millidecibels
<ID-number>
the ID number of the event to be changed
<volume>
volume change in millidecibels
<relative-bit>
If the relative bit is set to 0, the change occurs relative to the start value of
the event. If it is set to 1, it occurs relative to the actual volume value.
The different implications are only relevant when there is more than one
change_vol() statement applied to the same event.
change_tune(<ID-number>,<tune-amount>,<relative-bit>)
change the tuning of the sample of a specific note event in Millicents
<ID-number>
the ID number of the event to be changed
<tune-amount>
amount in Millicents, so 100000 equals one half tone
<relative-bit>
If the relative bit is set to 0, the change occurs relative to the start value of
the event. If it is set to 1, it occurs relative to the actual tune value.
The different implications are only relevant when there is more than one
change_tune() statement applied to the same event.
fade_in(<ID-number>,<fade-time>)
perform a fade-in of a specific note event
<ID-number>
the ID number of the event to be changed
<fade-time>
fade-in time in microseconds
fade_out(<ID-number>,<fade-time>,<stop-voice>)
perform a fade-out of a specific note event
<ID-number>
the ID number of the event to be changed
<fade-time>
fade-out time in microseconds
<stop-voice>
indicate if
the voice is stopped after it has been faded (1)
the voice is faded out and kept silence, but is still running (0)

Kontakt Script Language Manual
43
Grouping Events
Sometimes it is impractical to address each event separately. Therefore one has the option of
creating groups by assigning a mark to an event:
set_event_mark(<ID-number>,<bit-mark>)
assign the specified event to a specified event group
<ID-number>
the ID number of the event to be grouped
<bit-mark>
here you can enter one of 28 marks from $MARK_1 to $MARK_28 which is
addressed to the event. You can also address more than one mark to a single
event, either by typing the command or by using the operator +.
So instead of the individual ID you can use marks by typing by_marks(<bit-mark>) in
place of the ID (the program needs to know that you want to address marks and not ID's).
Let's look at the following example to illustrate this:
on init
declare $new_id
end on
on note
set_event_mark($EVENT_ID,$MARK_1)
$new_id := play_note($EVENT_NOTE + 12,120,0,-1)
set_event_mark($new_id,$MARK_1 + $MARK_2)
change_tune(by_marks($MARK_1),50000,0)
{Both notes are set 50 cent higher}
change_vol(by_marks($MARK_2),-6000,0)
{only the volume of the new note changes –6dB}
end on
by_marks(<bit-mark>)
address all events of the specified event group

Kontakt Script Language Manual
44
Assigning Event Parameters
It is possible assign up to four parameters to an event. As you know by now, each event has
certain parameters, which are bound to that event like an id number (
$EVENT_ID), a note
number (
$EVENT_NOTE) and velocity number ($EVENT_VELOCITY).
You can assign up to four parameters to an event by using
set_event_par(<ID-number>,<index>,<value>)
assign a parameter to an event
<ID-number>
the ID number of the associated event
<index>
the index (0 – 3) of the assigned parameter
<value>
the value of the assigned parameter
The four parameters reside in the array
%EVENT_PAR[], which consists of four elements
(
$EVENT_PAR[0] – $EVENT_PAR[3]).
Here's an example for a usage of
set_event_par():
This script resides in slot 1 and tunes each note 50 cent up (this simple script just
demonstrates the principle, it could stand for example for scripts like Microtuning):
on note
change_tune($EVENT_ID,50000,1)
set_event_par($EVENT_ID,0,50000)
end on
In slot 2, an artificial note is created. Since the original event is ignored, the tuning
information (i.e. the 50 cent) is lost. By using
set_event_par in the first slot and
%EVENT_PAR[] in the second slot, you can retrieve this tuning information:
on init
declare $art_id
declare ui_button $On_Off
end on
on note
ignore_event($EVENT_ID)
$art_id := play_note($EVENT_NOTE+2,$EVENT_VELOCITY,0,-1)
if ($On_Off = 1)
change_tune($art_id,%EVENT_PAR[0],1)
end if
end on

Kontakt Script Language Manual
45
User Interface Controls
The script engine is capable of generating user interface modules to facilitate the usage of the
script and to give the user hands-on control over the variables. The user interface controls
have to be declared in the init callback, just like the other variables. A UI control is basically
a variable that can be controlled by the user from the Kontakt interface. The UI controls
appear in a separate module in Kontakt. Here are all the available UI controls:
Buttons
declare ui_button $<variable-name>
create a user interface button
on init
declare ui_button $mybutton
end on
A button is a variable that can have the value 0 (not active/pressed) or 1 (active/pressed). If
you click on the button, the variable and the button toggle between the two states.
Knobs
declare ui_knob $<variable-name> (<min>,<max>,<display-ratio>)
create a user interface knob
on init
declare ui_knob $myknob (1,100,1)
$myKnob := 50
end on
The variable of the knob can hold integers from <min> (when the knob is turned left-most) to
<max> (when the knob is turned right-most). The default value when initializing is <min>. In
our example patch above however, we have assigned the value 50 to the variable $myknob
which defaults the knob to that value when initializing the script. The name of the variable
will also be displayed right of the knob, so choose your variable name wisely.
<display-ratio> is a little tricky to understand: it means the ratio of displayed vs.
internal value. That can be of advantage for example if you want to adjust a time parameter,
which needs to be in microseconds, but you want to show seconds to the user.

Kontakt Script Language Manual
46
Let's assume you need a knob with values going from 0 to 1000000, since you want the user
to choose a time between 0 and 1 second (remember, 1 million microseconds equals one
second). Then you'd supply the knob with a scale of 1000000. This way, you get the values
you need internally and the user sees something he can deal with. Furthermore, the knob
knows that it's required to display fractional values, since the internal resolution is higher
than the displayed one.
Supplying zero for the scale parameter is the same as supplying 1 and means that the internal
and the displayed ranges match each other.
Menus
declare ui_menu $<variable-name>
create a user interface menu
add_menu_item (<variable>,<text>,<number>)
add text to a user interface menu
on init
declare ui_menu $myMenu
add_menu_item($myMenu,"take the first",0)
add_menu_item($myMenu,"take that",1)
add_menu_item($myMenu,"take this",2)
end on
The line declare ui_menu $myMenu declares a UI control variable and creates a menu
for it. The new menu will initially be empty, so we must fill it with something sensible. The
add_menu_item statement takes three parameters: first comes the menu variable, then
comes the text showing up in the menu, and finally comes the value the variable will have
when the particular menu item is selected.

Kontakt Script Language Manual
47
Text Labels
declare ui_label $<variable-name> (<width>,<height>)
create a user interface text label
set_text (<variable>,<text>)
when applied to a text label: delete the text currently visible in the specified label and add new text
add_text_line (<variable>,<text>)
add a new text line in the specified label without erasing existing text
on init
declare ui_label $myText(<width>,<height>)
set_text(<label_variable>,<text>)
add_text_line(<label_variable>,<text>)
end on
This creates a text field in which you can write text. You have to supply values for width and
height of the text field. The width is measured in columns and the height in lines, with a
maximum of six columns and six lines.
set_text() deletes text currently visible and adds new text, whereas add_text_line()
adds a new line and therefore can be used for logging.
Value Edit
declare ui_value_edit $<variable>(<min>,<max>,<display-ratio>)
create a user interface number box
on init
declare ui_value_edit $myEdit (0, 1000,10)
$myEdit := 166
end on
This control behaves exactly like a knob, with the difference that the user can enter a value by
double clicking.

Kontakt Script Language Manual
48
Table
declare ui_table %<array-name>[columns](<width>,<height>,
<range>)
create a user interface table
on init
declare ui_table %table[32](2,2,128)
end on
This control creates a table that can be edited by the user. The number of columns is
indicated in brackets (the number of indices or "x" values) and is limited to a maximum of
128. <width> and <height> work as in the text label. The <range> in the example
above is from 0 to 127, positive values for the range create a unipolar table while negative
values create a bipolar table. This means we get a table with steps from -100 to 100 if
<range> is set to -100.
Positioning of ui elements
A script can appear with one, two or three height units. One height unit equals two lines, so
six lines is the maximum a script module can have. The number of columns is always six.
By using the command
move_control (<variable>,<x position>, <y position>)
move a UI element to a specific place
you can move a UI control around. You can do this not only in the init callback, but in all
callbacks; thus allowing ui elements to appear dynamically at any position. Here's an
example:
on init
declare ui_label $label (1,1)
set_text ($label,"Move the wheel!")
move_control ($label,3,6)
end on
on controller
if ($CC_NUM = 1)
move_control ($label,3,(%CC[1] * (-5) / (127)) + 6 )
end if
end on
(don't worry about the
on controller callback, this will be covered later).

Kontakt Script Language Manual
49
Hiding GUI elements
You can hide GUI elements like buttons, knobs etc. Just move the control to the position 0 - 0
and the control is invisible. move_control(<variable>,0,0) can be used in all
callbacks and can be applied to more than one GUI element:
on init
declare ui_button $Bingo
$Bingo := 1
move_control ($Bingo,0,0)
end on
on note
move_control ($Bingo,3,6)
end on
on release
move_control ($Bingo,0,0)
end on
UI Callbacks
You can create a callback for each UI control, which is triggered when the user changes the
respective control. The example below creates a button which plays a note when it's being
pressed.
on ui_control (<variable-name>) ... end on
UI callback, executed whenever the user changes the respective UI element
on init
declare ui_button $play
$play := 0
end on
on ui_control ($play)
play_note(60,120,0,1000000)
wait (1000000)
$play := 0
end on
The variable name of the UI control has to be indicated in the callback. Otherwise, these
callbacks behave like the other ones.
Naming of GUI elements
It is possible to label GUI elements like knobs, buttons and value edits with text strings. The
command is the same as for GUI labels:
This command can be used in all callbacks:
set_text (<variable>,<text>)
when applied to a label: delete the text currently visible in the specified label and add new text
when applied to knobs, buttons and value edits: set the name of the ui element

Kontakt Script Language Manual
50
Here's a simple example for this:
on init
declare ui_button $Toggle
$Toggle := 0
set_text ($Toggle,"Off")
end on
on ui_control ($Toggle)
select ($Toggle)
case 0
set_text ($Toggle,"Off")
case 1
set_text ($Toggle,"On")
end select
end on
Performance View
By using the command:
make_perfview
activates the performance view for the respective script
in the init callback, you can the GUI of the script will appear as the performance view.
So, when this script is used in an iinstrument:
on init
declare ui_knob $A (0,127,1)
declare ui_knob $B (0,127,1)
declare ui_knob $C (0,127,1)
declare ui_knob $D (0,127,1)
declare ui_knob $E (0,127,1)
declare ui_knob $F (0,127,1)
make_perfview
end on
the instrument's performance view looks like this:

Kontakt Script Language Manual
51
Usage of Midi Controllers
The Controller Callback
The last callback type we haven't handled so far is the controller callback. It gets called every
time a controller value changes:
on controller ... end on
controller callback, executed whenever a cc or pitch bend message is received
The controller callback must be used with care, since controllers tend to produce quite a large
number of events. Reacting to those events with complicated scripts means using a lot of CPU
and that might produce unwanted artifacts and compromise playback.
on controller
message ("You've changed a controller!")
wait (1000000)
message ("")
end on
Similar to the note and release callbacks there is an ignore function:
ignore_controller
ignore a controller event in a controller callback
This function has no parameters.
Controller variables and arrays
You can access the controller number which started the callback with the built-in variable
$CC_NUM:
$CC_NUM
controller number of the controller which triggered the callback
By using the array %CC[<controller number>] you can access the specific controller
values which go from 0 to 127:
%CC[<controller-number>]
current controller value for the specified controller (CC# 128 = pitch bend)
Pitch bend values can be retrieved by using the built-in variable $VCC_PITCH_BEND: pitch
bend values go from –8192 to +8191:
$VCC_PITCH_BEND
the value of the virtual cc controller for pitch bend

Kontakt Script Language Manual
52
So by writing
on controller
message(%CC[$VCC_PITCH_BEND])
end on
the pitch bend values from –8192 to +8191 are displayed on incoming pitch bend messages.
Another array is %CC_TOUCHED[<controller-number>]:
%CC_TOUCHED[<controller-number>]
1 if a controller value has changed, 0 otherwise
This array will contain a "1" for each controller that has been changed since the last visit to
the controller callback and a zero for all others. It's important to know if a certain controller of
interest has changed, since the callback gets executed for every controller.
on controller
if (%CC_TOUCHED[1] = 1)
message ("You've changed the mod wheel!")
wait (1000000)
message ("")
end if
if (%CC_TOUCHED[$VCC_PITCH_BEND] = 1)
message ("You've changed the pitch bend wheel!")
wait (1000000)
message ("")
end if
end on
A function related to controllers is set_controller():
set_controller(<controller-number>,<controller-value>)
send a MIDI CC value of a specific controller
This function is available in all callbacks. With it you can assign controller values to
controllers. By modulating parameters in Kontakt through MIDI CC's, you can basically access
all parameters in Kontakt through the script engine.

Kontakt Script Language Manual
53
Working with RPN and NRPN messages
There are two other callback types available, which are called whenever a rpn or nrpn message
is received:
on rpn ... end on
rpn callback, executed whenever a rpn (registered parameter number) message is received
on nrpn ... end on
nrpn callback, executed whenever a nrpn (non-registered parameter number) message is received
To make use of these two callbacks, the following two built-in variables are of importance:
$RPN_ADDRESS
the parameter number of a received rpn/nrpn message (0 – 16383). Can only be used in an rpn/nrpn
callback.
$RPN_VALUE
the value of a received rpn/nrpn message (0 – 16383). Can only be used in rpn/nrpn callback.
The variables can be used both in an rpn and nrpn callback. The following simple script looks
for three common rpn types:
on rpn
if ($RPN_ADDRESS <= 2)
select ($RPN_ADDRESS)
case 0
message("Pitch Bend Sensitivity")
case 1
message("Channel Fine Tuning")
case 2
message("Channel Coarse Tuning")
end select
else
message ("Not specified")
end if
end on
Any (n)rpn message uses two bytes to represent the parameter number, for example in the
case of rpn messages CC 101 represents the MSB (most significant byte) and CC100 the LSB
(least significant byte).
Also, two bytes are used to represent the value (CC 6 for MSB and CC 38 for LSB). It is
possible to retrieve the MSB or LSB portion of a message by using the following functions:
msb(<built-in variable>)
returns the MSB portion of a rpn/nrpn address or value.
lsb(<built-in variable>)
returns the LSB portion of a rpn/nrpn address or value.

Kontakt Script Language Manual
54
And finally there are two commands, with which you can create rpn and nrpn messages
(similar to
set_controller). These commands can be used in all callbacks:
set_rpn(<address>,<value>)
send a rpn message
set_nrpn(<address>,<value>)
send a nrpn message

Kontakt Script Language Manual
55
Advanced Concepts
Preprocessor
A preprocessor is used to exclude code elements from interpretation. Here's how it works:
USE_CODE_IF(<condition>)
...
END_USE_CODE
or
USE_CODE_IF_NOT(<condition>)
...
END_USE_CODE
<condition> refers to a symbolic name which consists of alphanumeric symbols, preceded
by a letter. You could write for example:
on note
{do something general}
$var := 5
{do some conditional code}
USE_CODE_IF_NOT(dont_do_sequencer)
while ($count > 0)
play_note()
end while
END_USE_CODE
end on
What's happening here?
Only if the symbol
dont_do_sequencer is not defined, the code between USE_ and
END_USE will be processed. If the symbol were to be found, the code would not be passed on
to the parser; it is as if the code was never written (therefore it does not utilize any CPU
power).
You can define symbols with
SET_CONDITION(<condition symbol>)
and delete the definition with
RESET_CONDITION(<condition symbol>)
All commands will be interpreted bbef ore the script is running, i.e. by using USE_CODE_ the
code might get stalled before it is passed to the script engine. That means,
SET_CONDITION
and
RESET_CONDITION are actually not true commands: they cannot be utilized in
if()...end if statements; also a wait() statement before those commands is useless.
Each
SET_CONDITION and RESET_CONDITION will be executed before something else
happens.
All defined symbols are passed on to following scripts, i.e. if script 3 contains conditional
code, you can turn it on or off in script 1 or 2.
You can use conditional code to bypass system scripts. There are two built-in symbols:

Kontakt Script Language Manual
56
NO_SYS_SCRIPT_PEDAL
NO_SYS_SCRIPT_RLS_TRIG
If you define one of those symbols with
SET_CONDITION(), the corresponding part of the
system scripts will be bypassed. For clarity reasons, those definitions should always take place
in the
init callback.
on init
{we want to do our own release triggering}
SET_CONDITION(NO_SYS_SCRIPT_RLS_TRIG)
end on
on release
{do something custom here}
end on

Kontakt Script Language Manual
57
Engine Parameter
Gen er a l S y nt a x
It is possible to control all automatable Kontakt parameters with a KSP. The general syntax is
the following:
_set_engine_par(<parameter>,<value>,<group>,<slot>,<generic>)
control any automatable Kontakt parameter from KSP
<parameter>
here you specify the parameter to be controlled with a built-in variable.
All of those built-in variables start with $ENGINE_PAR_ , e.g.
$ENGINE_PAR_VOLUME
$ENGINE_PAR_TUNE
$ENGINE_PAR_CUTOFF
You can find a list of all Kontakt parameters in the appendix of this manual.
<value>
The value to which the specified parameter is set.
The range of values is always 0 to 1000000.
<group>
the index (zero based) of the group in which the specified parameter resides.
If the specified parameter resides on an Instrument level, enter -- 1.
<slot>
the slot index (zero based) of the specified parameter, applies only Group
Effects, Instrument Insert and Send Effects and Modulators.
For Group/Instrument effects, this parameter specifies the slot in which the
effect resides (zero-based).
For internal modulators, this parameters specifies the modulation
assignment, based on the order of creation.
For external modulators, this parameter specifies the modulation module.
For all other applications, set this parameter to --1.
<generic>
this parameter applies to Instrument Effects (Send/Insert) and to internal
modulators.
For Instrument Effects, this parameter distinguishes between
1: Insert Effect
0: Send Effect
For internal modulators, this parameter specifies the actual modulation
assignment.
For all other applications, set this parameter to --1.
One word of caution before we delve into this: this command is only applicable for Kontakt
parameters which are available for automation, i.e. knobs and sliders. Additionally, the Bypass
knob of all filters and effects is available as an engine parameter.

Kontakt Script Language Manual
58
Another word of caution: since this command is nothing else then remote controlling the
parameter, just like automation. This also means, that changing values can be CPU intensive
(just like automation).
We can basically strip down the Kontakt parameters into four groups:
• "Basic" parameters, i.e. parameters that are available for every instrument (instrument
tune, pan and volume; group tune, pan and volume)
• Group and Instrument Effects
• External Modulators
• Internal Modulators
In the next four chapters, we'll demonstrate each scenario with some example scripts.
For the sake of simplicity, you don't have to use _set_engine_par to control parameters,
since MIDI events generated by set_controller can also be used to automate
parameters.

Kontakt Script Language Manual
59
Bas ic P ro ced u r e
The following script simply creates a knob which controls the instrument volume; no more, no
less:
on init
declare ui_knob $Volume (0,1000000,1000000)
end on
on ui_control ($Volume)
_set_engine_par($ENGINE_PAR_VOLUME,$Volume,-1,-1,-1)
end on
It's important to memorize the order of the last three parameters: group/slot/generic.
In our example above,
• the
group parameter is set to -- 1 since we address something on ii n s t ru men t level
• the
slot parameter is set to -- 1 since it has no function here
• the
generic parameter is set to -- 1 since it has no function here
If we want to control group volume instead, we write:
on init
declare ui_knob $Volume (0,1000000,1000000)
end on
on ui_control ($Volume)
_set_engine_par($ENGINE_PAR_VOLUME,$Volume,0,-1,-1)
end on
Now, the knob controls the volume of the first group, because the
group parameter has been
set to 0:
_set_engine_par($ENGINE_PAR_VOLUME,$Volume,0,-1,-1)
However, the knob will always only control the volume of the first group, regardless of the
amount of groups in the instrument.
Check out the following example:
on init
declare $count
declare ui_menu $group_menu
while ($count < $NUM_GROUPS)
add_menu_item ($group_menu,group_name($count),$count)
inc($count)
end while
declare ui_knob $Pan (0,1000000, 1000000)
end on
on ui_control ($Pan)
_set_engine_par($ENGINE_PAR_PAN,$Pan,$group_menu,-1,-1)
end on
Here, a drop down menu is created in the init callback with the group names of all groups in
the instrument. If you change the knob, the pan position of the chosen group will be changed.
Of course, if you make any changes to the amount of groups in your instrument, or if you
change the names of the groups in your instrument, the changes to the menu are not reflected
right away. Either click on apply again, or save and reload the instrument (remember, the init
callback is processed when you click on Apply, or open a script from the Script menu, or
when you load an instrument).

Kontakt Script Language Manual
60
Wor k in g w ith Gr ou p /In str u m e nt Eff ect s
Now, let's control the cutoff frequency of a filter which is applied as a Group Insert FX (we'll
leave out the generic group menu from above to save space and apply everything to the first
group). First, create an empty instrument and insert a filter into the third slot, then enter the
following script:
on init
declare ui_knob $Freq (0,1000000,1000000)
end on
on ui_control ($Freq)
_set_engine_par($ENGINE_PAR_CUTOFF,$Freq,0,2,-1)
end on
Now, the knob controls the cutoff frequency of a filter in the t
th i rd slot in the ffir s t group,
simply because:
• the
group parameter is set to 00 since we address the first group
• the
slot parameter is set to 22 since we look for an effect in the third slot
• the
generic parameter is set to -- 1 since it has no function here
Two minor remarks:
• the built-in variable
$ENGINE_PAR_CUTOFF is valid for all filter types
• if there is no filter in the specified slot, the knob will simply don't do anything.
Let's finish this little script by adding a Bypass button:
on init
declare ui_knob $Freq (0,1000000,1000000)
declare ui_button $Bypass
end on
on ui_control ($Freq)
_set_engine_par($ENGINE_PAR_CUTOFF,$Freq,0,2,-1)
end on
on ui_control ($Bypass)
_set_engine_par($ENGINE_PAR_EFFECT_BYPASS,$Bypass,0,2,-1)
end on

Kontakt Script Language Manual
62
Wor k in g w ith ex t er n al m o du l ato r s
Now we'll go one step further: let's suppose, we have a simple patch with a filter as a Group
Insert Effect. The Cutoff Frequency is being modulated by velocity and we want to control the
modulation amount with the
_set_engine_par command. Since Velocity is an external
modulator, we use the built-in variable:
$ENGINE_PAR_EXTMOD_INTENSITY
Create a new instrument, put a filter in the first Group Insert FX slot and assign velocity to
modulate the filter cutoff frequency. Then enter the following script:
on init
declare ui_knob $Mod (0,1000000,1000000)
end on
on ui_control ($Mod)
_set_engine_par($ENGINE_PAR_EXTMOD_INTENSITY,$Mod,0,2,-1)
end on
The script
should
now control the modulation slider, but not necessarily…
In our script, we've given the slot index (the fourth parameter) the value 2. The slot index
determines, which of the modulation assignments is being addressed. The internal numbering
of the slot indices is determined by their order of creation. So when you have three external
mod assignments (e.g. velocity amp, pitch bend pitch, velocity cutoff), the slot index
of the respective assignments depends on when those assignments where created.
Let's take a look at the instrument:
When you create a new instrument, usually velocity volume and pitch bend pitch are
already assigned, thus the slot indices 0 and 1 are already occupied. If your default
instrument however has already more assignments, you need to experiment to find the correct
slot index.
The slot indices are not changed when deleting a module! Also, when deleting an assignment
an re-entering the same assignment, the slot index will be the same!

Kontakt Script Language Manual
63
So in the above example, let's assume the velocity volume assignment has the slot index 0.
If you delete the assignment, and later on assign velocity to control volume, this assignment
again will have the slot index 0.
Wor k in g w ith in t er n al m o du l a to r s
Internal modulators are envelopes (AHDSR, DBD, flexible) and LFO's. Like external mod
assignments, the slot index is a crucial factor and behaves similar. However, the
<generic>
parameter (the fifth parameter) comes into play too, so please memorize the following when
working with internal modulators:
The
<slot> parameter specifies the modulation module.
The <generic> parameter specifies the actual modulation assignment.
Kinda hard to grasp, so let's go easy and first write a script to control the attack time of a
volume envelope:
on init
declare ui_knob $Attack (0,1000000,1000000)
end on
on ui_control ($Attack)
_set_engine_par($ENGINE_PAR_ATTACK,$Attack,0,0,-1)
end on
Again, the slot index determines which internal modulator is addressed.
In our default instrument:
there's only one internal modulator (which probably was created first), so we address it with a
slot index of 0.

Kontakt Script Language Manual
64
Now one step further, we want to control the mod intensity of this envelope (ok, it does not
make much sense to control the intensity of a volume envelope, but it serves the purpose of
our explanation).
Notice the use of the
<generic> parameter:
on init
declare ui_knob $Mod (0,1000000,1000000)
end on
on ui_control ($Mod)
_set_engine_par($ENGINE_PAR_INTMOD_INTENSITY,$Mod,0,0,0)
end on
Now the script knob controls the mod intensity:
Now consider the following: the above envelope does not only modulate volume but also filter
cutoff (a combined volume/filter envelope). Create a filter and assign the existing envelope to
modulate the cutoff frequency. Now we want to control the env cutoff with a script knob:
on init
declare ui_knob $Mod (0,1000000,1000000)
end on
on ui_control ($Mod)
_set_engine_par($ENGINE_PAR_INTMOD_INTENSITY,$Mod,0,0,1)
end on

Kontakt Script Language Manual
65
The <generic> parameter has been set to 1, to distinguish between the env volume and
env cutoff assignment:
Re c eiv in g p a r am et e r v a lu es ( a . k . a . w h at go es u p , mu s t co m e d ow n)
It's not only possible, to send specific values to automatable Kontakt parameters from KSP,
you can also retrieve those values. The basic syntax is as following:
_get_engine_par(<parameter>,<group>,<slot>,<generic>)
returns the value of any automatable Kontakt parameter from KSP
So let's get back to the very first script we wrote using
_set_engine_par. We can use the
above command to retrieve the knob setting in the init callback:
on init
declare ui_knob $Volume (0,1000000,1000000)
$Volume := _get_engine_par($ENGINE_PAR_VOLUME,-1,-1,-1)
end on
on ui_control ($Volume)
_set_engine_par($ENGINE_PAR_VOLUME,$Volume,-1,-1,-1)
end on
Now, whenever the init callback is processed, the knob resets itself to the correct instrument
volume level.

Kontakt Script Language Manual
66
Here's a real-life-scenario script:
on init
declare ui_label $label (1,1)
set_text ($label,"Select Group:")
declare $count
declare ui_menu $group_menu
while ($count < $NUM_GROUPS)
add_menu_item ($group_menu,group_name($count),$count)
inc($count)
end while
declare ui_knob $Volume (0, 100, 1)
declare ui_knob $Pan (-100, 100, 1)
declare ui_knob $Tune (-1200, 1200, 100)
$Volume := _get_engine_par($ENGINE_PAR_VOLUME,0,0,1) / 10000
$Pan := _get_engine_par($ENGINE_PAR_PAN,0,0,1) / 5000 -100
$Tune := _get_engine_par($ENGINE_PAR_TUNE,$group_menu,0,1)*24/10000-1200
move_control ($label,1,1)
move_control ($group_menu,1,2)
move_control ($Volume,2,1)
move_control ($Pan,3,1)
move_control ($Tune,4,1)
make_perfview
end on
on ui_control ($Volume)
_set_engine_par($ENGINE_PAR_VOLUME,$Volume * 10000,$group_menu,0,-1)
end on
on ui_control ($Pan)
_set_engine_par($ENGINE_PAR_PAN,($Pan+100) * 5000,$group_menu,0,-1)
end on
on ui_control ($Tune)
_set_engine_par($ENGINE_PAR_TUNE,($Tune + 1200)*100000/240,$group_menu,0,-1)
end on
on ui_control ($group_menu)
$Volume := _get_engine_par($ENGINE_PAR_VOLUME,$group_menu,0,1) / 10000
$Pan := _get_engine_par($ENGINE_PAR_PAN,$group_menu,0,1) / 5000 -100
$Tune := _get_engine_par($ENGINE_PAR_TUNE,$group_menu,0,1)*24/10000-1200
end on
You'll end up with a nice and simple performance view, with three basic parameters available
for tweaking:

Kontakt Script Language Manual
67
Mod u l e st a tu s r e tr i ev al
By combining the command
_get_engine_par and the following five built-in variables:
$ENGINE_PAR_EFFECT_TYPE
$ENGINE_PAR_EFFECT_SUBTYPE
$ENGINE_PAR_SEND_EFFECT_TYPE
$ENGINE_PAR_INTMOD_TYPE
$ENGINE_PAR_INTMOD_SUBTYPE
you can retrieve information about which module is used in which slot. This is basically an
advanced tool to create generic menus, based on the composition of the Kontakt instrument.
There are built-in variables for any effect type, like
$EFFECT_TYPE_FILTER or
$EFFECT_TYPE_REVERB, please check the appendix for a complete listing.
The usage of this command can be best explained with the following little scripts.
This script looks if a filter is used as a group insert effect in the second slot of the first group:
on init
if (_get_engine_par($ENGINE_PAR_EFFECT_TYPE,0,1,-1) = $EFFECT_TYPE_FILTER)
message ("There's a filter in the second slot of the first group, hooray!")
else
message ("There's no filter in the second slot of the first group, boooo!")
end if
end on
The statement
_get_engine_par($ENGINE_PAR_EFFECT_TYPE,0,1,-1) returns the effect
type of the second slot (slot index = 1; third parameter) of the first group (group index = 0;
second parameter). The generic parameter has been set to -1 since it has no meaning here.
The above mentioned statement actually returns an integer, from zero to 20 (the built-in
variable
$EFFECT_TYPE_FILTER has the value 7).
By using the following string array:
declare !effect_name[21]
!effect_name[0] := "None"
!effect_name[2] := "Compressor"
!effect_name[3] := "Limiter"
!effect_name[4] := "Inverter"
!effect_name[5] := "Surround Panner"
!effect_name[6] := "Saturation"
!effect_name[7] := "Filter"
!effect_name[8] := "Lo-Fi"
!effect_name[9] := "Stereo Modeller"
!effect_name[10] := "Distortion"
!effect_name[11] := "Send Levels"
!effect_name[14] := "Phaser"
!effect_name[15] := "Flanger"
!effect_name[16] := "Chorus"
!effect_name[17] := "Reverb"
!effect_name[18] := "Delay"
!effect_name[19] := "Convolution"
!effect_name[20] := "Gainer"
you can easily retrieve the name of any effect. So let's rewrite the above script to the
following:

Kontakt Script Language Manual
68
on init
declare !effect_name[21]
!effect_name[0] := "None"
!effect_name[2] := "Compressor"
!effect_name[3] := "Limiter"
!effect_name[4] := "Inverter"
!effect_name[5] := "Surround Panner"
!effect_name[6] := "Saturation"
!effect_name[7] := "Filter"
!effect_name[8] := "Lo-Fi"
!effect_name[9] := "Stereo Modeller"
!effect_name[10] := "Distortion"
!effect_name[11] := "Send Levels"
!effect_name[14] := "Phaser"
!effect_name[15] := "Flanger"
!effect_name[16] := "Chorus"
!effect_name[17] := "Reverb"
!effect_name[18] := "Delay"
!effect_name[19] := "Convolution"
!effect_name[20] := "Gainer"
message (!effect_name[_get_engine_par($ENGINE_PAR_EFFECT_TYPE,0,1,-1)])
end on
This script will now output the name of the effect of the s
se c on d slot of the ff irs t group.
If you'd like to retrieve information about the instrument insert effects, the last command
would have to be rewritten to
message (!effect_name[_get_engine_par($ENGINE_PAR_EFFECT_TYPE,-1,1,1)])
since:
• the second parameter specifies the instrument level (-1)
• the third parameter specifies the second slot (1)
• the fourth parameter specifies the insert effect (1)
There are times when you need information about which filter is used, so let's suppose you
know that you have a filter in the first slot of the first group. By using
$EFFECT_SUBTYPE you
can retrieve the type of the filter:
on init
declare !filter_name[25]
!filter_name[2] := "1-pole LP"
!filter_name[3] := "1-pole HP"
!filter_name[4] := "2-pole BP"
!filter_name[6] := "2-pole LP"
!filter_name[7] := "2-pole HP"
!filter_name[8] := "4-pole LP"
!filter_name[9] := "4-pole HP"
!filter_name[10] := "4-pole BP"
!filter_name[11] := "4-pole BR"
!filter_name[12] := "6-pole LP"
!filter_name[13] := "Phaser"
!filter_name[14] := "Vowel A"
!filter_name[15] := "Vowel B"
!filter_name[16] := "Pro 53"
!filter_name[17] := "4-stage ladder"
!filter_name[19] := "3x2"
!filter_name[22] := "1-band EQ"
!filter_name[23] := "2-band EQ"
!filter_name[24] := "3-band EQ"
message (!filter_name[_get_engine_par($ENGINE_PAR_EFFECT_SUBTYPE,0,0,-1)])
end on
Now let's do the same with instrument send effects; here we use the built-in variable
$ENGINE_PAR_SEND_EFFECT_TYPE, so if we want to know, which effect reside in the first
send effect slot we write:

Kontakt Script Language Manual
69
on init
declare !effect_name[21]
!effect_name[0] := "None"
!effect_name[14] := "Phaser"
!effect_name[15] := "Flanger"
!effect_name[16] := "Chorus"
!effect_name[17] := "Reverb"
!effect_name[18] := "Delay"
!effect_name[19] := "Convolution"
!effect_name[20] := "Gainer"
message (!effect_name[_get_engine_par($ENGINE_PAR_SEND_EFFECT_TYPE,-1,0,-1)])
end on
Loading IR Samples
It is possible to load impulse response samples into the convolution effect with the following
command:
_load_ir_sample(<file name>,<slot>,<generic>)
load an impulse response sample into Kontakt's convolution effect
<file name>
the file name of the sample. A relative path has to be used.
<slot>
the slot index of the convolution effect (zero-based)
<generic>
specifies if the convolution effect is used as an
Insert Effect (1)
Send Effect (0)
The problematic issue here is the correct path to the sample. To ensure cross platform
compatibility, always use a relative path with help of this command:
_get_folder(<path variable>)
returns the path specified with the built-in path variable
and these three built-in path variables:
$GET_FOLDER_INSTALL_DIR
the installation directory of Kontakt 2
$GET_FOLDER_LIBRARY_DIR
the library directory (set in Options/Load-Import)
$GET_FOLDER_PATCH_DIR
the directory in which the patch was saved. If the patch was not saved before, an empty string is
returned.
So let's assume we have an impulse response sample called "Super Hall.wav" and it resides in
the installation directory of Kontakt. By using a script such as:
on init
declare ui_button $Load
end on
on ui_control ($Load)

Kontakt Script Language Manual
70
_load_ir_sample(_get_folder($GET_FOLDER_INSTALL_DIR) ...
& "Super Hall.wav",0,1)
$Load := 0
end on
the sample is loaded into the convolution effect (which itself is specified to reside in the
insert chain in the first slot) whenever the button is pressed.
Of course, there must be a sample called "Super Hall.wav" in the installation directory of
Kontakt 2, otherwise you'll get a warning message.
Since Kontakt 2 comes with a number of convolution presets and samples, here's the example
from above, pointing to the sample "warm room.wav" which is located here:
Kontakt 2/presets/effects/convolution/06 Medium Rooms/IR Samples/warm room.wav
So the correct command would be
_load_ir_sample(_get_folder($GET_FOLDER_INSTALL_DIR) ...
& "presets/effects/convolution/06 Medium Rooms/IR Samples/warm room.wav",0,1)
Specifying when persistent variables are read
It is possible to specify the exact moment when persistent variables are read out:
_read_persistent_var(<variable>)
reads the value of the specified persistent variable in the init callback
Usually, all persistent variables are set AFTER the init callback. With
_read_persistent_var(), persistent variables can be retained at any spot in the init
callback. If a value is read with _read_persistent_var(), the value is of course not
read out again after the init callback.
This command is very useful if certain gui elements can be made visible or invisible by the
user and the loaded patch should recall the last gui state. See the following script:

Kontakt Script Language Manual
71
on init
declare ui_button $Sync
declare ui_menu $time
add_menu_item ($time,"16th",0)
add_menu_item ($time,"8th",1)
$Sync := 0
{sync is off by default, so hide menu}
move_control ($time,0,0)
move_control ($Sync,1,1)
make_persistent ($Sync)
make_persistent ($time)
_read_persistent_var ($Sync)
if ($Sync = 1)
move_control ($time,2,1)
else
move_control ($time,0,0)
end if
end on
on ui_control ($Sync)
if ($Sync = 1)
move_control ($time,2,1)
else
move_control ($time,0,0)
end if
end on
Depending on the state of the button, a menu is shown or not. By using
_read_persistent_var ($Sync), you can retrieve the last saved state of the button
and therefore decide to show or hide the menu.

Kontakt Script Language Manual
72
Reference
1. Callback types
on init ... end on
initial callback, executed when the script was successfully analyzed
on note ... end on
note callback, executed whenever a note on message is received
on release ... end on
release callback, executed whenever a note off message is received
on ui_control (<variable-name>) ... end on
UI callback, executed whenever the user changes the respective UI element
on controller ... end on
controller callback, executed whenever a cc or pitch bend message is received
on rpn ... end on
rpn callback, executed whenever a rpn (registered parameter number) message is received
on nrpn ... end on
nrpn callback, executed whenever a nrpn (non-registered parameter number) message is received
2. Declaration of variables and ui elements
declare $<variable-name>
declare a user-defined normal variable to store a single integer value
declare const $<variable-name>
declare a user-defined constant variable to store a single integer value
declare polyphonic $<variable-name>
declare a user-defined polyphonic variable to store a single integer value
declare %<array-name>[<number-of-elements]
declare a user-defined array to store single integer values at specific indices
declare ui_button $<variable-name>
create a user interface button
declare ui_knob $<variable-name> (<min>,<max>,<display-ratio>)
create a user interface knob

Kontakt Script Language Manual
73
declare ui_menu $<variable-name>
create a user interface menu
add_menu_item (<variable>,<text>,<number>)
add text to a user interface menu
declare ui_label $<variable-name> (<width>,<height>)
create a user interface text label
set_text (<variable>,<text>)
when applied to a label: delete the text currently visible in the specified label and add new text
when applied to knobs, buttons and value edits: set the name of the ui element
add_text_line (<variable>,<text>)
add a new text line in the specified label without erasing existing text
declare ui_value_edit $<variable>(<min>,<max>,<display-ratio>)
create a user interface number box
declare ui_table %<array>[columns](<width>,<height>, <range>)
create a user interface table
move_control (<variable>,<x position>, <y position>)
move a UI element to a specific place. Moving a UI element to the position 0,0 hides the element
make_perfview
activates the performance view for the respective script

Kontakt Script Language Manual
74
3. Functions
abs(<expression>)
return the absolute value of an expression
by_marks(<bit-mark>)
address all events of the specified event group
change_note(<ID-number>,<new-note-number>)
change the note value of a specific note event
change_pan(<ID-number>,<panorama>,<relative-bit>)
change the pan position of a specific note event
change_time_with_pitch(<ID-number>,<time>)
returns the expression <time> scaled by the actual tune amount
change_tune(<ID-number>,<tune-amount>,<relative-bit>)
change the tuning of the sample of a specific note event in Millicents
change_velo(<ID-number>,<new-velocity-number>)
change the velocity value of a specific note event
change_vol(<ID-number>,<volume>,<relative-bit>)
change the volume of the sample of a specific note event in millidecibels
dec(<expression>)
decrement an expression by 1
exit
immediately stops a callback
fade_in(<ID-number>,<fade-time>)
perform a fade-in of a specific note event
fade_out(<ID-number>,<fade-time>,<stop-voice>)
perform a fade-out of a specific note event
ignore_controller
ignore a controller event in a controller callback
ignore_event(<ID-number>)
ignore an event in a callback

Kontakt Script Language Manual
75
inc(<expression>)
increment an expression by 1
lsb(<built-in variable>)
returns the LSB portion of a rpn/nrpn address or value.
make_persistent(<variable-name>)
retain the value of a variable when a patch is saved
message(<number,variable or text>)
display text in the status line in Kontakt
msb(<built-in variable>)
returns the MSB portion of a rpn/nrpn address or value.
note_off(<ID-number>)
send a note off message to a specific note event and triggers the release callback
play_note(<note-number>,<velocity>,<sample-offset>,<duration>)
play a note, i.e. generate a note on message followed by a note off message
random(<min>,<max>)
generate a random number
_read_persistent_var(<variable>)
reads the value of the specified persistent variable in the init callback
_reset_rls_trig_counter(<note>)
resets the release trigger counter (used by the release trigger system script)
set_controller(<controller-number>,<controller-value>)
send a MIDI CC value of a specific controller
set_event_mark(<ID-number>,<bit-mark>)
assign the specified event to a specified event group
set_event_par(<ID-number>,<index>,<value>)
assign a parameter to an event
set_nrpn(<address>,<value>)
send a nrpn message
set_rpn(<address>,<value>)
send a rpn message

Kontakt Script Language Manual
76
sh_left(<expression>,<amount>)
shift the bits in <expression> by the specified amount to the left
sh_right(<expression>,<amount>)
shift the bits in <expression> by the specified amount to the right
wait(<wait-time>)
pauses the callback for the specified time
_will_never_terminate(<event-id>)
tells the script engine that this event will never be finished (used by the release trigger system script)

Kontakt Script Language Manual
77
4. Group and array functions
disallow_group(<group-index>)
turn off the specified group, i.e. make it unavailable for playback
allow_group(<group-index>)
turn on the specified group, i.e. make it available for playback
find_group(<group-name>)
returns the group-index for the specified group
group_name(<group-index>)
returns the group-name for the specified group
sort(<array-variable>,<direction>)
sort an array in ascending or descending order
With direction = 0, this function sorts in ascending order, with a value other than 0, it sorts in
descending order.
num_elements(<array-variable>)
returns the number of elements of the specified array
search(<array-variable>,<value>)
searches the specified array for the specified value and returns the index.
If the value is not found, the function returns -1.
array_equal(<array1-variable>,<array2-variable>)
check the values of two arrays, true if values are equal

Kontakt Script Language Manual
78
5. Built-in Variables
$ALL_GROUPS
addresses all groups in a disallow_group() and allow_group() function
$ALL_EVENTS
addresses all events in functions which deal with a ID-number
%CC[<controller-number>]
current controller value for the specified controller (CC# 128 = pitch bend)
$CC_NUM
controller number of the controller which triggered the callback
%CC_TOUCHED[<controller-number>]
1 if a controller value has changed, 0 otherwise
$DISTANCE_BAR_START
returns the time of a note on message in µsec from the beginning of the current bar with respect to the
current tempo
$DURATION_BAR
returns the duration in µsec of one bar with respect to the current tempo
$DURATION_QUARTER
duration of a quarter note, with respect to the current tempo
$DURATION_EIGHTH
duration of an eighth note, with respect to the current tempo
$DURATION_SIXTEENTH
duration of a sixteenth note, with respect to the current tempo
$DURATION_QUARTER_TRIPLET
duration of a triplet quarter note, with respect to the current tempo
$DURATION_EIGHTH_TRIPLET
duration of a triplet eighth note, with respect to the current tempo
$DURATION_SIXTEENTH_TRIPLET
duration of a triplet sixteenth note, with respect to the current tempo
$ENGINE_UPTIME
Returns the time period in milliseconds (not microseconds) that has passed since the start of the script

Kontakt Script Language Manual
79
$EVENT_ID
unique ID number of the event which triggered the callback
$EVENT_NOTE
note number of the event which triggered the callback
%EVENT_PAR[]
event parameter of an event, which was set with set_event_par
$EVENT_VELOCITY
velocity of the note which triggered the callback
%GROUPS_AFFECTED
an array with the group indexes of those groups that are affected by the current Note On or Note Off
events
%KEY_DOWN[<note-number>]
array which contains the current state of all keys. 1 if the key is held, 0 otherwise
%KEY_DOWN_OCT[<octave-number>]
1 if a note independently of the octave is held, 0 otherwise
$MARK_<number>
bit mark of an event group
%NOTE_DURATION[<note-number>]
note length since note-start in µsec for each key
$NOTE_HELD
1 if the key which triggered the callback is still held, 0 otherwise
$NUM_GROUPS
total amount of groups in an instrument
$NUM_ZONES
total amount of zones in an instrument
$PLAYED_VOICES_INST
the amount of played voices of the respective instrument
$PLAYED_VOICES_TOTAL
the amount of played voices all instruments
$RPN_ADDRESS
the parameter number of a received rpn/nrpn message (0 – 16383). Can only be used in an rpn/nrpn

Kontakt Script Language Manual
80
callback.
$RPN_VALUE
the value of a received rpn/nrpn message (0 – 16383). Can only be used in rpn/nrpn callback.
$SIGNATURE_NUM
nominator of the current time signature
$SIGNATURE_DENOM
denominator of the current time signature
$VCC_PITCH_BEND
the value of the virtual cc controller for pitch bend

Kontakt Script Language Manual
81
6. Slice functions
_num_slices(<group-index>)
returns the number of slices in the specified group
_slice_length(<group-index>,<slice-index>)
return the length of the specified slice in the specified group with respect to the current tempo
_slice_start(<group-index>,<slice-index>)
return the absolute start point of the specified slice, independent of the current tempo
_slice_idx_loop_start(<group-index>,<loop-index>)
return the index number of the slice at the loop start
_slice_idx_loop_end(<group-index>,<loop-index>)
return the index number of the slice at the loop end
_slice_loop_count(<group-index>,<loop-index>)
return the loop count of the specified loop
dont_use_machine_mode(<ID-number>)
play the specified event in sampler mode

Kontakt Script Language Manual
82
7. Preprocessor
SET_CONDITION(<condition-symbol>)
define a symbol to be used as a condition
RESET_CONDITION(<condition-symbol>)
delete a definition
USE_CODE_IF(<condition-symbol>)
...
END_USE_CODE
interpret code when <condition> is defined
USE_CODE_IF_NOT(<condition-symbol>)
...
END_USE_CODE
interpret code when <condition> is not defined
NO_SYS_SCRIPT_PEDAL
condition; if defined with SET_CONDITION(), the system script which sustains notes when CC# 64 is
received will be bypassed
NO_SYS_SCRIPT_RLS_TRIG
condition; if defined with SET_CONDITION(), the system script which triggers samples upon the
release of a key is bypassed

Kontakt Script Language Manual
83
8. Engine Parameters
Gen er a l S y nt a x
_set_engine_par(<parameter>,<value>,<group>,<slot>,<generic>)
control any automatable Kontakt parameter from KSP
_get_engine_par(<parameter>,<group>,<slot>,<generic>)
returns the value of any automatable Kontakt parameter from KSP
G
Gen er a l
$ENGINE_PAR_VOLUME
instrument volume
$ENGINE_PAR_PAN
instrument panorama
$ENGINE_PAR_TUNE
instrument tuning
Source Module
$ENGINE_PAR_Tune
$ENGINE_PAR_SMOOTH
$ENGINE_PAR_FORMANT
$ENGINE_PAR_SPEED
$ENGINE_PAR_GRAIN_LENGTH
$ENGINE_PAR_SLICE_ATTACK
$ENGINE_PAR_SLICE_RELEASE
$ENGINE_PAR_TRANSIENT_SIZE
Amp Module
$ENGINE_PAR_VOLUME
$ENGINE_PAR_PAN

Kontakt Script Language Manual
84
Filt er / EQ
$ENGINE_PAR_CUTOFF
cutoff frequency of all filters
$ENGINE_PAR_RESONANCE
resonance of all filters
$ENGINE_PAR_EFFECT_BYPASS
bypass button of all filters/eq
3x2 Versatile
$ENGINE_PAR_FILTER_SHIFTB
$ENGINE_PAR_FILTER_SHIFTC
$ENGINE_PAR_FILTER_RESB
$ENGINE_PAR_FILTER_RESC
$ENGINE_PAR_FILTER_TYPEA
$ENGINE_PAR_FILTER_TYPEB
$ENGINE_PAR_FILTER_TYPEC
$ENGINE_PAR_FILTER_BYPA
$ENGINE_PAR_FILTER_BYPB
$ENGINE_PAR_FILTER_BYPC
$ENGINE_PAR_FILTER_GAIN
EQ
$ENGINE_PAR_FREQ1
$ENGINE_PAR_BW1
$ENGINE_PAR_GAIN1
$ENGINE_PAR_FREQ2
$ENGINE_PAR_BW2
$ENGINE_PAR_GAIN2
$ENGINE_PAR_FREQ3
$ENGINE_PAR_BW3
$ENGINE_PAR_GAIN3

Kontakt Script Language Manual
85
Ins e rt Eff ec t s
$ENGINE_PAR_EFFECT_BYPASS
bypass button of all insert effects
$ENGINE_PAR_INSERT_EFFECT_OUTPUT_GAIN
output gain of all insert effects
Compressor
$ENGINE_PAR_THRESHOLD
$ENGINE_PAR_RATIO
$ENGINE_PAR_COMP_ATTACK
$ENGINE_PAR_COMP_DECAY
Limiter
$ENGINE_PAR_LIM_IN_GAIN
$ENGINE_PAR_LIM_RELEASE
Surround Panner
$ENGINE_PAR_SP_OFFSET_DISTANCE
$ENGINE_PAR_SP_OFFSET_AZIMUTH
$ENGINE_PAR_SP_OFFSET_X
$ENGINE_PAR_SP_OFFSET_Y
$ENGINE_PAR_SP_LFE_VOLUME
$ENGINE_PAR_SP_SIZE
$ENGINE_PAR_SP_DIVERGENCE
Saturation
$ENGINE_PAR_SHAPE
Lo-Fi
$ENGINE_PAR_BITS
$ENGINE_PAR_FREQUENCY
$ENGINE_PAR_NOISELEVEL
$ENGINE_PAR_NOISECOLOR
Stereo Modeller
$ENGINE_PAR_STEREO
$ENGINE_PAR_STEREO_PAN
Distortion
$ENGINE_PAR_DRIVE
$ENGINE_PAR_DAMPING
Send Levels
$ENGINE_PAR_SENDLEVEL_0
$ENGINE_PAR_SENDLEVEL_1
$ENGINE_PAR_SENDLEVEL_2
$ENGINE_PAR_SENDLEVEL_3
$ENGINE_PAR_SENDLEVEL_4
$ENGINE_PAR_SENDLEVEL_5
$ENGINE_PAR_SENDLEVEL_6
$ENGINE_PAR_SENDLEVEL_7

Kontakt Script Language Manual
86
Sen d E f f e c ts
$ENGINE_PAR_SEND_EFFECT_BYPASS
bypass button of all send effects
$ENGINE_PAR_SEND_EFFECT_DRY_LEVEL
dry amount of send effects when used in an insert chain
$ENGINE_PAR_SEND_EFFECT_OUTPUT_GAIN
when used with send effects, this controls either:
• ww e t amount of send effects when used in an iinse r t chain
• rreturn amount of send effects when used in a ss e n d chain
Phaser
$ENGINE_PAR_PH_DEPTH
$ENGINE_PAR_PH_SPEED
$ENGINE_PAR_PH_PHASE
$ENGINE_PAR_PH_FEEDBACK
Flanger
$ENGINE_PAR_FL_DEPTH
$ENGINE_PAR_FL_SPEED
$ENGINE_PAR_FL_PHASE
$ENGINE_PAR_FL_FEEDBACK
$ENGINE_PAR_FL_COLOR
Chorus
$ENGINE_PAR_CH_DEPTH
$ENGINE_PAR_CH_SPEED
$ENGINE_PAR_CH_PHASE
Reverb
$ENGINE_PAR_RV_PREDELAY
$ENGINE_PAR_RV_SIZE
$ENGINE_PAR_RV_COLOUR
$ENGINE_PAR_RV_STEREO
$ENGINE_PAR_RV_DAMPING
Delay
$ENGINE_PAR_DL_TIME
$ENGINE_PAR_DL_DAMPING
$ENGINE_PAR_DL_PAN
$ENGINE_PAR_DL_FEEDBACK
Convolution
$ENGINE_PAR_IRC_PREDELAY
$ENGINE_PAR_IRC_LENGTH_RATIO_ER
$ENGINE_PAR_IRC_FREQ_LOWPASS_ER
$ENGINE_PAR_IRC_FREQ_HIGHPASS_ER
$ENGINE_PAR_IRC_LENGTH_RATIO_LR
$ENGINE_PAR_IRC_FREQ_LOWPASS_LR
$ENGINE_PAR_IRC_FREQ_HIGHPASS_LR
Gainer
$ENGINE_PAR_GN_GAIN

Kontakt Script Language Manual
87
Mod u l a ti o n
$ENGINE_PAR_EXTMOD_INTENSITY
the intensity slider of an external modulation assignment (e.g. velocity, pitch bend, aftertouch, midi
CC)
$ENGINE_PAR_INTMOD_INTENSITY
the intensity slider of an internal modulation assignment (e.g. AHDSR envelope, LFO)
$ENGINE_PAR_INTMOD_BYPASS
the bypass button of an internal modulation assignment (e.g. AHDSR envelope, LFO)
Envelopes:
AHDSR
$ENGINE_PAR_ATK_CURVE
$ENGINE_PAR_ATTACK
$ENGINE_PAR_HOLD
$ENGINE_PAR_DECAY
$ENGINE_PAR_SUSTAIN
$ENGINE_PAR_RELEASE
DBD
$ENGINE_PAR_DECAY1
$ENGINE_PAR_BREAK
$ENGINE_PAR_DECAY2
LFO:
LFO
For all LFOs:
$ENGINE_PAR_INTMOD_FREQUENCY
$ENGINE_PAR_LFO_DELAY
For Rectangle:
$ENGINE_PAR_INTMOD_PULSEWIDTH
For Multi:
$ENGINE_PAR_LFO_SINE
$ENGINE_PAR_LFO_RECT
$ENGINE_PAR_LFO_TRI
$ENGINE_PAR_LFO_SAW
$ENGINE_PAR_LFO_RAND

Kontakt Script Language Manual
88
Mod u l e st a tu s r e tr i ev al
$ENGINE_PAR_EFFECT_TYPE
used to query the type of a group insert or instrument insert effect, can be any of the following:
$EFFECT_TYPE_FILTER
$EFFECT_TYPE_COMPRESSOR
$EFFECT_TYPE_LIMITER
$EFFECT_TYPE_INVERTER
$EFFECT_TYPE_SURROUND_PANNER
$EFFECT_TYPE_SHAPER (Saturation)
$EFFECT_TYPE_LOFI
$EFFECT_TYPE_STEREO (Stereo Modeller)
$EFFECT_TYPE_DISTORTION
$EFFECT_TYPE_SEND_LEVELS
$EFFECT_TYPE_PHASER
$EFFECT_TYPE_CHORUS
$EFFECT_TYPE_FLANGER
$EFFECT_TYPE_REVERB
$EFFECT_TYPE_DELAY
$EFFECT_TYPE_IRC (Convolution)
$EFFECT_TYPE_GAINER
$EFFECT_TYPE_NONE (empty slot)
you can use this string array to query the names:
declare !effect_name[21]
!effect_name[0] := "None"
!effect_name[2] := "Compressor"
!effect_name[3] := "Limiter"
!effect_name[4] := "Inverter"
!effect_name[5] := "Surround Panner"
!effect_name[6] := "Saturation"
!effect_name[7] := "Filter"
!effect_name[8] := "Lo-Fi"
!effect_name[9] := "Stereo Modeller"
!effect_name[10] := "Distortion"
!effect_name[11] := "Send Levels"
!effect_name[14] := "Phaser"
!effect_name[15] := "Flanger"
!effect_name[16] := "Chorus"
!effect_name[17] := "Reverb"
!effect_name[18] := "Delay"
!effect_name[19] := "Convolution"
!effect_name[20] := "Gainer"
$ENGINE_PAR_SEND_EFFECT_TYPE
used to query the type of a send effect, can be any of the following:
$EFFECT_TYPE_PHASER
$EFFECT_TYPE_CHORUS
$EFFECT_TYPE_FLANGER
$EFFECT_TYPE_REVERB
$EFFECT_TYPE_DELAY
$EFFECT_TYPE_IRC (Convolution)
$EFFECT_TYPE_GAINER

Kontakt Script Language Manual
89
$EFFECT_TYPE_NONE (empty slot)
$ENGINE_PAR_EFFECT_SUBTYPE
used to query the type of filter/EQ, can be any of the following:
$FILTER_TYPE_LP1POLE
$FILTER_TYPE_HP1POLE
$FILTER_TYPE_BP2POLE
$FILTER_TYPE_LP2POLE
$FILTER_TYPE_HP2POLE
$FILTER_TYPE_LP4POLE
$FILTER_TYPE_HP4POLE
$FILTER_TYPE_BP4POLE
$FILTER_TYPE_BR4POLE
$FILTER_TYPE_LP6POLE
$FILTER_TYPE_PHASER
$FILTER_TYPE_VOWELA
$FILTER_TYPE_VOWELB
$FILTER_TYPE_PRO52
$FILTER_TYPE_LADDER
$FILTER_TYPE_VERSATILE
$FILTER_TYPE_EQ1BAND
$FILTER_TYPE_EQ2BAND
$FILTER_TYPE_EQ3BAND
you can use this string array to query the names:
declare !filter_name[25]
!filter_name[2] := "1-pole LP"
!filter_name[3] := "1-pole HP"
!filter_name[4] := "2-pole BP"
!filter_name[6] := "2-pole LP"
!filter_name[7] := "2-pole HP"
!filter_name[8] := "4-pole LP"
!filter_name[9] := "4-pole HP"
!filter_name[10] := "4-pole BP"
!filter_name[11] := "4-pole BR"
!filter_name[12] := "6-pole LP"
!filter_name[13] := "Phaser"
!filter_name[14] := "Vowel A"
!filter_name[15] := "Vowel B"
!filter_name[16] := "Pro 53"
!filter_name[17] := "4-stage ladder"
!filter_name[19] := "3x2"
!filter_name[22] := "1-band EQ"
!filter_name[23] := "2-band EQ"
!filter_name[24] := "3-band EQ"

What's new in Kontakt 2.2 – KSP
What's new in Kontakt 2.2 – KSP
Copyright © 2006 Native Instruments Software Synthesis GmbH. All rights reserved.
Last changed: October 13, 2006
Introduction
This short document covers all changes related to KSP and the included script modules. The
documents "Kontakt Script Language Manual.pdf" and the "Kontakt 2 Script Library.pdf" have been
updated to reflect all changes. For most applications, it is sufficient to read though this document;
where stated, you should consult the Kontakt Script Language Manual for a complete description.
Tab le o f C ont ent
KSP changes in Kontakt 2.2 ......................................................................................................2
New callback type: on ui_update ............................................................................................. 2
New built-in variables for group based scripting ........................................................................ 2
Creating custom group start options......................................................................................... 4
Retrieving the Release Trigger state of a group.......................................................................... 4
Default values for knobs......................................................................................................... 5
KSP changes in Kontakt 2.1.1 ................................................................................................... 5
Assigning unit marks to knobs................................................................................................. 5
Assigning text strings to knobs ................................................................................................ 5
Retrieving knob values ........................................................................................................... 5
1

What's new in Kontakt 2.2 – KSP
KSP changes in Kontakt 2.2
New callback type: on ui_update
There is a new callback type: on ui_update. This callback is executed whenever you change
something in the Kontakt GUI, like selecting a different group, changing knobs etc. If for example you
want to exactly mirror one particular knob of Kontakt in the script, you could write:
on init
declare ui_knob $Volume (0,1000000,1)
set_knob_unit ($Volume,$KNOB_UNIT_DB)
set_knob_defval ($Volume,630859)
$Volume := _get_engine_par ($ENGINE_PAR_VOLUME,0,-1,-1)
set_knob_label ($Volume,_get_engine_par_disp($ENGINE_PAR_VOLUME,0,-1,-1))
end on
on ui_update
$Volume := _get_engine_par ($ENGINE_PAR_VOLUME,0,-1,-1)
set_knob_label($Volume,_get_engine_par_disp($ENGINE_PAR_VOLUME,0,-1,-1))
end on
on ui_control ($Volume)
_set_engine_par($ENGINE_PAR_VOLUME,$Volume,0,-1,-1)
set_knob_label ($Volume,_get_engine_par_disp($ENGINE_PAR_VOLUME,0,-1,-1))
end on
This script will create a script knob which mirrors the volume knob in the amp module of the first
group.
Caution: This callback should be used with care, since knob movements create many events which in
turn always execute this callback.
New built-in variables for group based scripting
There are two new built-in variables to facilitate group based scripting:
$REF_GROUP_IDX
group index number of the currently viewed group
%GROUPS_SELECTED
initial callback, executed when the script was successfully analyzed
$REF_GROUP_IDX contains the index of the currently visible group (i.e. the group whose group name's
text appears inverted in the group editor). In the following screenshot for example, the third group
(Rock Organ) is currently visible:
2

What's new in Kontakt 2.2 – KSP
Obviously, only one group can be visible at a time.
Now insert the following script into an instrument with more than one group:
on init
declare ui_label $group_name_label (1,1)
set_text ($group_name_label,group_name($REF_GROUP_IDX))
end on
on ui_update
set_text ($group_name_label,group_name($REF_GROUP_IDX))
end on
and click on various group names in the group editor to see the effect.
%GROUPS_SELECTED is an array with each array index pointing to the group with the same index. In
other words, num_elements(%GROUPS_SELECTED) equals $NUM_GROUPS.
If a group is selected for editing (i.e. it has a checkmark to the left of the group name in the group
editor), the corresponding array index contains a 1, otherwise 0. In the following screenshot, the first
and third group are selected for editing, i.e. if you create a group insert effect in the second slot, the
effect will be created in the group "Digital Rhodes" and in the group "Rock Organ":
Insert the following script into an instrument with more than one group:
on init
declare ui_label $label (3,4)
set_text ($label,"Selected Groups for editing:")
declare $count
while ($count < $NUM_GROUPS)
if (%GROUPS_SELECTED[$count] = 1)
add_text_line ($label,group_name($count))
end if
inc ($count)
end while
end on
on ui_update
set_text($label,"Selected Groups for editing:")
$count := 0
while ($count < $NUM_GROUPS)
if (%GROUPS_SELECTED[$count] = 1)
add_text_line ($label,group_name($count))
end if
inc ($count)
end while
end on
and click on various checkboxes in the group editor to see the effect.
3

What's new in Kontakt 2.2 – KSP
Creating custom group start options
By defining the condition
NO_SYS_SCRIPT_GROUP_START
condition; if defined with SET_CONDITION(), the system script which handles all group start options
will be bypassed
with SET_CONDITION(), you can disable all group start options.
By using the following engine parameter variables, you can retrieve the status of the group start options
for each key:
Group Start Options – List of built-in variables
$ENGINE_PAR_START_CRITERIA_MODE
$ENGINE_PAR_START_CRITERIA_KEY_MIN
$ENGINE_PAR_START_CRITERIA_KEY_MAX
$ENGINE_PAR_START_CRITERIA_CONTROLLER
$ENGINE_PAR_START_CRITERIA_CC_MIN
$ENGINE_PAR_START_CRITERIA_CC_MAX
$ENGINE_PAR_START_CRITERIA_CYCLE_CLASS
$ENGINE_PAR_START_CRITERIA_ZONE_IDX
$ENGINE_PAR_START_CRITERIA_SLICE_IDX
$ENGINE_PAR_START_CRITERIA_SEQ_ONLY
$ENGINE_PAR_START_CRITERIA_NEXT_CRIT
$ENGINE_PAR_START_CRITERIA_MODE can return one of the following values:
$START_CRITERIA_NONE
$START_CRITERIA_ON_KEY
$START_CRITERIA_ON_CONTROLLER
$START_CRITERIA_CYCLE_ROUND_ROBIN
$START_CRITERIA_CYCLE_RANDOM
$START_CRITERIA_SLICE_TRIGGER
$ENGINE_PAR_START_CRITERIA_NEXT_CRIT can return one of the following values:
$START_CRITERIA_AND_NEXT
$START_CRITERIA_AND_NOT_NEXT
$START_CRITERIA_OR_NEXT
With these commands it is possible to create custom group start options, while giving the user the
opportunity to use the commands found in the group start options tab in the group editor.
Retrieving the Release Trigger state of a group
There is a new engine parameter variable which can be used to retrieve the state of the Release Trigger
button in the source module:
$ENGINE_PAR_RELEASE_TRIGGER
engine parameter variable; 1 if the Release Trigger button in the source module is activated, 0
otherwise
4

What's new in Kontakt 2.2 – KSP
Default values for knobs
By using the command
set_knob_defval(<knob-variable>,<value>)
assign a default value to a knob
you can set a default value for a knob, to which the knob is reset when Cmd-clicking the knob.
KSP changes in Kontakt 2.1.1
Assigning unit marks to knobs
By using the command
set_knob_unit(<knob-variable>,<unit>)
assign a unit mark to a knob
you can set a unit mark next to the numerical display of knobs. To choose a unit mark, use any of the
following built-in variables:
Built-in variables for knob unit marks
$KNOB_UNIT_NONE
$KNOB_UNIT_DB
$KNOB_UNIT_HZ
$KNOB_UNIT_PERCENT
$KNOB_UNIT_MS
$KNOB_UNIT_OCT
Assigning text strings to knobs
By using the command:
set_knob_label(<knob-variable>,<text>)
assign a text string to a knob
you can assign a text string to a knob variable. You could for example create a knob which controls
some kind of rate, and set the knob to display values like 1/4, 1/8, 1/16 etc.
Retrieving knob values
If you control knobs by using _set_engine_par(), you can now retrieve the displayed knob value
by using the command:
_get_engine_par_disp(<parameter>,<group>,<slot>,<generic>)
retrieve the displayed knob values from the specified knob
5

What's new in Kontakt 3 – KSP
What's new in Kontakt 3 – KSP
Copyright © 2007 Native Instruments Software Synthesis GmbH. All rights reserved.
Last changed: October 8, 2007
Performance View Handling
It is now possible to have more than one script as the performance view script – all five scripts can be
brought to the front by using the make_persistent command.
By using the new command
_set_skin_offset(<offset in pixel>)
offsets the chosen background tga file by the specified number of pixels
If a background tga graphic file has been selected in the instrument options and this file is larger than
the maximum height of the performance view, you can use this command to offset the background
graphic, thus creating separate backgrounds for each of the script slots.
Inter-Script Communication: PGS
It is now possible to send and receive values from one script to another, discarding the usual left-toright order by using the new Program Global Storage (PGS) commands. PGS is a dynamic memory
which can be read/written by any script. Here are the commands:
PGS commands
_pgs_create_key(<key-id>,<size>)
_pgs_key_exists(<key-id>)
_pgs_set_key_val(<key-id>,<index>,<value>)
_pgs_get_key_val(<key-id>,<index>)
<key-id> is something similar to a variable name, it can only contain letters and numbers and must
start with a number. It might be a good idea to always write them in capitals to emphasize their unique
status.
Here's an example, insert this script into any slot:
on init
_pgs_create_key(FIRST_KEY, 1) {defines a key with 1 element}
_pgs_create_key(NEXT_KEY, 128) {defines a key with 128 elements}
declare ui_button $Just_Do_It
end on
on ui_control($Just_Do_It)
{writes 70 into the first and only memory location of FIRST_KEY}
_pgs_set_key_val(FIRST_KEY, 0, 70)
{writes 50 into the first and 60 into the last memory location of NEXT_KEY}
_pgs_set_key_val(NEXT_KEY, 0, 50)
_pgs_set_key_val(NEXT_KEY, 127, 60)
end on
1

What's new in Kontakt 3 – KSP
and insert the following script into any other slot:
on init
declare ui_knob $First (0,100,1)
declare ui_table %Next[128] (5,2,100)
end on
on _pgs_changed
{checks if FIRST_KEY and NEXT_KEY have been declared}
if(_pgs_key_exists(FIRST_KEY) and _pgs_key_exists(NEXT_KEY))
$First := _pgs_get_key_val(FIRST_KEY,0) {in this case 70}
%Next[0] := _pgs_get_key_val(NEXT_KEY,0) {in this case 50}
%Next[127] := _pgs_get_key_val(NEXT_KEY,127) {in this case 60}
end if
end on
As illustrated above, there is also a new callback type which is executed whenever a set_key command
has been executed:
on _pgs_changed
callback type, executed whenever any _pgs_set_key_val() is executed in any script
It is possible to have as many keys as you want, however each key can only have up to 256 elements.
Addressing modulators by name
It is now possible to address modulators and modulation intensities by a using the name of a modulator
or modulation assignment. This text string can be pre-defined or manually altered.
The two new commands are
find_mod(<group-idx>,<mod-name>)
returns the index of a modulator
and
find_target(<group-idx>, <mod-idx>, <target-name>)
returns the index of a modulation assignment
Let's see how these commands can be used in real life. Let's say we want to control the attack time of
the volume envelope of the first group in an instrument. We can simply write:
on init
declare $mod_idx
$mod_idx := find_mod(0,"ENV_AHDSR")
declare ui_knob $Attack (0,1000000,1)
set_knob_unit ($Attack,$KNOB_UNIT_MS)
set_knob_label ($Attack,_get_engine_par_disp($ENGINE_PAR_ATTACK,0,$mod_idx,-1))
end on
on ui_control ($Attack)
_set_engine_par ($ENGINE_PAR_ATTACK,$Attack,0,0,-1)
set_knob_label ($Attack,_get_engine_par_disp($ENGINE_PAR_ATTACK,0,$mod_idx,-1))
end on
2

What's new in Kontakt 3 – KSP
But why do we write "ENV_AHDSR"? Because this is the default name of any ahdsr envelope. You can
view and change the name while the script editor is open and right clicking on the module:
This means, you could rename an existing modulator, for example if you have to envelopes (one for
volume , one for filter).
Now, controlling the velocity to volume modulation is just as easy, just write this:
on init
declare $mod_idx
$mod_idx := find_mod(0,"VEL_VOLUME")
declare ui_knob $Velocity (0,1000000,1)
set_knob_label...
($Velocity,_get_engine_par_disp($ENGINE_PAR_MOD_TARGET_INTENSITY,0,$mod_idx,-1))
end on
on ui_control ($Velocity)
_set_engine_par($ENGINE_PAR_MOD_TARGET_INTENSITY,$Velocity,0,$mod_idx,-1)
set_knob_label...
($Velocity,_get_engine_par_disp($ENGINE_PAR_MOD_TARGET_INTENSITY,0,$mod_idx,-1))
end on
3

What's new in Kontakt 3 – KSP
Here, we change the value of the modulation slider (the velocity to volume modulation). Since we're
addressing an external modulator, we can also use the find_mod command.
If you want to control the modulation intensity of e.g. the filter envelope, check this out:
on init
declare $mod_idx
$mod_idx := find_mod(0,"FILTER_ENV")
declare $target_idx
$target_idx := find_target(0,$mod_idx,"ENV_AHDSR_CUTOFF")
declare ui_knob $Knob (-100,100,1)
$Knob := 0
set_text ($Knob, "FLT Env")
end on
on ui_control ($Knob)
if ($Knob < 0)
_set_engine_par ($MOD_TARGET_INVERT_SOURCE,1,0,$mod_idx,$target_idx)
else
_set_engine_par ($MOD_TARGET_INVERT_SOURCE,0,0,$mod_idx,$target_idx)
end if
_set_engine_par($ENGINE_PAR_MOD_TARGET_INTENSITY,abs($Knob*10000),0,$mod_idx,$target_idx)
end on
Note that we have manually renamed the ahdsr envelope to "FILTER_ENV".
Other changes/improvements
UI T ab le ch a n ge s
You can now change the number of displayed columns in an ui table:
set_table_steps_shown(<ui-table-variable>,<num-steps>)
changes the number of displayed columns in an ui table
Further, it is now also possible to declare tables with a height of 1. This could e.g. be useful for
displaying steps in a sequencing module:
4

What's new in Kontakt 3 – KSP
Inf o T a gs for UI e l em ent s
By using the following command:
set_control_help(<control-id>,<text-string>)
assigns a text string to be displayed when hovering the ui element
You can create help texts which appear when hovering the ui element with the mouse (make sure
Kontakt's Info Pane is visible). Just try it:
on init
declare ui_knob $Knob(0,100,1)
set_control_help($Knob, "Hello, I'm the only knob, folks")
end on
Kno b U nit M a rk f or Se mit on e
$KNOB_UNIT_ST
displays "ST" (semitone) as a knob unit mark
New En gin e P ar a me t er Va r iab le s
Below is a list of all new Engine Parameter variables for the new effects in Kontakt 3:
Skreamer
$ENGINE_PAR_SK_TONE
$ENGINE_PAR_SK_DRIVE
$ENGINE_PAR_SK_BASS
$ENGINE_PAR_SK_BRIGHT
$ENGINE_PAR_SK_MIX
Rotator
$ENGINE_PAR_RT_SPEED
$ENGINE_PAR_RT_BALANCE
$ENGINE_PAR_RT_ACCEL_HI
$ENGINE_PAR_RT_ACCEL_LO
$ENGINE_PAR_RT_DISTANCE
$ENGINE_PAR_RT_MIX
Twang
$ENGINE_PAR_TW_VOLUME
$ENGINE_PAR_TW_TREBLE
$ENGINE_PAR_TW_MID
$ENGINE_PAR_TW_BASS
Cabinet
$ENGINE_PAR_CB_SIZE
$ENGINE_PAR_CB_AIR
$ENGINE_PAR_CB_TREBLE
$ENGINE_PAR_CB_BASS
$ENGINE_PAR_CABINET_TYPE
5
 Loading...