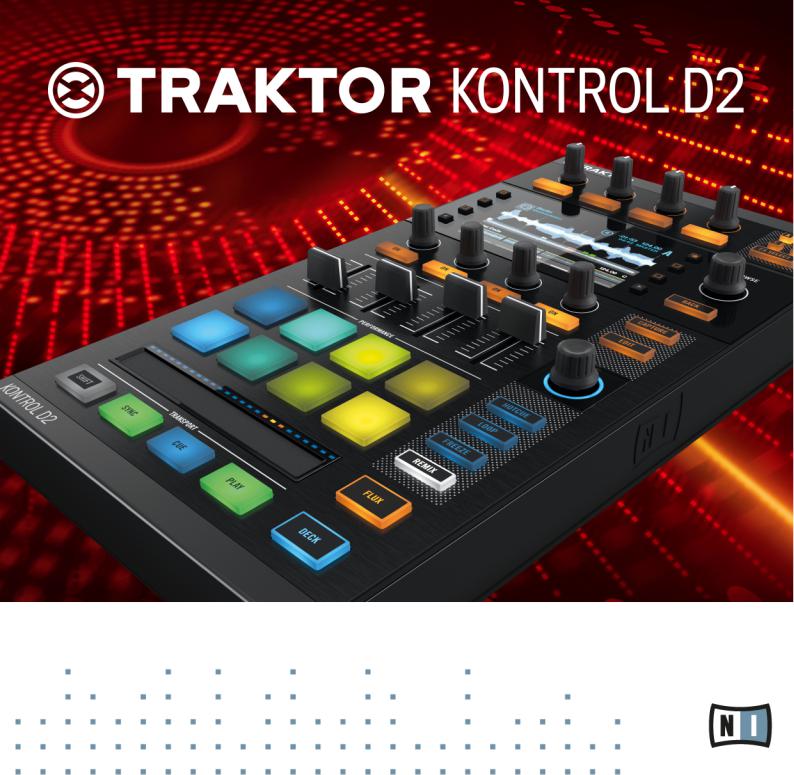
Native Instruments Traktor Kontrol D2 Setup Guide

Setup Guide

Disclaimer
The information in this document is subject to change without notice and does not represent a commitment on the part of Native Instruments GmbH. The software described by this document is subject to a License Agreement and may not be copied to other media. No part of this publication may be copied, reproduced or otherwise transmitted or recorded, for any purpose, without prior written permission by Native Instruments GmbH, hereinafter referred to as Native Instruments.
“Native Instruments”, “NI” and associated logos are (registered) trademarks of Native Instruments GmbH.
Mac, Mac OS, GarageBand, Logic, iTunes and iPod are registered trademarks of Apple Inc., registered in the U.S. and other countries.
Windows, Windows Vista and DirectSound are registered trademarks of Microsoft Corporation in the United States and/or other countries.
All other trade marks are the property of their respective owners and use of them does not imply any affiliation with or endorsement by them.
Document authored by: Christian Schulz
Software version: 2.8 (04/2015)
Special thanks to the Beta Test Team, who were invaluable not just in tracking down bugs, but in making this a better product.

Contact
NATIVE INSTRUMENTS GmbH
Schlesische Str. 29-30
D-10997 Berlin
Germany
www.native-instruments.de
NATIVE INSTRUMENTS North America, Inc.
6725 Sunset Boulevard 5th Floor
Los Angeles, CA 90028 USA www.native-instruments.com
NATIVE INSTRUMENTS K.K.
YO Building 3F
Jingumae 6-7-15, Shibuya-ku,
Tokyo 150-0001
Japan
www.native-instruments.co.jp
NATIVE INSTRUMENTS UK Limited
18 Phipp Street London EC2A 4NU UK
www.native-instruments.com
© NATIVE INSTRUMENTS GmbH, 2015. All rights reserved.

Table of Contents
Table of Contents
1 Welcome to TRAKTOR KONTROL D2 ............................................................................ |
6 |
||
1.1 |
This is Included in the Box .......................................................................................................... |
6 |
|
1.2 |
Document Conventions ............................................................................................................... |
6 |
|
2 Software Installation ................................................................................................. |
8 |
||
2.1 |
Important Software Installation Information .............................................................................. |
8 |
|
2.2 |
Installation on Mac OS X ............................................................................................................ |
9 |
|
|
2.2.1 |
Locate and Start the Installation Program ................................................................. |
9 |
|
2.2.2 |
Select the Components to Install ............................................................................... |
9 |
|
2.2.3 |
Enter Your Password .................................................................................................. |
11 |
|
2.2.4 |
Complete the Installation .......................................................................................... |
12 |
2.3 |
Installation on Windows ............................................................................................................. |
13 |
|
|
2.3.1 |
Locate and Start the Installation Program ................................................................. |
13 |
|
2.3.2 |
Confirm the Features to Install .................................................................................. |
14 |
|
2.3.3 |
Confirm the Application Installation Path ................................................................. |
15 |
|
2.3.4 |
Select Your Hardware Drivers .................................................................................... |
16 |
|
2.3.5 |
Complete the Software Installation ........................................................................... |
17 |
3 Product Activation with SERVICE CENTER ................................................................... |
19 |
||
3.1 |
Activating Your Product Online ................................................................................................... |
19 |
|
|
3.1.1 |
Start SERVICE CENTER .............................................................................................. |
19 |
|
3.1.2 |
Log In Into Your User Account .................................................................................... |
20 |
|
3.1.3 |
Activate the Product .................................................................................................. |
21 |
|
3.1.4 |
Finish the Online Activation ....................................................................................... |
22 |
3.2 |
Updating Your Product ............................................................................................................... |
23 |
|
|
3.2.1 |
Select Updates .......................................................................................................... |
23 |
|
3.2.2 |
Download the Updates ............................................................................................... |
24 |
|
3.2.3 |
Install Your Updates .................................................................................................. |
25 |
TRAKTOR KNOTRL D2 - Setup Guide - 4

|
|
|
|
Table of Contents |
|
|
|
|
|
|
3.3 |
Activating Your Product Offline .................................................................................................. |
26 |
|
|
|
3.3.1 |
Start the Offline Activation ........................................................................................ |
27 |
|
|
3.3.2 |
Create the Activation Request File ............................................................................. |
28 |
|
|
3.3.3 |
Enter the Serial Number ............................................................................................ |
29 |
|
|
3.3.4 |
Transfer the Activation Request File .......................................................................... |
30 |
|
|
3.3.5 |
Open the Activation Return File ................................................................................. |
31 |
|
|
3.3.6 |
Finish the Offline Activation ...................................................................................... |
32 |
|
3.4 |
Further Information .................................................................................................................... |
33 |
|
4 |
Hardware Installation ................................................................................................ |
34 |
||
|
4.1 |
Important Hardware Installation Information ............................................................................. |
35 |
|
|
4.2 |
Unfolding the Feet ...................................................................................................................... |
36 |
|
|
4.3 |
Connecting to Your Computer ..................................................................................................... |
37 |
|
|
4.4 |
Connecting the Power Supply ..................................................................................................... |
38 |
|
|
4.5 |
Final Preparations ...................................................................................................................... |
39 |
|
5 |
What's Next .............................................................................................................. |
|
41 |
|
6 |
Troubleshooting and FAQ ........................................................................................... |
42 |
||
|
6.1 |
Installation Folder Not Found by an Update Installer .................................................................. |
42 |
|
|
6.2 |
Audio Clicks and Drop-outs When Playing Tracks ....................................................................... |
42 |
|
|
6.3 |
More Troubleshooting Resources ................................................................................................ |
42 |
|
7 |
Support ..................................................................................................................... |
|
43 |
|
|
7.1 |
Knowledge Base / Online Support / Readme ............................................................................... |
43 |
|
|
7.2 |
Forum ......................................................................................................................................... |
|
44 |
|
7.3 |
Updates ...................................................................................................................................... |
|
44 |
8 |
Product Returns |
........................................................................................................ |
45 |
|
TRAKTOR KNOTRL D2 - Setup Guide - 5

Welcome to TRAKTOR KONTROL D2
This is Included in the Box
1Welcome to TRAKTOR KONTROL D2
Thank you for purchasing the TRAKTOR KONTROL D2. On behalf of the entire Native Instruments team, we hope you are truly inspired by this product. This Setup Guide covers the following topics:
•How to install the TRAKTOR software on your computer.
•How to activate your TRAKTOR version using the SERVICE CENTER application.
•How to connect the devices and get your TRAKTOR KONTROL D2 system up and running.
•How to proceed once your TRAKTOR KONTROL D2 system is up and running.
•How to solve common problems and where to find further product support.
1.1This is Included in the Box
The TRAKTOR KONTROL D2 box contains the following items:
•The TRAKTOR KONTROL D2.
•The D2's power supply.
•A USB cable.
•A safety instructions flyer.
•A sticker sheet.
1.2Document Conventions
This document uses particular formatting to point out special facts and to warn you of potential issues. The icons introducing the following notes let you see what kind of information can be expected:
Whenever this exclamation mark icon appears, you should read the corresponding note carefully and follow the instructions and hints given there if applicable.
TRAKTOR KNOTRL D2 - Setup Guide - 6

Welcome to TRAKTOR KONTROL D2
Document Conventions
This light bulb icon indicates that a note contains useful extra information. This information may often help you to solve a task more efficiently, but does not necessarily apply to the setup or operating systems you are using; however, it's always worth a look.
Furthermore, the following formatting is used:
•Text appearing in (drop-down) menus (such as Open…, Save as…) and paths to locations on your hard drive or other storage devices is printed in italics.
•Text referring to elements appearing on the screen (labels of buttons, controls, text next to checkboxes, etc.) is printed in light blue. Whenever you see this formatting applied, you will find the same text appearing on your computer screen.
•Text referring to elements printed on hardware is formatted orange. Whenever you see this formatting applied, you will find the same text appearing on the hardware.
•Important names and concepts are printed in bold.
►Single instructions are introduced by this play button type arrow.
→Results of actions are introduced by this smaller arrow.
TRAKTOR KNOTRL D2 - Setup Guide - 7

Software Installation
Important Software Installation Information
2Software Installation
This section describes the installation process of the TRAKTOR software on Mac and on Windows.
2.1Important Software Installation Information
Before starting the TRAKTOR software installation, here are some points to be aware of:
•Make sure you have downloaded the TRAKTOR software to your computer by following the instructions on the registration page:
http://www.native-instruments.com/go-d2
If you have already registered your device but need to download the installer again, you can find the relevant downloads in the "My Account" section of the NI website: https://www.native-instruments.com/en/my-account/my-products-serials
•Carefully review the installer screens and the suggested installation paths in order to avoid that any unwanted folders are created on your hard disk.
•Moving any folders related to Native Instruments software after installation is not recommended. Future software updates rely on the directory locations set during initial installation.
•After successful installation, you will find the TRAKTOR software installation folder on your hard disk containing the application and the documentation resources. If you installed using the default settings, these folders can be found here:
◦Mac OS X: Macintosh HD/Applications/Native Instruments/Traktor 2/
◦Windows: C:\Program Files\Native Instruments\Traktor 2\
If you are using a Mac, continue reading with the following section ↑2.2, Installation on Mac OS X and install the TRAKTOR software as explained. If you want to install the TRAKTOR software on a Windows computer, continue reading with section ↑2.3, Installation on Windows and follow the instructions.
TRAKTOR KNOTRL D2 - Setup Guide - 8

Software Installation
Installation on Mac OS X
2.2Installation on Mac OS X
This section describes the process of installing the TRAKTOR software on Mac OS X. At the end of the installation process, you will need to restart your computer. Please save your work and close all applications before proceeding.
2.2.1 |
Locate and Start the Installation Program |
|
1. |
Locate and unpack the downloaded installer package file on your computer. |
|
2. |
Double-click the Traktor 2 Installer.mpkg file to start the installation procedure. |
|
3. |
Follow the on-screen instructions. |
|
2.2.2 |
Select the Components to Install |
|
After you have accepted the software license agreement, the installer window displays the components available for installation. This installer screen also contains information regarding the amount of disk space the individual components will use.
TRAKTOR KNOTRL D2 - Setup Guide - 9

Software Installation
Installation on Mac OS X
The components selection screen of the installation program.
Basic Installation: This installs the TRAKTOR software along with its documentation. This component cannot be deselected. It also installs the SERVICE CENTER application (required for activation of your product) and the CONTROLLER EDITOR application, which allows you to configure the controllerʼs MIDI assignments for using the controller with applications other than TRAKTOR.
Traktor Kontrol S4: This installs the driver for the TRAKTOR KONTROL S4 controller. If you do not intend to use a TRAKTOR KONTROL S4 controller on your computer, you can deactivate the checkbox.
Traktor Kontrol X1: This installs the driver for the TRAKTOR KONTROL X1 controller. If you do not intend to use a TRAKTOR KONTROL X1 controller on your computer, you can deactivate the checkbox.
Traktor Audio 10/6/2 Drivers: This installs the drivers for the TRAKTOR AUDIO 10, TRAKTOR AUDIO 6 and TRAKTOR AUDIO 2 audio interfaces by Native Instruments. If you do not intend to use any of these audio interfaces, you can deactivate the checkboxes.
TRAKTOR KNOTRL D2 - Setup Guide - 10

Software Installation
Installation on Mac OS X
Audio 8/4/2 DJ Drivers: This installs drivers for the AUDIO 8 DJ, AUDIO 4 DJ and AUDIO 2 DJ audio interfaces by Native Instruments. If you do not intend to use any of these audio interfaces, you can deactivate the checkboxes.
Background Components
These components are not displayed in the installer window, but are always installed:
SERVICE CENTER: The SERVICE CENTER application is required for activation of the TRAKTOR software. This component will automatically be installed unless a newer version of SERVICE CENTER already exists on your computer.
CONTROLLER EDITOR: The CONTROLLER EDITOR application allows you to configure your controller for use as a MIDI controller with applications other than the TRAKTOR software. This component will automatically be installed unless a newer version of CONTROLLER EDITOR already exists on your computer.
It is strongly recommended to install the TRAKTOR software to the default location. If you still need to change the install location, click on the folder icon in the Location column and select the desired folder.
►After you have customized the installation as required, click Continue and then follow the on-screen instructions.
2.2.3Enter Your Password
Before installing the selected components, the installer will prompt you to enter your Mac OS X password. This is a standard behavior on Mac OS X that makes sure you are aware of the changes the installer is about to make.
The Mac OS X user account you are using needs to have Administrator privileges.
TRAKTOR KNOTRL D2 - Setup Guide - 11

Software Installation
Installation on Mac OS X
The Mac OS X password prompt.
►To proceed, enter your password and click OK.
→The selected components will be installed.
2.2.4Complete the Installation
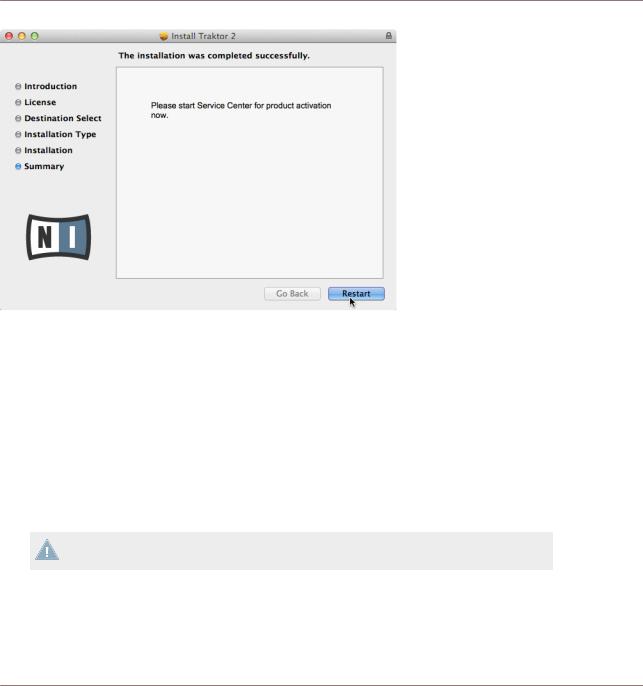
After the components have been installed, you need to restart your computer.
TRAKTOR KNOTRL D2 - Setup Guide - 12

Software Installation
Installation on Windows
The final screen of the installation program.
►Click Restart to restart your computer and complete the software installation.
→Your computer will immediately restart.
►After your computer has restarted, start reading section ↑3, Product Activation with SERVICE CENTER of this Setup Guide for information about product activation.
2.3Installation on Windows
This section describes the installation process of the TRAKTOR software on Windows.
It may be necessary to disable your anti-virus software during installation, please refer to the software's own documentation for further information.
2.3.1Locate and Start the Installation Program
1.Locate and unpack the downloaded installer package file on your computer.
TRAKTOR KNOTRL D2 - Setup Guide - 13

Software Installation
Installation on Windows
2.Double-click the Traktor 2 Setup.exe file to start the installation procedure.
3.Follow the on-screen instructions.
2.3.2Confirm the Features to Install
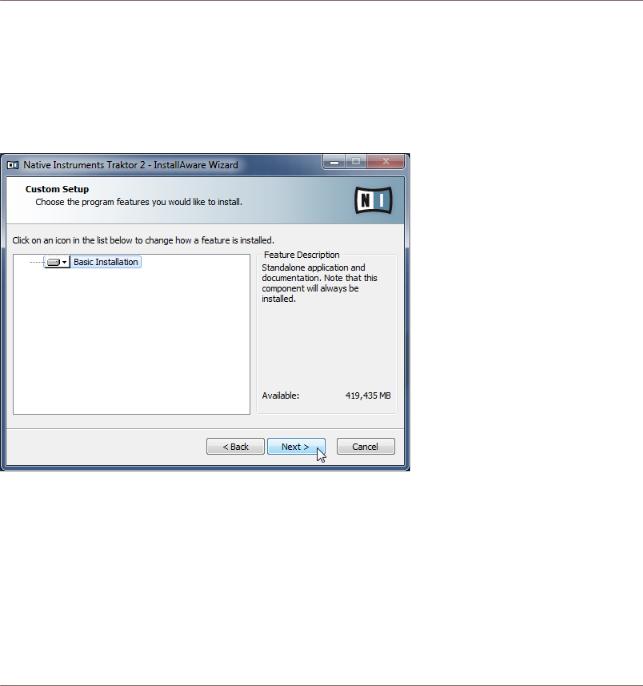
After you have accepted the software license agreement, the installer window displays the features available for installation.
The components selection screen of the installation program.
Basic Installation: This installs the TRAKTOR software along with its documentation. This component cannot be deselected.
Background Components
These components are not displayed in the installer window, but are always installed:
TRAKTOR KNOTRL D2 - Setup Guide - 14
 Loading...