


 Loading...
BATTERY 3
Operation Manual

The information in this document is subject to change without notice and does not represent a commitment on the part of NATIVE INSTRUMENTS GmbH. The software described by this document is subject to a License Agreement and may not be copied to other media. No part of this publication may be copied, reproduced or otherwise transmitted or recorded, for any purpose, without prior written permission by NATIVE INSTRUMENTS GmbH, hereinafter referred to as NATIVE INSTRUMENTS. All product and company names are trademarks of their respective owners.
Furthermore, the fact that you are reading this text means you are the owner of legal version rather than an illegal, pirated copy. It is only through the loyalty and honesty of people like yourself that NATIVE INSTRUMENTS GmbH can continue to develop and create innovative audio software. On behalf of the entire company, thank you very much.
Users Guide written by Craig Anderton, Cliff Douse
Special thanks to the Beta Test Team, who were invaluable not just in tracking down bugs, but in making this a better product.
© Native Instruments GmbH, 2006. All rights reserved.
Germany |
USA |
NATIVE INSTRUMENTS GmbH |
NATIVE INSTRUMENTS North America, Inc. |
Schlesische Str. 28-30 |
5631 A Hollywood Boulevard |
D-10997 Berlin |
Los Angeles, CA 90028 |
Germany |
USA |
info@native-instruments.de |
info@native-instruments.com |
www.native-instruments.de |
www.native-instruments.com |
Table Of Contents |
|
The BATTERY 3 Interface.................................................................... |
5 |
Master Section................................................................................ |
5 |
Drum/Sample Matrix........................................................................ |
5 |
The Edit Pane................................................................................. |
6 |
The Master Section............................................................................. |
7 |
File Menu: Loading Kits and Sounds.................................................. |
7 |
Loading Dialogue............................................................................ |
10 |
Options.......................................................................................... |
11 |
Edit Menu: Modify the Cells............................................................. |
13 |
View Menu: Alter the Workspace....................................................... |
16 |
Automation Page............................................................................ |
17 |
Library “Fast Find”......................................................................... |
19 |
Master Volume Control.................................................................... |
19 |
Output Meter.................................................................................. |
19 |
Panic! Button................................................................................. |
19 |
Data Fields................................................................................... |
20 |
The Drum/Sample Matrix.................................................................... |
21 |
Cell Contents.................................................................................. |
21 |
Auditioning Cells............................................................................. |
21 |
Get Cell Info.................................................................................. |
22 |
Copying and Moving Cells............................................................... |
22 |
Cell Solo and Mute......................................................................... |
23 |
Selecting and Editing Cells.............................................................. |
23 |
Selecting Cells................................................................................ |
24 |
Freeze and Padlock ........................................................................ |
25 |
The Edit Pane.................................................................................. |
26 |
Edit Pane Overview........................................................................ |
26 |
Cell View Tab................................................................................. |
28 |
Setup Tab..................................................................................... |
33 |
Mapping View Tab.......................................................................... |
43 |
Wave Editor.................................................................................... |
49 |
Loop View Tab................................................................................ |
51 |
Modulation View Tab...................................................................... |
53 |
Effects View Tab............................................................................. |
57 |
Browser View Tab............................................................................ |
72 |
Tips and Techniques.......................................................................... |
76 |
Drum Pitch Tuning.......................................................................... |
76 |
Tweaking the Drum Mix.................................................................. |
77 |
BATTERY 3 –
Filter Modulation............................................................................ |
78 |
Multiple-Cycle Looping = Long Sustain.............................................. |
78 |
Infinite-Cycle Looping = Infinite Sustain............................................ |
78 |
Click Layering................................................................................. |
79 |
MIDI Timing Tweaks........................................................................ |
79 |
Why Randomization is Not the Answer.............................................. |
80 |
Why Quantization is Not the Answer either......................................... |
81 |
Tempo Track Timing Tweaks............................................................. |
81 |
Battery 3 Library.............................................................................. |
82 |
Introduction.................................................................................. |
82 |
Overview....................................................................................... |
83 |
Battery 3 Video Tutorials................................................................... |
85 |
Index.............................................................................................. |
86 |
– BATTERY 3

The BATTERY 3 Interface
BATTERY 3’s interface is intuitive and flexible. You can view the entire interface or hide areas that aren’t of interest to save screen space. BATTERY 3 also lets you select different elements of the interface in different ways, so you can use an approach that’s most comfortable for you.
Although it’s possible to use BATTERY 3’s interface entirely in its default mode, you may want to acquaint yourself with the customizable options so that you can optimize your workflow based on your needs.
The interface is divided into three main sections:
Master Section
The Master Section has drop-down menus for File, Edit, and View functions, and another one for selecting kits.
This is where you manage and import drum kits, perform basic editing operations, check and adjust master levels, choose different interface views, set the size of the drum/sample matrix, set the tempo for imported REX/ Apple/ACID loops (in stand-alone mode) and see information on polyphony, kit size, and the master level setting. Think of it as BATTERY 3’s main “control panel.”
Drum/Sample Matrix
This shows a 16x8 drum/sample matrix — the maximum number of cells possible in BATTERY 3.
The Drum/Sample Matrix consists of a number of rows and columns. At the intersection of each row and column is a Cell, which represents a particular “drum” (or other sound – some people use BATTERY 3 to play back sound effects or even bass lines).
BATTERY 3 –
Each Cell can contain up to 128 samples. If the Cell contains multiple samples, they can be layered and/or velocity-switched (e.g., different velocity levels can trigger different drum samples to give realistic dynamics or special effects).
The matrix can contain up to 128 Cells, viewable as 4-16 columns wide. You can add or delete rows as desired so that the matrix doesn’t take up more space than needed.
One reason for setting up Cells as rows and columns is that this allows for powerful Mute, Solo, Copy, Paste and Delete options. For example, not only can you mute and solo individual Cells, but also individual rows and/or columns. You can organize 12 percussion instruments as one row in a matrix that’s 12 columns wide; to hear just that percussion, you would solo just that row. Or you could mute just the percussion and listen to everything else, and so on.
The Edit Pane
Note the small triangle in the upper right corner. This is a shortcut to show/hide the Edit Pane. The function key F2 will also perform the same action.
The Edit Pane works on the Cell level, just as the Master Section works on a ‘global’ level and the Drum Matrix works on a kit level. The Edit Pane is where you can map samples within a cell, add expressive signal processing such as modulation, filtering and dynamics, set up loop points for a sample, alter pitch, assign outputs, and much more. It is your key to drum kit customization and personalization.
The next few sections cover each element in detail.
– BATTERY 3
The Master Section
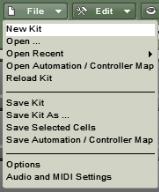
File Menu: Loading Kits and Sounds
There are several ways to load complete kits and individual sounds into BATTERY 3. We’ll start with the File Menu.
There are two ways to call up the File Menu: From the Menu bar (stand-alone mode only) or from the File button within the program itself.
Here are the functions available via the File menu. When you access them from the Menu bar, you can also see the keyboard equivalents for calling up some of the functions in stand-alone mode:
New Kit (PC: Ctrl+N/ MAC: Apple+N)
Open (PC: Ctrl+O / MAC: Apple+O) Open Recent kits
Reload Kit
Save Kit (PC: Ctrl+S / MAC: Apple+S)
Save Kit As… (PC: Ctrl+Shift+S / MAC: Apple+Shift+S) Save Selected Cells
Save Automation/Controller Map Options
Audio and MIDI Settings Exit
BATTERY 3 –
New Kit
Use this when you want to create a new, blank kit. The Cells in the new kit will have no contents and they will use BATTERY 3’s default parameter settings.
Open
When selected, a file selection box appears that recognizes all file types supported by BATTERY 3. This is a somewhat “intelligent” function. For example, if you load a kit, it will replace the existing kit with a new kit (and ask you first if this is what you want to do).
If you load a Sound Font file (which will probably contain multiple samples), your current kit will be replaced and the various samples will be mapped in cells from left to right beginning with row A.
On the other hand if you have selected a single Cell and choose a WAV or AIF file, it will load into only that Cell. If you Ctrl-click on several WAV or AIF files, it will load all of them, starting at the currently selected Cell.
The bottom line is that BATTERY 3 makes it easy to load/import a variety of sounds or kits in a very flexible way. Supported file types are:
Kontakt Instruments (*.nki) Cells (*.cel)
Battery 1 kits (*.kit) Battery 2 kits (*.kt2) Battery 3 kits (*.kt3) Wave audio (*.wav)
AIF audio (*.aif, *.aiff) MPC samples (*.snd) MPC Program (*.pgm) HALion (*.fxp).
Samplecell (*.bnk) LM4 (*.txt)
SF2 (Sound Font) container (*.sf2) Gigasampler container (*.gig)
REX files (*.rex) REX2 files (*.rx2)
Sound Designer II (SD2) files (*.sd2)
– BATTERY 3
ACID (*.wav)
Apple Loops
AKAI S1000/S3000/S5000/S6000
Beatcreator (*.zgr)
Reaktor (*.map)
EXS24 (*.exs)
Open Recent Kits
This displays a list of your most recently used kits. It’s like a “favorites” function, as you can return quickly to a kit used in a recent project.
Open Automation/Controller Map
Use this to open Automation/Controller Map settings you have created for BATTERY 3 kits.
Reload Kit
Allows you to reload an unedited version of your selected kit.
Save
This saves the current kit and overwrites the kit’s previously saved version. If you Save a kit that has never been saved before, it will be treated the same way as the “Save As…” option described next.
Save As…
This saves the kit, but presents the option to specify a different file name and location. Furthermore, there are saving options:
Patch Only. This option saves Kit and Cell settings along with pointers to where samples reside on your hard disk. It references samples, but does not include them in the file, thus producing a smaller file size than if the samples were included. Checking Absolute Sample Paths forces BATTERY 3 to look in a specific path to find the associated samples.
Patch and Samples. Here you can choose a directory into which the samples will be saved. This is a good Save As… choice if you want a “transportable” patch, for example, when collaborating with another musician. Send the musician the patch and directory containing the samples, and it will be possible to reproduce exactly the kit and sounds you used.
BATTERY 3 –
The default Save As... option is Patch and Samples since this continues to be the surest way that you will always be able to load your kits and as quickly as possible, because they are saved all in one folder. If your kits are built with samples from multiple folders, then it is best to use Absolute Sample Paths. However, please be aware that renaming folders or moving them may result in having to relocate the used samples. In this case, please find them and then resave your kit.
Save Selected Cells
You can save one or more Cells as a .cel file. This function allows you to name the .cel file and choose its location. Hold down the shift or ctrl/ key and make your selection. When finished, use this function to save them as a .cel file.
Revert to Saved
When creating kits, it’s a good idea to Save frequently (as described later) in case you “over-edit” and wish you had stayed with a previous version. This function returns the current kit to its last saved state.
Save Automation/Controller map
You can use this to save your Automation and Controller settings for a loaded kit.
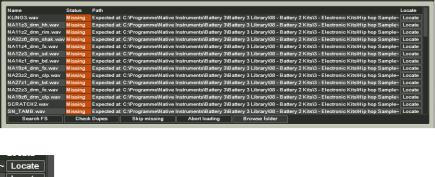
Loading Dialogue
The loading dialogue appears when you load kits in Battery 3. It shows the file name and the file path (optional) within the loading window.
If samples are not found, you will see details about them in the following window:
The following options are available:
10 – BATTERY 3
Locate: Click on the Locate button next to a missing sample to locate the sample.
Search File System (FS): Initiates an intelligent search process on your local file system starting in your battery folder and continuing in a recursive way.
Check Dupes: Allows you to check for duplicates of a sample to ensure you have the correct filepath.
Skip Missing: Skips the search and displays only the samples that have been found when the dialogue appears.
Abort Loading: Stops the loading process and returns to the previous battery status.
Browse Folder: Lets you select a folder to locate any missing samples.
Options
The Options menu lets you specify various essential default settings for BATTERY 3:
Key follow: Selects the Cell(s) for editing when a key input is received from your MIDI keyboard. Multiple held keys select multiple Cells. The selection is renewed after all the keys are released and new notes are received.
Show Cell Info Window on Mouseover: Displays an Info message when you move your mouse cursor over a Cell.
Warning on Delete Cells: Displays a warning message before you delete Cells.
Warning on Delete Rows/Columns: Displays a warning message before you delete a row or column.
Use Computer Keyboard for Playback: This lets you use your computer keyboard to trigger BATTERY 3. You can also edit the velocity value that a key will trigger.
BATTERY 3 – 11
Trigger cell on Click: Plays samples when you click on a Cell.
Trigger cell on Cursor: Selecting a different Cell via cursor keys triggers the Cell.
Click/Key Trigger Velocity: Plays the velocity layer’s audio when selecting it in the Matrix.
Transpose MIDI In (Octave): Transposes the MIDI input in octaves. Use the ‘+’ button to transpose up and the ‘–‘ button to transpose down.
Transpose Comp. Keyboard (Octave): Transposes the computer keyboard input in octaves. Use the ‘+’ button to transpose up and the ‘–‘ button to transpose down.
Auto Refresh Browser: The Browser refreshes automatically so that new file names and position alterations are clearly visible.
Hide Known File Extensions: File extensions of the filetypes that are supported by BATTERY 3 are hidden.
Show Full Filepath while Loading: Displays the full file path of a kit as it is being loaded.
Load Multiple Samples into One Cell: Allows you to load multiple samples into one Cell.
Load REX/REX2 Without original Loop: Load slices only.
Convolution Reverb Sample Rate: Sets the sample rate of BATTERY 3’s convolution reverb.
Convolution Reverb Latency: Sets the latency of BATTERY 3’s convolution reverb in milliseconds.
RAM for DFD: Adjusts the amount of RAM to dedicate to the DFD process. Although samples stream from disk, it is necessary to store attacks in RAM so they are available instantly upon playback. If DFD isn’t working properly, try allocating more RAM to this function.
Number of DFD Voices: Maximum number of stereo DFD voices the user will be able to play.
Override Instruments Preload Size: Ratio of the samples that will be loaded into RAM.
Total Stereo Outputs Count: Determines the number of Stereo Outputs to be used by BATTERY 3.
Total Mono Outputs Count: Determines the number of Mono Outputs to be used by BATTERY 3.
12 – BATTERY 3
Default Kit Location: If you have a favorite kit and would like it to load automatically every time you launch Battery 3, click the Set button and select the path to your kit. Clicking the Clear button deletes this setting so Battery can be launched later without loading your kits.
Factory Content Path: Setting this directory allows quick access to the BATTERY
3 library from the “fast find” drop-down menu.
Audio and MIDI Settings
This brings up the dialog boxes for stand-alone mode where you can change SoundCard drivers, Routing, and MIDI assignments, as described earlier.
Exit/Quit
This closes BATTERY 3, and asks if you want to save your work before quitting.
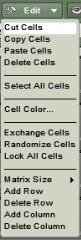
Edit Menu: Modify the Cells
As with the File Menu, you can call up the Edit Menu from the menu bar (stand-alone mode only) or from within the program itself.
When you access these functions from the menu bar’s Edit menu, you can also see the keyboard equivalents for calling up the following functions:
Cut (PC: Ctrl+X / MAC: Apple+X)
Copy (PC: Ctrl+C / MAC: Apple+C)
BATTERY 3 – 13
Paste (PC: Ctrl+V / MAC: Apple+V)
Delete (PC and MAC: Del)
Select All Cells (PC: Ctrl+A / MAC: Apple+A)
Exchange Cells (PC: Ctrl+E / MAC: Apple+E)
Randomize (PC: Ctrl+R / MAC: Apple+R)
Cut
Cuts the selected Cell(s).
Copy
Copies the selected Cell(s).
Paste
Pastes cell(s) into the drum / sample matrix. If multiple Cells were copied, they will paste starting at the selected Cell.
Delete
Deletes all selected Cells. Note: In the section on the drum/sample matrix, we will cover the various ways to select multiple Cells and groups of Cells for Copy, Paste, and Delete operations.
Select All Cells
Selects all of Battery 3’s Cells.
Cell color
Can be used to set the color of selected Cells.
Exchange Cells
If two Cells are selected, this function switches them. For example, if the first
Cell in Row A and the second Cell in Row B are selected, choosing Swap will place the contents of the first Cell in Row A into the second Cell in Row B, and the contents of the second Cell in Row B into the first Cell in Row A.
If multiple Cells are selected, then all will be swapped based on the number of Cells selected and the order in which they were selected. For example, if the first five cells of a row are called A, B, C, D, and E, you select them in that order, and then choose Swap, the new order will be E, D, C, B, A.
14 – BATTERY 3

Randomize Cells
This places Cells at random locations within the drum matrix. Try this if you’re getting into a creative rut and want to shake things up a bit!
Important: Consider saving your kit before using Randomize so that you can “Revert to Saved” if desired.
Lock All Cells
Locks all selected Cells so that their contents and parameter settings cannot be changed.
Matrix Size
Sets the size of the Drum Matrix. You can customize the Matrix size to show 4 x 4, 8 x 4, 9 x 6, 12 x 6, 16 x 8 Cells. You can also adjust the number of rows and columns by clicking the ‘+’ and ‘-‘ buttons at the bottom right corner of the Matrix.
Add Row
Adds a horizontal Cell row to the Matrix.
Delete Row
Deletes a horizontal Cell row from the Matrix.
Add Column
Adds a vertical Cell column to the Matrix.
Delete Column
Deletes a vertical Cell column from the Matrix.
BATTERY 3 – 15

View Menu: Alter the Workspace
You can use the View Menu shortcuts to make quick window selections in the Edit area:
The View Menu gives shortcuts to all of these Edit windows: Browser (F1)
Cell Page (F2)
Setup Page (F3) Mapping Page (F4) Wave Page (F5) Loop Page (F6) Modulation (F7)
Cell Effects Page (F8) Master Effects (F9) Automation Page (F10) Hide Edit area (Page Up)
Hide Drum Matrix (Page Up twice)
Show Matrix/Edit Page (Page Down once or twice)
16 – BATTERY 3

Automation Page
Please note: In plugin mode you have one table for midi cc controllers and one for host automation. You can change between them by clicking on the Midi CC/ Host Tab.
Just drag and drop the Midi CC number to the knob you want to automate. You can automate multiple parameters by dragging and dropping the same Midi CC number to another parameter on the Battery interface. The automatable parameters are marked with an hand-symbol during the dropping process.
The next controller appears then automatically in the list after a parameter has been allocated.
Here is a detailed description of the visible columns:
Column CC
Displays the Midi CC number.
You can the change the midi controller itself by clicking and moving the mouse on the number.
BATTERY 3 – 17
Column Midi Label
Displays the name of the Midi controller
Column Cell
Displays the name of the affected cell
Column Parameter Name
Displays the allocated parameter.
Column From/ To
Here you can adjust the range of the knob you want to be affected by the Midi controller.
Column Soft
Incoming MIDI data is “quantized” to 128 divisions. Sweeping some parameters with this quantized signal produces a “stair-step” or “zipper” effect. The Smoothing parameter smoothes the incoming MIDI data by creating a ramp between values rather than a sudden jump. However, note that higher smoothing values also make the control less responsive.
Column Learn
By pressing learn and moving a knob on your Midi-Keyboard you can allocate the assigned
Midi controller in the list directly to this knob.
Column Reset
By pressing the „X“ sign in the appropriate list-entry the assigned parameters are deleted beginning with the parameter you added lastly.
18 – BATTERY 3
Library “Fast Find”
You can step through kits rapidly with the left and right arrows, as well as select kits from within the BATTERY 3 Library folder.
The Library Fast Find section under the File, Edit, and View menus browses the kits located in the BATTERY 3 Library folder. Click on the name for a drop-down menu of kits within the Library. You can also load the next kit in the Library by clicking on the (+) button, or the previous kit by clicking on the (–) button.
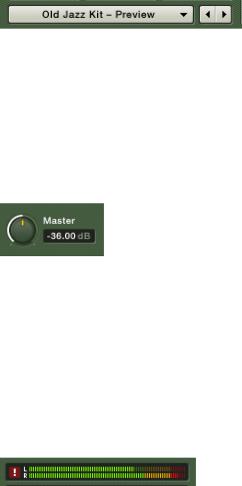
Master Volume Control
The Master Volume control and associated display field allow for precise level setting, whether in stand-alone mode or used with a host.
The Master Section volume control sets the overall level for all outputs used by the kit. The display field to the left of the control provides a precise numeric readout of the control’s setting. This is handy if, for example, the mixer in your host shows that BATTERY 3 is overloading a mixer channel by 0.6dB, even though BATTERY 3’s level is set to 0.0dB. You can then use this information to reduce BATTERY 3’s level control to -0.7dB, thus insuring the host mixer will not distort.
Output Meter
The output meter shows the total level of the signals being produced by BATTERY 3. To avoid distortion, avoid having the meters go into the red.
Panic! Button
The red exclamation mark to the left of the output meters is there for those moments when things get a bit hectic. This cuts off all playing notes.
BATTERY 3 – 19

Data Fields
Use the data fields to check polyphony, the amount of memory required by the current kit, and the master volume level.
The data field to the right shows the CPU usage. The data field to the left indicates the amount of polyphony being used. For example, if it shows 4/32, then four out of 32 voices are being used. The voice filed is editable. Click and enter the maximum polyphony by hand or drag the mouse up or down.
The middle field shows how much memory the kit requires.
Purge
Purge analyzes which samples are being used in an arrangement, and removes from RAM any samples that aren’t being used. Thus, BATTERY 3 can handle huge amounts of samples while exhibiting very low RAM usage. Purge is handy if you’ve finished a part; you can purge samples for that kit alone, thus freeing up RAM for additional overdubs. If you click on the downward arrow to the right of the kit memory size display you will be presented with access to the following functions:
Reset Markers: Deletes all ’tags’ that mark samples as used.
Update Sample Pool: Unloads unused samples from RAM, and loads newly marked samples in RAM.
Purge All Samples: Unloads all samples from RAM.
Reload All Samples: Reloads all samples used in a kit. A display for the instrument shows Purge status.
20 – BATTERY 3
The Drum/Sample Matrix
The Drum/Sample Matrix is where you assign samples to Cells, check info about Cells, mute and solo layers (rows and columns) of Cells, and copy/paste/ delete individual Cells or groups of Cells. More detailed Cell editing occurs in the section Edit Pane.
Loading a kit loads samples into the matrix’s Cells, and sets any Cell-related parameters to the same values as when the kit was saved.
Various View commands let you modify the Drum/Sample Matrix by adding or deleting rows, and changing the number of columns in the matrix. These functions were described in the previous section, and can be accessed from the View menu in the Master Section (as well as from the View menu option on the menu bar when in stand-alone mode).
Cell Contents
Each Cell contains up to 128 samples (layered and/or velocity-split) and a set of parameters that affect the sound. These include key range (the range of notes to which the sound will respond), volume, pan, tuning, compression, modulation, etc. Although BATTERY 3 is a drum sampler, you can of course load any sample into a Cell – background vocals, sound effects, phrases, scratches, notes, whatever.
Auditioning Cells
To hear what’s in a Cell, click on it with the mouse, or feed it a MIDI signal that triggers the Cell (as specified in the Edit Pane). When BATTERY 3 receives
MIDI from a sequencer or other MIDI device, cells that are sounding have a blue “backlight.”
BATTERY 3 – 21

Get Cell Info
Holding your cursor over a Cell reveals info concerning several parameters.
To see several crucial Cell parameter values (Name, Key Range, Root Key, Volume, Pan, and Tune) at a glance, hold your mouse’s cursor anywhere over the Cell for about half a second. Active functions (i.e. loop, compressor, filter) will also be shown in this list. This is for informational purposes only; you cannot edit these parameters from this particular view. This hint can be deactivated in Options.
Copying and Moving Cells
Cell contents are freely movable among Cells. For example, suppose you have a great snare drum, but it sounds too mechanical when you trigger it repeatedly. You can copy the Cell contents to another Cell, make a few small changes to the copy (e.g., a slight pitch change), then alternate hits between the two Cells. This gives a more “humanized” effect.
Following are the procedures for manipulating Cell contents.
If you move a source Cell to a non-empty destination Cell, then the destination Cell’s contents will replace the source Cell’s contents – in other words, an automatic swap function. If you move a source Cell to an empty destination cell, then the source Cell becomes empty after the move is complete.
Move Cells (default): Click on the source Cell you want to move, and drag it to the destination Cell. The destination cell’s key range will be used. Moving a cell to an occupied cell will swap them.
Move a Cell with key range to another Cell: Alt+drag (PC); Apple+drag (Mac) on the source Cell you want to move, and drag it to the destination Cell. This moves the cell, the key range and root key.
Copy a Cell to another Cell: Ctrl+drag (PC); Alt+drag (Mac) on the source Cell you want to copy, and drag it to the destination Cell. The destination cell’s key range will be used.
22 – BATTERY 3

Copy a Cell with key range to another Cell: Alt+Ctrl+drag (PC); Apple+Alt+drag (Mac) on the source Cell you want to copy, and drag it to the destination Cell. This copies the cell, the key range and root key.
You can access several more Cell-related functions by right-clicking (or Ctrlclicking for Mac) on the Cell. See the section “Right-Click Cell Edits”.
Cell Solo and Mute
Each row, column, and Cell has a solo and mute button.
Each Cell, row, and column has two LEDs – yellow (solo) and red (mute).
•Click on the red LED to mute the Cell, row, or column. Click on it again to unmute.
•Click on the yellow LED to solo the Cell, row, or column. Click on it again to cancel.
The solo function is additive (not a “radio button”-type function): You can solo multiple Cells, rows, and columns. Solos can also be combined; for example, solo a row and a column. If all Cells in a row or column are muted or soloed, the row’s or column’s mute or solo LED will be lit. If a column or row contains a combination of soloed and muted Cells, then it will have no lit row or column LEDs.
Selecting and Editing Cells
Parameter-related editing operations (modulation, pan, tuning, etc.) affect ALL SELECTED Cells. For example, if you select an entire row of Cells and change tuning, all Cells within that row will have their tuning changed. As a result, BATTERY 3 includes flexible ways to select anything from a single Cell to various groups of Cells.
BATTERY 3 – 23
Selecting Cells
Select any arbitrary collection of Cells by Shift-clicking on them:
Select an individual Cell: Click on it.
Select discontiguous Cells: Ctrl-click (PC) / Apple-click (Mac) on the Cells to be selected.
Select continuous cells (not a row/column): Shift-click the first and last cell in the range.
Select a row of Cells: Click on one of the row letters to the left of the matrix (A, B, C, etc.).
Select a column of Cells: Click on one of the column numbers on the bottom on of the matrix (1, 2, 3, etc.).
Shiftor Ctrl-clicking applies to rows and columns as well as individual Cells. For example, if you Shift-click on rows A and C, all the Cells in both rows will be selected. If you Shift-click on row C and column 3, all the Cells in row C and column 3 will be selected.
Context Menu - Right-click Cell Edits
Powerful Cell edit functions are only a click away.
Right-clicking (Mac: Ctrl-clicking) on a Cell offers several editing functions:
Load Previous Cell/Sample: With multi-sampled sounds, samples are often saved in a folder and named so they can be differentiated easily (e.g., KickLowVel, KickMedVel, KickHiVel). Selecting this option loads the previous sample in the series compared to the existing sample within the Cell.
Load Next Cell/Sample: This is similar to Load Previous Sample, but loads the next sample in the series compared to any existing sample within the Cell.
The same loading functions are available as + and - in the Cell tab view. There it is called sample.
24 – BATTERY 3
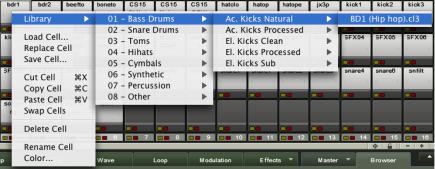
Library: Provides quick access to BATTERY 3’s extensive library for easy kit editing. To make life even easier, drums are pre-arranged into different types
– Kicks, Snares, Toms, Hihats, Cymbals, Synthetic, Percussion and Other.
Add Sample: Opens a dialog box where you can navigate to a sample you want to add to the Cell.
Note that if you open a kit, it will replace the existing kit.
Replace Sample: Opens a dialog box where you can navigate to a sample. If you select this, it will replace the Cell’s current contents.
Save Cell: Opens up a “tree” view where you can choose a folder into which the Cell will be saved under its current name.
Cut: Cuts the Cell your clipboard. Copy: Copies the Cell.
Paste: Pastes the Cell into the currently selected Cell. Swap Cells: For swapping the positions of two Cells. Delete: Deletes the Cell.
Rename Cell: For renaming the Cell. Color: For changing the color of the Cell.
Alt-Click Sample Selection
When you click the Alt button, arrows will appear on the left and right sides of all selected Cells. You can use these arrows to ’step’ through other samples or Cells.
Freeze and Padlock
The Freeze button at the bottom right of the Cell Matrix changes the edit status of the values within the Matrix Cells. When it’s activated, the values within the Cells do not change when you’re editing them within the cells directly.
The Padlock Button locks the cell to its last displayed value. When it’s activated different value types to the one that was last displayed within the cell before activating the function will not be displayed.
BATTERY 3 – 25

The Edit Pane
This is where you can take your creativity to the max by manipulating drum and other samples with anything from subtle to extreme processing. It’s also a place where you can do Cell “housekeeping,” such as making MIDI trigger and controller assignments.
Edit Pane Overview
The Edit Pane can display any one of nine different windows with which you can organize samples within a Cell and process them in many different ways. Each window is selectable by clicking on a tab:
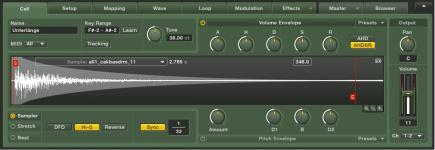
Cell: The Cell section defines a selected Cell’s basic MIDI and sample assignments, its pitch and its basic sonic characteristics.
Setup: This page provides powerful new tools specifically designed for drum playing and programming.
Mapping: The Mapping window is where you can set the minimum and maximum velocities for each sample in a selected Cell. You can also adjust the tuning, panning and root key for each sample.
Wave: This page is a convential wave editor with the functions available on the screen. You can use it to edit drum samples within BATTERY 3 so you don’t have to export them into a separate audio editor.
Loop: This window lets you loop (repeat indefinitely) a section of a sample to produce a sustained effect when you hold down a key. Such an effect can even evolve over time.
Modulation: The Modulation window allows you to modulate your drum sound with a variety of sources including LFOs (Low Frequency Oscillators), envelopes, aftertouch, and external MIDI controllers.
Effects: The Effects page is where you can apply one or more effects to a Cell’s audio output to enhance it’s sonic richness or make it blend within a mix.
Master: The Master section has a range of high quality effects that can be applied to an entire drum mix: EQ/Filter, Compressor, Limiter, Delay, Reverb.
Browser: This page allows you to quickly browse and select files from BATTERY
3’s library folder or anywhere else on your computer.
26 – BATTERY 3
The button in the top right hand corner of the Edit Pane area can be clicked to make the Edit Pane disappear or reappear.
Four Important Points!
•Remember that altering most of these parameters can affect everything from a single Cell to all Cells in the matrix, depending on which Cells you have selected.
•One extremely cool feature is that when you select a parameter for editing, the Info Strip towards the bottom of each Cell shows the status of that same parameter for each Cell. For example, if you tweak the Pan parameter, you’ll see the current pan position for all Cells in their info strips. This makes it easy to compare settings for the various Cells.
•Most numeric fields can be edited in two ways: Double-click on the parameter value and type in a new number, or click on the field and drag up to increment the value, or down to decrement. For “fine tuning,” hold Shift while dragging.
•Double-clicking on knobs resets them to default values.
Now let’s consider each section in detail.
BATTERY 3 – 27
Loading...