


ENGLISH
ESPAÑOL
NEDERLANDS
PORTUGUÊS
KD-X262 / KD-X162 / KD-X161
DIGITAL MEDIA RECEIVER
INSTRUCTION MANUAL
RECEPTOR DE MEDIOS DIGITALES
MANUAL DE INSTRUCCIONES
DIGITALE MEDIAONTVANGER
GEBRUIKSAANWIJZING
RECEPTOR MÉDIA DIGITAL
MANUAL DE INSTRUÇÕES
B5A-2653-00 [E]

Information on Disposal of Old Electrical and Electronic Equipment and Batteries (applicable for countries that have adopted separate waste collection systems)
Products and batteries with the symbol (crossed-out wheeled bin) cannot be disposed as household waste. Old electrical and electronic equipment and batteries should be recycled at a facility capable of handling these items and their waste byproducts.
Contact your local authority for details in locating a recycle facility nearest to you. Proper recycling and waste disposal will help conserve resources whilst preventing detrimental effects on our health and the environment.
Notice: The sign “Pb” below the symbol for batteries indicates that this battery contains lead.
Información acerca de la eliminación de equipos eléctricos, electrónicos y baterías al final de la vida útil (aplicable a los países que hayan adoptado sistemas independientes de recogida de residuos)
Los productos y las baterías con el símbolo de un contenedor con ruedas tachado no podrán ser desechados como residuos domésticos.
Los equipos eléctricos, electrónicos y baterías al final de la vida útil, deberán ser reciclados en instalaciones que puedan dar el tratamiento adecuado a estos productos y a sus subproductos residuales correspondientes.
Póngase en contacto con su administración local para obtener información sobre el punto de recogida más cercano. Un tratamiento correcto del reciclaje y la eliminación de residuos ayuda a conservar los recursos y evita al mismo tiempo efectos perjudiciales en la salud y el medio ambiente.
Nota: El símbolo “Pb” debajo del (contenedor con ruedas tachado) en baterías indica que dicha batería contiene plomo.
Informatie over het weggooien van elektrische en elektronische apparatuur en batterijen (particulieren)
Dit symbool geeft aan dat gebruikte elektrische, elektronische producten en batterijen niet bij het normale huishoudelijke afval mogen.
Lever deze producten in bij de aangewezen inzamelingspunten, waar ze gratis worden geaccepteerd en op de juiste manier worden verwerkt, teruggewonnen en hergebruikt.
Voor inleveradressen zie www.nvmp.nl, www.ictmilieu.nl, www.stibat.nl. Wanneer u dit product op de juiste manier als afval inlevert, spaart u waardevolle hulpbronnen en voorkomt u potentiële negatieve gevolgen voor de volksgezondheid en het milieu, die anders kunnen ontstaan door een onjuiste verwerking van afval.
Opgelet: Het teken “Pb” onder het teken van de batterijen geeft aan dat deze batterij lood bevat.
Informação sobre a forma de deitar fora Velho Equipamento Eléctrico, Electrónico e baterias (aplicável nos países que adotaram sistemas de recolha de lixos separados)
Produtos e baterias com o símbolo (caixote do lixo com um X) não podem ser deitados fora junto com o lixo doméstico.
Equipamentos velhos eléctricos, electrónicos e baterias deverão ser reciclados num local capaz de o fazer bem assim como os seus subprodutos.
Contacte as autoridades locais para se informar de um local de reciclagem próximo de si. Reciclagem e tratamento de lixo correctos ajudam a poupar recursos e previnem efeitos prejudiciais na nossa saúde e no ambiente.
Note: o símbolo “Pb” abaixo do símbolo em baterias indica que esta bateria contém chumbo.
i
For Israel
ii

Declaration of Conformity with regard to the RE Directive 2014/53/EU Declaration of Conformity with regard to the RoHS Directive 2011/65/EU Manufacturer:
JVC KENWOOD Corporation
3-12, Moriya-cho, Kanagawa-ku, Yokohama-shi, Kanagawa, 221-0022, JAPAN
EU Representative:
JVCKENWOOD Europe B.V.
Amsterdamseweg 37, 1422 AC UITHOORN, THE NETHERLANDS
Declaración de conformidad con respecto a la Directiva RE 2014/53/EU Declaración de conformidad con respecto a la Directiva RoHS 2011/65/EU Fabricante:
JVC KENWOOD Corporation
3-12, Moriya-cho, Kanagawa-ku, Yokohama-shi, Kanagawa, 221-0022, JAPAN
Representante en la UE:
JVCKENWOOD Europe B.V.
Amsterdamseweg 37, 1422 AC UITHOORN, THE NETHERLANDS
Conformiteitsverklaring met betrekking tot de RE-richtlijn van de Europese Unie (2014/53/EU)
Conformiteitsverklaring met betrekking tot de RoHS richtlijn van de Europese Unie (2011/65/EU)
Fabrikant:
JVC KENWOOD Corporation
3-12, Moriya-cho, Kanagawa-ku, Yokohama-shi, Kanagawa, 221-0022, JAPAN
EU-vertegenwoordiger:
JVCKENWOOD Europe B.V.
Amsterdamseweg 37, 1422 AC UITHOORN, THE NETHERLANDS
Declaração de conformidade relativa à Directiva RE 2014/53/EU Declaração de conformidade relativa à Directiva RoHS 2011/65/EU Fabricante:
JVC KENWOOD Corporation
3-12, Moriya-cho, Kanagawa-ku, Yokohama-shi, Kanagawa, 221-0022, JAPAN
Representante na UE:
JVCKENWOOD Europe B.V.
Amsterdamseweg 37, 1422 AC UITHOORN, THE NETHERLANDS
English
Hereby, JVCKENWOOD declares that the radio equipment “KD-X262/KD-X162/KD-X161” is in compliance with Directive 2014/53/EU.
The full text of the EU declaration of conformity is available at the following internet address: http://www.jvc.net/cs/car/eudoc/
Français
Par la présente, JVCKENWOOD déclare que l’équipement radio « KD-X262/KD-X162/KD-X161 » est conforme à la directive 2014/53/UE.
L’intégralité de la déclaration de conformité UE est disponible à l’adresse Internet suivante : http://www.jvc.net/cs/car/eudoc/
Deutsch
Hiermit erklärt JVCKENWOOD, dass das Funkgerät “KD-X262/KD-X162/KD-X161” der Richtlinie 2014/53/EU entspricht.
Der volle Text der EU-Konformitätserklärung steht unter der folgenden Internetadresse zur Verfügung: http://www.jvc.net/cs/car/eudoc/
Nederlands
Hierbij verklaart JVCKENWOOD dat de radioapparatuur “KD-X262/KD-X162/KD-X161” in overeenstemming is met Richtlijn 2014/53/EU.
De volledige tekst van de EU-verklaring van overeenstemming is te vinden op het volgende internetadres: http://www.jvc.net/cs/car/eudoc/
Italiano
Con la presente, JVCKENWOOD dichiara che l΄apparecchio radio “KD-X262/KD-X162/KD-X161” è conforme alla Direttiva 2014/53/UE.
Il testo integrale della dichiarazione di conformità UE è disponibile al seguente indirizzo internet: http://www.jvc.net/cs/car/eudoc/
Español
Por la presente, JVCKENWOOD declara que el equipo de radio “KD-X262/KD-X162/KD-X161” cumple la Directiva 2014/53/EU.
El texto completo de la declaración de conformidad con la UE está disponible en la siguiente dirección de internet: http://www.jvc.net/cs/car/eudoc/
Português
Deste modo, a JVCKENWOOD declara que o equipamento de rádio “KD-X262/KD-X162/KD-X161” está em conformidade com a Diretiva 2014/53/UE.
O texto integral da declaração de conformidade da UE está disponível no seguinte endereço de internet: http://www.jvc.net/cs/car/eudoc/
Polska
Niniejszym, JVCKENWOOD deklaruje, że sprzęt radiowy “KD-X262/KD-X162/KD-X161” jest zgodny z dyrektywą 2014/53/UE.
Pełny tekst deklaracji zgodności EU jest dostępny pod adresem:
http://www.jvc.net/cs/car/eudoc/
Český
Společnost JVCKENWOOD tímto prohlašuje, že rádiové zařízení “KD-X262/KD-X162/KD-X161” splňuje podmínky směrnice 2014/53/EU.
Plný text EU prohlášení o shodě je dostupný na následující internetové adrese:
http://www.jvc.net/cs/car/eudoc/
Magyar
JVCKENWOOD ezennel kijelenti, hogy a „KD-X262/KD-X162/ KD-X161“ rádióberendezés megfelel a 2014/53/EU irányelvnek.
Az EU konformitási nyilatkozat teljes szövege az alábbi weboldalon érhető el: http://www.jvc.net/cs/car/eudoc/
iii

Svenska
Härmed försäkrar JVCKENWOOD att radioutrustningen “KD-X262/KD-X162/KD-X161” är i enlighet med direktiv 2014/53/EU.
Den fullständiga texten av EU-försäkran om överensstämmelse finns på följande Internetadress : http://www.jvc.net/cs/car/eudoc/
Suomi
JVCKENWOOD julistaa täten, että radiolaite “KD-X262/KD-X162/KD-X161” on direktiivin 2014/53/EU mukainen.
EU-vaatimustenmukaisuusvakuutusvaatimus löytyy kokonaisuudessaan seuraavasta internetosoitteesta:
http://www.jvc.net/cs/car/eudoc/
Slovensko
S tem JVCKENWOOD izjavlja, da je radijska oprema »KD-X262/KD-X162/KD-X161« v skladu z Direktivo 2014/53/EU.
Celotno besedilo direktive EU o skladnosti je dostopno na tem spletnem naslovu: http://www.jvc.net/cs/car/eudoc/
Slovensky
Spoločnosť JVCKENWOOD týmto vyhlasuje, že rádiové zariadenie „KD-X262/KD-X162/KD-X161“ vyhovuje smernici 2014/53/EÚ.
Celý text EÚ vyhlásenia o zhode nájdete na nasledovnej internetovej adrese: http://www.jvc.net/cs/car/eudoc/
Dansk
Herved erklærer JVCKENWOOD, at radioudstyret “KD-X262/KD-X162/KD-X161” er i overensstemmelse med Direktiv 2014/53/EU.
EU-overensstemmelseserklæringens fulde ordlyd er tilgængelig på følgende internetadresse: http://www.jvc.net/cs/car/eudoc/
Ελληνικά
Με το παρόν, η JVCKENWOOD δηλώνει ότι ο ραδιοεξοπλισμός «KD-X262/KD-X162/KD-X161» συμμορφώνεται με την Οδηγία 2014/53/ΕΕ.
Το πλήρες κείμενο της δήλωσης συμμόρφωσης της ΕΕ είναι διαθέσιμο στην ακόλουθη διεύθυνση στο διαδίκτυο: http://www.jvc.net/cs/car/eudoc/
Eesti
Käesolevaga JVCKENWOOD kinnitab, et „KD-X262/KD-X162/KD-X161“ raadiovarustus on vastavuses direktiiviga 2014/53/EL.
ELi vastavusdeklaratsiooni terviktekst on kättesaadav järgmisel internetiaadressil: http://www.jvc.net/cs/car/eudoc/
Latviešu
JVCKENWOOD ar šo deklarē, ka radio aparatūra „KD-X262/KD-X162/KD-X161” atbilst direktīvas 2014/53/ES prasībām.
Pilns ES atbilstības deklarācijas teksts ir pieejams šādā tīmekļa adresē: http://www.jvc.net/cs/car/eudoc/
Lietuviškai
Šiuo JVCKENWOOD pažymi, kad radijo įranga „KD-X262/KD-X162/KD-X161“ atitinka 2014/53/EB direktyvos reikalavimus.
Visą EB direktyvos atitikties deklaracijos tekstą galite rasti šiuo internetiniu adresu: http://www.jvc.net/cs/car/eudoc/
Malti
B’dan, JVCKENWOOD jiddikjara li t-tagħmir tar-radju “KD-X262/KD-X162/KD-X161” huwa konformi mad-Direttiva 2014/53/UE.
It-test kollu tad-dikjarazzjoni ta’ konformità huwa disponibbli fl-indirizz intranet li ġej: http://www.jvc.net/cs/car/eudoc/
HRVATSKI / SRPSKI JEZIK
JVCKENWOOD ovim izjavljuje da je radio oprema “KD-X262/KD-X162/KD-X161” u skladu s Direktivom 2014/53/EU.
Cjeloviti tekst deklaracije Europske unije o usklađenosti dostupan je na sljedećoj internet adresi:
http://www.jvc.net/cs/car/eudoc/
ROMÂNĂ
Prin prezenta, JVCKENWOOD declară că echipamentul radio “KD-X262/KD-X162/KD-X161” este în conformitate cu Directiva 2014/53/UE. Textul integral al declarației de conformitate UE este disponibil la urmatoarea adresă de internet: http://www.jvc.net/cs/car/eudoc/
БЪЛГАРСКИ
С настоящото JVCKENWOOD декларира, че радиооборудването на
“KD-X262/KD-X162/KD-X161” е в съответствие с Директива 2014/53/ЕС.
Пълният текст на ЕС декларацията за съответствие е достъпен на следния интернет адрес:
http://www.jvc.net/cs/car/eudoc/
Turkish
Burada, JVCKENWOOD “KD-X262/KD-X162/ KD-X161” radyo ekipmanının 2014/53/AB Direktifine uygun olduğunu bildirir.
AB uyumluluk deklarasyonunun tam metni aşağıdaki internet adresinde mevcuttur. http://www.jvc.net/cs/car/eudoc/
Русский
JVCKENWOOD настоящим заявляет, что радиооборудование
«KD-X262/KD-X162/KD-X161» соответствует Директиве 2014/53/EU.
Полный текст декларации соответствия ЕС доступен по следующему адресу в сети Интернет: http://www.jvc.net/cs/car/eudoc/
Українська
Таким чином, компанія JVCKENWOOD заявляє, що радіообладнання «KD-X262/KD-X162/KD-X161» відповідає Директиві 2014/53/EU.
Повний текст декларації про відповідність ЄС можна знайти в Інтернеті за такою адресою: http://www.jvc.net/cs/car/eudoc/
iv

CONTENTS
BEFORE USE |
2 |
BASICS |
3 |
GETTING STARTED |
5 |
1 Cancel the demonstration |
|
2 Set the clock and date |
|
3 Set the basic settings |
|
RADIO |
6 |
AUX |
8 |
USB/iPod/ANDROID |
8 |
AUDIO SETTINGS |
10 |
DISPLAY SETTINGS |
13 |
REFERENCES |
14 |
Maintenance |
|
More information |
|
TROUBLESHOOTING |
16 |
INSTALLATION/ |
|
CONNECTION |
17 |
SPECIFICATIONS |
20 |
BEFORE USE
IMPORTANT
•To ensure proper use, please read through this manual before using this product. It is especially important that you read and observe Warnings and Cautions in this manual.
•Please keep the manual in a safe and accessible place for future reference.
 WARNING
• Do not operate any function that takes your attention away from safe driving.
 Caution
Volume setting:
•Adjust the volume so that you can hear sounds outside the car to prevent accidents.
•Lower the volume before playing digital sources to avoid damaging the speakers by the sudden increase of the output level.
General:
•Avoid using the external device if it might hinder safe driving.
•Make sure all important data has been backed up. We shall bear no responsibility for any loss of recorded data.
•Never put or leave any metallic objects (such as coins or metal tools) inside the unit to prevent a short circuit.
How to read this manual
•Operations are explained mainly using buttons on the faceplate of KD-X262 and KD-X161.
•English indications are used for the purpose of explanation. You can select the display language from the menu. (Page 6)
•[XX] indicates the selected items.
•(Page XX) indicates references are available on the stated page.
2ENGLISH

BASICS |
|
|
|
|
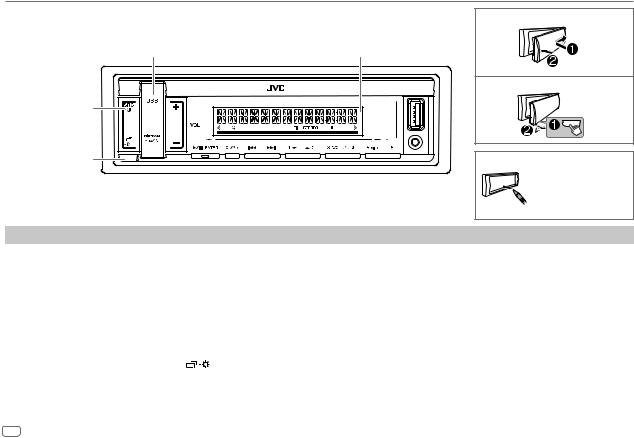
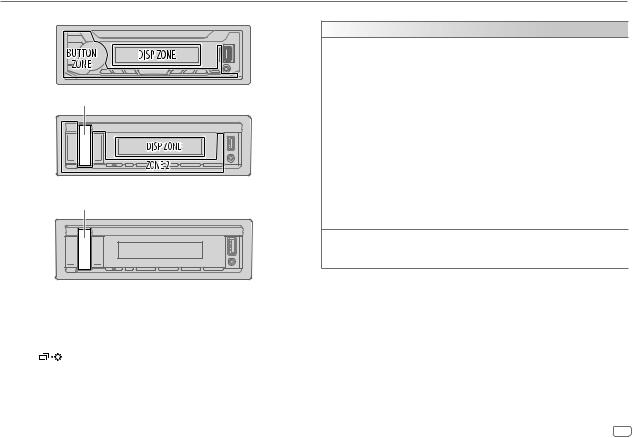
Faceplate |
|
|
|
Attach |
|
|
|
|
|
KD-X262/KD-X162: |
|
|
|
|
Volume knob |
|
Display window |
||
Source button |
|
|
|
Detach |
Detach button |
|
|
|
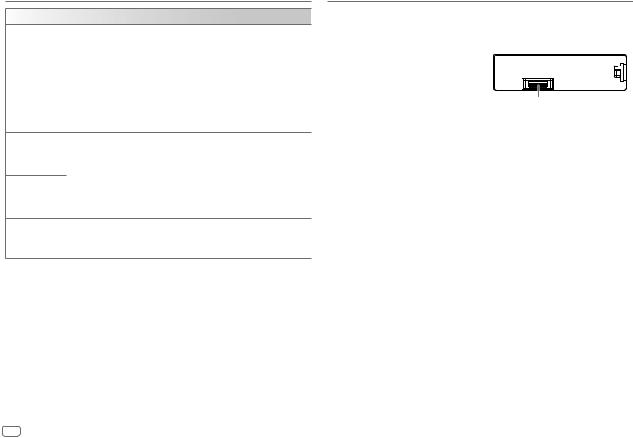
How to reset |
|
|
|
|
|
|
|
|
|
Your preset |
|
|
|
KD-X162 |
adjustments will be |
|
|
|
|
erased except stored |
|
|
|
|
radio stations. |
To |
On the faceplate |
|
||
Turn on the power |
Press BSRC. |
|
||
|
• |
Press and hold to turn off the power. |
||
Adjust the volume |
Turn the volume knob. |
|
||
|
Press the volume knob to mute the sound or pause playback. |
|||
|
• |
Press again to cancel. The volume level returns to the previous level before muting or pause. |
||
Select a source |
• |
Press BSRC repeatedly. |
|
|
|
• |
Press BSRC, then turn the volume knob within 2 seconds. |
||
Change the display information |
Press |
repeatedly. (Page 15) |
|
|
Select an item |
1 Turn the volume knob to select an item. |
|||
|
2 Press the knob to confirm. |
|
||
ENGLISH 3
BASICS |
|
Faceplate |
Attach |
|
|
KD-X161: |
|
Symbolic button |
Display window |
|
Detach |
Source button |
|
Detach button |
How to reset |
Your preset adjustments will be erased except stored radio stations.
To |
On the faceplate |
||
Turn on the power |
Press SRC-B. |
||
|
• |
Press and hold to turn off the power. |
|
|
|
||
Adjust the volume |
Press VOL +/– . |
||
|
• |
Press and hold VOL + to continuously increase the volume to 15. |
|
|
|
||
|
Press *ENTER to mute the sound or pause playback. |
||
|
• |
Press again to cancel. The volume level returns to the previous level before muting or pause. |
|
|
|
|
|
Select a source |
• |
Press SRC-B repeatedly. |
|
|
• |
Press SRC-B, then press VOL +/– within 2 seconds. |
|
|
|
|
|
Change the display information |
Press |
repeatedly. (Page 15) |
|
|
|
||
Select an item |
1 Press VOL +/– to select an item. |
||
|
2 Press *ENTER to confirm. |
||
4ENGLISH
GETTING STARTED
For key layout on the faceplate, see page 3 or page 4.
1Cancel the demonstration
When you turn on the power for the first time (or after you reset the unit), the display shows:
KD-X262/KD-X162:
“CANCEL DEMO”  “PRESS”
  “VOLUME KNOB”
1Press the volume knob.
[YES] is selected for the initial setup.
2Press the volume knob again.
“DEMO OFF” appears.
KD-X161:
“CANCEL DEMO”  “PRESS ENTER”
1Press *ENTER.
[YES] is selected for the initial setup.
2Press *ENTER again.
“DEMO OFF” appears.
2Set the clock and date
1 Press and hold
 .
.
2Perform ‘Select an item (page 3 or 4)’ operation to select
[CLOCK].
3Perform ‘Select an item (page 3 or 4)’ operation to adjust the clock.
[CLOCK ADJUST]  set the hour and minute
  [CLOCK FORMAT]
  [12H] or [24H]
4Perform ‘Select an item (page 3 or 4)’ operation to set the date.
[DATE SET]  set the day, month and year
5 Press
 to exit.
To return to the previous setting item, press
 .
.
3Set the basic settings
1 Press and hold |
. |
2Perform ‘Select an item (page 3 or 4)’ operation to select an item (see the following table).
3 Repeat step 2 until the desired item is selected or activated. 4 Press
 to exit.
To return to the previous setting item, press 
 .
.
|
|
|
Default: [XX] |
[SYSTEM] |
|
||
|
|
|
|
[KEY BEEP] |
[ON]: Activates the keypress tone. ; [OFF]: Deactivates. |
||
|
|
|
|
[SOURCE SELECT] |
|
||
|
|
|
|
|
[AM SRC]* |
[ON]: Enables AM in source selection. ; [OFF]: Disables. (Page 6) |
|
|
|
|
|
|
[BUILT-IN AUX]* |
[ON]: Enables AUX in source selection. ; [OFF]: Disables. (Page 8) |
|
[F/W UPDATE] |
|
||
|
|
|
|
|
[UPDATE SYSTEM] |
|
|
|
|
[F/W UP xxxx] |
[YES]: Starts upgrading the firmware. ; [NO]: Cancels (upgrading is not |
|
|
|
activated). |
|
|
|
For details on how to update the firmware, visit |
|
|
|
<http://www.jvc.net/cs/car/>. |
|
|
|
|
* Not displayed when the corresponding source is selected.
ENGLISH 5

GETTING STARTED
[CLOCK]
[TIME SYNC] |
[ON]: The clock time is automatically set using |
|
|
the Clock Time (CT) data in FM Radio Data |
|
|
System signal. ; [OFF]: Cancels. |
|
|
|
|
[CLOCK |
[ON]: The clock time is shown on the |
|
DISPLAY] |
display even when the unit is turned off. ; |
|
|
[OFF]: Cancels. |
|
|
|
|
[ENGLISH] |
|
|
|
Select the display language for menu and music |
|
[РУССКИЙ] |
||
|
information if applicable. |
|
[ESPANOL] |
||
By default, [ENGLISH] is selected. |
||
|
||
[FRANCAIS] |
|
RADIO
For key layout on the faceplate, see page 3 or page 4.
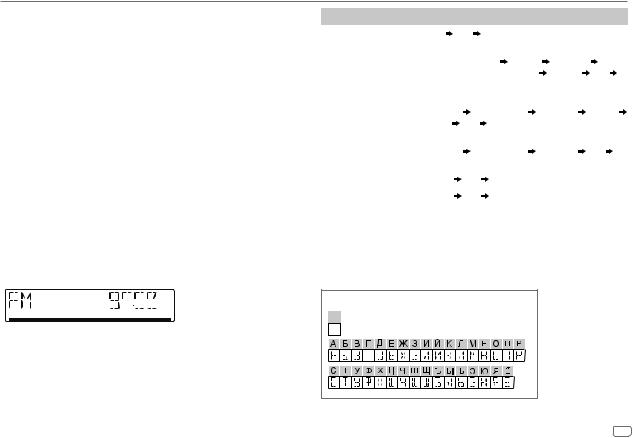
Search for a station
1 Press source button repeatedly to select FM or AM.
2Press S / T to search for a station automatically.
(or)
Press and hold S / T until “M” flashes, then press repeatedly to search for a station
manually.
•“STEREO” lights up when receiving an FM stereo broadcast with sufficient signal strength.
•The unit switches to FM alarm automatically when receiving an alarm signal from FM broadcast.
Settings in memory
You can store up to 18 stations for FM and 6 stations for AM.
 Store a station
While listening to a station...
Press and hold one of the number buttons (1 to 6).
(or)
1Press and hold the following button until “PRESET MODE” flashes.
KD-X262/KD-X162: Volume knob
KD-X161: *ENTER
2Perform ‘Select an item (page 3 or 4)’ operation to select a preset number.
“MEMORY” appears once the station is stored.
 Select a stored station
Press one of the number buttons (1 to 6).
(or)
1 Press 
 .
.
2 Perform ‘Select an item (page 3 or 4)’ operation to select a preset number.
6ENGLISH
RADIO
Other settings
1 Press and hold
 .
.
2Perform ‘Select an item (page 3 or 4)’ operation to select an item (see the following table).
3Repeat step 2 until the desired item is selected/activated or follow the instructions stated on the selected item.
4 Press 
 to exit.
To return to the previous setting item, press 
 .
.
Default: [XX]
[TUNER SETTING]
[RADIO TIMER] Turns on the radio at a specific time regardless of the current source.
1[ONCE]/[DAILY]/[WEEKLY]/[OFF]: Select how often the timer will be turned on.
2 [FM]/[AM]: Select the source.
3 [01] to [18] (for FM)/[01] to [06] (for AM): Select the preset station. 4 Set the activation day*1 and time.
“M” lights up when complete.
Radio Timer will not activate for the following cases.
•The unit is turned off.
•[OFF] is selected for [AM SRC] in [SOURCE SELECT] after Radio Timer for AM is selected. (Page 5)
[SSM] |
[SSM 01–06]/[SSM 07–12]/[SSM 13–18]: Automatically presets up to 18 |
|
stations for FM. “SSM” stops flashing when the first 6 stations are stored. Select |
|
[SSM 07–12]/[SSM 13–18] to store the following 12 stations. |
|
|
[LOCAL SEEK] |
[ON]: Searches only FM stations with good reception. ; [OFF]: Cancels. |
|
• Settings made are applicable only to the selected source/station. Once you |
|
change the source/station, you need to make the settings again. |
[IF BAND] |
[AUTO]: Increases the tuner selectivity to reduce interference noises from |
|
adjacent FM stations. (Stereo effect may be lost.) ; [WIDE]: Subjects to |
|
interference noises from adjacent FM stations, but sound quality will not be |
|
degraded and the stereo effect will remain. |
|
|
[MONO SET] |
[ON]: Improves the FM reception, but the stereo effect will be lost. ; |
|
[OFF]: Cancels. |
|
|
[NEWS SET]*2 |
[ON]: The unit will temporarily switch to News Programme if available. ; |
|
[OFF]: Cancels. |
|
|
[REGIONAL]*2 |
[ON]: Switches to another station only in the specific region using the “AF” |
|
control. ; [OFF]: Cancels. |
|
|
[AF SET]*2 |
[ON]: Automatically searches for another station broadcasting the same |
|
program in the same Radio Data System network with better reception when |
|
the current reception is poor. ; [OFF]: Cancels. |
[TI]*2 |
[ON]: Allows the unit to temporarily switch to Traffic Information if available |
|
(“TI” lights up) while listening to all sources except in AM. ; [OFF]: Cancels. |
|
|
[PTY SEARCH]*2 |
Select a PTY code (see below). |
|
If there is a station broadcasting a program of the same PTY code as you have |
|
selected, that station is tuned in. |
|
|
*1 Selectable only when [ONCE] or [WEEKLY] is selected in step 1. *2 Selectable only when in FM source.
PTY code
[NEWS], [AFFAIRS], [INFO], [SPORT], [EDUCATE], [DRAMA], [CULTURE], [SCIENCE], [VARIED], [POP M] (music), [ROCK M] (music), [EASY M] (music), [LIGHT M] (music), [CLASSICS], [OTHER M] (music), [WEATHER], [FINANCE], [CHILDREN], [SOCIAL], [RELIGION], [PHONE IN], [TRAVEL], [LEISURE], [JAZZ], [COUNTRY], [NATION M] (music), [OLDIES], [FOLK M] (music), [DOCUMENT]
ENGLISH 7
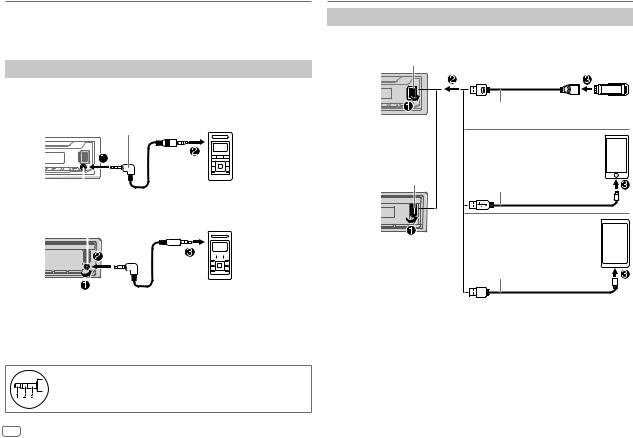
AUX
Preparation:
You can listen to music from a portable audio player via the auxiliary input jack.
• Select [ON] for [BUILT-IN AUX] in [SOURCE SELECT]. (Page 5)
Start listening
1Connect a portable audio player (commercially available).
KD-X262/KD-X162:
3.5 mm stereo mini plug with “L” shaped connector (commercially available)
|
|
|
|
|
|
|
|
|
|
Portable audio player |
||
|
|
|
|
|
|
|
|
|
|
|||
|
Auxiliary input jack |
|||||||||||
|
|
|
|
|||||||||
KD-X161: |
|
|
|
|||||||||
|
Auxiliary input |
jack |
Portable audio player |
|||||||||
|
|
|
|
|
|
|
|
|
|
|
|
|
|
|
|
|
|
|
|
|
|
|
|
|
|
|
|
|
|
|
|
|
|
|
|
|
|
|
|
|
|
|
|
|
|
|
|
|
|
|
|
3.5 mm stereo mini plug with “L” shaped connector (commercially available)
2 Press source button repeatedly to select AUX.
3 Turn on the portable audio player and start playback.
Use a 3-core plug head stereo mini plug for optimum audio output.
USB/iPod/ANDROID
Start playback
The source changes automatically and playback starts.
USB input terminal
KD-X262/ |
USB |
|
KD-X162: |
||
|
||
|
USB 2.0 cable*1 |
|
|
(commercially available) |
|
|
iPod/iPhone |
|
|
USB input terminal |
|
KD-X161: |
Accessory of the iPod/iPhone*1 |
|
|
||
|
ANDROID*2 |
USB cable*1 (commercially available)
*1 Do not leave the cable inside the car when not using.
*2 You can control Android device using the Android device itself via other media player applications installed in the Android device.
8ENGLISH

USB/iPod/ANDROID
For key layout on the faceplate, see page 3 or page 4.
Selectable sources:
KD-X262: USB/iPod/ANDROID
KD-X162/KD-X161: USB/ANDROID
• To directly select USB/iPod/ANDROID source, press iPod/USB or USB.
To |
On the faceplate |
|
Reverse/ |
Press and hold S / T. |
|
Fast-forward*3 |
|
|
|
|
|
Select a file |
Press S / T. |
|
|
|
|
Select a folder*4 |
Press 2J / 1K. |
|
|
|
|
Repeat play*3*5 |
Press 4B repeatedly. |
|
|
[TRACK REPEAT]/[FOLDER REPEAT]/[ALL REPEAT] : MP3/WMA/WAV/ |
|
|
[ONE REPEAT]/[ALL REPEAT]/[REPEAT OFF] |
FLAC file |
|
: iPod |
|
Random play*3*5 |
Press 3A repeatedly. |
|
|
[FOLDER RANDOM]/[ALL RANDOM]/[RANDOM OFF] : MP3/WMA/WAV/ |
|
|
[SONG RANDOM]/[ALL RANDOM]/[RANDOM OFF] |
FLAC file |
|
: iPod |
|
|
|
|
*3 Not applicable for ANDROID.
*4 This does not work for iPod/ANDROID.
*5 For iPod: Applicable only when [HEAD MODE] is selected.
Select music drive
While in USB source, press 5MODE repeatedly.
Stored songs in the following drive will be played back.
•Selected internal or external memory of a smartphone (Mass Storage Class).
•Selected drive of a multiple drive device.
Select control mode
While in iPod source, press 5MODE repeatedly.
[HEAD MODE]: Control iPod from this unit.
[IPHONE MODE]: Control iPod using the iPod itself. However, you can still perform play/pause, file skip, fast-forward or fastreverse from this unit.
ENGLISH 9

USB/iPod/ANDROID
Select a file from a folder/list
For iPod, applicable only when [HEAD MODE] is selected. (Page 9)
1 Press 
 .
.
2Perform ‘Select an item (page 3 or 4)’ operation to select a folder/list.
3 Perform ‘Select an item (page 3 or 4)’ operation to select a file.
Quick search (applicable only for USB source)
If you have many files, you can search through them quickly.
Perform the following operation to browse through the list quickly.
KD-X262/KD-X162: Turn the volume knob quickly KD-X161: Press and hold VOL +/–
Alphabet search (applicable only for iPod source)
You can search for a file according to the first character.
Press 2J / 1K or turn the volume knob quickly to select the desired character (A to Z, 0 to 9, OTHERS).
•Select “OTHERS” if the first character is other than A to Z, 0 to 9.
•To return to the previous setting item, press 
 .
.
•To cancel, press and hold 
 .
.
AUDIO SETTINGS
For key layout on the faceplate, see page 3 or page 4.
Select a preset equalizer directly (for KD-X262/KD-X162)
Press EQ-BASS repeatedly.
(or)
Press EQ-BASS, then turn the volume knob within 5 seconds.
Preset equalizer:
[FLAT] (default)/[DRVN 3]/[DRVN 2]/[DRVN 1]/[HARD ROCK]/[HIP HOP]/[JAZZ]/[POP]/ [R&B]/[TALK]/[USER]/[VOCAL BOOST]/[BASS BOOST]/[CLASSICAL]/[DANCE]
•Drive equalizer ([DRVN 3]/[DRVN 2]/[DRVN 1]) boosts specific frequencies in the audio signal to reduce the noise heard from outside the car or running noise of the tyres.
Select a drive equalizer directly (for KD-X161)
Drive equalizer boosts specific frequencies in the audio signal to reduce the noise heard from outside the car or running noise of the tyres.
Press drvn-BASS repeatedly.
Drive equalizer: [DRVN 3] (default)/[DRVN 2]/[DRVN 1]
Store your own sound settings
1Press and hold the following button to enter [EASY EQ] setting.
KD-X262/KD-X162: EQ-BASS
KD-X161: drvn-BASS
2Perform ‘Select an item (page 3 or 4)’ operation to make the setting.
Refer to [EASY EQ] (page 11) for setting and the result is stored to [USER].
•To return to the previous setting item, press 
 .
.
•Press the following button to exit.
KD-X262/KD-X162: EQ-BASS KD-X161: drvn-BASS
10 ENGLISH

AUDIO SETTINGS
Other settings
1 Press and hold
 .
.
2Perform ‘Select an item (page 3 or 4)’ operation to select an item (see the following table).
3Repeat step 2 until the desired item is selected/activated or follow the instructions stated on the selected item.
4 Press 
 to exit.
To return to the previous setting item, press 
 .
.
Default: [XX]
[EQ SETTING]
[PRESET EQ] Selects a preset equalizer suitable to the music genre.
• Select [USER] to use the settings made in [EASY EQ] or [PRO EQ].
[FLAT]/[DRVN 3]/[DRVN 2]/[DRVN 1]/[HARD ROCK]/[HIP HOP]/ [JAZZ]/[POP]/[R&B]/[TALK]/[USER]/[VOCAL BOOST]/[BASS BOOST]/ [CLASSICAL]/[DANCE]
[EASYEQ] |
Adjusts your own sound settings. |
|
|
|
|
• The settings are stored to [USER] in [PRESET EQ]. |
|
||
|
• The settings made may affect the current settings of [PRO EQ]. |
|||
|
[SUB.W SP]*1*2: |
[00] to [+06] |
(Default: |
[+03] |
|
[SUB.W]*1*3: |
[–08] to [+08] |
|
[00] |
|
[BASS]: |
[LVL–06] to [LVL+06] |
|
[LVL 00] |
|
[MID]: |
[LVL–06] to [LVL+06] |
|
[LVL 00] |
|
[TRE]: |
[LVL–06] to [LVL+06] |
|
[LVL 00]) |
[PRO EQ] Adjusts your own sound settings.
•The settings are stored to [USER] in [PRESET EQ].
•The settings made may affect the current settings of [EASY EQ].
1 [BASS]/[MIDDLE]/[TREBLE]: Select a sound tone.
2Adjust the sound elements of the selected sound tone.
[BASS] Frequency : [60HZ]/[80HZ]/[100HZ]/[200HZ]
Level |
: |
[LVL–06] to [LVL+06] |
Q |
: |
[Q1.0]/[Q1.25]/[Q1.5]/[Q2.0] |
(Default |
: |
[80HZ]/[LVL 00]/[Q1.0]) |
[MIDDLE] Frequency |
: |
[0.5KHZ]/[1.0KHZ]/[1.5KHZ]/[2.5KHZ] |
Level |
: |
[LVL–06] to [LVL+06] |
Q |
: |
[Q0.75]/[Q1.0]/[Q1.25] |
(Default |
: |
[1.0KHZ]/[LVL 00]/[Q1.25]) |
[TREBLE] Frequency |
: [10.0KHZ]/[12.5KHZ]/[15.0KHZ]/[17.5KHZ] |
|
Level |
: |
[LVL–06] to [LVL+06] |
Q |
: |
[Q FIX] |
(Default |
: |
[10.0KHZ]/[LVL 00]/[Q FIX]) |
[AUDIO CONTROL]
[BASS BOOST] |
[LEVEL +01] to [LEVEL +05] ([LEVEL +01]): Selects your preferred bass boost |
|
|
level. ; [OFF]: Cancels. |
|
|
|
|
[LOUDNESS] |
[LEVEL 01]/[LEVEL 02]: Boosts low or high frequencies to produce a well- |
|
|
balanced sound at low volume. ; [OFF]: Cancels. |
|
|
|
|
[SUB.W |
[SPK-OUT]*2 |
[SUB.W 00] to [SUB.W +06] ([SUB.W +03]): Adjusts the |
LEVEL]*1 |
|
output level of the subwoofer connected via speaker lead. |
|
|
(Page 19) |
|
|
|
|
[PRE-OUT]*3 |
[SUB.W –08] to [SUB.W +08] ([SUB.W 00]): Adjusts |
|
|
the output level of the subwoofer connected to the lineout |
terminals (REAR/SW) through an external amplifier. (Page 19)
*1, *2, *3: (page 12)
ENGLISH 11

AUDIO SETTINGS
[SUBWOOFER SET]*3 |
[ON]: Turns on the subwoofer output. ; [OFF]: Cancels. |
|
|
[SUBWOOFER LPF]*1 |
[FRQ THROUGH]: All signals are sent to the subwoofer. ; |
|
[FRQ 55HZ]/[FRQ 85HZ]/[FRQ 120HZ]: Audio signals with frequencies |
|
lower than 55 Hz/85 Hz/120 Hz are sent to the subwoofer. |
|
|
[SUB.W PHASE]*1*4 |
[REVERSE] (180°)/[NORMAL] (0°): Selects the phase of the subwoofer |
|
output to be in line with the speaker output for optimum performance. |
[FADER] |
[POSITION R06] to [POSITION F06] ([POSITION 00]): Adjusts the front |
|
and rear speaker output balance. |
|
|
[BALANCE]*5 |
[POSITION L06] to [POSITION R06] ([POSITION 00]): Adjusts the left |
|
and right speaker output balance. |
|
|
[VOLUME ADJUST] |
[LEVEL –15] to [LEVEL +06] ([LEVEL 00]): Presets the initial volume |
|
level of each source by comparing to the FM volume level. (Before |
|
adjustment, select the source you want to adjust. “VOL ADJ FIX” appears |
|
if FM is selected.) |
|
|
[AMPGAIN] |
[LOW POWER]: Limits the maximum volume level to 25. (Select if the |
|
maximum power of each speaker is less than 50 W to prevent damaging |
|
the speakers.) ; [HIGH POWER]: The maximum volume level is 35. |
|
|
[D.T.EXPANDER] |
[ON]: Creates realistic sound by compensating the high-frequency |
(Digital Track |
components and restoring the rise-time of the waveform that are lost in |
Expander) |
audio data compression. ; [OFF]: Cancels. |
[SPK/PRE OUT] |
Depending on the speaker connection method, select the appropriate |
|
setting for the desired output. (See “Speaker output settings”.) |
|
|
*1 Displayed only when [SUBWOOFER SET] is set to [ON].
*2 Displayed only when [SPK/PRE OUT] is set to [SUB.W/SUB.W].
*3 Displayed only when [SPK/PRE OUT] is set to [REAR/SUB.W] or [SUB.W/SUB.W].
*4 Selectable only if a setting other than [FRQ THROUGH] is selected for [SUBWOOFER LPF]. *5 This adjustment will not affect the subwoofer output.
Speaker output settings [SPK/PRE OUT]
Select the output setting for the speakers [SPK/PRE OUT], based on the speaker connection method.
 Connection via lineout terminals
For connections through an external amplifier. (Page 19)
Setting on |
Audio signal through lineout terminal |
[SPK/PRE OUT] |
REAR/SW |
|
|
[REAR/REAR] |
Rear speakers output |
|
|
[REAR/SUB.W] (default) |
Subwoofer output |
|
|
[SUB.W/SUB.W] |
Subwoofer output |
|
|
 Connection via speaker leads
You can also connect the speakers without using an external amplifier but still being able to enjoy the subwoofer output with these settings. (Page 19)
Setting on |
Audio signal through rear speaker lead |
|
[SPK/PRE OUT] |
L (left) |
R (right) |
|
|
|
[REAR/REAR] |
Rear speakers output |
Rear speakers output |
|
|
|
[REAR/SUB.W] |
Rear speakers output |
Rear speakers output |
|
|
|
[SUB.W/SUB.W] |
Subwoofer output |
(Mute) |
|
|
|
If [SUB.W/SUB.W] is selected:
–[FRQ 120HZ] is selected in [SUBWOOFER LPF] and [FRQ THROUGH] is not available.
–[POSITION R01] is selected in [FADER] and selectable range is [POSITION R06] to
[POSITION 00].
12 ENGLISH
DISPLAY SETTINGS
Zone identification for brightness settings
KD-X262/
KD-X162:


 (Symbolic button)
KD-X161:
Zone identification for color settings
 Symbolic button
KD-X161:
1 Press and hold
 .
.
2Perform ‘Select an item (page 3 or 4)’ operation to select an item (see the following table).
3Repeat step 2 until the desired item is selected/activated or follow the instructions stated on the selected item.
4 Press |
to exit. |
To return to the previous setting item, press 
 .
.
Default: [XX]
[DISPLAY]
[DIMMER] |
Dims the illumination. |
|
|
[OFF]: Dimmer is turned off. Brightness changes to [DAY] setting. |
|
|
[ON]: Dimmer is turned on. Brightness changes to [NIGHT] setting. |
|
|
(See “[BRIGHTNESS]” below.) |
|
|
[DIMMER TIME]: Set the dimmer on and off time. |
|
|
1 |
Perform ‘Select an item (page 3 or 4)’ operation to adjust the [ON] |
|
2 |
time. |
|
Perform ‘Select an item (page 3 or 4)’ operation to adjust the |
|
|
|
[OFF] time. |
|
|
(Default: [ON]: [18:00] ; [OFF]: [6:00]) |
|
[DIMMER AUTO]: Dimmer turns on and off automatically when you turn off |
|
|
or on the car headlights.*1 |
|
|
|
|
[BRIGHTNESS] |
Sets the brightness for day and night separately. |
|
|
1 |
[DAY]/[NIGHT]: Select day or night. |
|
2 |
Select a zone. (See the illustration on the left column.) |
|
3 |
[LEVEL 00] to [LEVEL 31]: Set the brightness level. |
[TEXT SCROLL]*2 [SCROLL ONCE]: Scrolls the display information once. ; [SCROLL AUTO]: Repeats scrolling at 5-second intervals. ;
[SCROLL OFF]: Cancels.
*1 The illumination control wire connection is required. (Page 19)
*2 Some characters or symbols will not be shown correctly (or will be blank).
ENGLISH 13
DISPLAY SETTINGS
[COLOR] (for KD-X161: Symbolic button only)
[PRESET] |
Selects an illumination color for the symbolic button. (See the illustration |
|
on page 13.) |
|
• [COLOR 01] to [COLOR 49] |
|
• [USER]: The color you have created for [DAY COLOR] or [NIGHT COLOR] |
|
is shown. |
|
• [COLOR FLOW01] to [COLOR FLOW03]: Color changes at different |
|
speeds. |
|
• Preset color: [CRYSTAL]/[FLOWER]/[FOREST]/[GRADATION]/[OCEAN]/ |
|
[RELAX]/[SUNSET] |
[DAY COLOR]
[NIGHT COLOR]
Stores your own day and night illumination colors for the symbolic button. 1 [RED]/[GREEN]/[BLUE]: Select a primary color.
2 [00] to [31]: Select the level.
Repeat steps 1 and 2 for all the primary colors.
•Your setting is stored to [USER] in [PRESET].
•[NIGHT COLOR] or [DAY COLOR] is changed by turning on or off your car’s headlights.
[MENU COLOR] |
[ON]: The illumination color of the symbolic button changes to white color |
|
when settings are performed on menu and list search, except in color setting |
|
mode. ; [OFF]: Cancels. |
REFERENCES
 Maintenance
Cleaning the unit
Wipe off dirt on the faceplate with a dry silicone or soft cloth.
Cleaning the connector
Detach the faceplate and clean the connector gently with a cotton swab. Be careful not to damage the connector.
 More information
Connector (on the reverse side of the faceplate)
For: – Latest firmware updates and latest compatible item list
– Any other latest information Visit <www.jvc.net/cs/car/>.
Playable files
•Playable audio file for USB mass storage class device: MP3 (.mp3), WMA (.wma), WAV (.wav), FLAC (.flac)
•Playable USB device file system: FAT12, FAT16, FAT32
Even when audio files comply with the standards listed above, playback may be impossible depending on the types or conditions of media or devices.
•For detailed information and notes about the playable audio files, visit <www.jvc.net/cs/car/audiofile/>.
About USB devices
•You cannot connect a USB device via a USB hub.
•Connecting a cable whose total length is longer than 5 m may result in abnormal playback.
•This unit cannot recognize a USB device whose rating is other than 5 V and exceeds 1 A.
14 ENGLISH
REFERENCES
About iPod/iPhone
Made for
–iPod touch (5th and 6th generation)
–iPod nano (7th generation)
–iPhone 4S, 5, 5S, 5C, 6, 6 Plus, 6S, 6S Plus, SE, 7, 7 Plus, 8, 8 Plus, X
•It is not possible to browse video files on the “Videos” menu in [HEAD MODE].
•The song order displayed on the selection menu of this unit may differ from that of the iPod/ iPhone.
•You cannot operate iPod if “JVC” or “ ” is displayed on iPod.
•Depending on the version of the operating system of the iPod/iPhone, some functions may not operate on this unit.
About Android device
•This unit supports Android OS 4.1 and later.
•Some Android devices (with OS 4.1 and later) may not fully support Android Open Accessory (AOA) 2.0.
•If the Android device supports both mass storage class device and AOA 2.0, this unit always play back via AOA 2.0 as priority.
Change the display information
Each time you press
 , the display information changes.
•If the information is unavailable or not recorded, “NO TEXT”, “NO NAME”, or other information (eg. station name) appears or display will be blank.


 Main display
Source name |
Display information: Main |
|
|
||
|
|
|
|
||
FM or AM |
Frequency Clock |
back to the beginning |
|
||
|
|
|
|
||
|
For FM Radio Data System stations only: |
|
|
||
|
Station name/Program type Radio text Radio text+ |
||||
|
Radio text+ song title/Radio text+ artist |
Frequency |
Clock |
||
|
back to the beginning |
|
|
|
|
USB |
For MP3/WMA/WAV/FLAC files: |
|
|
||
|
Song title/Artist |
Album title/Artist |
Folder name |
File name |
|
|
Playing time |
Clock |
back to the beginning |
|
|
|
|
|
|||
iPod USB |
When [HEAD MODE] is selected (page 9): |
|
|||
|
Song title/Artist |
Album title/Artist |
Playing time |
Clock |
|
|
back to the beginning |
|
|
|
|
|
|
|
|
|
|
ANDROID |
Source name |
Clock |
back to the beginning |
|
|
|
|
|
|
|
|
AUX |
Source name |
Clock |
back to the beginning |
|
|
|
|
|
|
|
|
Available Cyrillic letters |
Available characters |
Display indications |
ENGLISH 15
TROUBLESHOOTING
Symptom |
Remedy |
|
|
Sound cannot be heard. |
• Adjust the volume to the optimum level. |
|
|
• Check the cords and connections. |
|
|
|
|
“MISWIRING CHECK WIRING |
Turn the power off, then check to be sure the terminals of |
|
THEN PWR ON” appears. |
the speaker wires are insulated properly. Turn the power |
|
|
on again. |
General |
“PROTECTING SEND SERVICE” |
Send the unit to the nearest service center. |
Source cannot be selected. |
Check the [SOURCE SELECT] setting. (Page 5) |
|
|
appears. |
|
|
|
|
|
The unit does not work at all. |
Reset the unit. (Page 3 or 4) |
|
|
|
|
Correct characters are not |
• This unit can only display uppercase letters, numbers, |
|
displayed. |
and a limited number of symbols. |
|
|
• Depending on the display language you have selected |
|
|
(page 6), some characters may not be displayed |
|
|
correctly. |
|
|
|
Radio |
• Radio reception is poor. |
Connect the antenna firmly. |
• Static noise while listening |
|
|
|
|
|
|
to the radio. |
|
|
|
|
|
Playback order is not as |
The playback order is determined by the file name (USB). |
|
intended. |
|
|
|
|
USB/iPod |
Elapsed playing time is not |
This depends on the recording process earlier (USB). |
“NOT SUPPORT” appears and |
Check whether the track is a playable format. |
|
|
correct. |
|
|
track skips. |
(Page 14, 15) |
|
|
|
|
“READING” keeps flashing. |
• Do not use too many hierarchical levels and folders. |
|
|
• Reattach the device (USB/iPod/iPhone). |
|
|
|
Symptom |
|
Remedy |
|
|
“CANNOT PLAY” flashes and/ |
• |
Check whether the connected device is compatible with |
|
or connected device cannot |
|
this unit and ensure the files are in supported formats. |
USB/iPod |
be detected |
|
(Page 14, 15) |
|
• |
Reattach the device. |
|
|
|
||
|
|
|
|
|
The iPod/iPhone does not |
• |
Check the connection between this unit and iPod/iPhone. |
|
turn on or does not work. |
• |
Disconnect and reset the iPod/iPhone using hard reset. |
|
|
|
|
|
“NO DEVICE” |
|
Connect a device (USB/iPod/iPhone), and change the |
|
|
|
source to USB/iPod/iPhone again. |
|
|
|
|
|
• Sound cannot be heard |
• |
Reconnect the Android device. |
|
during playback. |
• |
Launch any media player application on the Android |
|
• Sound output only from |
|
device and start playback. |
|
the Android device. |
• |
Relaunch the current media player application or use |
|
|
|
another media player application. |
|
|
• Restart the Android device. |
|
|
|
• If this does not solve the problem, the connected Android |
|
|
|
|
device is unable to route the audio signal to unit. |
ANDROID |
|
|
(Page 15) |
|
• If USB connection does not work, connect the Android |
||
|
|
||
|
|
|
device through auxiliary input jack. |
|
|
|
|
|
“NO DEVICE” or “READING” |
• |
Reconnect the Android device. |
|
keeps flashing. |
• |
If USB connection does not work, connect the Android |
|
|
|
device through auxiliary input jack. |
|
|
|
|
|
Playback is intermittent or |
|
Turn off the power saving mode on the Android device. |
|
sound skips. |
|
|
|
|
|
|
|
“CANNOT PLAY” |
• |
Make sure Android device contains playable audio files. |
|
|
• Reconnect the Android device. |
|
|
|
• Restart the Android device. |
|
|
|
|
|
If you still have troubles, reset the unit. (Page 3 or 4)
16 ENGLISH
INSTALLATION/CONNECTION
 Warning
•The unit can only be used with a 12 V DC power supply, negative ground.
•Disconnect the battery’s negative terminal before wiring and mounting.
•Do not connect Battery wire (yellow) and Ignition wire (red) to the car chassis or Ground wire (black) to prevent a short circuit.
•To prevent short circuit:
–Insulate unconnected wires with vinyl tape.
–Be sure to ground this unit to the car’s chassis again after installation.
–Secure the wires with cable clamps and wrap vinyl tape around the wires that come in contact with metal parts to protect the wires.
 Caution
•For safety’s sake, leave wiring and mounting to professionals. Consult the car audio dealer.
•Install this unit in the console of your vehicle. Do not touch the metal parts of this unit during and shortly after use of the unit. Metal parts such as the heat sink and enclosure become hot.
•Do not connect the  wires of speakers to the car chassis or Ground wire (black), or connect them in parallel.
•Connect speakers with a maximum power of more than 50 W. If the maximum power of the speakers is lower than 50 W, change the [AMP GAIN] setting to avoid damaging the speakers. (Page 12)
•Mount the unit at an angle of less than 30º.
•If your vehicle wiring harness does not have the ignition terminal, connect Ignition wire (red) to the terminal on the vehicle’s fuse box which provides 12 V DC power supply and is turned on and off by the ignition key.
•Keep all cables away from heat dissipate metal parts.
•After the unit is installed, check whether the brake lamps, blinkers, wipers, etc. on the car are working properly.
•If the fuse blows, first make sure the wires are not touching car’s chassis, then replace the old fuse with one that has the same rating.
Part list for installation
(A) Faceplate (×1) |
(B) Trim plate (×1) |
(C) Mounting sleeve (×1) |
(D) Wiring harness (×1) |
(E) Extraction key (×2)
Basic procedure
1Remove the key from the ignition switch, then disconnect the  terminal of the car battery.
2Connect the wires properly.
See “Wiring connection” on page 19.
3Install the unit to your car.
See “Installing the unit (in-dash mounting)” on page 18.
4 Connect the  terminal of the car battery.
5 Detach the faceplate and reset the unit. (Page 3 or 4)
ENGLISH 17
INSTALLATION/CONNECTION
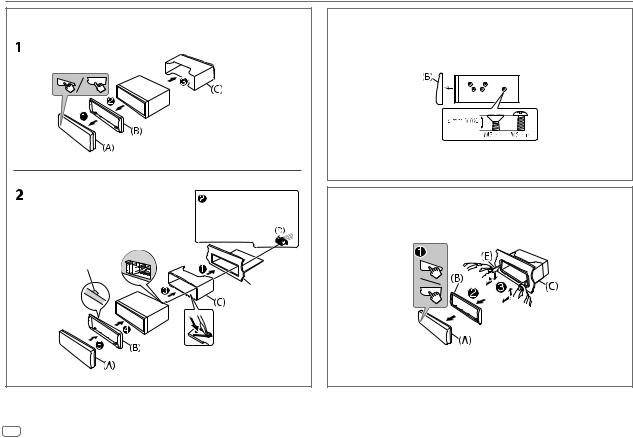
Installing the unit (in-dash mounting)
|
Do the required wiring. |
|
|
(Page 19) |
|
Hook on the top side |
|
|
Orientate the trim |
Dashboard of |
|
plate as illustrated |
||
your car |
||
before fitting. |
||
|
||
|
Bend the appropriate tabs to hold the |
|
|
sleeve firmly in place. |
Installing the unit without mounting sleeve
1 Remove the mounting sleeve and trim plate from the unit.
2Align the holes in the unit (on both sides) with the vehicle mounting bracket and secure the unit with screws (commercially available).
 Use only the specified screws. Using wrong screws might damage the unit.
Removing the unit
18 ENGLISH
INSTALLATION/CONNECTION
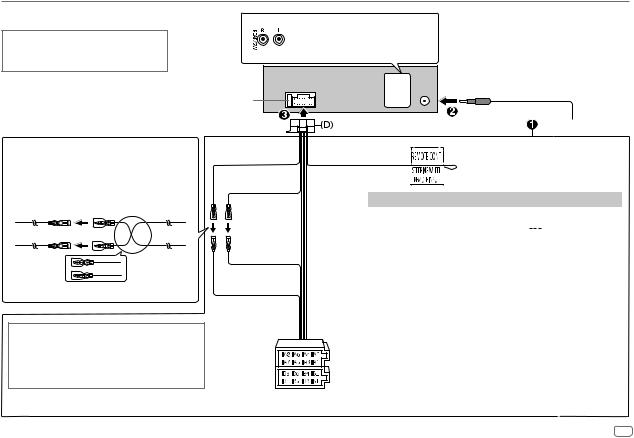
Wiring connection
When connecting to an external amplifier, connect its ground wire to the car’s chassis to avoid damaging the unit.
Rear/subwoofer output
 Antenna terminal
Fuse (10 A)
Connecting the ISO connectors on some VW/ Audi or Opel (Vauxhall) automobiles
You may need to modify the wiring of the supplied wiring harness as illustrated below.
|
|
Ignition wire |
A7 |
(Red) |
(Red) |
Vehicle |
Unit |
|
A4 |
(Yellow) |
Battery wire |
|
|
(Yellow) |
Default wiring
If your car does not have an ISO terminal
We recommend installing the unit with a commercially available custom wiring harness specific for your car and leave this job to professionals for your safety. Consult your car audio dealer.
Yellow (Battery wire) |
Light blue/yellow |
|
(Steering remote |
Red (Ignition wire) |
control wire) |
Red (A7)
Yellow (A4)
ISO connectors
To the steering wheel remote control adapter
Pin |
|
Color and function |
|
|
A4 |
Yellow |
: Battery |
|
|
A5 |
Blue/White |
: Power control (12 V |
|
350 mA) |
|
||||
A6 |
Orange/white |
: Car light control switch |
|
|
A7 |
Red |
: Ignition (ACC) |
|
|
A8 |
Black |
: Earth (ground) connection |
||
B1 |
Purple ] |
: Rear speaker (right) |
|
|
B2 |
Purple/black [ |
|
||
|
|
|
||
B3 |
Gray ] |
: Front speaker (right) |
|
|
B4 |
Gray/black [ |
|
||
|
|
|
||
B5 |
White ] |
: Front speaker (left) |
|
|
B6 |
White/black [ |
|
||
|
|
|
||
B7 |
Green ] |
: Rear speaker (left)* |
|
|
B8 |
Green/black [ |
|
||
|
|
|
||
*You can also connect a subwoofer speaker directly without an external subwoofer amplifier. For setting, see page 12.
ENGLISH 19

SPECIFICATIONS
|
FM |
Frequency Range |
87.5 MHz — 108.0 MHz (50 kHz step) |
||
|
|
|
|
|
|
|
|
Usable Sensitivity (S/N = 26 dB) |
0.71 μV/75 Ω (8.2 dBf) |
||
|
|
|
|
|
|
|
|
Quieting Sensitivity (DIN S/N = 46 dB) |
2.0 μV/75 Ω |
||
|
|
Frequency Response (±3 dB) |
30 Hz — 15 kHz |
||
|
|
|
|
|
|
Tuner |
|
Signal-to-Noise Ratio (MONO) |
64 dB |
|
|
|
|
|
|
|
|
|
Stereo Separation (1 kHz) |
40 dB |
|
|
|
|
|
|
|
||
|
|
|
|
|
|
|
AM |
Frequency Range |
531 kHz — 1 611 kHz (9 kHz step) |
||
|
(MW) |
|
|
|
|
|
Usable Sensitivity (S/N = 20 dB) |
28.2 μV (29 dBμ) |
|||
|
|
|
|
|
|
|
AM |
Frequency Range |
153 kHz — 279 kHz (9 kHz step) |
||
|
(LW) |
|
|
|
|
|
Usable Sensitivity (S/N = 20 dB) |
50 μV (33.9 dBμ) |
|||
|
|
|
|
||
|
USB Standard |
USB 1.1, USB 2.0 (Full speed) |
|||
|
|
|
|
||
|
Compatible Devices |
Mass storage class |
|||
|
|
|
|
||
|
File System |
FAT12/16/32 |
|||
|
|
|
|
|
|
|
Maximum Supply Current |
DC 5 V |
|
1 A |
|
|
|
||||
|
|
|
|
|
|
|
Digital Filter (D/A) Converter |
24 Bit |
|
|
|
USB |
|
|
|
||
Frequency Response (±1 dB) |
20 Hz — 20 kHz |
||||
|
|
|
|
|
|
|
Signal-to-Noise Ratio (1 kHz) |
92 dB |
|
|
|
|
|
|
|
|
|
|
Dynamic Range |
88 dB |
|
|
|
|
|
|
|
|
|
|
Channel Separation |
83 dB |
|
|
|
|
|
|
|
||
|
MP3 Decode |
Compliant with MPEG-1/2 Audio Layer-3 |
|||
|
|
|
|
||
|
WMA Decode |
Compliant with Windows Media Audio |
|||
USB |
WAV Decode |
Linear-PCM |
|
|
|
||
FLAC Decode |
FLAC files, up to 16 bit/48 kHz |
||
|
|||
|
|
|
|
Auxiliary |
Frequency Response (±3 dB) |
20 Hz — 20 kHz |
|
|
|
||
Input Maximum Voltage |
1 000 mV |
||
|
|||
|
|
|
|
|
Input Impedance |
30 kΩ |
|
|
|
|
|
|
Maximum Output Power |
50 W × 4 or |
|
|
|
50 W × 2 + 50 W × 1 (Subwoofer = 4 Ω) |
|
|
|
|
|
Audio |
Full Bandwidth Power |
22 W × 4 |
|
(at less than 1 % THD) |
|
||
|
|
||
|
|
|
|
|
Speaker Impedance |
4 Ω — 8 Ω |
|
|
Preout Level/Load (USB) |
2 500 mV/10 kΩ load |
|
|
|
|
|
|
Preout Impedance |
≤ 600 Ω |
|
|
|
|
|
|
Operating Voltage |
12 V DC car battery |
|
General |
|
|
|
Installation Size (W × H × D) |
182 mm × 53 mm × 100 mm |
||
|
|||
|
Net Weight (includes Trimplate, |
0.6 kg |
|
|
Mounting Sleeve) |
|
|
|
|
|
Subject to change without notice.
20 ENGLISH

CONTENIDO
ANTES DEL USO |
2 |
PUNTOS BÁSICOS |
3 |
PROCEDIMIENTOS INICIALES |
5 |
1 Cancele la demostración |
|
2 Ajuste del reloj y la fecha |
|
3 Realice los ajustes básicos |
|
RADIO |
6 |
AUX |
8 |
USB/iPod/ANDROID |
8 |
AJUSTES DE AUDIO |
10 |
AJUSTES DE VISUALIZACIÓN |
13 |
REFERENCIAS |
14 |
Mantenimiento |
|
Más información |
|
LOCALIZACIÓN Y SOLUCIÓN |
|
DE PROBLEMAS |
16 |
INSTALACIÓN/CONEXIÓN |
17 |
ESPECIFICACIONES |
20 |
ANTES DEL USO
IMPORTANTE
•Antes de utilizar este producto y para asegurar su uso correcto, lea completamente este manual. En especial, lea y acate las Advertencias y Precauciones incluidas en este manual.
•Guarde el manual en un lugar seguro y accesible para futuras consultas.
 ADVERTENCIA
• No utilice ninguna función que pueda desviar su atención mientras está conduciendo el vehículo.
 Precaución
Ajuste del volumen:
•Ajuste el volumen a un nivel que le permita oír los ruidos del exterior para impedir accidentes.
•Antes de reproducir fuentes digitales, baje el volumen para evitar que el repentino aumento del nivel de salida cause daños a los altavoces.
General:
•Evite el uso de dispositivos externos cuando puedan afectar la seguridad de conducción.
•Asegúrese de tener una copia de respaldo de todos los datos importantes. No aceptamos responsabilidad alguna por la pérdida de los datos grabados.
•Para evitar cortocircuitos, nunca coloque ni deje objetos metálicos (por ejemplo, monedas o herramientas metálicas) dentro de la unidad.
Cómo leer este manual
•Las operaciones se explican utilizando principalmente los botones de la placa frontal del KD-X262 y KD-X161.
•Se utilizan indicaciones en inglés para las explicaciones. Puede seleccionar el idioma de visualización desde el menú. (Página 6)
•[XX] indica los elementos seleccionados.
•(Página XX) significa que hay información disponible en la página indicada.
2ESPAÑOL
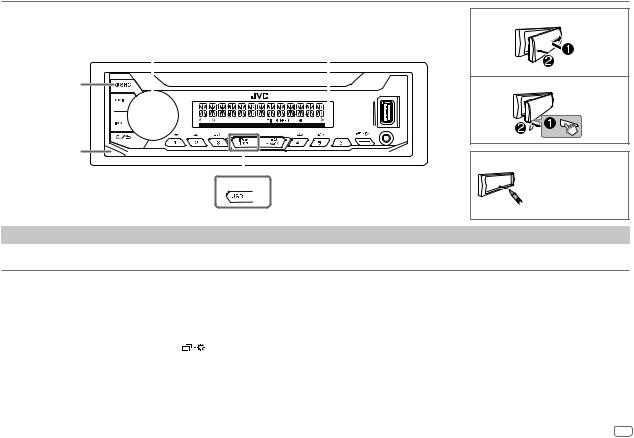
PUNTOS BÁSICOS
Placa frontal
KD-X262/KD-X162:
Botón fuente
Botón de liberación
Para
Encender la unidad
Rueda de volumen |
|
|
|
|
|
Ventanilla de visualización |
|||||||||||||||||
|
|
|
|
|
|
|
|
|
|
|
|
|
|
|
|
|
|
|
|
|
|
|
|
|
|
|
|
|
|
|
|
|
|
|
|
|
|
|
|
|
|
|
|
|
|
|
|
|
|
|
|
|
|
|
|
|
|
|
|
|
|
|
|
|
|
|
|
|
|
|
|
|
|
|
|
|
|
|
|
|
|
|
|
|
|
|
|
|
|
|
|
|
|
|
|
|
|
|
|
|
|
|
|
|
|
|
|
|
|
|
|
|
|
|
|
|
|
|
|
|
|
|
|
|
|
|
|
|
|
|
|
|
|
|
|
|
|
|
|
|
|
|
|
|
|
|
|
|
|
|
|
|
|
|
|
|
|
|
|
|
|
|
|
|
|
|
|
|
|
|
|
|
|
|
|
|
|
|
|
|
|
|
|
|
|
|
|
|
|
|
|
|
|
|
|
|
|
|
|
|
|
|
|
|
|
|
|
|
|
|
|
|
|
|
|
KD-X162
En la placa frontal
Pulse BSRC.
• Pulse y mantenga pulsado para apagar la unidad.
Fijar
Desmontar
Cómo reinicializar
Se borrarán los ajustes preestablecidos, excepto las emisoras de radio memorizadas.
Ajustar el volumen |
Gire la rueda de volumen. |
||
|
Pulse la rueda de volumen para enmudecer el sonido o pausar la reproducción. |
||
|
• Pulse otra vez para cancelar. El nivel de volumen vuelve al nivel anterior antes del silenciamiento o la pausa. |
||
|
|
|
|
Seleccionar una fuente |
• |
Pulse BSRC repetidamente. |
|
|
• Pulse BSRC y, a continuación, gire la rueda de volumen antes de que transcurran 2 segundos. |
||
|
|
|
|
Cambiar la información en pantalla |
Pulse |
repetidamente. (Página 15) |
|
|
|
|
|
Seleccionar un elemento |
1 |
Gire la rueda de volumen para seleccionar un elemento. |
|
|
2 |
Pulse la rueda para confirmar. |
|
ESPAÑOL 3
 Loading...