


 Loading...
CASSETTE RECEIVER
«‘∑¬ÿ‡§√◊ËÕ߇≈Ëπ‡∑ª
For installation and connections, refer to the separate manual.
°√ÿ≥“¥Ÿ§ŸË¡◊Õ∑’Ë·¬°µË“ßÀ“° „π°“√µ‘¥µß·≈È—–°“√‡™◊ËÕ¡µËÕ
KS-F185 |
ENGLISH |
|
|
|
|
KS-F185 |
‰∑¬ |
|
|
|
|
INSTRUCTIONS
§”·π–π”
GET0225-001A
[U/UH]
ENGLISH
Thank you for purchasing a JVC product.
Please read all instructions carefully before operation, to ensure your complete understanding and to obtain the best possible performance from the unit.
CONTENTS
How to reset your unit ............................... |
2 |
LOCATION OF THE BUTTONS ............ |
3 |
Control panel ............................................. |
3 |
BASIC OPERATIONS ....................... |
4 |
Turning on the power ................................ |
4 |
Setting the clock ........................................ |
5 |
TAPE OPERATIONS ........................ |
9 |
Listening to a cassette .............................. |
9 |
SOUND ADJUSTMENTS ................... |
10 |
Adjusting the sound .................................. |
10 |
Turning on/off the super bass function ...... |
10 |
Selecting preset sound modes .................. |
11 |
Storing your own sound adjustments ........ |
11 |
RADIO OPERATIONS ...................... |
6 |
DETACHING THE C0NTROL PANEL |
12 |
|
Listening to the radio |
6 |
|||
TROUBLESHOOTING |
13 |
|||
Storing stations in memory ....................... |
7 |
|||
Tuning in to a preset station ...................... |
8 |
MAINTENANCE |
14 |
|
Storing your favorite station in to the |
|
|||
one-touch operation button |
|
SPECIFICATIONS |
15 |
|
(EX—extra) |
8 |
|||
|
|
How to reset your unit
While holding SEL (select), press 


 (standby/on/attenuator) button for more than 2 seconds.
This will reset the built-in microcomputer.


 (standby/on/attenuator)
SEL (select)
Note:
Your preset adjustments—such as preset channels or sound adjustments—will also be erased.
BEFORE USE
*For safety....
•Do not raise the volume level too much, as this will block outside sounds, making driving dangerous.
•Stop the car before performing any complicated operations.
*Temperature inside the car....
If you have parked the car for a long time in hot or cold weather, wait until the temperature in the car becomes normal before operating the unit.
2
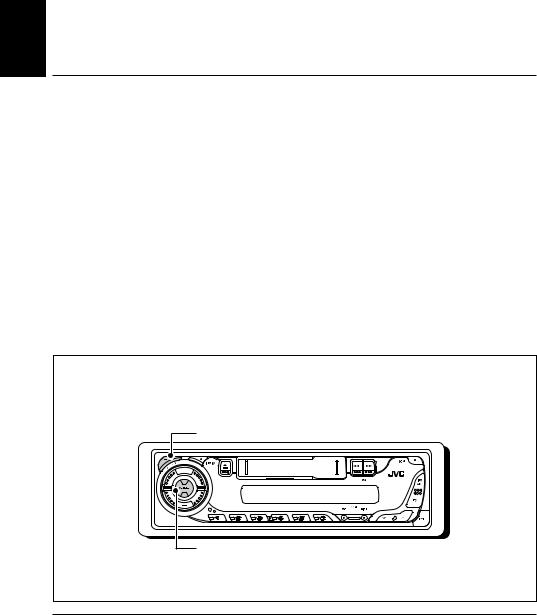
LOCATION OF THE BUTTONS
Control panel
Display window
ENGLISH
|
|
|
|
|
|
|
|
|
|
|
|
|
|
|
|
|
|
|
|
|
|
|
|
|
|
|
|
|
|
|
|
|
|
|
|
|
|
|
|
|
|
|
|
|
|
|
|
|
|
|
|
|
|
|
|
|
|
|
|
|
|
|
|
|
|
|
|
|
|
|
|
|
|
|
|
|
|
|
|
|
|
|
|
|
|
|
|
|
|
|
|
|
|
|
|
|
|
|
|
|
|
|
|
|
|
|
|
|
|
|
|
1 |
|
|
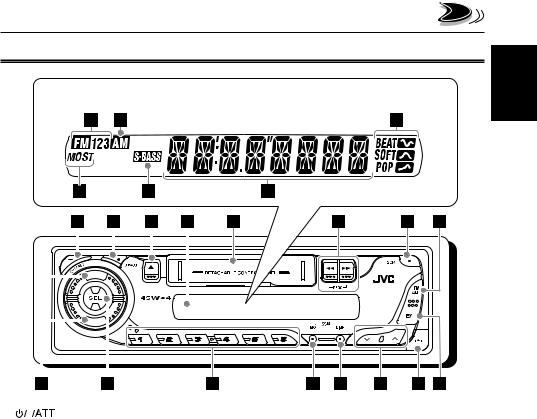
(standby/on/attenuator) button |
||||||||||||
|
|||||||||||||||
|
|||||||||||||||
2 |
S BASS (super bass) button |
||||||||||||||
3 |
0(eject) button |
||||||||||||||
4 |
Display window |
||||||||||||||
5 |
Cassette compartment |
||||||||||||||
6 |
1/¡PROG (program) button |
||||||||||||||
7 |
SCM (sound control memory) button |
||||||||||||||
8 |
FM AM button |
||||||||||||||
9 |
+/– buttons |
||||||||||||||
p SEL (select) button q Number buttons
wMO (monaural) button
• Also functions as SSM buttons when pressed
together with DISP (display) button.
eDISP (display) button
•Also functions as SSM buttons when pressed together with MO (monaural) button.
r  /
/ buttons
t  (control panel release) button y EX (extra) button
Display window
uFM band indicators FM1, FM2, FM3
i AM band indicator
oSound mode indicators BEAT, SOFT, POP
;Tuner reception indicators
MO (monaural), ST (stereo)
a S.BASS (super bass) indicator s Main display
3

BASIC OPERATIONS
ENGLISH
1 3 2
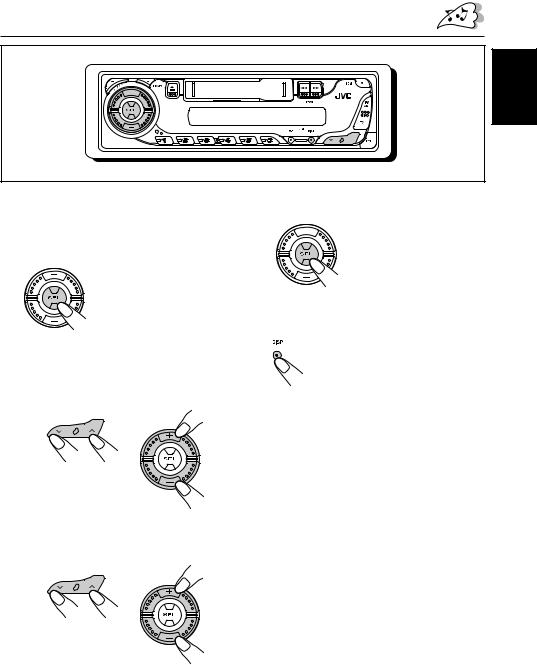
Turning on the power |
3 Adjust the volume. |
1 Turn on the power. |
To increase the volume |
|
Note on One-Touch Operation:
When you select a source in step 2 below, the |
To decrease the volume |
power automatically comes on. You do not have |
|
to press this button to turn on the power. |
|
2 Select the source.
Volume level appears.
To operate the tuner (FM or AM), see pages 6 – 8.
To operate the EX (extra) button, see page 8.
To play a tape, see page 9.
4 Adjust the sound as you want. (See pages 10 and 11.)
To drop the volume in a moment
Press 


 briefly while listening to any source. “ATT” starts flashing on the display, and the volume level will drop in a moment.
To resume the previous volume level, press the button briefly again.
To turn off the power
Press and hold 


 for more than one second.
“SEE YOU” appears, then the unit turns off.
4
ENGLISH
Setting the clock |
4 Finish the setting. |
|
|
1 Press and hold SEL (select) for more than 2 seconds.
“CLOCK H” or “CLOCK M” appears on the display.
2 Set the hour.
1 Select “CLOCK H” (hour) if not shown on the display.
2Adjust the hour.
1 2
3 Set the minute.
1 Select “CLOCK M” (minute).
2 Adjust the minute.
12
To check the current clock time or change the display mode
Press DISP (display) repeatedly.
Each time you press the button, the display mode changes as follows:
• During tuner operation:
Frequency 
 Clock
Clock
• During tape operation:
Play mode (TAPE) 
 Clock
Clock
5

RADIO OPERATIONS
ENGLISH
Listening to the radio
You can use either automatic searching or manual searching to tune in to a particular station.
Note:
When a cassette is in the cassette compartment, you cannot select the tuner. Be sure to eject the cassette from the cassette compartment to listen to the radio.
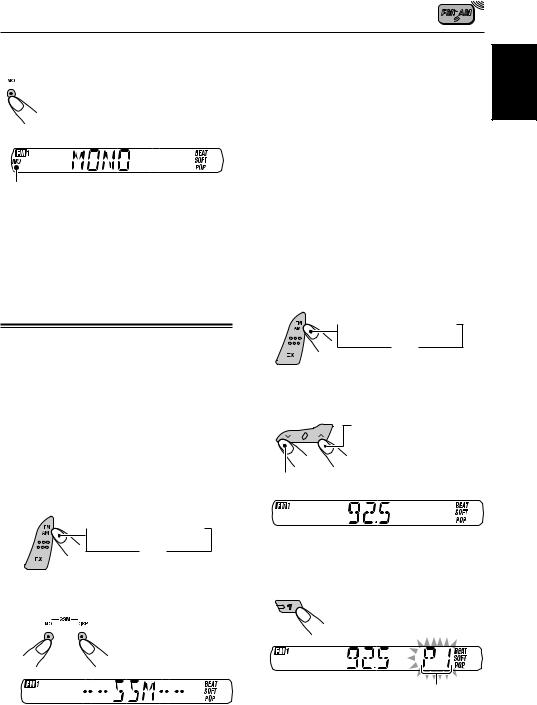
Searching for a station automatically: Auto search
1 Select the band (FM1 – 3, AM).
 FM1
FM1 FM2
FM2  FM3
FM3
AM 
Selected band appears.
Lights up when receiving an FM stereo broadcast with sufficient signal strength.
Note:
This receiver has three FM bands (FM1, FM2, FM3). You can use any one of them to listen to an FM broadcast.
2 Start searching for a station.
To search for stations of higher frequencies
To search for stations of lower frequencies
When a station is received, searching stops.
To stop searching before a station is received, press the same button you have
pressed for searching.
6
Searching for a station manually: Manual search
1 Select the band (FM1 – 3, AM).
 FM1
FM1 FM2
FM2  FM3
FM3
AM
Note:
This receiver has three FM bands (FM1, FM2, FM3). You can use any one of them to listen to an FM broadcast.
2 Press and hold  or
or  until
until
“M” (manual) starts flashing on the display.
3 Tune in to a station you want while “M” (manual) is still flashing.
To tune in to stations of higher frequencies
To tune in to stations of lower frequencies
•If you release your finger from the button, the manual mode will automatically turns off after 5 seconds.
•If you hold down the button, the frequency keeps changing (in 50 kHz intervals for FM and 9 kHz intervals for AM) until you release the button.
When an FM stereo broadcast is hard to receive:
Press MO (monaural), while listening to an FM stereo broadcast. Each time you press the button, the
MO indicator lights up and goes off alternately.
Local FM stations with the strongest signals are searched and stored automatically in the band number you have selected (FM1, FM2, or FM3).
These stations are preset in the number buttons
—No.1 (lowest frequency) to No.6 (highest frequency).
When automatic preset is over, the station stored in number button 1 will be automatically tuned in.
ENGLISH
MO (monaural) indicator
When the MO indicator is lit on the display, the sound you hear becomes monaural but the reception will be improved.
To restore the stereo effect, press the same button again.
Storing stations in memory
You can use one of the following two methods to store broadcasting stations in memory.
•Automatic preset of FM stations: SSM (Strongstation Sequential Memory)
•Manual preset of both FM and AM stations
FM station automatic preset: SSM
You can preset 6 local FM stations in each FM band (FM1, FM2, and FM3).
1 Select the FM band (FM1 – 3) you want to store FM stations into.
 FM1
FM1 FM2
FM2  FM3
FM3
AM
2 Press and hold both buttons for more than 2 seconds.
“SSM” appears, then disappears when automatic preset is over.
Manual preset
You can preset up to 6 stations in each band (FM1, FM2, FM3, and AM) manually.
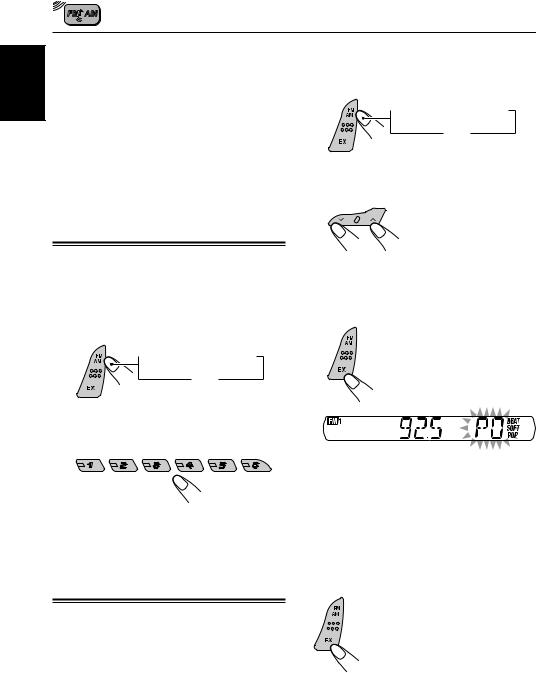
Ex.: Storing FM station of 92.5 MHz into the preset number 1 of the FM1 band.
1 Select the band (FM1 – 3, AM) you want to store stations into (in this example, FM1).
 FM1
FM1 FM2
FM2  FM3
FM3
AM
2 Tune in to a station (in this example, of 92.5 MHz).
To tune in to stations of higher frequencies
To tune in to stations of lower frequencies
3 Press and hold the number button (in this example, 1) for more than 2 seconds.
Preset number flashes for a while.
CONTINUED ON THE NEXT PAGE
7
ENGLISH
4 Repeat the above procedure to store other stations into other preset numbers.
Notes:
•A previously preset station is erased when a new station is stored in the same preset number.
•Preset stations are erased when the power supply to the memory circuit is interrupted (for example, during battery replacement). If this occurs, preset the stations again.
1 Select the band (FM1 – 3, AM) you want to store stations into (in this example, FM1).
 FM1
FM1 FM2
FM2  FM3
FM3
AM
2 Tune in to a station (in this example, of 92.5 MHz).
Tuning in to a preset station
You can easily tune in to a preset station. Remember that you must store stations first. If you have not stored them yet, see “Storing stations in memory” on pages 7 and 8.
1 Select the band (FM1 – 3, AM).
 FM1
FM1 FM2
FM2  FM3
FM3
AM
2 Select the number (1 – 6) for the preset station you want.
Storing your favorite station in to the one-touch operation button (EX—extra)
You can preset an FM or AM station (such as your favorite station or traffic announcement station); and recall it by one touch operation even if the unit is turned off.
Ex.: Storing an FM station of 92.5 MHz in to the one-touch operation button (EX).
3 Press and hold the button for more than 2 seconds.
“P0” flashes on the display, showing that the station has been preset.
Notes:
•A previously preset station is erased when a new station is stored in the EX button.
•The preset station is erased when the power supply to the memory circuit is interrupted (for example, during battery replacement). If this occurs, preset the station again.
To tune into the favorite station
The unit automatically turns on (if it has been off).
Your favorite station is tuned in—except when the tape is playing.
•If you press the button again, the last received station will be tuned in.
8
TAPE OPERATIONS
ENGLISH
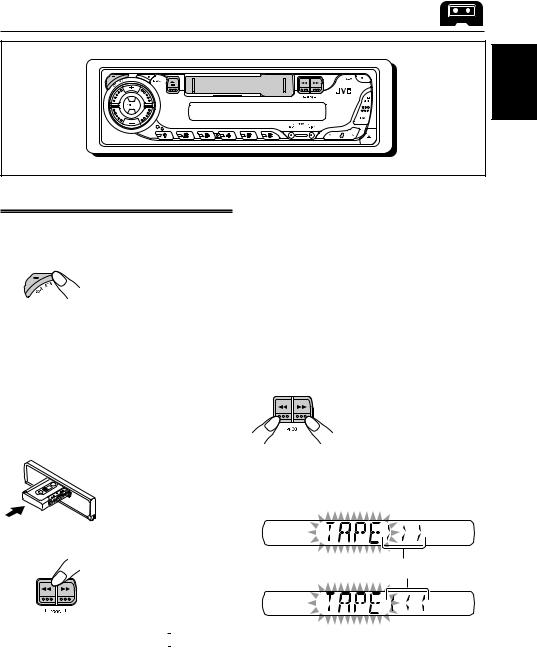
Listening to a cassette
You can play back type I (normal) tapes.
1 Turn on the power.
Note on One-Touch Operation:
When a cassette is already in the cassette compartment, tape play starts automatically. However, it is not recommended to leave the cassette in the compartment when turning off the power. It may damage the tape head and the cassette.
2 Insert a cassette into the cassette compartment.
To stop play and eject the cassette
Press 0.
Tape play stops, the cassette automatically ejects from the cassette compartment. The source changes to the previously selected one.
•You cannot change the source if the cassette is still in the cassette compartment.
To change the source, you must eject the cassette first.
•You can also eject the cassette by pressing 0 while the unit is turned off.
To fast wind a tape
When one side of the tape reaches its end during play, the other side of the tape automatically starts playing. (Auto Reverse)
3 Select the tape direction.
Press both buttons at the same time.
Each time you press both buttons, the tape direction changes alternately— forward (


 ) and reverse (


 ).
).
Press in ¡or 1.
The tape will be wound in the direction of the arrows (

 or
or 

 ).
).
Tape direction
To restart playback, lightly press the other button which is not pressed in (1or ¡).
9
ENGLISH
SOUND ADJUSTMENTS
Adjusting the sound |
2 Adjust the level. |
You can adjust the sound characteristics to your |
To increase the level |
preference. |
|
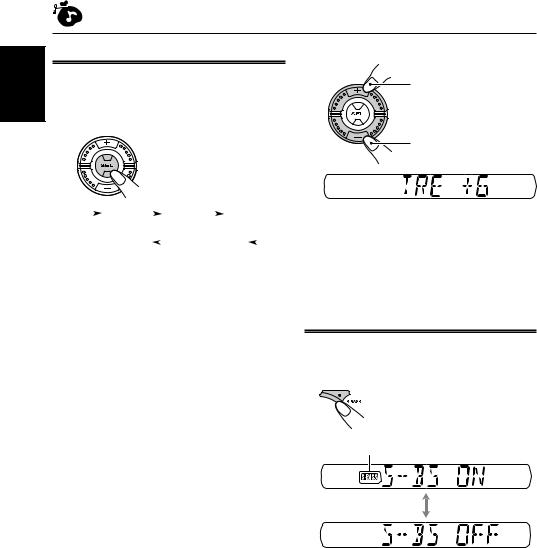
1 Select the item you want to adjust.
Each time you press the |
To decrease the level |
button, the adjustable |
|
items change as follows: |
|
|
|
|
BAS |
|
|
|
TRE |
|
|
|
|
FAD |
|
|
||
|
|
|
(bass) |
(treble) |
|
|
|
|
(fader) |
|
||||||
|
|
|
|
VOL |
|
|
|
|
|
BAL |
|
|
|
|||
|
|
|
|
|
|
|
|
|
|
|
|
|||||
|
|
|
(volume) |
|
|
|
(balance) |
|||||||||
|
|
|
|
|
|
|
|
|
|
|
|
|
|
|
|
|
Indication |
|
To do: |
|
|
|
|
Range |
|||||||||
|
|
|
|
|
|
|
|
|
|
|
|
|
|
|
||
BAS |
Adjust the bass. |
|
–6 (min.) |
|||||||||||||
(Bass) |
|
|
|
|
|
|
| |
|
|
|
|
|
||||
|
|
|
|
|
|
|
|
|
|
+6 (max.) |
||||||
|
|
|
|
|
|
|
|
|
|
|
|
|
|
|
||
TRE |
Adjust the treble. |
|
–6 (min.) |
|||||||||||||
(Treble) |
|
|
|
|
|
|
| |
|
|
|
|
|
||||
|
|
|
|
|
|
|
|
|
|
+6 (max.) |
||||||
|
|
|
|
|
|
|
|
|
|
|
|
|
|
|
||
FAD*1 |
Adjust the front |
|
R6 (Rear only) |
|||||||||||||
(Fader) |
and rear speaker |
| |
|
|
|
|
|
|||||||||
|
|
|
balance. |
|
|
F6 (Front only) |
||||||||||
|
|
|
|
|
|
|
|
|
|
|
|
|
|
|
|
|
BAL |
Adjust the left |
|
L6 |
(Left only) |
||||||||||||
(Balance) |
and right speaker |
| |
|
|
|
|
|
|||||||||
|
|
|
balance. |
|
|
R6 (Right only) |
||||||||||
|
|
|
|
|
|
|
|
|
|
|
|
|
|
|
|
|
VOL*2 |
Adjust the volume. |
00 |
(min.) |
|||||||||||||
(Volume) |
|
|
|
|
|
|
| |
|
|
|
|
|
||||
|
|
|
|
|
|
|
|
|
50 |
(max.) |
||||||
|
|
|
|
|
|
|
|
|
|
|
|
|
|
|
|
|
*1 If you are using a two-speaker system, set the fader level to “00.”
*2 Normally, the + and – buttons work as the volume control buttons. So you do not have to select “VOL” to adjust the volume level.
Ex.: When you select “TRE” (treble)
3 Repeat steps 1 and 2 to adjust the other items.
Turning on/off the super bass function
The super bass function allows you to maintain the richness and fullness of the bass sound regardless of how low you set the volume.
Each time you press the button, the function turns on and off alternately.
S.BASS indicator
10
Selecting preset sound modes
You can select a preset sound adjustment suitable to the music genre.
Select the sound mode you want.
Each time you press the button, the sound mode changes as follows:
 SCM OFF
  BEAT
BEAT  SOFT
SOFT  POP
POP 
Ex.: When you select “BEAT”
Indication |
For: |
Preset values |
||
|
|
BAS |
TRE |
S.BASS |
|
|
|
|
|
SCM OFF |
(Flat sound) |
00 |
00 |
OFF |
|
|
|
|
|
BEAT |
Rock or |
+2 |
00 |
ON |
|
disco music |
|
|
|
|
|
|
|
|
SOFT |
Quiet |
+1 |
–3 |
OFF |
|
background |
|
|
|
|
music |
|
|
|
|
|
|
|
|
POP |
Light music |
+4 |
+1 |
OFF |
|
|
|
|
|
Notes:
•You can adjust each sound mode to your preference, and store it in memory.
If you want to adjust and store your original sound mode, see “Storing your own sound adjustments” below.
•To adjust the bass and treble reinforcement levels or to turn on/off the super bass function, see page 10.
Storing your own sound adjustments
You can adjust the sound modes (BEAT, SOFT, POP) to your preference and store your own adjustments in memory.
•There is a time limit in doing the following procedure. If the setting is canceled before you finish, start from step 1 again.
1 Call up the sound mode you want to adjust.
• See on the left column for details.
2 To adjust the bass or treble level.
1 Select “BAS” (bass) or “TRE” (treble).
2 Adjust the level.
To turn on or off the super bass function.
• See page 10 for details.
3 Repeat step 2 to adjust the other items.
4 Press and hold SCM until the sound mode you have selected in step 1 flashes on the display.
Your adjustment made for the selected sound mode is stored in memory.
5 Repeat the same procedure to store other sound modes.
To reset to the factory settings, repeat the same procedure and reassign the preset values listed in the table on the left column.
ENGLISH
11
ENGLISH
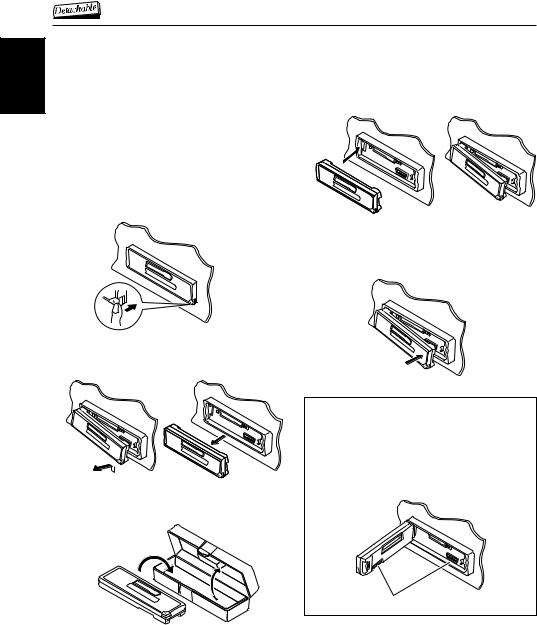
DETACHING THE C0NTROL PANEL
You can detach the control panel when leaving the car.
When detaching or attaching the control panel, be careful not to damage the connectors on the back of the control panel and on the panel holder.
Attaching the control panel
1 Insert the left side of the control panel into the groove on the panel holder.
Detaching the control panel
Before detaching the control panel, be sure to turn off the power.
1 Unlock the control panel.
2 Press the right side of the control panel to fix it to the panel holder.
2 Lift and pull the control panel out of the unit.
3 Put the detached control panel into the provided case.
Note on cleaning the connectors:
If you frequently detach the control panel, the connectors will deteriorate.
To minimize this possibility, periodically wipe the connectors with a cotton swab or cloth moistened with alcohol, being careful not to damage the connectors.
Connectors
12
Loading...