


Bluetooth adapter
Bluetooth-Adapter / Adaptateur Bluetooth Bluetooth adapter / Adaptador Bluetooth Adattatore Bluetooth / Adaptador Bluetooth
 /
/ 
KS-BTA200
For customer Use:
INSTRUCTIONS
BEDIENUNGSANLEITUNG MANUEL D’INSTRUCTIONS
GEBRUIKSAANWIJZING MANUAL DE INSTRUCCIONES
ISTRUZIONI
INSTRUÇÕES
Enter below the Model No. and Serial No. which are located on the top or bottom of the cabinet. Retain this information for future reference.
Model No.
Serial No.
LVT1640-001A
ΕΛΛΗΝΙΚΑ PORTUGUÊS ITALIANO ESPAÑOL NEDERLANDS FRANÇAIS DEUTSCH ENGLISH
[K]

Declaration of Conformity with regard to the R&TTE Directive 1999/5/EC

 0536
0536
English: |
Español: |
Hereby, JVC, declares that this KS-BTA200 is in compliance with the essential requirements and other relevant provisions of Directive 1999/5/EC.
Deutsch:
Hiermit erklärt JVC, dass sich das Gerät KS-BTA200 in Übereinstimmung mit den grundlegenden Anforderungen und den übrigen einschlägigen Bestimmungen der Richtlinie 1999/5/ EG befindet. (BMWi)
Hiermit erklärt JVC die Übereinstimmung des Gerätes KS-BTA200 mit den grundlegenden Anforderungen und den anderen relevanten Festlegungen der Richtlinie 1999/5/EG befindet. (Wien)
Français:
Par la présente JVC déclare que l’appareil KS-BTA200 est conforme aux exigences essentielles et aux autres dispositions pertinentes de la directive 1999/5/CE.
Nederlands:
Hierbij verklaart JVC dat het toestel KS-BTA200 in overeenstemming is met de essentiële eisen en de andere relevante bepalingen van richtlijn 1999/5/EG.
Dansk:
Undertegnede JVC erklærer herved, at følgende udstyr KS-BTA200 overholder de væsentlige krav og øvrige relevante krav i direktiv 1999/5/EF.
Por medio de la presente JVC declara que el KS-BTA200 cumple con los requisitos esenciales y cualesquiera otras disposiciones aplicables o exigibles de la Directiva 1999/5/CE.
Ελληνική:
ΜΕ ΤΗΝ ΠΑΡΟΥΣΑ JVC ΔΗΛΩΝΕΙ ΟΤΙ KS-BTA200 ΣΥΜΜΟΡΦΩΝΕΤΑΙ ΠΡΟΣ ΤΙΣ ΟΥΣΙΩΔΕΙΣ ΑΠΑΙΤΗΣΕΙΣ ΚΑΙ ΤΙΣ ΛΟΙΠΕΣ ΣΧΕΤΙΚΕΣ ΔΙΑΤΑΞΕΙΣ ΤΗΣ ΟΔΗΓΙΑΣ 1999/5/ΕΚ.
Italiano:
Con la presente JVC dichiara che questo KS-BTA200 è conforme ai requisiti essenziali ed alle altre
disposizioni pertinenti stabilite dalla direttiva 1999/5/CE.
Malti:
Hawnhekk, JVC, jiddikjara li dan KS-BTA200 jikkonforma mal-ħtiġijiet essenzjali u ma provvedimenti oħrajn relevanti li hemm fid-Dirrettiva 1999/5/ EC.
Português:
JVC declara que este KS-BTA200 está conforme com os requisitos essenciais e outras disposições da Directiva 1999/5/CE.
Suomi:
JVC vakuuttaa täten että KS-BTA200 tyyppinen laite on direktiivin 1999/5/ EY oleellisten vaatimusten ja sitä koskevien direktiivin muiden ehtojen mukainen.
G-1

Svenska:
Härmed intygar JVC att denna KS-BTA200 står I överensstämmelse med de väsentliga egenskapskrav och övriga relevanta bestämmelser som framgår av direktiv 1999/5/EG.
Íslenska:
Hér með lýsir JVC yfir því að KS-BTA200 er í samræmi við grunnkröfur og aðrar kröfur, sem gerðar eru í tilskipun 1999/5/EC.
Norsk:
JVC erklærer herved at utstyret KS-BTA200 er i samsvar med de grunnleggende krav og øvrige relevante krav i direktiv 1999/5/EF.
Cesky:
JVC tímto prohlašuje, že tento KS-BTA200 je ve shodě se základními požadavky a dalšími príslušnými ustanoveními směrnice 1999/5/ES.
Eesti:
Käesolevaga kinnitab JVC seadme KSBTA200 vastavust direktiivi 1999/5/EÜ põhinõuetele ja nimetatud direktiivist tulenevatele teistele asjakohastele sätetele.
Latviski:
Ar šo JVC deklarē, ka KS-BTA200 atbilst Direktīvas 1999/5/EK būtiskājam prasībām un citiem ar to saistītajiem noteikumiem.
Lietuviu:
Šiuo JVC deklaruoja, kad šis KS-BTA200 atitinka esminius reikalavimus ir kitas 1999/5/EB Direktyvos nuostatas.
Magyar:
Alulírott, JVC nyilatkozom, hogy a KSBTA200 megfelel a vonatkozó alapvetõ követelményeknek és az 1999/5/EC irányelv egyéb elõírásainak.
Polski:
Niniejszym JVC oświadcza, że KS-BTA200 jest zgodny z zasadniczymi wymogami oraz pozostałymi stosownymi postanowieniami Dyrektywy 1999/5/EC.
Slovensko:
JVC izjavlja, da je ta KS-BTA200 v skladu z bistvenimi zahtevami in ostalimi relevantnimi določili direktive 1999/5/ES.
Slovensky:
JVC týmto vyhlasuje, že KS-BTA200 spĺňa základné požiadavky a všetky príslušné ustanovenia Smernice 1999/5/ES.
G-2
ENGLISH
Thank you for purchasing a JVC product.
Please read all instructions carefully before operation, to ensure your complete understanding and to obtain the best possible performance from the unit.
INFORMATION (For U.S.A.)
This equipment has been tested and found to comply with the limits for a Class B digital device, pursuant to Part 15 of the FCC Rules. These limits are designed to provide reasonable protection against harmful interference
in a residential installation. This equipment generates, uses and can radiate radio frequency energy and, if not installed and used in accordance with the instructions, may cause harmful interference to radio communications. However, there is no guarantee that interference will not occur in a particular installation. If this equipment does cause harmful interference to radio or television reception, which can be determined by turning the equipment off and on, the user is encouraged to try to correct the interference by one or more of the following measures:
–Reorient or relocate the receiving antenna.
–Increase the separation between the equipment and receiver.
–Connect the equipment into an outlet on a circuit different from that to which the receiver is connected.
–Consult the dealer or an experienced radio/TV technician for help.
Caution:
Changes or modifications not approved by JVC could void the user’s authority to operate the equipment.
Information for Users on Disposal of Old Equipment
This symbol indicates that the product with this symbol should not be disposed as general household waste at its end-of-life. If you wish to dispose of this product, please do so in accordance with applicable national legislation or other rules in your country and municipality. By disposing of this product correctly, you will help to conserve natural resources and will help prevent potential negative effects on the environment and human health.
This symbol is only valid in the
European Union.
Dear Customer,
This apparatus is in conformance with the valid European directives and standards regarding electromagnetic compatibility and electrical safety.
European representative of Victor Company of Japan, Limited is: JVC Technology Centre Europe GmbH
Postfach 10 05 52
61145 Friedberg Germany
2

Introduction
Warnings 
•USE WITH DC 12 V NEGATIVE GROUND VEHICLES.
If your vehicle is not of 12 V Negative Ground type, a voltage inverter is required, which can be purchased at a JVC car audio (IN-CAR ENTERTAINMENT) dealer.
•This adapter has been designed exclusively for use with JVC’s car receivers. Do not use this adapter with any other car receiver.
Precautions 
•This adapter is designed for use with Bluetooth devices (cellular phone and audio players).
•Do not raise the volume level too much, as this will block outside sounds, making driving dangerous.
•Do not perform complicated operations while driving; otherwise, it may result in an accident.
•While driving, do not perform any complicated operation such as dialling the numbers, using phone book, etc. When you perform these operations, stop your car in a safe place.
•Some Bluetooth devices may not be connected to this unit depending on the Bluetooth version of the device.
•This unit may not work for some Bluetooth devices.
•Connecting condition may vary depending on circumstances around you.
Introduction 3

ENGLISH
Introduction
About Bluetooth 
Bluetooth is a short-range wireless radio communication technology for the mobile device such as cellular phones, portable PCs, and other devices. The bluetooth devices can be connected without cables and communicate each other.
•The Bluetooth word mark and logos are owned by the Bluetooth SIG, Inc. and any use of such marks by Victor Company of Japan, Limited (JVC) is under
licence. Other trademarks and trade names are those of their respective owners.
•The serial number is printed on the label placed on the bottom of the adapter unit.
To send or receive voice and data between this adapter and your Bluetooth device must be within 10 m in distance.
However, the transmission distance may be shorter depending on the circumstances around you.
Bluetooth profile
This adapter supports the following Bluetooth profiles; HSP (Headset Profile)
HFP (Hands-Free Profile)
A2DP (Advanced Audio Distribution Profile) AVRCP (Audio/Video Remote Control Profile) SPP (Serial Port Profile)
OPP (Object Push Profile)
General information 
•This adapter supports only JVC’s Bluetooth-Ready car receivers.
•Refer to the list (included in the box) to see the countries where you may use the Bluetooth® function.
Features
By using this adapter, you can operate Bluetooth devices with your receiver as follows:
•Making/receiving a call
•Calling from phonebook
•Calling by voice command
•Calling from call histories
–Redial
–Missed Call
–Received Call
•Calling by preset numbers
•Receiving the SMS (Short Message Service)/Text Message
•Playback a Bluetooth audio player
Available functions differ depending on the type of your receiver and Bluetooth devices.
Pairing and PIN Code
When you connect a Bluetooth device to your car receiver through this adapter for the first time, make pairing between the adapter and the device. Pairing allows Bluetooth devices to communicate each other. To make pairing, you may need to enter the PIN (Personal Identification Number) code of your Bluetooth device you want to connect.
4
Contents
Introduction |
|
Introduction ................................ |
3 |
Warnings........................................................... |
3 |
Precautions........................................................ |
3 |
About Bluetooth................................................ |
4 |
General information .......................................... |
4 |
Getting Started............................ |
6 |
Installation ........................................................ |
6 |
Connecting to the receiver................................. |
8 |
Check the type of your receiver.......................... |
9 |
Menu structures ............................................. |
10 |
Bluetooth Audio |
|
Bluetooth Audio Operations........ |
29 |
Selecting a source........................................... |
29 |
Playback operations..................................... |
29 |
Settings |
|
Other Settings ........................... |
30 |
Basic procedure .............................................. |
30 |
Setting items .............................................. |
31 |
Connection |
|
Bluetooth Connection ................ |
12 |
Selecting a Source .......................................... |
12 |
Registering a Bluetooth device — Pairing ..... |
12 |
Connecting/Disconnecting the device ............ |
17 |
Bluetooth Phone |
|
Bluetooth Phone Operations....... |
19 |
Selecting a Source .......................................... |
19 |
Receiving a call............................................... |
19 |
Calling a number in the phone book............... |
20 |
Advanced Operations.................. |
21 |
Calling by voice command.............................. |
21 |
Calling a number from the call history............ |
22 |
Calling the last call number directly |
|
— Redial.................................................. |
23 |
Answering a waiting call ................................ |
23 |
Using preset numbers..................................... |
24 |
Calling by entering a phone number .............. |
25 |
Receiving an SMS (Short Message Service)/ |
|
Text Message............................................. |
27 |
Reading an SMS/Text Message ....................... |
27 |
Others |
|
Troubleshooting......................... |
32 |
Specifications ............................ |
33 |
Introduction 5
ENGLISH
Getting Started
Installation
Warning
Avoid installing the adapter unit and the microphone unit in the following places.
–Where they would hinder your safety driving.
–Where they would be exposed to direct sunlight or heat directly from the heater or placed in an extremely hot place.
–Where they would be subject to rain, water splashes or excessive humidity.
–Where they would be subject to dust.
–Where they would be positioned on an unstable place.
–Where they could damage the car’s fittings.
–Where radio wave interferes (EX.: trunk, etc.).
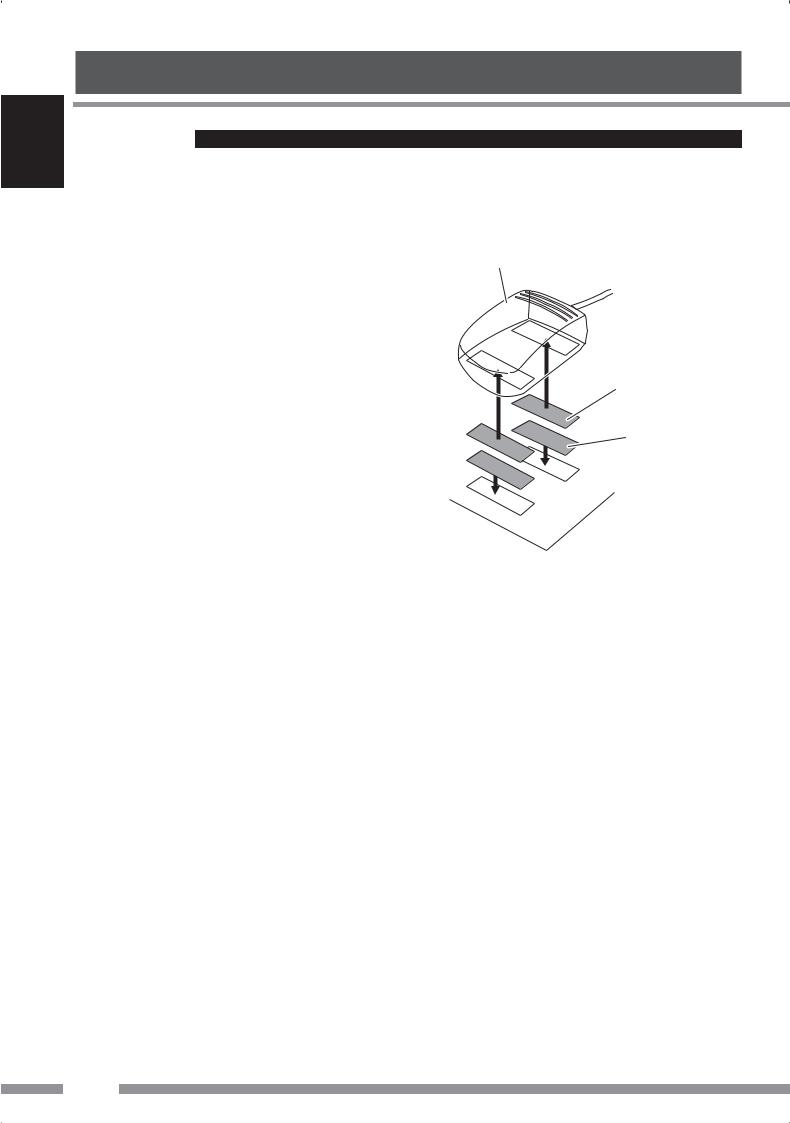
Mounting the adapter unit
Wipe clean the selected surface sufficiently, and affix the Velcro tape.
Interface adapter unit
Velcro tape (hard) (supplied)
Velcro tape (soft) (supplied)
•If the Velcro tape (hard) adheres to the car mat directly, you may install this unit without using the Velcro tape (soft).
•The serial number is printed on the label placed on the bottom of the unit. Do not cover up the label with the velcro tape.
6
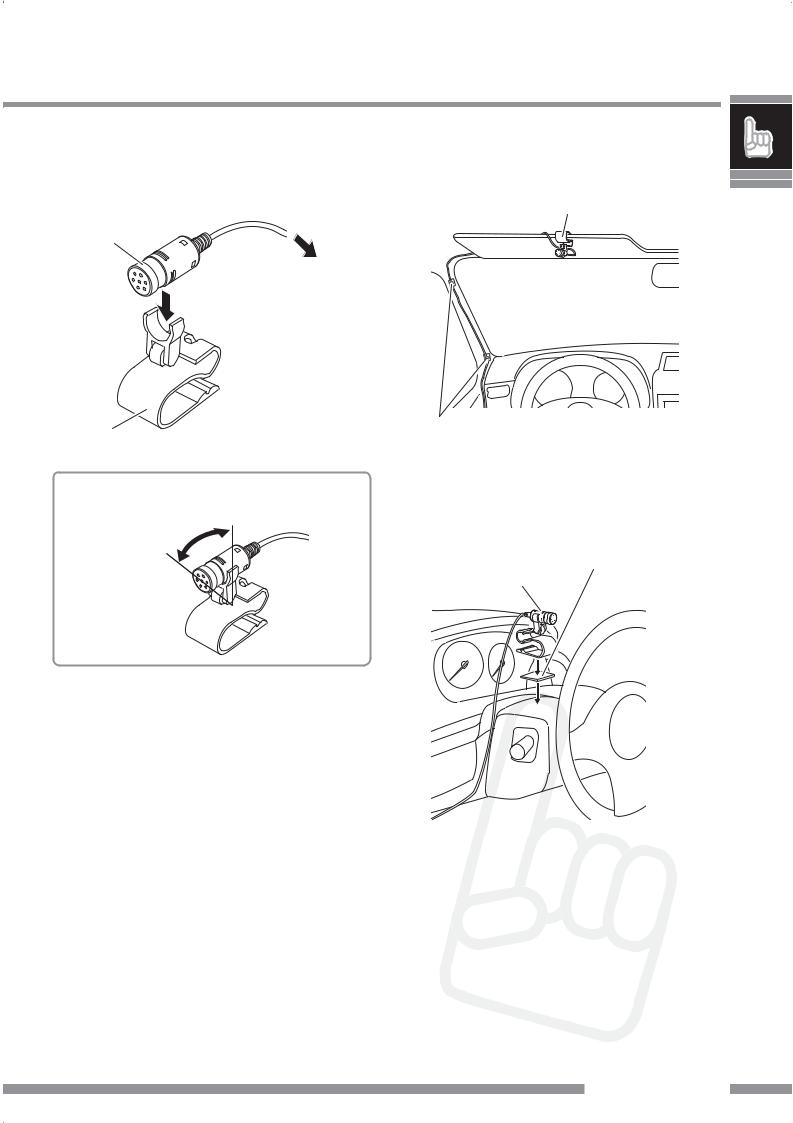
Installing the microphone unit |
2 Install the microphone unit. |
1 Attach the microphone to the |
To install on the sun visor |
microphone clip. |
Microphone unit (supplied) |
|
|
Microphone |
|
(supplied) |
|
To Interface |
|
adapter unit |
|
Microphone clip |
Secure the microphone cord using cord |
|
clamps (not supplied) if necessary. |
||
(supplied) |
||
|
To adjust the microphone angle
To install on the steering column
Install the microphone unit on the top side of the steering column.
microphone unit (supplied) |
Double-sided adhesive |
tape (supplied) |
Introduction 7
ENGLISH
Getting Started
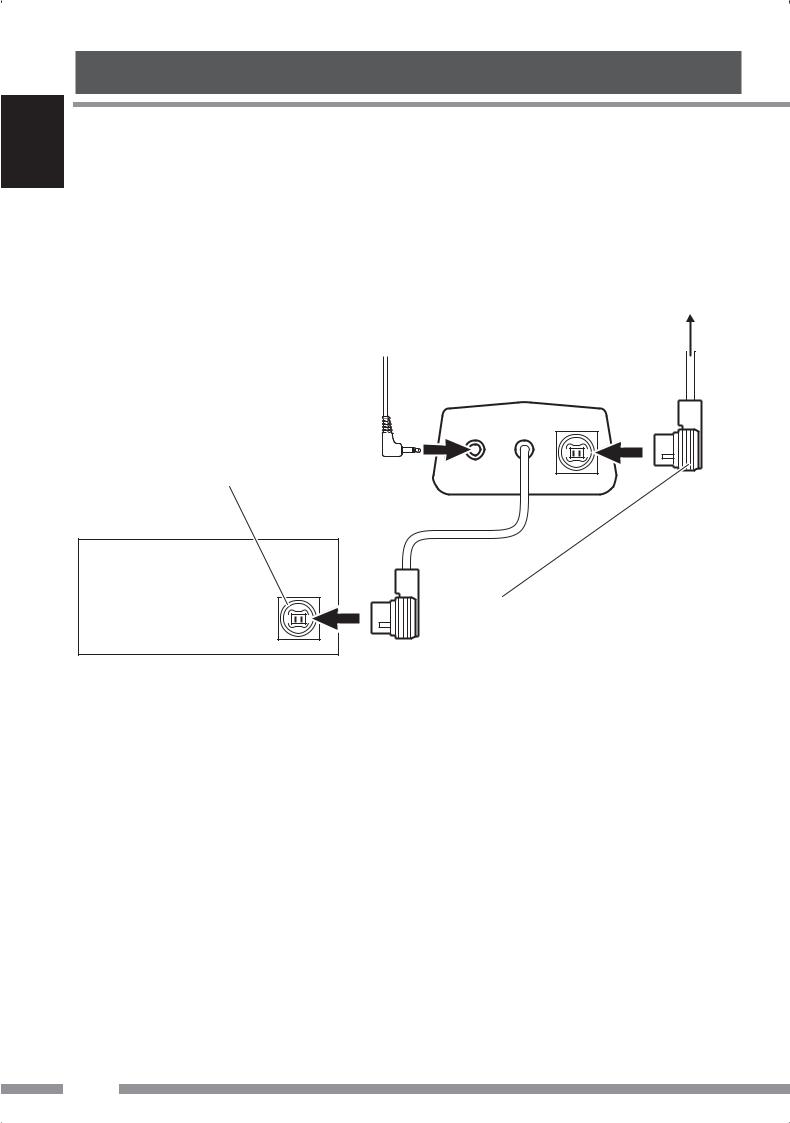
Connecting to the receiver 
Typical connection
Turn off the power to the receiver and turn off the vehicle’s ignition switch before connecting or disconnecting the unit.
To other external component (see below)
From microphone unit
Interface adapter unit
CD Changer jack
Receiver
Signal cord
(supplied for or attached to the external component)
•You can connect the following external components to this adapter;
-CD Changer
-SIRIUS Satellite radio
-XM Satellite radio
-DAB tuner
-Interface adapter for iPod
-D.player interface adapter
-Line Input Adapter
-Aux Input Adapter
•See also the installation manual supplied with your receiver.
8
Checking the type of your receiver 

Operating procedures through a receiver are different depending on the type of the receiver.
Check the type of your receiver by the chart below.
•If your answer is “Yes,” follow .
.
•If your answer is “No,” follow .
.
Is your receiver KD-NX5000? |
Type A |
|
Is your receiver equipped with the |
Type B |
|
built-in monitor? |
||
|
||
|
Example: type of the receiver
Type A
Type B
Is your receiver equipped with the 3 Dimensional Liquid Crystal Display?
Type C |
|
Type C |
|
|
|
|
|
|
Type D |
|
Type D |
|
|
|
• Menu operations are different depending on the type of your receiver.
For details, see also the instructions supplied with your receiver.
Introduction 9

ENGLISH
Getting Started
Menu structures 
Indication language
In this manual, English indications are used for purpose of explanation. You can change the indication language to other than English for some receivers. Refer to the instruction manual supplied with your receiver.
Bluetooth Phone
Dial / Dial Menu / DIAL *1 |
Select the method to make a call. |
|
|
Redial / REDIAL *2 |
Select a phone number from the list of the phone |
|
|
numbers you have dialed. page 22. |
|
Received Calls / RECEIVE *2 |
Select a phone number from the list of the received |
|
|
calls. page 22. |
|
Phonebook / PH BOOK *2 |
Select a name, then phone number from the phone |
|
|
book of the connected cellular phone. page 20. |
|
Missed Calls / MISSED *2 |
Select a phone number from the list of the missed calls. |
|
|
page 22. |
|
Phone number / NUMBER |
Enter the phone number. page 25. |
|
Voice / Voice Dialing / |
You can call by voice command. page 21. |
|
VOICE *3 |
|
Message *1, 2, 4 |
You can read a message from the following message histories. |
|
|
Unread |
Messages you have not read. page 27. |
|
Read |
Messages you have read. page 27. |
|
Unsent |
Messages you have not sent. page 27. |
|
Sent |
Messages you have sent. page 27. |
Open / OPEN *5 |
Make the unit ready to establish a new Bluetooth connection. Select this when |
|
|
establishing a Bluetooth connection with a device for the first time, from the |
|
|
device. page 12. |
|
Search / SEARCH *5 |
Make the unit ready to establish a new Bluetooth connection. Select this when |
|
|
establishing a Bluetooth connection with a device for the first time, from the unit. |
|
|
The unit searches for available new devices. page 14. |
|
Special Device / SPECIAL *5 |
Shows the list of Bluetooth devices which require some special procedure to establish |
|
|
Bluetooth connection. Select a device you want to connect. page 15. |
|
Connection / Connect / |
After selecting a device from among the registered devices, establish the connection |
|
CONNECT *6 |
with it. page 17. |
|
Disconnection / Disconnect |
Disconnect the current device before connecting another device. page 18. |
|
/ DISCNNCT *1 |
|
|
Delete Pair / DELETE *6 |
Delete the registered devices. page 16. |
|
10
 Loading...