


|
ENGLISH |
|
ESPAÑOL |
|
NEDERLANDS |
|
PORTUGUÊS |
|
DEUTSCH |
|
FRANÇAIS |
KD-X372BT / KD-X272BT |
ITALIANO |
РУCCKИЙ |
|
|
|
DIGITAL MEDIA RECEIVER
Quick Start Guide
RECEPTOR DE MEDIOS DIGITALES
Guía de inicio rápido
DIGITALE MEDIAONTVANGER
Snelstartgids
RECEPTOR MÉDIA DIGITAL
Guia de Início Rápido
DIGITAL-MEDIA-RECEIVER
Schnellstartanleitung
RÉCEPTEUR MULTIMÉDIA NUMÉRIQUE
Guide de démarrage rapide
RICEVITORE MULTIMEDIALE DIGITALE
Guida di avvio rapido
ЦИФРОВОЙ МЕДИА-РЕСИВЕР
Краткое руководство по началу работы
For detailed operations and information, refer to the INSTRUCTION MANUAL on the following website:
Para obtener más información y detalles sobre las operaciones, consulte el MANUAL DE INSTRUCCIONES en el siguiente sitio web:
Raadpleeg de GEBRUIKSAANWIJZING op de volgende website voor gedetailleerde informatie over de bediening:
Para as operações e informações detalhadas, consulte o MANUAL DE INSTRUÇÕES no website abaixo:
Für detaillierte Bedienungen und Informationen siehe BEDIENUNGSANLEITUNG auf der folgenden Website:
Pour les opérations et les informations détaillées, reportez-vous au MANUEL D’INSTRUCTIONS sur le site web suivant.
Per le operazioni e le informazioni dettagliate, fare riferimento al ISTRUZIONI PER L’USO nel seguente sito web:
За подробными инструкциями по управлению и информацией обращайтесь к ИHCTPУKЦИИ ПO ЭKCПЛУATAЦИИ на следующем веб-сайте:
<http://www.jvc.net/cs/car/>
B5K-0664-20 [E]

Information on Disposal of Old Electrical and Electronic Equipment and Batteries (applicable for countries that have adopted separate waste collection systems)
Products and batteries with the symbol (crossed-out wheeled bin) cannot be disposed as household waste. Old electrical and electronic equipment and batteries should be recycled at a facility capable of handling these items and their waste byproducts.
Contact your local authority for details in locating a recycle facility nearest to you. Proper recycling and waste disposal will help conserve resources whilst preventing detrimental effects on our health and the environment.
Notice: The sign “Pb” below the symbol for batteries indicates that this battery contains lead.
Información acerca de la eliminación de equipos eléctricos, electrónicos y baterías al final de la vida útil (aplicable a los países que hayan adoptado sistemas independientes de recogida de residuos)
Los productos y las baterías con el símbolo de un contenedor con ruedas tachado no podrán ser desechados como residuos domésticos.
Los equipos eléctricos, electrónicos y baterías al final de la vida útil, deberán ser reciclados en instalaciones que puedan dar el tratamiento adecuado a estos productos y a sus subproductos residuales correspondientes.
Póngase en contacto con su administración local para obtener información sobre el punto de recogida más cercano. Un tratamiento correcto del reciclaje y la eliminación de residuos ayuda a conservar los recursos y evita al mismo tiempo efectos perjudiciales en la salud y el medio ambiente.
Nota: El símbolo “Pb” debajo del (contenedor con ruedas tachado) en baterías indica que dicha batería contiene plomo.
Informatie over het weggooien van elektrische en elektronische apparatuur en batterijen (particulieren)
Dit symbool geeft aan dat gebruikte elektrische, elektronische producten en batterijen niet bij het normale huishoudelijke afval mogen.
Lever deze producten in bij de aangewezen inzamelingspunten, waar ze gratis worden geaccepteerd en op de juiste manier worden verwerkt, teruggewonnen en hergebruikt.
Voor inleveradressen zie www.nvmp.nl, www.ictmilieu.nl, www.stibat.nl. Wanneer u dit product op de juiste manier als afval inlevert, spaart u waardevolle hulpbronnen en voorkomt u potentiële negatieve gevolgen voor de volksgezondheid en het milieu, die anders kunnen ontstaan door een onjuiste verwerking van afval.
Opgelet: Het teken “Pb” onder het teken van de batterijen geeft aan dat deze batterij lood bevat.
Informação sobre a forma de deitar fora Velho Equipamento Eléctrico, Electrónico e baterias (aplicável nos países que adotaram sistemas de recolha de lixos separados)
Produtos e baterias com o símbolo (caixote do lixo com um X) não podem ser deitados fora junto com o lixo doméstico.
Equipamentos velhos eléctricos, electrónicos e baterias deverão ser reciclados num local capaz de o fazer bem assim como os seus subprodutos.
Contacte as autoridades locais para se informar de um local de reciclagem próximo de si. Reciclagem e tratamento de lixo correctos ajudam a poupar recursos e previnem efeitos prejudiciais na nossa saúde e no ambiente.
Note: o símbolo “Pb” abaixo do símbolo em baterias indica que esta bateria contém chumbo.
Entsorgung von gebrauchten elektrischen und elektronischen Geräten und Batterien (anzuwenden in Ländern mit einem separaten Sammelsystem für solche Geräte)
Das Symbol (durchgestrichene Mülltonne) auf dem Produkt oder seiner Verpackung weist darauf hin, dass dieses Produkt nicht als normaler Haushaltsabfall behandelt werden darf, sondern an einer Annahmestelle für das Recycling von elektrischen und elektronischen Geräten und batterien abgegeben werden muss.
Durch Ihren Beitrag zur korrekten Entsorgung dieses Produktes schützen Sie die Umwelt und die Gesundheit Ihrer Mitmenschen.
Unsachgemässe oder falsche Entsorgung gefährden Umwelt und Gesundheit. Weitere Informationen über das Recycling dieses Produktes erhalten Sie von Ihrer Gemeinde oder den kommunalen Entsorgungsbetrieben.
Achtung: Das Zeichen „Pb“ unter dem Symbol fur Batterien zeigt an, dass diese Batterie Blei enthalt.
i
Information sur l’élimination des anciens équipements électriques et électroniques et piles électriques (applicable dans les pays qui ont adopté des systèmes de collecte sélective)
Les produits et piles électriques sur lesquels le pictogramme (poubelle barrée) est apposé ne peuvent pas être éliminés comme ordures ménagères.
Les anciens équipements électriques et électroniques et piles électriques doivent être recyclés sur des sites capables de traiter ces produits et leurs déchets.
Contactez vos autorités locales pour connaître le site de recyclage le plus proche. Un recyclage adapté et l’élimination des déchets aideront à conserver les ressources et à nous préserver des leurs effets nocifs sur notre santé et sur l’environnement.
Remarque: Le symbole “Pb“ ci-dessous sur des piles électrique indique que cette pile contient du plomb.
Informazioni sullo smaltimento delle vecchie apparecchiature elettriche ed elettroniche e delle batterie (valide per i paesi che hanno adottato sistemi di raccolta differenziata)
I prodotti e le batterie recanti il simbolo di un cassonetto della spazzatura su ruote barrato non possono essere smaltiti insieme ai normali rifiuti di casa.
I vecchi prodotti elettrici ed elettronici e le batterie devono essere riciclati presso un'apposita struttura in grado di trattare questi prodotti e di smaltirne i loro componenti.
Per conoscere dove e come recapitare tali prodotti nel luogo a voi più vicino, contattare l'apposito ufficio comunale. Un appropriato riciclo e smaltimento aiuta a conservare la natura e a prevenire effetti nocivi alla salute e all'ambiente.
Nota: Il simbolo “Pb” sotto al simbolo delle batterie indica che questa batteria contiene piombo.
Дата изготовления (месяц/год) находится на этикетке устройства.
В соответствии с Законом Российской Федерации “О защите прав потребителей” срок службы (годности) данного товара “по истечении которого он может представлять опасность для жизни, здоровья потребителя, причинять вред его имуществу или окружающей среде” составляет семь (7) лет со дня производства.
Дополнительные косметические материалы к данному товару, поставляемые вместе с ним, могут храниться в течение двух (2) лет со дня его производства.
Срок службы (годности), кроме срока хранения дополнительных косметических материалов, упомянутых в предыдущих двух пунктах, не затрагивает никаких других прав потребителя, в частности, гарантийного обслуживания JVC, которое он может получить в соответствии с законом о правах потребителя или других законов, связанных с ним.
Условия хранения:
Температура: |
от –30°C до +85°C |
Влажность: |
от 0% до 90% |
|
|
For Israel |
|
ii

SOFTWARE LICENSE AGREEMENT
The software embedded in the Product (hereinafter the "Licensed Software") provided by Licensor is copyrighted to or sublicensable by the Licensor, and this Agreement provides for the terms and conditions which Users shall follow in order to use the Licensed Software.
The User shall use the Licensed Software by agreeing with the terms of this Software License Agreement. This Agreement shall be deemed completed at the time the User (hereinafter the "User") initially used the Product in which the "Licensed Software" is embedded.
The Licensed Software may include the software which has been licensed to the Licensor directly or indirectly from any third party. In such case, some third parties require the Users to follow their conditions for use separately from this Software License Agreement. Such software shall not be subject to this Agreement, and the Users are urged to read the "Important Notice concerning the Software" to be provided separately below.
Article 1 |
General Provision |
The Licensor shall grant to the User a non-exclusive and non-transferable (other than the exceptional case referred to in Article 3, Paragraph 1) licensed to use the Licensed Software within the country of the User. (the country where the User bought the Product (hereinafter the "Country")
Article 2 |
License |
1.The license granted under this Agreement shall be the right to use the Licensed Software in the Product.
2.The User shall not duplicate, copy, modify, add, translate or otherwise alter, or lease the Licensed Software and any related documents, whether in whole or in part.
3.The use of the Licensed Software shall be limited to personal purpose, and the Licensed Software shall not be distributed, licensed or sub-licensed whether it is for commercial purpose or not.
4.The User shall use the Licensed Software according to the directions described in the operation manual or help file, and is prohibited to use or duplicate any data in a manner violating the Copyright Law or any other laws and regulations by applying whole or a part of the Licensed Software.
Article 3 |
Conditions for Grant of License |
1.When the User transfers the Product, it may also transfer the license to use the Licensed Software embedded in the Product (including any related materials, updates and upgrades) on condition that no original, copies or related materials continue in the possession of the User, and that the User shall cause the transferee to comply with this Software License Agreement.
2.The User shall not carry out reverse engineering, disassembling, decompiling or any other code analysis works in connection with the Licensed Software.
Article 4 Right pertaining to the Licensed Software
Any and all copyrights and other rights pertaining to the Licensed Software and related documents shall belong to the Licensor or the original holder of the right who granted to the Licensor the license or sublicense for the Licensed Software (hereinafter the "Original Rightholder"), and the User shall not be
entitled to any right other than the license granted hereunder, in respect of the Licensed Software and any related documents.
Article 5 Indemnification of Licensor
1.Neither the Licensor nor the Original Rightholder shall be liable for any damage incurred by the User or any third party due to the exercise of the license granted to the User under this Agreement, unless otherwise restricted by law.
2.The Licensor will offer no guarantee for the merchantability, convertibility and consistency with certain objective of the Licensed Software.
Article 6 |
Liability to Third Party |
If any dispute has arisen with any third party due to an infringement upon a copyright, patent or any other intellectual property right that was caused by the User's use of the Licensed Software, the User shall settle such dispute at its own cost and hold the Licensor and the Original Rightholder harmless from any inconvenience it may cause.
Article 7 |
Confidentiality |
The User shall keep the confidentiality of such portion of the Licensed Software, related documents thereof or any other information to be granted under this Agreement, as well as the conditions of this Agreement as has not yet entered the public domain, and shall not disclose or divulge the same to any third party without approval of the Licensor.
Article 8 |
Termination |
In case the User falls under any of the events described in the following items, the Licensor may immediately terminate this Agreement or claim that the User compensates for the damage incurred by the Licensor due to such event:
(1)when the User violated any provision of this Agreement; or
(2)when a petition has been filed against the User for an attachment, provisional attachment, provisional disposition or any other compulsory execution.
iii
Article 9 Destruction of the Licensed Software
If this Agreement is terminated pursuant to the provision of Article 8, the User shall destroy the Licensed Software, any related documents and copies thereof within two (2) weeks from such date of termination.
Article 10 Protection of Copyright
1.The copyright and all the other intellectual property rights relating to the Licensed Software shall belong to the Licensor and the Original Rightholder, and in no event shall they be under the ownership of the User.
2.The User shall, whenever it uses the Licensed Software, comply with any laws relating to the copyright and other intellectual property rights.
Article 11 Export Restriction
1.It is prohibited to export the Licensed Software and any related documents outside the country of the User (including transmission thereof outside the country of the User via Internet of other communication tools).
2.The User shall understand that the Licensed Software shall be subject to the export restrictions adopted by the country of User and any other countries.
3.The User shall agree that the software will be subject to any and all applicable international and domestic laws (including the export control regulation of the country of User and any other countries, and any restrictions concerning the end-users, the use by end-users and importing countries to be provided by the country of User and any other countries, and any other governmental authorities).
Article 12 |
Miscellaneous |
1.In the event any part of this Agreement is invalidated by operation of law, the residual provisions shall continue in force.
2.Matters not stipulated in this Agreement or any ambiguity or question raised in the construction of this Agreement shall be provided or settled upon good-faith consultation between the Licensor and the User.
3.The Licensor and the User hereby agree that this Agreement is governed by the laws of Japan, and any dispute arising from, and relating to the rights and obligations under, this Agreement shall be submitted to the exclusive jurisdiction of the Tokyo District Court for its first instance.
Important Notice concerning the Software
-jansson
Copyright (c) 2009-2012 Petri Lehtinen <petri@digip.org>
Permission is hereby granted, free of charge, to any person obtaining a copy of this software and associated documentation files (the "Software"), to deal in the Software without restriction, including without limitation the rights to use, copy, modify, merge, publish, distribute, sublicense, and/or sell copies of the Software, and to permit persons to whom the Software is furnished to do so, subject to the following conditions:
The above copyright notice and this permission notice shall be included in all copies or substantial portions of the Software.
THE SOFTWARE IS PROVIDED "AS IS", WITHOUT WARRANTY OF ANY KIND, EXPRESS OR IMPLIED, INCLUDING BUT NOT LIMITED TO THE WARRANTIES OF MERCHANTABILITY, FITNESS FOR A PARTICULAR PURPOSE
AND NONINFRINGEMENT. IN NO EVENT SHALL THE AUTHORS OR COPYRIGHT HOLDERS BE LIABLE FOR ANY CLAIM, DAMAGES OR OTHER LIABILITY, WHETHER IN AN ACTION OF CONTRACT, TORT OR OTHERWISE, ARISING FROM, OUT OF OR IN CONNECTION WITH THE SOFTWARE OR THE USE OR OTHER DEALINGS IN THE SOFTWARE.
-cJSON
Copyright (c) 2009 Dave Gamble
Permission is hereby granted, free of charge, to any person obtaining a copy of this software and associated documentation files (the "Software"), to deal in the Software without restriction, including without limitation the rights to use, copy, modify, merge, publish, distribute, sublicense, and/or sell copies of the Software, and to permit persons to whom the Software is furnished to do so, subject to the following conditions:
The above copyright notice and this permission notice shall be included in all copies or substantial portions of the Software.
THE SOFTWARE IS PROVIDED "AS IS", WITHOUT WARRANTY OF ANY KIND, EXPRESS OR IMPLIED, INCLUDING BUT NOT LIMITED TO THE WARRANTIES OF MERCHANTABILITY, FITNESS FOR A PARTICULAR PURPOSE
AND NONINFRINGEMENT. IN NO EVENT SHALL THE AUTHORS OR COPYRIGHT HOLDERS BE LIABLE FOR ANY CLAIM, DAMAGES OR OTHER LIABILITY, WHETHER IN AN ACTION OF CONTRACT, TORT OR OTHERWISE, ARISING FROM, OUT OF OR IN CONNECTION WITH THE SOFTWARE OR THE USE OR OTHER DEALINGS IN THE SOFTWARE.
iv

-CMP
The MIT License (MIT)
Copyright (c) 2014 Charles Gunyon
Permission is hereby granted, free of charge, to any person obtaining a copy of this software and associated documentation files (the "Software"), to deal in the Software without restriction, including without limitation the rights to use, copy, modify, merge, publish, distribute, sublicense, and/or sell copies of the Software, and to permit persons to whom the Software is furnished to do so, subject to the following conditions:
The above copyright notice and this permission notice shall be included in all copies or substantial portions of the Software.
THE SOFTWARE IS PROVIDED "AS IS", WITHOUT WARRANTY OF ANY KIND, EXPRESS OR IMPLIED, INCLUDING BUT NOT LIMITED TO THE WARRANTIES OF MERCHANTABILITY, FITNESS FOR A PARTICULAR PURPOSE
AND NONINFRINGEMENT. IN NO EVENT SHALL THE AUTHORS OR COPYRIGHT HOLDERS BE LIABLE FOR ANY CLAIM, DAMAGES OR OTHER LIABILITY, WHETHER IN AN ACTION OF CONTRACT, TORT OR OTHERWISE, ARISING FROM, OUT OF OR IN CONNECTION WITH THE SOFTWARE OR THE USE OR OTHER DEALINGS IN THE SOFTWARE.
nanopb
Copyright (c) 2011 Petteri Aimonen <jpa at nanopb.mail.kapsi.fi>
This software is provided 'as-is', without any express or implied warranty. In no event will the authors be held liable for any damages arising from the use of this software.
Permission is granted to anyone to use this software for any purpose, including commercial applications, and to alter it and redistribute it freely, subject to the following restrictions:
1.The origin of this software must not be misrepresented; you must not claim that you wrote the original software. If you use this software in a product, an acknowledgment in the product documentation would be appreciated but is not required.
2.Altered source versions must be plainly marked as such, and must not be misrepresented as being the original software.
3.This notice may not be removed or altered from any source distribution.
sha2
AUTHOR: Aaron D. Gifford - http://www.aarongifford.com/
Copyright (c) 2000-2001, Aaron D. Gifford
All rights reserved.
You may obtain a copy of the license at https://opensource.org/licenses/BSD-3-Clause
THE SOFTWARE IS PROVIDED “AS IS”, WITHOUT WARRANTY OF ANY KIND, EXPRESS OR IMPLIED, INCLUDING BUT NOT LIMITED TO THE WARRANTIES OF MERCHANTABILITY, FITNESS FOR A PARTICULAR PURPOSE
AND NONINFRINGEMENT. IN NO EVENT SHALL THE AUTHORS OR COPYRIGHT HOLDERS BE LIABLE FOR ANY CLAIM, DAMAGES OR OTHER LIABILITY, WHETHER IN AN ACTION OF CONTRACT, TORT OR OTHERWISE, ARISING FROM, OUT OF OR IN CONNECTION WITH THE SOFTWARE OR THE USE OR OTHER DEALINGS IN THE SOFTWARE.
Posix
Copyright (c) 1990, 1993
The Regents of the University of California. All rights reserved.
Redistribution and use in source and binary forms, with or without modification, are permitted provided that the following conditions are met:
1.Redistributions of source code must retain the above copyright notice, this list of conditions and the following disclaimer.
2.Redistributions in binary form must reproduce the above copyright notice, this list of conditions and the following disclaimer in the documentation and/or other materials provided with the distribution.
3.All advertising materials mentioning features or use of this software must display the following acknowledgement:
This product includes software developed by the University of California, Berkeley and its contributors.
4.Neither the name of the University nor the names of its contributors may be used to endorse or promote products derived from this software without specific prior written permission.
Copyright (C) 1993 by Sun Microsystems, Inc. All rights reserved.
Developed at SunPro, a Sun Microsystems, Inc. business.
Permission to use, copy, modify, and distribute this software is freely granted, provided that this notice is preserved.
Copyright (C) 1991-2, RSA Data Security, Inc. Created 1991. All rights reserved.
License to copy and use this software is granted provided that it is identified as the “RSA Data Security, Inc. MD4 Message-Digest Algorithm” in all material mentioning or referencing this software or this function.
v

Copyright (c) 1995, 1996 Carnegie-Mellon University. All rights reserved.
Author: Chris G. Demetriou
Permission to use, copy, modify and distribute this software and its documentation is hereby granted, provided that both the copyright notice and this permission notice appear in all copies of the software, derivative works or modified versions, and any portions thereof, and that both notices appear in supporting documentation.
CARNEGIE MELLON ALLOWS FREE USE OF THIS SOFTWARE IN ITS “AS IS” CONDITION. CARNEGIE MELLON DISCLAIMS ANY LIABILITY OF ANY KIND FOR ANY DAMAGES WHATSOEVER RESULTING FROM THE USE OF THIS SOFTWARE.
Carnegie Mellon requests users of this software to return to
Software Distribution Coordinator or Software.Distribution@
CS.CMU.EDU
School of Computer Science
Carnegie Mellon University
Pittsburgh PA 15213-3890
any improvements or extensions that they make and grant Carnegie the rights to redistribute these changes.
License is also granted to make and use derivative works provided that such works are identified as “derived from the RSA Data Security, Inc. MD4 Message-Digest Algorithm” in all material mentioning or referencing the derived work.
RSA Data Security, Inc. makes no representations concerning either the merchantability of this software or the suitability of this software for any particular purpose. It is provided “as is” without express or implied warranty of any kind.
Copyright (c) 1993 Martin Birgmeier
All rights reserved.
You may redistribute unmodified or modified versions of this source code provided that the above copyright notice and this and the following conditions are retained.
This software is provided “as is”, and comes with no warranties of any kind. I shall in no event be liable for anything that happens to anyone/anything when using this software.
These notices must be retained in any copies of any part of this documentation and/or software.
T-Kernel 2.0
This product uses the source code of T-Kernel 2.0 under T-License 2.0 granted by T-Engine Forum (www.tron.org)
BSD-3-Clause
Copyright (c) 2000-2001, Aaron D. Gifford All rights reserved.
You may obtain a copy of the license at https://opensource.org/licenses/BSD-3-Clause
THE SOFTWARE IS PROVIDED “AS IS”, WITHOUT WARRANTY OF ANY KIND, EXPRESS OR IMPLIED, INCLUDING BUT NOT LIMITED TO THE WARRANTIES OF MERCHANTABILITY, FITNESS FOR A PARTICULAR PURPOSE AND NONINFRINGEMENT. IN NO EVENT SHALL THE AUTHORS OR COPYRIGHT HOLDERS BE LIABLE FOR ANY CLAIM, DAMAGES OR OTHER LIABILITY, WHETHER IN AN ACTION OF CONTRACT, TORT OR OTHERWISE, ARISING FROM, OUT OF OR IN CONNECTION WITH THE SOFTWARE OR THE USE OR OTHER DEALINGS IN THE SOFTWARE.
LFS Subsystem
Copyright The Regents of the University of California. All rights reserved.
You may obtain a copy of the license at https://directory.fsf.org/wiki/License:BSD-4-Clause
THE SOFTWARE IS PROVIDED “AS IS”, WITHOUT WARRANTY OF ANY KIND, EXPRESS OR IMPLIED, INCLUDING BUT NOT LIMITED TO THE WARRANTIES OF MERCHANTABILITY, FITNESS FOR A PARTICULAR PURPOSE AND NONINFRINGEMENT. IN NO EVENT SHALL THE AUTHORS OR COPYRIGHT HOLDERS BE LIABLE FOR ANY CLAIM, DAMAGES OR OTHER LIABILITY, WHETHER IN AN ACTION OF CONTRACT, TORT OR OTHERWISE, ARISING FROM, OUT OF OR IN CONNECTION WITH THE SOFTWARE OR THE USE OR OTHER DEALINGS IN THE SOFTWARE.
Accordo2 Player
Apache License
Licensed under the Apache License,
Version 2.0, January 2004(the “License”);
You may obtain a copy of the license at
http://www.apache.org/licenses/LICENSE-2.0
THE SOFTWARE IS PROVIDED “AS IS”, WITHOUT WARRANTY OF ANY KIND, EXPRESS OR IMPLIED, INCLUDING BUT NOT LIMITED TO THE WARRANTIES OF MERCHANTABILITY, FITNESS FOR A PARTICULAR PURPOSE AND NONINFRINGEMENT. IN NO EVENT SHALL THE AUTHORS OR COPYRIGHT HOLDERS BE LIABLE FOR ANY CLAIM, DAMAGES OR OTHER LIABILITY, WHETHER IN AN ACTION OF CONTRACT, TORT OR OTHERWISE, ARISING FROM, OUT OF OR IN CONNECTION WITH THE SOFTWARE OR THE USE OR OTHER DEALINGS IN THE SOFTWARE.
vi

Declaration of Conformity with regard to the RE Directive 2014/53/EU Declaration of Conformity with regard to the RoHS Directive 2011/65/EU
Manufacturer:
JVCKENWOOD Corporation
3-12, Moriya-cho, Kanagawa-ku, Yokohama-shi, Kanagawa, 221-0022, JAPAN
EU Representative:
JVCKENWOOD Europe B.V.
Amsterdamseweg 37, 1422 AC UITHOORN, THE NETHERLANDS
Declaración de conformidad con respecto a la Directiva RE 2014/53/EU Declaración de conformidad con respecto a la Directiva RoHS 2011/65/EU
Fabricante:
JVCKENWOOD Corporation
3-12, Moriya-cho, Kanagawa-ku, Yokohama-shi, Kanagawa, 221-0022, JAPAN
Representante en la UE:
JVCKENWOOD Europe B.V.
Amsterdamseweg 37, 1422 AC UITHOORN, THE NETHERLANDS
Conformiteitsverklaring met betrekking tot de RE-richtlijn van de Europese Unie (2014/53/EU) Conformiteitsverklaring met betrekking tot de RoHS richtlijn van de Europese Unie (2011/65/EU)
Fabrikant:
JVCKENWOOD Corporation
3-12, Moriya-cho, Kanagawa-ku, Yokohama-shi, Kanagawa, 221-0022, JAPAN
EU-vertegenwoordiger:
JVCKENWOOD Europe B.V.
Amsterdamseweg 37, 1422 AC UITHOORN, THE NETHERLANDS
Declaração de conformidade relativa à Directiva RE 2014/53/EU
Declaração de conformidade relativa à Directiva RoHS 2011/65/EU
Fabricante:
JVCKENWOOD Corporation
3-12, Moriya-cho, Kanagawa-ku, Yokohama-shi, Kanagawa, 221-0022, JAPAN
Representante na UE:
JVCKENWOOD Europe B.V.
Amsterdamseweg 37, 1422 AC UITHOORN, THE NETHERLANDS
Konformitätserklärung in Bezug auf die RE-Vorschrift 2014/53/EU Konformitätserklärung in Bezug auf die RoHS-Vorschrift 2011/65/EU
Hersteller:
JVCKENWOOD Corporation
3-12, Moriya-cho, Kanagawa-ku, Yokohama-shi, Kanagawa, 221-0022, JAPAN
EU-Vertreter:
JVCKENWOOD Europe B.V.
Amsterdamseweg 37, 1422 AC UITHOORN, THE NETHERLANDS
Déclaration de conformité se rapportant à la directive RE 2014/53/EU Déclaration de conformité se rapportant à la directive RoHS 2011/65/EU
Fabricant:
JVCKENWOOD Corporation
3-12, Moriya-cho, Kanagawa-ku, Yokohama-shi, Kanagawa, 221-0022, JAPAN
Représentants dans l’UE:
JVCKENWOOD Europe B.V.
Amsterdamseweg 37, 1422 AC UITHOORN, THE NETHERLANDS
Dichiarazione di conformità alla Direttiva RE 2014/53/EU Dichiarazione di conformità relativa alla direttiva RoHS 2011/65/EU
Produttore:
JVCKENWOOD Corporation
3-12, Moriya-cho, Kanagawa-ku, Yokohama-shi, Kanagawa, 221-0022, JAPAN
Rappresentante UE:
JVCKENWOOD Europe B.V.
Amsterdamseweg 37, 1422 AC UITHOORN, THE NETHERLANDS
Декларация соответствия относительно Директивы RE 2014/53/EU Декларация соответствия относительно Директивы RoHS 2011/65/EU
Производитель:
JVCKENWOOD Corporation
3-12, Moriya-cho, Kanagawa-ku, Yokohama-shi, Kanagawa, 221-0022, JAPAN
Представительство в ЕС:
JVCKENWOOD Europe B.V.
Amsterdamseweg 37, 1422 AC UITHOORN, THE NETHERLANDS
vii

English
Hereby, JVCKENWOOD declares that the radio equipment “KD-X372BT/KD-X272BT” is in compliance with Directive 2014/53/EU.
The full text of the EU declaration of conformity is available at the following internet address: http://www.jvc.net/cs/car/eudoc/
Français
Par la présente, JVCKENWOOD déclare que l’équipement radio « KD-X372BT/KD-X272BT » est conforme à la directive 2014/53/UE.
L’intégralité de la déclaration de conformité UE est disponible à l’adresse Internet suivante : http://www.jvc.net/cs/car/eudoc/
Deutsch
Hiermit erklärt JVCKENWOOD, dass das Funkgerät “KD-X372BT/KD-X272BT” der Richtlinie 2014/53/EU entspricht.
Der volle Text der EU-Konformitätserklärung steht unter der folgenden Internetadresse zur Verfügung: http://www.jvc.net/cs/car/eudoc/
Nederlands
Hierbij verklaart JVCKENWOOD dat de radioapparatuur “KD-X372BT/KD-X272BT” in overeenstemming is met Richtlijn 2014/53/EU. De volledige tekst van de EU-verklaring van overeenstemming is te vinden op het volgende internetadres: http://www.jvc.net/cs/car/eudoc/
Italiano
Con la presente, JVCKENWOOD dichiara che l΄apparecchio radio “KD-X372BT/KD-X272BT” è conforme alla Direttiva 2014/53/UE.
Il testo integrale della dichiarazione di conformità UE è disponibile al seguente indirizzo internet: http://www.jvc.net/cs/car/eudoc/
Español
Por la presente, JVCKENWOOD declara que el equipo de radio “KD-X372BT/KD-X272BT” cumple la Directiva 2014/53/EU.
El texto completo de la declaración de conformidad con la UE está disponible en la siguiente dirección de internet: http://www.jvc.net/cs/car/eudoc/
Português
Deste modo, a JVCKENWOOD declara que o equipamento de rádio “KD-X372BT/KD-X272BT” está em conformidade com a Diretiva 2014/53/UE. O texto integral da declaração de conformidade da UE está disponível no seguinte endereço de internet:
http://www.jvc.net/cs/car/eudoc/
Polska
Niniejszym, JVCKENWOOD deklaruje, że sprzęt radiowy “KD-X372BT/KD-X272BT” jest zgodny z dyrektywą 2014/53/UE.
Pełny tekst deklaracji zgodności EU jest dostępny pod adresem: http://www.jvc.net/cs/car/eudoc/
Český
Společnost JVCKENWOOD tímto prohlašuje, že rádiové zařízení “KD-X372BT/KD-X272BT” splňuje podmínky směrnice 2014/53/EU.
Plný text EU prohlášení o shodě je dostupný na následující internetové adrese: http://www.jvc.net/cs/car/eudoc/
Magyar
JVCKENWOOD ezennel kijelenti, hogy a „KD-X372BT/KD-X272BT“ rádióberendezés megfelel a 2014/53/EU irányelvnek.
Az EU konformitási nyilatkozat teljes szövege az alábbi weboldalon érhető el: http://www.jvc.net/cs/car/eudoc/
Svenska
Härmed försäkrar JVCKENWOOD att radioutrustningen “KD-X372BT/KD-X272BT” är i enlighet med direktiv 2014/53/EU.
Den fullständiga texten av EU-försäkran om överensstämmelse finns på följande Internetadress : http://www.jvc.net/cs/car/eudoc/
Suomi
JVCKENWOOD julistaa täten, että radiolaite “KD-X372BT/KD-X272BT” on direktiivin 2014/53/EU mukainen. EU-vaatimustenmukaisuusvakuutusvaatimus löytyy kokonaisuudessaan seuraavasta internetosoitteesta:
http://www.jvc.net/cs/car/eudoc/
Slovensko
S tem JVCKENWOOD izjavlja, da je radijska oprema »KD-X372BT/KD-X272BT« v skladu z Direktivo 2014/53/EU.
Celotno besedilo direktive EU o skladnosti je dostopno na tem spletnem naslovu: http://www.jvc.net/cs/car/eudoc/
Slovensky
Spoločnosť JVCKENWOOD týmto vyhlasuje, že rádiové zariadenie „KD-X372BT/KD-X272BT“ vyhovuje smernici 2014/53/EÚ.
Celý text EÚ vyhlásenia o zhode nájdete na nasledovnej internetovej adrese: http://www.jvc.net/cs/car/eudoc/
Dansk
Herved erklærer JVCKENWOOD, at radioudstyret “KD-X372BT/KD-X272BT” er i overensstemmelse med Direktiv 2014/53/EU.
EU-overensstemmelseserklæringens fulde ordlyd er tilgængelig på følgende internetadresse: http://www.jvc.net/cs/car/eudoc/
Ελληνικά
Με το παρόν, η JVCKENWOOD δηλώνει ότι ο ραδιοεξοπλισμός «KD-X372BT/KD-X272BT» συμμορφώνεται με την Οδηγία 2014/53/ΕΕ.
Το πλήρες κείμενο της δήλωσης συμμόρφωσης της ΕΕ είναι διαθέσιμο στην ακόλουθη διεύθυνση στο διαδίκτυο: http://www.jvc.net/cs/car/eudoc/
viii

Eesti
Käesolevaga JVCKENWOOD kinnitab, et „KD-X372BT/KD-X272BT“ raadiovarustus on vastavuses direktiiviga 2014/53/EL.
ELi vastavusdeklaratsiooni terviktekst on kättesaadav järgmisel internetiaadressil: http://www.jvc.net/cs/car/eudoc/
Latviešu
JVCKENWOOD ar šo deklarē, ka radio aparatūra „KD-X372BT/KD-X272BT” atbilst direktīvas 2014/53/ES prasībām.
Pilns ES atbilstības deklarācijas teksts ir pieejams šādā tīmekļa adresē: http://www.jvc.net/cs/car/eudoc/
Lietuviškai
Šiuo JVCKENWOOD pažymi, kad radijo įranga „KD-X372BT/KD-X272BT“ atitinka 2014/53/EB direktyvos reikalavimus.
Visą EB direktyvos atitikties deklaracijos tekstą galite rasti šiuo internetiniu adresu: http://www.jvc.net/cs/car/eudoc/
Malti
B’dan, JVCKENWOOD jiddikjara li t-tagħmir tarradju “KD-X372BT/KD-X272BT” huwa konformi mad-Direttiva 2014/53/UE.
It-test kollu tad-dikjarazzjoni ta’ konformità huwa disponibbli fl-indirizz intranet li ġej: http://www.jvc.net/cs/car/eudoc/
HRVATSKI / SRPSKI JEZIK
JVCKENWOOD ovim izjavljuje da je radio oprema “KD-X372BT/KD-X272BT” u skladu s Direktivom 2014/53/EU.
Cjeloviti tekst deklaracije Europske unije o usklađenosti dostupan je na sljedećoj internet adresi:
http://www.jvc.net/cs/car/eudoc/
ROMÂNĂ
Prin prezenta, JVCKENWOOD declară că echipamentul radio “KD-X372BT/KD-X272BT” este în conformitate cu Directiva 2014/53/UE.
Textul integral al declarației de conformitate UE este disponibil la urmatoarea adresă de internet: http://www.jvc.net/cs/car/eudoc/
БЪЛГАРСКИ
С настоящото JVCKENWOOD декларира, че радиооборудването на “KD-X372BT/KD-X272BT” е в съответствие с Директива 2014/53/ЕС. Пълният текст на ЕС декларацията за съответствие е достъпен на следния интернет адрес:
http://www.jvc.net/cs/car/eudoc/
Turkish
Burada, JVCKENWOOD “KD-X372BT/KD-X272BT” radyo ekipmanının 2014/53/AB Direktifine uygun olduğunu bildirir.
AB uyumluluk deklarasyonunun tam metni aşağıdaki internet adresinde mevcuttur. http://www.jvc.net/cs/car/eudoc/
Русский
JVCKENWOOD настоящим заявляет, что радиооборудование «KD-X372BT/KD-X272BT» соответствует Директиве 2014/53/EU. Полный текст декларации соответствия ЕС доступен по следующему адресу в сети Интернет:
http://www.jvc.net/cs/car/eudoc/
Українська
Таким чином, компанія JVCKENWOOD заявляє, що радіообладнання «KD-X372BT/KD-X272BT» відповідає Директиві 2014/53/EU.
Повний текст декларації про відповідність ЄС можна знайти в Інтернеті за такою адресою: http://www.jvc.net/cs/car/eudoc/
ix
x
INSTALLATION/CONNECTION
This section is for the professional installer.
For safety’s sake, leave wiring and mounting to professionals. Consult the car audio dealer.
 Warning
•The unit can only be used with a 12 V DC power supply, negative ground.
•Disconnect the battery’s negative terminal before wiring and mounting.
•Do not connect Battery wire (yellow) and Ignition wire (red) to the car chassis or Ground wire (black) to prevent a short circuit.
•To prevent short circuit:
–Insulate unconnected wires with vinyl tape.
–Be sure to ground this unit to the car’s chassis again after installation.
–Secure the wires with cable clamps and wrap vinyl tape around the wires that comes into contact with metal parts to protect the wires.
 Caution
•Install this unit in the console of your vehicle. Do not touch the metal parts of this unit during and shortly after use of the unit. Metal parts such as the heat sink and enclosure become hot.
•Do not connect the  wires of speakers to the car chassis or Ground wire (black), or connect them in parallel.
•Connect speakers with a maximum power of more than 50 W. If the maximum power of the speakers is lower than 50 W, change the [AMP GAIN] setting to avoid damaging the speakers.
•Mount the unit at an angle of less than 30º.
•If your vehicle wiring harness does not have the ignition terminal, connect Ignition wire (red) to the terminal on the vehicle’s fuse box which provides 12 V DC power supply and is turned on and off by the ignition key.
•Keep all cables away from heat dissipate metal parts.
•After the unit is installed, check whether the brake lamps, blinkers, wipers, etc. on the car are working properly.
•If the fuse blows, first make sure the wires are not touching car’s chassis, then replace the old fuse with one that has the same rating.
 Basic procedure
1Remove the key from the ignition switch, then disconnect the terminal of the car battery.
2 Connect the wires properly. See “Wiring connection” on page 3.
3Install the unit to your car. See “Installing the unit (in-dash mounting)”.
4 Connect the terminal of the car battery.
5 Press BSRC to turn on the power.
6Detach the faceplate and reset the unit within 5 seconds. See “How to reset” on page 4.
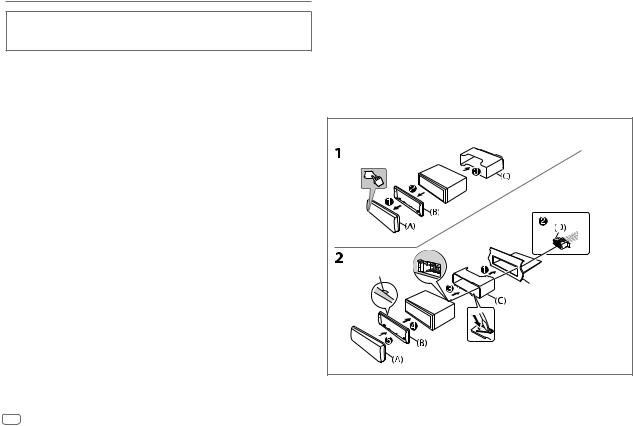
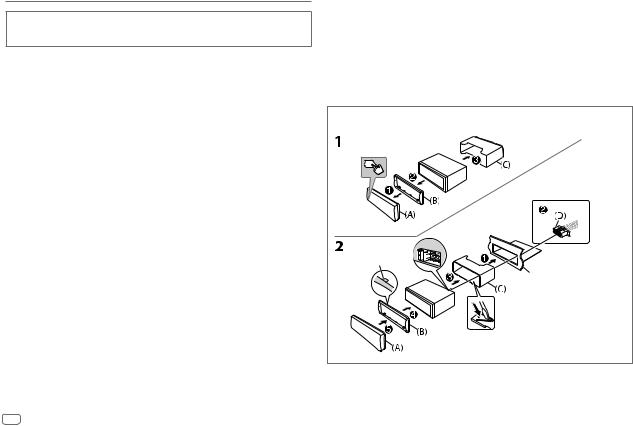
Installing the unit (in-dash mounting)
Hook on the top side
Dashboard of your car
Dashboard
Bend the appropriate tabs to hold the sleeve firmly in place.
2

Installing the unit (without mounting sleeve)
1 Remove the mounting sleeve and trim plate from the unit.
2Align the holes in the unit (on both sides) with the vehicle mounting bracket and secure the unit with screws (commercially available).
 Use only the specified screws. Using wrong screws might damage the unit.
Removing the unit
 Part list (supplied)
(A)Faceplate (×1)
(B)Trimplate (×1)
(C)Mounting sleeve (×1)
(D)Wiring harness (×1)
(E)Extraction key (×2)
Wiring connection
|
|
Antenna terminal |
|
|
Fuse (10 A) |
|
|
|
|
a Light blue/yellow: To the |
|
|
|
steering wheel remote control |
|
|
|
adapter |
|
|
|
b Yellow: Battery wire |
|
|
|
c Yellow: A4 |
|
|
|
d Red: Ignition wire |
|
|
|
e Red: A7 |
|
|
ISO connectors |
|
|
Pin |
|
Color and function |
|
A4 |
Yellow |
: Battery |
|
A5 |
Blue/White |
: Power control (12 V |
350 mA) |
A6 |
Orange/white |
: Car light control switch |
|
A7 |
Red |
: Ignition (ACC) |
|
A8 |
Black |
: Earth (ground) connection |
|
B1, B2 Purple ], Purple/black [ |
: Rear speaker (right) |
|
|
B3, B4 Gray ], Gray/black [ |
: Front speaker (right) |
|
|
B5, B6 White ], White/black [ |
: Front speaker (left) |
|
|
B7, B8 Green ], Green/black [ |
: Rear speaker (left) |
|
|
3
BEFORE USE |
|
BASICS |
IMPORTANT
•To ensure proper use, please read through this Guide before using this product. It is especially important that you read and observe Warnings and Cautions in this Guide.
•Please keep the Guide in a safe and accessible place for future reference.
 Warning
Do not operate any function that takes your attention away from safe driving.
 Caution
Volume setting:
•Adjust the volume so that you can hear sounds outside the car to prevent accidents.
•Lower the volume before playing digital sources to avoid damaging the speakers by the sudden increase of the output level.
General:
•Avoid using the external device if it might hinder safe driving.
•Make sure all important data has been backed up. We shall bear no responsibility for any loss of recorded data.
•Never put or leave any metallic objects (such as coins or metal tools) inside the unit to prevent a short circuit.
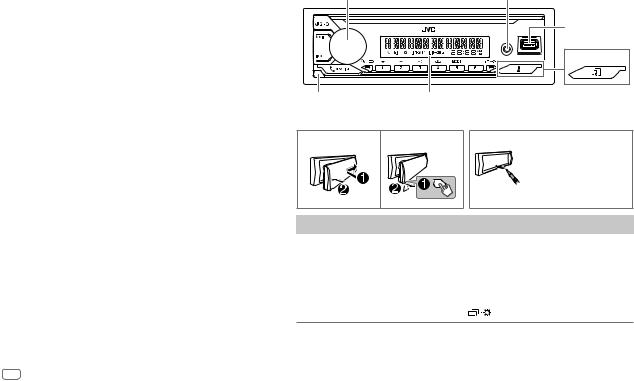
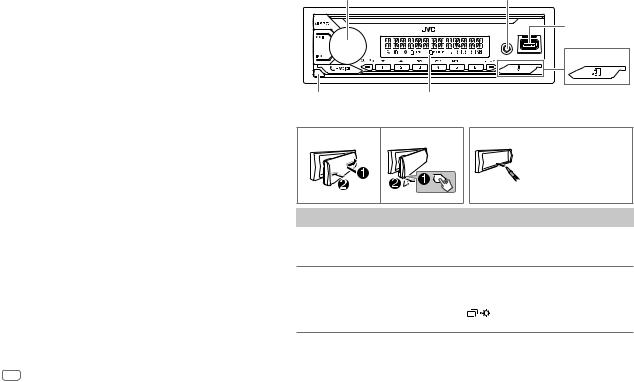
Faceplate
Volume knob |
Auxiliary input jack |
|
USB input |
|
terminal |
|
KD-X272BT: |
Detach button |
Display window*1 |
*1 Only for illustration purpose.
Attach |
Detach |
How to reset |
Reset the unit within 5 seconds after detaching the faceplate.
To |
On the faceplate |
|
Turn on the power |
Press BSRC. |
|
|
• Press and hold to turn off the power. |
|
|
|
|
Adjust the volume |
Turn the volume knob. |
|
|
|
|
Select a source |
Press BSRC repeatedly. |
|
|
|
|
Change the display information*2 |
Press |
repeatedly. |
*2 One of the display information supports Music Synchronization Effect. The brightness level of the buttons changes and synchronizes with the music level.
4
GETTING STARTED
1 Cancel the demonstration
When you turn on the power for the first time (or [FACTORY RESET] is set to [YES]), the display shows: “CANCEL DEMO”  “PRESS”
  “VOLUME KNOB”
1Press the volume knob.
[YES] is selected for the initial setup.
2Press the volume knob again.
“DEMO OFF” appears.
2 Set the clock and date
1 Press and hold
 .
.
2 Turn the volume knob to select [CLOCK], then press the knob.
To adjust the clock
3 Turn the volume knob to select [CLOCK ADJUST], then press the knob.
4Turn the volume knob to make the settings, then press the knob.
Set the time in the order of “Hour”  “Minute”.
5 Turn the volume knob to select [CLOCK FORMAT], then press the knob. 6 Turn the volume knob to select [12H] or [24H], then press the knob.
To set the date
7 Turn the volume knob to select [DATE SET], then press the knob.
8Turn the volume knob to make the settings, then press the knob.
Set the date in the order of “Day”  “Month”
  “Year”.
9 Press
 to exit.
To return to the previous setting item, press
 .
.
3 Set the basic settings
1 Press and hold
 .
.
2Turn the volume knob to select an item (see the following table), then press the knob.
3 Repeat step 2 until the desired item is selected or activated. 4 Press
 to exit.
To return to the previous setting item, press
 .
.
|
Default: [XX] |
|
[SYSTEM] |
|
|
|
|
|
[KEY BEEP] |
(Not applicable when 3-way crossover is selected.) |
|
|
[ON]: Activates the keypress tone. ; [OFF]: Deactivates. |
|
|
|
|
[FACTORY RESET] |
[YES]: Resets the settings to default (except the stored station). ; |
|
|
[NO]: Cancels. |
|
|
|
|
[CLOCK] |
|
|
|
|
|
[CLOCK DISPLAY] |
[ON]: The clock time is shown on the display even when the unit is |
|
|
turned off. ; [OFF]: Cancels. |
|
|
|
|
[ENGLISH] |
|
|
|
|
|
[РУССКИЙ] |
Select the display language for menu and music information if |
|
|
||
[ESPANOL] |
||
applicable. |
||
|
By default, [ENGLISH] is selected. |
|
[FRANCAIS] |
||
|
||
|
|
|
[DEUTSCH]* |
|
|
|
|
* Only for KD-X372BT.
5

RADIO
 Search for a station
1 Press BSRC repeatedly to select FM or AM.
2Press S / T to search for a station automatically.
(or)
Press and hold S / T until “M” flashes, then press repeatedly to search for a station manually.
 Settings in memory
You can store up to 18 stations for FM and 6 stations for AM.
Store a station
While listening to a station....
Press and hold one of the number buttons (1 to 6).
(or)
1 Press and hold the volume knob until “PRESET MODE” flashes.
2Turn the volume knob to select a preset number, then press the knob.
“MEMORY” appears once the station is stored.
Select a stored station
Press one of the number buttons (1 to 6).
(or)
1 Press 
 .
.
2 Turn the volume knob to select a preset number, then press the knob.
USB/iPod
Selectable source:
•KD-X372BT: USB/iPod USB or iPod BT
•KD-X272BT: USB
 Start playback
The source changes automatically and playback starts when you attach a device (USB device/ iPod/iPhone) to the USB input terminal.
To |
On the faceplate |
Reverse/Fast-forward |
Press and hold S / T. |
|
|
Select a file |
Press S / T. |
|
|
Select a folder |
Press 2J / 1K. |
|
|
Repeat play |
Press 4B repeatedly. |
|
|
Random play |
Press 3A repeatedly. |
|
|
6

MENU SETTINGS
1 Press and hold
 to enter menu settings.
2 Turn the volume knob to select an item, then press the knob. 3 Repeat step 2 until the desired item is selected/activated.
4 Press
 to exit.
To return to the previous setting item, press
 .
.
•Refer to the INSTRUCTION MANUAL on the following website for the detailed explanation of each item: <http://www.jvc.net/cs/car/>
•The availability of each item vary depending on the model.
Menu items |
|
|
[EQ SETTING] |
: |
Selects a preset equalizer or adjusts your own sound |
|
|
settings. |
[AUDIO CONTROL] : |
Sets your preferred audio settings. |
|
[SOUND EFFECT] |
: |
Sets your preferred sound effect. |
[DISPLAY] |
: |
Sets your preferred control for the display window. |
[TUNER SETTING] |
: |
Settings for radio source. |
[BT MODE] |
: |
Settings for using a Bluetooth device. |
[REMOTE APP] |
: |
Settings for using smartphone to control this unit. |
[MIC GAIN]*1 |
: |
Sets the sensitivity of the microphone. |
[NR LEVEL]*1 |
: |
Adjusts the noise reduction level. |
[ECHO CANCEL]*1 : |
Adjusts the echo cancellation delay time. |
|
[SYSTEM] |
: |
Settings for this unit. |
[CLOCK] |
: |
Adjusts the clock. |
[ENGLISH] |
: |
Selects language for the menu and music information. |
[ESPANOL] |
: |
Selects language for the menu and music information. |
[FRANCAIS] |
: |
Selects language for the menu and music information. |
[DEUTSCH]*2 |
: |
Selects language for the menu and music information. |
[РУССКИЙ] |
: |
Selects language for the menu and music information. |
[DEMO MODE] |
: |
Activates or deactivates the display demonstration. |
*1 Applicable only while talking on the phone.
*2 Only for KD-X372BT.
Examples of some well-used settings
 Subwoofer Level Setting
1 Press and hold
 to enter menu settings.
2Turn the volume knob clockwise to select [AUDIO CONTROL], then press the knob.
3Turn the volume knob clockwise to select [SUBWOOFER SET], then press the knob.
4 Turn the volume knob clockwise to select [ON], then press the knob.
5Turn the volume knob clockwise to select [SUB.W LEVEL], then press the knob.
6 Press the volume knob if [PRE-OUT] is shown on the display.
7 Turn the volume knob to adjust the subwoofer level, then press the knob.
Continued on the next page...
7

8 Press
 to exit the setting menu.
Note:
You need to set [SPK/PRE OUT] to [REAR/SUB.W] or [SUB.W/SUB.W] before you can make the subwoofer level settings.
OTHER INFORMATION
For playback operations of AUX, Spotify, AMAZON ALEXA sources, refer to the INSTRUCTION MANUAL on the following website: <http://www.jvc.net/ cs/car/>
• The availability of each source vary depending on the model.
Note for specifications
Bluetooth Frequency Range: 2.402 GHz — 2.480 GHz
Bluetooth RF Output Power (E.I.R.P.): +4 dBm (MAX), Power Class 2
Speaker Impedance: 4 Ω — 8 Ω Operating Voltage:
12 V DC car battery
8
BLUETOOTH®
•Depending on the Bluetooth version, operating system and the firmware version of your mobile phone, Bluetooth features may not work with this unit.
•Be sure to turn on the Bluetooth function of the device to make the following operations.
•Signal conditions vary depending on the surroundings.
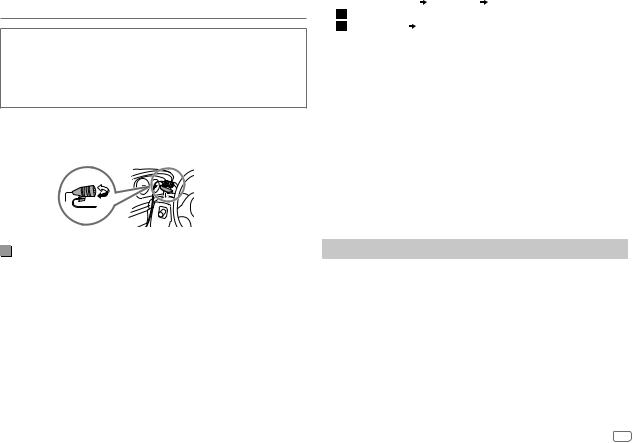
 Connect the microphone
Connect the supplied microphone to the microphone input jack on the rear panel.
Adjust the |
Secure using cord |
microphone |
clamps (not supplied) |
angle |
if necessary. |
Pair and connect a Bluetooth device for the first time
1 Press BSRC to turn on the unit.
2Search and select the name of your receiver (“KD-X372BT”/ “KD-X272BT”) on the Bluetooth device.
3Perform (A) or (B) depending on what appears on the display.
For some Bluetooth devices, pairing sequence may vary from the steps described below.
(A)“[Device Name]”  “XXXXXX”
  “VOL – YES”
  “BACK – NO”
“XXXXXX” is a 6-digit passkey randomly generated during each pairing.  Ensure that the passkeys appear on the unit and Bluetooth device
are the same.
 Press the volume knob to confirm the passkey.
 Operate the Bluetooth device to confirm the passkey.
(B) “[Device Name]” |
“VOL – YES” “BACK – NO” |
|
Press the volume knob to start pairing. |
|
|
• If “PAIRING” |
“PIN 0000” scrolls on the display, enter the PIN code |
|
“0000” into the Bluetooth device.
•If only “PAIRING” appears, operate the Bluetooth device to confirm pairing.
“PAIRING COMPLETED” appears when pairing is completed and “ ” will light up when the Bluetooth connection is established.
 Answer a call
Press 

 or the volume knob.
•To adjust the phone volume [00] to [35], turn the volume knob.
•To end a call, press and hold 

 or the volume knob.
 Audio player via Bluetooth
1Press BSRC repeatedly to select BT AUDIO.
• For KD-X272BT: Pressing enters BT AUDIO directly.
2 Operate the audio player via Bluetooth to start playback.
To |
On the faceplate |
Play back/pause |
Press the volume knob. |
|
|
Select group or folder |
Press 2J / 1K. |
|
|
Reverse skip/Forward skip |
Press S / T. |
|
|
Reverse/Fast-forward |
Press and hold S / T. |
|
|
Repeat play |
Press 4B repeatedly. |
|
|
Random play |
Press 3A repeatedly. |
|
|
9
INSTALACIÓN/CONEXIÓN
Esta sección es para los instaladores profesionales.
Para fines de seguridad, deje que un profesional realice el cableado y el montaje. Consulte con un distribuidor de productos de audio para automóviles.
 Advertencia
•La unidad puede utilizarse solamente con una fuente de alimentación de 12 V CC con negativo a masa.
•Desconecte el terminal negativo de la batería antes de realizar el cableado y el montaje.
•Para evitar un cortocircuito, no conecte el cable de la batería (amarillo) ni el cable de encendido (rojo) al chasis del vehículo o cable de conexión a masa (negro).
•Para evitar cortocircuitos:
–Utilice una cinta de vinilo para aislar los cables no conectados.
–Asegúrese de volver a conectar a masa esta unidad al chasis del automóvil después de la instalación.
–Para proteger los cables, asegúrelos con abrazaderas de cables y con una cinta de vinilo, enrolle los cables que entran en contacto con partes metálicas.
 Precaución
•Instale esta unidad en la consola de su vehículo. No toque las partes metálicas de la unidad durante o un poco después del uso de la unidad. Las partes metálicas, tales como el disipador de calor o la carcasa, pueden estar muy calientes.
•No conecte los cables  de los altavoces al chasis del vehículo, al cable de conexión a masa (negro) o en paralelo.
•Conecte altavoces con una potencia máxima de más de 50 W. Si la potencia máxima de los altavoces es inferior a 50 W, cambie el ajuste [AMP GAIN] para evitar daños en los mismos.
•Monte la unidad a un ángulo de menos de 30˚.
•Si el mazo de conductores de su vehículo no dispone de terminal de encendido, conecte el cable de encendido (rojo) al terminal de la caja de fusibles del vehículo, el cual suministrará una alimentación de 12 V CC y podrá conectarse y desconectarse mediante la llave de encendido.
•Mantenga todos los cables alejados de las partes metálicas disipadoras de calor.
•Después de instalar la unidad, compruebe que las lámparas de freno, las luces intermitentes, el limpiaparabrisas, etc. funcionen satisfactoriamente.
•Si se funde el fusible, en primer lugar asegúrese de que los cables no estén en contacto con el chasis del vehículo y, a continuación, reemplace el fusible usado por otro del mismo régimen.
 Procedimiento básico
1Quite la llave del interruptor de encendido; después, desconecte el terminal de la batería del automóvil.
2Conecte los cables correctamente. Consulte “Conexión del cableado” en la página 3.
3Instale la unidad en su automóvil. Consulte “Instalación de la unidad (montaje en el tablero)”.
4 Conecte el terminal de la batería del automóvil. 5 Pulse BSRC para encender la unidad.
6Extraiga la placa frontal y reinicialice la unidad en menos de 5 segundos. Consulte “Cómo reinicializar” en la página 4.
Instalación de la unidad (montaje en el tablero)
Gancho en el lado superior
Salpicadero del automóvil
Salpicadero
Doble las lengüetas apropiadas para retener firmemente la manga en su lugar.
2
Instalación de la unidad (sin manguito de montaje)
1 Retire de la unidad, el manguito de montaje y la placa embellecedora.
2Alinee los orificios de la unidad (en ambos lados) con la ménsula de montaje del vehículo y asegure la unidad con los tornillos (disponibles en el mercado).
 Utilice solo los tornillos especificados. El uso de tornillos incorrectos puede dañar la unidad.
Desmontaje de la unidad
 Lista de piezas (suministradas)
(A)Placa frontal (×1)
(B)Placa embellecedora (×1)
(C)Manguito de montaje (×1)
(D)Mazo de conductores (×1)
(E)Herramienta de extracción (×2)
Conexión del cableado
Terminal de la antena
Fusible (10 A)
a Luz azul/amarilla: Al adaptador del mando a distancia del volante de la dirección
b Amarillo: Cable de la batería c Amarillo: A4
d Rojo: Cable de encendido e Rojo: A7
Conectores ISO
Patilla |
|
Color y función |
|
|
A4 |
Amarillo |
: Batería |
|
|
A5 |
Azul/blanco |
: Control de alimentación (12 V |
|
350 mA) |
|
||||
A6 |
Naranja/blanco |
: Interruptor de control de las luces del automóvil |
||
A7 |
Rojo |
: Encendido (ACC) |
|
|
A8 |
Negro |
: Conexión a tierra (masa) |
|
|
B1, B2 |
Púrpura ], Púrpura/negro [ |
: Altavoz trasero (derecho) |
|
|
B3, B4 |
Gris ], Gris/negro [ |
: Altavoz delantero (derecho) |
|
|
B5, B6 |
Blanco ], Blanco/negro [ |
: Altavoz delantero (izquierdo) |
|
|
B7, B8 |
Verde ], Verde/negro [ |
: Altavoz trasero (izquierdo) |
|
|
3
ANTES DEL USO |
|
PUNTOS BÁSICOS |
IMPORTANTE
•Antes de utilizar este producto y para asegurar su uso correcto, lea esta guía por completo. En especial, lea y observe las Advertencias y Precauciones incluidas en esta guía.
•Guarde la guía en un lugar seguro y accesible para futuras consultas.
 Advertencia
No utilice ninguna función que pueda desviar su atención mientras está conduciendo el vehículo.
 Precaución
Ajuste del volumen:
•Ajuste el volumen a un nivel que le permita oír los ruidos del exterior para impedir accidentes.
•Antes de reproducir fuentes digitales, baje el volumen para evitar que el repentino aumento del nivel de salida cause daños a los altavoces.
General:
•Evite el uso de dispositivos externos cuando puedan afectar la seguridad de conducción.
•Asegúrese de tener una copia de respaldo de todos los datos importantes. No aceptamos responsabilidad alguna por la pérdida de los datos grabados.
•Para evitar cortocircuitos, nunca coloque ni deje objetos metálicos (por ejemplo, monedas o herramientas metálicas) dentro de la unidad.
Placa frontal
Rueda de volumen |
Toma de entrada auxiliar |
|
Terminal de |
|
entrada USB |
|
KD-X272BT: |
Botón de liberación |
Ventanilla de visualización*1 |
*1 Solo para fines ilustrativos.
Fijar |
Desmontar |
Cómo reinicializar |
Reinicialice la unidad en menos de 5 segundos después de haber extraído la placa frontal.
Para
Encender la unidad
En la placa frontal
Pulse BSRC.
•Pulse y mantenga pulsado para apagar la unidad.
Ajustar el volumen |
Gire la rueda de volumen. |
|
Seleccionar una fuente |
Pulse BSRC repetidamente. |
|
|
|
|
Cambiar la información en |
Pulse |
repetidamente. |
pantalla*2 |
|
|
*2 Una de las informaciones en pantalla admite el Efecto de sincronización de música. El nivel de brillo de los botones cambia y se sincroniza con el nivel de música.
4
PROCEDIMIENTOS INICIALES
1 Cancele la demostración
Cuando enciende la unidad por primera vez (o [FACTORY RESET] está ajustado a [YES]), en la pantalla se muestra: “CANCEL DEMO”  “PRESS”
  “VOLUME KNOB”
1Pulse la rueda de volumen.
Se selecciona [YES] para la configuración inicial.
2Pulse de nuevo la rueda de volumen.
Aparece “DEMO OFF”.
2 Ajuste del reloj y la fecha
1 Pulse y mantenga pulsado
 .
.
2Gire la rueda de volumen para seleccionar [CLOCK] y, a continuación, pulse la rueda.
Para ajustar el reloj
3Gire la rueda de volumen para seleccionar [CLOCK ADJUST] y, a continuación, pulse la rueda.
4Gire la rueda de volumen para realizar los ajustes y, a continuación, pulse la rueda.
Ajuste la hora en el orden de “Hora”  “Minutos”.
5Gire la rueda de volumen para seleccionar [CLOCK FORMAT] y, a continuación, pulse la rueda.
6Gire la rueda de volumen para seleccionar [12H] o [24H] y, a continuación, pulse la rueda.
Para ajustar la fecha
7Gire la rueda de volumen para seleccionar [DATE SET] y, a continuación, pulse la rueda.
8Gire la rueda de volumen para realizar los ajustes y, a continuación, pulse la rueda.
Ajuste la fecha en el orden de “Día”  “Mes”
“Mes”  “Año”.
9 Pulse
 para salir.
Para volver al elemento de ajuste anterior, pulse
 .
.
3 |
Realice los ajustes básicos |
|
|
|
|||
1 |
Pulse y mantenga pulsado |
. |
|
2Gire la rueda de volumen para seleccionar un elemento (consulte la siguiente tabla) y, a continuación, pulse la rueda.
3 Repita el paso 2 hasta que se seleccione o active el elemento deseado. 4 Pulse
 para salir.
Para volver al elemento de ajuste anterior, pulse
 .
.
|
Predeterminado: [XX] |
|
[SYSTEM] |
|
|
|
|
|
[KEY BEEP] |
(No aplicable si se ha seleccionado crossover de 3 vías.) |
|
|
[ON]: Activa el tono de pulsación de teclas. ; [OFF]: Se desactiva. |
|
|
|
|
[FACTORY RESET] |
[YES]: Se restablecen los ajustes predeterminados (excepto la emisora |
|
|
memorizada). ; [NO]: Se cancela. |
|
|
|
|
[CLOCK] |
|
|
|
|
|
[CLOCK DISPLAY] |
[ON]: La hora del reloj siempre se visualiza en la pantalla cuando la unidad |
|
|
está apagada. ; [OFF]: Se cancela. |
|
|
|
|
[ENGLISH] |
|
|
|
|
|
[РУССКИЙ] |
Seleccione el idioma de visualización para el menú y la información de la |
|
|
||
[ESPANOL] |
||
música, si corresponde. |
||
|
Por defecto, se selecciona [ENGLISH]. |
|
[FRANCAIS] |
||
|
||
|
|
|
[DEUTSCH]* |
|
|
|
|
* Solo para KD-X372BT.
5
 Loading...