


CASSETTE RECEIVER
KS-FX12/KS-FX12WT
ENGLISH
RECEPTOR-REPRODUCTOR DE |
|
CASSETTE |
KS-FX12/KS-FX12WT |
RADIOCASSETTE |
|
|
|
|
|
|
|
|
|
|
|
|
|
|
|
KS-FX12/KS-FX12WT |
||||||||||||||||||||||||||||
|
|
|
|
|
|
|
|
|
|
|
|
|
|
|
|
|
|
|
|
|
|
|
|
|
|
|
|
|
|
|
|
|
|
|
|
|
|
|
|
|
|
|
|
|
|
|
|
|
|
|
|
|
|
|
|
|
|
|
|
|
|
|
|
|
|
|
|
|
|
|
|
|
|
|
|
|
|
|
|
|
|
|
|
|
|
|
|
|
|
|
|
|
|
|
|
|
|
|
|
|
|
|
|
|
|
|
|
|
|
|
|
|
|
|
|
|
|
|
|
|
|
|
|
|
|
|
|
|
|
|
|
|
|
|
|
|
|
|
|
|
|
|
|
|
|
|
|
|
|
|
|
|
|
|
|
|
|
|
|
|
|
|
|
|
|
|
|
|
|
|
|
|
|
|
|
|
|
|
|
|
|
|
|
|
|
|
|
|
|
|
|
|
|
|
|
|
|
|
|
|
|
|
|
|
|
|
|
|
|
|
|
|
|
|
|
|
|
|
|
|
|
|
|
|
|
|
|
|
|
|
|
|
|
|
|
|
|
|
|
|
|
|
|
|
|
|
|
|
|
|
|
|
|
|
|
|
|
|
|
|
|
|
|
|
|
|
|
|
|
|
|
|
|
|
|
|
|
|
|
|
|
|
|
|
|
|
|
|
|
|
|
|
|
|
|
|
|
|
|
|
|
|
|
|
|
|
|
|
|
|
|
|
|
|
|
|
|
|
|
|
|
|
|
|
|
|
|
|
|
|
|
|
|
|
|
|
|
|
|
|
|
|
|
|
|
|
|
|
|
|
|
|
|
|
|
|
|
|
|
|
|
|
|
|
|
|
|
|
|
|
|
|
|
|
|
|
|
|
|
|
|
|
|
|
|
|
|
|
|
|
|
|
|
|
|
|
|
|
|
|
|
|
|
|
|
|
|
|
|
|
|
|
|
|
|
|
|
|
|
|
|
|
|
|
|
|
|
|
|
|
|
|
|
|
|
|
|
|
|
|
|
|
|
|
|
|
|
|
|
FRANÇAIS ESPAÑOL
For installation and connections, refer to the separate manual. Para la instalación y las conexiones, refiérase al manual separado. Pour l’installation et les raccordements, se référer au manuel séparé.
INSTRUCTIONS
MANUAL DE INSTRUCCIONES MANUEL D’INSTRUCTIONS
For customer Use:
Enter below the Model No. and Serial No. which are located on the top or bottom of the cabinet. Retain this information for future reference.
Model No.
Serial No.
FSUN3098-631 [J]

ENGLISH
Thank you for purchasing a JVC product. Please read all instructions carefully before operation, to ensure your complete understanding and to obtain the best possible performance from the unit.
CONTENTS |
|
BASIC OPERATIONS .................................................... |
3 |
RADIO OPERATIONS................................................... |
4 |
Listening to the radio ..................................................................... |
4 |
Storing stations in memory ............................................................ |
5 |
FM station automatic preset: SSM ............................................... |
5 |
Manual preset .............................................................................. |
6 |
Tuning into a preset station ........................................................... |
7 |
Other convenient tuner functions ................................................. |
8 |
Scanning broadcast stations ....................................................... |
8 |
Selecting FM reception sound ..................................................... |
8 |
Changing the AM/FM channel intervals ....................................... |
8 |
TAPE OPERATIONS ..................................................... |
9 |
Listening to a tape .......................................................................... |
9 |
SOUND ADJUSTMENTS ............................................. |
10 |
Turning on/off the loudness function .......................................... |
10 |
Selecting preset sound modes ...................................................... |
10 |
Adjusting the sound ...................................................................... |
11 |
Storing your own sound adjustments ......................................... |
12 |
OTHER MAIN FUNCTIONS ......................................... |
13 |
Setting the clock ............................................................................ |
13 |
Detaching the control panel ......................................................... |
14 |
CD CHANGER OPERATIONS ...................................... |
15 |
Playing CDs ................................................................................... |
15 |
Selecting CD playback modes ..................................................... |
17 |
MAINTENANCE ........................................................ |
18 |
To extend the lifetime of the unit ................................................. |
18 |
How to reset your unit .................................................................. |
18 |
TROUBLESHOOTING ................................................. |
19 |
SPECIFICATIONS ....................................................... |
20 |
BEFORE USE
* For safety....
•Do not raise the volume level too much, as this will block outside sounds, making driving dangerous.
•Stop the car before performing any complicated operations.
* Temperature inside the car....
If you have parked the car for a long time in hot or cold weather, wait until the temperature in the car becomes normal before operating the unit.
2

BASIC OPERATIONS 

1
2
Note:
When you use this unit for the
first time, set the built-in
clock correctly, see page 13.
3
1
/I/ATT |
Turn on the power. |
|
Notes on One-Touch Operation:
•When you select tuner as a source in step 2 below, the power automatically comes on. You do not have to press this button to turn on the power.
•If the cassette is already in the cassette compartment, tape play starts automatically.
2
F M
A M
CD-CH
Play the source.
To operate the tuner, see pages 4 – 8. To operate the tape deck, see page 9.
To operate the CD changer, see pages 15 – 17.
3
Adjust the volume.
Volume level appears.
4
Adjust the sound as you want (see pages 10 – 12).
To drop the volume in a moment
Press 


 briefly while listening to any source. “ATT” starts flashing on the display, and the volume level will drop in a moment.
To resume the previous volume level, press the button briefly again.
To turn off the power
Press 


 for more than 1 second.
ENGLISH
3
ENGLISH

 RADIO OPERATIONS
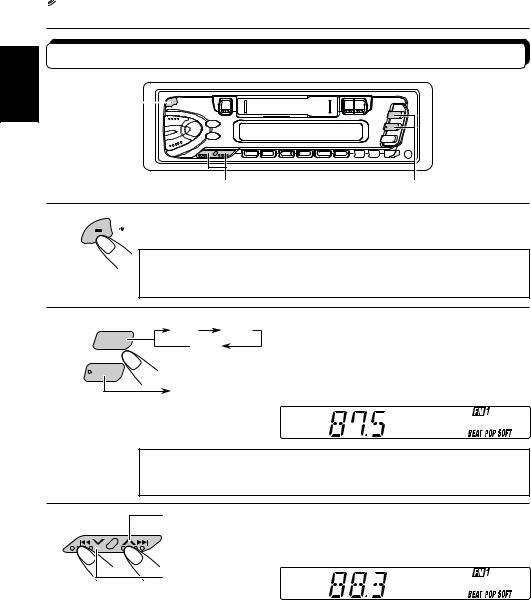
Listening to the radio
1 |
|
3 |
2 |
1 |
/I/ATT |
Turn on the power. |
|
|
Note on One-Touch Operation:
When you select a band in step 2 below, the power automatically comes on. You do not have to press this button to turn on the power.
2 |
F M |
FM1 |
FM2 |
|
FM3 |
|
|
|
|
|
|
|
A M |
|
|
|
|
AM |
|
Select the band (FM1, FM2, FM3 or AM).
You can select any one of FM1, FM2, and FM3 to listen to an FM station.
Note:
When a cassette is in the cassette compartment, you cannot select the tuner. Be sure to eject the cassette from the cassette compartment to listen to the radio.
3 |
To search stations |
|
|
|
|
|
of higher |
Start searching a station. |
|
frequencies. |
When a station is received, searching stops. |
|
|
To search stations of lower frequencies.
To stop searching before a station is received, press the same button you have pressed for searching.
To tune in a particular frequency manually:
1 Press FM or AM to select the band.
2 Press and hold  T or S
 until “M” starts flashing on the display. Now you can manually change the frequency while “M” is flashing.
3 Press  T or S
 repeatedly until the frequency you want is reached.
• If you hold down the button, the frequency keeps changing until you release the button.
4
Storing stations in memory
You can use one of the following two methods to store broadcasting stations in memory.
•Automatic preset of FM stations: SSM (Strong-station Sequential Memory)
•Manual preset of both FM and AM stations.
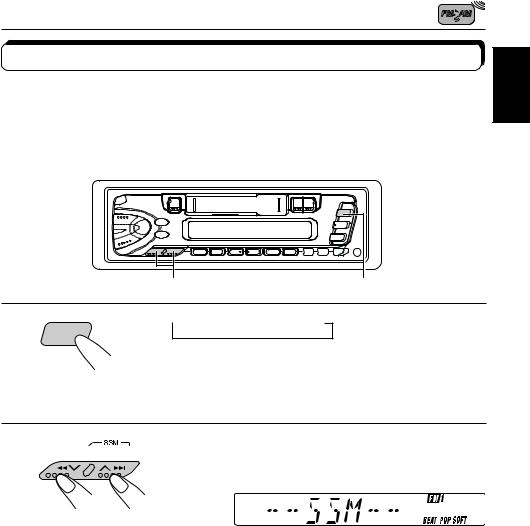
FM station automatic preset: SSM
You can preset 6 local FM stations in each FM band (FM1, FM2 and FM3).
ENGLISH
2 |
1 |
1
F M
 FM1
FM1 FM2
FM2 FM3
FM3
Select the FM band number (FM1, FM2 or FM3) you want to store FM stations into.
2
Press and hold the button for more than 2 seconds.
“SSM” appears, then disappears when automatic preset is over.
Local FM stations with the strongest signals are searched and stored automatically in the band number you have selected (FM1, FM2 or FM3). These stations are preset in the number buttons — No. 1 (lowest frequency) to No. 6 (highest frequency).
When automatic preset is over, the station stored in number button 1 will be automatically tuned in.
5
ENGLISH
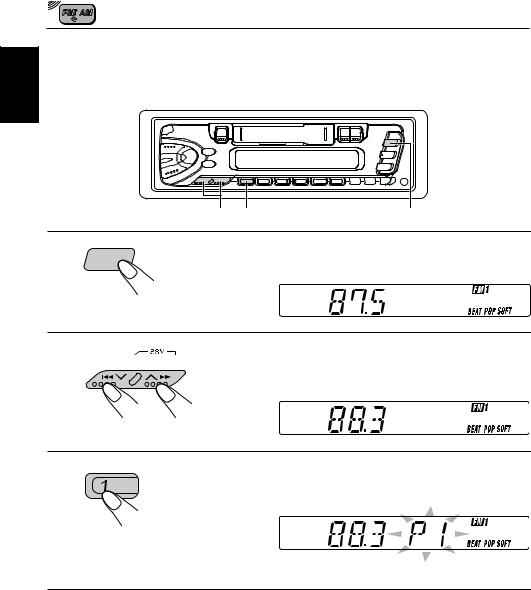
Manual preset
You can preset up to 6 stations in each band (FM1, FM2, FM3 and AM) manually. Example: Storing an FM station of 88.3 MHz into the preset number 1 of the FM1 band.
2 |
3 |
1 |
1 |
F M |
Select the FM1 band. |
|
|
2
Tune into a station of 88.3 MHz.
See page 4 to tune into a station.
3
Press and hold the button for more than 2 seconds.
Preset number “1” flashes for a while.
4
Repeat the above procedure to store other stations into other preset numbers.
Notes:
•A previously preset station is erased when a new station is stored in the same preset number.
•Preset stations are erased when the power supply to the memory circuit is interrupted (for example, during battery replacement). If this occurs, preset the stations again.
6
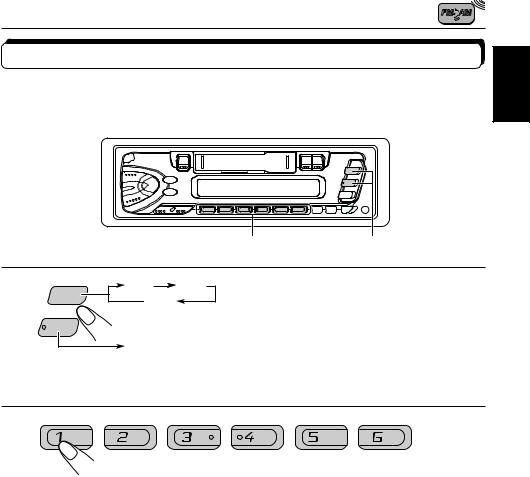
Tuning into a preset station
You can easily tune into a preset station.
Remember that you must store stations first. If you have not stored them yet, see page 5 or 6.
ENGLISH
2 |
1 |
1 |
F M |
FM1 |
FM2 |
|
|
FM3 |
|
A M
AM
Select the band (FM1, FM2, FM3 or AM) you want.
2
Select the number (1 – 6) for the preset station you want.
7
 Loading...