


Start Here |
|
Pocz tek |
||
|
|
|
|
|
|
|
Important: Do not connect the USB cable until Step 15 or software may not install |
||
|
1 |
|||
|
properly. |
|
|
|
|
Follow the steps in order. If you have problems during setup, see Troubleshooting on page 10. |
|||
|
|
Wa ne: Kabel USB nale y podł czyć dopiero w kroku 15. W przeciwnym razie |
||
|
|
oprogramowanie mo e zostać nieprawidłowo zainstalowane. |
||
|
|
Opisane czynno ci nale y wykonywać w przedstawionej kolejno ci. W przypadku problemów w trakcie |
||
|
|
konfiguracji nale y zapoznać si z sekcj Rozwi zywanie problemów na stronie 10. |
||
2 |
Remove all tape and components |
Zdejmij cał ta m i wszystkie elementy |
|
|
a Remove all tape. |
|
b Lower the paper tray, and then the access door. |
|
Remove the shipping material and components. |
|
a Zdejmij cał ta m . |
|
b Opu ć podajnik papieru, a nast pnie drzwiczki |
|
dost pu. Wyjmij materiały pakunkowe i elementy. |
3 |
Locate components |
Znajd nast puj ce elementy |
HP Photosmart 2600/2700 series all-in-one
Windows CD |
|
print cartridges |
dysk CD dla systemu Windows |
pojemniki z tuszem |
|
Macintosh CD |
|
power cord and |
dysk CD dla komputerów |
|
|
|
adapter |
|
Macintosh |
|
kabel zasilaj cy |
|
|
|
User Guide |
|
i zasilacz |
Podr cznik u ytkownika |
*Purchased separately |
|
* USB cable |
The contents of your box may differ. |
|
*Nale y zakupić oddzielnie |
||
* kabel USB |
||
Rzeczywista zawarto ć opakowania mo e być inna. |
||
|
control panel overlay (sticker, may be preattached)
nakładka na panel sterowania (naklejka, mo e być ju zało ona)
HP PSC 1400 All-in-One series Setup Guide
Podr cznik instalacji urz dzenia HP PSC 1400 All-in-One series
4 |
|
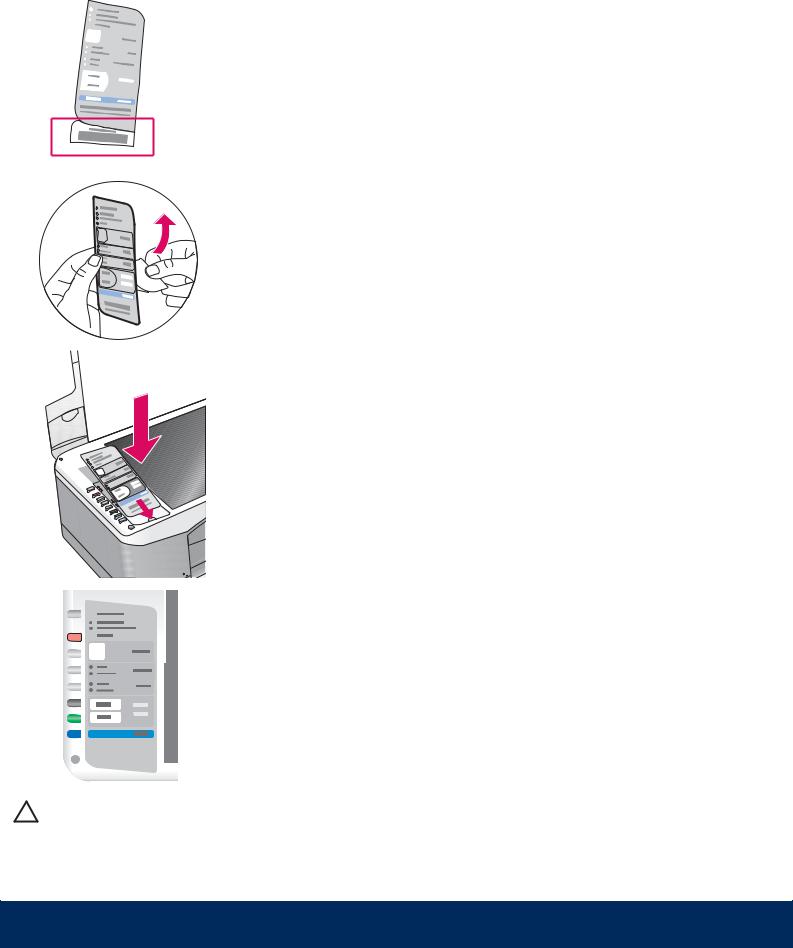
Attach the control panel overlay (if not attached) |
||
|
Załó nakładk na panel sterowania (je li nie jest zało ona) |
|||
|
|
|
|
|
|
|
|
a |
Bend the bottom of the control panel overlay. |
|
|
|
b |
Remove the bottom tab and the backing from the |
|
|
|
|
overlay. |
|
|
|
c |
Lift the lid. Attach the overlay to the device. |
|
|
|
d |
Press down on the overlay to ensure it is firmly |
|
|
|
|
attached. |
|
|
|
|
|
a Zagnij doln cz ć nakładki na panel sterowania.
b Odklej z nakładki doln wypustk i tyln warstw ochronn .
c Podnie pokryw . Naklej nakładk na urz dzenie.
d Doci nij nakładk , aby upewnić si , e została dobrze naklejona.
CAUTION: The control panel overlay must be attached for the HP All-in-One to work!
OSTRO NIE: Aby urz dzenie HP All-in-One mogło działać, nakładka musi być zało ona na panel sterowania!
2 • HP All-in-One
5 |
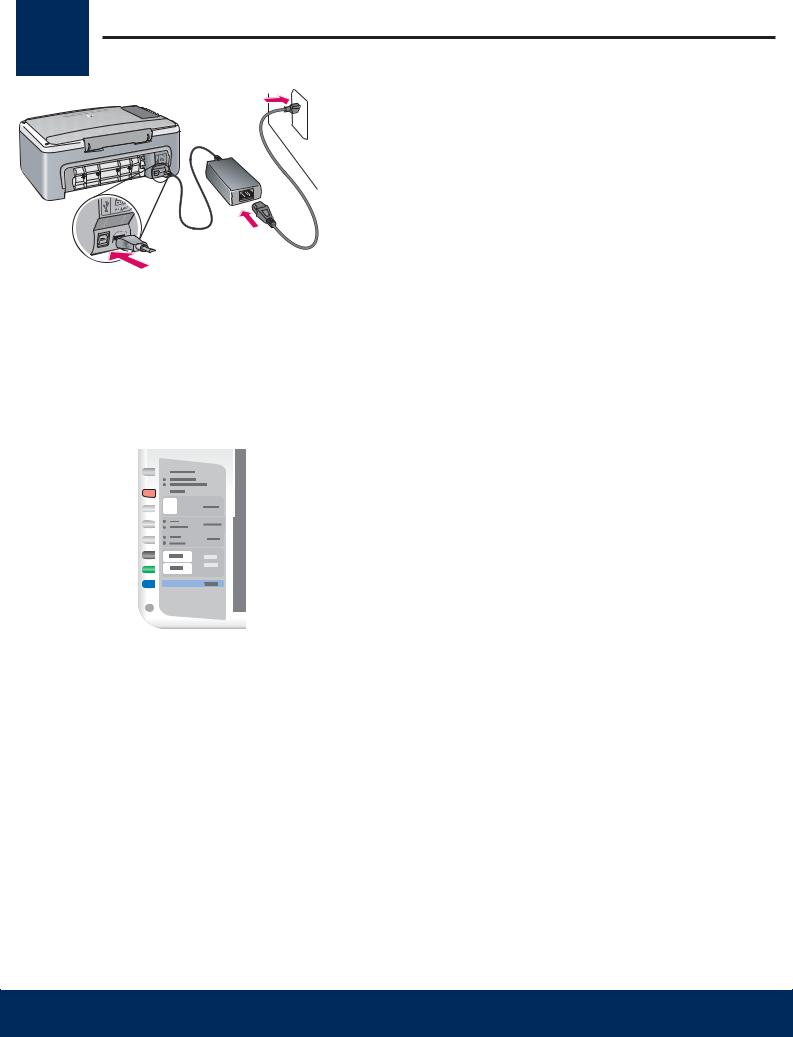
Connect the power cord and adapter |
Podł cz kabel zasilaj cy i zasilacz |
|
|
Important: Do not connect the USB cable until |
|
instructed later in this guide. |
|
Wa ne: Nie nale y podł czać kabla USB dopóki |
|
w dalszej cz ci tego podr cznika nie zostanie podana |
|
odpowiednia instrukcja. |
6 |
Press the On/Resume button |
|
|
|
|
Naci nij przycisk Wł cz/Wznów |
||
|
|
|

 After you press the On/Resume button, the green light On/Resume Wł cz/Wznów flashes, and then becomes solid. This may take up to a
minute.
Po naci ni ciu przycisku Wł cz/Wznów zielona lampka zacznie migać, a nast pnie b dzie wiecićwiatłem ci głym. Mo e to potrwać minut .
7 |
|
Load plain white paper |
|
|
|
|
|
||||
|
Włó zwykły biały papier |
|
|
|
|
|
|||||
1 |
|
|
2 |
|
|
3 |
|
4 |
|
||
|
|
|
|
|
|
|
|
|
|
|
|
CAUTION: To avoid paper jams, do not force paper too far into the tray.
OSTRO NIE: Aby unikn ć zaci ć papieru, nie nale y wkładać papieru zbyt gł boko do podajnika.
HP All-in-One • 3

8 |
Open access door |
Otwórz drzwiczki dost pu |
Lower the access door until it stops. Make sure the print carriage moves to the center.
Opu ć drzwiczki dost pu a do oporu. Sprawd , czy karetka przesuwa si do rodka.
The device must be On before you can insert the print cartridges.
Zało enie pojemników z tuszem jest mo liwe pod warunkiem, e urz dzenie jest wł czone.
9 |
Remove tape from both cartridges |
Zdejmij ta m z obu pojemników |
|
|
Pull the pink tab to remove the tape from both print |
|
cartridges. |
Poci gnij za ró ow wypustk , aby zdj ć ta m z obu pojemników z tuszem.
CAUTION: Do not touch the copper-colored contacts or retape the cartridges.
OSTRO NIE: Nie nale y dotykać styków w kolorze miedzianym ani ponownie naklejać ta my na pojemniki z tuszem.
4 • HP All-in-One
 Loading...