


hp psc 700 series
Windows Users
Your Basic Guide

©Copyright Hewlett-Packard Company 2001
All rights are reserved. No part of the document may be photocopied, reproduced, or translated to another language without the prior written consent of Hewlett-Packard Company.
Publication number: C8424-90154 First edition: March 2001
Printed in U.S.A., Mexico, Germany, or Singapore
Windows® and Windows NT® are U.S.-registered trademarks of Microsoft Corporation.
Intel® and Pentium® are registered trademarks of Intel Corporation.
1RWLFH
The information contained in this document is subject to change without notice and should not be construed as a commitment by the Hewlett-Packard Company.
Hewlett-Packard assumes no responsibility for any errors that may appear in this document, nor does it make expressed or implied warranty of any kind with regard to this material, including, but not limited to, the implied warranties of merchantability and fitness for a particular purpose. The Hewlett-Packard Company shall not be liable for incidental or consequential damages in connection with, or arising out of the furnishing, performance, or use of this document and the program material which it describes.
Note: Regulatory information can be found in the “Technical information” section.
It is not lawful in many places to make copies of the following items. When in doubt, check with a legal representative first.
•Governmental paper or documents:
-Passports
-Immigration papers
-Selective service papers
-Identification badges, cards, or insignias
•Governmental stamps:
-Postage stamps
-Food stamps
•Checks or drafts drawn on Governmental agencies
•Paper currency, traveler’s checks, or money orders
•Certificates of deposit
•Copyrighted works
6DIHW\ ,QIRUPDWLRQ
WARNING
!To prevent fire or shock hazard, do not expose this product to rain or any type of moisture.
Always follow basic safety precautions when using this product to reduce risk of injury from fire or electric shock.
WARNING: Potential Shock Hazard
1Read and understand all instructions in the Setup Poster.
2Use only a grounded electrical outlet when connecting the unit to a power source. If you do not know whether the outlet is grounded, check with a qualified electrician.
3Observe all warnings and instructions marked on the product.
4Unplug this product from wall outlets before cleaning.
5Do not install or use this product near water or when you are wet.
6Install the product securely on a stable surface.
7Install the product in a protected location where no one can step on or trip over the line cord, and where the line cord will not be damaged.
8If the product does not operate normally, see the online Troubleshooting help.
9No operator-serviceable parts inside. Refer servicing to qualified service personnel.
10Use in a well-ventilated area.

HP PSC 700 Series
&RQWHQWV
5HYLHZ \RXU XQLW¶V IURQW SDQHO
8VH \RXU +3 36& ZLWK D FRPSXWHU
5HYLHZ WKH 'LUHFWRU
5HYLHZ WKH VWDWXV ZLQGRZ
*HW KHOS
:KHUH FDQ , ILQG KHOS"
/RDG SDSHU RU WUDQVSDUHQF\ ILOP RU ORDG RULJLQDOV
/RDG WKH LQSXW WUD\ ZLWK OHWWHU OHJDO RU$VL]H SDSHU 5HYLHZ WLSV IRU ORDGLQJ VSHFLILF W\SHV RI SDSHU
/RDG WKH LQSXW WUD\ ZLWK HQYHORSHV RQO\ ZRUNV ZLWK SULQWLQJ
6HW WKH SDSHU W\SH /RDG RULJLQDOV RQ WKH JODVV
$YRLG SDSHU MDPV
8VH WKH SULQW IHDWXUHV
6WDUW D SULQW MRE
8VH WKH VFDQ IHDWXUHV
%HJLQ D VFDQ
8VH WKH FRS\ IHDWXUHV
0DNH FRSLHV
,QLWLDWH WKH FRS\ SURFHVV IURP \RXU +3 36& ,QLWLDWH WKH FRS\ SURFHVV IURP \RXU FRPSXWHU
5HGXFH RU HQODUJH D FRS\ /LJKWHQ RU GDUNHQ D FRS\
6KLIW WKH VLGH PDUJLQV
3HUIRUP VSHFLDO FRS\ MREV
0DNH FRSLHV DXWRPDWLFDOO\ ILW
3ULQW VHYHUDO FRSLHV RQ RQH SDJH 0DNH D SRVWHU
6WRS FRS\LQJ
$GGLWLRQDO VHWXS LQIRUPDWLRQ
0LFURVRIW¶V SOXJ DQG SOD\ PHVVDJHV GR QRW DSSHDU 1HZ +DUGZDUH PHVVDJH DSSHDUV :LQGRZV RU 0(
3UHYLRXV YHUVLRQ LQVWDOOHG PHVVDJH <RXU FRPSXWHU LV XQDEOH WR FRPPXQLFDWH ZLWK \RXU +3 36&
:LQGRZV$GG 3ULQWHU IHDWXUH 6HW XS IRU QHWZRUN SULQWLQJ XVLQJ :LQGRZV VKDULQJ
5HPRYH DQG UHLQVWDOO \RXU +3 36& VRIWZDUH &KDQJH WKH IURQW SDQHO FRXQWU\ RU ODQJXDJH
Contents |
i |

HP PSC 700 Series
8VH +HZOHWW 3DFNDUG¶V VXSSRUW VHUYLFHV
,QWHUQHW
+3 &XVWRPHU 6XSSRUW
+3 'LVWULEXWLRQ &HQWHU
7HFKQLFDO LQIRUPDWLRQ
3RZHU VSHFLILFDWLRQV 2UGHU SULQW FDUWULGJHV
5HJXODWRU\ QRWLFHV
'HFODUDWLRQ RI &RQIRUPLW\
+3 36& 0HQX
&UHDWLYH &RS\ 0HQX
ii |
Contents |

1
5HYLHZ \RXU XQLW¶V IURQW SDQHO
You can perform many functions using either the front panel or the HP PSC 700 Series software. The method you choose may depend on the function you need to perform, or it may depend on which is the most convenient.
$UURZV
6FUROO WKURXJK PHQX VHWWLQJV $OVR XVHG WR VFUROO WKURXJK QXPEHU RI FRSLHV SDSHU W\SHV DQG FUHDWLYH FRS\ VHWWLQJV
2Q
7XUQ XQLW RQ RII
(QWHU |
|
|
|
|
|
|
|
|
|
|
&DQFHO |
6HOHFW RU VDYH GLVSOD\HG |
|
|
|
|
|
|
|
|
|
|
|
|
|
|
|
|
|
|
|
|
|
6WRS MRE H[LW PHQX RU H[LW |
|
VHWWLQJ |
|
|
|
|
|
|
|
|
|
|
|
|
|
|
|
|
|
|
|
|
|
EXWWRQ VHWWLQJV |
|
|
|
|
|
|
|
|
|
|
|
|
|
|
|
|
|
|
|
|
|
|
|
|
|
1XPEHU RI &RSLHV |
|
|
|
|
|
|
|
|
|
|
0HQX |
|
|
|
|
|
|
|
|
|
|
$FFHVV WR YDULRXV FRS\ VHWXS |
|
6HOHFWV WKH QXPEHU RI FRSLHV IRU D |
|
|
|
|
|
|
|
|
|
|
|
FRS\ MRE $UURZV FDQ DOVR EH XVHG |
|
|
|
|
|
|
|
|
|
|
VFDQQLQJ UHSRUW DQG |
|
|
|
|
|
|
|
|
|
|
PDLQWHQDQFH RSWLRQV |
|
3DSHU 7\SH |
|
|
|
|
|
|
|
|
|
|
|
|
|
|
|
|
|
|
|
|
|
|
|
6HOHFWV SDSHU W\SH RSWLRQV |
|
|
|
|
|
|
|
|
|
|
4XDOLW\ |
|
|
|
|
|
|
|
|
|
|
||
|
|
|
|
|
|
|
|
|
|
|
6HOHFWV WKH VSHHG DQG TXDOLW\ |
|
|
|
|
|
|
|
|
|
|
|
IRU D FRS\ MRE |
%ODFN |
|
|
|
|
|
|
|
|
|
|
&RORU |
6WDUW D EODFN DQG ZKLWH FRS\ |
|
|
|
|
|
|
|
|
|
|
|
6WDUW 6FDQ |
|
|
|
|
|
|
|
|
|
|
6WDUW D FRORU FRS\ |
|
|
|
|
|
|
|
|
|
|
||
|
|
|
|
|
|
|
|
|
|
|
|
|
|
|
|
|
|
|
|
|
|
|
|
6WDUWV D VFDQ MRE |
&UHDWLYH &RS\LQJ |
||||||||||
|
|||||||||||
|
6HOHFWV UHGXFWLRQ HQODUJHPHQW RSWLRQV |
||||||||||
|
DQG QXPEHU RI LWHPV RQ D SDJH |
||||||||||
Chapter 1—Review your unit’s front panel |
1 |

HP PSC 700 Series
Even if you do not connect your HP PSC to a computer (also called stand-alone use), you can use the front panel to process copy jobs. You can change a wide variety of settings using the front-panel buttons and menu system. Depending on your model, your front panel may look slightly different from the diagram.
2 |
Chapter 1—Review your unit’s front panel |
2
8VH \RXU +3 36& ZLWK D FRPSXWHU
If you connect your HP PSC to a computer, you can work from the front panel or from the HP PSC 700 Series software.
For comprehensive information, see the fully searchable Onscreen Guide. To access the guide, go to the Director, click Help, and choose Onscreen Guide.
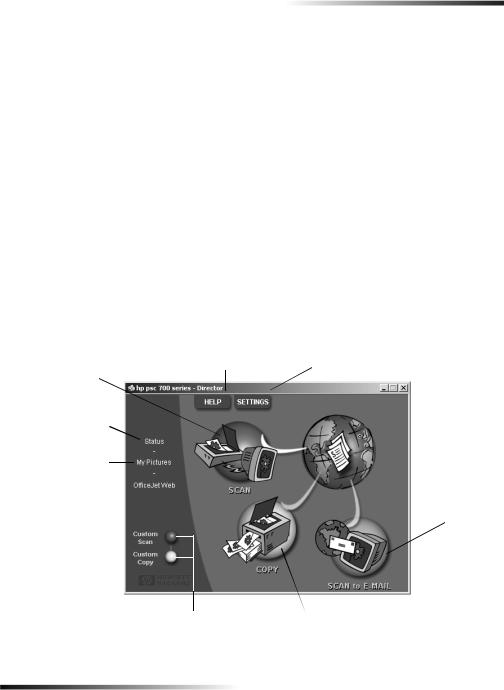
5HYLHZ WKH 'LUHFWRU
The Director is available through the desktop shortcut.
To start the Director:
•Double-click the HP PSC 700 Series shortcut on the Windows desktop, or
•In the Windows taskbar, click Start, point to Programs, choose HP PSC 700 Series, and then choose HP Director.
The following shows some of the features available through the Director.
6FDQ LPDJH RU WH[W 
2SHQ VWDWXV ZLQGRZ
2SHQ GHIDXOW IROGHU IRU VFDQQHG LPDJHV
/DXQFK \RXU EURZVHU  DQG DFFHVV RXU VLWH
$FFHVV RQVFUHHQ DVVLVWDQFH
5LJKW FOLFN WR FUHDWH EXWWRQV IRU IUHTXHQWO\ XVHG VFDQ RU FRS\ VHWWLQJV
9LHZ RU FKDQJH YDULRXV VHWWLQJV LQFOXGLQJ GHYLFH DQG SULQW
 6FDQ GLUHFWO\ WR \RXU H PDLO RQ \RXU FRPSXWHU
&RS\ LQ EODFN DQG ZKLWH RU FRORU
Chapter 2—Use your HP PSC with a computer |
3 |

HP PSC 700 Series
5HYLHZ WKH VWDWXV ZLQGRZ
The status window is similar to the display included on the front panel of your HP PSC. It describes the current state of your HP PSC, and it is always available by right-clicking the status icon in the Windows status area (lower-right corner of the Windows taskbar). One of the default settings for your HP PSC instructs the computer to display the status window automatically if there is an issue that needs to be addressed, such as your
HP PSC being out of paper.
Depending on the current state of your HP PSC, a different icon appears in the Windows status area. Right-clicking an icon displays a shortcut menu that lets you display the status window or close the HP PSC software.
Icon |
Indicates |
|
|
|
|
|
Print job in process |
|
|
|
Scan job in process |
|
|
|
Copy job in process |
|
|
|
Error condition |
|
|
|
Ready (idle) |
|
|
4 |
Chapter 2—Use your HP PSC with a computer |

3
*HW KHOS
For comprehensive information, see the fully searchable Onscreen Guide. To access the guide, go to the Director, click Help, and choose Onscreen Guide.
:KHUH FDQ , ILQG KHOS"
For hardware and setup information:
•See the HP PSC 700 Series: Setup Poster. The printed Setup Poster comes in the box with your unit.
For software information:
•If available, click the Help button that appears on a specific dialog box. Most of the windows (also known as dialog boxes) available in the HP PSC software have Help topics that provide assistance for the visible window.
•See the HP PSC 700 Series: Onscreen Guide.
•See Troubleshooting. To access Troubleshooting, go to the Director, click Help, and then choose Troubleshooting. Troubleshooting is also available via the Help button that appears on some error messages.
For feature information:
•Run the HP PSC 700 Series: Product Tour. To access the tour, go to the Director, click Help, and then choose Product Tour. After the Product Tour dialog box appears, insert the HP PSC 700 Series CD into your computer’s CD-ROM drive, and click Search.
•See the HP PSC 700 Series: Onscreen Guide.
For technical support:
•See the HP OfficeJet support website at www.officejetsupport.com
Chapter 3—Get help |
5 |

HP PSC 700 Series
6 |
Chapter 3—Get help |
4
/RDG SDSHU RU WUDQVSDUHQF\ ILOP RU ORDG RULJLQDOV
You can print and copy onto a variety of transparency films and paper types, weights, and sizes. It is important, however, that you choose the right paper and make sure that it is not damaged.
For comprehensive information, see the fully searchable Onscreen Guide. To access the guide, go to the Director, click Help, and choose Onscreen Guide.
/RDG WKH LQSXW WUD\ ZLWK OHWWHU OHJDO RU $ VL]H SDSHU
For best results, adjust the paper settings each time you change paper types or paper sizes. For more information, see “Set the paper type.”
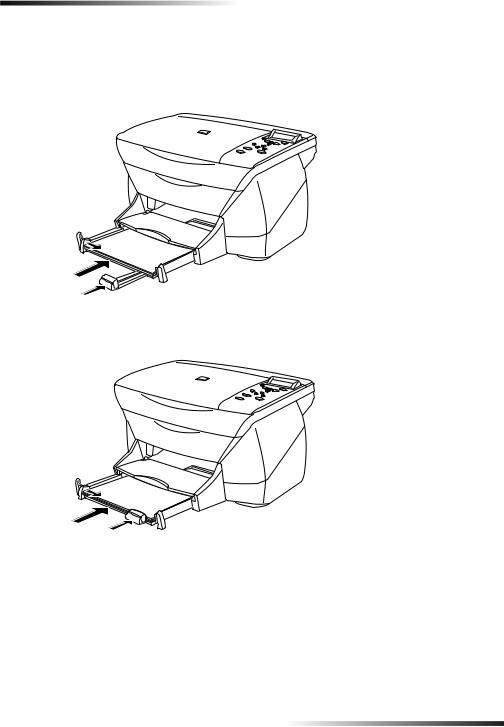
1Pull out the bottom (input) tray, and slide the paper-width and -length adjusters to their outermost positions.
2Tap the stack on a flat surface to even the edges of the paper, and then check the paper for the following:
•Make sure it is free of rips, dust, wrinkles, and curled or bent edges.
•Make sure all the paper in the stack is the same size and type, unless you are working with photo paper.
3Insert paper into the input tray, print-side down and letterhead or top of page first, until it stops.
Chapter 4—Load paper or transparency film, or load originals |
7 |
HP PSC 700 Series
4Slide the paper-width and -length adjusters in until they stop at the edges of the paper, and be sure that the paper stack lies flat in the input tray and fits under the tab of the paper-length adjuster.
Do not overfill the input tray as this may cause paper jams.
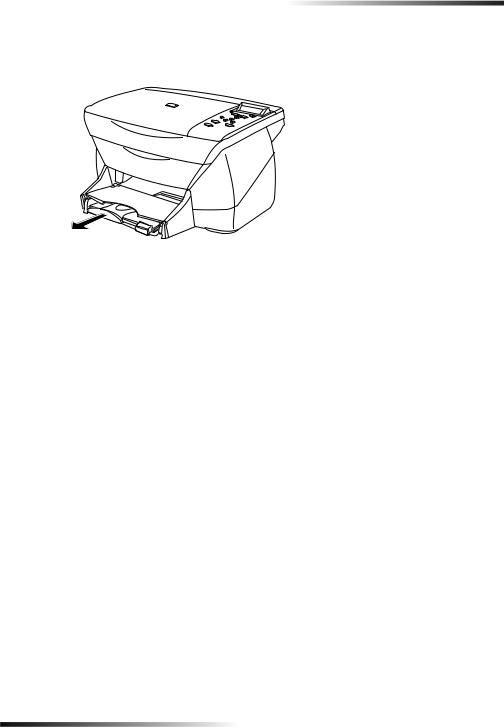
5 Push the input tray back in until it stops.
8 |
Chapter 4—Load paper or transparency film, or load originals |
HP PSC 700 Series
6To prevent printed paper from possibly falling off the tray, fully extend the outputtray extender.
5HYLHZ WLSV IRU ORDGLQJ VSHFLILF W\SHV RI SDSHU
The following table provides guidelines for loading certain types of paper and film. For best results, adjust the paper settings each time you change paper types and paper sizes. For more information, see “Set the paper type”.
Paper |
Tips |
|
|
|
|
|
|
|
HP papers |
• HP Premium Inkjet paper: Locate the gray arrow on the |
|
|
|
nonprinting side of the paper, and insert paper with the arrow |
|
|
side facing up. |
|
• HP Premium or Premium Plus Photo Paper: Load the glossy |
|
|
|
(print) side down. Always load at least five sheets of regular |
|
|
paper in the input tray first, and place the photo paper on top of |
|
|
the regular paper. |
|
• |
HP Premium Inkjet Transparency Film: Insert the film so that the |
|
|
white transparency strip, with arrows and the HP logo, is on top |
|
|
and is going into the tray first. |
|
• |
HP Iron-On T-shirt Transfers: Flatten the transfer sheet |
|
|
completely before using it; do not load curled sheets. (To prevent |
|
|
curling, keep transfer sheets sealed in the original package until |
|
|
just before using.) Manually feed one sheet at a time, with the |
|
|
unprinted side facing down (the blue stripe faces up). |
|
• |
HP Greeting Cards, Glossy Greeting Cards, or Textured Greeting |
|
|
Cards: Insert a small stack of HP greeting-card paper with the |
|
|
print-side down into the input tray until it stops. |
|
• |
HP Restickable Inkjet Stickers: Place the sheets in the input tray, |
|
|
print-side (sticker-side) down. |
|
|
|
Chapter 4—Load paper or transparency film, or load originals |
9 |

HP PSC 700 Series
Paper |
Tips |
|
|
|
|
|
|
|
Legal-size paper |
Even though the paper-length adjuster is fully extended, make sure |
|
|
that the input tray itself is pushed all the way in. |
|
|
|
|
Labels |
• |
Always use letteror A4-size label sheets designed for use with |
(only works with |
|
HP inkjet products (like Avery Inkjet Labels), and make sure that |
printing) |
|
the labels are not over two years old. |
|
• |
Fan the stack of labels to make sure none of the pages are |
|
|
sticking together. |
|
• |
Place a stack of label sheets on top of standard paper in the input |
|
|
tray, print-side down. Do not insert labels one sheet at a time. |
|
|
|
Postcards |
Insert a stack of postcards with the print-side down into the input |
|
(only works with |
tray until it stops. Line the postcards up on the right side of the input |
|
printing) |
tray, slide the width adjuster up against the left side of the cards, and |
|
|
slide the length adjuster in until it stops. |
|
|
|
|
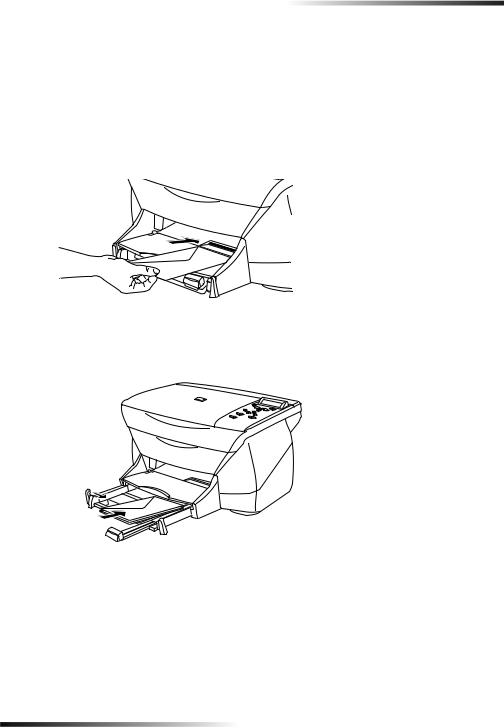
Continuous |
Continuous, banner paper is also known as computer or z-fold paper. |
|
(banner) paper |
• |
Before loading banner paper, remove all other paper from the |
(only works with |
|
input tray, and then raise the output tray above the catch on the |
printing) |
|
right side. |
|
|
5DLVH WKH RXWSXW WUD\ |
|
|
DERYH WKH FDWFK RQ |
|
|
WKH ULJKW VLGH |
•If you use non-HP paper, use 20-lb. paper and fan the paper before loading it.
•Verify that the stack of banner paper contains at least five pages in the stack.
•Carefully tear off the perforated edge strips from both sides of the paper stack, if any, and unfold and refold the paper to make sure the pages do not stick together.
•Put the paper in the input tray so that the unattached edge is at the top of the stack. Insert the first edge into the input tray until it stops, as shown in the figure above.
10 |
Chapter 4—Load paper or transparency film, or load originals |
HP PSC 700 Series
/RDG WKH LQSXW WUD\ ZLWK HQYHORSHV RQO\ ZRUNV ZLWK SULQWLQJ
Your HP PSC provides two methods for working with envelopes. Do not use shiny or embossed envelopes or envelopes that have clasps or windows.
•If you are printing one envelope, use the envelope slot. Slide the envelope into the envelope slot, which is located on the right side toward the back of the output tray. The envelope should be inserted with the flap up and the flap positioned on the left, as shown in the illustration. Insert the leading edge of the envelope on the top of the output tray until it stops.
•If you are printing multiple envelopes, remove all paper from the input tray, and then slide a stack of envelopes into the tray, with the envelope flaps up and to the left (print-side down), until they stop.
Chapter 4—Load paper or transparency film, or load originals |
11 |
 Loading...