


Remote Device Access Software
Table of contents
 Loading...
HP Remote Device Access
vCAS User Guide
Software Version: 8.1
Document Release Date: June 2014
Software Release Date: June 2014

Legal Notices
Warranty
The only warranties for HP products andservices are set forth in the express warranty statements
accompanying such products and services. Nothing herein should be construed as constituting an
additional warranty. HP shall not be liable for technical or editorial errors oromissions contained herein.
The information containedherein is subject to change without notice.
Restricted Rights Legend
Confidential computersoftware. Valid license from HP required for possession, use or copying.
Consistent with FAR 12.211 and 12.212, Commercial Computer Software, Computer Software
Documentation, and Technical Data for Commercial Items are licensed to the U.S. Government under
vendor's standard commercial license.
Copyright Notice
© Copyright 2014 Hewlett-Packard Development Company, L.P.
Trademark Notices
Microsoft® and Windows® are U.S. registered trademarks of Microsoft Corporation.
UNIX® is a registered trademark of The OpenGroup.
Page 2 of 65HP Remote Device Access 8.1:vCAS User Guide

Contents
Contents 3
About This Document 6
Document Revision History 6
Chapter 1: Understanding the vCAS 7
About Remote Device Access (RDA) 8
About the Customer Access System (CAS) 8
Chapter 2: Installing the vCAS 9
Summary of Network Ports for Virtual CAS (vCAS) Installation 10
Install the vCAS on VMware ESX/ESXi 12
Verifying Prerequisites 12
Importing to VMware ESX/ESXi 12
Install onOracle VM VirtualBox 18
Verifying Prerequisites 18
Importing to VirtualBox 18
Install onVMware Player 21
Verifying Prerequisites 21
Importing to VMware Player 22
Install onVMware Server 24
Chapter 3: Configuring Your vCAS 25
Verify Prerequisites 25
Configure YourvCAS 25
Add the Virtual CAS to the RAP 27
Chapter 4: Managing your vCAS 29
Monitor HP's Activity 29
Understanding the Activity Graph 29
Active Tunnels 30
Logins 30
Blocked Tunnels 31
Blocked Logins 32
Controlling Access 33
Page 3 of 65HP Remote Device Access 8.1:vCAS User Guide

Contents
Tunnel Access Control 33
Grant Access 34
Login Access Control 35
PerformingOptional Configuration 36
Authentication 36
Email Alerts 37
Preferences 38
Send Logs to a Remote Log Server 40
Become a Central Logs Collector 40
Software Updates 41
Managing Automatic Settings 42
Managing Software Channels 43
Managing Optional SoftwarePackages 43
Managing Manual Actions 44
Downloading Source Code 44
Viewing the Log 45
LogRefresh Rate 46
Chapter 5: Troubleshooting Information 47
Test the Virtual CASNetwork Check Tool 47
Run the Virtual CASNetwork Check Tool 47
Check Manual Setup 48
Logging on to the Console 48
Changing yourPassword 48
Running the Manual Setup Command 48
Repeat Setup 49
Preserve and Restore vCAS Settings 49
Start Fresh 49
Appendix A: Starting a Virtual CAS at System Startup using VirtualBox 50
Configure Linux Hosts 50
Configure Windows Hosts 50
VirtualBox Extension Pack 51
VirtualBox Control Service 51
HP Remote Device Access 8.1:vCAS User Guide Page 4 of 65

Contents
VirtualBox Control Service system tray application 52
Use VBoxVmService 53
Create a scheduledtask 54
Test the autostart 55
Appendix B: Release Notes 57
Fixed Problems and Enhancements 57
Known Issues 57
Apply the Update 57
Access the Kit 57
HP RDA CAS New Packages 58
HP RDA CAS Ubuntu Changelog Summary 58
hp-rdacas 58
hp-rdacas (1:14.06-37604) stable; urgency=low 58
hp-rdacas (1:14.04-37038) stable; urgency=low 58
libterm-emit-perl 59
libterm-emit-perl (0.0.3-1) 59
Appendix C: License 60
HP Remote Device Access 8.1:vCAS User Guide Page 5 of 65

About This Document
The vCAS User Guide provides the necessary information to install, manage, and troubleshoot your
Virtual Customer Access System (vCAS).
Document Revision History
Edition Software Version Publication Date
Edition 1 RDA 7.1 June 2012
Edition 2 RDA 7.2 December 2012
Edition 3 RDA 7.3 June 2013
Edition 4 RDA 8.1 June 2014
Page 6 of 65HP Remote Device Access 8.1:vCAS User Guide
Chapter 1: Understanding the vCAS
The Virtual Customer Access System (vCAS) is a pre-packaged virtual appliance. It is a small but
complete operating system, with HP's CAS softwarepre-installed.
The vCAS contains the software necessary for HP to securely access your network (depending on your
access control settings) and provides support for your systems and devices. In addition to its service
gateway capabilities, it includes advanced forms of the following:
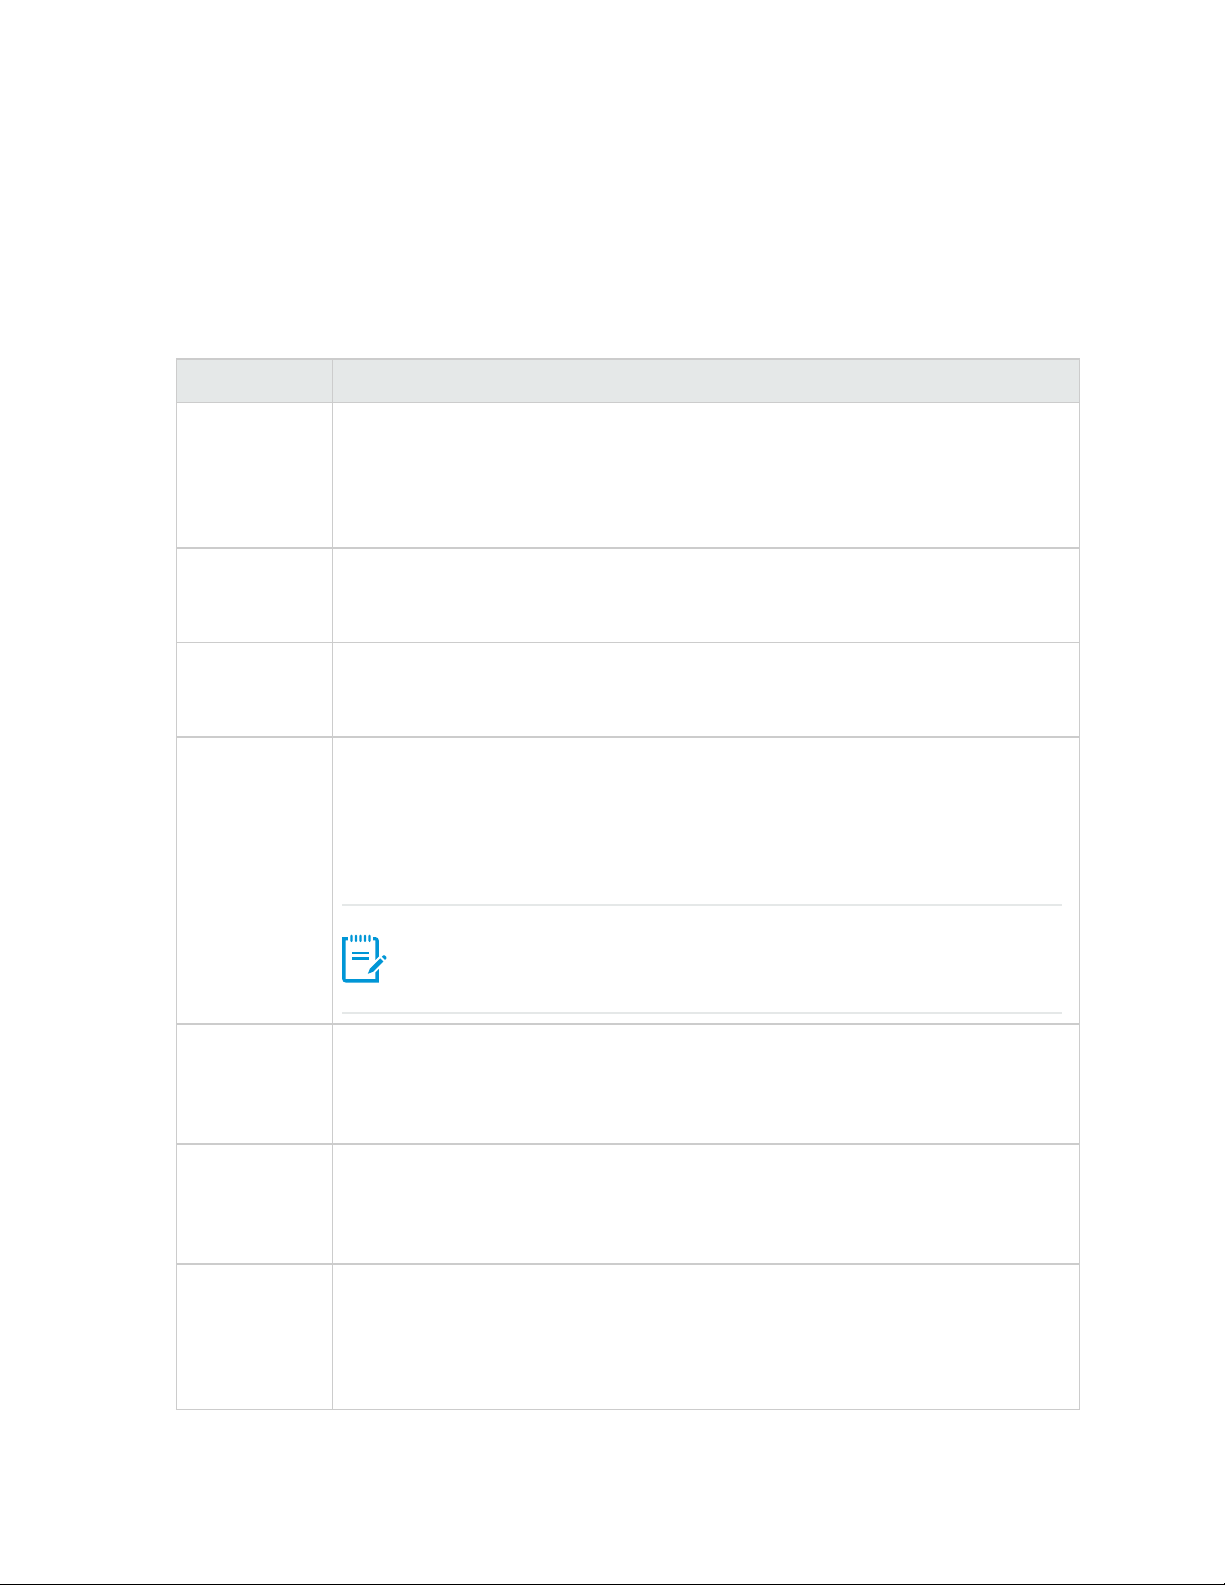
Components Description
Authentication The vCAS uses a single sign-on authentication mechanism based on HP's
DigitalBadge infrastructure - an X.509 certificate-basedpublic key
infrastructure.When an HP Support Agent logs on to orthrough a virtual CAS, the
strong authentication is performed at HP's perimeter servers and at your vCAS.This
helps protect you from unwanted intrusion.
Access
Control
Audit Logs View detailed audit logs of activity on the vCAS. The log details the HP Support
Manageability The vCAS has an integrated patch and update mechanism.Select to have patches
OpenSSH
Software and
X.509
Extensions
Control who can access your network and what systems, ports, and protocols you
allow. The intuitive web interface enables you to disable all access or enable wideopen access as desired.
Agent's e-mail address, the date andtime of the support session, and the details of
the target to which the HP Support Agent is connected.
andupdates applied automatically, or manually apply them. Youcan also view
changelogs of all updates and get the source codefor the entire appliance.
The vCAS is based on a stripped-down Ubuntu server Linux distribution. It contains
the following HP supplied software components:
Note: To allow updates, the customer has to allow https access to a
specific server in HP, if not the client will have to manually perform this
step.
The OpenSSH software provides basic SSH connectivity and is enhanced by adding
a digital certificate authentication and other security extensions (see RDA Security
Extensions). Currently, a modified version 6.1p1 with the X.509 patches (written by
Roumen Petrov)is used.
RDA Security
Extensions
RDA CAS
User Interface
and
Management
Includes components for secure auditing, logging, and access control functionality.
The primary components of this package are NSS and PAM libraries which enable
the CAS to automatically create accounts for authenticated DigitalBadge users and
to containtheir activities.
A web-based user interface and the code to automatically create accounts for
authenticated DigitalBadge users. The web UI supports both Firefox and Internet
Explorer browsers and should work on other popular browsers. The lighttpd web
server is used to host the pages. The user interface provides initial configuration
features, access control, audit logs, software updates, and appliance setup.
Page 7 of 65HP Remote Device Access 8.1:vCAS User Guide

Chapter 1: Understanding the vCAS
About Remote Device Access (RDA)
Remote Device Access (RDA) is an HP solution that allows HP Support Agents to connect securely from
the HP network to systems on a customer's network. RDA provides problem diagnosis, troubleshooting,
andproactive support activities.
About the Customer Access System (CAS)
A CustomerAccess System (CAS) acts as a gateway for HP to access your network. HP Support
Agents use your CAS to provide support to you. It is a single point of control for you. You decide who from
HP can access what parts of your network, and when.
A CAS comes in many forms. A CAS can be as simple as one of yourown servers on which you allow HP
to access the SSH. It could be the lightweight instant CAS that you run in yourweb browser or be a
dedicated server where you have installed a full physical CAS kit. It may even be a virtual appliance, for
example, the vCAS.
HP Remote Device Access 8.1:vCAS User Guide Page 8 of 65

Chapter 2: Installing the vCAS
This chapter describes installing the vCAS on the following systems:
l VMware ESX/ESXi 4.0 or later
l Oracle VM VirtualBox 4.2 or later
l VMware Player 5.0.0 or later
l VMware Server(we highly recommend NOT to use VMware Server as it is unsupported since 2011)
The two main steps to running your vCAS are:
1. Import the virtual appliance
2. Configure the virtual appliance
Page 9 of 65HP Remote Device Access 8.1:vCAS User Guide

Summary of Network Ports for Virtual CAS (vCAS) Installation
The following table summarizes all ports that might be used for a vCAS installation. Seefor ports that are required for basic system operation.
Table 2.1 vCAS Connectivity - Firewall/Port Requirements
Protocol Ports Source Destination Function Configurable Optional
TCP 22 HP Remote
Access
Connectivity
System
(RACS)
TCP 443 Customer's
Web
Browser
UDP 53 Virtual CAS DNS Server DomainName Service (DNS) - Host
UDP 123 Virtual CAS Network Time Server Network Time Protocol No Recommended
TCP 80 or web
proxy port
TCP 80 Virtual CAS onsite-ocsp.verisign.com OCSP (Online Certificate Status
TCP 443or web
proxy port
Virtual CAS onsitecrl.verisign.com or
Virtual CAS h20529.www2.hp.com or
Virtual CAS SSH Tunnel Yes Required
Virtual CAS HTTPS port for web UI for managing
Virtual CAS
name resolution
HTTP (Unencrypted) Daily fetch of HP
Web Proxy
Web Proxy
Class 2 CA certificate revocation list
(CRL)
Protocol) for certificate revocation check
HTTPS connection to the HP RDA CAS
Kit serverto download updates
No Required
No Required
No Recommended
No Recommended
No Recommended
TCP 22 Customer's
SSH Client
TCP 25 Virtual CAS Customer-Designated
Virtual CAS SSH command-line access for Virtual
SMTP Server
No Optional
CAS management
Email notifications No Optional
Page 10 of 65HP Remote Device Access 8.1:vCAS User Guide

Table 2.1 vCAS Connectivity - Firewall/Port Requirements, continued
Protocol Ports Source Destination Function Configurable Optional
TCP 514 Virtual CAS Logging Server Syslog remote logging (unencrypted) Yes Optional
UDP 514 Virtual CAS Logging Server Syslog remote logging (unencrypted) Yes Optional
TCP other Virtual CAS Target System Customer-specified TCP port and
application protocol SSH-forwarded from
HP via the relay application
UDP other Virtual CAS Target System Customer-specified TCP port and
application protocol SSH-forwarded from
HP via the relay application
Yes Optional
Yes Optional
HP Remote Device Access 8.1:vCAS User Guide Page 11 of 65
Install the vCAS on VMware ESX/ESXi
You can install the vCAS on a VMware ESX or ESXi server using a VMware vSphere Client.
Verifying Prerequisites
Beforeyou install the vCAS, verify the following prerequisites:
l Make sure you have access to a VMware VSphere Server and that VMware vSphereClient is installed
l Make sure to downloadthe vCAS .ova image or that it is available via URL
l Make sure you have access to a VMware vSphere Server
Importing to VMware ESX/ESXi
To import the vCAS on a VMwareESX/ESXi Server, complete the following steps:
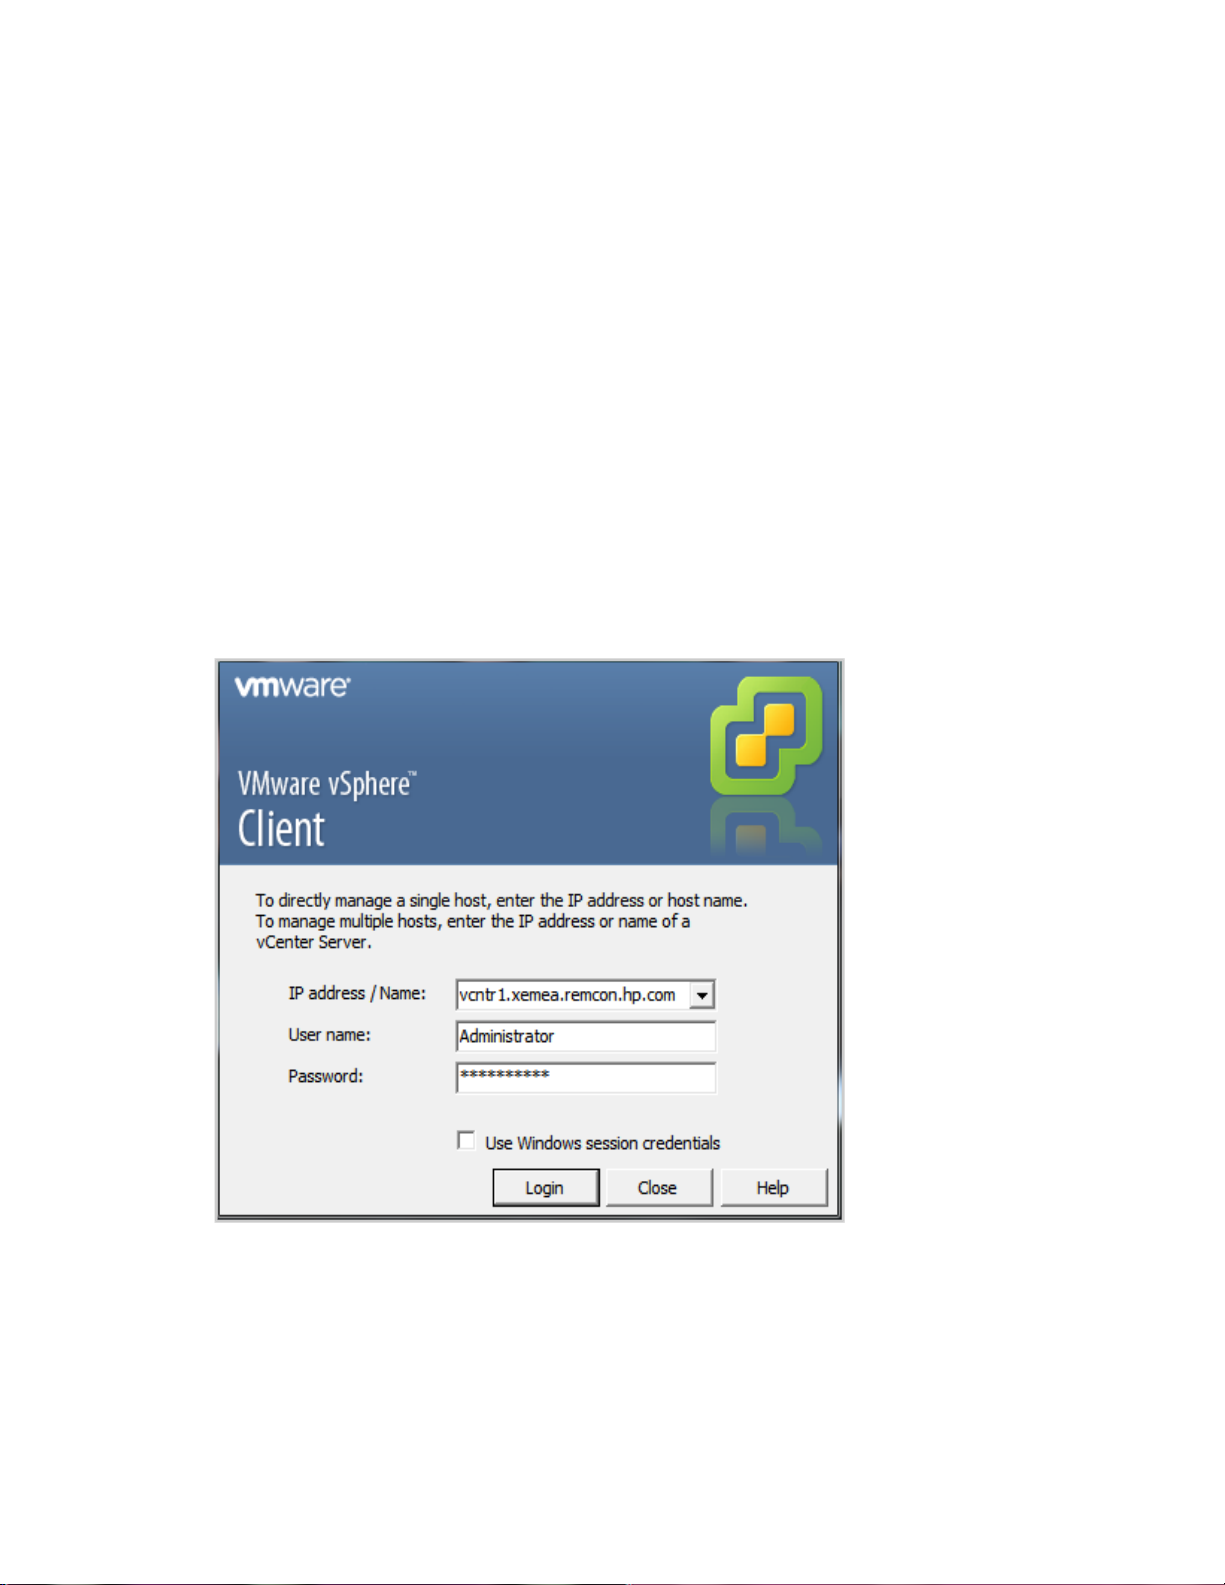
1. To launch the VMware vSphere client, double-click the VMwarevSphere Client icon.
The VMware vSphere Client login window appears.
2. Log on to the vSphere Client. Use any Windows account that has administrator rights.
3. Click Login. ThevSphere Client main window appears.
Page 12 of 65HP Remote Device Access 8.1:vCAS User Guide
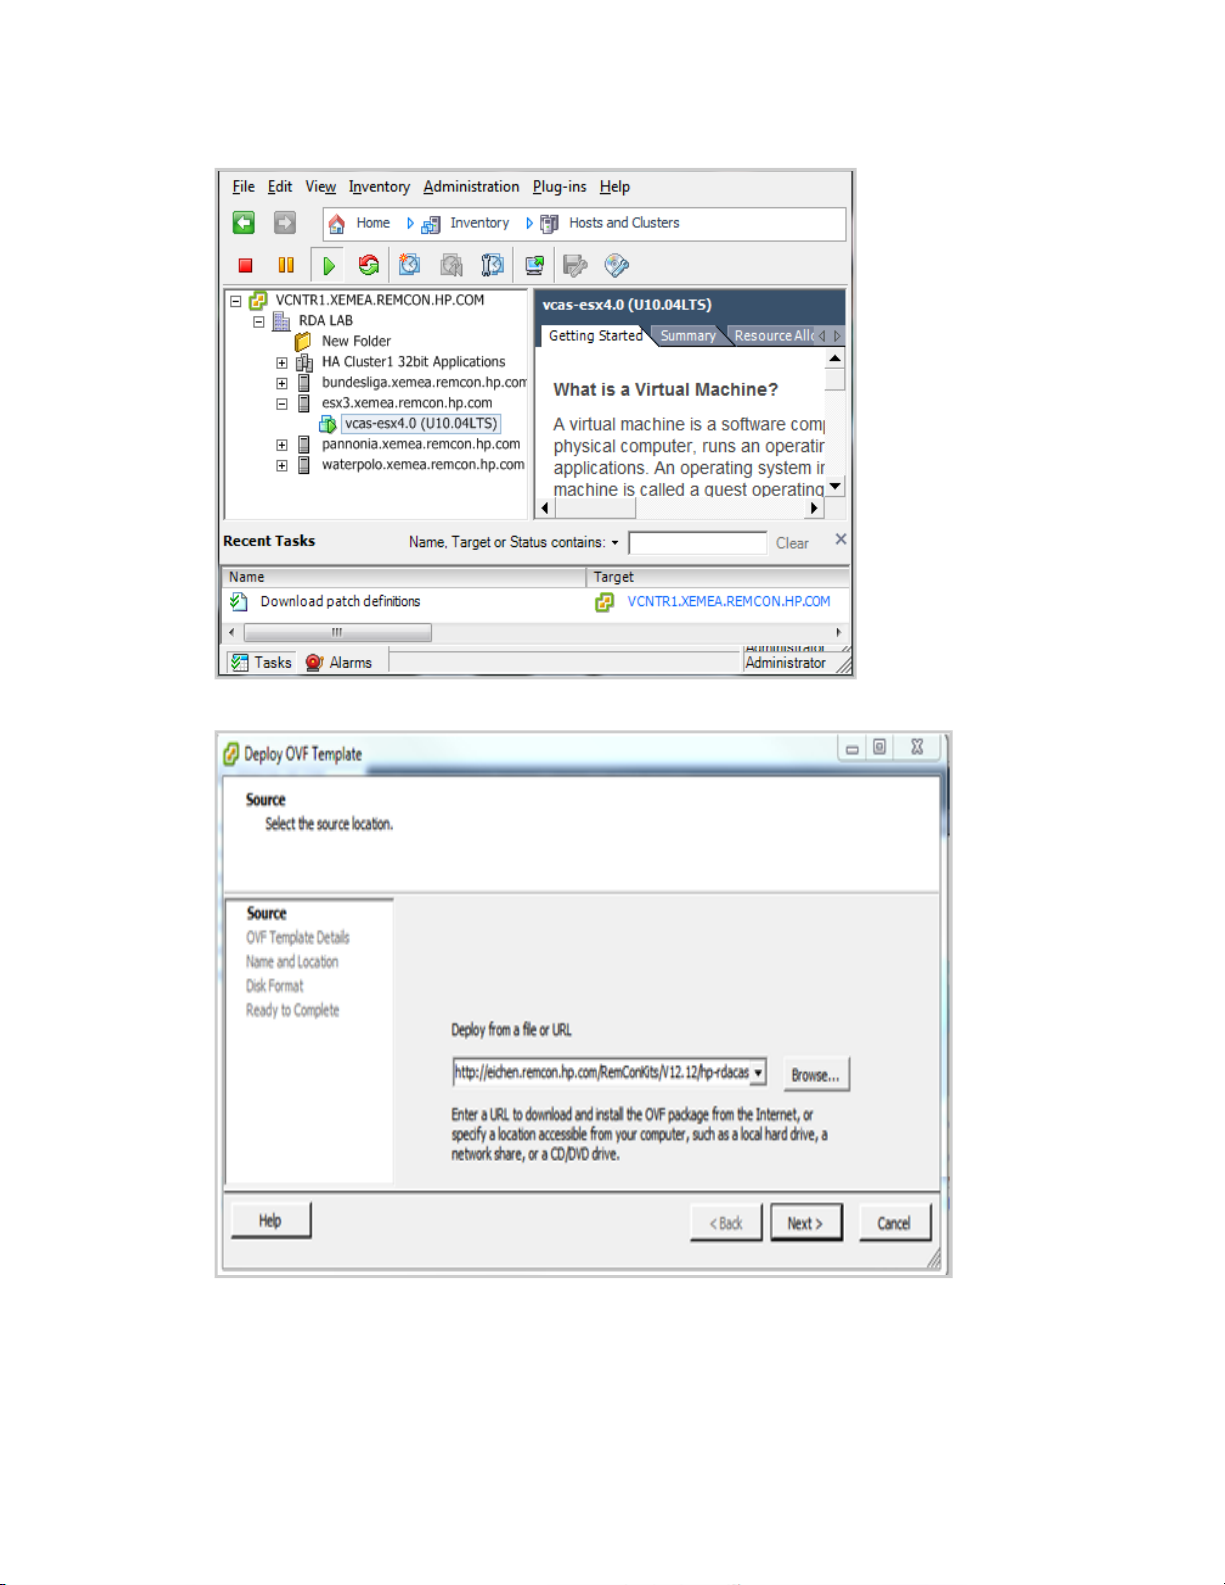
4. Click File, then Deploy OVF Template. The Deploy OVF Template wizard appears.
5. Select source location.
6. Click Browse to search yourfile system for the ovf or.ova file, or entera URL to the .ova file located
on the Internet. TheOVF Template Details page appears.
HP Remote Device Access 8.1:vCAS User Guide Page 13 of 65
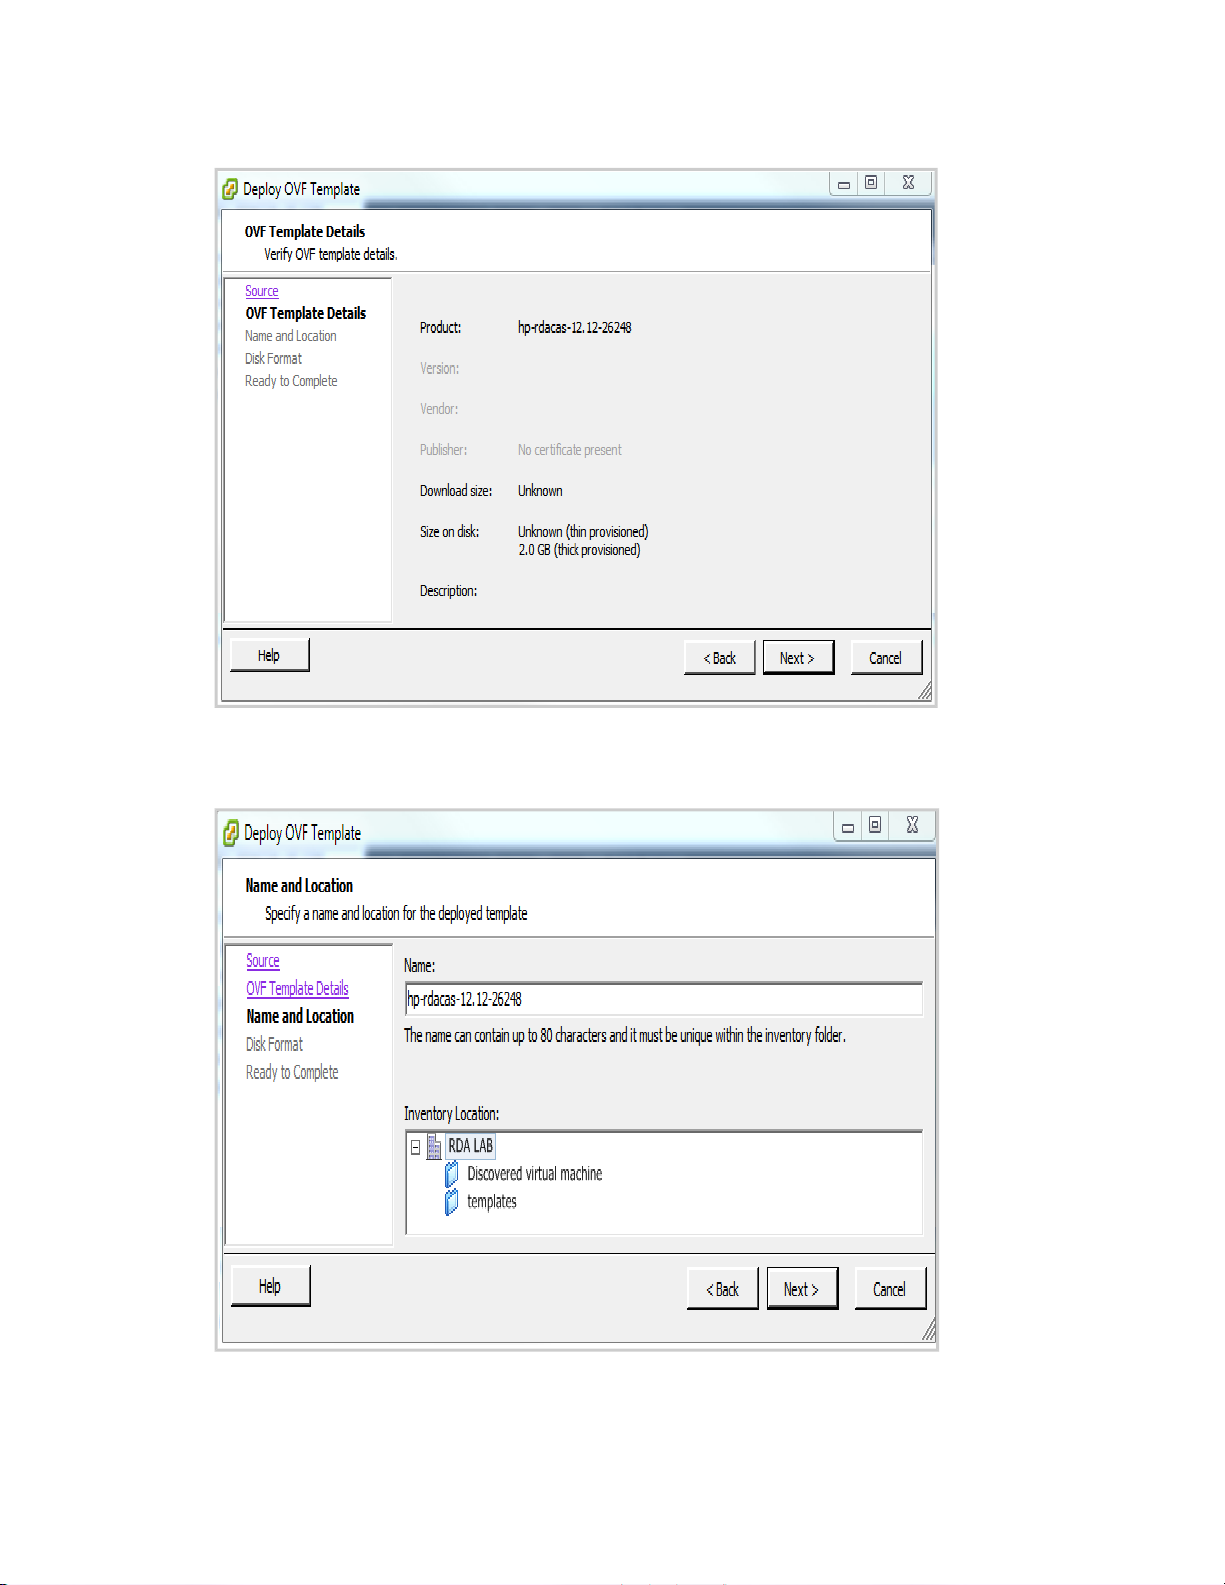
7. Verify OVF template details. Click Next.
8. The Name andLocation page appears.
HP Remote Device Access 8.1:vCAS User Guide Page 14 of 65
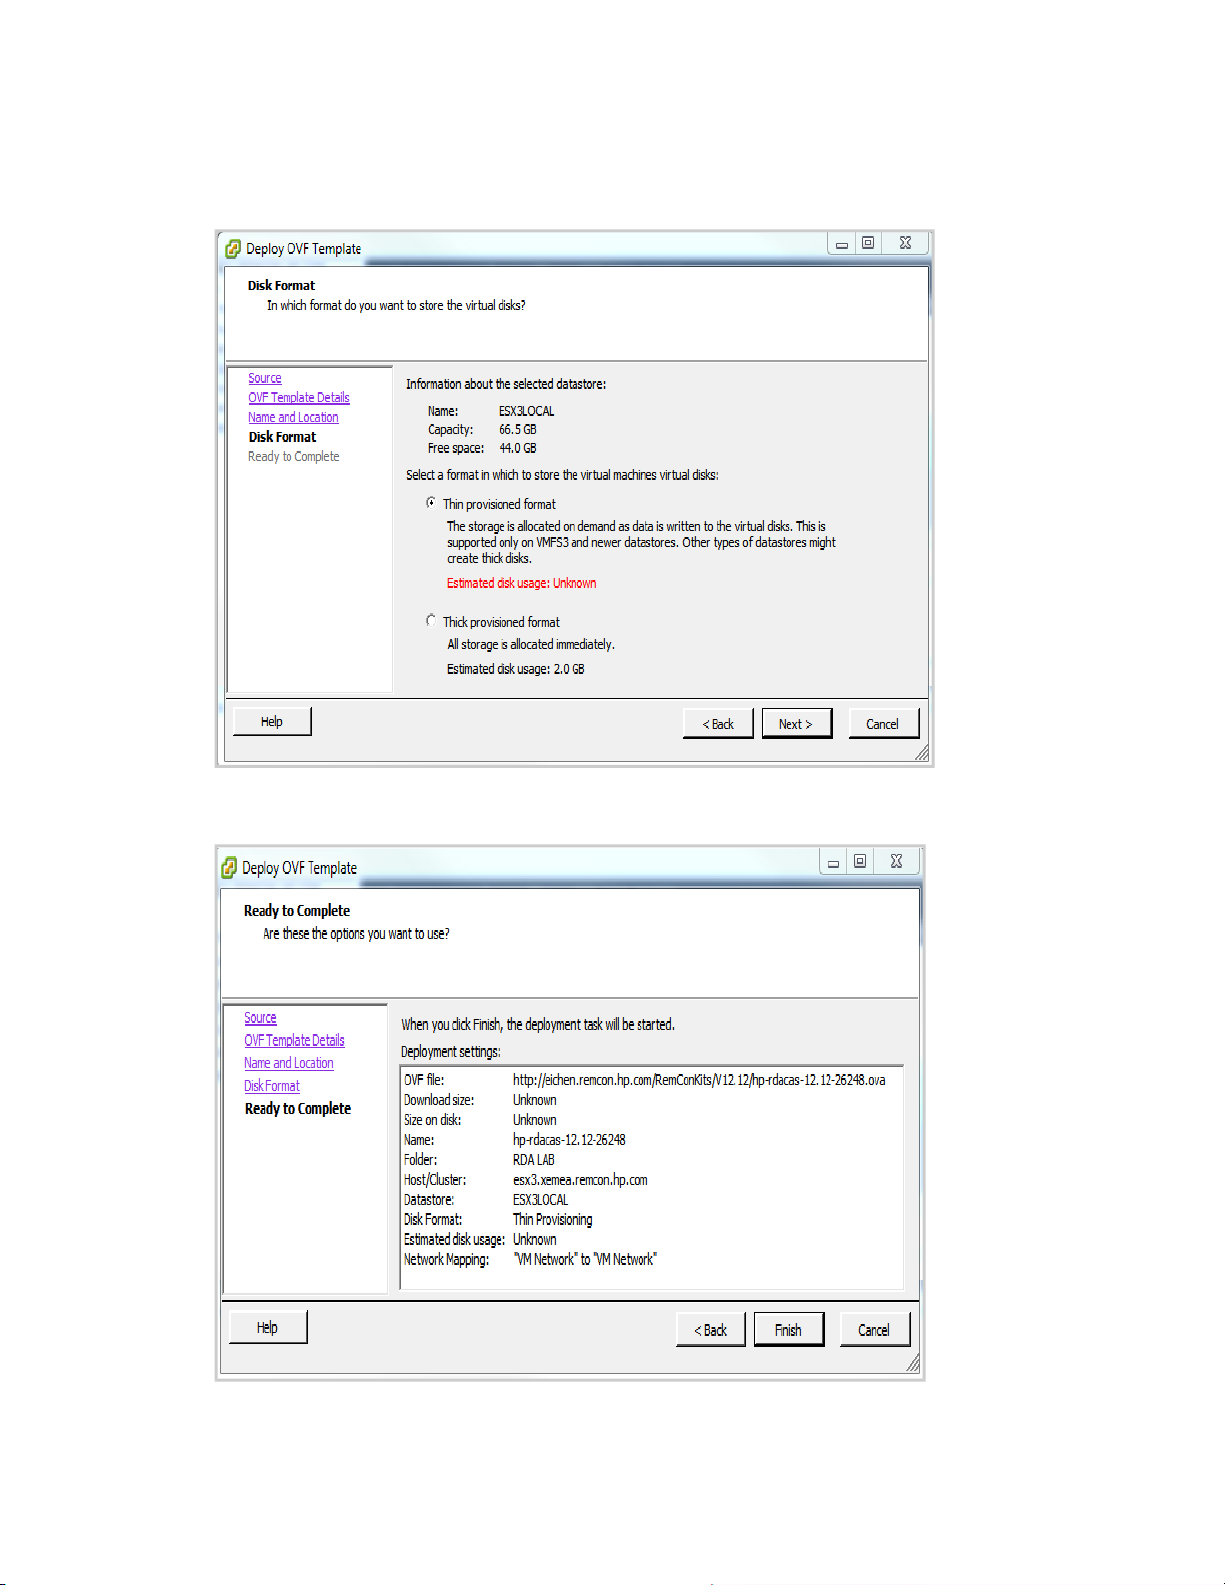
9. Enter the name of the deployed template and select the location. Click Next. The Disk Format page
appears.
10. Select the disk format to storethe virtual machine disks, and click Next.TheReady to Complete page
appears.
HP Remote Device Access 8.1:vCAS User Guide Page 15 of 65
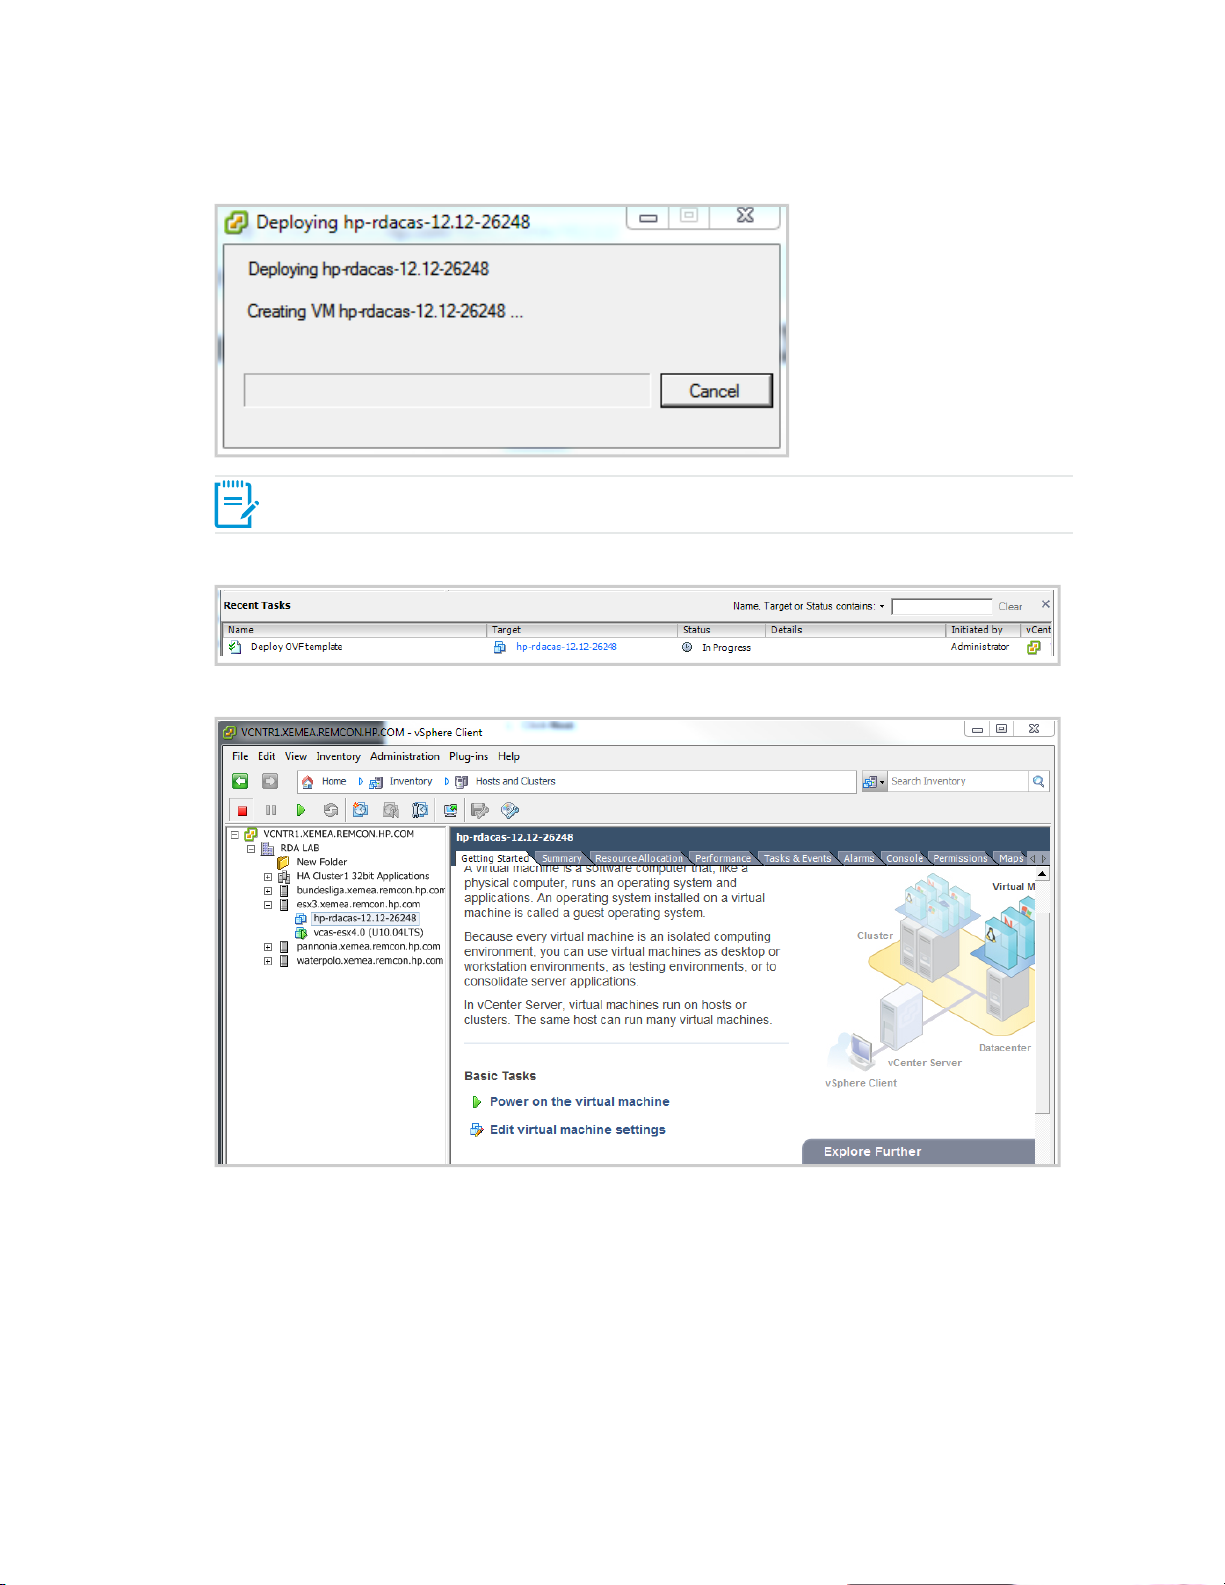
11. Review the deployment settings and click Finish.The Deploying dialog box appears.
Note: The new vCAS takes a few minutes to create.
12. The progress of the import task appears in the vSphere Client Status panel.
The vSphere Client window appears.
13. Select the newly created vCAS appliance andclick Power on the virtual machine.The vCAS
appliance starts and the console output displays in the Console tab.
HP Remote Device Access 8.1:vCAS User Guide Page 16 of 65
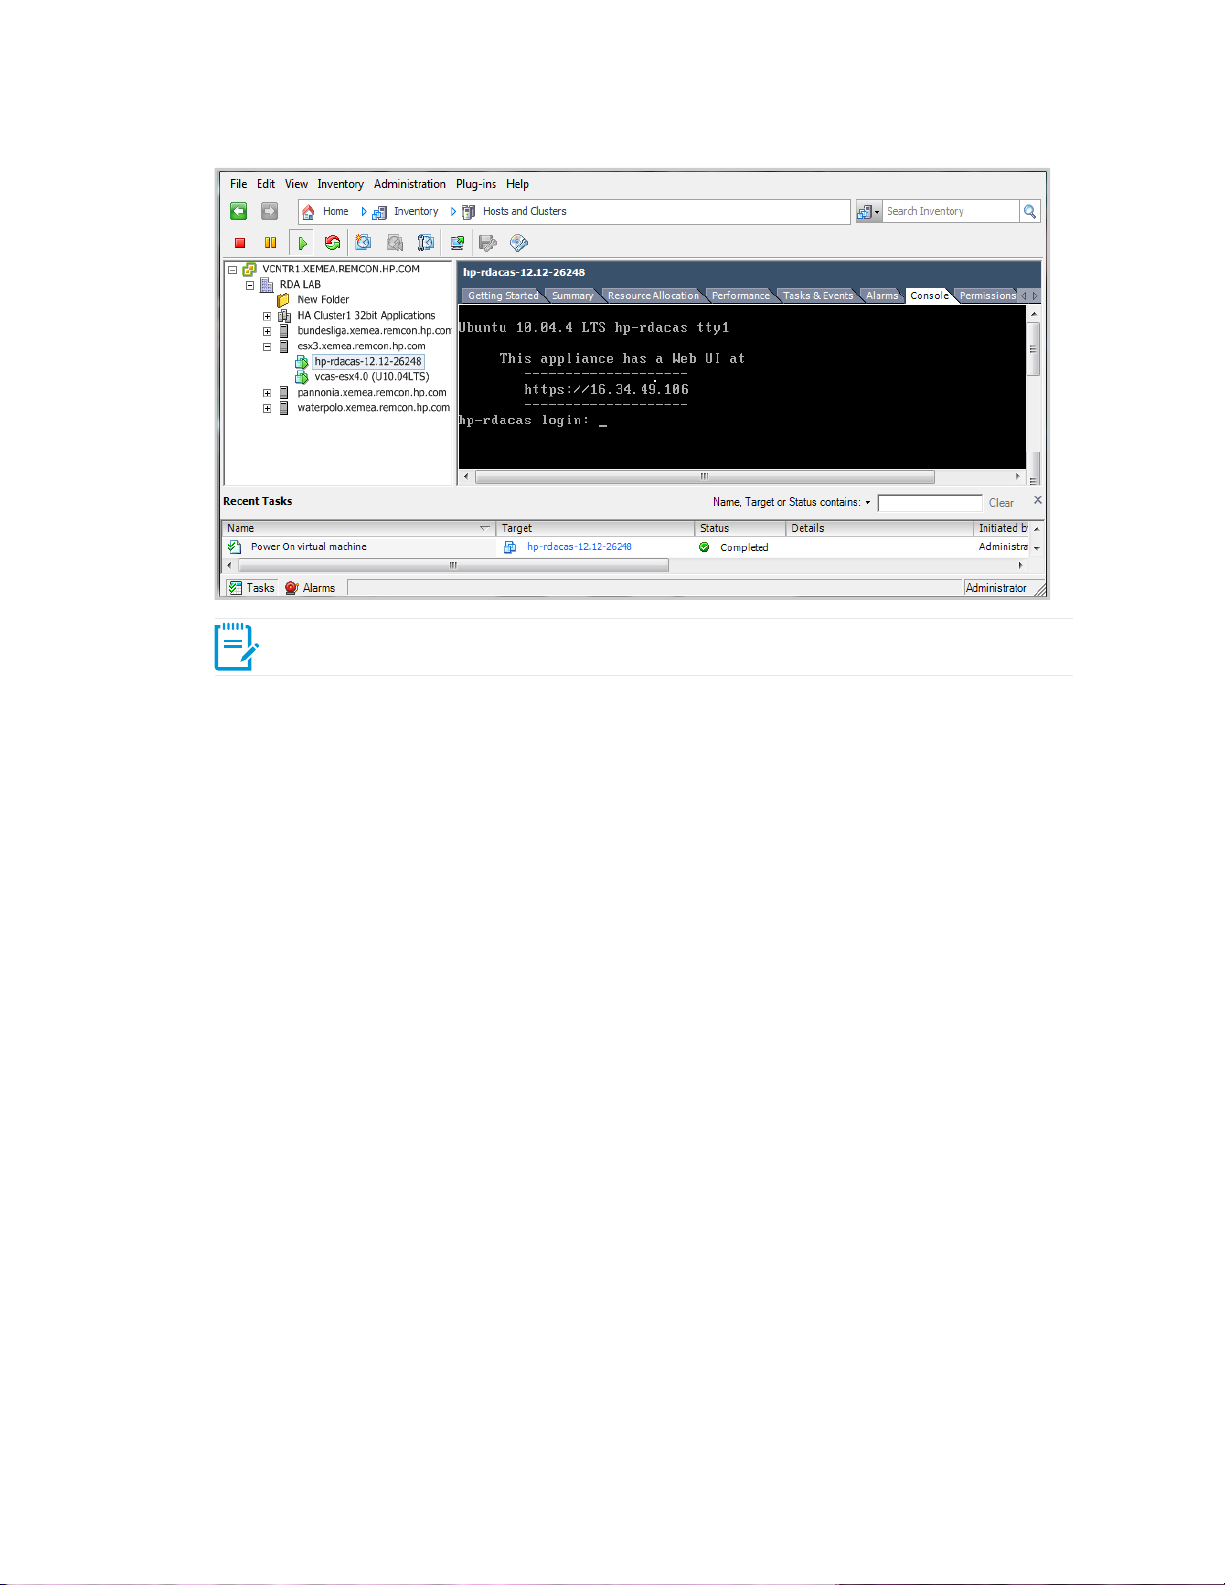
Note: The first time it starts, it reconfigures itself and then reboots.
Once it completes rebooting, the URL for the management UI appears.
14. Enter the URL into a web browser and follow the vCAS initial configuration instructions.
HP Remote Device Access 8.1:vCAS User Guide Page 17 of 65
Install on Oracle VM VirtualBox
You can install the vCAS on a VirtualBox Hypervisor. It takes less than five minutes to complete.
Verifying Prerequisites
Beforeyou install the vCAS, verify the following prerequisites:
l Make sure VirtualBox is installed. For more information about VirtualBox, go to:
https://www.virtualbox.org/wiki/Downloads.
l Make sure to downloadthe vCAS .ova image.
Importing to VirtualBox
To import the vCAS into a VirtualBox Hypervisor, complete the following steps:
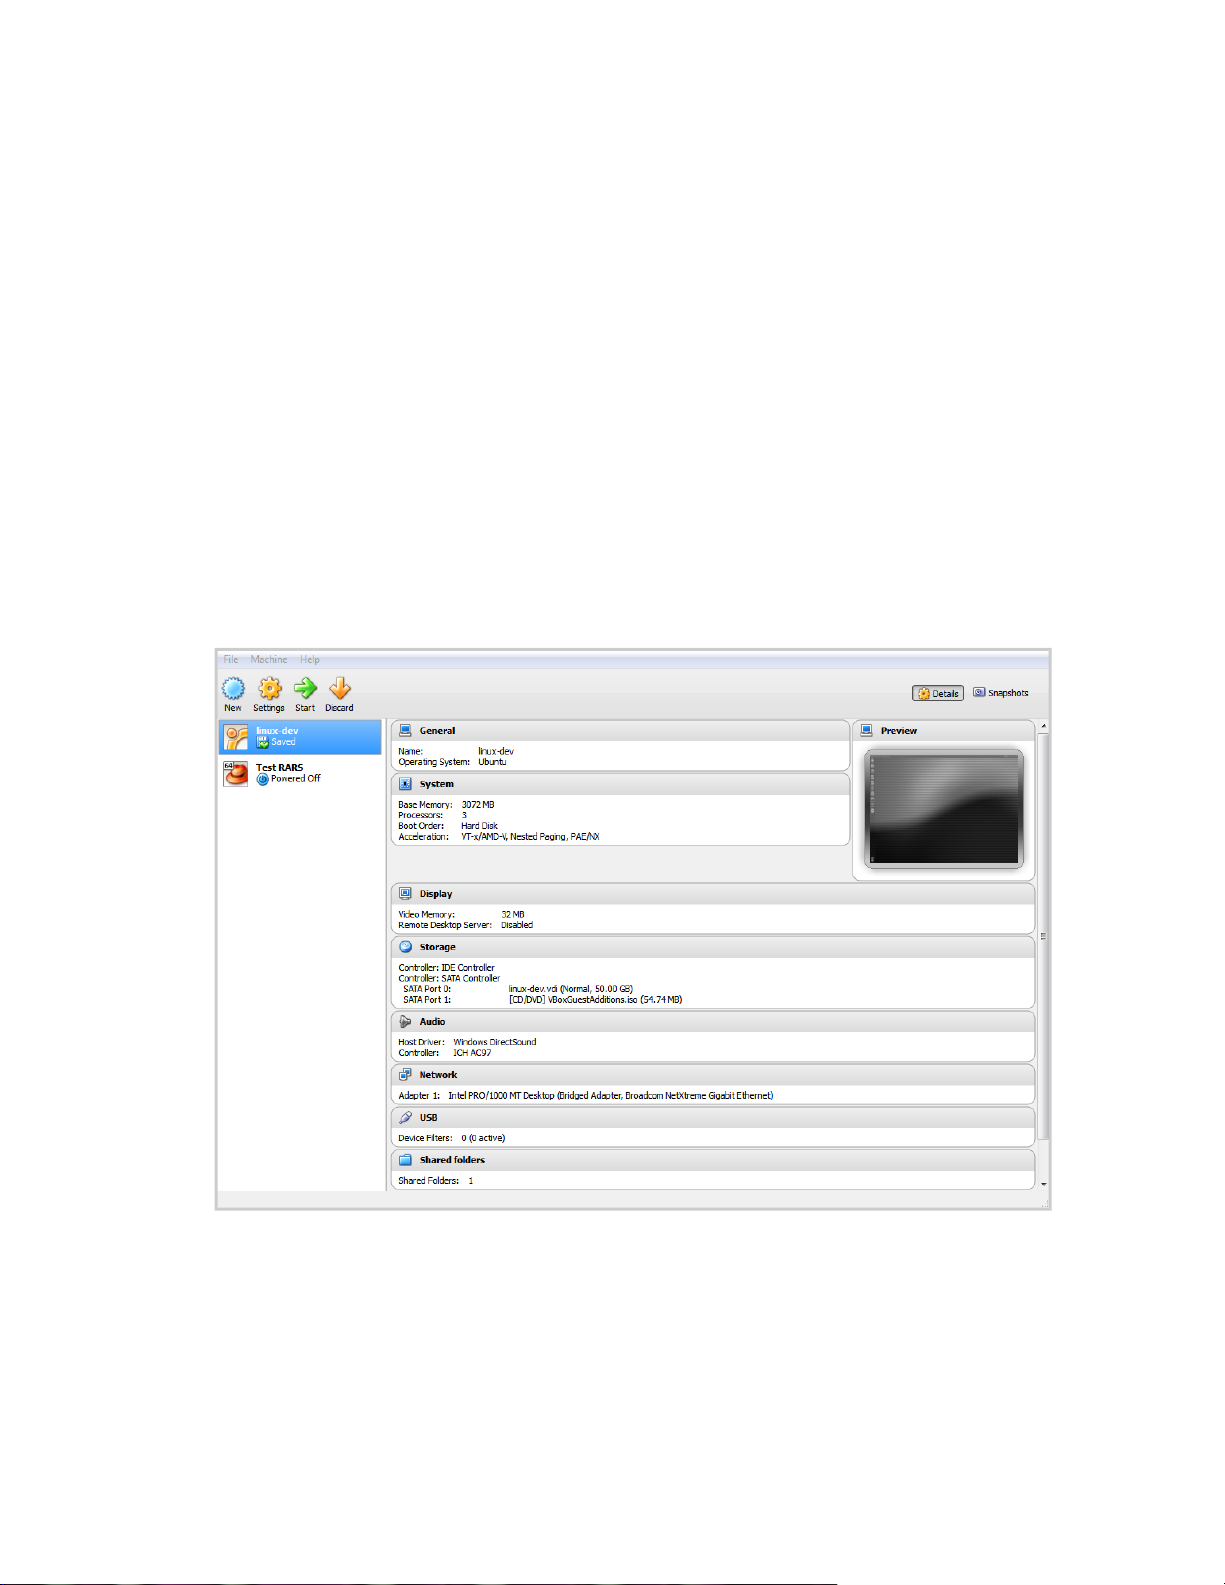
1. Launch the Oracle VM VirtualBox Manager. The Oracle VM VirtualBox Manager appears.
2. Click File, then Import Appliance. The Import Virtual Appliance wizard appears.
HP Remote Device Access 8.1:vCAS User Guide Page 18 of 65
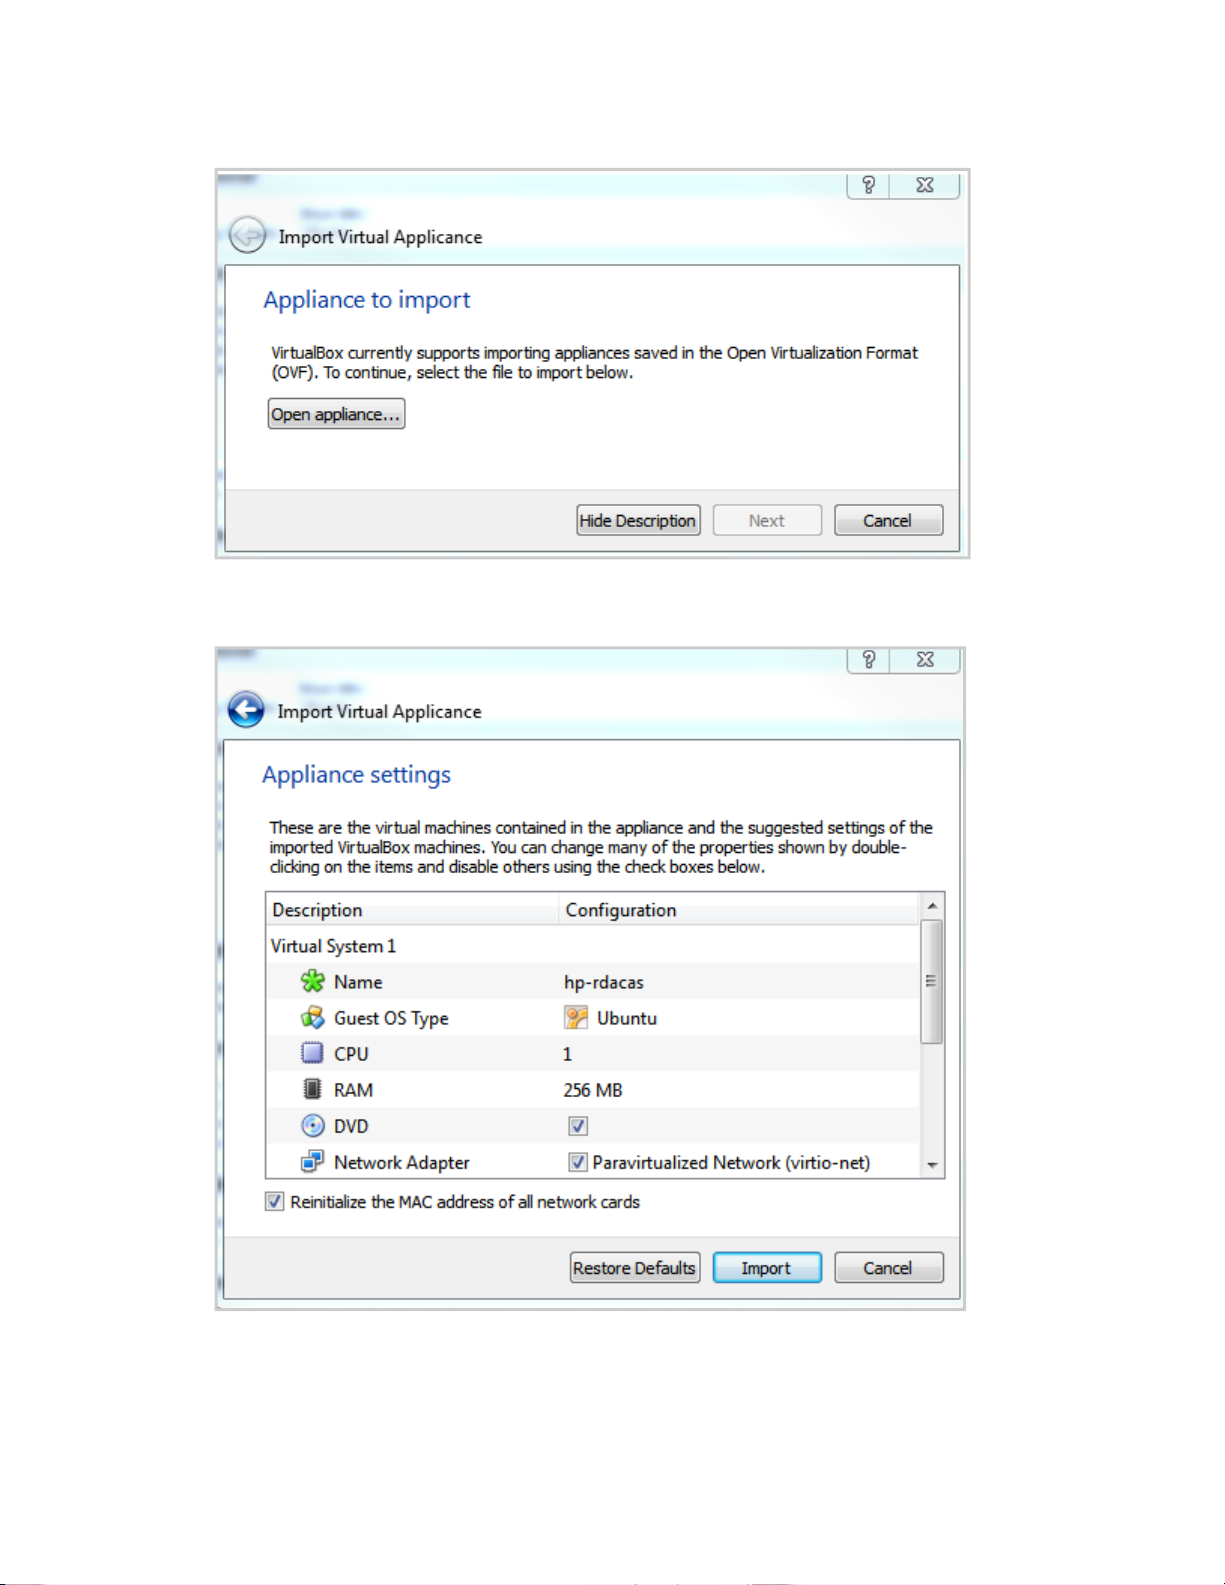
3. Click Open appliance to select and import the vCAS .ova file, then click Next.
The Appliance settings pageappears.
4. Select the Reinitialize the MAC address of all network cards check box, and then click Import.
The Importing Appliance dialogbox appears.
HP Remote Device Access 8.1:vCAS User Guide Page 19 of 65

Note: The new vCAS takes a few minutes to create.
The Oracle VM VirtualBox Manager window appears.
5. Select the newly created vCAS appliance and click Start.
The vCAS appliance starts and the console output displays in a new window. The first time it starts, it
reconfigures itself and then reboots. Once it completes rebooting, the URL for the management UI
appears.
HP Remote Device Access 8.1:vCAS User Guide Page 20 of 65
Loading...