


 Loading...
HP DesignJet T1700 Printer Series
User Guide

Edition 2
© Copyright 2018 HP Development Company,
L.P.
Legal notices
The information contained herein is subject to change without notice.
The only warranties for HP products and services are set forth in the express warranty statements accompanying such products and services. Nothing herein should be construed as constituting an additional warranty. HP shall not be liable for technical or editorial errors or omissions contained herein.
IPv6-ready
Trademarks
Adobe®, Acrobat®, Adobe Photoshop® and Adobe® PostScript® 3™ are trademarks of Adobe Systems Incorporated.
ENERGY STAR and the ENERGY STAR mark are registered U.S. trademarks.
Microsoft® and Windows® are U.S. registered trademarks of Microsoft Corporation.
PANTONE® is Pantone, Inc.'s check-standard trademark for color.

Table of contents
1 Introduction ............................................................................................................................................................................................... |
1 |
Welcome to your printer .......................................................................................................................................................... |
2 |
Printer models .......................................................................................................................................................................... |
2 |
Safety precautions ................................................................................................................................................................... |
2 |
Main components ..................................................................................................................................................................... |
6 |
Turn the printer on and off ...................................................................................................................................................... |
9 |
Front panel .............................................................................................................................................................................. |
10 |
HP Utility .................................................................................................................................................................................. |
13 |
HP Print Preview ..................................................................................................................................................................... |
14 |
Embedded Web Server .......................................................................................................................................................... |
14 |
Demo prints ............................................................................................................................................................................ |
14 |
onfigure your printer ........................................................................................................................................................... |
15 |
Mobile printing ........................................................................................................................................................................ |
22 |
Accessibility ............................................................................................................................................................................. |
22 |
Other sources of information ............................................................................................................................................... |
23 |
2 Paper handling ........................................................................................................................................................................................ |
24 |
General advice ........................................................................................................................................................................ |
25 |
Load a roll onto the spindle .................................................................................................................................................. |
25 |
Load a roll into the printer .................................................................................................................................................... |
28 |
Unload a roll ............................................................................................................................................................................ |
30 |
Load a single sheet ................................................................................................................................................................ |
31 |
Unload a single sheet ............................................................................................................................................................ |
32 |
Sensitive-paper mode (T1700dr only) ............................................................................................................................... |
32 |
View information about the paper ...................................................................................................................................... |
33 |
Paper presets .......................................................................................................................................................................... |
33 |
Printing paper info ................................................................................................................................................................. |
35 |
Move the paper ....................................................................................................................................................................... |
35 |
Maintain paper ........................................................................................................................................................................ |
35 |
Change the drying time ......................................................................................................................................................... |
36 |
Turn the automatic cutter on and off .................................................................................................................................. |
36 |
Feed and cut the paper ......................................................................................................................................................... |
36 |
ENWW |
iii |
3 Working with two rolls (T1700dr only) ............................................................................................................................................... |
38 |
Advantages of a multiroll printer ......................................................................................................................................... |
39 |
How the printer allocates jobs to paper rolls ..................................................................................................................... |
39 |
4 Networking .............................................................................................................................................................................................. |
41 |
Introduction ............................................................................................................................................................................. |
42 |
Control network protocols .................................................................................................................................................... |
42 |
Front-panel menu items ....................................................................................................................................................... |
42 |
Link configuration methods ................................................................................................................................................. |
45 |
Troubleshooting ..................................................................................................................................................................... |
46 |
5 Printing ..................................................................................................................................................................................................... |
49 |
Introduction ............................................................................................................................................................................. |
50 |
Print from a USB ash drive ................................................................................................................................................. |
50 |
Print from a computer using a printer driver ..................................................................................................................... |
51 |
Advanced print settings ........................................................................................................................................................ |
51 |
6 Mobile printing ........................................................................................................................................................................................ |
64 |
Mobile printing ........................................................................................................................................................................ |
65 |
Print from in-OS ..................................................................................................................................................................... |
65 |
Print by email (HP ePrint) ...................................................................................................................................................... |
66 |
Print and share from the HP Smart App ............................................................................................................................. |
66 |
Mobile specifications .............................................................................................................................................................. |
66 |
7 Job queue management ....................................................................................................................................................................... |
67 |
Job queue in the front panel ................................................................................................................................................ |
68 |
Job queue in the Embedded Web Server or HP DesignJet Utility ................................................................................... |
72 |
8 Color management ................................................................................................................................................................................ |
75 |
Introduction ............................................................................................................................................................................. |
76 |
How colors are represented ................................................................................................................................................. |
76 |
A summary of the color management process ................................................................................................................. |
76 |
Color calibration ...................................................................................................................................................................... |
76 |
Color profiling .......................................................................................................................................................................... |
77 |
Color management from printer drivers ............................................................................................................................ |
79 |
Color management from the front panel ........................................................................................................................... |
81 |
9 Practical printing examples .................................................................................................................................................................. |
83 |
Print a draft for revision with the correct scale ................................................................................................................. |
84 |
Print a PDF multipage job from Adobe Acrobat Reader or Adobe Acrobat Pro ............................................................ |
84 |
Print a document with the correct colors ........................................................................................................................... |
87 |
Print a project ......................................................................................................................................................................... |
92 |
Print a presentation ............................................................................................................................................................... |
95 |
iv |
ENWW |
Print and scale from Microsoft Office .................................................................................................................................. |
98 |
10 Retrieving printer usage information ............................................................................................................................................. |
102 |
Get printer accounting information .................................................................................................................................. |
102 |
Check usage statistics ......................................................................................................................................................... |
102 |
Check usage statistics for a job ......................................................................................................................................... |
105 |
Check cost assignment ....................................................................................................................................................... |
107 |
11 Handling ink cartridges and printheads ......................................................................................................................................... |
108 |
About the ink cartridges ..................................................................................................................................................... |
109 |
Check the ink cartridges status ......................................................................................................................................... |
109 |
Remove an ink cartridge ..................................................................................................................................................... |
109 |
Insert an ink cartridge ......................................................................................................................................................... |
110 |
About the printheads .......................................................................................................................................................... |
112 |
Check the printhead status ................................................................................................................................................ |
112 |
Remove a printhead ............................................................................................................................................................ |
113 |
Insert a printhead ................................................................................................................................................................ |
115 |
Safe mode ............................................................................................................................................................................. |
118 |
12 Maintaining the printer ..................................................................................................................................................................... |
119 |
Check printer status ............................................................................................................................................................ |
120 |
Clean the exterior of the printer ........................................................................................................................................ |
120 |
Maintain the ink cartridges ................................................................................................................................................. |
120 |
Move or store the printer .................................................................................................................................................... |
120 |
Update the firmware ........................................................................................................................................................... |
121 |
Update the software ........................................................................................................................................................... |
122 |
Printer maintenance kits .................................................................................................................................................... |
122 |
Secure File Erase .................................................................................................................................................................. |
123 |
Disk Wipe ............................................................................................................................................................................... |
123 |
13 Accessories ......................................................................................................................................................................................... |
124 |
How to order supplies and accessories ............................................................................................................................ |
125 |
Introduction to the accessories ......................................................................................................................................... |
129 |
Disposal instructions ........................................................................................................................................................... |
129 |
14 Troubleshooting paper issues ......................................................................................................................................................... |
130 |
Paper cannot be loaded successfully ............................................................................................................................... |
131 |
Paper type is not in the driver ............................................................................................................................................ |
132 |
Printer printed on the wrong paper type ......................................................................................................................... |
133 |
Automatic cut not available ................................................................................................................................................ |
133 |
On hold for paper ................................................................................................................................................................. |
134 |
Roll paper will not advance ................................................................................................................................................ |
135 |
Paper has jammed .............................................................................................................................................................. |
135 |
ENWW |
v |
A strip stays on the output tray and generates jams ..................................................................................................... |
138 |
Printer displays out of paper when paper is available ................................................................................................... |
138 |
Prints do not fall neatly into the basket ........................................................................................................................... |
138 |
Sheet stays in the printer when the print has been completed ................................................................................... |
138 |
Paper is cut when the print has been completed ........................................................................................................... |
138 |
Cutter does not cut well ...................................................................................................................................................... |
138 |
Roll is loose on the spindle ................................................................................................................................................. |
138 |
Recalibrate the paper advance .......................................................................................................................................... |
139 |
15 Troubleshooting print-quality issues ............................................................................................................................................. |
141 |
General advice ...................................................................................................................................................................... |
142 |
Horizontal lines across the image (banding) ................................................................................................................... |
142 |
Whole image is blurry or grainy ......................................................................................................................................... |
143 |
Paper is not at .................................................................................................................................................................... |
144 |
Print is scuffed or scratched ............................................................................................................................................... |
144 |
Ink marks on the paper ....................................................................................................................................................... |
144 |
Black horizontal lines on yellow background .................................................................................................................. |
145 |
Black ink comes off when you touch the print ................................................................................................................ |
145 |
Edges of objects are stepped or not sharp ...................................................................................................................... |
146 |
Edges of objects are darker than expected ..................................................................................................................... |
146 |
Horizontal lines at the end of a cut sheet print .............................................................................................................. |
146 |
Vertical lines of different colors ......................................................................................................................................... |
146 |
White spots on the print ..................................................................................................................................................... |
147 |
Colors are inaccurate ........................................................................................................................................................... |
147 |
Colors are fading .................................................................................................................................................................. |
148 |
Image is incomplete (clipped at the bottom) .................................................................................................................. |
148 |
Image is clipped ................................................................................................................................................................... |
148 |
Some objects are missing from the printed image ........................................................................................................ |
149 |
Lines are too thick, too thin or missing ............................................................................................................................ |
149 |
Lines appear stepped or jagged ........................................................................................................................................ |
150 |
Lines print double or in the wrong colors ........................................................................................................................ |
150 |
Lines are discontinuous ...................................................................................................................................................... |
151 |
Lines are blurred .................................................................................................................................................................. |
151 |
Line lengths are inaccurate ................................................................................................................................................ |
152 |
Image Diagnostics Print ...................................................................................................................................................... |
152 |
If you still have a problem .................................................................................................................................................. |
154 |
16 Troubleshooting ink cartridge and printhead issues ................................................................................................................... |
155 |
Cannot insert an ink cartridge ........................................................................................................................................... |
156 |
Ink cartridge status messages .......................................................................................................................................... |
156 |
Cannot insert a printhead ................................................................................................................................................... |
156 |
Front panel recommends reseating or replacing a printhead ...................................................................................... |
156 |
Clean the printheads ........................................................................................................................................................... |
157 |
Clean the printhead drop detector .................................................................................................................................... |
158 |
vi |
ENWW |
Align the printheads ............................................................................................................................................................ |
160 |
Printhead status messages ............................................................................................................................................... |
162 |
17 Troubleshooting general printer issues ......................................................................................................................................... |
163 |
Printer does not print .......................................................................................................................................................... |
164 |
Front panel fails to initialize ............................................................................................................................................... |
164 |
Printer seems slow .............................................................................................................................................................. |
164 |
Communication failures between computer and printer .............................................................................................. |
165 |
Cannot access the Embedded Web Server ...................................................................................................................... |
165 |
Cannot connect to the Internet ......................................................................................................................................... |
165 |
Web Services issues ............................................................................................................................................................ |
166 |
Automatic file system check .............................................................................................................................................. |
166 |
Alerts ...................................................................................................................................................................................... |
166 |
18 Front-panel error messages ............................................................................................................................................................ |
167 |
System error log .................................................................................................................................................................. |
167 |
19 HP Customer Care .............................................................................................................................................................................. |
168 |
Introduction .......................................................................................................................................................................... |
169 |
HP Professional Services .................................................................................................................................................... |
169 |
Customer Self Repair .......................................................................................................................................................... |
170 |
Contact HP Support ............................................................................................................................................................. |
170 |
20 Printer specifications ......................................................................................................................................................................... |
171 |
Functional specifications .................................................................................................................................................... |
172 |
Physical specifications ........................................................................................................................................................ |
173 |
Memory specifications ........................................................................................................................................................ |
173 |
Power specifications ........................................................................................................................................................... |
173 |
Ecological specifications ..................................................................................................................................................... |
173 |
Environmental specifications ............................................................................................................................................. |
174 |
Acoustic specifications ........................................................................................................................................................ |
174 |
Glossary ..................................................................................................................................................................................................... |
175 |
Index ........................................................................................................................................................................................................... |
178 |
ENWW |
vii |
viii |
ENWW |

1Introduction
●Welcome to your printer
●Printer models
●Safety precautions
●Main components
●Turn the printer on and off
●Front panel
●HP Utility
●HP Print Preview
●Embedded Web Server
●Demo prints
●onfigure your printer
●Mobile printing
●Accessibility
●Other sources of information
ENWW |
1 |

Welcome to your printer
Your printer is a color inkjet printer designed for printing high-quality images on paper up to 1118 mm (44 in) wide. Some major features of the printer are shown below:
●Print resolution of up to 2400 × 1200 optimized dpi, from a 1200 × 1200 dpi input, using the Best printquality option, the Maximum Detail option and photo paper.
●The printer can be controlled from its front panel or from a remote computer using the Embedded Web Server, HP DesignJet Utility, or HP Click Printing Software (see http://www.hp.com/go/designjetclick).
●Touch-sensitive front panel in color, with an intuitive graphical user interface.
●Job previews in the front panel.
●Job previews on remote computers.
●Includes Web-connected features such as automatic firmware updates, HP ePrint, and Mobile Printing.
●Driverless printing: Files in common graphical formats can be printed directly without needing a printer
|
driver. Just insert a USB ash drive or use HP Click Printing Software. |
● |
Paper exibility and automatic easy load, see Paper handling on page 24, with information and presets |
|
accessible from the front panel and the HP DesignJet Utility. |
●Handles cut-sheet and roll paper.
●Six-ink system.
●Accurate and consistent color reproduction with automatic color calibration.
●Economode for printing economically.
●Two rolls loaded at once (T1700dr only) provide fast and easy switching between different rolls, or long runs of unattended printing.
●High productivity features such as job previewing and nesting using HP Click Printing Software.
●Ink and paper usage information available from the Embedded Web Server, see Embedded Web Server on page 14.
●Access to the online HP Support Center (see HP Support Center on page 169).
Printer models
This guide covers the following printer models, normally referring to them by their short names for brevity.
Full name |
Short name |
|
|
HP DesignJet T1700 |
T1700 |
|
|
HP DesignJet T1700 PostScript Printer |
T1700 PS |
|
|
HP DesignJet T1700dr |
T1700dr |
|
|
HP DesignJet T1700dr PostScript Printer |
T1700dr PS |
|
|
Safety precautions
Read these safety precautions before using your printer. Also read your local Environmental, Health, and Safety regulations.
2 Chapter 1 Introduction |
ENWW |
This equipment is not suitable for use in locations where children are likely to be present.
For any maintenance or part replacement, follow the instructions provided in HP documentation to minimize safety risks and to avoid damaging the printer.
General safety guidelines
There are no operator-serviceable parts inside the printer except those covered by HP’s Customer Self Repair program (see http://www.hp.com/go/selfrepair). Refer servicing of other parts to qualified service personnel.
Turn off the printer and call your service representative in any of the following cases:
●The power cord or plug is damaged.
●The printer has been damaged by an impact.
●There is any mechanical or enclosure damage.
●Liquid has entered the printer.
●There is smoke or an unusual smell coming from the printer.
●The printer has been dropped.
●The printer is not operating normally.
Turn off the printer in either of the following cases:
●During a thunderstorm.
●During a power failure.
Take special care with zones marked with warning labels.
Ventilation measures for your location, whether office, copy room, or printer room, should meet local environmental health and safety (EHS) guidelines and regulations.
Electrical shock hazard
 WARNING! The internal circuits of the built-in power supplies and power inlet operate at hazardous voltages capable of causing death or serious personal injury.
Unplug the printer’s power cord before servicing the printer.
The printer requires a building installation circuit breaker, which must meet the requirements of the printer and should be in accordance with the Electrical Code requirements of the local jurisdiction of the country in which the equipment is installed.
To avoid the risk of electric shock:
●The printer should be connected to earthed mains outlets only.
●Avoid overloading the printer's electrical outlet with multiple devices.
●Do not remove or open any closed system covers or plugs.
●Do not insert objects through slots in the printer.
●Take care not to trip over the cables when walking behind the printer.
●Insert the power cord securely and completely into the wall socket and printer inlet.
●Never handle the power cord with wet hands.
ENWW |
Safety precautions 3 |
Fire hazard
To avoid the risk of fire, take the following precautions:
●The customer is responsible for meeting the printer’s requirements and the Electrical Code requirements according to the local jurisdiction of the country where the printer is installed. Use the power supply voltage specified on the nameplate.
●Use only the power cord supplied by HP with the printer. Do not use a damaged power cord. Do not use the power cord with other products.
●Do not insert objects through slots in the printer.
●Take care not to spill liquid on the printer. After cleaning, make sure all components are dry before using the printer again.
● Do not use aerosol products that contain ammable gases inside or around the printer. Do not operate the printer in an explosive atmosphere.
●Do not block or cover the openings of the printer.
Mechanical hazard
The printer has moving parts that could cause injury. To avoid personal injury, take the following precautions when working close to the printer.
●Keep your clothing and all parts of your body away from moving parts.
●Avoid wearing necklaces, bracelets, and other hanging objects.
●If your hair is long, try to secure it so that it will not fall into the printer.
●Take care that sleeves or gloves do not get caught in moving parts.
●Do not operate the printer with covers bypassed.
●If you need to replace the cutter assembly, take care not to cut yourself on the sharp cutting edge.
●Internal fan blades are hazardous moving parts. Disconnect the printer before servicing.
●Never insert your hands into the printer while it is printing, due to the moving parts inside.
Heavy paper hazard
Special care must be taken to avoid personal injury when handling heavy papers.
●Handling heavy paper rolls may require more than one person. Care must be taken to avoid back strain and/or injury.
●When handling heavy paper rolls, wear personal protective equipment, including boots and gloves.
●Follow your local Environmental Health and Safety regulations for handling heavy paper rolls.
Ink handling
HP recommends that you wear gloves when handling ink supplies.
Warnings and cautions
The following symbols are used in this manual to ensure the proper use of the printer and to prevent the printer from being damaged. Follow the instructions marked with these symbols.
4 Chapter 1 Introduction |
ENWW |

 WARNING! Failure to follow the guidelines marked with this symbol could result in serious personal injury or death.
CAUTION: Failure to follow the guidelines marked with this symbol could result in minor personal injury or damage to the printer.
Warning labels
Label |
Explanation |
|
|
|
Electric shock hazard. Hazardous voltages inside the electrical box. |
|
Disconnect the power cord before servicing. Before starting, read |
|
and follow the operating and safety instructions. |
Moving part. Keep your fingers and hands away from the moving paper system.
Moving fan blade. While servicing, keep your fingers and hands away from the blades.
Sharp edges. Avoid handling the cutting system.
When replacing the cutter assembly, handle with care and follow the safety instructions.
Risk of inlet damage. Maintain the end stoppers always assembled.
Only disassemble if needed for printer relocation.
 NOTE: The final label position and its size on the printer may vary slightly, but labels should always be visible and close to the potential risk area.
ENWW |
Safety precautions 5 |
Main components
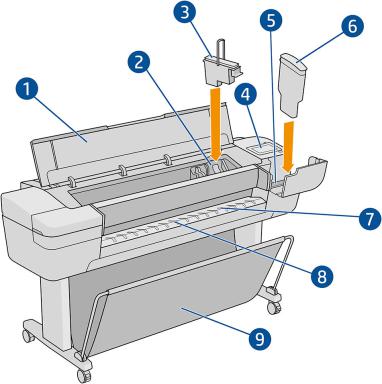
The following front and rear views of the printer illustrate the main components.
Front view
1.Window
2.Printhead carriage
3.Printhead
4.Front panel
5.Ink cartridge slot
6.Ink cartridge
7.Output platen
8.Paper alignment lines
9.Basket
6 Chapter 1 Introduction |
ENWW |
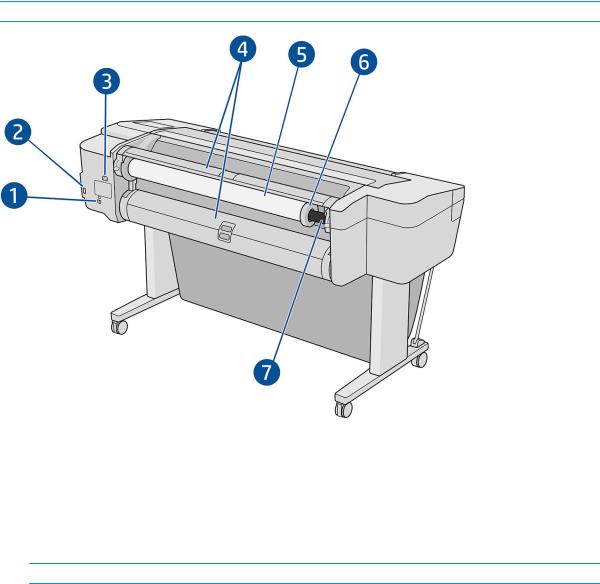
Rear view
 NOTE: This illustration shows the T1700dr.
1.Gigabit Ethernet port
2.Communication port
3.Power socket
4.Roll cover
5.Paper roll
 NOTE: The upper roll is roll 1 and the lower roll is roll 2.
6.Spindle stop
7.Spindle
ENWW |
Main components 7 |
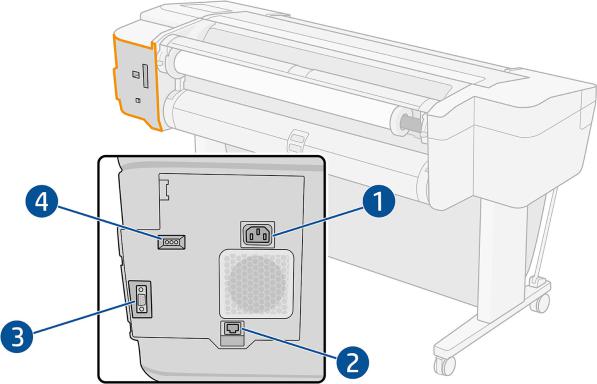
Communication ports
1.Power socket
2.Gigabit Ethernet port, to connect to a network
3.Communication port
4.Diagnostic LEDs, to be used by service engineers
The Hi-Speed USB host port is on the other side of the printer, beside the front panel.
8 Chapter 1 Introduction |
ENWW |
Wall spacers (some models only)
If you place the printer close to a wall, ensure that there is some space between the printer and the wall. Otherwise, you may experience paper advance problems. If your model has wall spacers, lower them to ensure a minimum distance.
Turn the printer on and off
TIP: The printer can be left powered on without wasting energy. Leaving it on improves response time and overall system reliability. When the printer has not been used for a certain period of time (the default time is determined by Energy Star), it saves power by going into sleep mode. However, any interaction with the printer's front-panel display, or sending a new job to print, returns it to active mode, and it can resume printing immediately. To change the sleep mode time, see Change system options on page 12.


 NOTE: In sleep mode, the printer performs maintenance service to the printheads from time to time. This avoids long preparation times after long idle periods. Therefore, it is strongly recommended to leave the printer powered on or in sleep mode to avoid wasting ink and time.
If you want to turn the printer on or off or reset the printer, the normal and recommended method is to use the power key beside the front panel.
However, if you plan to store the printer for a long period or the power key does not seem to work, you are recommended to unplug the power cord at the rear.
To turn it back on, plug in the power cord.
When the printer is powered back on, it takes about three minutes to initialize and check and prepare the printheads. Preparing the printheads takes about 75 seconds. However, if the printer has been off for six weeks or more, preparing the printheads could take up to 45 minutes.
ENWW |
Turn the printer on and off 9 |
Front panel
The front panel is a touch-sensitive screen with a graphical user interface, located on the front right of the printer.
It gives you complete control of your printer: from the front panel, you can view information about the printer, change printer settings, monitor printer status, and perform tasks such as supplies replacement and calibrations. The front panel displays alerts (warning and error messages) when necessary.
It includes the following components:
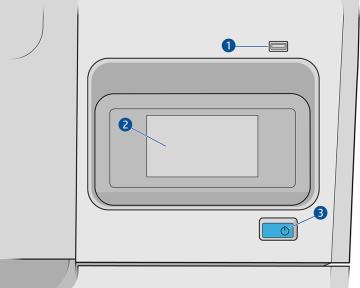
1. A Hi-Speed USB host port, intended for connecting a USB ash drive, which can provide files to be printed. When a USB ash drive is inserted, a USB icon  is displayed on the front panel's all-apps page.
2.The front panel itself: a 4.3 inch, full-color, touch-sensitive screen with a graphical user interface.
3.The power key, with which you can turn the printer on or off, or wake up from sleep mode.
The front panel has a large central area to display dynamic information and icons. Left fixed icons
●Tap  to return to the home page.
●Tap  to view help about the current page.
●Tap  to go back to the previous page. This does not discard any changes made to the current page.
10 Chapter 1 Introduction |
ENWW |
Home pages
There are three top-level pages that you can move between by sliding your finger across the screen:
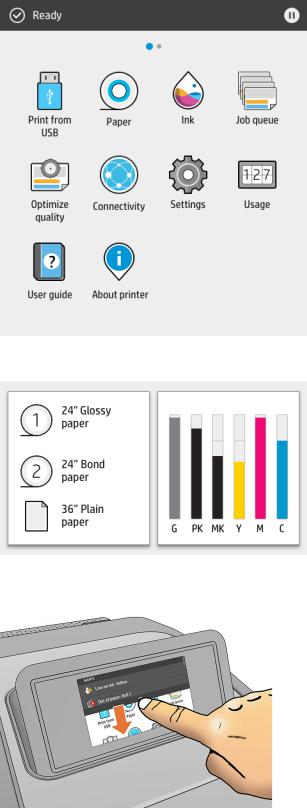
●The all-apps page displays a list of all apps available in your printer, and the status of each of them.
●If you swipe left to the widget page, you can see at a glance the status of ink and paper supplies.
●At the top of the all-apps page there is a dashboard that displays alerts related to the main functions of the printer. Swipe down the dashboard to access the Status Center.
ENWW |
Front panel 11 |
Dim mode
After some time with no activity (5 minutes by default), the printer goes to dim mode, which reduces the brightness of the front panel by 25%. Any activity, such as the use of the front panel or the arrival of a print job, ends dim mode and restores normal brightness. After some time in dim mode (15 minutes by default), the printer changes to sleep mode. The time periods can be changed from the front panel.
Sleep mode
Sleep mode puts the printer into a reduced power state after a period of inactivity, turning off some elements to save energy. Printer features can be enabled from this mode, and the printer maintains network connectivity, waking up only as necessary.
The printer can be woken from sleep mode any of the following ways:
●By pressing the power button
●By opening a door
●By sending a print job
The printer wakes up in several seconds, more quickly than if it is completely turned off. While in sleep mode, the power button blinks.
To change the time that elapses before sleep mode, see Change system options on page 12.
Printer Monitoring (with the Print Spooler) and Remote Printer Management with the HP Utility and Web JetAdmin continue to be available during sleep mode. Some remote management tasks offer the option of remotely waking up the printer if needed to perform the task.
Change the language of the front-panel display
There are two possible ways to change the language of the front-panel menus and messages.
●If you can understand the current front-panel display language, tap  , then System > Language.
●If you cannot understand the current front-panel display language, start with the printer powered off. Press
the power key to turn it on. When you see icons appear on the front panel, tap  and then
  . The front panel acknowledges this sequence by turning the icons on and off rapidly.
Whichever method you used, the language selection menu should now appear on the front-panel display. Tap your preferred language.
The available languages are English, Portuguese, Spanish, Catalan, French, Dutch, Italian, German, Polish, Russian, Simplified Chinese, Traditional Chinese, Korean, and Japanese.
Change system options
You can change various printer system options from the front panel. Tap  , then System.
●Date and time options to view or set the printer's date and time.
●Speaker volume to change the volume of the printer's loudspeaker. Select Off, Low, or High.
●Display brightness to change the brightness of the front-panel display. The default brightness is 50.
12 Chapter 1 Introduction |
ENWW |
●Power options > Printer sleep to change the length of time the printer waits before going into sleep mode (see Sleep mode on page 12). You can set the time from 5 to 240 minutes. The default time is 20 minutes (total time including 5 minutes in dim mode).
●Power options > uto-off due to inactivity to turn off the printer automatically after 120 minutes of inactivity.
●Unit selection to change the units of measurement in the front-panel display. Select English or Metric. By default, units are set to Metric.
●Restore factory settings to restore the printer settings to their original values as set in the factory. This option restores all of the printer settings except the administrator password and the paper presets.
●Language.
●Firmware update to configure the automatic firmware update.
HP Utility
The HP Utility enables you to manage your printer from a computer with a TCP/IP connection.
 NOTE: The HP Utility under Mac OS X and the HP DesignJet Utility under Windows have similar functions and are sometimes referred to collectively as the HP Utility in this guide.
You can install the HP Utility from http://www.hp.com/go/T1700/drivers.
How to launch the HP Utility
●Under Windows, start the HP DesignJet Utility from the  icon on your taskbar or from the Start menu > HP > HP DesignJet Utility. This launches the HP DesignJet Utility, showing the printers installed on your computer. When you open the HP DesignJet Utility for the first time, it may offer you an automatic update with enhanced functionality that we recommend you to accept.
●Under Mac OS X, start the HP Utility from your Dock shortcut or by clicking Applications > HP > HP Utility. This launches the HP Utility, showing the printers installed on your computer.
When you select your printer in the left pane, everything that appears in the right pane is specific to that printer.
ENWW |
HP Utility 13 |
HP Print Preview
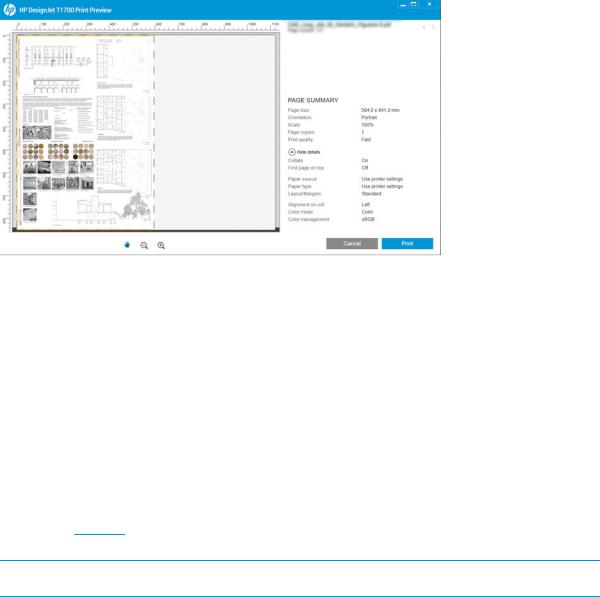
The HP Print Preview application enables you to see a basic preliminary preview of how your job will be printed. This application is available only under Windows. You can install the HP Print Preview by downloading the integrated installer from http://www.hp.com/go/T1700/drivers.
Embedded Web Server
The following browsers are known to be compatible with the Embedded Web Server:
●Microsoft Internet Explorer 11 and later for Windows 7 and later
●Apple Safari 8 and later for OS X 10.10 and later
●Mozilla Firefox (latest version)
●Google Chrome (latest version)
To use the Embedded Web Server on any computer, open your Web browser and enter the printer's IP address in the browser's address bar. You can find your printer's IP address in the printer’s front panel: tap  and then Network. See onfigure your printer on page 15.
 NOTE: Your browser may display a security warning when you enter the IP address. If you have entered the correct address, it is safe to ignore the warning and continue to access the Embedded Web Server.
The Embedded Web Server window displays a menu used to access all the supported functionality. It supports the following languages: English, Portuguese, Spanish, Catalan, French, Dutch, Italian, German, Polish, Russian, Simplified Chinese, Traditional Chinese, Korean, and Japanese. It uses the language that you specified in your Web browser options. If you specify a language that it cannot support, it is displayed in the language selected in the printer, or else in English.
To change the language, change your Web browser's language setting. To complete the change, close and reopen your Web browser.
Demo prints
The demo prints give various kinds of information about your printer. They can be requested from the front panel.
14 Chapter 1 Introduction |
ENWW |
Before requesting a demo print, check that the printer and the paper are ready for printing.
●The loaded paper should be at least A3 landscape—419 mm (16.53 in) wide—otherwise the print may be clipped.
●The front panel should be displaying the Ready message.
To print a demo print, tap  , then scroll down and tap Internal prints, then Demo prints, and select a print. The following prints are available:
●Render
●CAD black & white
●GIS
onfigure your printer
Connect the printer to your network
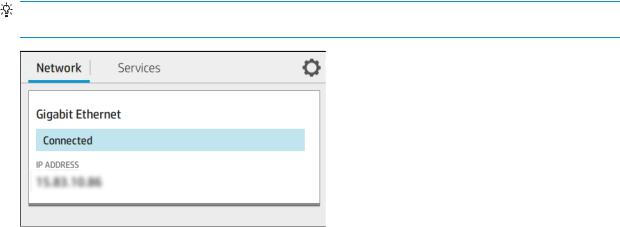
The printer is able to configure itself automatically for most networks, in a similar way to any computer in the same network. The first time you connect it to a network, this process may take a few minutes.
Once the printer has a working network configuration, you can check its network address from the front panel: tap  .
.
TIP: Consider making a note of the printer’s IP address, because you may need it during the setup process of connecting your Windows or Mac OS computer clients.
Modify network configuration
To modify the current network configuration, go to the front panel and tap  , then
  , then Network >
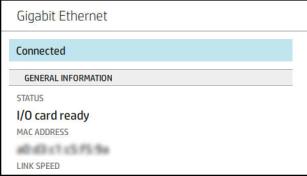
Gigabit Ethernet. From here it is possible, though not normally necessary, to change the settings manually; this can also be done remotely using the Embedded Web Server.
For full details of the available connectivity settings, see Networking on page 41.
If you accidentally misconfigure the printer’s network settings, you can restore the network settings to their factory values from the front panel: tap  , then Network > Restore factory settings. Then you must restart
the printer. This automatically provides a working network configuration for most networks. The printer’s other settings remain unchanged.
ENWW |
onfigure your printer 15 |

Install your printer under Windows
The following instructions apply if you intend to print from software applications using a printer driver. See Printing on page 49 for alternative ways of printing.
Before you begin, check your equipment:
●The printer should be set up and on.
●The Ethernet switch or router should be on and functioning correctly.
●The printer and the computer should be connected to the network (see Connect the printer to your network on page 15).
Now you can proceed to install the printer software and connect to your printer.
Printer software installation
1.Make a note of the printer’s host name and IP address from the front panel (see Connect the printer to your network on page 15).
2.Install the printer software from http://www.hp.com/go/T1700/drivers, following the software installation instructions. By default, the following driver is installed:
●Non-PostScript printers: The raster driver
●PostScript printers, with Windows 7 or Windows Server 2008R2: The PostScript driver
●PostScript printers, with Windows 8, Windows Server 2012, or later: The PDF driver
3.Once downloaded, open it, and follow on-screen steps.
If your computer fails to find any printers on the network, the Printer Not Found window is displayed, which helps you to try to find your printer. If you have a firewall in operation; you may have to disable it temporarily in order to find the printer. You also have the options of searching for the printer by its hostname, IP address or MAC address.
Uninstall the printer software under Windows
Use the Control Panel to uninstall the software, in the same way as you can uninstall any other software.
Install your printer under Mac OS X
You can connect your printer to a network under Mac OS X by using the following methods:
●Bonjour
●TCP/IP (important: select HP Jetdirect-Socket)
 NOTE: The printer does not support AppleTalk.
The following instructions apply if you intend to print from software applications using a printer driver. See Printing on page 49 for alternative ways of printing.
Before you begin, check your equipment:
●The printer should be set up and on.
●The Ethernet switch or router should be on and functioning correctly.
●The printer and the computer should be connected to the network (see Connect the printer to your network on page 15).
16 Chapter 1 Introduction |
ENWW |

Now you can proceed to install the printer software and connect to your printer.
1.Go to the front panel and tap  , then Network, and note the IP address of your printer. If you intend to connect with Bonjour, click the network card and note the Bonjour name.
2.Install the printer software from http://www.hp.com/go/T1700/drivers.
3.Select Windows or Mac OS X software, and choose which specific software you want to install (by default, all of it).
 NOTE: You can download HP Click with the other software.
4.Double-click the HP DesignJet Installer icon. You will be guided through the steps to install the HP software for your printer.
5.When the software has been installed, the HP Utility Setup Assistant starts automatically, to set up a connection to your printer.
6.In the Setup Assistant, look for your printer's Bonjour name or IP address (which you noted in step 1) in the table.
●If you find the right name, scroll sideways if necessary to see the Connection column, and check that it shows Bonjour. Then highlight that line. Otherwise, continue searching further down the list.
●If you cannot find your printer's name, just click Continue and do the setup manually. Access System Preferences, and in Printers and Scanners select the + sign at the bottom of the table. Then go to the IP tab, enter your IP address, and select the protocol HP Jetdirect-Socket.
Click Continue.
7.Follow the instructions on the screen.
Uninstall the printer software under Mac OS X
During the previous installation step, you have the option to install the HP Uninstaller application in your system. This should be available under HP in the system Applications folder.
 IMPORTANT: The HP Uninstaller application will uninstall all HP Software installed in your system.
To delete the print queue only, select the Printers & Scanners dialog from the system preferences. Click the name of the printer and then click the – button.
Set up printer services
You can set up the following services:
●Receive automatic firmware updates
●Enable email printing
●Participate in the Product Data Sharing Agreement
●Enable additional printer services
A network connection is required, so the printer will test its own connectivity. Remember to connect the network cable to the printer.
Each printer service can be enabled or disabled individually as explained below.
ENWW |
onfigure your printer 17 |
During initial printer setup, you are asked whether you want to enable these services. That decision can be changed later by tapping  , then
  , then Services > Printer Data Sharing Agreement.
If you are part of the HP Partner Link Pay-per-use service, tap  , then Services >
  > Register new service in order to register the printer service.
Verify printer connection to HP
You can check that the printer is able to connect to HP services by tapping  and viewing the status there. You can see detailed information by clicking the Network or Service card.
If there is any problem connecting to HP, you will be provided with a description of the problem and some possible solutions.
Enable email printing with HP ePrint
The HP Connected service makes it easy to send jobs to your printer by attaching them to an email message. You must accept the Printer Data Sharing Agreement in order to use HP Connected.
To configure the email printing configuration, tap  , then Services. Scroll down until you find the HP ePrint
card, which will display your printer’s email address, which can be used to send jobs to the printer. Double-click the HP ePrint card to access the printer's code and other configuration details.
If you are the printer administrator, log in at HP Connected (http://www.hpconnected.com) to customize your printer’s email address or manage printer security for remote printing.
You must also visit http://www.hpconnected.com to register yourself and your printer (using the printer code).
onfigure your HP ePrint connection
By default, the jobs sent by email are directly printed. To change the settings, tap  , then
  at the right top corner of the page, then Services > HP Connected > HP ePrint jobs > On hold.
You can disable the connection to HP ePrint if required for security. At the front panel, tap  , then
  at the right top corner of the page, then Services > HP Connected > HP ePrint Connectivity > Disable.
Disable just puts the remote printing function on hold. If you want to resume using it, you just need to re-enable it in the same menu. No more setup steps are required.
18 Chapter 1 Introduction |
ENWW |

If you want to disable remote printing permanently, tap Remove. To use remote printing again, you will need to set it up again from scratch.
onfigure firmware updates
You can choose from the Embedded Web Server or from the front panel whether and how to download firmware updates.
 NOTE: If an administrator password has been set, it will be required to change these settings.
●In the Embedded Web Server: Click About printer > Firmware update.
●Using the front panel: Tap  , then System > Firmware update. The following settings are available:
●Download new firmware automatically: If you select Automatically (the default setting), the printer will automatically download new firmware whenever it becomes available. Deactivate this option to download new firmware manually.
 NOTE: Downloading the firmware does not mean that you have installed it in your printer. To install the new firmware, you must confirm the installation manually.
Control access to the printer
Manage printer security with HP Connected
When you have set up Web Services, the printer is in unlock mode. In unlock mode, anyone who knows your printer's email address can print to your printer just by sending a file to it. Although HP provides a spam filtering service, you should be careful about giving out your printer's email address, as everything sent to that address may be printed on your printer.
If you are the printer administrator, you can manage printer security or change your printer status to lock mode by visiting HP Connected at http://www.hpconnected.com. You can also customize your printer's email address and manage print jobs from there. At your first visit, you will need to create an account at HP Connected using the printer's code.
Embedded Web Server security settings
From the Embedded Web Server menu, you can click Security and then Administrator password to control access to the printer by specifying an administrator account to control access to the Embedded Web Server and the printer’s front panel.
The administrator can also define other types of permissions in the control panel through the Access control menu option. In this section, the administrator can create new printer user accounts and assign them specific permissions depending on their role.
Other security settings are available under the Security settings menu option, which apply to all users.
ENWW |
onfigure your printer 19 |

Front-panel security settings
From the front panel, you can tap  , then Security, to control some of the features of the printer:
●User sessions: Enable or disable automatic log-out after 1, 3, or 5 minutes.
●Embedded Web Server: Enable or disable the Embedded Web Server.
●Printing & management Web services: Enable or disable Web services that are used by printing and management tools such as the HP Utility, HP Click, and SDK for RIPs.
If an administrator password has been set, it must be given in order to perform the following operations:
●Change the security settings (including the administrator password itself).
●Change the configuration of the Internet connection.
●Change the Automatic Firmware Update configuration.
●Enable or disable automatic downloading and/or installation of automatic firmware updates.
●Restore an earlier firmware version.
●Reset factory defaults.
 NOTE: The administrator password can contain only characters that appear on the front panel's on-screen keyboard. If you set a new password with the Embedded Web Server, it will reject characters that do not appear in that limited character set.
Require account ID
If you want to keep records of printer usage by different users, you can set your printer to require an account ID for each job. At the front panel, tap  , then Job management > Account ID required.
If this setting is turned on, the account ID field will be mandatory and jobs with no account ID will be kept "on hold for accounting".
The account ID can be set in the printer driver when sending the job. If the job is set "on hold for accounting" by the printer, you can introduce the account ID in the driver or front panel, by going to the job queue and clicking the job that is on hold. A window with a text box is displayed and you can enter the account ID into it.
Drivers
There are various different drivers for your printer; which is best for you depends on your circumstances:
●Your operating system
●The type of applications from which you print
●The number of printers you have
●The output accessories you have
You may wish to install one or several drivers according to your needs.
You can find the latest driver software at http://www.hp.com/go/T1700/drivers/.
20 Chapter 1 Introduction |
ENWW |
Specific Windows drivers
The following driver is recommended:
●Non-PostScript printers: The raster driver
●PostScript printers, with Windows 7 or Windows Server 2008R2: The PostScript driver
●PostScript printers, with Windows 8, Windows Server 2012, or later: The PDF driver
HP DesignJet Universal Print Driver for Windows
The Universal Print Driver (UPD) is recommended if you have a eet of HP DesignJet and PageWide XL printers: it facilitates installation and queue management.
HP Universal Print Driver configuration tool
The HP UPD configuration tool is a utility that allows you to personalize DesignJet and PageWide UPDs by modifying the default settings or locking some of them, preventing users from changing them. This tool is intended for IT administrators.
To install the tool, go to http://www.hp.com/go/T1700/support and click Software and drivers > Software – Utility > UPD configuration tool > Download.
For information about how to install and use the tool, go to https://support.hp.com/us-en/document/ c05658213.
Mac OS drivers
Raster driver
●Specifically for Mac OS X 10.9, 10.10, 10.11, 10.12, and 10.13
●Best for CAD, GIS, and office applications
PostScript 3 driver
●Specifically for Mac OS X 10.9, 10.10, 10.11, 10:12, and 10.13
●Best for applications requiring accurate color
Set Windows driver preferences
You can change some default settings in your printer driver according to your own preferences, for instance to set color or paper-saving options. To do this, click the Start or Search button on your computer's screen, then click Devices and Settings or Devices and Printers. In the next window, right-click your printer's icon, and click Printing Preferences. Any settings you change in the Printing Preferences window will be saved as default values for the current user.
To set the default values for all users of your system, right-click the printer’s icon, click Printer Properties, go to the Advanced tab, and click Printing Defaults. Any settings you change in the printing defaults will be saved for all users.
Change the graphic language setting
You can change the graphic language setting from the front panel. Tap  , then Default printing configuration > Graphics language.
ENWW |
onfigure your printer 21 |
Then select one of the following options:
●Select Automatic to let the printer determine which type of file it is receiving. This is the default setting; it works for most software applications. You should not normally need to change it.
●Select PS (PostScript) only if you are sending a file of that type directly to the printer, without going through a printer driver.
●Select PDF only if you are sending a file of that type directly to the printer, without going through a printer driver.
●Select HP-GL/2 only if you are sending a file of that type directly to the printer, without going through a printer driver.
●Select CALS/G4 only if you are sending a file of that type directly to the printer, without going through a printer driver.
●Select TIFF only if you are sending a file of that type directly to the printer, without going through a printer driver.
●Select JPEG only if you are sending a file of that type directly to the printer, without going through a printer driver.
Mobile printing
With HP Mobile Printing Solutions you can print straight from your smartphone or tablet in just a few simple steps wherever you are; using your mobile device OS or sending an email to your printer with PDF, TIFF, or JPEG attachments.
●Apple iOS printing is enabled through AirPrint, which comes pre-installed in iOS devices.
●For Android printing, install the HP Print Service App from Google Play. If you have have already installed it, check that it is up to date. You can obtain the latest version from https://play.google.com/store/apps/ details?id=com.hp.android.printservice.
●You can also download the HP Smart App to enhance your printing capabilities from a smartphone or tablet.
–Latest iOS version from https://itunes.apple.com/app/id469284907
–Latest Android version from https://play.google.com/store/apps/details?id=com.hp.printercontrol
●To enable email printing, ensure that the service is enabled, and retrieve the printer's email address from the front panel.
For more detailed information, see http://www.hp.com/go/designjetmobility.
Accessibility
Front panel
If required, the front-panel display brightness and the loudspeaker volume can be changed (see Change system options on page 12).
Embedded Web Server
From the Embedded Web Server, you can see the status of the printer, and perform other actions without using the front panel.
For information about the accessibility features of the Embedded Web Server, click Support > Accessibility.
22 Chapter 1 Introduction |
ENWW |
Loading...