


 Loading...
HP Designjet T1120
Printer Series
Using your printer

HP Designjet T1120 printer series
Using your printer

Legal notices
© 2008 Hewlett-Packard Development
Company, L.P.
The information contained herein is subject to change without notice.
The only warranties for HP Products and services are set forth in the express warranty statement accompanying such products and services. Nothing herein should be construed as constituting an additional warranty. HP shall not be liable for technical or editorial errors or omissions contained herein.
USB 2.0 high-speed certified.
Trademarks
Adobe®, Acrobat®, Adobe Photoshop® and Adobe® PostScript® 3™ are trademarks of Adobe Systems Incorporated.
Corel® is a trademark or registered trademark of Corel Corporation or Corel Corporation Limited.
ENERGY STAR and the ENERGY STAR mark are registered U.S. trademarks.
Microsoft® and Windows® are U.S. registered trademarks of Microsoft Corporation.
PANTONE® is Pantone, Inc.'s checkstandard trademark for color.

Table of contents
1 |
Introduction |
|
|
Safety precautions ................................................................................................................................ |
2 |
|
HP Start-Up Kit ..................................................................................................................................... |
2 |
|
Using this guide .................................................................................................................................... |
2 |
|
The printer's main features ................................................................................................................... |
4 |
|
The printer's main components ............................................................................................................ |
4 |
|
The front panel ..................................................................................................................................... |
6 |
|
Printer software .................................................................................................................................... |
8 |
|
The printer's internal prints ................................................................................................................... |
8 |
2 |
Installing the software |
|
|
Choose which connection method to use ........................................................................................... |
12 |
|
Connect to a network (Windows) ....................................................................................................... |
12 |
|
Connect directly to a computer (Windows) ......................................................................................... |
13 |
|
Uninstall the printer software (Windows) ............................................................................................ |
14 |
|
Connect to a network (Mac OS) ......................................................................................................... |
14 |
|
Connect directly to a computer (Mac OS) .......................................................................................... |
17 |
|
Uninstall the printer software (Mac OS) ............................................................................................. |
19 |
3 |
Setting up the printer |
|
|
Introduction ......................................................................................................................................... |
22 |
|
Handle paper conflicts ........................................................................................................................ |
22 |
|
Turn nesting on and off ...................................................................................................................... |
22 |
|
Turn usage information on and off ..................................................................................................... |
23 |
|
Turn alerts on and off ......................................................................................................................... |
24 |
|
Set or delete the security password ................................................................................................... |
24 |
|
Require account ID ............................................................................................................................. |
25 |
|
Set Windows driver preferences ........................................................................................................ |
25 |
4 |
Personalizing the printer |
|
|
Turn the printer on and off .................................................................................................................. |
28 |
|
Change the language of the front-panel display ................................................................................. |
29 |
|
Access the HP Printer Utility .............................................................................................................. |
29 |
|
Access the Embedded Web Server ................................................................................................... |
29 |
|
Change the language of the HP Printer Utility .................................................................................... |
30 |
|
Change the language of the Embedded Web Server ......................................................................... |
30 |
|
Change the sleep mode setting .......................................................................................................... |
30 |
ENWW |
iii |
Turn the buzzer on and off ................................................................................................................. |
30 |
Change the front-panel display contrast ............................................................................................. |
31 |
Change the units of measurement ..................................................................................................... |
31 |
Configure network settings ................................................................................................................. |
31 |
Change the graphic language setting ................................................................................................. |
32 |
5 Paper handling |
|
General advice ................................................................................................................................... |
34 |
Load a roll onto the 24-inch spindle ................................................................................................... |
34 |
Load a roll onto the 44-inch spindle .................................................................................................. |
36 |
Load a roll into the 24-inch printer ..................................................................................................... |
38 |
Load a roll into the 44-inch printer ...................................................................................................... |
42 |
Unload a roll ....................................................................................................................................... |
46 |
Load a single sheet ............................................................................................................................ |
47 |
Unload a single sheet ......................................................................................................................... |
50 |
View information about the paper ....................................................................................................... |
50 |
Paper profiles ..................................................................................................................................... |
51 |
Print on loaded paper ......................................................................................................................... |
52 |
Maintain paper .................................................................................................................................... |
52 |
Change the drying time ...................................................................................................................... |
52 |
Turn the automatic cutter on and off .................................................................................................. |
53 |
Feed and cut the paper ...................................................................................................................... |
53 |
6 Printing |
|
Create a print job ................................................................................................................................ |
56 |
Select print quality .............................................................................................................................. |
57 |
Select paper size ................................................................................................................................ |
57 |
Select margins options ....................................................................................................................... |
58 |
Print with shortcuts ............................................................................................................................. |
59 |
Rescale a print ................................................................................................................................... |
60 |
Change the treatment of overlapping lines ......................................................................................... |
60 |
Preview a print .................................................................................................................................... |
61 |
Print a draft ......................................................................................................................................... |
61 |
High-quality printing ............................................................................................................................ |
62 |
Print in gray shades ............................................................................................................................ |
63 |
Print with no margins .......................................................................................................................... |
63 |
Print with crop lines ............................................................................................................................ |
64 |
Use paper economically ..................................................................................................................... |
64 |
Nest jobs to save roll paper ................................................................................................................ |
64 |
Use ink economically .......................................................................................................................... |
66 |
7 Color management |
|
Introduction ......................................................................................................................................... |
68 |
How colors are represented ............................................................................................................... |
68 |
A summary of the color management process ................................................................................... |
68 |
Color calibration ................................................................................................................................. |
68 |
iv |
ENWW |
|
Color management from printer drivers .............................................................................................. |
69 |
|
Color management from printer drivers (T1120ps only) ..................................................................... |
72 |
|
Color management from the Embedded Web Server ........................................................................ |
74 |
|
Color management from the front panel ............................................................................................. |
76 |
8 |
Practical printing examples |
|
|
Print a draft for revision with the correct scale ................................................................................... |
80 |
|
Print a project ..................................................................................................................................... |
83 |
|
Print a presentation ............................................................................................................................ |
90 |
|
Print and scale from Microsoft Office ................................................................................................. |
97 |
9 Job queue management |
|
|
|
Job queue page ................................................................................................................................ |
104 |
|
Job preview ...................................................................................................................................... |
104 |
|
Turn off the job queue ...................................................................................................................... |
105 |
|
Select when to print a job in the queue ............................................................................................ |
105 |
|
Identify a job in the queue ................................................................................................................ |
105 |
|
Prioritize a job in the queue .............................................................................................................. |
106 |
|
Delete a job from the queue ............................................................................................................. |
106 |
|
Reprint or copy a job in the queue ................................................................................................... |
106 |
|
Job status messages ........................................................................................................................ |
106 |
10 |
Retrieving printer usage information |
|
|
Get printer accounting information ................................................................................................... |
110 |
|
Check printer usage statistics .......................................................................................................... |
110 |
|
Check ink and paper usage for a job ................................................................................................ |
110 |
11 Handling ink cartridges and printheads |
|
|
|
About the ink cartridges .................................................................................................................... |
114 |
|
Check the ink cartridges status ........................................................................................................ |
114 |
|
Remove an ink cartridge .................................................................................................................. |
115 |
|
Insert an ink cartridge ....................................................................................................................... |
116 |
|
About the printheads ........................................................................................................................ |
117 |
|
Check the printhead status ............................................................................................................... |
118 |
|
Remove a printhead ......................................................................................................................... |
118 |
|
Insert a printhead ............................................................................................................................. |
121 |
12 |
Maintaining the printer |
|
|
Check printer status ......................................................................................................................... |
126 |
|
Clean the exterior of the printer ........................................................................................................ |
126 |
|
Replace the cutter ............................................................................................................................ |
126 |
|
Maintain the ink cartridges ............................................................................................................... |
130 |
|
Move or store the printer .................................................................................................................. |
130 |
|
Update the firmware ......................................................................................................................... |
131 |
|
Update the software ......................................................................................................................... |
132 |
|
Printer maintenance kits ................................................................................................................... |
132 |
ENWW |
v |
Secure Disk Erase ............................................................................................................................ |
132 |
13 Accessories |
|
How to order supplies and accessories ............................................................................................ |
136 |
Introduction to the accessories ......................................................................................................... |
140 |
14 Troubleshooting paper issues |
|
The paper cannot be loaded successfully ........................................................................................ |
142 |
The paper type is not in the driver .................................................................................................... |
144 |
The paper has jammed .................................................................................................................... |
146 |
The printer displays out of paper when paper is available ............................................................... |
148 |
Prints do not fall nicely into the basket ............................................................................................. |
148 |
The sheet stays in the printer when the print has been completed .................................................. |
148 |
The paper is cut when the print has been completed ....................................................................... |
149 |
The cutter does not cut well ............................................................................................................. |
149 |
The roll is loose on the spindle ......................................................................................................... |
149 |
A strip stays on the output tray and generates jams ........................................................................ |
149 |
Recalibrate the paper advance ........................................................................................................ |
149 |
15 Troubleshooting print-quality issues |
|
General advice ................................................................................................................................. |
152 |
Print quality troubleshooting wizard .................................................................................................. |
152 |
Horizontal lines across the image (banding) .................................................................................... |
153 |
Lines are too thick, too thin or missing ............................................................................................. |
154 |
Lines appear stepped or jagged ....................................................................................................... |
154 |
Lines print double or in the wrong colors .......................................................................................... |
155 |
Lines are discontinuous .................................................................................................................... |
155 |
Lines are blurred .............................................................................................................................. |
156 |
Line lengths are inaccurate .............................................................................................................. |
157 |
The whole image is blurry or grainy ................................................................................................. |
157 |
The paper is not flat .......................................................................................................................... |
158 |
The print is scuffed or scratched ...................................................................................................... |
158 |
Ink marks on the paper ..................................................................................................................... |
159 |
Black ink comes off when you touch the print .................................................................................. |
159 |
Edges of objects are stepped or not sharp ....................................................................................... |
160 |
Edges of objects are darker than expected ...................................................................................... |
160 |
Horizontal lines at the end of a cut sheet print ................................................................................. |
160 |
Vertical lines of different colors ........................................................................................................ |
160 |
White spots on the print .................................................................................................................... |
161 |
Colors are inaccurate ....................................................................................................................... |
161 |
Colors are fading .............................................................................................................................. |
162 |
The image is incomplete (clipped at the bottom) .............................................................................. |
162 |
The image is clipped ........................................................................................................................ |
162 |
Some objects are missing from the printed image ........................................................................... |
163 |
A PDF file is clipped or objects are missing ..................................................................................... |
163 |
The Image Diagnostics Print ............................................................................................................ |
163 |
vi |
ENWW |
|
If you still have a problem ................................................................................................................. |
166 |
16 |
Troubleshooting ink cartridge and printhead issues |
|
|
Cannot insert an ink cartridge .......................................................................................................... |
168 |
|
Ink cartridge status messages .......................................................................................................... |
168 |
|
Cannot insert a printhead ................................................................................................................. |
168 |
|
The front-panel display recommends reseating or replacing a printhead ........................................ |
169 |
|
Clean the printheads ........................................................................................................................ |
169 |
|
Clean the printhead drop detector .................................................................................................... |
169 |
|
Align the printheads .......................................................................................................................... |
172 |
|
Printhead status messages .............................................................................................................. |
174 |
17 |
Troubleshooting general printer issues |
|
|
The printer does not print ................................................................................................................. |
176 |
|
The printer seems slow .................................................................................................................... |
176 |
|
The printer printed on undesirable paper ......................................................................................... |
176 |
|
Communication failures between computer and printer ................................................................... |
177 |
|
Cannot access the HP Printer Utility ................................................................................................ |
177 |
|
Cannot access the Embedded Web Server ..................................................................................... |
178 |
|
Automatic file system check ............................................................................................................. |
178 |
|
An AutoCAD 2000 memory allocation error ..................................................................................... |
179 |
|
No output when printing from Microsoft Visio 2003 .......................................................................... |
179 |
|
Unavailable driver features when printing from QuarkXpress ......................................................... |
179 |
|
Printer alerts ..................................................................................................................................... |
180 |
18 Front-panel error messages |
|
|
19 HP Customer Care |
|
|
|
Introduction ....................................................................................................................................... |
184 |
|
HP Professional Services ................................................................................................................. |
184 |
|
HP Instant Support ........................................................................................................................... |
185 |
|
HP Proactive Support ....................................................................................................................... |
185 |
|
Contact HP Support ......................................................................................................................... |
186 |
20 |
Printer specifications |
|
|
Functional specifications .................................................................................................................. |
190 |
|
Physical specifications ..................................................................................................................... |
191 |
|
Memory specifications ...................................................................................................................... |
191 |
|
Power specifications ......................................................................................................................... |
191 |
|
Ecological specifications .................................................................................................................. |
191 |
|
Environmental specifications ............................................................................................................ |
192 |
|
Acoustic specifications ..................................................................................................................... |
192 |
Glossary ........................................................................................................................................................... |
193 |
|
ENWW |
vii |
Index ................................................................................................................................................................. |
195 |
viii |
ENWW |

1 Introduction
●Safety precautions
●HP Start-Up Kit
●Using this guide
●The printer's main features
●The printer's main components
●The front panel
●Printer software
●The printer's internal prints
Introduction
ENWW |
1 |
Introduction
Safety precautions
The following precautions ensure the proper use of the printer and prevent the printer from being damaged. Follow these precautions at all times.
●Use the power supply voltage specified on the nameplate. Avoid overloading the printer's electrical outlet with multiple devices.
●Ensure the printer is well-grounded. Failure to ground the printer may result in electrical shock, fire and susceptibility to electromagnetic interference.
●Do not disassemble or repair the printer yourself. Contact your local HP Service Representative for service, see Contact HP Support on page 186.
●Use only the electrical cord supplied by HP with the printer. Do not damage, cut or repair the power cord. A damaged power cord has risk of fire and electric shock. Replace a damaged power cord with an HP-approved power cord.
●Do not allow metal or liquids (except those used in HP Cleaning Kits) to touch the internal parts of the printer. Doing so may cause fire, electric shock or other serious hazards.
●Power OFF the printer and unplug the power cable from the power outlet in any of the following cases:
◦When placing your hands inside the printer
◦If there is smoke or an unusual smell coming from the printer
◦If the printer is making an unusual noise not heard during normal operation
◦A piece of metal or a liquid (not part of cleaning and maintenance routines) touches internal parts of the printer
◦During an electrical (thunder/lightning) storm
◦During a power failure.
HP Start-Up Kit
The HP Start-Up Kit is the DVD that comes with your printer; it contains the printer's software and documentation, including introductory multimedia tutorials to help you to get a good first print.
Using this guide
Using your printer (on DVD) and the Quick Reference Guide (on paper) are organized into the following chapters. The most complete source of information is Using your printer.
Introduction
This chapter provides a brief introduction to the printer and its documentation for new users.
Use and maintenance
These chapters help you carry out normal printer procedures and include the following topics.
●Installing the software on page 11
●Setting up the printer on page 21
●Personalizing the printer on page 27
2 Chapter 1 Introduction |
ENWW |

●Paper handling on page 33
●Printing on page 55
●Color management on page 67
●Practical printing examples on page 79
●Job queue management on page 103
●Retrieving printer usage information on page 109
●Handling ink cartridges and printheads on page 113
●Maintaining the printer on page 125
Troubleshooting
These chapters help you solve problems that may occur while printing and include the following topics.
●Troubleshooting paper issues on page 141
●Troubleshooting print-quality issues on page 151
●Troubleshooting ink cartridge and printhead issues on page 167
●Troubleshooting general printer issues on page 175
●Front-panel error messages on page 181
Accessories, support and specifications
These chapters, Accessories on page 135, HP Customer Care on page 183 and Printer specifications on page 189, contain reference information, including customer care, the printer specifications and part numbers for paper types, ink supplies and accessories.
Glossary
The Glossary on page 193 contains definitions of printing and HP terms used in this documentation.
Index
In addition to the table of contents, there is an alphabetical index to help you to find topics quickly.
Warnings and Cautions
The following symbols are used in this manual to ensure the proper use of the printer and to prevent the printer from being damaged. Follow the instructions marked with these symbols.
 WARNING! Failure to follow the guidelines marked with this symbol could result in serious personal injury or death.
 CAUTION: Failure to follow the guidelines marked with this symbol could result in minor personal injury or damage to the product.
Introduction
ENWW |
Using this guide 3 |

Introduction
The printer's main features
Your printer is a color inkjet printer designed for printing high-quality images on paper up to 24 inches (61 cm) or 44 inches (1.12 m) wide depending on your printer's width. Some major features of the printer are shown below:
●Print resolution of up to 2400 × 1200 optimized dpi, from a 1200 × 1200 dpi input, using the Best print-quality option, the Maximum Detail option and photo paper
●The HP Printer Utility, see Access the HP Printer Utility on page 29, provides an easy-to-use interface including:
◦Job management, see Job queue management on page 103
◦Calibration of printer
◦Access to the online HP Knowledge Center
●Accurate and consistent color reproduction with automatic color calibration
●Economode for printing economically
●Six-ink system
●Color emulations, see Printer emulation on page 70
●High productivity features such as job previewing and nesting using the HP Printer Utility or the printer's Embedded Web Server
●Ink and paper usage information available from the Web from the Embedded Web Server, see Access the Embedded Web Server on page 29
●Paper flexibility and automatic easy load, see Paper handling on page 33, with information and profiles accessible from the front panel and the HP Printer Utility
The printer's main components
The following front and rear views of the printer illustrate the main components.
4 Chapter 1 Introduction |
ENWW |

Front view
Introduction
1.Ink cartridge
2.Ink cartridge slots
3.Blue lever
4.Window
5.Front panel
6.Printhead carriage
7.Printhead
8.Output tray
9.Paper alignment lines
10.Basket
ENWW |
The printer's main components 5 |

Rear view
Introduction
1.Spindle
2.Spindle holders
3.Quick Reference Guide holder
4.Sockets for communication cables and optional accessories
5.Hard power switch
6.Power cord plug in
7.Paper feeder
The front panel
Your printer's front panel is located on the front of the printer, in the center. It has the following important functions:
●Assists you in troubleshooting issues
●Is used to perform certain procedures, such as cutting and unloading paper
●Displays helpful animations to guide you through procedures
●Displays up-to-date information about the status of the printer such as, the ink cartridges, the printheads, the paper and the print jobs
●Displays warning and error messages, when appropriate, along with audio alerts to call attention to a warning or message
●Can be used to change the values of printer settings and thus change the operation of the printer. However, settings in the front panel are overridden by settings in the printer drivers, see Installing the software on page 11
6 Chapter 1 Introduction |
ENWW |

Introduction
The front panel has the following components:
1.Direct access keys:
● |
First key |
: View ink levels, see Check the ink cartridges status on page 114 |
● |
Second key |
: View loaded paper, see View information about the paper on page 50 |
● |
Third key |
: Unload paper, see Unload a roll on page 46 and Unload a single sheet |
|
on page 50 |
|
● |
Fourth key |
: Form feed and cut, see Feed and cut the paper on page 53 |
2.Menu key - Press to return to the main menu of the front-panel display. If you are already on the main menu it will display the status screen.
3.OK key - To confirm an action while in a procedure or interaction. To enter in a submenu in the menu. To select a value when given an option.
4.Back key - To go to the previous step in a procedure or interaction. To go to the upper level, or leave the option in the menu, or when given an option.
5.Down key - To go down in a menu or option, or to decrease a value, for example when configuring the front-panel display contrast or the IP address.
6.Up key - To go up in a menu or option, or to increase a value, for example when configuring the front-panel display contrast or the IP address.
7.Cancel key - To abort a procedure or interaction.
8.Power key - To turn the printer off or on, it also has a light to indicate the printer's status. If the power key light is off the printer is off. If the power key light is blinking green, the printer is starting up. If the power key light is green on, the printer is on. If the power key light is amber on, the printer is in standby. If the power key light is blinking amber, the printer needs attention.
9.LED light - Indicates the printer's status. If the LED light is solid green, the printer is ready. If it is flashing green, the printer is busy. If it is solid amber, there is a system error. If it is flashing amber, the printer needs attention.
10.Front-panel display - Displays errors, warnings and information on using your printer.
To highlight an item in the front-panel display, press the Up or Down key until the item is highlighted.
To select an item in the front-panel display, first highlight it and then press the OK key.
When this guide shows a series of front-panel display items like this: Item1 > Item2 > Item3, it means that you should select Item1, then select Item2, then select Item3.
Information about specific uses of the front panel can be found throughout this guide.
ENWW |
The front panel 7 |

Introduction
Printer software
The following software is provided with your printer:
●The RTL and HP-GL/2 driver for Windows
●PostScript driver, for HP Designjet T1120ps only
●The PCL3 raster driver for T1120
●The HP Printer Utility, see Access the HP Printer Utility on page 29, allows you to:
◦Manage the job queue, see Job queue management on page 103
◦Manage the printer including color with the HP Color Center
◦Access the HP Knowledge Center
◦View the status of the ink cartridges, the printheads and the paper
◦View job accounting information, see Retrieving printer usage information on page 109
◦Update the printer's firmware, see Update the firmware on page 131
◦Change various printer settings (in the Settings tab)
◦Perform calibrations and troubleshooting
●The Embedded Web Server, runs in the printer and enables you to use a Web browser on any computer to check ink levels and printer status, see Access the Embedded Web Server
on page 29.
The printer's internal prints
The internal prints give various kinds of information about your printer. They can be requested from the front panel without using a computer.
 CAUTION: Before requesting any internal print, make sure that paper is loaded (roll or sheet), and that the front panel displays the Ready message. The loaded paper should be at least A3 landscape (16.53 in or 42 cm wide); otherwise the print may be clipped.
To print any internal print, press the Menu key to return to the main menu, select the Internal Prints menu icon  , then select the internal print you want. The following internal prints are available.
●Demo prints: show some of the capabilities of the printer
◦Print drawing demo
◦Print rendering demo
◦Print GIS demo
 NOTE: Demo prints are printed the same size as the loaded paper .
●Menu map: shows details of all the front-panel display menus
●Configuration: shows all the current front-panel display settings
●Usage report: shows estimates of the total number of prints, number of prints by paper type, number of prints by print-quality option and total amount of ink used per color (the accuracy of these estimates is not guaranteed)
●HP-GL/2 palette: shows the color or grayscale definitions in the currently selected color palette
8 Chapter 1 Introduction |
ENWW |

●Service information: provides information needed by service engineers
●PostScript font list: shows PostScript fonts available, for HP Designjet T1120ps only
Introduction
ENWW |
The printer's internal prints 9 |

Introduction
10 Chapter 1 Introduction |
ENWW |

2 Installing the software
●Choose which connection method to use
●Connect to a network (Windows)
●Connect directly to a computer (Windows)
●Uninstall the printer software (Windows)
●Connect to a network (Mac OS)
●Connect directly to a computer (Mac OS)
●Uninstall the printer software (Mac OS)
Installing the software
ENWW |
11 |
software the Installing
Choose which connection method to use
The following methods can be used to connect your printer.
Connection type |
Speed |
Cable length |
Other factors |
|
|
|
|
Gigabit Ethernet |
Very fast; varies |
Long (100 m=328 ft.) |
Requires extra equipment (switches). |
|
according to network |
|
|
|
traffic |
|
|
|
|
|
|
Jetdirect print server |
Moderate; varies |
Long (100 m = 328 ft) |
Requires extra equipment (switches) |
(optional accessory) |
according to network |
|
Provides additional features |
|
traffic |
|
|
|
|
|
See http://www.hp.com/go/jetdirect/ for |
|
|
|
more details |
|
|
|
|
USB 2.0 |
Very fast |
Short (5 m = 16 ft) |
A certified USB 2.0 cable is necessary for |
|
|
|
reliable communication. |
|
|
|
|
 NOTE: The speed of any network connection depends on all components used in the network, which can include network interface cards, hubs, routers, switches and cables. If any one of these components cannot operate at high speed, you will have a low-speed connection. The speed of your network connection can also be affected by the total amount of traffic from other devices on the network.
Connect to a network (Windows)
Before you begin, check your equipment:
●The printer should be set up and on.
●The Ethernet hub or router should be on and functioning correctly.
●All computers on the network should be on and connected to the network.
●The printer should be connected to the network.
Now you can proceed to install the printer software and connect your printer:
1.Make a note of the IP address from the status screen on the printer's front panel (192.168.1.1 in this example):
2.Insert the HP Start-Up Kit DVD into your computer. If the DVD does not start automatically, run the START.EXE program in the root folder of the DVD.
12 Chapter 2 Installing the software |
ENWW |

3.Click Install. The printer drivers and the HP Printer Utility are installed.
4.Follow the instructions on your screen to set up the printer. The following notes help you to understand the screens and make appropriate choices.
●When asked how the printer is connected, select Wired Networking.
●The configuration program looks for printers connected to your network. When the search is complete, a list of printers appears. Identify your printer by its IP address and select it from the list.
●The configuration program analyzes the network and the printer. The program detects the network settings and suggests the settings to use when configuring the printer. It is not normally necessary to change any of these settings, but you can do so if you wish.
If your computer fails to find any printers on the network, the Printer Not Found window is displayed, which helps you to try to find your printer. If you have a firewall in operation; you may have to disable it temporarily in order to find the printer. You also have the options of searching for the printer by its URL, IP address or MAC address.
Connect directly to a computer (Windows)
You can connect your printer directly to a computer without going through a network, by using the printer's built-in USB 2.0 socket (supported under Windows 2000, Windows XP and later versions of Windows).
TIP: A USB connection may be faster than a network connection, but the cable is limited in length and it is more difficult to share the printer.
1.Do not connect the computer to the printer yet. You must first install the printer driver software on the computer, as follows.
2.Insert the HP Start-Up Kit DVD into your DVD drive. If the DVD does not start automatically, run the START.EXE program in the root folder of the DVD.
3.Click Install. The printer drivers and the HP Printer Utility are installed.
4.Follow the instructions on your screen to set up the printer. The following notes help you to understand the screens and make appropriate choices.
●When asked how the printer is connected, select Connected directly to this computer.
●If you would like to share the printer with other people connected to your network, press the Printer Properties button in the Ready to Install window, then select the Sharing tab and enter the name under which the printer will be shared.
●When prompted to do so, connect your computer to the printer with a certified USB cable. Ensure that the printer is turned on.
 NOTE: You may complete the installation without connecting your printer if you prefer. To do so, check the box marked I want to connect my printer after completing the setup wizard.
NOTE: The use of non-certified USB cables can lead to connectivity problems. Only cables certified by the USB Implementor's Forum (http://www.usb.org/) should be used with this printer.
Installing the software
ENWW |
Connect directly to a computer (Windows) 13 |

software the Installing
Printer sharing considerations
●The HP Printer Utility must be installed on a computer before it can be used from that computer.
●Any other users sharing your directly connected printer will be able to send print jobs, but will not be able to receive information from the printer— which affects printer alerts, printer status reports, paper management, printer administration and troubleshooting.
●Any other users sharing your directly connected printer will be unable to use the printer's own print preview facility, although the application's print preview will still be available. See Preview a print on page 61.
 TIP: The best way to share the printer over a network is to connect the printer not to any computer, but to the network. See Connect to a network (Windows) on page 12.
Uninstall the printer software (Windows)
1.Insert the HP Start-Up Kit DVD into your DVD drive. If the DVD does not start automatically, run the START.EXE program in the root folder of the DVD.
2.Select Install, and follow the instructions on your screen to uninstall the printer software.
Connect to a network (Mac OS)
You can connect your printer to a network under Mac OS X by using the following methods:
●Bonjour/Rendezvous
●TCP/IP
 NOTE: The printer does not support AppleTalk.
Before you begin, check your equipment:
●The printer should be set up and on.
●The Ethernet hub or router should be on and functioning correctly.
●All computers on the network should be on and connected to the network.
●The printer should be connected to the network.
Now you can proceed to install the printer software and connect your printer.
Bonjour/Rendezvous connection
1.Go to your printer's front panel and select the Connectivity menu icon  , then Gigabit Ethernet > View configuration. Note the mDNS service name of your printer.
2.Insert the HP Start-Up Kit DVD into your DVD drive.
14 Chapter 2 Installing the software |
ENWW |
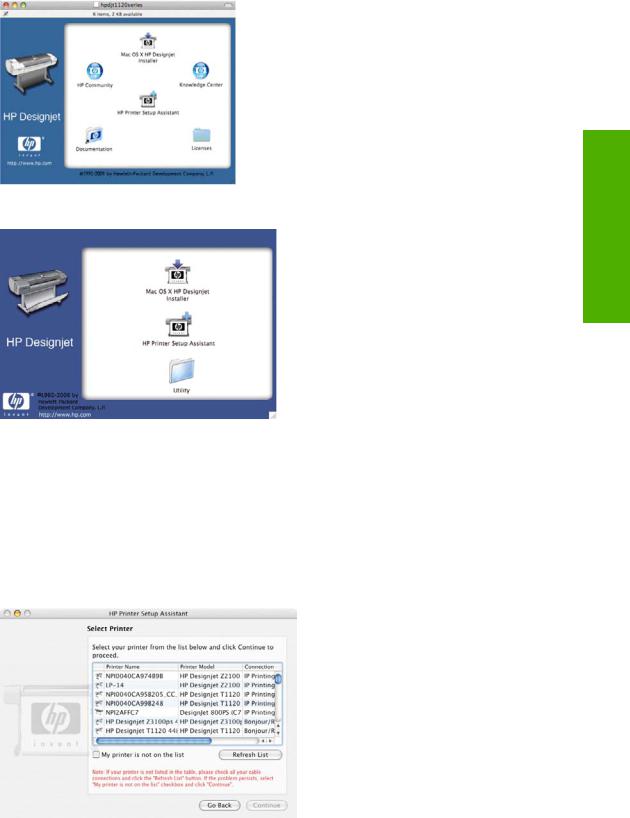
3.Open the DVD icon on your desktop.
4.Open the Install icon for your printer (HP Designjet T1120ps or T1120).
5.Open the Mac OS X HP Designjet Installer icon.
6.Follow the instructions on your screen. You are recommended to use the Easy Install option.
7.The printer software is installed, including the printer driver and the HP Printer Utility.
8.When the software has been installed, the HP Printer Setup Assistant starts automatically, to set up a connection to your printer. Follow the instructions on your screen.
9.When you reach the Select Printer screen, look for your printer's mDNS service name (which you noted in step 1) in the Printer Name column.
●If you find the right printer name, scroll sideways if necessary to see the Connection Type column, and check that it shows Bonjour/Rendezvous. Then highlight that line. Otherwise, continue searching further down the list.
●If you cannot find your printer name with a Bonjour/Rendezvous connection type, check the box My printer is not in the list.
Installing the software
ENWW |
Connect to a network (Mac OS) 15 |
software the Installing
Click Continue.
10.Continue following the instructions on the screen. When you reach the Printer Queue Created screen, click Quit to exit, or Create New Queue if you want to connect another printer to the network.
11.When the HP Printer Setup Assistant has finished, you can remove the DVD from the DVD drive.
If the printer driver is already installed, the HP Printer Setup Assistant can be run at any time from the DVD.
TCP/IP connection
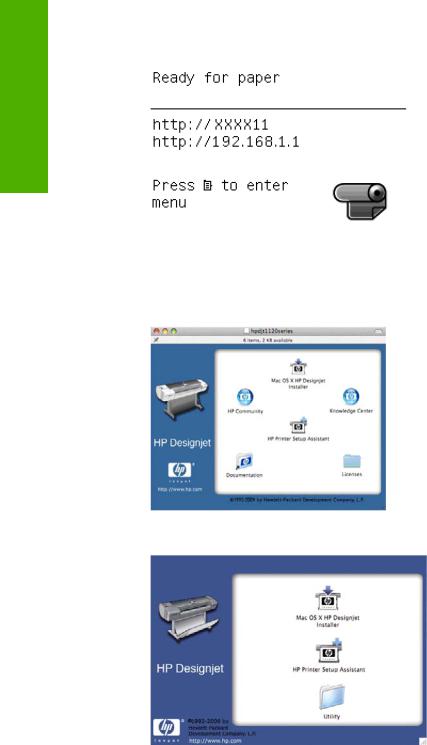
1.Go to your printer's front panel and press the Menu key until you see the status screen.
Note the URL of your printer (http://XXXX11 in this example).
2.Insert the HP Start-Up Kit DVD into your DVD drive.
3.Open the DVD icon on your desktop.
4.Open the Install icon for your printer (HP Designjet T1120ps or T1120).
5.Open the Mac OS X HP Designjet Installer icon.
16 Chapter 2 Installing the software |
ENWW |
6.Follow the instructions on your screen. You are recommended to use the Easy Install option.
7.The printer software is installed, including the printer driver and the HP Printer Utility.
8.When the software has been installed, the HP Printer Setup Assistant starts automatically, to set up a connection to your printer. Follow the instructions on your screen.
9.When you reach the Select Printer screen, look for your printer's URL (which you noted in step 1) in the Printer Name column.
●If you find the right printer name, scroll sideways if necessary to see the Connection Type column, and check that it shows IP Printing. Then highlight that line. Otherwise, continue searching further down the list.
●If you cannot find your printer name with an IP Printing connection type, check the box My printer is not in the list.
Click Continue.
10.Continue following the instructions on the screen. When you reach the Printer Queue Created screen, click Quit to exit, or Create New Queue if you want to connect another printer to the network.
11.When the HP Printer Setup Assistant has finished, you can remove the DVD from the DVD drive.
If the printer driver is already installed, the HP Printer Setup Assistant can be run at any time from the DVD.
Connect directly to a computer (Mac OS)
You can connect your printer directly to a computer without going through a network, by using the printer's built-in USB 2.0 socket.
1.Make sure the printer is either turned off, or disconnected from the computer.
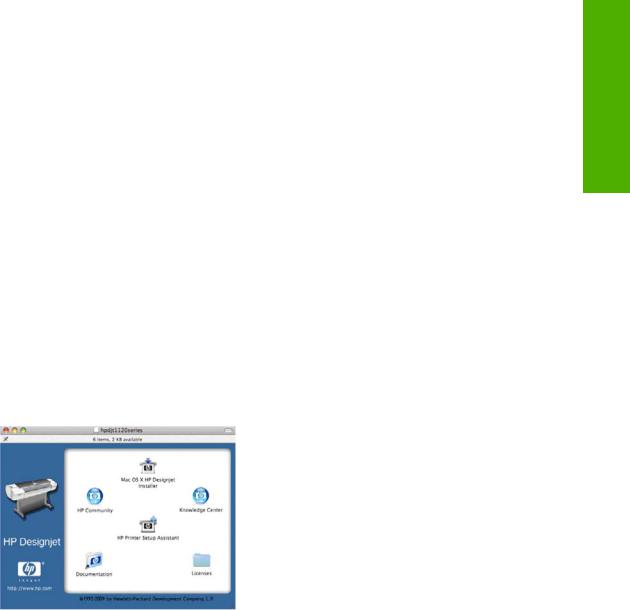
2.Insert the HP Start-Up Kit DVD into your DVD drive.
3.Open the DVD icon on your desktop.
Installing the software
ENWW |
Connect directly to a computer (Mac OS) 17 |

4.Open the Install icon for your printer (HP Designjet T1120ps or T1120).
software the Installing
5.Open the Mac OS X HP Designjet Installer icon.
6.Follow the instructions on your screen. You are recommended to use the Easy Install option.
7.The printer software is installed, including the printer driver and the HP Printer Utility.
8.When the software has been installed, the HP Printer Setup Assistant starts automatically, to set up a connection to your printer.
9.Make sure that the printer is turned on and connected to the computer with a certified USB cable.
 NOTE: The use of non-certified USB cables can lead to connectivity problems. Only cables certified by the USB Implementor's Forum (http://www.usb.org/) should be used with this printer.
10.In the HP Printer Setup Assistant, click Continue.
11.In the list of printers that appears, select the entry that uses the connection type USB, and click
Continue.
12.The following screen displays information about your printer's installation, where the name of the printer can be modified. Make any changes you wish to make, and click Continue.
13.Your printer is now connected. In the Printer Queue Created screen, click Quit to exit, or Create New Queue if you want to connect another printer.
14.When the HP Printer Setup Assistant has finished, you can remove the DVD from the DVD drive.
If the printer driver is already installed, the HP Printer Setup Assistant can be run at any time from the DVD.
Sharing the printer
 NOTE: Printer sharing between users is supported under Mac OS X 10.4 and Mac OS X 10.5.
If your computer is connected to a network, you can make your directly connected printer available to other computers on the same network.
1.Double-click the System Preferences icon on the Dock menu bar on your desktop.
2.Enable printer sharing by going to Sharing > Services > Printer Sharing.
3.Your printer now automatically appears in the list of shared printers displayed by any other computer running Mac OS and connected to your local network.
18 Chapter 2 Installing the software |
ENWW |
 NOTE: Any other users wishing to share your printer must install the printer software on their own computers.
Any other users sharing your directly connected printer will be able to send print jobs, but will not be able to receive information from the printer— which affects printer alerts, printer status reports, paper management, printer administration and troubleshooting.
Mac OS X 10.4 users need to enable the Show printers connected to other computers option in the Print Center Preferences window in order to see shared printers. To open the Print Center Preferences window, select Preferences from the Print Center menu.
You may find that sharing your directly connected printer with other users will slow down your computer unacceptably.
 TIP: The best way to share the printer over a network is to connect the printer not to any computer, but to the network. See Connect to a network (Mac OS) on page 14.
Uninstall the printer software (Mac OS)
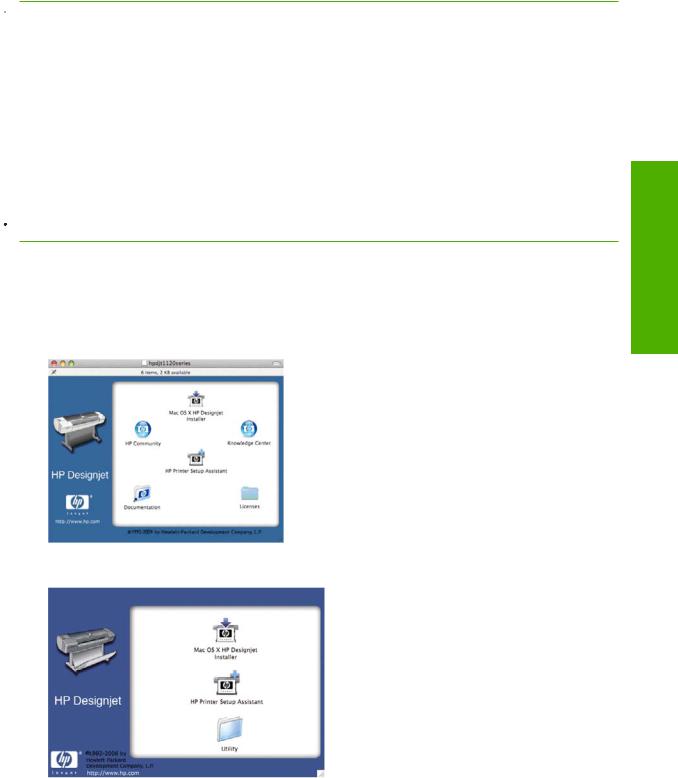
1.Insert the HP Start-Up Kit DVD into your DVD drive.
2.Open the DVD icon on your desktop.
3.Open the Install icon for your printer (HP Designjet T1120ps or T1120).
4.Open the Mac OS X HP Designjet Installer icon.
5.Select Uninstall, and follow the instructions on your screen to uninstall the printer software.
Installing the software
ENWW |
Uninstall the printer software (Mac OS) 19 |

software the Installing
20 Chapter 2 Installing the software |
ENWW |

3 Setting up the printer
●Introduction
●Handle paper conflicts
●Turn nesting on and off
●Turn usage information on and off
●Turn alerts on and off
●Set or delete the security password
●Require account ID
●Set Windows driver preferences
Setting up the printer
ENWW |
21 |
Loading...