


EN
TR
CS
HU
HP Designjet T1120 SD-MFP
Quick reference guide
HP Designjet T1120 SD-MFP
Hızlı başvuru kılavuzu
HP Designjet T1120 SD-MFP
Stručná referenční příručka
HP Designjet T1120 SD-MFP
Felhasználói gyorskalauz

EN
You can find legal and warranty information on the CD. Further information is available at HP’s support Web site (http://www.hp.com/go/knowledge_center/).
Legal notices
The information contained herein is subject to change without notice. The only warranties for HP Products and services are set forth in the express warranty statement accompanying such products and services. Nothing herein should be construed as constituting an additional warranty. HP shall not be liable for technical or editorial errors or omissions contained herein.
TR
CD'de yasal ve garanti ile ilgili bilgiler mevcuttur. Diğer bilgiler HP’nin destek web sitesinde (http://www.hp.com/go/knowledge_center/) bulunmaktadır.
Yasal bildirimler
Burada yer alan bilgiler önceden bildirilmeden değiştirilebilir. HP ürün ve hizmetleri için yalnızca söz konusu ürün ve hizmetlere eşlik eden açık garanti belgelerinde belirtilen garantiler geçerlidir. Burada kullanılan hiçbir ifade ek garanti olarak yorumlanamaz. HP, bu belgedeki teknik hatalardan veya yazım hatalarından ya da eksikliklerden sorumlu tutulamaz.
CS
Na disku CD naleznete právní ujednání a informace o záruce. Další informace jsou k dispozici na webu podpory společnosti HP (http://www.hp.com/go/knowledge_center/).
Právní informace
Informace v tomto dokumentu mohou být změněny bez předchozího upozornění. Jediné záruky poskytované k produktům a službám HP jsou výslovně uvedeny v prohlášení o záruce, které se dodává společně s těmito produkty a službami. Žádné z informací uvedených v tomto dokumentu nemohou sloužit jako podklad pro vyvození dalších záruk. Společnost HP nenese odpovědnost za případné technické či redakční chyby ani opomenutí v tomto dokumentu.
HU
A CD-lemezen jogi tudnivalókat és a jótállással kapcsolatos információkat találhat. További információ a HP terméktámogatási webhelyén található (http://www.hp.com/go/knowledge_center/).
Jogi kitételek
Az itt található információk előzetes értesítés nélkül megváltozhatnak. A HP termékekre és szolgáltatásokra vonatkozó garanciákat kizárólag az ilyen termékek és szolgáltatások kifejezett garancianyilatkozatában rögzítettek szerint vállaljuk. Az itt talált információk semmilyen módon nem tekinthetők további garanciának. A HP nem felelős az itt található semmilyen technikai vagy szerkesztési hibáért vagy kihagyásért.

|
EN |
Table of contents |
|
1 Introduction |
|
Using this guide .............................................................................................. |
1 |
Scanner software ............................................................................................ |
2 |
Scanner .......................................................................................................... |
3 |
Documentation and help ................................................................................. |
3 |
2 Basic operations |
|
Turn the scanner on or off .............................................................................. |
4 |
Load and eject documents .............................................................................. |
5 |
Set a destination folder for scans ................................................................... |
6 |
Copy a document ............................................................................................ |
8 |
Scan to a file ................................................................................................... |
9 |
Batch scan and batch copy ........................................................................... |
10 |
Specify the original type and make image adjustments ................................ |
11 |
Set input and output sizes ............................................................................ |
13 |
Preview copies and scans ............................................................................ |
15 |
Set the output quality .................................................................................... |
17 |
Create a media profile .................................................................................. |
19 |
View, move, rename or delete scanned files ................................................ |
21 |
System setup and options ............................................................................ |
22 |
3 Maintenance |
|
Clean the glass plate and the scanning area ................................................ |
25 |
Calibrate the scanner .................................................................................... |
27 |
Calibrate the touch screen pointer ................................................................ |
29 |
Replace the scanner glass plate ................................................................... |
29 |
4 Troubleshooting |
|
The system reports an error ......................................................................... |
30 |
There is a paper jam ..................................................................................... |
30 |
Streaks in the scanned image ...................................................................... |
32 |
Lines in the scanned image appear too thin or discontinuous ...................... |
33 |
Cannot connect or scan to a destination folder on the LAN ......................... |
33 |
Image cropped—not whole image scanned ................................................. |
34 |
A media profile cannot be generated ............................................................ |
34 |
My color matching results are not optimal .................................................... |
35 |
I need to update or recover the system ........................................................ |
35 |
ENWW
The system software is in the wrong language ............................................. |
36 |
Install new system software .......................................................................... |
37 |
Index ............................................................................................................................... |
39 |
ENWW

1 Introduction
Using this guide
This guide is organized into the following chapters.
1.Introduction: This chapter provides a brief introduction to the software, scanner device and available documentation.
2.Basic operations: This chapter helps you to carry out various common procedures.
3.Maintenance: This chapter helps you to carry out various calibration and maintenance procedures.
4.Troubleshooting: This chapter helps you to solve problems that may occur while scanning.
5.Index: In addition to the table of contents, there is an alphabetical index to help you to find topics quickly.
Warnings and cautions
Symbols are used in this manual to ensure the proper use of the printer and to prevent printer damage. Follow the instructions that are marked with these symbols.
 WARNING! Failure to follow the guidelines that are marked with this symbol could result in serious personal injury or death.
 CAUTION: Failure to follow the guidelines that are marked with this symbol could result in minor personal injury or damage to the product.
Introduction
ENWW |
Using this guide 1 |
Introduction
Scanner software
The scanner software runs automatically when you turn on the touch screen. The main screen is divided into the following sections:
●Main menu area
●Right bar, top: the task buttons
●Right bar, bottom: the function buttons
Task buttons
Press this button to set the program in the copy (scan to printer) task mode.
Press this button to set the program in the scan (scan to file) task mode.
Press this button to open program settings and preference menus.
Function buttons
File manager: Opens the File Manager dialog box.
Online help: Provides detailed information on many topics. Opens instructions related to your current task.
Stop: Cancels the current activity.
Start scan/copy: Initiates the copy or scan, depending on which task button has been selected.
2 Chapter 1 Introduction |
ENWW |

Scanner
Introduction
1. |
Scanner lid |
6. |
USB port |
2. |
Touch screen for scan/copy application |
7. |
Operator's panel |
3. |
Release buttons for opening scanner lid |
8. |
Paper forward button |
4. |
Scanner bed: paper feed area |
9. |
Paper backward button |
5. |
Insertion slot for document feeding |
10. Power button and indicator |
|
Documentation and help
This Quick Reference Guide provides a brief overview of the system and software. The Online Help function button  opens the online help window and displays general help on the current task (Scan, Copy, Options).
The online help window’s Home button  will take you to a table of contents with links to online help sections and topics.
In many dialogs you will find a Context-sensitive Help button  that will open instructions specifically related to the current dialog and its options.
ENWW |
Scanner 3 |

operations Basic
2 Basic operations
Turn the scanner on or off
The system (scanner, screen and software) can be turned on or off by pressing the power button on the scanner operation panel.
 NOTE: The printer has a separate power on/off button. Normally this button is always left turned on and is not pressed in connection with restarting the system.
Turn on
Press the power button. The power LED shows a green light.
Turn off
Press the power button. The power LED blinks and then turns off.
Restart
Press the power button to turn the system off and then press it again to turn the system on.
4 Chapter 2 Basic operations |
ENWW |

Load and eject documents
Load document
1.Load your document with the image side facing upwards. Align the center of the document with the center arrow mark on and above the scanner bed.
2.Use the standard size markings to help align the document for a straight scan path.
3.Push the original into the insertion slot until you feel it contact the rollers.
4.The scanner will automatically grab the original and move it into start-scan position.
Eject document
●Press the Paper Backward button to eject the original back to the scanner feeding bed (towards you).
Basic operations
ENWW |
Load and eject documents 5 |

●Press the Paper Forward button if you wish to eject the original out the back of the scanner.
operations Basic
Set a destination folder for scans
The instructions below describe how to set up and select a destination folder in which you will save your scan-to-file output. Destinations are folders on computers known to your system through the local network (LAN) or folders on a USB flash drive inserted in the touch screen.
1.Make sure your system and any intended destination computers are correctly set up on your local network (LAN). Configuration of your system on the LAN is carried out through the Options > Advanced Options > Network menu.
This is a system administrator option that may require a password.
2.If you wish to save your scans on a USB flash drive, press the Scan button and insert the drive into the USB port on the touch screen. The system will detect the drive and enquire whether you want to set/change the destination to USB.
3.To access the destination setup options, press Options > Advanced Options > Manage Destinations. From there you can select, add and change destinations.
6 Chapter 2 Basic operations |
ENWW |
Basic operations
Select a destination
Select a destination from the list of destinations previously created and saved on the system. If there are no destinations available, or you want to use a destination that is not on the list, you will have to add a new destination. Press the USB destination if you want to scan to an inserted USB flash drive.
Add a new destination
Press the Add button to enter destination details. Enter values in the Label, Network Path, Domain, Username and Password fields. Select Remember if you want to save the destination password in the system. Leave Remember unselected if you want users to enter the password to connect to the destination. Press Test Connection to check your settings.
Change (edit) a destination
Press the Change button and edit the Label, Network Path, Domain, Username and Password fields. Select Remember if you want to save the destination password in the system. Leave Remember unselected if you want users to enter the password to connect to the destination. Press Test Connection to check your settings.
Remove a destination
Select a destination from the Destinations list and press the Remove button.
ENWW |
Set a destination folder for scans 7 |

Copy a document
Follow the steps below to make a copy (scan to print).
1.Insert and feed your document into the scanner, with the side to be scanned facing upwards.
2.Make sure the printer is turned on and the intended media is loaded.
 NOTE: To copy, you need a media profile for the loaded media. The system comes with a set of media profiles for the most commonly-used media. If you need to create a new media profile, see Create a media profile
on page 19.
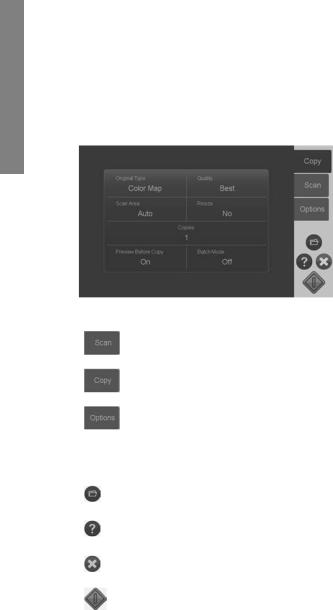
3. Press the Copy button to access the copy (scan to print) settings and buttons.
The Copy dialog is shown below. Basicoperations 
4.Press the Original Type button and select the type that matches your document and required output. See Specify the original type and make image adjustments on page 11.
5.Press the Quality button and select the desired quality of your output.
6.Press the Scan Area button to set the size of the image capture area. If you wish to capture the whole image, select Auto and the system will measure and set the size for you.
7.Press the Resize button to determine the size of the printed copy. Set to No if you want a 1:1 copy.
8.Press the Copies button to select how many copies you want printed with the job.
9.Toggle the Preview before Copy button to On if you want to control settings before committing the job to the printer. See Preview copies and scans
on page 15.
10. When you have made your settings, press the Start Scan/Copy button  to start copying.
8 Chapter 2 Basic operations |
ENWW |

See also:
●Set and preview image adjustments on page 15
●Set input and output sizes on page 13
●Set the output quality on page 17
Scan to a file
Follow the steps below to scan to file.
1.Insert and feed your document into the scanner with the side to be scanned facing upwards.
2.Press the Scan button to access the scan to file settings and buttons. The Scan dialog is shown below.
Basic operations
3.Press the Original Type button and select the type that matches/describes your document. See Specify the original type and make image adjustments on page 11.
4.Press the Quality button and select the scan resolution.
5.Press the Scan Area button to set the size of the image capture area. If you wish to capture the whole image, select Auto and the system will measure and set the size for you.
6.Press the File Format button to determine the file format, such as JPG or TIFF.
7.Press the File Name button to enter a name for the destination file.
8.The Destination button shows where your scan output file will be created. Press the Destination button if you want to select a different destination.
9.Toggle the Preview before Scan button to On if you want to control your settings before saving to file. See Preview copies and scans on page 15.
10. When you have made your settings, press the Start Scan/Copy button  to start scanning.
ENWW |
Scan to a file 9 |

operations Basic
See also:
●Set and preview image adjustments on page 15
●Set input and output sizes on page 13
●Set the output quality on page 17
●Set a destination folder for scans on page 6
Batch scan and batch copy
With batch scanning and batch copying you can continuously feed new originals into the scanner and the system will start processing right away without waiting for you to press the Start Scan/Copy button. The system will apply the current settings to all documents. If you are scanning to file, your files will automatically be named with increasing numbers.
1.Lay your originals face up, near the scanner so they are easily reached.
2.Make your scan or copy settings. These will apply for all the originals in the batch.
3.Press the Batch Mode button to turn batch mode to On.
4.Press the Start Scan/Copy button  .
.
5.If you have already loaded the first original, the system will start scanning or copying. If not, the Batch Mode dialog will ask you to insert the first original into the scanner.
6.When you insert the first original, the system will start scanning it right away.
10 Chapter 2 Basic operations |
ENWW |

7.When an original is scanned, it is ejected. The Batch Mode dialog returns and asks for the next original.
8.Remove the ejected original and feed the next one.
9.Continue to feed originals until finished with the batch.
10.Press the Batch Mode dialog’s Cancel button to abort batch mode.
 NOTE: Previewing is disabled when in Batch Mode.
NOTE: To ensure fast loading in batch mode, the scanner will automatically eject each original after it is scanned. The setting in Options > Basic Options > Rewind after scan will determine the direction. If the option is selected, scanned originals will be ejected towards the front and if the option is not selected, scanned originals will be ejected out the back.
Specify the original type and make image adjustments
Basic capture parameters are set when you select Original Type. You can then adjust specific factors such as image brightness, sharpening and background cleaning level. The adjustments available will depend on the Original Type selection.
1.Press the Scan or Copy button and then the Original Type button to reach the Original Type selection list.
2.Select an Original Type that best describes your original.
Basic operations
ENWW |
Specify the original type and make image adjustments |
11 |

operations Basic
Original Type |
Description |
|
|
Color Lines |
Suitable for color CAD drawings and graphics with a high level of detail. |
|
Applies image processing to clean the background and sharpen lines. 24-bit |
|
color scan. |
|
|
Gray Lines |
Suitable for grayscale CAD drawings and graphics with a high level of detail. |
|
Applies image processing to clean the background and sharpen lines. 8-bit |
|
grayscale scan. |
|
|
B&W Lines |
Suitable for clean B&W CAD drawings and graphics with a high level of detail. |
|
Especially useful for scan-to-file as file sizes are minimal compared to color |
|
and gray original types. Minimal application of image processing for a neutral |
|
and fast scan.1-bit B&W scan. |
|
|
Color Map |
Suitable for color maps such as topographic maps, road maps or other |
|
document types that contain fill areas and a high level of detail. Applies image |
|
processing to sharpen details. 24-bit color scan. |
|
|
Gray Map |
Suitable for grayscale maps such as topographic maps, road maps or other |
|
document types that contain fill areas and a high level of detail. Applies image |
|
processing to sharpen details. 8-bit grayscale scan. |
|
|
Color Poster |
Suitable for color photos and posters of good quality. Minimal application of |
|
image processing for a neutral and fast scan. 24-bit color scan. |
|
|
Old Drawing |
Suitable for faded and creased drawings with low contrast between the |
|
foreground and background. Applies image processing to clean the |
|
background and sharpen lines. 8-bit grayscale scan. |
|
|
12 Chapter 2 Basic operations |
ENWW |
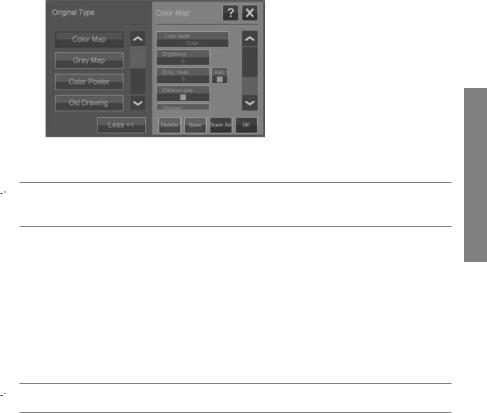
3.You can fine-tune the Original Type settings (optional): Press the More button
 to expand the Original Type dialog and make adjustment options relevant to the selected Original Type. Press OK when done.
4.Press the Context-sensitive Help button  for additional information about each setting and about saving your settings as a new custom Original Type.
 NOTE: You can press the Preview Before Scan/Copy button and then the Adjustment button to make image adjustments and view the effects on your screen. See Preview copies and scans on page 15.
Set input and output sizes
The "Scan Area" is your input size and defines how much of the image is captured. Often, this will be equal to the total size of the original. However, there may be cases when you only want to scan a portion of the original or wish the capture area to be equal to a certain standard size.
When copying, you can also determine the output size (the size of the image in your printed copy) through the Resize setting. You can choose No resize to use the current Scan Area size for a 1:1 copy, or you can select a different size in order to reduce or enlarge the printed image in relation to the Scan Area size.
 NOTE: When scanning, the image’s size in the output file is always equal to the Scan Area size (1:1).
Set the Scan Area (input size) for Copy and Scan
When in the Scan or Copy screens, press the Scan Area button to view the Scan Area size list.
Basic operations
ENWW |
Set input and output sizes 13 |
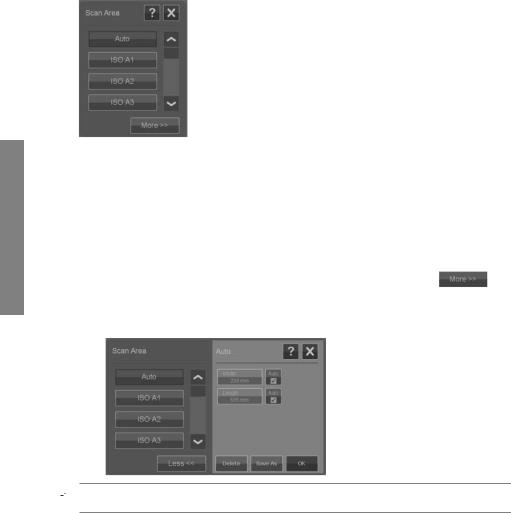
The list offers different methods you can use to determine the Scan Area size: ● Auto: The program will automatically detect the size of the full document
Basic |
loaded in the scanner. You can use the preview to check that the scanner has |
||
detected the size correctly. |
|
||
|
|
||
operations |
● Use a standard or custom size: The dialog contains a list of standard sizes |
||
and custom sizes saved on the system. Scroll through the list and select the |
|||
|
|||
|
size you want to use. To create a new custom size, follow the instructions |
||
|
below. |
|
|
|
● Set size values for width and length: Press the More button |
to |
|
|
expand the Scan Area dialog. Make your width and length size settings in the |
||
fields or set Auto on width or length separately. You can save your changes to create a new custom size or use them for the current job only.
 NOTE: You can also set the Scan Area visually on the screen through a preview. See Preview copies and scans on page 15.
Set the Resize value (output size) for Copy only
1.Press the Resize button.
2.Select No if you do not want to resize the image: that is, you want the end result to be the same size as the Scan Area.
3.Press the Size button to select a standard size (such as A2 or A4) from a list.
4.Select Scale to resize according to a scale factor (such as 50% or 32%).
14 Chapter 2 Basic operations |
ENWW |

Preview copies and scans
You can preview your copies and scans before committing them to the printer or file system. With previewing you can:
●Make image adjustments that are relevant for your selected Original Type, such as brightness and sharpening, and view the effects of these on your screen.
●Visually set the Scan Area (input size) using handles to drag and position a Scan Area frame on the image.
●Zoom in and out to evaluate specific image areas and the effects of your settings.
Load a preview scan or copy
1.Load your original and press the Preview Before Scan/Copy button to turn preview mode to On.
2.Press the Scan or Copy button to load the preview.
3.You can at any time press the Cancel button  to close the preview.
Set and preview image adjustments
1.Press the Adjustment button  at the top left corner of the preview screen.
2.Make your settings in the adjustments dialog.
3.Press the OK button to close the adjustments dialog and see the effects of your settings on the preview. Use the zoom tools to inspect details and areas of interest.
4.Repeat steps 1–3 if you need to readjust your settings.
 NOTE: The effects of the image adjustment settings are applied and displayed in the low-resolution preview and hence do not fully represent the final image in the destination file or printed copy.
Basic operations
ENWW |
Preview copies and scans 15 |
Set and preview the scan area
The preview shows the image inside a white frame. The frame represents the current Scan Area (input) size. Changing the frame’s size before scanning will change the Scan Area settings. The frame's size can be adjusted by moving its borders and corners. To do so you can:
● |
Drag the resize handles |
on the frame’s sides and corners. |
|
● Press with your finger on the place where you wish to reposition the nearest |
|||
|
border edge or corner. The border will jump to that place. |
||
● Use the image zoom and positioning tools to assist you in setting the frame |
|||
|
size and positioning the image inside of it. The image zoom and positioning |
||
Basic |
tools are: |
|
|
Zoom crop: Snaps to the image as cropped by the borders. |
|||
|
|||
operations |
Zoom in: Enlarge the image size in the preview. Zooming is targeted on |
||
the center of the window. |
|
||
|
the center of the window. |
|
|
 Zoom out: Reduce the image size in the preview. Zooming is targeted on
 Zoom all: Displays the whole capture area without cropping. The borders positions are defined by the current Original size setting.


 Image panning tools: Use these arrows to center the captured image in the window.
 Frame center handle (blue circle): Use this to drag the whole size frame and reposition it on the captured image.
Press the Start Scan/Copy button  when you are finished previewing and want to commit the job.
Press the Cancel button  if you want to abort the preview process without committing the job.
16 Chapter 2 Basic operations |
ENWW |
Set the output quality
Set quality when scanning to file
You apply quality settings to scanning (scan to file) in terms of the scan resolution measured in dots per inch (dpi).
1.Press the Scan button and then the Quality button to open the Quality(dpi) dialog.
2.Use the scroll bar to view available resolutions.
3.Press the button displaying the scan resolution you want to use. The Custom button opens a list with alternative resolutions.
Basic operations
ENWW |
Set the output quality 17 |

Set quality when scanning to print
When copying (scan-to-print), you set general print-quality parameters (Fast, Normal, Best) that apply for the whole copy process (scan and print).
●The scan quality is defined by resolution (dpi). You can select the scan resolution you want tied to each quality setting (Fast, Normal, Best). This is done through the Original Type adjustment options (see below).
●The print quality parameters that are tied to a quality setting (Fast, Normal, Best) are defined in the printer.
1.Press the Copy button and then the Quality button to open the print Quality dialog.
Basicoperations  2. Select the required quality setting from the list.
● Fast is for making a quick draft with minimum use of ink.
● Normal is good for most copy jobs that require an average quality level. ● Best is for high-quality prints.
Tie scan resolutions to the Fast, Normal, Best quality settings (scan- to-print)
1.Press the Original Type button and then the More button to open the Original Type’s adjustment options.
2.Scroll down the list of adjustments to reach the buttons Fast Scan Resolution, Normal Scan Resolution and Best Scan Resolution.
18 Chapter 2 Basic operations |
ENWW |

3.Press a button to open a list of resolution selections.
4.Select the scan resolution you want applied when you choose the named quality setting (Fast, Normal, Best) with the current Original Type.
Example: Select the Color Poster original type and press the More button to make adjustments. Press the Best Scan Resolution button and then select 400 dpi. This means that, thereafter, 400 dpi will be applied as the scan resolution whenever you use the Color Poster original type and the quality setting Copy > Quality > Best.
Create a media profile
Your system supports color matching between scanner, printer and media type through media profiles. A media profile must exist for each media type (such as glossy or coated paper) used with your printer.
In most cases, color matching and media profiles are administrated by the system and their application is transparent for the user. Right after you load new media on your printer, you select the media type in the printer’s settings menus. If a media profile for the media type exists, your system automatically loads it for optimal color matching of your copy.
There are, however, two cases that will require your attention:
●No media profile found: If the system does not already contain a media profile for the current media, you will need to create one. A message dialog will inform you when you need to create a media profile and display a button that takes you to the Create Media Profile wizard (see below).
●Colors not optimal: Some of the default media profiles supplied with the system are generic and may not be optimal with all media types. Also, current conditions may not be optimal for even specific media profiles. If your trials show the need for improved color matching, you should update (renew) the current media profile through the Create Media Profile wizard (see below).
Update (renew) the current media profile
1.Make sure your printer’s media type setting corresponds to the loaded media.
2.Make a trial copy with the current media profile to evaluate whether it needs to be updated.
Basic operations
ENWW |
Create a media profile 19 |
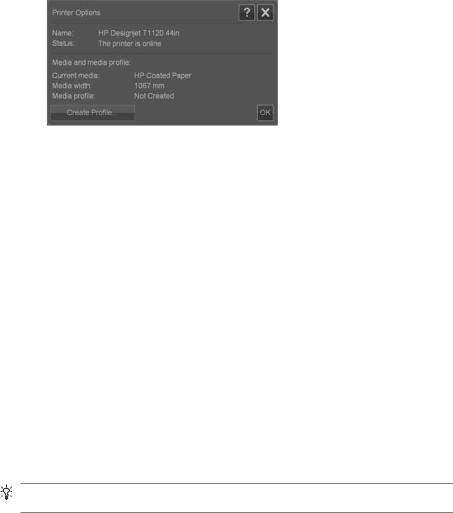
3.Press Options > Printer Options.
|
4. |
The Printer Options dialog displays information about your printer and shows |
|
Basic |
|
the Current media which is the media setting made on the printer’s main menu. |
|
|
● |
Default: The media profile for the current media was supplied with the |
|
operations |
|
The Media profile value may show: |
|
|
|
program and has not been updated. |
|
|
|
|
|
|
|
● Created dd-mm-yyyy: The current media profile has been created or |
|
|
|
|
updated on the date specified. |
|
|
● Not Created: The system has not found a media profile for the current |
|
|
|
|
media. |
|
5. |
If you see the status Not Created, you need to create a media profile in order |
|
|
|
to make a copy. Press the Create Profile button to start the Create Media |
|
|
|
Profile wizard. |
|
6. |
If you are satisfied with the media profile status and color matching results in |
||
|
|
your trials, press OK to close the dialog. |
|
7. |
If your colors are not optimal in your trials, press the Update Profile button to |
||
|
|
start the Create Media Profile wizard. |
|
The Create Media Profile wizard
The wizard is both for creating a new media profile and for updating an existing one. Follow the wizard’s instructions on your screen.
The process will require that you print a system-stored color patch sheet and then scan it. The system will take care of the rest.
TIP: The wizard prints two pages; you should discard the first page and scan the second.
The media profile creation date will be updated when you complete the process.
20 Chapter 2 Basic operations |
ENWW |

View, move, rename or delete scanned files
Your system's scan destinations, on the LAN and on your USB drive, will contain image files that you will need to access and manage. Access to your image files takes place through the File Manager dialog.
Open the File Manager
Press the File Manager button  .
.
Browse the file system
●The File Manager is limited to folders that are defined on your system as scan destinations. The file list defaults to the root of your current destination folder.
●The Folder Up button (marked ..) will move you up a level until you reach the list of created destination folders.
●Click a folder name to move onto its level.
●Click an image name to display an image thumbnail and basic information about the image.
●Select image files for a file action (see below) by checking the box to the left of the image file name.
Basic operations
ENWW |
View, move, rename or delete scanned files |
21 |

operations Basic
File action buttons
To use the action buttons, check one or more boxes next to file names and then press the relevant action button.
●Copy: To copy one or more selected (check-marked) files to another folder.
●Move: To move one or more selected (check-marked) files to another folder.
●Rename: To change the name of a selected (check-marked) file.
●Delete: To delete one or more selected (check-marked) files from the system.
●New folder: To create a new subfolder in the current folder.
●All / None: will toggle between checking and un-checking the boxes to the left of all the file names in the current folder being viewed.
●View: Opens a separate window with a larger view of the image file currently displayed.
System setup and options
Basic options
Set date and time
Local date and time parameters are entered through the configuration program that is run the first time the system is turned on. If needed you can change the local date and time settings through the Options menu.
1.Press Options > Basic Options > Date & Time.
2.Enter the correct local date and time values and time zone. The date and time settings will be used with various program actions.
Units of measure
1.Press Options > Basic Options > Units of measure.
2.Select the preferred unit (such as inch or mm) to use when defining document sizes.
22 Chapter 2 Basic operations |
ENWW |

Paper series preference
1.Press Options > Basic Options.
2.Select/tick the Paper series fields that represent the paper series you wish displayed in the size dialogs (Scan Area and Resize). You can select one or more paper series to display.
Rewind after scan
1.Press Options > Basic Options.
2.Select/tick the Rewind after scan option if you want the document to return to the paper feed area after it is scanned so that you can eject it backwards by pressing the paper backward button on the scanner’s panel. Leave the option unselected if you want the document to hang behind the scanner so that you can eject towards the back with the paper forward button.
Auto reset and inactivity timeout
Press Options > Basic Options.
These two options tell the system to return automatically to default parameters after a defined idle period—by default, five minutes—so that users will always start with the system’s basic settings even if a previous user has changed them. The system returns to the saved system parameters: those set when the Options > Advanced > Save Settings button was last pressed (see below).
Select/tick the Auto Reset option if you want to apply the function. Use Inactivity Timeout to set the idle time before Auto Reset is triggered.
 NOTE: New destinations and media profiles are not affected or lost when Auto Reset is applied.
Advanced options
Set password for advanced options
Press Options > Advanced Options > Set Password to apply passwordprotected access to the Advanced Options dialog.
Basic operations
ENWW |
System setup and options 23 |

operations Basic
Network settings
Network parameters are entered through the configuration program that is run the first time the system is turned on. If the system is moved or the network parameters have changed, new network settings can be entered through the Options menu.
1.Press Options > Advanced Options > Network.
2.Select Auto IP address if you know that your network has a DHCP server and thus your system can automatically retrieve its network connection parameters. Otherwise, enter the IP address, subnet mask and default gateway manually.
Save settings
Press Options > Advanced Options > Save Settings.
This will save the current settings as the new system default settings. The saved settings will be reapplied when an Auto Reset is triggered (see above).
Reset settings to the factory defaults
Press Options > Advanced Options > Factory Default.
This will restore all settings to their factory defaults. The standard Original Types that came with the program are restored to their original settings. Resetting to factory defaults is an administrator function and may require a password.
Other advanced options
●Manage Destinations is described under Set a destination folder for scans on page 6.
●Calibrate Screen is described under Calibrate the touch screen pointer on page 29.
●Software Update is described under Install new system software on page 37.
●Service is an option for service technicians and not within the scope of this guide.
24 Chapter 2 Basic operations |
ENWW |

3 Maintenance
Clean the glass plate and the scanning area
1.Turn off the scanner and disconnect the power cable.
2.Flip the touch screen backwards.
 Maintenance
ENWW |
Clean the glass plate and the scanning area |
25 |

3.There are two lid release buttons on the backside of the scanner. Simultaneously slide the lid release buttons towards the scanner's center until you feel them unlock, and pull the lid backwards towards your body. Open the scanner lid all the way back.
4.Gently wipe the glass plate and the three rows of rollers with a lint-free cloth dampened with a mild, streak-free glass cleaner.
 CAUTION: Do not use abrasives, acetone, benzene or fluids that contain these chemicals. Do not spray liquids directly onto the scanner glass plate or anywhere else in the scanner.
Maintenance
26 Chapter 3 Maintenance |
ENWW |
 Loading...