


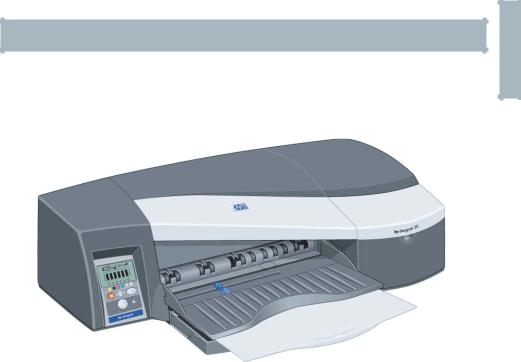
HP Designjet 30/90/130 series
Quick reference guide

HP Designjet 30/90/130 Printer series – Quick Reference Guide
How Do I…? |
|
How Do I Perform a Color Calibration? .......................................................... |
3 |
How Do I Load Sheets of Paper? (General Guidance) ...................................... |
4 |
How Do I Load Paper Using the Front Path? .................................................... |
6 |
How Do I Unload Paper from the Front Path?................................................... |
6 |
How Do I Load Paper in the Input Tray? (30 Printer series)................................. |
8 |
How Do I Load Paper in the Input Tray? (90/130 Printer series) ......................... |
9 |
How Do I Load Sheet Paper Using the Rear Path? .......................................... |
11 |
How Do I Load a Roll of Paper? (90 Printer series) ......................................... |
13 |
How Do I Unload a Roll of Paper? (90 Printer series) ...................................... |
15 |
How Do I Load a Roll of Paper? (130 Printer series) ....................................... |
16 |
How Do I Unload a Roll of Paper? (130 Printer series) .................................... |
18 |
How Do I Print on Large Sheets? (30 Printer series) ........................................ |
19 |
How Do I Print on Large Sheets? (90 Printer series) ........................................ |
20 |
How Do I Print on Large Sheets? (130 Printer series) ...................................... |
22 |
How Do I Select Paper Type? ...................................................................... |
24 |
How Do I Replace Ink Cartridges? ............................................................... |
26 |
How Do I Clean a Printhead? ..................................................................... |
27 |
How Do I Replace Printheads? .................................................................... |
31 |
How Do I Align Printheads? ........................................................................ |
35 |
How Do I Access the Printer Driver? ............................................................. |
36 |
How Do I Print from Adobe Photoshop?........................................................ |
37 |
How Do I Use HP Designjet System Maintenance? ......................................... |
40 |
How Do I Print the Printer Information Pages? ................................................ |
41 |
How Do I Test My Printer?........................................................................... |
41 |
The Problem Is… |
|
The Problem is the Input Tray Will Not Fit Properly ......................................... |
42 |
The Problem is a Sheet of Paper is Jammed (30 Printer series) ......................... |
43 |
The Problem is a Sheet of Paper is Jammed (90/130 Printer series).................. |
44 |
The Problem is a Roll of Paper is Jammed ..................................................... |
45 |
The Problem is there is a Printhead Failure .................................................... |
46 |
The Problem is Bad Color ........................................................................... |
50 |
The Problem is Poor Print Quality ................................................................. |
51 |
The Problem is a Partial or Blank Image is Printed .......................................... |
52 |
The Problem is Paper is Not Taken from the Input Tray .................................... |
54 |
The Problem is the Printer Rejects Paper from Front Path or Tray ........................ |
55 |
The Problem is the Printer Takes Two or More Sheets At Once ......................... |
56 |
The Problem is Images are Low Resolution..................................................... |
57 |
The Problem is the Printer has Not Received the Job ....................................... |
58 |
The Problem is a Flashing Tool Icon in the Front Panel..................................... |
59 |
The Problem is Something Else (General Guidance) ....................................... |
61 |
English
|
HP Designjet 30/90/130 Printer series – Quick Reference Guide |
|
|
Tell Me About… |
|
English |
|
|
|
Tell Me About the Front Panel ...................................................................... |
62 |
|
Tell Me About the Icons on the Front Panel .................................................... |
63 |
|
Tell Me About Hardware Error Information .................................................... |
65 |
|
Tell Me About Color Calibration.................................................................. |
66 |
|
Tell Me About HP Designjet System Maintenance........................................... |
67 |
|
Tell Me More About My Printer.................................................................... |
68 |
Legal information |
|
HP Limited Warranty Statement ................................................................... |
69 |
Regulatory Notices .................................................................................... |
73 |
Important Note: To ensure color consistency, you must perform a color calibration at various times. See “Tell Me About Color Calibration” on page 66.
More information
For more information about your printer (including Mac driver and networking information), and troubleshooting printer problems, refer to the HP Designjet Driver and Documentation CD. For information about the Windows driver, use the on-line help for the driver.
The information contained herein is subject to change without notice. The only warranties for HP products and services are set forth in the express warranty statements accompanying such products and services. Nothing herein should be construed as constituting an additional warranty. HP shall not be liable for technical or editorial errors or omissions contained herein.
2

HP Designjet 30/90/130 Printer series – Quick Reference Guide
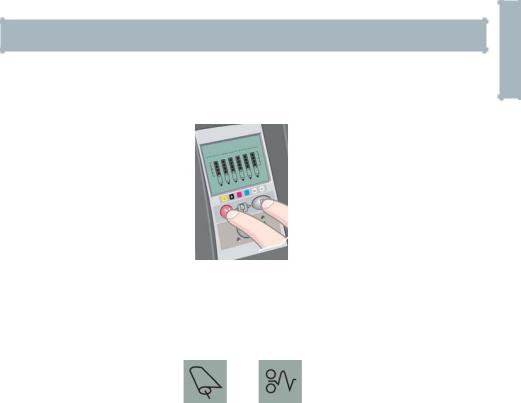
How Do I Perform a Color Calibration?
To ensure that color consistency is maintained, you will need to perform a color calibration at various times (for example, when you change the printheads). For more information on when you should perform a color calibration, refer to “Tell Me About Color Calibration” on page 66.
The calibration is performed for a given combination of printheads, paper type, and print quality. After you have done the calibration, the calibration data is stored in the printer and is used the next time you print with the same type of paper loaded.
Note that the color calibration is restricted to HP manufactured paper of certain types. Refer to the HP Designjet Driver and Documentation CD for more details.
For more general information about color calibration, refer to “Tell Me About Color Calibration” on page 66.
1.Make sure that you have a blank sheet of A4 or Letter paper, or a roll of paper of the relevant type at hand.
2.Double-click the HP Designjet Color Calibration icon on the desktop.
3.Choose the appropriate on-screen options.
The color calibration print will be produced. Once the calibration has finished, you do not need to keep the printout.
English
3

|
HP Designjet 30/90/130 Printer series – Quick Reference Guide |
|
English |
How Do I Load Sheets of Paper? (General Guidance) |
|
There are four ways of loading sheets of paper into the printer if you have the |
||
|
||
|
Automatic Roll Feed installed on your printer. There are three ways of loading |
|
|
paper if you have the manual roll feed or no roll feed installed: |
extensions |
output tray |
to support |
|
paper |
|
2. front path
3.rear path (sheet/ manual  roll)
roll)
4. rear path  (auto.
roll)
1.input tray
1.The input tray at the front of the printer for normal sheets of paper between:
•76 × 142 mm (3 × 5.6 inches) and 457 × 610 mm (18 × 24 inches) (C+ or A2+). (90 and 130 printer series)
•95 × 146 mm (3.74 × 5.75 inches) and 330 × 483 mm (13 × 19 inches). (30 Printer series)
Envelopes can also be loaded in the input tray.
2.The front path for paper between:
•95 × 146 mm (3.74 × 5.75 inches) and 330 × 483 mm (13 × 19 inches). (30 Printer series)
•152 × 229 mm (6 × 9 inches) and 458 × 1625 mm (18.03 × 63.9 inches) (A2 oversize). (90 Printer series)
•110 × 205 mm (4.3 × 8.1 inches) and 625 × 1625 mm (24.6 × 63.9 inches) (D+ or A1+). (130 printer)
3.The rear path (upper slot), for single thick sheets of paper or other media between:
•95 × 146 mm (3.74 × 5.75 inches) and 330 × 483 mm (13 × 19 inches). (30 Printer series)
•76 × 205 mm (4 × 8.1 inches) and 458 × 1625 mm (18.03 × 63.9 inches) (A2+). (90 Printer series)
4

HP Designjet 30/90/130 Printer series – Quick Reference Guide
How Do I Load Sheets of Paper? (General Guidance) (continued)
•110 × 205 mm (4.3 × 8.1 inches) and 625 × 1625 mm (24.6 × 63.9 inches) (D+ or A1+). (130 printer)
The rear path (upper slot) is also used for roll input if your printer has the manual roll feed installed.
4.The rear path (lower slot) is used for roll input if your printer has the Automatic Roll Feed installed (HP Designjet 130 only).
The extensions may be used to support large sheets of paper going into the front input path, and also act as supports for paper arriving in the output tray.
Important: If you wish to print to a sheet and there is a roll of paper loaded in the printer, the roll must be unloaded to allow printing to the sheet. If you are using the 90 Printer series, see “How Do I Unload a Roll of Paper? (90 Printer series)” on page 15. If you are using the 130 printer, see “How Do I Unload a Roll of Paper? (130 Printer series)” on page 18.
English
5
|
HP Designjet 30/90/130 Printer series – Quick Reference Guide |
|
English |
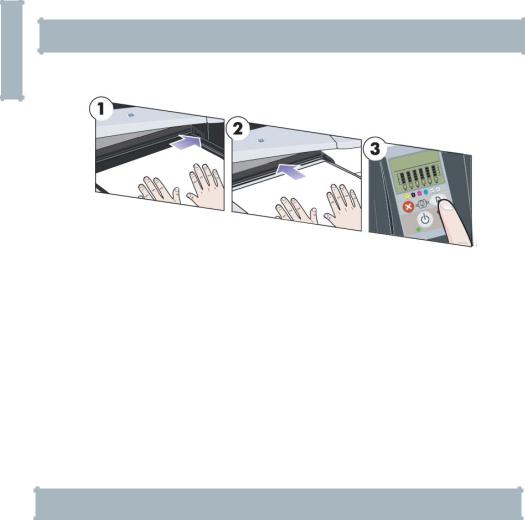
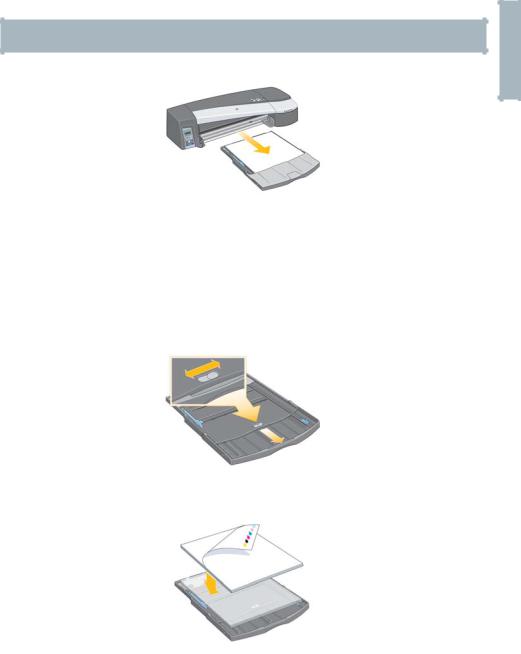
How Do I Load Paper Using the Front Path? |
|
Note that the illustration below shows the HP Designjet 130 printer. |
||
|
1.Place a piece of paper in the output tray, aligning it on the right of the output tray, with the surface that is to be printed facing down. Do NOT stack paper.
2.Push the paper into the printer, pushing it firmly in as far as it will go, while maintaining its alignment to the right. Ensure that your hands are flat on the paper and close to the slot, and that the paper remains flat. If the printer does not “catch” the paper, try again, making sure that the leading edge of the paper is flat.
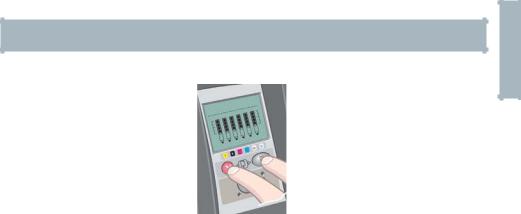
3.If you are using the 90/130 Printer series, press the OK key (the upper right key) on the front panel.
The printer will check the alignment of the paper, and if it is misaligned, it will eject the paper; in this case you will have to reload the paper.
How Do I Unload Paper from the Front Path?
If you want to change or remove the paper that you have loaded before printing, for example to change the type of paper or to use a different input path:
•If you are using the 30 Printer series, pull the unwanted paper gently out of the printer.
•If you are using the 90/130 Printer series, press the Cancel and OK keys at the same time to eject the paper.
6
HP Designjet 30/90/130 Printer series – Quick Reference Guide
How Do I Load Paper Using the Front Path? (continued)
Note that the illustration below shows the HP Designjet 130 printer.
English
7
|
|
HP Designjet 30/90/130 Printer series – Quick Reference Guide |
|
English |
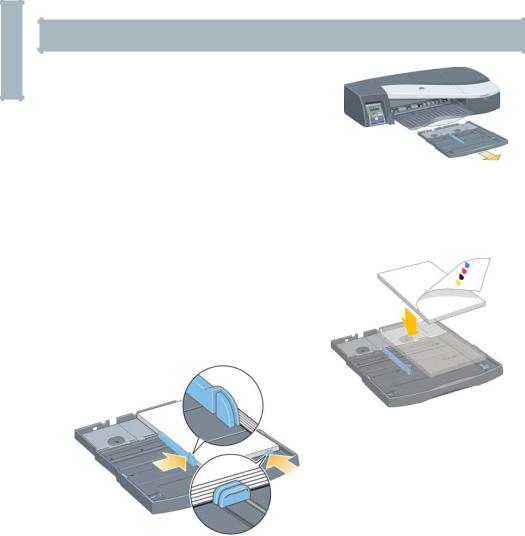
How Do I Load Paper in the Input Tray? (30 Printer series) |
||
1. |
Remove the tray. |
||
|
|||
|
2. |
Adjust the size of the tray if necessary. If the |
|
|
|
paper you are using is larger than Legalor |
|
|
|
A4-size, extend the tray. For Legaland A4- |
|
|
|
size or smaller paper, use the tray in its |
|
|
|
normal size. To adjust the size of the tray, |
|
|
|
first slide the tray extension locking tab to |
|
|
|
the left until it clicks. This unlocks the tray extension. To lengthen the tray, |
|
|
|
pull the tray extension out as far as it will go. To make the tray shorter, push |
|
|
|
the tray extension in as far as it will go. The tray extension locking tab will |
|
|
|
click back to its normal position, locking the tray size. |
|
|
3. Place the paper in the tray, to the right |
||
|
|
and towards the printer. |
|
|
4. |
Push in the small tab on the right of the |
|
|
|
tray so that it fits snugly against the |
|
|
|
paper. |
|
5.Move the larger tab on the left of the tray to the right so that it fits snugly against the paper.
6.Insert the tray into the printer, pushing it in as far as it will go. Note that if the paper tray is extended, it will project out from the printer and must be supported.
8
HP Designjet 30/90/130 Printer series – Quick Reference Guide
How Do I Load Paper in the Input Tray? (90/130 Printer series)
1. Remove the tray from the printer.
2.Remove the dust cover from the tray. Adjust the size of the tray if necessary. If the paper you are using is larger than Legalor A4-size, extend the tray. For Legaland A4-size or smaller paper, use the tray in its normal size. To adjust the size of the tray, slide the tray extension locking tab to the left until it clicks. This unlocks the tray extension. To lengthen the tray, pull the tray extension out as far as it will go. To make the tray shorter, push the tray extension in as far as it will go. The tray extension locking tab will click back to its normal position, locking the tray size.
3. Place the paper in the tray, to the right and towards the printer.
Do not try to load more than 70 sheets of plain paper, 50 sheets of coated paper, or 20 sheets of glossy paper in the tray (for more details, see the HP Designjet Driver and Documentation CD).
English
9
|
HP Designjet 30/90/130 Printer series – Quick Reference Guide |
|
English |
How Do I Load Paper in the Input Tray? (90/130...) (continued) |
|
4. Push in the small tab on the right of the tray so that it fits snugly against the |
||
|
||
|
paper. Move the larger tab on the left of the tray to the right so that it too fits |
|
|
snugly against the paper.ì |
5.Replace the dust cover.
6.Lift up the output tray and insert the input tray into the printer, keeping it straight and pushing it in from both sides as far as it will go. The left inside corner must be aligned with the plastic paper tray guide and the right inside corner must be aligned with the sticker of the input tray.
7.Lower the output tray, pushing the tray slightly to the left. Note that if the paper tray is extended, it will project out from the printer and must be supported. Check that the tray is fully inserted.
10

HP Designjet 30/90/130 Printer series – Quick Reference Guide
How Do I Load Sheet Paper Using the Rear Path?
In order to print on sheet paper using the rear path, you must submit your print job to the printer before loading the paper.
1.Set the paper source to Rear Manual Feed. If you leave the paper source set to Auto Select (Windows) or Automatic (Mac OS), the printer will start printing on any paper that is already loaded. If you specify Rear Manual Feed, you do not need to remove paper from the tray before using the rear path.
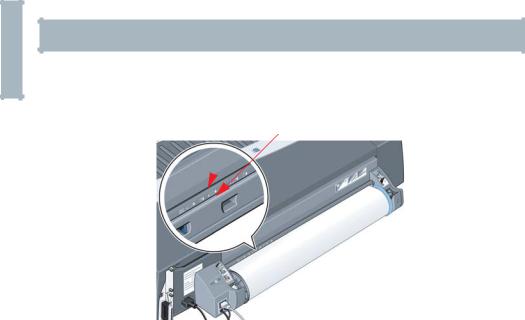
2.Submit your print job, then wait for the Paper Status icon on the front panel to flash before you load the sheet into the rear path. The Paper Status icon is shown on the right.
•If the Automatic Roll Feed is installed on your printer (130 only) and a roll of paper is in the rear path, the roll will automatically be unloaded when you submit your print job. The Paper Status icon will then flash to indicate there is no longer any paper in the rear path. You can then load your sheet.
If other icons appear, such as the Roll icon with the Paper Jam icon, or the Roll icon with the Paper Misalign icon, you may have to unload the roll manually before continuing to load a sheet.
•If the manual roll feed is installed on your printer (90 Printer series) and a roll of paper is in the rear path, you will need to unload it manually before you can print on sheet paper. See “How Do I Unload a Roll of Paper? (90 Printer series)” on page 15.
3.When you are ready to load the sheet, place the paper in the rear feed, to the left as seen from the rear, with the surface on which you wish to print facing up.
English
11
|
HP Designjet 30/90/130 Printer series – Quick Reference Guide |
|
English |
How Do I Load Sheet Paper Using the Rear Path? (continued) |
|
If your printer has two slots, you must feed the sheet through the upper slot |
||
|
||
|
(the lower slot is for roll paper only). |
|
|
Sheet paper |
|
|
Roll paper |
4.Align the left edge of the paper with the left mark on the rear feed. If you do not see a mark, align it with the paper stop near the left-hand end of the roll feed spindle. Make sure that the leading edge of the sheet is parallel to the slot and aligned properly.
5.Push the paper into the printer, pushing it as far as it will go. For best results you should push the paper in quickly rather than slowly.
12
HP Designjet 30/90/130 Printer series – Quick Reference Guide
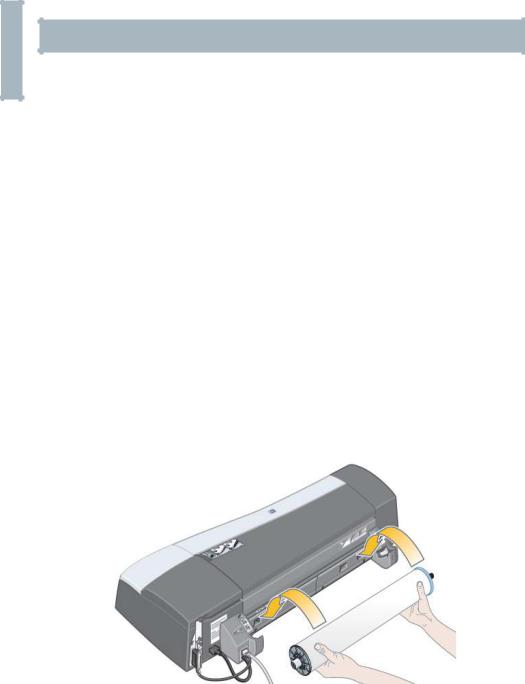
How Do I Load a Roll of Paper? (90 Printer series)
Roll paper can be used only if you have the roll feed accessory.
Note that only one source of paper can be used by the printer at any time. So if a roll of paper is loaded and the software requests printing on a sheet of paper, you must unload the roll manually before you can print to the sheet. If subsequent jobs require a roll to be used, the roll must be loaded again before they can be printed.
You can cut a roll without unloading it by pressing the OK key; the paper first advances about 1 cm.
1.Set your application to pick paper from the roll feed.
2.Select Print from your application.
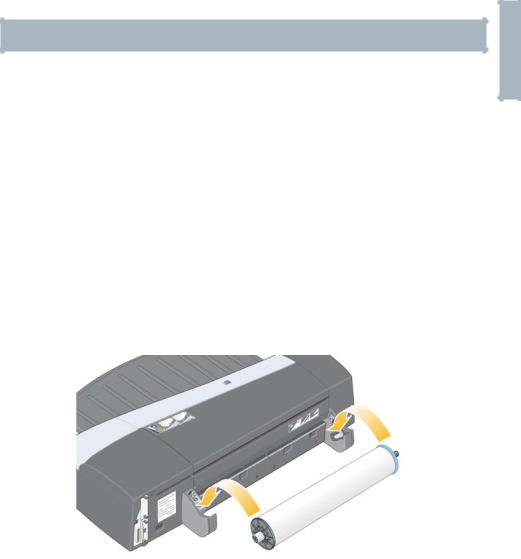
3.Load a roll of the required paper onto the spindle. Ensure that the roll is the right way round with the surface on which you wish to print facing up and that the blue stop on the spindle is pushed in against the paper.
4.Insert the spindle into its retaining slots, with the blue stop on the right and the black stop on the left as seen from the rear of the printer.
If the paper is glossy, we recommend that you wear gloves to avoid smearing the surface of the paper.
5.Make sure that the leading edge of the roll is straight and perpendicular to its side edges.
English
13
|
HP Designjet 30/90/130 Printer series – Quick Reference Guide |
|
English |
How Do I Load a Roll of Paper? (90 Printer series) (continued) |
|
6. Rewind any excess paper so that the paper is rolled tightly onto the spindle. |
||
|
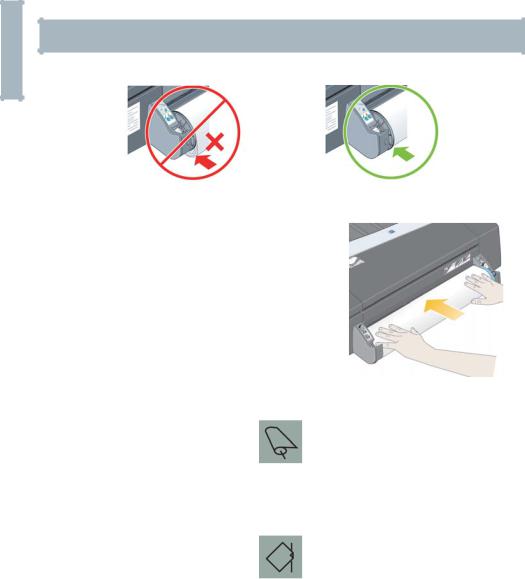
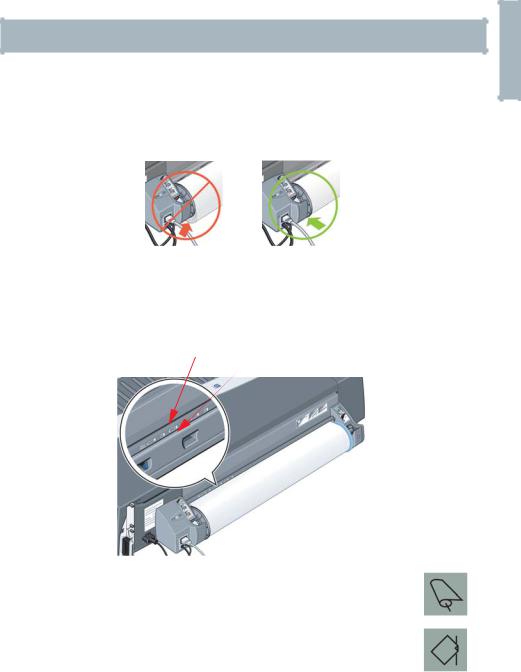
7.Insert the leading edge of the paper into the rear of the printer until it encounters resistance, keeping the sides of the paper rolled tightly so that the paper is properly aligned.
8.After emitting a ‘beep’ the printer will take up the paper.
9.The printer will check the alignment of the paper.
If the paper is properly aligned, the Roll icon
will appear on the display, indicating that the printer is ready to print.
If the paper is misaligned, the printer will eject the paper and the display will show the Misaligned and Roll icons; in that case you will have to reload the paper.
14
HP Designjet 30/90/130 Printer series – Quick Reference Guide
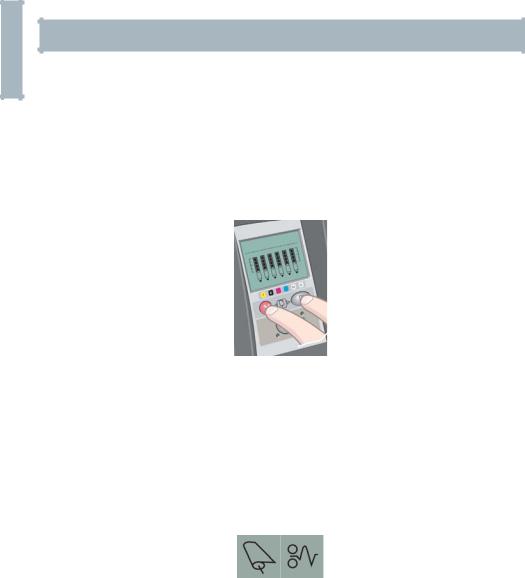
How Do I Unload a Roll of Paper? (90 Printer series)
Important: do not pull on the roll of paper once it is taken up by the printer; that is, if there is any resistance.
1. Press the Cancel and OK keys at the same time to eject the roll of paper.
2.Pull the roll towards you and remove the paper completely from the rear paper path of the printer. The icons shown below flash until the paper is completely out; because, if the paper is only partially removed, paper jams may subsequently occur. Sometimes the paper may by itself fall away from the rear path.
3.You do not need to remove the spindle from the printer.
English
15
|
HP Designjet 30/90/130 Printer series – Quick Reference Guide |
|
English |
How Do I Load a Roll of Paper? (130 Printer series) |
|
This section is only relevant if your printer has a roll feed installed. |
||
|
||
|
Only one source of paper can be used by the printer at any one time, so if a |
|
|
roll of paper is loaded and the software requests printing on a sheet |
|
|
of paper: |
•If you have a manual roll feed installed on your printer, you must unload the roll manually before you can print to a sheet of paper.
•If you have the Automatic Roll Feed installed on your printer, the roll is automatically unloaded by the printer.
In any case, the roll is automatically reloaded the next time printing to the roll is requested.
You can cut a roll without unloading it by pressing the OK key (top right key on the front panel); the paper first advances about 1 cm or 0.4 inch.
1.Set your application to pick paper from the roll feed (only applicable with the manual roll feed).
2.Select Print from your application.
3.Load a roll of the required paper onto the spindle. Ensure that the roll is the right way round with the surface on which you wish to print facing up and that the blue stop on the spindle is pushed in against the paper.
4.Insert the spindle into its retaining slots, with the blue stop on the right and the black stop on the left as seen from the rear of the printer.
16
HP Designjet 30/90/130 Printer series – Quick Reference Guide
How Do I Load a Roll of Paper? (130 Printer series) (continued)
If the paper is glossy, we recommend that you wear gloves to avoid smearing the surface of the paper.
5.Make sure that the leading edge of the roll is straight and perpendicular to its side edges and has no irregularities.
6.Rewind any excess paper so that the paper is rolled tightly onto the spindle.
7.Insert the leading edge of the paper into the lower slot in the rear of the printer. Push the paper in until it encounters resistance, keeping the sides of the paper rolled tightly so that the paper is aligned properly. After emitting a ‘beep’, the printer will take up the paper.
Sheet paper
Roll paper
The printer will check the alignment of the paper.If the paper is properly aligned, the roll icon will appear on the display, indicating that the printer is ready to print.
If the paper is misaligned, the printer will eject the paper and the display will show the misaligned and roll icons; you will have to reload the paper.
8. Repeat Step 6, so that the paper is tightly rolled onto the spindle.
English
17
|
HP Designjet 30/90/130 Printer series – Quick Reference Guide |
||
English |
How Do I Unload a Roll of Paper? (130 Printer series) |
||
This section is only relevant if your printer has a roll feed installed. |
|||
|
|||
|
Important: |
Do not pull on the roll of paper once it is taken up by the |
|
|
|
printer, that is, if there is any resistance. |
|
There are two ways of unloading a roll of paper:
If you want to unload the roll in order to feed a single sheet through the printer, press the Cancel and OK keys on the front panel at the same time (see below). If you later request printing to the roll, the Automatic Roll Feed will then automatically reload the roll.
If you want to unload the roll in order to completely remove it (for example, you no longer wish to use this roll of paper):
1.Push the Eject button on the left roll feed support at the rear of the printer.
Avoid pressing the Eject button several times, as this can damage the paper.
2.Pull the roll towards you and remove the paper completely from the rear paper path of the printer. The icons shown below flash until the paper is completely out, because if the paper is only partially removed, paper jams may subsequently occur. Sometimes the paper may fall away from the rear path by itself.
You do not need to remove the spindle from its supports in the printer.
18
HP Designjet 30/90/130 Printer series – Quick Reference Guide
How Do I Print on Large Sheets? (30 Printer series)
The output tray has an extension that can be pulled out to extend its length. When printing on large sheets of paper (A3, A3+, B, B+ and larger sizes) stored in the input tray, pull out the extension to support the paper when it emerges from the printer. It should now look like this:
English
19
|
HP Designjet 30/90/130 Printer series – Quick Reference Guide |
|
English |
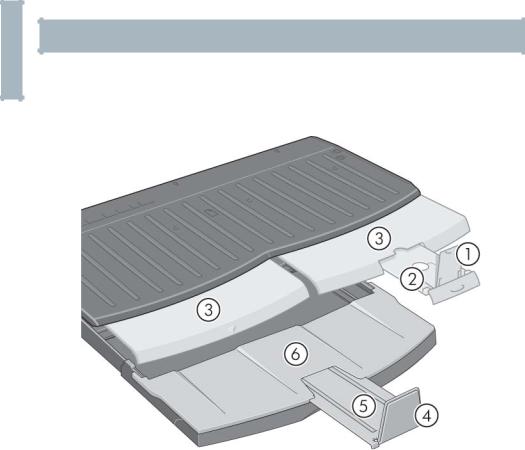
How Do I Print on Large Sheets? (90 Printer series) |
|
The printer output system has several adjustable components. When printing on |
||
|
||
|
large sheets of paper, it is important that you use the correct printer output |
|
|
configuration. The following diagram shows the adjustable parts of the printer |
|
|
output system: |
The table on the next page gives the output system configuration required for various paper sizes.
Note the following:
•When using the main tray or roll feedback as source, make the necessary adjustments to the output system to enable output to be stacked.
•If the output tray already has prints stacked in it and you want to print from the roll feed, empty the output tray and adjust it as necessary before printing.
...continued on next page...
20

HP Designjet 30/90/130 Printer series – Quick Reference Guide
How Do I Print on Large Sheets? (90 Printer series) (continued)
English
|
Media |
|
|
|
|
|
|
|
|
|
|
|
|
|
|
|
|
|
|
|
|
|
|
|
|
|
|
Source |
|
Destination |
|
Size |
Width |
Length |
1 |
2 |
3 |
4 |
5 |
6 |
|
|
|
|
|
|
|
|
|
|
|
|
|
|
|
|
|
|
|
|
JIS B5 |
182mm |
257mm |
|
|
|
|
|
|
|
|
|
|
|
|
|
|
|
|
|
|
|
|
|
|
|
|
|
ANSI A |
8.5’’ |
11’’ |
|
|
|
|
|
|
|
|
|
|
|
|
|
|
|
Position |
|
|
|
|
|
|
|
|
|
ISO A4 |
210mm |
297mm |
UP |
Closed |
DOWN |
Closed |
N/A |
|
|
|
|
|
|
A3, ... |
||||||||
|
|
|
|
|
|
|
|
|
|
|
|
|
|
|
|
|
|
|
ARCH A |
9’’ |
12’’ |
|
|
|
|
|
|
|
|
|
A-Size |
|
|
|
|
|
|
|
|
|
|
|
|
|
|
DIN C4 |
229mm |
324mm |
|
|
|
|
|
|
|
|
|
|
|
|
|
|
|
|
|
|
|||
|
|
|
|
|
|
|
|
|
|
|
|
|
|
|
|
|
|
|
ISO B4 |
250mm |
353mm |
|
|
|
|
|
|
|
|
|
|
|
|
|
|
|
Position |
|
|
|
|
|
|
|
|
|
LEGAL |
8.5’’ |
14’’ |
UP |
Closed |
DOWN |
Closed |
N/A |
|
|
|
|
|
|
B4, ... |
||||||||
|
|
|
|
|
|
|
|
|
|
|
|
|
|
|
|
|
|
|
JIS B4 |
257mm |
364mm |
|
|
|
|
|
|
|
|
|
|
|
|
|
|
|
|
|
|
|
|
C-Size |
|
Output |
|
|
ISO A3 |
297mm |
420mm |
|
Position |
Position |
|
|
|
|
|
|
|
|
|
UP |
DOWN |
Closed |
N/A |
||||
Tray |
|
tray |
|
|
ANSI B |
11’’ |
17’’ |
A3, ... |
A3, ... |
||||
|
|
|
|
|
|
|
|||||||
|
|
|
|
|
|
|
|
|
|
|
|||
|
|
|
|
|
|
|
|
|
|
|
|
|
|
|
|
|
B-Size |
|
ARCH B |
12’’ |
18’’ |
|
|
|
|
|
|
|
|
|
|
|
|
|
|
|
Position |
Position |
|
|
|
|
|
|
|
|
DIN C3 |
324mm |
458mm |
UP |
DOWN |
Closed |
N/A |
||
|
|
|
|
|
B4, ... |
A3, ... |
|||||||
|
|
|
|
|
|
|
|
|
|
|
|
||
|
|
|
|
|
ANSI B+ |
13’’ |
19’’ |
|
|
|
|
|
|
|
|
|
|
|
|
|
|
|
|
|
|
|
|
|
|
|
|
|
ISO B3 |
353mm |
500mm |
|
|
|
|
Position |
|
|
|
|
|
|
|
|
|
DOWN |
Closed |
Closed |
UP |
Open |
|
|
|
|
|
|
JIS B3 |
264mm |
515mm |
17x22 |
|||||
|
|
|
|
|
|
|
|
|
|
||||
|
|
|
|
|
|
|
|
|
|
|
|||
|
|
|
|
|
|
|
|
|
|
|
|
|
|
|
|
|
C-Size |
|
ANSI C |
17’’ |
22’’ |
|
|
|
|
|
|
|
|
|
|
|
|
|
|
|
|
|
|
Position |
|
|
|
|
|
|
ISO A2 |
420mm |
594mm |
DOWN |
Closed |
Closed |
UP |
Open |
|
|
|
|
|
|
A2, ... |
||||||||
|
|
|
|
|
|
|
|
|
|
|
|
|
|
|
|
|
|
|
ARCH C |
18’’ |
24’’ |
|
|
|
|
|
|
|
|
|
|
|
|
|
|
|
|
|
|
|
|
Front |
|
Output |
|
|
|
|
|
|
|
Position |
|
|
|
manual |
|
C-Size |
|
DIN C2 |
458mm |
648mm |
DOWN |
Closed |
Roll |
DOWN |
Closed |
N/A |
|
|
tray |
|
|||||||||||
feed |
|
|
|
|
|
|
|
|
icon |
|
|
|
|
|
|
|
|
|
|
|
|
|
|
|
|
||
|
|
|
|
|
|
|
|
|
|
|
|
|
|
|
|
|
|
|
ISO A6 |
105mm |
148mm |
|
Position |
|
|
|
|
|
|
|
|
|
|
A6,... |
|
|
|
|
|||
|
|
|
|
|
|
|
|
|
|
|
|
|
|
|
|
|
A-Size |
|
|
|
|
UP |
|
Closed |
DOWN |
Closed |
N/A |
Rear |
|
Output |
|
ISO A5 |
148mm |
210mm |
Position |
||||||
|
|
|
|
|
|
|
|
||||||
manual |
|
|
|
|
A5,... |
|
|
|
|
||||
|
tray |
|
|
|
|
|
|
|
|
|
|
||
feed |
|
|
|
|
|
|
|
|
|
|
|
|
|
|
|
|
|
|
|
|
|
|
|
Position |
|
|
|
|
|
|
C-Size |
|
DIN C2 |
458mm |
648mm |
DOWN |
Closed |
Roll |
DOWN |
Closed |
N/A |
|
|
|
|
|
|
|
|
|
|
icon |
|
|
|
|
|
|
|
|
|
|
|
|
|
|
|
|
|
Roll |
|
Output |
|
|
|
Up to |
|
|
|
Position |
|
|
|
|
|
Custom |
|
DOWN |
Closed |
Roll |
DOWN |
Closed |
N/A |
||||
accessory |
|
tray |
|
18’’ |
|
||||||||
|
|
|
|
|
|
|
icon |
|
|
|
|||
|
|
|
|
|
|
|
|
|
|
|
|
|
|
|
|
|
|
|
|
|
|
|
|
|
|
|
|
21
|
HP Designjet 30/90/130 Printer series – Quick Reference Guide |
|
English |
How Do I Print on Large Sheets? (130 Printer series) |
|
The printer output system has several adjustable components. When printing on |
||
|
||
|
large sheets of paper, it is important that you use the correct printer output |
|
|
configuration. The following diagram shows the adjustable parts of the printer |
|
|
output system: |
The table on the next page gives the output system configuration required for various paper sizes.
Note the following:
•When using the main tray or roll feedback as source, make the necessary adjustments to the output system to enable output to be stacked.
•If the output tray already has prints stacked in it and you want to print from the roll feed, empty the output tray and adjust it as necessary before printing.
...continued on next page...
22

HP Designjet 30/90/130 Printer series – Quick Reference Guide
How Do I Print on Large Sheets? (130 Printer series) (continued)
English
|
Media |
|
|
|
|
|
|
|
|
|
|
|
|
|
|
|
|
|
|
|
|
|
|
|
|
|
|
Source |
|
Destination |
|
Size |
Width |
Length |
1 |
2 |
3 |
4 |
5 |
6 |
|
|
|
|
|
|
|
|
|
|
|
|
|
|
|
|
|
|
|
|
JIS B5 |
182mm |
257mm |
|
|
|
|
|
|
|
|
|
|
|
|
|
|
|
|
|
|
|
|
|
|
|
|
|
ANSI A |
8.5’’ |
11’’ |
|
|
|
|
|
|
|
|
|
|
|
|
|
|
|
Position |
|
|
|
|
|
|
|
|
|
ISO A4 |
210mm |
297mm |
UP |
Closed |
DOWN |
Closed |
N/A |
|
|
|
|
|
|
A3, ... |
||||||||
|
|
|
|
|
|
|
|
|
|
|
|
|
|
|
|
|
|
|
ARCH A |
9’’ |
12’’ |
|
|
|
|
|
|
|
|
|
A-Size |
|
|
|
|
|
|
|
|
|
|
|
|
|
|
DIN C4 |
229mm |
324mm |
|
|
|
|
|
|
|
|
|
|
|
|
|
|
|
|
|
|
|||
|
|
|
|
|
|
|
|
|
|
|
|
|
|
|
|
|
|
|
ISO B4 |
250mm |
353mm |
|
|
|
|
|
|
|
|
|
|
|
|
|
|
|
Position |
|
|
|
|
|
|
|
|
|
|
|
|
|
|
|
|
|
|
|
|
|
|
|
LEGAL |
8.5’’ |
14’’ |
UP |
B4, ... |
Closed |
DOWN |
Closed |
N/A |
|
|
|
|
|
|
|
|
|
|
|
|
|
|
|
|
|
|
|
JIS B4 |
257mm |
364mm |
|
|
|
|
|
|
|
|
|
|
|
|
|
|
|
|
|
|
|
|
C-Size |
|
Output |
|
|
ISO A3 |
297mm |
420mm |
|
Position |
Position |
|
|
|
|
|
|
|
|
|
UP |
DOWN |
Closed |
N/A |
||||
Tray |
|
tray |
|
|
ANSI B |
11’’ |
17’’ |
A3, ... |
A3, ... |
||||
|
|
|
|
|
|
|
|||||||
|
|
|
|
|
|
|
|
|
|
|
|||
|
|
|
|
|
|
|
|
|
|
|
|
|
|
|
|
|
B-Size |
|
ARCH B |
12’’ |
18’’ |
|
|
|
|
|
|
|
|
|
|
|
|
|
|
|
Position |
Position |
|
|
|
|
|
|
|
|
DIN C3 |
324mm |
458mm |
UP |
DOWN |
Closed |
N/A |
||
|
|
|
|
|
B4, ... |
A3, ... |
|||||||
|
|
|
|
|
|
|
|
|
|
|
|
||
|
|
|
|
|
ANSI B+ |
13’’ |
19’’ |
|
|
|
|
|
|
|
|
|
|
|
|
|
|
|
|
|
|
|
|
|
|
|
|
|
ISO B3 |
353mm |
500mm |
|
|
|
|
Position |
|
|
|
|
|
|
|
|
|
DOWN |
Closed |
Closed |
UP |
Open |
|
|
|
|
|
|
JIS B3 |
264mm |
515mm |
17x22 |
|||||
|
|
|
|
|
|
|
|
|
|
||||
|
|
|
|
|
|
|
|
|
|
|
|||
|
|
|
|
|
|
|
|
|
|
|
|
|
|
|
|
|
C-Size |
|
ANSI C |
17’’ |
22’’ |
|
|
|
|
|
|
|
|
|
|
|
|
|
|
|
|
|
|
Position |
|
|
|
|
|
|
ISO A2 |
420mm |
594mm |
DOWN |
Closed |
Closed |
UP |
Open |
|
|
|
|
|
|
A2, ... |
||||||||
|
|
|
|
|
|
|
|
|
|
|
|
|
|
|
|
|
|
|
ARCH C |
18’’ |
24’’ |
|
|
|
|
|
|
|
|
|
|
|
|
|
|
|
|
|
|
|
|
|
|
|
|
|
DIN C2 |
458mm |
648mm |
|
|
|
|
|
|
|
|
|
|
|
|
|
|
|
|
|
|
|
|
|
|
|
|
|
ISO B2 |
500mm |
707mm |
|
|
|
|
|
|
Manual |
|
|
|
|
|
|
|
|
|
|
|
|
|
|
|
|
|
JIS B2 |
515mm |
728mm |
|
|
Position |
|
|
|
|
feed, |
|
Output bin |
D-Size |
|
|
|
|
DOWN |
Closed |
Roll |
DOWN |
Closed |
N/A |
front or |
|
|
|
|
|
||||||||
|
|
|
|
ISO A1 |
594mm |
841mm |
|
|
icon |
|
|
|
|
rear |
|
|
|
|
|
|
|
|
|
||||
|
|
|
|
|
|
|
|
|
|
|
|
|
|
|
|
|
|
|
ANSI D |
22’’ |
34’’ |
|
|
|
|
|
|
|
|
|
|
|
|
|
|
|
|
|
|
|
|
|
|
|
|
|
ARCH D |
24’’ |
36’’ |
|
|
|
|
|
|
|
|
|
|
|
|
|
|
|
|
|
|
|
|
Roll |
|
|
|
|
|
Up to |
|
|
|
Position |
|
|
|
|
Output bin |
|
Custom |
|
DOWN |
Closed |
Roll |
DOWN |
Closed |
N/A |
|||
accessory |
|
|
24’’ |
|
|||||||||
|
|
|
|
|
|
|
|
icon |
|
|
|
||
|
|
|
|
|
|
|
|
|
|
|
|
|
|
|
|
|
|
|
|
|
|
|
|
|
|
|
|
23
 Loading...