


HP Designjet 5100 printer
Customer Reference Guide

More Information
You can find more about the following topics on the Using Your Printer CD:
Printing materials and their characteristics
Animations of loading materials and installing ink supplies
More about solving problems
Page formatting
Printer configuration and maintenance
Functional specifications
A glossary of terms and a comprehensive index
There is also more information available from the following sources:
The WebAccess tool, for information about your printer status, technical support, on-line documentation, etc.
HP Designjet Online (http://www.designjet.hp.com) for the latest product information, including on-line documentation and application notes for leading GIS software
The setup instructions that came with your printer
HP Designjet 5100 printer Customer Reference Guide

Table of Contents
1.Use the front panel
2.Load and unload material
3.Maintain the ink system
4.Manage the prints
5.Front-panel messages
6.Troubleshooting image quality
7.Troubleshooting the ink supply
8.Troubleshooting print material jams
9.Legal and service information
HP Designjet 5100 printer Customer Reference Guide

HP Designjet 5100 printer Customer Reference Guide

Use the front panel 1 1
Functional areas 1-2
The navigation keys 1-2 Display screens 1-3 Action keys 1-4
Status lights 1-4 Sleep mode key 1-5
Print mode selection 1-5 Selecting production mode 1-6
Internal prints 1-7
Print the configuration 1-7 Menu print 1-7
Front-panel menus 1-9
Setup menu: device setup 1-9
Setup menu: internal rip settings 1-12 Setup menu: queuing and nesting 1-12 Setup menu: page format 1-13
Setup menu: demos 1-14 Media menu 1-14
Ink cartridge menu 1-15 Printhead menu 1-15
Navigation 1-15
Using the navigation keys 1-15 Entering the setup menu 1-16
Navigation examples 1-17 Changing menu mode 1-17 Changing the page size 1-17 Changing the drying time 1-18 Restoring the default menu 1-19
HP Designjet 5100 printer Customer Reference Guide |
1-1 |

Use the front panel
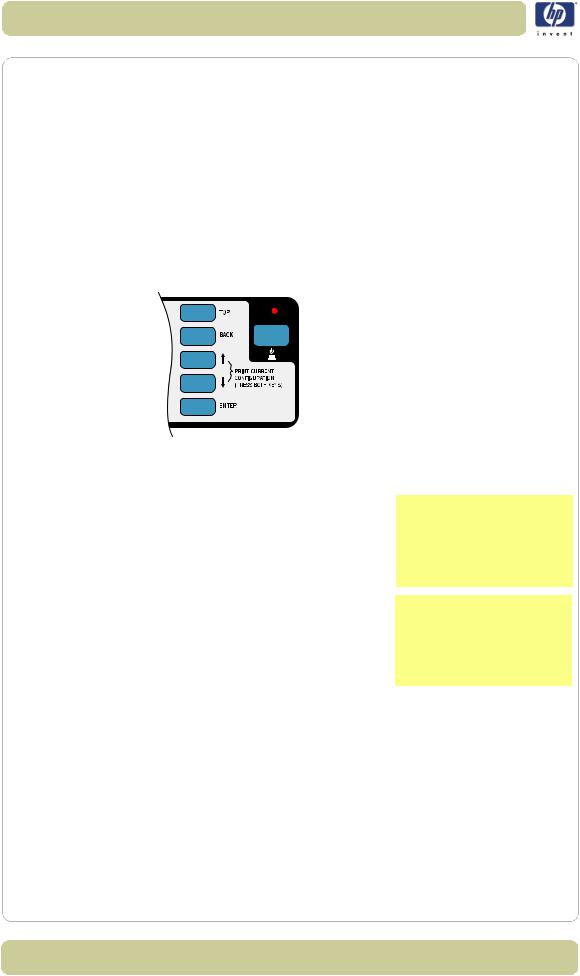
Functional areas
The front panel of the printer is made up of the following functional areas, from left to right:
Action keys and associated status lights
A message display screen
Navigation keys
Sleep mode key and status light.
|
|
|
|
|
|
|
|
|
|
|
|
|
|
|
|
|
|
|
|
|
|
|
|
|
|
|
|
|
|
|
|
|
|
|
|
|
|
Sleep mode key |
|
On/off power LED |
||||||||||||||
|
|
|
|
|
|
|
|
|
|
|
|
|
|
|
|
|
|
|
|
|
|
|
|
|
|
|
|
|
|
|
|
|
|
|
|
|
|
|
|
|
|
|
|
|
|
|
|
|
|
|
|
|
(red when in standby) |
|
|
|
|
|
|
|
|
|
|
|
|
|
|
|
|
|
|
|
|
|
|
|
|
|
|
|
|
|
|
|
|
|
|
|
|
|
|
|
|
|
|
|
|
|
|
|
|
|
|
|
|
|
|
|
|
|
|
|
|
|
|
|
|
|
|
|
|
|
|
|
|
|
|
|
|
|
|
|
|
|
|
|
|
|
|
|
|
|
|
|
|
|
|
|
|
|
|
|
|
|
|
|
|
|
|
|
|
|
|
|
|
|
|
|
|
|
|
|
|
|
|
|
|
|
|
|
|
|
|
|
|
|
|
|
|
|
|
|
|
|
|
|
|
|
|
|
|
|
|
|
|
|
|
|
|
|
|
|
|
|
|
|
|
|
|
|
|
|
|
|
|
|
|
|
|
|
|
|
|
|
|
|
|
|
|
|
|
|
|
|
|
|
|
|
|
|
|
|
|
|
|
|
|
|
|
|
|
|
|
|
|
|
|
|
|
|
|
|
|
|
|
|
|
|
|
|
|
|
|
|
|
|
|
|
|
|
|
|
|
|
|
|
|
|
|
|
|
|
|
|
|
|
|
|
|
|
|
|
|
|
|
|
|
|
|
|
|
|
|
|
|
|
|
|
|
|
|
|
|
|
|
|
|
|
|
|
|
|
|
|
|
|
|
|
|
|
|
|
|
|
|
|
|
|
|
|
|
|
|
|
|
|
|
|
|
|
|
|
|
|
|
|
|
|
|
|
|
|
|
|
|
|
|
|
|
|
|
|
|
|
|
|
|
|
|
|
|
|
|
|
|
|
|
|
|
|
|
|
|
|
|
|
|
|
|
|
|
|
|
|
|
|
|
|
|
|
|
|
|
|
|
|
|
|
|
|
|
|
|
|
|
|
|
|
|
|
|
|
|
|
|
|
|
|
|
|
|
|
|
|
|
|
|
|
|
|
|
|
|
|
|
|
|
|
|
|
|
|
|
|
|
|
|
|
|
|
|
|
|
|
|
|
|
|
|
|
|
|
|
|
|
|
|
|
|
|
|
|
|
|
|
|
|
|
|
|
|
|
|
|
|
|
|
|
|
|
|
|
|
|
|
|
|
|
|
|
|
|
|
|
|
|
|
|
|
|
|
|
|
|
|
|
|
|
|
|
|
|
|
|
|
|
|
|
|
|
|
|
|
|
|
|
|
|
|
|
|
|
|
|
|
|
|
|
|
|
|
|
|
|
|
|
|
|
|
|
|
|
|
|
|
|
|
|
|
|
|
|
|
|
|
|
|
|
|
|
|
|
|
|
|
|
|
|
|
|
|
|
|
|
|
|
|
|
|
|
|
|
|
|
|
|
|
|
|
|
|
|
|
|
|
|
|
|
|
|
|
|
|
|
|
|
|
|
|
|
|
|
|
|
|
|
|
|
|
|
|
|
|
|
|
|
|
|
|
|
|
|
|
|
|
|
|
|
|
|
|
|
|
|
|
|
|
|
|
|
|
|
|
|
|
|
|
|
|
|
|
|
|
|
|
|
|
|
|
|
|
|
|
|
|
|
|
|
|
|
|
|
|
|
|
|
|
|
|
|
|
|
|
|
|
|
|
|
|
|
|
|
|
|
|
|
|
|
|
|
|
|
|
|
|
|
|
|
|
|
|
|
|
|
|
|
|
|
|
|
|
|
|
|
|
|
|
|
|
|
|
|
|
|
|
|
|
|
|
|
|
|
|
|
|
|
|
|
|
|
|
|
|
|
|
|
|
|
|
|
|
|
|
|
|
|
|
|
|
|
|
|
|
|
|
|
|
|
|
|
|
|
|
|
|
|
|
|
|
|
|
|
|
|
|
|
|
|
|
|
|
|
|
|
|
|
|
|
|
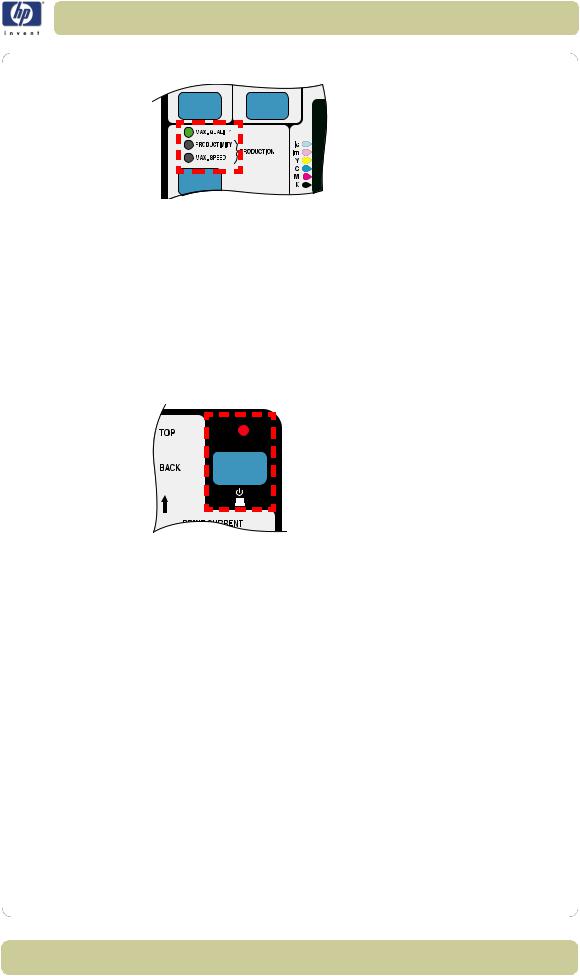
Action keys |
Green |
Message display |
Navigation keys |
status |
|
|
|
|
|
|
|
|
lights |
|
|
The navigation keys
The navigation keys are TOP, BACK, ↑, ↓ and ENTER. They are located on the right-hand side of the front panel.
You use these keys to navigate through the menu system and to select menu icons and menus. See Front-panel menus, on page 9 and Navigation, on
page 15.
You can also use the navigation keys to respond to messages. See 4, in section front-panel messages on the reverse of this guide, for detailed descriptions of error and status messages.
1-2 |
|
|
|
|
|
|
|
|
|
|
|
|
HP Designjet 5100 printer Customer Reference Guide |
||
Use the front panel
Display screens
The front panel can display a variety of information. When one of the four menus is highlighted, the front panel displays the following information:
Printer setup menu
If the Printer Setup menu is selected, there is a brief and overall description of the status of the consumable. If there is no printing material loaded, then there is a message describing the first step in loading material.
If you press Enter now, you will go to the Setup menu. See Front-panel menus, on page 9.
Media menu
If the Media menu is selected, and there is printing material loaded, the front panel displays information on the material you have loaded.
If you press Enter now, you will go to the
Media menu, see Media menu, on page 14.
Ink cartridge icon 
If the Ink Cartridge menu is selected, the status of each of the ink cartridges is shown. If there is a problem with one or more of the ink cartridges, the front panel will display an action message or a error code, see 4, in section front-panel messages on the reverse of this guide for more details.
If you press Enter now, you will go to the Ink Cartridge menu, see Ink cartridge menu, on page 15.
Printhead icon
If the Printhead menu is selected, the front panel displays the status of each of the printheads. If there is a problem with one or more of the printheads, the front panel will display an action message or a error code see 4, in section front-panel messages on the reverse of this guide for more details.
If you press Enter now, you will go to the Printhead Menu, see Printhead menu, on page 15.
HP Designjet 5100 printer Customer Reference Guide |
1-3 |
Use the front panel
Menus
To configure the printer, use the menus to select and change the settings. Use the ↑ and ↓ keys to navigate and press the Enter key to select the options.
Procedure information
The front-panel display can help you through the various procedures you have to perform, such as loading printing material.
Action keys
The action portion of the front panel contains three buttons:
CANCEL stops printing and printing material loading while they are in progress, cancels dry time, or cancels nest waiting. See cancelling a page, on page 131.
LOAD/UNLOAD loads or unloads printing material. See loading a roll into the printer, on page 34.
PRINT QUALITY selects the print mode, which may be Max Quality, Productivity, Production, or Max Speed. A green status light indicates the print mode you have selected. Two green lights indicate that you have selected Production mode (not available with all printing materials). See
Print mode selection, on page 5.
Status lights
The green status lights indicates what setting is currently active in the front
1-4 |
HP Designjet 5100 printer Customer Reference Guide |
Use the front panel
panel.
NOTE: In most cases, settings in your application software or printer driver will override the settings you make on the front panel of the printer.
Sleep mode key
After a period of inactivity, the printer goes into a sleep mode (low-power usage mode). This is indicated by the front-panel display and status indicators turning off. The indicator light on the front panel is on when the printer is in standby mode. The printer “wakes up” when you press the sleep mode key (or any other key) on the printer’s front panel, or when there is any I/O activity, such as the arrival of a printing job.
Print mode selection
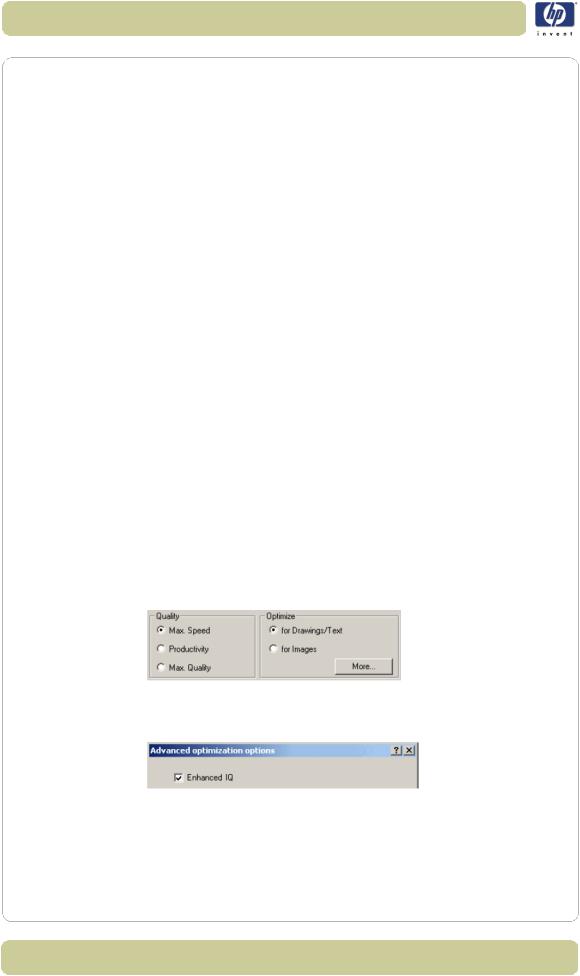
Choose Max Speed for the fastest printing. Ideal for checking prints, when image quality is not very important.
Choose Production for fast printing with image quality good enough for some production purposes. Production mode is available only with certain paper types.
Choose Productivity for a good combination of image quality and speed.
Choose Max Quality for the highest possible image quality.
You can print images in different settings to see which gives the best combination of throughput and quality for your application. The resolution at which your print will be printed is summarized in the table below.
NOTE: To print in Max Quality mode with the Enhanced IQ setting, you must use glossy paper.
|
Print quality |
Default |
|
Resolution with Enhanced IQ |
|
|
setting |
resolution |
|
setting |
|
|
Max Speed |
300 × 300 |
|
|
|
HP Designjet 5100 printer Customer Reference Guide |
1-5 |
||||
Use the front panel |
|
|
|
|
|
|
|
|
Print quality |
Default |
Resolution with Enhanced IQ |
|
setting |
resolution |
setting |
|
Production |
300 × 300 |
|
|
Productivity |
300 × 300 |
600 × 600 |
|
Max Quality |
600 × 600 |
1200 × 600 |
|
(with glossy paper) |
||
|
|
|
|
Selecting production mode
Production mode is a fast print mode that gives acceptable image quality for some purposes. It is available only with dye-based inks and certain specific HP paper types: Coated, Heavyweight Coated, Productivity Gloss, and Productivity Semi-Gloss. When one of these paper types is loaded, the front panel announces that Production mode is available.
If you select Production mode when using a printing material that does not support Production mode, the printer will print in Productivity mode.
If you decide to use a non-HP printing material, see using non-hp printing materials, on page 60.
Selecting production mode using the front panel
Press the Print Quality key repeatedly until you see two green lights, beside Productivity and Max Speed. The two lights indicate that Production mode is selected.
However, remember that the print mode selected in the front panel is ignored if you have set a different mode in the printer driver or in WebAccess.
Selecting production mode using the printer driver
To select Production mode in the Windows HP-GL/2 printer driver, you must select the Max Speed mode with the Enhanced IQ option.
Click the More button above to obtain the Advanced Optimization Options box, below:
Selecting production mode using webaccess
Choose Submit Job and you will see a Print Quality option. Select
1-6 |
HP Designjet 5100 printer Customer Reference Guide |
Use the front panel
Production.
Internal prints
Print the configuration
To request a Current Configuration Print from the front panel:
1Make sure that a roll or a sheet is loaded into the printer.
2Press the TOP key to select the main menu on the front panel.
3Make sure that the front panel displays the Ready message.
4Press the ↑ and ↓ keys on the front panel simultaneously to print the Current Configuration Print.
5The front panel displays the message Receiving while the file is being processed, and then Printing as the printer starts printing.
Menu print
You can see the complete menu structure available on the printer by printing the Menu print. Alternatively, see Front-panel menus, on page 9. Use it to help you to navigate the menus.
NOTE: The Menu print is printed in the size specified in the Page Format → Size settings in the front panel. However, if a sheet is loaded, it will automatically shrink to fit. Make sure this setting specifies the size you want before printing.
1 Make sure that printing material is loaded.
HP Designjet 5100 printer Customer Reference Guide |
1-7 |
Use the front panel
2Make sure the front panel displays the printer setup menu icon. If it does, press the Top key to select it. Press the Enter key.
3The front panel will now display the printer setup options:
4Press ↓ key until “Demos” is selected. Press the
Enter key.
5Press ↓ or ↑ key until “Menu” is displayed. Press the Enter key.
6The front panel will now display the message “Receiving” while the file is being processed, and then the printer starts printing the Menu print.
Other internal prints
Your printer can produce a number of other internal prints, as follows.
Service configuration print
The Service Configuration print provides information needed by service engineers, including the internal current configuration, operating conditions (temperature and humidity), ink levels, and other statistics about printer usage.
Network card configuration print
The Network Card Configuration Print shows the configuration of your network card.
Usage report
The Usage Report shows the status of the printer’s usage counters. This information includes the total number of prints, number of prints per print mode, and total amount of ink used per color. The counts in this report are estimates.
Image quality print
The Image Quality Print can be used to help diagnose whether the printer has image quality problems, and if problems exist, help determine their cause. See 29, in section image quality on the reverse of this guide.
Palette print
The HP-GL/2 Palette Print shows the color or grayscale definitions in the
1-8 |
HP Designjet 5100 printer Customer Reference Guide |

Use the front panel
currently-selected color palette. See the ‘Using Your Printer CD’.
Samples
These are prints showing the capabilities of the printer.
Front-panel menus
Key:
1The items on a yellow background always appear on the Front Panel.
2The items on a gray background appear in the front panel only when Utilities > Menu mode is set to Full. Full is the default.
3The items on a blue background appear in the front panel only when the TUR is installed and loaded with a roll.
4The items on a green background appear in the front panel only when the TUR is installed and not loaded with a roll, or when the TUR is not installed.
Setup menu: device setup
1st level |
2nd level |
3rd level |
|
|
|
Accessories → |
TUR installed → |
Yes, No |
|
Other accessories → |
Yes, No |
Cutter → |
On, Off |
|
Reduced |
On, Off |
|
margins → |
|
|
|
|
|
Lang → |
CALS/G4, HP-GL/2, TIFF, |
|
JPEG, Automatic |
|
|
|
|
|
Drying time → |
Automatic |
|
|
None |
|
|
Manual → |
1 to 255 min |
Pen check → |
Optimized |
|
|
Manual → |
every 1 to 255 |
|
plots |
|
|
|
|
|
Next plot |
|
Heater → |
Automatic |
|
|
None |
|
|
Manual → |
10 to 100% |
Sleep mode → |
30, 60, 120, 150, 180, |
|
210, 240 min |
|
|
|
|
|
|
|
|
HP Designjet 5100 printer Customer Reference Guide |
1-9 |

Use the front panel
Setup menu: i/o setup
1st level |
2nd level |
3rd level |
|
|
|
No I/O card |
|
|
found |
|
|
Card ID |
|
|
Card setup → |
Configuration |
|
|
Advanced → |
Reset card |
I/O timeout → |
0.5 to 30 min |
|
|
|
|
Setup menu: utilities
1st level
Track media length →
Usage →
Menu mode →
Calibrations →
Reset WebAccess passwd
Test prints →
Statistics →
Default menu
2nd level |
3rd level |
4th level |
Yes, No |
|
|
|
|
|
Print usage, |
|
|
View usage |
|
|
Short, Full |
|
|
Printhead |
|
|
alignment |
|
|
|
|
|
Accuracy → |
Restore factory |
|
|
|
Create pattern, |
|
Recalibrate → |
Measure |
|
|
pattern |
Banding → |
Restore factory |
|
|
Recalibrate |
|
|
|
|
|
|
|
HP-GL/2 config, Service config, Network card config,
Usage report, Image quality print
RAM present,
Hard disk,
Code rev,
Service ID,
Num cycles,
Boot ROM
1-10 |
HP Designjet 5100 printer Customer Reference Guide |

Use the front panel
Display |
Up, Down |
|
|
contrast → |
|
||
|
|
||
Clean platen |
Automatic |
On, Off |
|
→ |
clean → |
||
|
|||
|
Clean now → |
Automatic, |
|
|
Manual |
||
|
|
||
Lens |
|
|
|
maintenance |
|
|
|
|
|
|
HP Designjet 5100 printer Customer Reference Guide |
1-11 |

Use the front panel
Setup menu: internal rip settings
1st level |
2nd level |
3rd level |
|
|
|
|
|
|
Optimized, |
|
|
Start printing → |
Immediately, |
|
|
After |
|
||
|
|
||
|
processing |
|
|
|
|
Native, sRGB, Apple |
|
Ink emulation → |
RGB → |
RGB, |
|
Adobe RGB, |
|||
|
|
||
|
|
ColorMatch RGB |
|
|
|
Native, EuroScale, |
|
|
CMYK → |
SWOP, |
|
|
|
Toyo, DIC, JMPA |
|
Align calibration |
On, Off |
|
|
→ |
|
||
|
|
||
Black |
Off, On |
|
|
replacement → |
|
||
|
|
||
|
100 ... |
|
|
Scale → |
419%, |
|
|
|
Fit to page |
|
|
|
|
|
Setup menu: queuing and nesting
1st level |
2nd |
3rd |
4th |
|
level |
level |
level |
|
|
|
|
Queue mgmt |
# ... → |
Copies |
0 ... 99 |
→ |
|
→ |
|
|
|
Move to |
|
|
|
top |
|
|
|
Delete |
|
|
|
page |
|
Queue → |
On, Off |
|
|
Nest → |
Off |
|
|
|
|
|
|
In order 1 ... 99
→min
The Nest option appears only if Queue=On.
1-12 |
HP Designjet 5100 printer Customer Reference Guide |

Use the front panel
Setup menu: hp-gl/2 settings
1st level |
2nd |
3rd level |
4th |
5th |
|
level |
|
level |
level |
|
|
|
|
|
|
Software, |
|
|
|
Palette → |
Factory, |
|
|
|
Palette A, |
|
|
|
|
|
|
|
|
|
|
Palette B |
|
|
|
Define palette |
Palette A, |
Pen no. 0 to 15 |
Width |
0.13 to |
Palette B |
12.0 |
|||
→ |
→ |
→ |
→ |
mm |
|
|
|
||
|
Factory |
Pen no. 0 to 15 |
Width |
0 to |
|
→ |
→ |
→ |
255 |
Merge → |
On, Off |
|
|
|
|
|
|
|
|
Setup menu: page format
1st level |
2nd level |
Size → |
Inked area |
Extrawide →
|
Oversize → |
|
|
Arch → |
|
|
JIS → |
|
|
ANSI → |
|
|
ISO → |
|
|
Software |
|
|
|
|
Rotate → |
0 to 270 |
|
|
|
|
Margins → |
Normal, Extended, |
|
Smaller |
||
|
||
Nest spacing |
Automatic |
|
→ |
||
|
||
|
Manual → |
|
Mirroring → |
On, Off |
|
|
|
3rd level
1.0 × 1.4 m, 42 × 59 in,
44 × 62 in, 1.2 × 1.7 m,
52 × 73 in, 54 × 76 in,
60 × 100 in
Over A2, Over A1
Best ARCH, ARCH A to E1
Best JIS B, JIS B4 to B1
Best ANSI, ANSI A to E
Best ISO A, ISO A4 to A0
0 to 30 mm
HP Designjet 5100 printer Customer Reference Guide |
1-13 |
Use the front panel
Setup menu: demos
1st level
Samples
Palette
Menu
Media menu
1st level |
2nd level |
|
Vendor name, |
|
Type of media, |
Roll/sheet info → Width, Length, Max XY, Profile revision
Media selection |
HP → |
|
→ |
||
|
Others →
|
(list of |
|
|
downloaded |
|
|
media profiles; |
|
Delete media → |
media profiles |
|
|
provided with the |
|
|
printer cannot be |
|
|
deleted) |
|
Move media |
|
|
|
||
TUR loaded → |
Yes, No |
|
Form feed & cut |
Yes, No |
|
→ |
||
|
||
|
|
3rd level |
4th level |
HW Coated,
Coated Paper,
Photo Imaging
Gloss,
Colorfast Vinyl, HP
Adhesive-Backed
Polypropylene,
Paper Semi-Gloss,
Poster Paper,
Studio Canvas,
More...
Coated, → |
|
HW Coated, |
|
Photo, |
|
Fine Arts, |
Choose |
Vinyl/Film, |
profile, |
Backlit, |
|
Textile, |
sample |
Colored, |
|
CAD, |
|
More... |
|
|
|
|
|
1-14 |
HP Designjet 5100 printer Customer Reference Guide |

Use the front panel
The front panel shows only a selection of the available printing materials. The Using Your Printer CD has a more complete list.
See also using non-hp printing materials, on page 60.
Ink cartridge menu
1st level
Light cyan cart info, → Light magenta cart info, Yellow cart info,
Cyan cart info, Magenta cart info, Black cart info
Replace ink cartridge
→
2nd level
HP 705 ink cartridge, Ink level,
Capacity, Part number,
Manufacture date
Yes, No
Printhead menu
1st level |
2nd level |
|
|
|
|
|
Light cyan info, |
|
|
Light magenta |
|
|
info, |
|
Printhead info → |
Yellow info, |
|
|
Cyan info, |
|
|
Magenta info, |
|
|
Black info |
|
|
All printheads, |
|
|
Cyan, |
|
Recover |
Magenta, |
|
Yellow, |
||
printheads → |
||
Black, |
||
|
||
|
Light C, |
|
|
Light M |
|
Replace |
Yes, No |
|
printheads → |
||
|
||
|
|
Navigation
Using the navigation keys
Once in the first-level menu, you can navigate the menu system using the display keys.
Press the Top key to go back to the top (1st) level. This will bring you to the
HP Designjet 5100 printer Customer Reference Guide |
1-15 |
Use the front panel
setup menu icon See Entering the setup menu, on page 16.
Press the Back key to display the previous menu level, without changing any menu selections
Press ↑ to scroll up, or ↓ to scroll down though the menus.
Press the Enter key to:
aSelect a menu and move to the next menu level, when in the menu system
bChange the printer’s configuration to the highlighted menu item indicated with a √ symbol.
The … characters in a menu box indicate that another level of menu is available.
Entering the setup menu
1Make sure the front panel displays the Printer Setup menu icon. If it does not, press the Top key.
2Press the Enter key to enter the Printer Setup menu:
Note: If the short menu is selected, the I/O setup menu will not be available.
To see how to change from the full menu to the short menu, see Navigation examples, on page 17.
3Now you are in the Printer Setup menu, you can change the settings of your printer.
4To return to the top of the menu system, press the Top key.
1-16 |
HP Designjet 5100 printer Customer Reference Guide |
Use the front panel
Navigation examples
Changing menu mode
The front panel displays two types of menu. One is the short menu. This menu only contains the settings for everyday use of the printer. The other menu is the full menu mode which contains all of the menus.
1Make sure the front panel displays the Printer Setup menu icon. If it does not, press the Top key. Then press the Enter key.
2The front panel will now display the printer setup options:
3Press the ↓ key until “Utilities” is selected. Press Enter key.
4Press the ↓ key until “Menu mode” is selected. Press Enter key.
5Use the ↑ or ↓ key to select the menu mode you want. The selected option will have a √ symbol.
6To return to the top of the menu system, press the Top key.
Changing the page size
This example shows how to adjust the page size.
1Make sure the front panel displays the printer Setup Menu Icon. If it does not, press the Top key. Then Press the Enter key.
HP Designjet 5100 printer Customer Reference Guide |
1-17 |
Use the front panel
2The front panel will now display the printer setup options:
3Press the ↓ key until “Page Format” is selected. Press the Enter key.
4The correct menu is already highlighted. Press the Enter key to select “Size=”.
5Press the ↓ key until “Software” is selected. Press the Enter key.
6‘Software’ is now selected.The selection you have made will be indicated by the √ symbol.
7To return to the top of the menu system, press the Top key.
Changing the drying time
This example adjusts the drying time, a setting used to suit special printing conditions. See the ‘Using Your Printer CD’ for more details.
1Make sure the front panel displays the Printer Setup menu icon. If it does not, press the Top key. Then press the Enter key.
2The front panel will now display the printer setup options:
1-18 |
HP Designjet 5100 printer Customer Reference Guide |
Use the front panel
3Press the ↓ key until the “Device setup” menu is selected. Press the Enter key.
4Press the ↓ key until the “Drying time=” menu is selected. Press the Enter key.
5Press the ↑ or ↓ key to select “Manual”.
6Press the Enter key to select it as the setting for Drying time.
7Press the ↑ or ↓ key to select the drying time.
8To return to the top of the menu system, press the Top key.
Restoring the default menu
If you are unsure about the settings you have made, or if you prefer to reset the printer’s default menu, go to the Utilities menu and select Default Menu.
HP Designjet 5100 printer Customer Reference Guide |
1-19 |

Use the front panel
1-20 |
HP Designjet 5100 printer Customer Reference Guide |

Load and unload |
|
2 |
|
|
|
material |
2 |
|
Loading roll guidelines 2-2
Loading a roll into the printer 2-2
Using pre-loaded spindles 2-2
Attaching printing material to the take-up reel 2-2
Help with loading 2-3
Loading a roll onto the spindle 2-3
Loading a roll into the printer 2-5
Attaching the roll to the take-up reel 2-9
Unloading the roll from the take-up reel 2-12
Removing the roll from the printer 2-15
Loading sheets 2-16
Unloading sheets 2-18
Using non-hp printing materials 2-18
Media length tracking 2-19
HP Designjet 5100 printer Customer Reference Guide |
2-1 |

Load and unload material
Loading roll guidelines
There are three steps to loading a roll into the printer.
1Load the roll onto the spindle and install the loaded spindle into the printer.
2Insert the roll into the printer and set the media type in the front panel.
3Attach the roll to the take-up reel (if you have one).
CAUTION |
Long rolls are heavy. You may need two people to load |
|
them. |
Loading a roll into the printer
In the initial stages of loading a roll you may want to open the window, but this is optional. If you are an experienced user for example, you can leave the window closed, thus saving time.
NOTE: Always start the procedure through the front panel.
When loading a roll into the printer:
Check that the printing material is wound onto the spindle tightly.
Check that the spindle is loaded correctly, with the guides installed firmly onto the spindle.
If you are using a three-inch cardboard core, check that the core adaptors supplied with the printer have been installed. See below
Using pre-loaded spindles
If you are a regular user of different printing materials, you can change your printing material more quickly if you have more than one spindle loaded with material. Extra spindles are available for purchase.
Attaching printing material to the take-up reel
When attaching printing material to the take-up reel:
Check the leading edge as it unwinds from the spool. If it is not evenly cut or if it is skewed, trim the printing material.
Check that the printing material is straight when it is attached to the takeup reel, otherwise it will skew as it is wound onto the core.
The core tube on the take-up reel must be the same width as the printing material you are using.
Make sure the take-up core is pushed firmly into both spindle guides.
2-2 |
HP Designjet 5100 printer Customer Reference Guide |
Load and unload material
If you need to feed more printing material from the printer, and the ‘Move Media’ screen is no longer displayed, go to the Media menu and press Enter. Then select ‘Move Media’.
If you are using a three-inch cardboard core, make sure the core adaptors supplied with the printer have been installed.
Core adaptors
Help with loading
When loading printing material there is information available from:
This Pocket Guide, installed at the back of the printer
The labels located on the printer and on the spindles
The front panel, which will guide you through the procedures step by step
Loading a roll onto the spindle
1Make sure the printer wheels are locked (the brake lever is pressed down) to prevent the printer from moving.
2Remove the empty spindle by pulling firmly on each end A and then B as indicated below.
The spindle has a stop at each end to keep the roll in position. The stop at the left-hand end can be removed to mount a new roll, it slides along the
HP Designjet 5100 printer Customer Reference Guide |
2-3 |
Load and unload material
spindle to hold rolls of different widths.
3 Remove the removable stop (A) from the left-hand end of the spindle.
4The roll may be very long; rest the spindle horizontally on a table and load the roll on the table. Bear in mind that you may need two people to handle it.
5Slide the new roll onto the spindle. Make sure the printing material is oriented as shown. If it is not, remove the roll, turn it 180 degrees and slide it back on to the spindle.
6Put the removable stop on to the upper end of the spindle, and push it towards the end of the roll.
7Ensure the spindle guide is pushed in as far as it will go, without using excessive force.
8With the movable roll stop on the left, slide the spindle into the printer left and then right as shown by the arrows A and B.
2-4 |
HP Designjet 5100 printer Customer Reference Guide |
Load and unload material
9The printing material should hang down from the roll exactly as shown below.
If you are a regular user of different printing materials, you can change rolls more quickly if you pre-load different materials on different spindles. Extra spindles are available for purchase.
Loading a roll into the printer
NOTE: To start this procedure you need to have a roll loaded on the spindle. See Loading a roll onto the spindle, on page 3.
NOTE: The following procedure assumes that you have the take-up reel installed and turned On in the Device Setup menu.
1Check the leading edge as it unwinds from the spool. If it is not cut straight, continue with the next procedure. If the printing material is cut correctly, go to step 3.
WARNING |
The knife used in the next step is sharp. Be sure the |
|
printer’s wheels are locked. Keep fingers clear of the |
|
cutting path. Keep the knife away from children. |
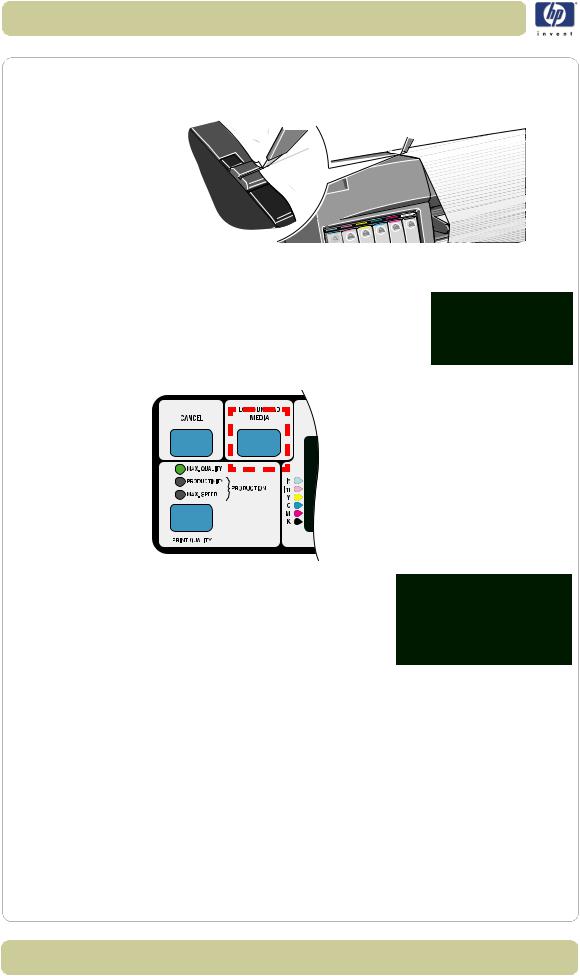
2Trim the leading edge of the roll only if it is not straight. If the amount of printing material was printed at the end of the roll, this figure will be cut off if the material is trimmed.
a Pull the printing material over the top of the printer and lay it over the cutting track.
b Use the knife in the pocket located on the back of the printer to cut off the first few inches of the material.
HP Designjet 5100 printer Customer Reference Guide |
2-5 |
Load and unload material
c Retract the blade and return the knife to its pocket.
3Press the Top button to select the main menu on the front panel.
4Make sure that the front panel displays the Ready for media message. Shown alongside is an example of what the front panel will display with the main screen selected
5Press the LOAD/UNLOAD MEDIA key on the front panel.
6The front panel displays:
7Select Roll and press Enter.
8Open the window (optional).
NOTE: If you have loaded rolls before and you are an experienced user, you may want to leave the window down. Rolls can be loaded with the
2-6 |
HP Designjet 5100 printer Customer Reference Guide |
 Loading...