


 Loading...
© 2017 Garmin Ltd. or its subsidiaries
All rights reserved. Under the copyright laws, this manual may not be copied, in whole or in part, without the written consent of Garmin. Garmin reserves the right to change or improve its products and to make changes in the content of this manual without obligation to notify any person or organization of such changes or improvements. Go to www.garmin.com for current updates and supplemental information concerning the use of this product.
Avtex® is a registered trademark of Avtex Limited.
Garmin® and the Garmin logo are trademarks of Garmin Ltd. or its subsidiaries, registered in the USA and other countries. These trademarks may not be used without the express permission of Garmin.
Garmin Express™, myTrends™, nüMaps Guarantee™, and nüMaps Lifetime™ are trademarks of Garmin Ltd. or its subsidiaries. These trademarks may not be used without the express permission of Garmin.
Android™ is a trademark of Google Inc. Apple® and Mac® are trademarks of Apple Inc, registered in the U.S. and other countries. The Bluetooth® word mark and logos are owned by the Bluetooth SIG, Inc., and any use of such word mark or logo by Garmin is under license. Caravan and Motorhome Club and associated logo is a trading name of The Caravan Club Limited whose registered office is East Grinstead House, East Grinstead, West Sussex RH19 1UA and is registered in England No 646027. Foursquare® is a trademark of Foursquare Labs, Inc. in the U.S. and in other countries. microSD® and the microSDHC logo are trademarks of SD-3C, LLC. TripAdvisor® is a registered trademark of TripAdvisor LLC. Wi Fi® is a registered mark of Wi-Fi Alliance Corporation. Windows®, Windows Vista®, and Windows XP® are registered trademarks of Microsoft Corporation in the United States and other countries.
Table of Contents |
|
Getting Started............................................................... |
1 |
Avtex Tourer One Device Overview ........................................... |
1 |
Mounting and Powering the Avtex Tourer One Device in Your |
|
Vehicle ........................................................................................ |
1 |
Turning the Device On or Off ...................................................... |
1 |
Acquiring GPS Signals ............................................................... |
1 |
Status Bar Icons ......................................................................... |
1 |
Using the On-Screen Buttons ..................................................... |
1 |
Adjusting the Volume .................................................................. |
2 |
Enabling Automatic Volume ................................................... |
2 |
Using the Audio Mixer ............................................................ |
2 |
Adjusting the Screen Brightness ................................................ |
2 |
Vehicle Profiles............................................................... |
2 |
Adding a Vehicle Profile .............................................................. |
2 |
Activating a Vehicle Profile ......................................................... |
2 |
Editing a Vehicle Profile .............................................................. |
2 |
Driver Awareness Features and Alerts........................ |
2 |
Enabling or Disabling Audible Driver Alerts ................................ |
3 |
Red Light and Speed Cameras .................................................. |
3 |
Navigating to Your Destination..................................... |
3 |
Routes ........................................................................................ |
3 |
Starting a Route .......................................................................... |
3 |
Starting a Route by Using the Map ........................................ |
3 |
Going Home ........................................................................... |
3 |
Your Route on the Map ............................................................... |
3 |
Active Lane Guidance ............................................................ |
4 |
Viewing Turns and Directions ................................................ |
4 |
Viewing the Entire Route on the Map .................................... |
4 |
Arriving at Your Destination ........................................................ |
4 |
Parking Near Your Destination .............................................. |
4 |
Finding Your Destination Using Your Garmin Watch ............. |
4 |
Finding Your Last Parking Spot ............................................. |
4 |
Changing Your Active Route ...................................................... |
5 |
Adding a Location to Your Route ........................................... |
5 |
Shaping Your Route ............................................................... |
5 |
Taking a Detour ..................................................................... |
5 |
Changing the Route Calculation Mode .................................. |
5 |
Stopping the Route ..................................................................... |
5 |
Using Suggested Routes ............................................................ |
5 |
Avoiding Delays, Tolls, and Areas .............................................. |
5 |
Avoiding Traffic Delays on Your Route .................................. |
5 |
Avoiding Toll Roads ............................................................... |
5 |
Avoiding Toll Stickers ............................................................. |
6 |
Avoiding Road Features ........................................................ |
6 |
Avoiding Environmental Zones .............................................. |
6 |
Custom Avoidances ............................................................... |
6 |
Navigating Off Road ................................................................... |
6 |
Finding and Saving Locations...................................... |
6 |
Points of Interest ......................................................................... |
6 |
Finding a Location Using the Search Bar ................................... |
6 |
Finding a Location by Category .................................................. |
7 |
Searching Within a Category ................................................. |
7 |
Navigating to Points of Interest Within a Venue .................... |
7 |
Finding Caravan Parks ............................................................... |
7 |
Location Search Results ............................................................. |
7 |
Location Search Results on the Map ..................................... |
7 |
Changing the Search Area ......................................................... |
8 |
Parking ........................................................................................ |
8 |
Finding Parking Near Your Current Location ......................... |
8 |
Finding Parking Near a Specified Location ............................ |
8 |
Understanding Parking Colors and Symbols ......................... |
8 |
Search Tools ............................................................................... |
8 |
Finding an Address ................................................................ |
8 |
Finding an Intersection ........................................................... |
8 |
Finding a City ......................................................................... |
8 |
Finding a Location Using Coordinates ................................... |
8 |
Foursquare ................................................................................. |
8 |
Connecting to Your Foursquare Account ............................... |
8 |
Searching Foursquare Points of Interest ............................... |
9 |
Viewing Foursquare Location Details .................................... |
9 |
Checking in with Foursquare ................................................. |
9 |
TripAdvisor® ............................................................................... |
9 |
Finding TripAdvisor Points of Interest .................................... |
9 |
Viewing Recently Found Locations ............................................ |
9 |
Clearing the List of Recently Found Locations ...................... |
9 |
Viewing Current Location Information ........................................ |
9 |
Finding Emergency Services and Fuel .................................. |
9 |
Getting Directions to Your Current Location .......................... |
9 |
Adding a Shortcut ....................................................................... |
9 |
Removing a Shortcut ............................................................. |
9 |
Saving Locations ........................................................................ |
9 |
Saving a Location .................................................................. |
9 |
Saving Your Current Location ................................................ |
9 |
Editing a Saved Location ....................................................... |
9 |
Assigning Categories to a Saved Location ............................ |
9 |
Deleting a Saved Location ................................................... |
10 |
Using the Map............................................................... |
10 |
Map Tools ................................................................................. |
10 |
Viewing a Map Tool ............................................................. |
10 |
Enabling Map Tools ............................................................. |
10 |
Up Ahead .................................................................................. |
10 |
Viewing Upcoming Locations ............................................... |
10 |
Customizing the Up Ahead Categories ................................ |
10 |
Trip Information ......................................................................... |
10 |
Viewing Trip Data from the Map .......................................... |
10 |
Viewing the Trip Information Page ....................................... |
11 |
Viewing the Trip Log ............................................................ |
11 |
Resetting Trip Information .................................................... |
11 |
Viewing Upcoming Traffic ......................................................... |
11 |
Viewing Traffic on the Map .................................................. |
11 |
Searching for Traffic Incidents ............................................. |
11 |
Customizing the Map ................................................................ |
11 |
Customizing the Map Layers ............................................... |
11 |
Changing the Map Data Field .............................................. |
11 |
Changing the Map Perspective ............................................ |
11 |
Live Services, Traffic, and Smartphone Features..... |
11 |
Pairing with Your Phone and Connecting to Smartphone |
|
Link ........................................................................................... |
11 |
Bluetooth Feature Status Icons ................................................ |
12 |
Garmin Live Services ................................................................ |
12 |
Subscribing to Garmin Live Services ................................... |
12 |
Sending a Location from Your Smartphone to Your Device ..... |
12 |
Smart Notifications .................................................................... |
12 |
Receiving Notifications ......................................................... |
12 |
Viewing the List of Notifications ........................................... |
13 |
Hands-Free Calling ................................................................... |
13 |
Placing a Call ....................................................................... |
13 |
Receiving a Call ................................................................... |
13 |
Using the Call History .......................................................... |
13 |
Using In-Call Options ........................................................... |
13 |
Saving a Home Phone Number ........................................... |
13 |
Setting Up Bluetooth Features for Your Apple Device ............. |
13 |
Connecting to the Smartphone Link App on Your Apple |
|
Device .................................................................................. |
13 |
Disabling Hands-Free Calling for Your Apple Device .......... |
13 |
Disabling Smartphone Link Data and Smart Notifications for |
|
Your Apple Device ............................................................... |
14 |
Setting Up Bluetooth Features for Your Smartphone with |
|
Android™ .................................................................................. |
14 |
Table of Contents |
i |
Connecting to the Smartphone Link App on Your Android |
|
Smartphone ......................................................................... |
14 |
Disabling Bluetooth Features for Your Smartphone with |
|
Android ................................................................................. |
14 |
Disconnecting a Bluetooth Device ............................................ |
14 |
Deleting a Paired Phone ........................................................... |
14 |
Traffic............................................................................ |
14 |
Receiving Traffic Data Using Smartphone Link ........................ |
14 |
Receiving Traffic Data Using a Traffic Receiver ....................... |
15 |
Traffic Receiver Subscriptions ............................................. |
15 |
Enabling Traffic ......................................................................... |
15 |
Viewing Traffic on the Map ....................................................... |
15 |
Searching for Traffic Incidents ............................................. |
15 |
Voice Command........................................................... |
15 |
Setting the Wakeup Phrase ...................................................... |
15 |
Activating Voice Command ....................................................... |
15 |
Voice Command Tips ............................................................... |
15 |
Starting a Route Using Voice Command .................................. |
15 |
Muting Instructions .................................................................... |
15 |
Voice Control ............................................................................ |
15 |
Configuring Voice Control .................................................... |
16 |
Using Voice Control ............................................................. |
16 |
Voice Control Tips ................................................................ |
16 |
Using the Apps............................................................. |
16 |
Viewing the Owner's Manual on Your Device ........................... |
16 |
Watch Link ................................................................................ |
16 |
Setting Up Watch Link ......................................................... |
16 |
Receiving Driver Alerts on Your Watch ................................ |
16 |
LiveTrack .................................................................................. |
16 |
Setting Up LiveTrack Sharing and Inviting Viewers ............. |
16 |
Starting LiveTrack Sharing ................................................... |
16 |
Viewing the Weather Forecast .................................................. |
17 |
Viewing Weather Near a Different City ................................ |
17 |
Viewing the Weather Radar ................................................. |
17 |
Viewing Weather Alerts ........................................................ |
17 |
Checking Road Conditions .................................................. |
17 |
Trip Planner .............................................................................. |
17 |
Planning a Trip ..................................................................... |
17 |
Editing and Reordering Locations in a Trip .......................... |
17 |
Discovering Attractions Along Your Trip .............................. |
17 |
Changing Routing Options for a Trip ................................... |
18 |
Navigating to a Saved Trip ................................................... |
18 |
Editing and Saving Your Active Route ................................. |
18 |
Logging Service History ............................................................ |
18 |
Adding Service Categories .................................................. |
18 |
Renaming Service Categories ............................................. |
18 |
photoLive Traffic Cameras ........................................................ |
18 |
Viewing and Saving photoLive Traffic Cameras .................. |
18 |
Viewing photoLive Traffic Cameras on the Map .................. |
18 |
Saving a Traffic Camera ...................................................... |
18 |
Viewing Previous Routes and Destinations .............................. |
18 |
Avtex Tourer One Settings.......................................... |
18 |
Map and Vehicle Settings ......................................................... |
18 |
Enabling Maps ..................................................................... |
18 |
Navigation Settings ................................................................... |
19 |
Calculation Mode Settings ................................................... |
19 |
Setting a Simulated Location ............................................... |
19 |
Wireless Network Settings ........................................................ |
19 |
Driver Assistance Settings ........................................................ |
19 |
Backup Camera Settings .......................................................... |
19 |
babyCam Settings .................................................................... |
19 |
Display Settings ........................................................................ |
19 |
Traffic Settings .......................................................................... |
19 |
Units and Time Settings ............................................................ |
20 |
Setting the Time ................................................................... |
20 |
Language and Keyboard Settings ............................................ |
20 |
Proximity Alerts Settings ........................................................... |
20 |
Device and Privacy Settings ..................................................... |
20 |
Restoring Settings .................................................................... |
20 |
Device Information....................................................... |
20 |
Viewing Regulatory and Compliance Information ..................... |
20 |
Specifications ............................................................................ |
20 |
Charging the Device ................................................................. |
20 |
Device Maintenance..................................................... |
20 |
Map and Software Updates ...................................................... |
20 |
Connecting to a Wi Fi Network ............................................ |
20 |
Updating Maps and Software Using a Wi Fi Network .......... |
21 |
Updating Maps and Software with Garmin Express ............ |
21 |
Device Care .............................................................................. |
21 |
Cleaning the Outer Casing ................................................... |
22 |
Cleaning the Touchscreen ................................................... |
22 |
Avoiding Theft ...................................................................... |
22 |
Resetting the Device ................................................................. |
22 |
Removing the Device, Mount, and Suction Cup ....................... |
22 |
Removing the Device from the Mount .................................. |
22 |
Removing the Mount from the Suction Cup ......................... |
22 |
Removing the Suction Cup from the Windshield ................. |
22 |
Changing the Fuse in the Vehicle Power Cable ....................... |
22 |
Troubleshooting........................................................... |
22 |
The suction cup will not stay on my windshield ........................ |
22 |
My device is not acquiring satellite signals ............................... |
22 |
The device does not charge in my vehicle ............................... |
22 |
My battery does not stay charged for very long ........................ |
22 |
My device does not connect to my phone or Smartphone |
|
Link ........................................................................................... |
22 |
The Smartphone Link app affects the battery charge level on my |
|
smartphone ............................................................................... |
23 |
Appendix....................................................................... |
23 |
Installing a Memory Card for Maps and Data ........................... |
23 |
Data Management .................................................................... |
23 |
About Memory Cards ........................................................... |
23 |
Connecting the Device to Your Computer ........................... |
23 |
Transferring Data From Your Computer .............................. |
23 |
Disconnecting the USB Cable .............................................. |
23 |
Viewing GPS Signal Status ...................................................... |
23 |
Purchasing Additional Maps ..................................................... |
23 |
Purchasing Accessories ........................................................... |
23 |
Index.............................................................................. |
24 |
ii |
Table of Contents |
Getting Started
 WARNING
See the Important Safety and Product Information guide in the product box for product warnings and other important information.
•Update the maps and software on your device (Map and Software Updates, page 20).
•Mount the device in your vehicle and connect it to power (Mounting and Powering the Avtex Tourer One Device in Your Vehicle, page 1).
•Acquire GPS signals (Acquiring GPS Signals, page 1).
•Adjust the volume (Adjusting the Volume, page 2) and display brightness (Adjusting the Screen Brightness, page 2).
•Set up a vehicle profile for your camper.
•Navigate to your destination (Starting a Route, page 3).
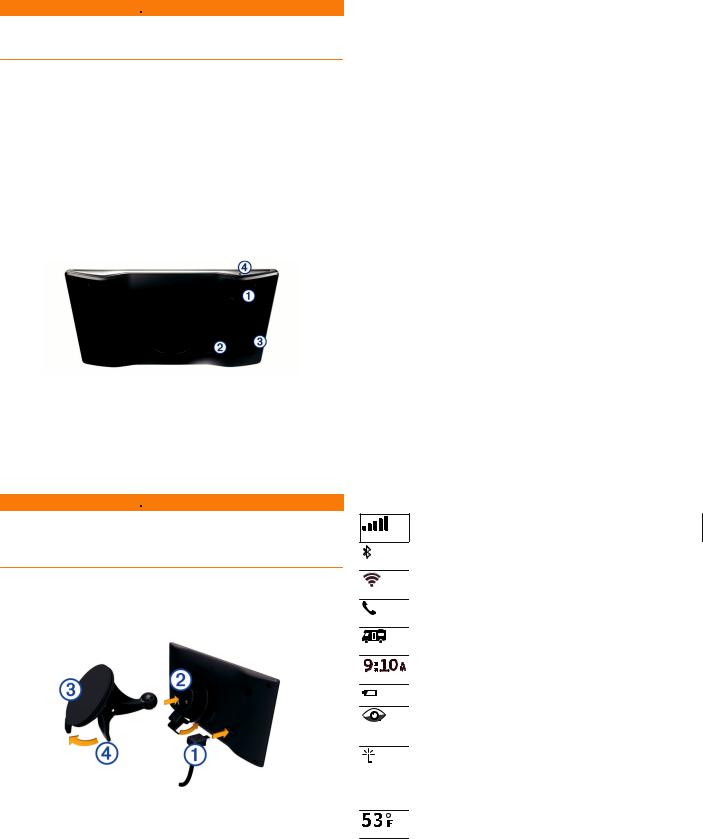
Avtex Tourer One Device Overview
À |
Power key |
Á |
USB power and data port |
|
|
 |
Map and data memory card slot |
|
|
à |
Microphone for Voice Command or hands-free calling |
Mounting and Powering the Avtex Tourer One Device in Your Vehicle
 WARNING
This product contains a lithium-ion battery. To prevent the possibility of personal injury or product damage caused by battery exposure to extreme heat, store the device out of direct sunlight.
Before you use your device on battery power, you should charge it.
1 Plug the vehicle power cable into the USB port on the
À
device.
2 Press the mount onto the suction cup until it snaps into
Á Â
place.
3 Press the suction cup to the windshield, and flip the lever
Ã
back toward the windshield.
4Fit the tab on the top of the mount into the slot on the back of the device.
5 Press the bottom of the mount into the device until it clicks.
6Plug the other end of the vehicle power cable into a power outlet in your vehicle.
Turning the Device On or Off
•To turn the device on, press the power key, or connect the device to power.
•To put the device in power saving mode, press the power key while the device is on.
While in power saving mode, the screen is off and the device uses very little power, but it can wake instantly for use.
TIP: You can charge your device faster by putting it in power saving mode while charging the battery.
•To turn off the device completely, hold the power key until a prompt appears on the screen, and select Off.
The prompt appears after five seconds. If you release the power key before the prompt appears, the device enters power saving mode.
Acquiring GPS Signals
When you turn on your navigation device, the GPS receiver must collect satellite data and establish the current location. The time required to acquire satellite signals varies based on several factors, including how far you are from the location where you last used your navigation device, whether you have a clear view of the sky, and how long it has been since you last used your navigation device. The first time you turn on your navigation device, it may take several minutes to acquire satellite signals.
1 Turn on the device.
2 Wait while the device locates satellites.
3If necessary, go to an open area, away from tall buildings and trees.


 in the status bar indicates the satellite signal strength. When at least half the bars are filled, the device is ready for navigation.
Status Bar Icons
The status bar is located at the top of the main menu. The status bar icons display information about features on the device. You can select some icons to change settings or view additional information.
GPS signal status. Hold to view GPS accuracy and acquired satellite information (Viewing GPS Signal Status, page 23).
Bluetooth® technology status. Select to view the Bluetooth settings (Wireless Network Settings, page 19).
Wi-fi signal strength. Select to change the wi-fi settings (Wireless Network Settings, page 19).
Connected to hands-free calling. Select to place a phone call (Hands-Free Calling, page 13).
Active vehicle profile. Select to view the vehicle profile settings.
Current time. Select to set the time (Setting the Time, page 20).
Battery charge level.
Sharing LiveTrack data. The number of invited viewers appears on the icon. Select to open the LiveTrack app (LiveTrack, page 16).
Smartphone Link status. Select to connect to the Smartphone Link app and receive live traffic data and other live services (Pairing with Your Phone and Connecting to Smartphone Link, page 11). When the icon is blue, the device is connected to the Smartphone Link app.
Temperature. Select to view the weather forecast (Viewing the Weather Forecast, page 17).
Using the On-Screen Buttons
On-screen buttons allow you to navigate the pages, menus, and menu options on your device.
•Select  to return to the previous menu screen.
•Hold  to quickly return to the main menu.
Getting Started |
1 |

•Select  or
or  to scroll through lists or menus.
•Hold  or
or  to scroll faster.
•Select  to see a context-based menu of options for the current screen.
Adjusting the Volume
1 Select Volume.
2Select an option:
•Use the slider bar to adjust the volume.
•Select  to mute the device.
•Select  for additional options.
Enabling Automatic Volume
Your device can increase or decrease the volume automatically based on the level of background noise.
1 Select Volume >  .
.
2 Select Automatic Volume.
Using the Audio Mixer
You can use the audio mixer to set the volume levels for different audio types, such as navigation prompts or phone calls. The level for each audio type is a percentage of the master volume.
1 Select Volume.
2 Select  > Audio Mixer.
3 Use the sliders to adjust the volume for each audio type.
Adjusting the Screen Brightness
1 Select Settings > Display > Brightness.
2 Use the slider bar to adjust the brightness.
Vehicle Profiles
 WARNING
Entering your vehicle profile characteristics does not guarantee that your vehicle's characteristics will be accounted for in all route suggestions or that you will receive the warning icons in all cases. Limitations may exist in the map data such that your device cannot account for these restrictions or road conditions in all cases. Always defer to all posted road signs and road conditions when making driving decisions.
Routing and navigation are calculated differently based on your vehicle profile. The activated vehicle profile is indicated by an icon in the status bar. The navigation and map settings on your device can be customized separately for each vehicle type.
When you activate a camper vehicle profile, the device avoids including restricted or impassable areas in routes based on the dimensions, weight, and other characteristics you entered for your vehicle.
Adding a Vehicle Profile
You should add a vehicle profile for each camper to be used with your Avtex Tourer One device.
1 Select Settings > Vehicle Profile >  .
.
2Select an option:
•To add a motorhome with a permanently attached camper, select Motorhome.
•To add a camper pulled behind a vehicle using a standard hitch, select Trailer.
•To add a camper pulled behind a truck using a fifth-wheel hitch, select Fifth Wheel.
3Follow the on-screen instructions to enter the vehicle characteristics.
After you add a vehicle profile, you can edit the profile to enter additional detailed information, such as the vehicle identification number or trailer number.
Activating a Vehicle Profile
Before you can activate a vehicle profile, you must add the profile.
1 Select Settings > Vehicle Profile.
2 Select a vehicle profile.
The vehicle profile information appears, including measurements and weight.
3 Select Select.
Editing a Vehicle Profile
You can change basic vehicle profile information or add detailed information to a vehicle profile, such as maximum speed.
1 Select Settings > Vehicle Profile.
2 Select the vehicle profile to edit.
3Select an option:
•To edit the vehicle profile information, select  , and select a field to edit.
•To rename a vehicle profile, select  >
>  > Rename Profile.
•To delete the vehicle profile, select  >
>  > Delete.
Driver Awareness Features and Alerts
NOTICE
The driver alerts and speed limit features are for information only and do not replace your responsibility to abide by all posted speed limit signs and to use safe driving judgment at all times. Garmin® is not responsible for any traffic fines or citations you receive for failing to follow all applicable traffic laws and signs.
Your device provides features that can help encourage safer driving and increase efficiency, even when you are driving in a familiar area. The device plays an audible tone or message and displays information for each alert. You can enable or disable the audible tone for some types of driver alerts. Not all alerts are available in all areas.
School zone or nearby school: The device plays a tone and displays the distance to and speed limit (if available) for an upcoming school or school zone.
Speed limit reduction: The device plays a tone and displays the upcoming reduced speed limit so you can be prepared to reduce your speed.
Speed limit exceeded: The device plays a tone and displays a red border on the speed limit icon when you exceed the posted speed limit for the current road.
Wrong way on a one-way street: The device plays a message and displays a full-screen warning if you travel the wrong way on a one-way street. The edges of the screen appear red and an alert remains at the top of the screen until you leave the one-way street or correct your direction of travel.
Railroad crossing: The device plays a tone and displays the distance to an upcoming railroad crossing.
Animal crossing: The device plays a tone and displays the distance to an upcoming animal crossing area.
Curve: The device plays a tone and displays the distance to a curve in the road.
Slower traffic: The device plays a tone and displays the distance to slower traffic when you approach slower traffic at a higher speed. Your device must be receiving traffic information to use this feature (Traffic, page 14).
2 |
Vehicle Profiles |

Fatigue warning: The device plays a tone and suggests upcoming rest stops after you have been driving for more than two hours without stopping.
Enabling or Disabling Audible Driver Alerts
You can enable or disable the audible tone for some types of driver alerts. The visual alert appears even when the tone is disabled.
1Select Settings > Driver Assistance > Audible Driver Alerts.
2 Select or clear the check box next to each alert.
Red Light and Speed Cameras
NOTICE
Garmin is not responsible for the accuracy of or the consequences of using a red light or speed camera database.
NOTE: This feature is not available for all regions or product models.
Information about red light and speed camera locations is available in some areas for some product models. The device alerts you when you approach a reported speed or red light camera.
•Live red light and safety camera data is available as a subscription from Garmin Live Services using the Smartphone Link app (Garmin Live Services, page 12).
•You must purchase a subscription to download and store safety camera data on your device. Go to garmin.com /speedcameras to check availability and compatibility, or to purchase a subscription or one-time update. You can purchase a new region or extend an existing subscription at any time.
•In some regions, some product bundles include pre-loaded red light and speed camera data with lifetime updates.
•You can use the Garmin Express™ software (garmin.com /express) to update the camera database stored on your device. You should update your device frequently to receive the most up-to-date camera information.
Navigating to Your Destination
Routes
A route is a path from your current location to one or more destinations.
•The device calculates a recommended route to your destination based on the preferences you set, including the route calculation mode (Changing the Route Calculation Mode, page 5) and avoidances (Avoiding Delays, Tolls, and Areas, page 5).
•You can start navigating to your destination quickly using the recommended route, or you can select an alternate route (Starting a Route, page 3).
•If there are specific roads you need to use or avoid, you can customize the route (Shaping Your Route, page 5).
•You can add multiple destinations to a route (Adding a Location to Your Route, page 5).
Starting a Route
1Select Where To?, and search for a location (Finding and Saving Locations, page 6).
2 Select a location.
3Select an option:
•To start navigating using the recommended route, select
Go!.
•To choose an alternate route, select  , and select a route.
Alternate routes appear to the right of the map.
•To edit the course of the route, select  > Edit Route, and add shaping points to the route (Shaping Your Route, page 5).
The device calculates a route to the location and guides you using voice prompts and information on the map (Your Route on the Map, page 3). A preview of the major roads in your route appears at the edge of the map for several seconds.
If you need to stop at additional destinations, you can add the locations to your route (Adding a Location to Your Route, page 5).
Starting a Route by Using the Map
You can start route by selecting a location from the map. 1 Select View Map.
2 Drag and zoom the map to display the area to search.
3If necessary, select  to filter the displayed points of interest by category.
Location markers ( or a blue dot) appear on the map.
4Select an option:
•Select a location marker.
•Select a point, such as a street, intersection, or address location.
5 Select Go!.
Going Home
The first time you start a route home, the device prompts you to enter your home location.
1 Select Where To? > Go Home.
2 If necessary, enter your home location.
Editing Your Home Location
1 Select Where To? >  > Set Home Location.
2 Enter your home location.
Your Route on the Map
As you travel, the device guides you to your destination using voice prompts and information on the map. Instructions for your next turn or exit, or other actions appear across the top of the map.
Next action in the route. Indicates the next turn, exit, or other action
À
and the lane in which you should travel, if available.
Distance to the next action.
Á
Name of the street or exit associated with the next action.
Â
Route highlighted on the map.
Ã
Next action in the route. Arrows on the map indicate the location of
Ä
upcoming actions.
Vehicle speed.
Å
Name of the road on which you are traveling.
Æ
Estimated arrival time.
Ç
TIP: You can touch this field to change the information it shows (Changing the Map Data Field, page 11).
Navigating to Your Destination |
3 |
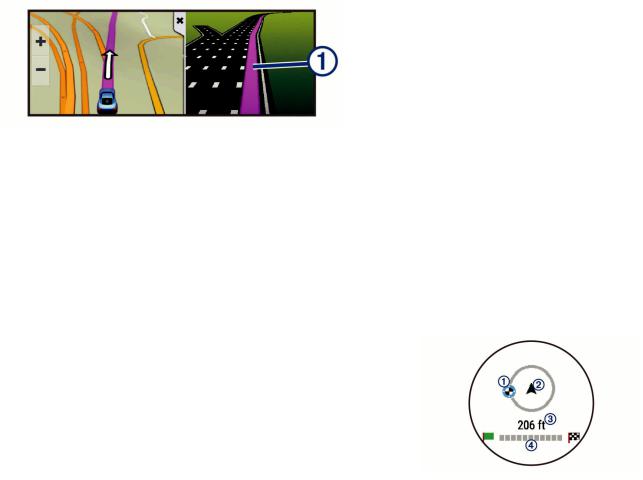
Active Lane Guidance
As you approach some turns, exits, or interchanges in your route, a detailed simulation of the road appears beside the map, if available. A colored line indicates the proper lane for the
À
turn.
Viewing Turns and Directions
While navigating a route, you can view upcoming turns, lane changes, or other directions for your route.
1From the map, select an option:
•To view upcoming turns and directions as you navigate, select  > Turns.
The map tool displays the next four turns or directions beside the map. The list updates automatically as you navigate the route.
•To view the complete list of turns and directions for the entire route, select the text bar at the top of the map.
2Select a turn or direction (optional).
Detailed information appears. An image of the junction may appear for junctions on major roadways, if available.
Viewing the Entire Route on the Map
1 While navigating a route, select anywhere on the map. 2 Select 
 .
.
Arriving at Your Destination
When you approach your destination, the device provides information to help you complete your route.
• indicates the location of your destination on the map, and a voice prompt announces you are approaching your destination.
•When you approach some destinations, the device automatically prompts you to search for parking. You can select Yes to find nearby parking areas (Parking Near Your Destination, page 4).
•When you must park or stop a longer distance from your destination, you can continue to your destination on foot using your Avtex Tourer One device or a compatible Garmin watch with Connect IQ™ (Finding Your Destination Using Your Garmin Watch, page 4).
•When you stop at your destination, the device automatically ends the route. If the device does not detect your arrival automatically, you can select Stop to end your route.
Parking Near Your Destination
Your device can help you find a parking spot near your destination. When you approach some destinations, the device automatically prompts you to search for parking.
1Select an option:
•When the device prompts you, select Yes to search for nearby parking.
•If the device does not prompt you, select Where To? >
Categories > Parking, and select  > My Destination.
2Select Filter Parking, and select one or more categories to filter parking by availability, type, price, or payment methods (optional).
NOTE: Detailed parking data is not available in all areas or for all parking locations.
3Select a parking location, and select Go! > Add As Next Stop.
The device guides you to the parking area.
After you park your vehicle, you can continue to your destination on foot using your Avtex Tourer One device or a compatible Garmin watch with Connect IQ (Finding Your Destination Using Your Garmin Watch, page 4). Your device or Garmin watch
can also guide you back to this parking spot when you return to your vehicle (Finding Your Last Parking Spot, page 4).
Finding Your Destination Using Your Garmin Watch
Before you can use this feature, you must set up Watch Link (Setting Up Watch Link, page 16).
You can use your compatible Garmin watch to navigate from your vehicle to your destination, or from your destination back to your vehicle. This feature is especially useful for finding a location within a large venue, or when you have to park away from your destination and finish navigating on foot.
NOTE: GPS technology requires a clear view of the sky. The Watch Link app may not be able to provide guidance in indoor venues, such as shopping malls or airports.
1On your watch, start the Watch Link app, and select Find My Destination.
Your watch acquires a GPS signal and starts guiding you to your destination.
2 Walk toward your destination.
The destination indicator shows the direction of your
À
destination relative to the direction you are moving . When
Á
the destination indicator appears at the top of the circle, you are heading toward your destination. The remaining distance to your destination appears below the circle. The progress
Â
bar shows your progress toward your destination.
Ã
Finding Your Last Parking Spot
When you disconnect your Avtex Tourer One device from vehicle power, it saves your current location as a parking spot. If you have set up Watch Link, the device sends the parking spot location to your compatible Garmin watch (Setting Up Watch Link, page 16). You can navigate back to your parking spot using either your Avtex Tourer One device or the Watch Link app on your watch.
TIP: If your Avtex Tourer One device is connected to a switched power outlet, it saves your parking spot each time you turn off your vehicle. If your device is connected to an non-switched power outlet, you must unplug the vehicle power cable to save your parking spot.
•On your Avtex Tourer One device, select Apps > Last Spot
> Go!.
•On your watch, start the Watch Link app, select Find My Car, and walk toward your parking spot.
4 |
Navigating to Your Destination |
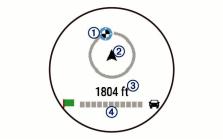
The destination indicator shows the direction of your
À
destination relative to the direction you are moving . When
Á
the destination indicator appears at the top of the circle, you are heading toward your destination. The remaining distance to your destination appears below the circle. The progress
Â
bar shows your progress toward your destination.
Ã
Changing Your Active Route
Adding a Location to Your Route
Before you can add a location to your route, you must be navigating a route (Starting a Route, page 3).
You can add locations to the middle or end of your route. For example, you can add a fuel station as the next destination in your route.
TIP: To create complex routes with multiple destinations or scheduled stops, you can use the trip planner to plan, schedule, and save a trip (Planning a Trip, page 17).
1 From the map, select  > Where To?.
2Search for a location (Finding and Saving Locations, page 6).
3 Select a location.
4 Select Go!.
5Select an option:
•To add the location as the next destination in your route, select Add As Next Stop.
•To add the location to the end of your route, select Add As Last Stop.
•To add the location and edit the order of destinations in your route, select Add to Active Route.
The device re-calculates the route to include the added location and guides you to the destinations in order.
Shaping Your Route
Before you can shape your route, you must start a route (Starting a Route, page 3).
You can manually shape your route to change its course. This allows you to direct the route to use a certain road or go through a certain area without adding a destination to the route.
1 Touch anywhere on the map.
2Select  .
.
The device enters route shaping mode.
3Select a location on the map.
TIP: You can select  to zoom in on the map and select a more precise location.
The device recalculates the route to travel through the selected location.
4If necessary, select an option:
•To add more shaping points to the route, select additional locations on the map.
•To remove a shaping point, select  .
.
5 When you are finished shaping the route, select Go!.
Taking a Detour
You can take a detour for a specified distance along your route or detour around specific roads. This is useful if you encounter construction zones, closed roads, or poor road conditions.
1 From the map, select  > Change Route.
TIP: If the Change Route tool is not in the map tools menu, you can add it (Enabling Map Tools, page 10).
2Select an option:
•To detour your route for a specific distance, select Detour by Distance.
•To detour around a specific road on the route, select
Detour by Road.
•To find a new route, select Detour.
Changing the Route Calculation Mode
1 Select Settings > Navigation > Calculation Mode.
2Select an option:
•Select Faster Time to calculate routes that are faster to drive but can be longer in distance.
•Select Off Road to calculate point-to-point routes (without roads).
•Select Shorter Distance to calculate routes that are shorter in distance but can take more time to drive.
Stopping the Route
From the map, select  > Stop.
Using Suggested Routes
Before you can use this feature, you must save at least one location and enable the travel history feature (Device and Privacy Settings, page 20).
Using the myTrends™ feature, your device predicts your destination based on your travel history, the day of the week, and the time of day. After you have driven to a saved location several times, the location may appear in the navigation bar on the map, along with the estimated time of travel, and traffic information.
Select the navigation bar to view a suggested route to the location.
Avoiding Delays, Tolls, and Areas
Avoiding Traffic Delays on Your Route
Before you can avoid traffic delays, you must be receiving traffic information (Receiving Traffic Data Using Smartphone Link, page 14).
By default, the device optimizes your route to avoid traffic delays automatically. If you have disabled this option in the traffic settings (Traffic Settings, page 19), you can view and avoid traffic delays manually.
1 While navigating a route, select  > Traffic. 2 Select Alternate Route, if available.
3 Select Go!.
Avoiding Toll Roads
Your device can avoid routing you through areas that require tolls, such as toll roads, toll bridges, or congestion areas. The device may still include a toll area in your route if no other reasonable routes are available.
1 Select Settings > Navigation.
2Select an option:
NOTE: The menu changes based on your area and the map data on your device.
•Select Toll Roads.
•Select Tolls and Fees > Toll Roads.
Navigating to Your Destination |
5 |
3Select an option:
•To be asked each time before routing through a toll area, select Always Ask.
•To always avoid tolls, select Avoid.
•To always allow tolls, select Allow.
4 Select Save.
Avoiding Toll Stickers
NOTE: This feature is not available in all areas.
The map data on your device may contain detailed toll sticker information for some countries. You can avoid or allow toll stickers for each country.
1Select Settings > Navigation > Tolls and Fees > Toll Stickers.
2 Select a country.
3Select an option:
•To be asked each time before routing through a toll area, select Always Ask.
•To always avoid tolls, select Avoid.
•To always allow tolls, select Allow.
4 Select Save.
Avoiding Road Features
1 Select Settings > Navigation > Avoidances.
2Select the road features to avoid on your routes, and select
Save.
Avoiding Environmental Zones
Your device can avoid areas with environmental or emissions restrictions that may apply to your vehicle.
1 Select Settings > Navigation > Environmental Zones.
2Select an option:
•To be asked each time before routing through an environmental zone, select Always Ask.
•To always avoid environmental zones, select Avoid.
•To always allow environmental zones, select Allow. 3 Select Save.
Custom Avoidances
Custom avoidances allow you select specific areas or sections of road to avoid. When the device calculates a route, it avoids these areas and roads unless no other reasonable route is available.
Avoiding a Road
1 Select Settings > Navigation > Custom Avoidances.
2 Select Add Avoid Road.
3Select the starting point of the section of road to avoid, and select Next.
4 Select the ending point of the road section, and select Next. 5 Select Done.
Avoiding an Area
1 Select Settings > Navigation > Custom Avoidances.
2 If necessary, select Add Avoidance.
3 Select Add Avoid Area.
4Select the upper-left corner of the area to avoid, and select
Next.
5Select the lower-right corner of the area to avoid, and select
Next.
The selected area is shaded on the map.
6 Select Done.
Disabling a Custom Avoidance
You can disable a custom avoidance without deleting it.
1 Select Settings > Navigation > Custom Avoidances.
2 Select an avoidance.
3 Select  > Disable.
Deleting Custom Avoidances
1 Select Settings > Navigation > Custom Avoidances.
2Select an option:
•To delete all custom avoidances, select  .
.
•To delete one custom avoidance, select the avoidance, and select  > Delete.
Navigating Off Road
If you are not following roadways as you navigate, you can use Off Road mode.
1 Select Settings > Navigation.
2Select Calculation Mode > Off Road > Save.
The next route will be calculated as a straight line to the location.
Finding and Saving Locations
The maps loaded in your device contain locations, such as restaurants, hotels, auto services, and detailed street information. The Where To? menu helps you find your destination by providing several methods to browse, search, and save this information.
•Enter search terms to quickly search all location information (Finding a Location Using the Search Bar, page 6).
•Browse or search pre-loaded points of interest by category (Points of Interest, page 6).
•Search and check into Foursquare® points of interest (Searching Foursquare Points of Interest, page 9).
•Use search tools to find specific locations, such as addresses, intersections, or geographic coordinates (Search Tools, page 8).
•Search near a different city or area (Changing the Search Area, page 8).
•Save your favorite locations to find them quickly in the future (Saving Locations, page 9).
•Return to recently found locations (Viewing Recently Found Locations, page 9).
Points of Interest
A point of interest is a place that you may find useful or interesting. Points of interest are organized by category and can include popular travel destinations such as gas stations, restaurants, hotels, and entertainment venues.
Finding a Location Using the Search Bar
You can use the search bar to search for locations by entering a category, brand name, address, or city name.
1 Select Where To?.
2 Select Enter Search in the search bar.
3Enter all or part of the search term.
Suggested search terms appear below the search bar.
4Select an option:
•To search for a type of business, enter a category name (for example, "movie theaters").
•To search for a business name, enter all or part of the name.
•To search for an address near you, enter the house number and street name.
6 |
Finding and Saving Locations |
Loading...