


OWNER’S MANUAL
& REFERENCE
GPSMAPTM |
215/225 |
® |


Software Version 2.12 or above
Internal Database Version 3.00 © 1998-2000 GARMIN Corporation
G-chart™ cartridge data is copyrighted and may not be copied or used for any other purpose without permission.
GARMIN Corporation, 1200 E. 151st Street, Olathe, KS 66062 USA
Tel: 913.397.8200 |
Fax: 913.397.8282 |
GARMIN (Europe) Ltd., Unit 5, The Quadrangle, Abbey Park, Romsey, Hampshire SO51 9AQ UK
Tel: 44/1794.519944 |
Fax: 44/1794.519222 |
Garmin (Asia) Corp., No. 68, Jangshu 2nd Rd., Shijr, Taipei County, Taiwan |
|
Tel: 886/02.2642.8999 |
Fax: 886/02.2642.9099 |
Web Site Address: www.garmin.com
© Copyright 1998-2000 GARMIN Corporation All Rights Reserved
Except as expressly provided herein, no part of this manual may be reproduced, copied, transmitted, disseminated, downloaded or stored in any storage medium, for any purpose without the express prior written consent of GARMIN Corporation. GARMIN Corporation hereby grants permission to download a single copy of this manual and of any revision to this manual onto a hard drive or other electronic storage medium to be viewed and to print one copy of this manual or of any revision hereto, provided that such electronic or printed copy of this manual or revision must contain the complete text of this copyright notice and provided further that any unauthorized commercial distribution of this manual or any revision hereto is strictly prohibited. Information in this document is subject to change without notice. GARMIN reserves the right to change or improve their products and to make changes in the content without obligation to notify any person or organization of such changes.
GARMIN, GPSMAP 215, GPSMAP 225, AutoLocate, TracBack, MapSource, and PhaseTrac12 are all trademarks of GARMIN Corporation and may not be used without the expressed permission of GARMIN.
April 2000 |
Part Number 190-00061-20 Rev. B |
Printed in Taiwan. |
INTRODUCTION
Foreword
i

INTRODUCTION
Cautions
FCC Compliance
This device complies with Part 15 of the FCC limits for Class B digital devices. This equipment generates, uses, and can radiate radio frequency energy and, if not installed and used in accordance with the instructions, may cause harmful interference to radio communications.
There is no guarantee that interference will not occur in a particular installation. If this equipment does cause harmful interference to other equipment, which can be determined by turning the affected equipment off and on, the user is encouraged to try correcting the interference by relocating the equipment or connecting the equipment to a different circuit than the affected equipment. Consult an authorized dealer or service technician for additional help.
Operation is subject to the following: (1) This device cannot cause harmful interference, and (2) this device must accept any interference received, includ-
ing interference that may cause undesired operation.
ii
I
CAUTION: The Global Positioning System (GPS) is operated by the government of the United States, which is solely responsible for its accuracy and maintenance. The system is subject to changes which could affect the accuracy and performance of all GPS equipment. Although the GPSMAP is a precision electronic NAVigation AID (NAVAID), any NAVAID can be misused or misinterpreted and, therefore, become unsafe.
Use the GPSMAP at your own risk. To reduce the risk of unsafe operation, carefully review and understand all aspects of this Owner’s Manual and thoroughly practice operation using the simulator mode prior to actual use. When in actual use, carefully compare indications from the GPSMAP to all available navigation sources including the information from other NAVAIDs, visual sightings, charts, etc. For safety, always resolve any discrepancies before continuing navigation.
I
WARNING: The electronic chart is an aid to navigation designed to facilitate the use of authorized government charts, not to replace them. Only official government charts and notices to mariners contain all information needed for the safety of navigation, and as always, the user is responsible for their prudent use.
I
CAUTION: The GPSMAP does not contain any user-serviceable parts. Repairs should only be made by an authorized GARMIN service center. Unauthorized repairs or modifications could void your warranty and your authority to operate this device under Part 15 FCC regulations.

GARMIN Corporation warrants this product to be free from defects in materials and manufacture for one year from the date of purchase. GARMIN will, at its sole option, repair or replace any components that fail in normal use. Such repairs or replacement will be made at no charge to the customer for parts or labor. The customer is, however, responsible for any transportation costs. This warranty does not cover failures due to abuse, misuse, accident or unauthorized alteration or repairs.
THE WARRANTIES AND REMEDIES CONTAINED HEREIN ARE EXCLUSIVE AND IN LIEU OF ALL OTHER WARRANTIES EXPRESS OR IMPLIED OR STATUTORY, INCLUDING ANY LIABILITY ARISING UNDER ANY WARRANTY OF MERCHANTABILITY OR FITNESS FOR A PARTICULAR PURPOSE, STATUTORY OR OTHERWISE. THIS WARRANTY GIVES YOU SPECIFIC LEGAL RIGHTS, WHICH MAY VARY FROM STATE TO STATE.
IN NO EVENT SHALL GARMIN BE LIABLE FOR ANY INCIDENTAL, SPECIAL, INDIRECT OR CONSEQUENTIAL DAMAGES, WHETHER RESULTING FROM THE USE, MISUSE, OR INABILITY TO USE THIS PRODUCT OR FROM DEFECTS IN THE PRODUCT. SOME STATES DO NOT ALLOW THE EXCLUSION OF INCIDENTAL OR CONSEQUENTIAL DAMAGES, SO THE ABOVE LIMITATIONS MAY NOT APPLY TO YOU.
To obtain warranty service, call the GARMIN Customer Service department (913-397-8200) for a returned merchandise tracking number or contact your GARMIN dealer. The unit should be securely packaged with the tracking number clearly marked on the outside of the package and sent freight prepaid and insured to a GARMIN warranty service station. A copy of the original sales receipt is required as the proof of purchase for warranty repairs. GARMIN retains the exclusive right to repair or replace the unit or software or offer a full refund of the purchase price at its sole discretion. SUCH REMEDY SHALL BE YOUR SOLE AND EXCLUSIVE REMEDY FOR ANY BREACH OF WARRANTY.
Serial Number
Use the area below to record the serial number (8-digit number located on the back of the unit) in case it is lost, stolen, or needs service. Be sure to keep your original sales receipt in a safe place or attach a photocopy inside the manual.
* |
* |
INTRODUCTION
Limited Warranty & Registration
Registration
Help us better support you by completing our on-line registration today! Have the serial number of your GPSMAP 215/225 handy and connect to our website at (www.garmin.com). Look for the Product Registration link on the Home page.
Why should you register your GPSMAP 215/225?
•Notification of Product Updates
•Notification of New Products
•Lost or Stolen unit tracking
NOTE: If you have previously registered your GARMIN product purchase using a mail-in registration card, we invite you to re-register using our NEW on-line system. Many services provided by our new product registration system are now being automated and re-registering your purchase ensures you the best possible support from GARMIN.
iii
INTRODUCTION
Packing List
The following optional accessories are available for your GPSMAP system:
•G-chart Electronic Chart Cartridges
•110/220 Volt AC Adapter
•Flush Mounting Kit
•Cigarette Lighter Adapter
•MapSource™ PC Software
•PC Interface Cable
•GA23 H-Field DGPS Antenna
•GBR 21/23 DGPS Receivers
•Antenna Extension Cable
•Second Mounting Station
iv• Protective Cover
Congratulations on choosing one of the most advanced marine navigation systems available! The GARMIN GPSMAP navigators combine the proven performance of GARMIN PhaseTrac12™ GPS, built-in “basemap” cartography and powerful G-Chart™ electronic charting for detailed cartography wherever you cruise.
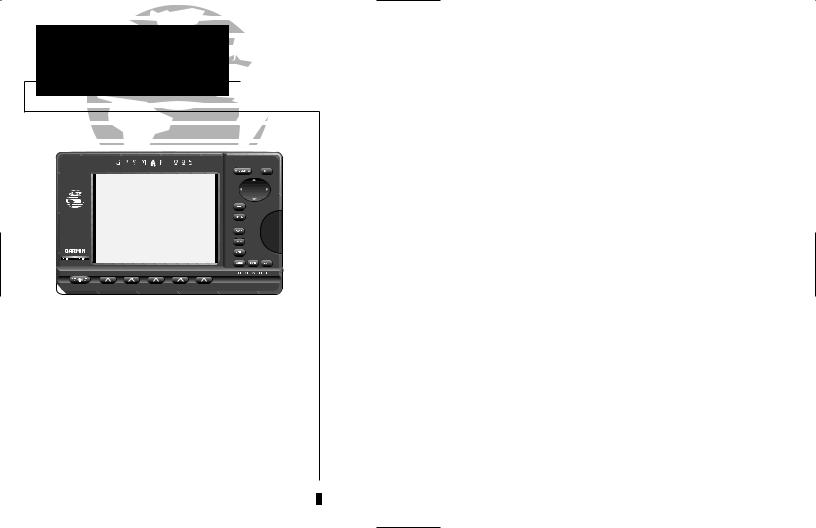
To get the most out of your new GPS navigation system, take the time to read through this owner’s manual and learn the operating procedures for your unit. This manual covers the following GPSMAP units:
GPSMAP 215 3-gray level LCD chart plotter with built-in GPS (available with or without built-in DGPS beacon receiver)
GPSMAP 225 color LCD chart plotter with built-in GPS (available with or without built-in DGPS beacon receiver)
Before installing and getting started with your unit, please check to see that your package includes the following items. If any parts are missing, please see your GARMIN dealer immediately.
Standard Package:
•GPSMAP Unit
•Remote GPS Antenna with 30’ Antenna Cable
•Mounting Bracket and 2 Mounting Knobs
•Power/Data Cable (with fuse)
•Owner’s Manual
•Antenna Combiner & cable (for GPSMAP purchased with built-in DGPS)
•Antenna Coupler and Whip Antenna (for GPSMAP purchased with builtin DGPS)

PART ONE: INTRODUCTION |
|
Foreword....................................................................................................... |
i |
Cautions....................................................................................................... |
ii |
Limited Warranty & Registration................................................................. |
iii |
Packing List ................................................................................................. |
iv |
Table of Contents...................................................................................... |
v-vi |
Capabilities................................................................................................. |
vii |
Keypad Usage ............................................................................................ |
viii |
The GPSMAP Tour .................................................................................. |
1-13 |
PART TWO: REFERENCE |
|
Section 1: Satellite Status Page......................................................... |
15-16 |
Satellite and receiver status, entering initial positions |
|
Section 2: Map Page & Map Configuration..................................... |
17-24 |
Using the target cursor, selecting zoom scales, calculating |
|
range and bearing, map configuration |
|
Section 3: Highway Page ................................................................... |
25-26 |
Navigation data and steering guidance, highway scale |
|
Section 4: Active Route Page .................................................................. |
27 |
Scrolling and reviewing the active route |
|
INTRODUCTION
Table of Contents
v

INTRODUCTION
Table of Contents
vi
Section 5: Waypoints ......................................................................... |
28-33 |
Creating, editing and using waypoints; using the |
|
WAYPTS softkey |
|
Section 6: MARK Key .............................................................................. |
34 |
Marking present position and target cursor position |
|
Section 7: GOTO/MOB Keys ............................................................. |
35-36 |
Going to a destination and using man overboard function |
|
Section 8: Routes................................................................................ |
37-45 |
Creating, activating and modifying routes; using the |
|
ROUTES softkey |
|
Section 9: Auxiliary Menu / Menu Options...................................... |
46-61 |
System, navigation and auxiliary functions and setups; |
|
using the AUX softkey |
|
Section 10: Using G-chartTM cartridges............................................. |
62-64 |
Inserting, removing and using electronic chart cartridges; |
|
viewing port services information |
|
Appendix A: Installation ...................................................................... |
65-68 |
Appendix B: Wiring Installation / NMEA Formats ............................... |
69-70 |
Appendix C: Physical Specifications.......................................................... |
71 |
Appendix D: Messages......................................................................... |
72-74 |
Appendix E: Time Offsets ......................................................................... |
75 |
Appendix F: Map Datums.................................................................... |
76-78 |
Appendix G: Glossary.......................................................................... |
79-80 |
Appendix H: LORAN TDs ................................................................... |
81-82 |
Index.................................................................................................... |
83-85 |

Designed for detailed electronic charting and simple operation, the GARMIN GPSMAP system is a powerful navigation device that can help guide you in waterways around the world:
Precision Performance
•16-color active-matrix TFT screen (GPSMAP 225)
•3-Gray FTN LCD screen (GPSMAP 215)
•PhaseTrac12TM receiver tracks up to 12 satellites simultaneously for fast, accurate positioning
•Differential-Ready— available with optional built-in beacon receiver for under 10 meter accuracy
•Fully gasketed, high-impact plastic alloy case
Advanced Navigating and Plotting
•Over 1900 alphanumeric waypoints with selectable icons and comments
•Built-in worldwide database usable from 4096 to 64 n.m. scales
•20 reversible routes with up to 50 waypoints each
•Graphic softkeys for easy operation right from the map display
•G-chartTM electronic charting for seamless, worldwide coverage
•On-screen point-to-point distance and bearing calculations
•2,000 track log points with time, distance or resolution settings
•Built-in simulator mode for full route and trip planning
INTRODUCTION
Capabilities
vii
INTRODUCTION
Keypad Usage
The GPSMAP system uses a set of on-screen
‘softkeys’ Mto perform route, waypoint and setup functions. These softkeys allow you to perform many navigation functions and custom setups right from the map display.
viii
LThe ZOOM key changes the map display scale to one of 16 available settings, or the highway display scale to one of five settings.
AThe CTR key eliminates the cursor and centers your vessel on the screen.
KThe ARROW KEYPAD controls the movement of the cursor and is used to select screen options and positions.
CThe ENTER key is used to confirm data entry and execute various on-screen function prompts.
EThe MAPS key returns the display to the map page and/or displays the outlines of chart coverage in use.
IThe PAGE key scrolls through the main screen pages in sequence.
BThe DATA key turns the data window on or off in map mode and toggles the displayed data on other pages.
GThe MENU key turns the softkey menu on or off in map mode.
FThe MARK key captures present position for storage as a waypoint.
HThe MOB key marks your present GPS position and instantly provides a return course with steering guidance.
DThe GOTO key lets you select a waypoint or target cursor position as a destination and sets a course from your present position.
JThe POWER key turns the GPSMAP on and off and adjusts the screen backlight level.
The GARMIN GPSMAP is a powerful electronic charting/navigating system that provides detailed chart coverage and convenient control of many advanced features right from the graphic charting page. This tour is designed to take you through the basic pages and functions of the GPSMAP system. Once you’re familiar with the main pages and functions of the unit, refer to the reference section for instructions on performing specific tasks and functions.
Before beginning the GPSMAP tour, make sure the main unit and antenna have been properly installed (see Appendices A & B). Note that our tour will use the GPSMAP’s built-in worldwide database and the simulator mode, so you won’t have to install a chart cartridge or acquire satellites for this exercise. The tour assumes you have not changed any of the default settings for the unit. If you have changed any settings (position formats, units of measure, etc.), the descriptions and pictures in the tour may not match your configuration.
Powering Up and Starting the GPSMAP Tour
The GPSMAP’s power and screen backlighting are controlled by the J key at the bottom left of the unit. To turn the GPSMAP on:
1.Press and hold the right side of the J key until the power tone sounds.
2.Once the welcome page appears, press the C key to acknowledge the mariner’s warning notice and begin operation.
To adjust the screen backlighting level:
1.To increase the brightness level, press and release the right side of the J key.
2.To decrease the brightness level, press and release the left side of the J key.
GPSMAP TOUR
Power On
The GPSMAP system is designed as an aid to navigation, and is not intended to replace the use of government-approved charts and traditional navigation practices. Make sure you read and understand the mariner’s acknowledgement before using the unit.
1
GPSMAP TOUR
Simulator Setup
I
The GPSMAP system does not actively track satellites in the simulator mode. Never use the simulator mode for actual navigation. Any waypoints, routes and track logs you create while simulating navigation will be saved in memory, and are available for use when using the unit in normal operating mode.
2
Once you’ve acknowledged the mariner’s warning, the Satellite Status Page will appear. The Satellite Status Page provides a visual reference of satellite acquisition and status, with a signal strength bar graph and satellite sky view in the center of the screen. The status field at the top left of the screen indicates the unit’s operating mode, with current GPS accuracy displayed below.
Across the bottom of the screen, you’ll find five on-screen menu buttons called ‘softkeys’. Each softkey corresponds to the M key directly below it, and provides access to various route, waypoint and auxiliary functions. To see how softkeys work, let’s put the GPSMAP in simulator mode:
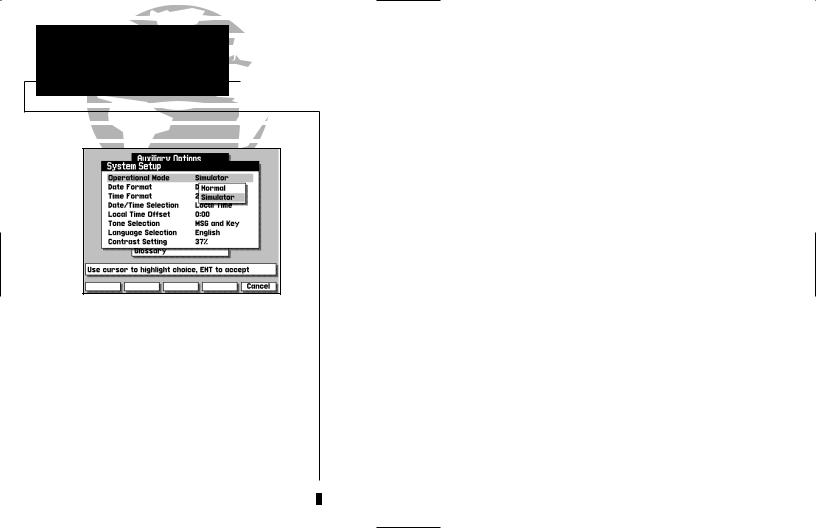
1. Press the AUX softkey to display the Auxiliary Menu.
The Auxiliary Options Menu will appear, with the System Setup option highlighted. At the bottom of the screen, you’ll notice a prompt field that provides you with instructions to help you through operating procedures.
1.With the System Setup option highlighted, press the C key.
2.The System Setup Menu will appear. Highlight the Operational Mode field, using the K keypad, and press C to see the available options.
3.Use the K keypad to highlight ‘Simulator’ and press C to accept.
4.Press C to acknowledge the simulator warning notice.
5.Press the EXIT softkey to return to the Auxiliary Options menu.
6.Press the EXIT softkey again to return to the Satellite Status Page.
Your GPSMAP is now in simulator mode.

Now that you are back at the Satellite Status Page, let’s enter a starting position for our tour. Entering names and numbers in the GPSMAP system is done through data entry windows. Once a data entry window is open, the K keypad and C key are used to choose and accept a value for each character position:
1.Press the K key to highlight the position field (top right).
2.Press the C key to begin entry of the following position: N 24º 43.111’, W 077º 42.407’.
3.Use the K keypad to highlight the appropriate character choice for each field.
4.Press the C key to accept each choice and move to the next character position. When you accept a value for the last character position, you will automatically return to the Satellite Status Page.
IIf you need to correct a mistake or change values in a character field, use the appropriate softkeys at the bottom of the screen. Use BKSPC to move back one character position; CLEAR to erase all entered data; and RESTORE to restore the previous field value. The OK softkey accepts data entry and returns the display to the previous page, and the CANCEL softkey stops the current data entry mode.
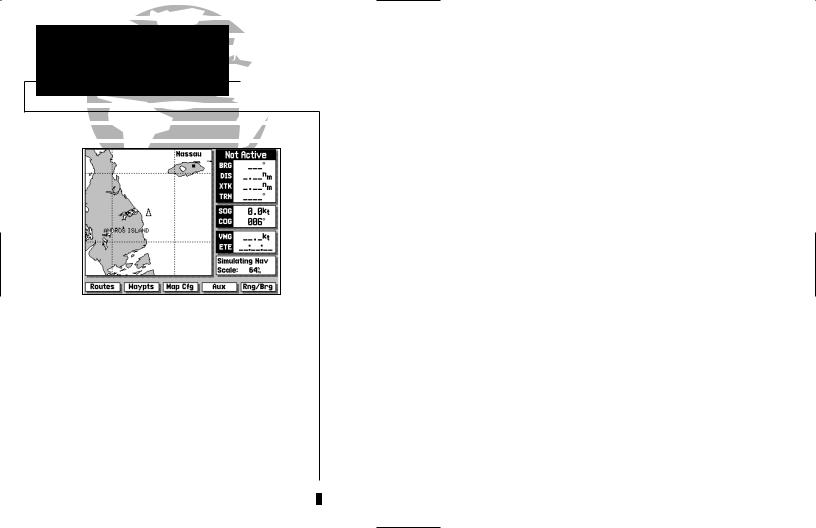
The Satellite Status Page will now indicate the position you entered and give you a simulated display of signal strength and satellite position. To continue the tour, let’s move on to the Map Page.
1. Press the E key to display the Map Page.
GPSMAP TOUR
Entering a Position
Use the K KEYPAD to choose letters, numbers, spaces and symbols in a data field. Only the appropriate characters will be available for a particular data entry window.
3

GPSMAP TOUR
Map Page
The Data Window (at the right side of the screen) and the Softkey Menu Display (at the bottom of the screen) may be turned off for a full page display of cartography:
•To turn the Data Window off, press B.
•To turn the Softkey Menu off, press G.
4
Boat
Icon
Map Display
Data
Window
Softkey
Menu
The GPSMAP system is built around a powerful graphical Map Page. The Map Page combines digital electronic charting with a complete display of important navigational data and easy access to advanced features. After completing the tour, you’ll be able to perform most navigation, waypoint and route functions directly from the Map Page. Before we start creating waypoints and routes, let’s take a brief look at its various features and displays.
The Map Page can be broken down into three main sections: map display, data window and softkey menu.
The map display shows your boat as a wedge icon on an electronically generated chart, complete with geographic names, markers, buoys and depth contours. It also displays your track, routes and nearby waypoints. An on-screen target cursor lets you pan to other map areas, determine the range and bearing to a position and perform various route and waypoint functions.
The data window provides a digital display of navigation data, in relation to your present position, the target cursor position or a particular waypoint.

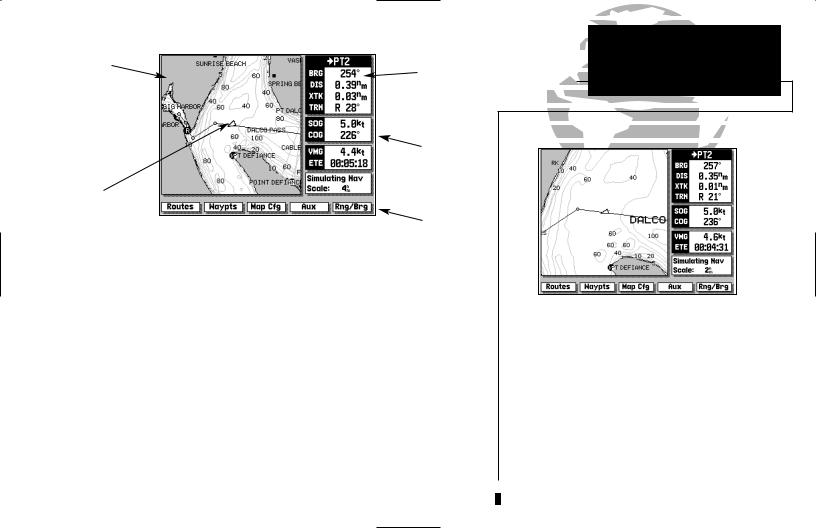
The destination field, located at the top of the data window, shows your bearing (BRG) and distance (DIS) to a destination waypoint or to the cursor. It also displays your crosstrack error (XTK) and turn (TRN) heading to an active destination. The XTK value is the distance you are off a desired course (left or right), while TRN represents the direction (left or right) in degrees between your course over ground (COG) and the bearing to your destination.
The speed and course field, located below the destination field, displays your present speed and course over ground (SOG and COG).
Below the speed and course field are the arrival and status fields. The arrival field displays your velocity made good (VMG) and estimated time enroute (ETE). Your velocity made good is the speed you are closing in on a destination along your desired track, while the ETE represents the total time left to reach your destination based on your current VMG.
The status field indicates the operating mode and map scale currently in use. The map scale represents the approximate distance from the top of the map display to the bottom.
The softkey menu provides you with direct access to the GPSMAP’s route, waypoint, auxiliary and range/bearing calculation functions.
GPSMAP TOUR
Map Page
ACTIVE TO
WAYPOINT
NORTH |
|
|
|
NORTH |
DISTANCE |
|
|
|
|
BRG |
|
|
|
CROSSTRACKXTK |
COG |
|
|
|
DTK |
|
|
||
|
|
ERROR |
|
||
|
|
|
|
||
|
|
|
OVER |
GROUND |
|
|
|
SPEED |
|
|
|
|
|
|
|
|
|
ACTIVE FROM
WAYPOINT
Basic Navigation Terms: |
|
For a glossary of navigation terms, select the |
|
‘Glossary’ option from the Auxiliary Options Menu |
5 |
or see pages 79-80. |

GPSMAP TOUR
Using the Target Cursor
As you move the cursor, the distance and bearing from your present position to the cursor will be displayed in the destination field (at the top right of the screen).
The cursor’s position coordinates will be displayed in the position field (below the speed and course field).
While in cursor mode, the boat icon will continue to move, and may go off screen to accommodate the scrolling cursor.
6
Using the Map Page is a simple process that centers around the use of the cursor. Controlled by the arrow keypad, the cursor is an important tool that can be used as a distance and bearing marker, to create new waypoints and routes, and to review position data of on-screen waypoints, buoys and markers. Try moving the cursor using the following exercise:
1.Use the L key to set the map scale to 64 n.m.
2.Your boat should be in the center of the map display, near Andros Island and Nassau (the position you entered earlier).
3.Press the bottom arrow of the K keypad to move the cursor down to the first lat/lon grid South of your boat’s position.
4.Using the K keypad to move the target crosshair in each direction, try following the outline of the lat/lon grid closest to your boat. Notice how the destination field of the data window displays the distance and bearing from your position to the target cursor, with the cursor’s coordinate position indicated in the position field.
5.Press the A key to eliminate the cursor and re-center your position on the map display.
As you become more familiar with using the cursor, you’ll see that the map display actively scrolls forward with your panning, letting you explore areas around the world (even outside of your current G-chartTM coverage) and create waypoints and routes. Wherever you move the cursor, you’ll always be one A keystroke away from returning to your present position.
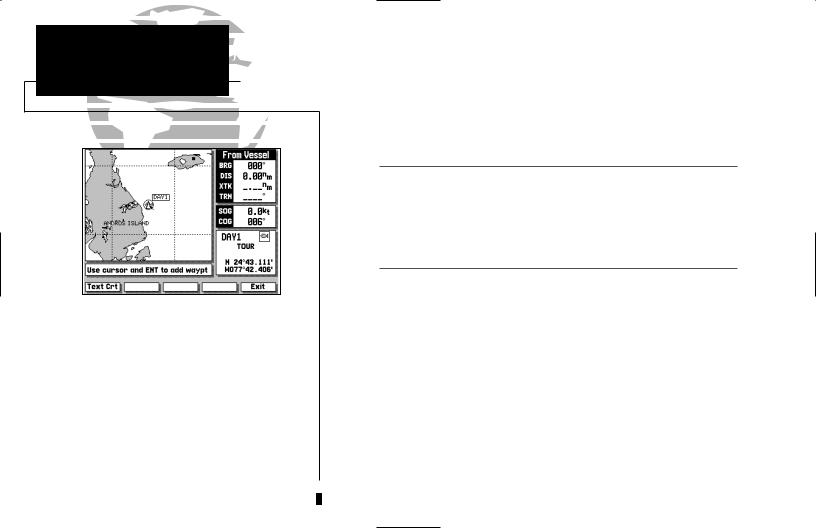
To continue the tour, let’s mark our simulated present position for reference:
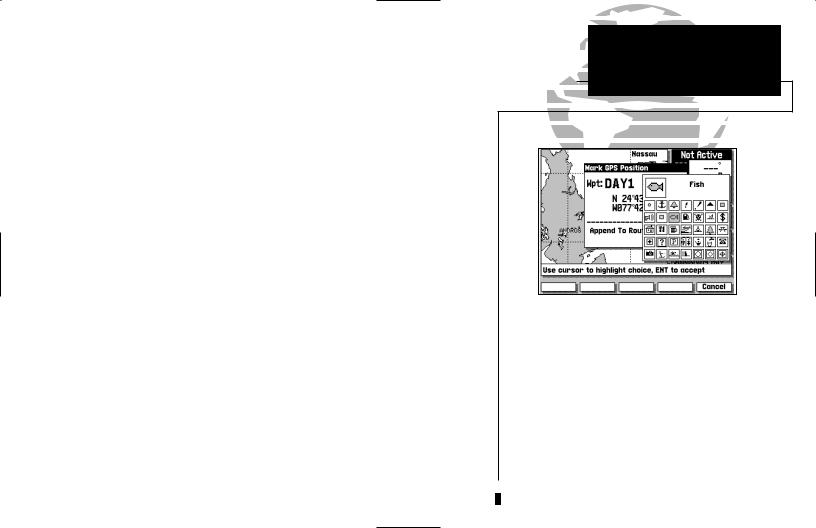
1. Press the F key to capture your present position as a waypoint.
The Mark GPS Position window will appear, with a default three-digit waypoint name and symbol. By pressing the C key, you can confirm the waypoint with the default name and symbol, but let’s change the name and symbol to something a little more meaningful:
1.Use the K keypad to move the field highlight to the ‘Wpt’ field and press C.
2.Enter the name ‘DAY1’ with the K keypad, pressing C after each character.
3.After you’ve entered the last letter, press the OK softkey to confirm the name.
4.The field highlight will move to the waypoint symbol field. Press C to begin selection of a new waypoint symbol.
5.Use the K keypad to highlight the fish symbol (on the second line of the window) and press the C key.
6.The field highlight will move to the comment field, where you may enter a 20character comment (the default comment is the date and time of creation).
7.Press C to begin entry of a comment.
8.Use the K keypad to enter ‘TOUR’ in the comment field, pressing the C key after each character.
9.Press the OK softkey to accept your comment.
10.Use the K keypad to highlight the OK field.
11.Press the C key to save your new waypoint.
GPSMAP TOUR
Marking a Position
The GPSMAP system stores over 1900 alphanumeric waypoints, with selectable graphic icons and a user-defined comment field. If you mark a navaid position that appears on a G-chart electronic cartridge, the default comment will automatically select the navaid text associated with the marker.
7
GPSMAP TOUR
Creating a Route
Whenever the cursor comes in close proximity to an on-screen waypoint or navaid, it will ‘snap’ to and highlight its on-screen icon.
Once an on-screen marker has been highlighted, destination and position information will be displayed in the data window.
This feature makes it easy to review waypoint positions right from the map display.
8
Now that you’ve marked a waypoint for your starting position, let’s make a route to navigate using the ROUTES softkey. (For the purposes of this tour, make sure that the current map scale is still at 64 n.m.)
1.Press the ROUTES softkey to begin creating a route.
2.Use the K keypad to highlight the Route 1 field and press C.
IThe GPSMAP system can store 20 reversible routes of up to 50 waypoints each. Routes 1-19 are used as storage routes, with Route 0 always serving as the active route. Although you may create a route in the Route 0 position, be aware that it will automatically become the active route upon completion. If you want to save a route created in the Route 0 position, be sure to copy it to another storage route, as it will be overwritten by the next route activation (see Section 8 for more details on routes).
As the GPSMAP returns to the Map Page, you’ll notice several changes. The map display will now show the cursor as an arrow at your present position, with the prompt field indicating instructions for adding waypoints to your route. To select the DAY1 waypoint as your first route waypoint:
1. Press the C key to add the waypoint to the route.
Now add the next waypoint to the route:
1.Use the K keypad to move the arrow cursor as close as possible to the following coordinates: N 24º 27.371’, W 077º 42.407’.
2.Press C to save the waypoint position.
3.Press C to confirm the default waypoint name, symbol and comment.
Now add the final waypoint to the route:
1.Use the K keypad to move the arrow cursor as close as possible to the following coordinates: N24º21.777’, W077º51.424.
2.Press the C key to save the waypoint position.
3.Press C to confirm the default waypoint name, symbol and comment.
We now have a three waypoint route from our present position to waypoint 002. To activate the route and begin navigation:
1.Press the EXIT softkey to quit the route creation mode.
2.Press the ACTIVTE softkey.
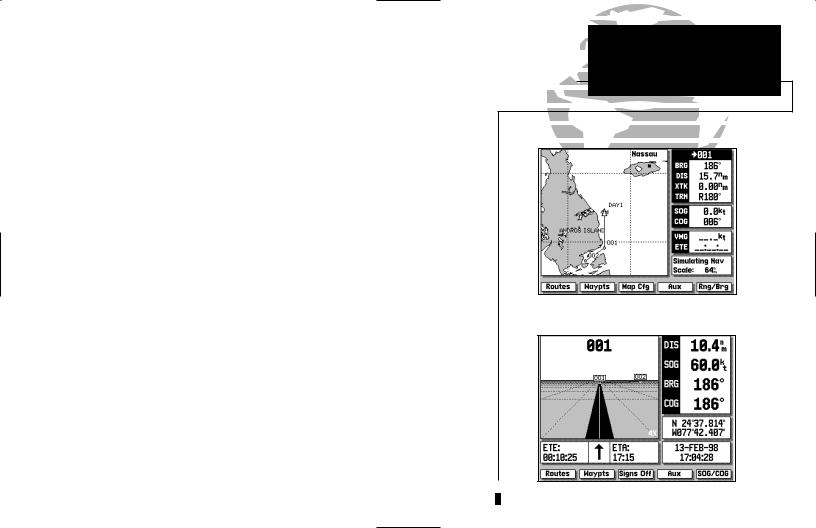
The GPSMAP will return to the Map Page, with your active route (Route 0) shown on the map display and the ‘active to’ waypoint (001) displayed in the destination field. The speed and course field tells us we’re getting nowhere fast, so let’s go to the Highway Page and enter a speed for our simulated trip:
1. Press the I key to display the Highway Page.
The Highway Page provides you with a large, digital display of navigation data and graphic steering guidance to an active destination via a three-dimen- sional perspective of your course. As you head toward your destination, the middle of the screen provides visual guidance on a moving “graphic” highway.
Your present position is at the bottom of the highway display. The line down the middle of the highway represents your desired course. As you navigate toward a waypoint, the highway will actually move—indicating the direction you’re off course. To stay on course, simply steer toward the center of the highway.
GPSMAP TOUR
Modifying a Route Graphically
Activating a Route
9

GPSMAP TOUR
Navigating a Route
The Simulator SOG/COG window lets you specify the speed and course for the simulator mode. By leaving the COG field value at
the default setting, the GPSMAP system will automatically set a course directly to your destination.
|
If you choose to enter your own course over |
|
|
ground, highlight the COG field and enter |
|
|
the desired course. To reset the simulator to |
|
|
steer a direct course for you, highlight the |
|
|
‘Reset COG to Nav Course’ prompt and |
|
10 |
press the C key. |
|
|
The active destination waypoint is displayed at the top of the screen, with the ETE (estimated time enroute) and ETA (estimated time of arrival) based on your present speed and course at the bottom.
The distance and bearing to the first route waypoint, along with your current speed and course over ground (SOG and COG), are indicated along the right-hand side of the screen. The SOG and COG fields can be changed to display velocity made good (VMG) and turn (TRN). To toggle the speed and course displays, press the B key.
Now enter a speed of 60 knots for our simulated trip:
1.Press the SOG/COG softkey to display the Simulator SOG/COG window.
2.Press the C key to begin data entry.
3.Use the K keypad to enter a speed of 60 knots, pressing the C key after each character entry.
4.Once you’ve entered your speed, press the EXIT softkey.
By leaving the COG field value at the default setting, the GPSMAP system will automatically set a direct course to each route waypoint. If you choose to enter your own course, highlight the COG field and enter the desired course. To reset the simulator to automatically steer a direct course for you, highlight the ‘Reset COG to Nav Course’ prompt and press the C key.
At the bottom right corner of the highway display is the highway scale. The highway scale ranges from ‘1X’ to ‘16X’, and allows you to change the perspective view of the highway to show a larger or smaller area.
1.Press the down arrow on L to decrease the scale and show a smaller area.
2.Press the up arrow on L to increase the scale and show a larger area.
You are now underway toward the first waypoint in your route. Whenever there is an active route in use for navigation, the GPSMAP will display route waypoint and leg information on the Active Route Page. To view the Active Route Page from the Highway Page:
1. Press the I key.
The Active Route Page shows each waypoint of the active route in sequence, along with the desired track, distance and ETE or ETA to each waypoint from your present position. As you navigate a route, the waypoint list will automatically update to list the next ‘active to’ waypoint first, followed by the remaining route waypoints in sequence. From the Active Route Page, you can:
1.Scroll through the entire list of route waypoints using the K key.
2.Review a highlighted waypoint by pressing the C key.
3.Change the ETE field to display ETA by pressing the B key.
Let’s go back to the Map Page to look at our progress:
1. Press the E key.
As you travel along your route, your boat will move across the map display, leaving a track plot of your course. You may have some difficulty differentiating track plots and route legs at the 64 n.m. scale, so try zooming down past the built-in database with L to get a good view of the track plot.
IWhenever you zoom past the usable range of the current electronic chart, the range field will display ‘Ovr Zm’ or ‘No Map’. These warnings indicate that although you may still have cartography, you should exercise extreme caution using the data. For a more detailed explanation of Overzoom and No Map modes, see page 20.
GPSMAP TOUR
Active Route Page
Map Display in Overzoom Mode |
11 |
GPSMAP TOUR
Marking a GOTO Destination
12
As you approach a destination waypoint, an audible alert and on-screen message will indicate when you are one minute from your destination. To acknowledge the message:
1. Press the C key.
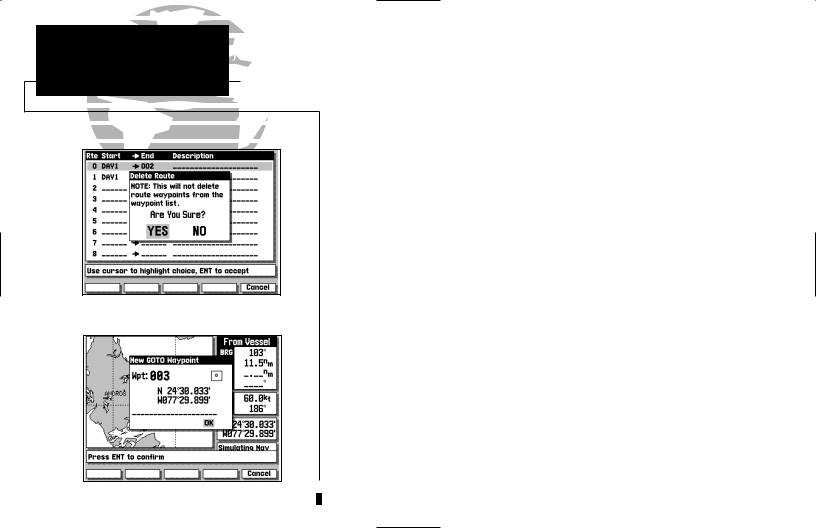
Whenever you’re finished navigating a route with the GPSMAP system, you’ll need to clear the Active Route to stop navigation guidance to the last route waypoint. To stop navigation of the Active Route:
1.Press the ROUTES softkey.
2.Press the DELETE softkey, followed by C. (Press the EXIT softkey to return to the previous page.)
Although creating and navigating routes in the GPSMAP system is a simple process, there may be times when you want to head right to a specific destination without creating a route. Imagine that as you were navigating the current route, you see a spot of interest off the starboard bow. By marking a new position with the cursor and using the GOTO function, we can set a new course right from the map display:
1.Use the K keypad to move the cursor as close to the following position as possible: N 24º 30.000, W 077º 30.000.
2.Press the D key.
Notice that the cursor has become an arrow pointer, and the prompt field displays instructions for going to the cursor position.
1.Press the C key.
2.The New GOTO Waypoint window will appear, asking you to confirm the waypoint name, position and details. Press the C key to confirm the information.
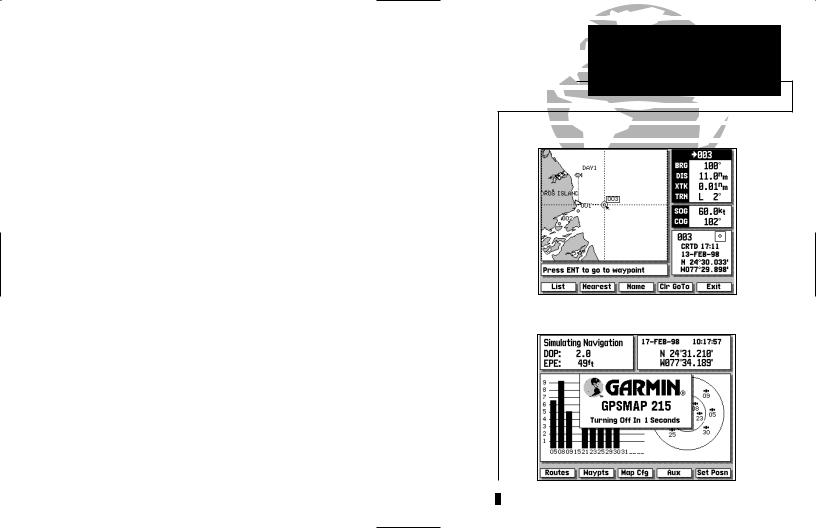
The GPSMAP will now provide you with steering guidance to your new waypoint. To stop navigation to a GOTO destination, clear the active GOTO:
1.Press the D key.
2.Press the CLR GOTO softkey. (Note that in simulator mode, navigation will continue along the previously defined course over ground.)
Congratulations! You’ve now gone through the basic operation of the GARMIN GPSMAP system. Your new unit is a powerful navigation device with many advanced features not covered in the tour.
Now that you have a working knowledge of the unit, use the reference section of this manual to help you with advanced navigation and setup functions. The reference section is organized by topic, so you can quickly find instructions for performing specific functions, including the installation and use of G-chartTM electronic navigation charts.
To turn your GPSMAP off:
1. Press and hold the left side of the J key for three seconds.
Thank you for choosing the GARMIN GPSMAP Navigation System. We hope it will be a useful navigation tool for you wherever you may travel. If you have any questions or comments about its use, please call our Product Support staff at 913-397-8200. You may also FAX our Product Support staff at 913-397-8282.
GPSMAP TOUR
Power Off
Press CLR GOTO to stop navigation.
13

REFERENCE SECTION
1 – SATELLITE STATUS PAGE
2 – MAP PAGE
3 – HIGHWAY PAGE
4 – ACTIVE ROUTE PAGE
5 – WAYPOINTS
6 – MARK KEY
7 – GOTO/MOB
8 – ROUTES
9 – AUXILIARY MENU
10 – G-CHART CARTRIDGES
14

Status |
Position |
Field |
|
Field |
(or Beacon |
|
Status) |
Signal |
Satellite |
Strength |
|
Indicators |
Sky |
|
View |
The GPSMAP 215/225 Satellite Status Page provides a visual reference of various receiver functions, including current satellite coverage, receiver operating mode and present position or DGPS status. The status information will give you an idea of what the receiver is doing at any given moment.
The sky view and signal strength bars give you an indication of what satellites are visible to the receiver and whether or not they are being tracked. The signal strength is shown on a bar graph for each satellite, with the satellite number below. When a satellite is visible but not being tracked, the strength bar will remain blank and the sky view indicator will remain highlighted.
The sky view shows a bird’s eye view of the position of each satellite relative to the receiver’s last known position. The outer circle represents the horizon (North up); the inner circle 45º above the horizon; and the center point a position directly overhead. Use the sky view to determine if there are obstructions shading your reception of GPS signals.
SATELLITE SECTION
STATUS PAGE 1
Overview
In this example, satellites 5, 21, 23, 25 and 29 are currently being tracked, with the corresponding signal strength bars indicating the relative strength of the signals. Satellites 3, 9, 15, 30 and 31 (shown with numbers highlighted) are visible, but are not currently being tracked. Satellite 8 is being received (as indicated by a hollow bar), but the data is not yet available for use in determining your position.
NOTE: For first time operation, GPSMAP 215 and |
|
225 units may require 5 minutes to collect initial |
|
satellite almanac data and establish a present |
|
position. You may speed up the initial acquisition |
|
process by entering an initial position (see page 16). |
15 |

SECTION |
SATELLITE |
1 |
STATUS PAGE |
Setting Initial Position |
Whenever your GPSMAP is operating with
a DGPS beacon receiver, the position window will be replaced by a beacon receiver status window. This window will display the beacon receiver status, the signal-to-noise ratio (SNR), and the distance from your beacon receiver to the DGPS transmitter.( If available)
GPSMAP 215/225 units purchased without the internal beacon receiver can be upgraded to DGPS accuracies using the GARMIN GBR 21 or GBR 23 beacon receiver.
16
The Satellite Status Page also shows receiver status and the current horizontal accuracy at the top left of the screen. The operating mode field will indicate whether the receiver is acquiring satellites, or is in simulator, 2-D, 2-D differential, 3-D or 3-D differential mode; with the current dilution of precision (DOP) and estimated position error (EPE) displayed below.
DOP is a measurement of satellite geometry quality, measured on a scale of one to ten (lower numbers being the best, higher numbers the poorest). The EPE uses the DOP and other factors such as signal quality to calculate a horizontal position error in feet or meters.
At the top right of the screen, your present position and the current date and time are displayed in the position window. The position shown will be the receiver’s last calculated position. If you have moved more than 300 miles from your last position, you may want to enter a more accurate position to speed up satellite acquisition (or select AutoLocate™ mode, as described on page 48). You may enter your own position coordinates—by data entry or graphically— whenever the GPSMAP is acquiring satellites or is in simulator mode.
To enter new position coordinates by data entry:
1.Highlight the position field and press the C key to begin data entry.
2.Use the K keypad to enter the new position, pressing the C key after each character is selected.
To enter new position coordinates graphically:
1.Press the SET POSN softkey.
2.Use the K keypad to move the cursor to the desired position on the map display and press the C key.
3.Press the EXIT softkey to return to the Satellite Status Page.
Map |
Destination |
|
Display |
||
Fields |
||
|
Data
Window
Boat
Icon
Softkey
Menu
The GPSMAP Map Page provides a comprehensive display of electronic cartography, plotting and navigational data. It is the primary page used for navigating with the GPSMAP system. The Map Page can be broken down into three main sections: map display, data window and softkey menu.
The map display shows your boat on an electronically generated chart, complete with geographic names, navaids, depth contours and a host of other chart features. It also plots your track and displays any routes and waypoints you create. An on-screen cursor lets you pan and scroll to other map areas, determine the distance and bearing to a position, and perform various route and waypoint functions. The GPSMAP system has a built-in worldwide database to 64 n.m. (see Appendix F for built-in coverage map), with more detailed coverage available through the use of G-chartTM data cartridges (see Section 10 for installing and using G-chartTM cartridges).
MAP PAGE |
SECTION |
|
2 |
||
Overview |
||
|
Your boat’s position is represented by a wedge icon, with your track plot shown as a dotted line (GPSMAP215) or a solid yellow line (GPSMAP225).
To select what chart features are displayed on a particular chart scale, refer to the Map Configuration section on pages 23-24.
17

SECTION |
MAP PAGE |
|
2 |
||
Map Page Modes |
Boat Mode
18 |
Cursor Mode |
The map display uses the cursor keypad and a set of hard keys to control most map display functions. The L, A, C and E keys, combined with the K keypad lets you select zoom ranges, move the cursor and display chart outlines. Two basic map operating modes determine what cartography is shown on the map display: boat mode and cursor mode. Boat mode pans the cartography to keep the present position marker within the display area, while cursor mode pans the cartography to keep the cursor within the display area.
The GPSMAP system will always power up in the boat mode, with your vessel centered on the map display. In boat navigation mode:
•Your movement is shown by the map scrolling past the centered boat.
•Whenever sufficient map coverage is not available to keep the boat centered, the boat icon will move toward the edge of the display.
•If the boat icon attempts to go off the display, the zoom level may need to be adjusted to keep cartography on screen.
Whenever the K keypad is pressed, the GPSMAP will enter cursor mode. In cursor mode:
•The cursor can be moved over the map display using the K keypad.
•Whenever the cursor reaches the edge of the display, the map will scroll forward under the cursor. Keep in mind that the boat icon will move with the map scrolling, and may go off the display screen (you may not be able to see your present position).
•When the cursor is stationary, a fixed coordinate position will appear in the position field. Note that the distance and bearing, displayed in the destination field, will change as your boat’s position changes.
•Whenever you zoom in cursor mode, the cursor will be centered on screen.

The cursor allows you to pan away from your present position and scroll to other map areas around the world (even outside of your current G-chartTM coverage). As you pan past the edge of the current map display, the screen will actively scroll forward to provide continuous map coverage wherever you move the cursor.
To move the cursor:
1.Press the appropriate arrow icon on the K keypad to move the cursor in the desired direction.
As you move the cursor, the distance and bearing from your present position to the cursor, will be displayed in the data window, with the cursor’s position coordinates shown in the position field. Keep in mind that when the cursor is stationary, the distance and bearing from your present position will change as your boat moves.
The cursor may also be used to ‘snap’ to on-screen waypoints and navaids, allowing you to review the selected position directly from the map display
To select an on-screen waypoint or navaid with the cursor:
1.Use the K keypad to move the cursor to the desired waypoint or navaid. (If there are several waypoints grouped closely together, zoom in closer for a better view of the area.)
2.When a waypoint or navaid is selected, it will become highlighted on-screen, with the name, position, comment and icon displayed in the data window.
To eliminate the cursor, re-center your position on-screen and return to the boat navigation mode:
1. Press the A key.
MAP PAGE |
SECTION |
|
2 |
||
Using the Cursor |
Snapping to an on-screen waypoint
Remove the cursor by pressing the A key |
19 |

SECTION |
MAP PAGE |
|
2 |
||
Selecting Zoom Scales |
Overzoom Mode
The map display has 16 available range scales from 1/8th to 4096 n.m. (1/4 to 7500km). The map scale is controlled by the L key, with the current scale displayed at the bottom of the data window.
To select a map scale:
1. Press the arrow icon on the right or left side of the L key to zoom in or out.
The GPSMAP will display cartography as long as there is chart information available for the range you’ve selected. Zooming operation will conform to the following default settings:
•When the selected zoom range is covered by either the internal database or a G-chartTM data cartridge, cartography will be displayed.
•When the selected zoom range is covered by both the internal database and a G-chartTM cartridge, cartography will be displayed using the data with the best resolution.
•When the selected zoom range exceeds the resolution of the chart in use by up to two settings, OVERZOOM cartography will be displayed. The display will not show any filled landmass areas, and an ‘Ovr Zm’ warning will appear in the scale field and the lat/lon grid will be turned on regardless of the map
configuration setting. Although OVERZOOM cartography provides some level of map detail, additional caution should be used while navigating.
•When the selected zoom range exceeds the resolution of the chart in use by more than two settings, a ‘No Map’ warning will appear and all cartography will be replaced by a TRACK PLOT display. The lat/lon grid will be displayed regardless of the map configuration setting. Additional caution should be used while navigating in track plot mode.
20 |
Track Plot Mode |
 Loading...