


 Loading...
nüvi® 2505 series
quick start manual
nüvi models: 2515, 2545, 2555, 2565, 2595
September 2011 |
190-01356-01_0B |
Printed in Taiwan |

Getting Started
‹ WARNING
See the Important Safety and Product Information guide in the product box for product warnings and other important information.
Setting Up Your Device
When using your device for the first time, complete the following tasks.
1Connect the device to vehicle power (page 2).
2 Mount the device (page 2).
3 Register the device (page 3).
4Check for updates.
•Software updates (page 4).
•Free map update (page 4).
5 Download the full owner’s manual (page 4).
Connecting the Device to Vehicle Power
‹ WARNING
This product contains a lithium-ion battery. To prevent the possibility of personal injury or product damage caused by battery exposure to extreme heat, remove the device from the vehicle when exiting or store it out of direct sunlight.
Notice
Before mounting the device, see the Important
Safety and Product Information guide for information about laws pertaining to windshield mounting.
Charge your device as you drive before using it on battery power.
1Plug the vehicle power cable into the USB port on the device .
2 Press the suction cup to the windshield.
2 |
nüvi 2505 Quick Start Manual |
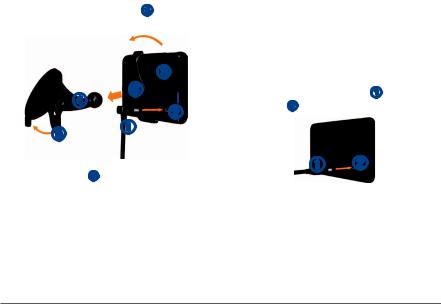
3While pressing, flip the lever back toward the windshield.
|
|
|
|
|
|
|
|
|
|
|
|
|
|
|
|
|
|
|
|
|
|
|
|
4 |
Snap the mount onto the suction cup. |
||
5 |
Fit the bottom of your device into the mount. |
||
6 |
Tilt your device back until it snaps into place. |
||
7Plug the other end of the vehicle power cable into a power outlet in your vehicle.
8If necessary, connect the external antenna to the vehicle power cable and secure it to the windshield using the suction cups.
About myDashboard
You can use myDashboard to register your device, check for software and map updates, access product manuals and support, and more.
Setting Up myDashboard
1Connect the mini-USB cable to the miniUSB port on the device (page 2).
2Connect the mini-USB cable to the USB port on your computer.
3 Go to www.garmin.com/dashboard.
4 Follow the on-screen instructions.
Registering your Device
1 From myDashboard, click Register Now.
nüvi 2505 Quick Start Manual |
3 |
2 Follow the on-screen instructions.
3Keep the original sales receipt, or a photocopy, in a safe place.
nüMaps Guarantee™
If you register the device at http://my.garmin
.com within 90 days of acquiring satellites while driving, your device could be eligible for one free map update. Go to www.garmin.com/numaps for terms and conditions.
Using myDashboard Services 1 Open myDashboard (page 3).
2Select an option:
•To update the software, click Update Now under Software Updates.
•To update the maps, click Update Now under Map Updates.
•To download the owner’s manual, click Manuals, and then click Download next to the manual you want.
3 Follow the on-screen instructions.
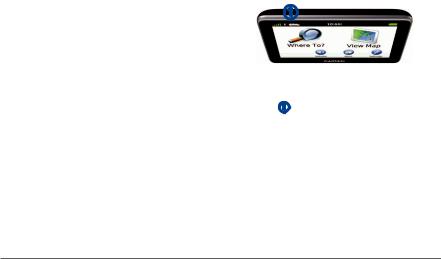
Using the Power Key
Select an option:
•To turn off the device, hold the Power key for 4 seconds.
•To reset the device, hold the Power key for 10 seconds.
•To put the device in sleep mode, press the Power key.
•To bring the device out of sleep mode, press the Power key and double-tap  .
.
4 |
nüvi 2505 Quick Start Manual |

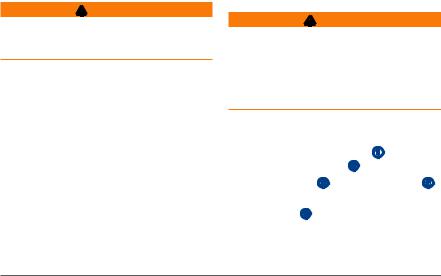
Finding a Location Using the Search Bar
You can use the search bar to search for locations by entering a category, brand name, address, or city name.
1 Select Where To?.
2 Select the search bar.
3Enter a search term.
Suggested search terms appear below the search bar as you type.
•To search for a type of business, enter a category name, such as “movie theaters” or “coffee shops.”
•To search for a business by name, enter all or part of the name.
•To search for an address near you, enter the street number and street name.
•To search for an address in another city, enter the street number, street name, city, and state.
•To search for a city, enter the city and state.
•To search for coordinates, enter latitude and longitude coordinates.
4Select an option:
•To search using a suggested search term, select the term.
•To search using the text you entered, select  .
.
5 If necessary, select a location.
Searching Near Another Location
From the main menu, select Where To? >
Searching Near.
nüvi 2505 Quick Start Manual |
5 |
Adding a Stop
1From the navigation screen, select  >
>
Points of Interest.
2 Search for the extra stop.
3 Select the stop from the search results.
4 Select Go!.
5 Select Add to Active Route.
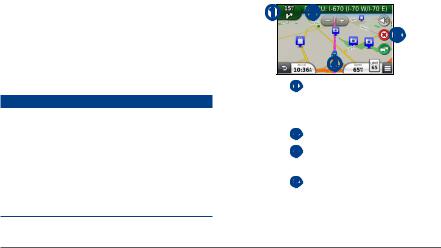
Your Route on the Map
notice
The speed limit icon feature is for information only and does not replace the driver’s responsibility to abide by all posted speed limit signs and to use safe driving judgment at all times. Garmin will not be responsible for any traffic fines or citations that you may receive for failing to follow all applicable traffic laws and signs.
Your route is marked with a magenta line on the map. If you depart from the original route, your device recalculates the route. A speed limit icon could appear as you travel on major roadways.
•Select to view the next turn.
If a view of a junction exists, the junction view appears.
•Select to view the turn list.
•Select to stop the route you are currently navigating.
•Select to view the Where Am I? page.
Taking a Detour
From the navigation page, select  >
>
Detour.
6 |
nüvi 2505 Quick Start Manual |

If the route you are currently taking is the only reasonable option, the device might not calculate a detour.
About Traffic
notice
Garmin is not responsible for the accuracy or timeliness of the traffic information.
Traffic information may not be available in all areas or countries.
A traffic receiver is included in some packages. It is built into the vehicle power cable. The traffic receiver and the device must be in data range of a station transmitting traffic data to receive traffic information. You do not need to activate the subscription included with your traffic receiver.
When you are receiving traffic information, a traffic icon appears on the map page. The traffic icon  changes color to indicate the severity
of traffic conditions on your route or on the road you are currently traveling.
Go to www.garmin.com/traffic for more information.
Pairing Your Phone
Hands-free calling is available on some nüvi models. Before you can pair, your phone and the device must be turned on and within 33 ft. (10 m) of each other.
1Enable the Bluetooth® component on your phone.
2 Select Settings > Bluetooth.
3 Select Bluetooth.
4 Select Add Phone > OK.
5 Select your phone, and touch OK.
6Enter the Bluetooth PIN (1234) for your device in your phone.
nüvi 2505 Quick Start Manual |
7 |

|
www.garmin.com/support |
|
||
913-397-8200 |
0808 2380000 |
1-866-429-9296 |
43 (0) 3133 3181 0 |
|
1-800-800-1020 |
+44 (0) 870.8501241 |
|||
|
|
|||
00 32 2672 5254 |
00 45 4810 5050 |
00 358 19 311 001 |
00 33 1 5517 81 89 |
|
0180 5 / 42 76 46 - 880 |
00 39 02 3669 9699 |
0800-0233937 |
815 69 555 |
|
0180 5 / 42 76 46 - 550 |
||||
|
|
|
||
00800 4412 454 |
00 35 1214 447 460 |
00 902 00 70 97 |
00 46 7744 52020 |
|
+44 2380 662 915 |
||||
|
|
|
||
Garmin International, Inc. |
Garmin®, the Garmin logo, and MapSource® are trademarks of Garmin |
1200 East 151st Street, |
Ltd. or its subsidiaries, registered in the USA and other countries. nüMaps |
Olathe, Kansas 66062, USA |
Guarantee™ is a trademarks of Garmin Ltd. or its subsidiaries. These |
Garmin (Europe) Ltd. |
trademarks may not be used without the express permission of Garmin. |
Liberty House, Hounsdown Business Park |
The Bluetooth® word mark and logos are owned by the Bluetooth SIG, Inc., |
Southampton, Hampshire, SO40 9LR UK |
and any use of such name by Garmin is under license. |
Garmin Corporation |
|
No. 68, Zhangshu 2nd Road, Xizhi Dist. |
|
New Taipei City, 221, Taiwan (R.O.C.) |
|
© 2011 Garmin Ltd. or its subsidiaries

nüvi® 2405/2505 series
owner’s manual
models: 2405, 2415, 2445, 2455, 2475, 2495, 2515, 2545, 2555, 2565, 2595
|
|
|
|
|
August 2011 |
190-01355-00_0A |
Printed in Taiwan |
||
© 2011 Garmin Ltd. or its subsidiaries
All rights reserved. Except as expressly provided herein, no part of this manual may be reproduced, copied, transmitted, disseminated, downloaded or stored in any storage medium, for any purpose without the express prior written consent of Garmin. Garmin hereby grants permission to download a single copy of this manual onto a hard drive or other electronic storage medium to be viewed and to print one copy of this manual or of any revision hereto, provided that such electronic or printed copy of this manual must contain the complete text of this copyright notice and provided further that any unauthorized commercial distribution of this manual or any revision hereto is strictly prohibited.
Information in this document is subject to change without notice. Garmin reserves the right to change or improve its products and to make changes in the content without obligation to notify any person or organization of such changes or improvements. Go to the Garmin Web site (www.garmin.com) for current updates and supplemental information concerning the use and operation of this and other Garmin products.
Table of Contents
Getting Started 1
Connecting the Device to Vehicle Power. |
..........1 |
About myDashboard.......................................... |
2 |
About Sleep Mode.............................................. |
4 |
Adjusting the Screen Brightness........................ |
4 |
Adjusting the Volume......................................... |
4 |
About Automatic Volume.................................... |
5 |
Status Bar Icons................................................. |
5 |
Satellite Signals.................................................. |
6 |
Using the On-screen Buttons............................. |
7 |
Using the On-screen Keyboard.......................... |
7 |
About Shortcuts.................................................. |
8 |
Finding Locations 8
About Locations................................................. |
9 |
About Search Tools.......................................... |
11 |
Saving a Home Location.................................. |
14 |
Finding Recently Found Places....................... |
14 |
Finding Parking................................................ |
14 |
Using Photo Navigation.................................... |
15 |
Setting a Simulated Location........................... |
15 |
Saving Locations.............................................. |
16 |
Voice Command 18
About Voice Commands |
...................................18 |
Navigation 21
Starting a Route............................................... |
21 |
Following an Automobile Route........................ |
22 |
About Exit Services.......................................... |
23 |
Avoiding Road Features................................... |
24 |
Map Pages 25
Customizing the Map....................................... |
25 |
Viewing Turns................................................... |
26 |
Pedestrian Routes............................................ |
29 |
Viewing Current Location Information.............. |
30 |
Hands-Free Phone Calls 31
About Hands-Free Calling |
................................31 |
Placing a Call................................................... |
32 |
nüvi 2405/2505 Series Owner’s Manual |
i |

Using In-Call Options ...................................... |
34 |
Saving a Home Phone Number....................... |
34 |
Using the Apps 35
Using Help........................................................ |
35 |
About ecoRoute .............................................. |
35 |
About Audiobooks............................................ |
38 |
Planning a Trip................................................. |
40 |
Viewing Pictures............................................... |
42 |
Viewing Previous Routes and Destinations..... |
42 |
Using the World Clock ..................................... |
43 |
Finding Your Last Parking Spot........................ |
43 |
Converting Units .............................................. |
43 |
About Offers..................................................... |
44 |
Using the Language Guide.............................. |
45 |
Traffic 46
Disabling Live Traffic........................................ |
46 |
Traffic Data....................................................... |
46 |
Traffic Receiver................................................ |
47 |
Traffic on Your Route........................................ |
48 |
Traffic in Your Area........................................... |
49 |
Understanding Traffic Data. |
.............................49 |
Traffic Subscriptions......................................... |
49 |
Data Management 50
File Types......................................................... |
50 |
About Memory Cards....................................... |
50 |
Transferring Files from Your Computer ........... |
51 |
Deleting Files .................................................. |
52 |
Customizing the Device 52
Map and Vehicle Settings................................. |
52 |
Navigation Settings.......................................... |
53 |
Display Settings............................................... |
54 |
Bluetooth Settings............................................ |
54 |
Traffic Settings................................................. |
55 |
Units and Time Settings................................... |
56 |
Language and Keyboard Settings.................... |
56 |
Proximity Alerts Settings.................................. |
57 |
Device Settings................................................ |
57 |
Restoring Settings............................................ |
57 |
ii |
nüvi 2405/2505 Series Owner’s Manual |

Appendix 58
Power Cables................................................... |
58 |
Caring for Your Device..................................... |
58 |
Erasing User Data............................................ |
59 |
Changing the Fuse in the Vehicle Power |
|
Cable................................................................ |
60 |
Mounting on Your Dashboard........................... |
60 |
Removing the Device, Cradle, and Mount....... |
61 |
Updating Maps ................................................ |
61 |
Purchasing Additional Maps............................. |
62 |
Custom Points of Interest................................. |
62 |
Purchasing Accessories................................... |
62 |
Troubleshooting ............................................... |
63 |
Index 65
nüvi 2405/2505 Series Owner’s Manual |
iii |
Getting Started
WARNING
See the Important Safety and Product Information guide in the product box for product warnings and other important information.
1Connect the device to vehicle power (page 1).
2 Mount the device (page 1).
3 Register the device (page 3).
4Check for updates.
•Software updates (page 3).
•Free map update (page 3).
Connecting the Device to Vehicle Power
WARNING
This product contains a lithium-ion battery. To prevent the possibility of personal injury or product damage caused by battery exposure to extreme heat, remove the device from the vehicle when exiting or store it out of direct sunlight.
Before you use your device on battery power, you should charge it.
1Plug the vehicle power cable into the USB port on the device .
2 Snap the mount onto the suction cup .
3Press the suction cup to the windshield, and flip the lever back toward the windshield.
4 Fit the bottom of your device into the mount. 5 Tilt your device back until it snaps into place.
nüvi 2405/2505 Series Owner’s Manual |
1 |

6Plug the other end of the vehicle power cable into a power outlet in your vehicle.
7If necessary, connect the external antenna to the traffic receiver and secure it to the windshield using the suction cups.
About myDashboard
Use myDashboard to register your device, check for software and map updates, access product manuals and support, and more.
Setting Up myDashboard
1Connect the USB cable to the USB porton the device.
2Connect the USB cable to the USB port on your computer.
3 Go to www.garmin.com/dashboard.
4 Follow the on-screen instructions.
2 |
nüvi 2405/2505 Series Owner’s Manual |

Registering the Device
1 Open myDashboard (page 2).
2 Follow the on-screen instructions.
Updating the Software
1 Open myDashboard (page 2).
2 Under Software Updates, click Update Now.
3 Follow the on-screen instructions.
nüMaps Guarantee™
If you register through myDashboard, your device could be eligible for one free map update within 90 days of first acquiring satellites while you drive. Go to www.garmin.com/numaps for details and terms and conditions.
Updating Maps
1 Open myDashboard (page 2).
2 Register the device (page 3).
3 Under Map Updates, click Update Now.
4 Follow the on-screen instructions.
Turning Off the Device
You can power off the device completely. 1 Hold the Power key for 3 seconds.
NOTE: If you hold the Power key for less than 3 seconds, the device enters sleep mode (page 4).
2 Select Off.
nüvi 2405/2505 Series Owner’s Manual |
3 |

Resetting the Device
You can reset your device if it stops functioning. Hold the Power key for 10 seconds.
About Sleep Mode
Use sleep mode to conserve battery power when your device is not in use. Sleep mode uses very little power, and a battery charge lasts for weeks when your device is in sleep mode.
Entering Sleep Mode
Press the Power key.
Exiting Sleep Mode
While the device is in sleep mode, Press the power key and double-tap  .
.
Adjusting the Screen Brightness
1 Select Settings > Display > Brightness.
2 Use the slider bar to adjust the brightness.
Adjusting the Volume
1 Select Volume.
2Select an option:
•Use the slider bar to adjust the volume.
•Select  to mute the device.
•Select  > Audio Mixer and use the slider bars to adjust the volume for navigation prompts, phone, and media.
4 |
nüvi 2405/2505 Series Owner’s Manual |

About Automatic Volume
NOTE: Automatic volume is not available on all models.
Your device can increase or decrease the volume automatically based on the level of background noise.
Enabling Automatic Volume
1 Select Volume >  > Automatic Volume.
2 Select Enabled.
Status Bar Icons
The status bar is located at the top of the main menu. The status bar icons display information about features on the device. You can select some icons to change settings or view additional information.
GPS signal status.
Bluetooth® technology status (appears when Bluetooth is enabled). See (page 31)
Transportation mode indicator.
 Current time. Battery status.
nüvi 2405/2505 Series Owner’s Manual |
5 |
Satellite Signals
After the device is turned on, it begins acquiring satellite signals. The device may need a clear view of the sky to acquire satellite signals. When at least one of the  bars is green, your device has acquired satellite signals.
For more information about GPS, go to www.garmin.com/aboutGPS.
Viewing GPS Signal Status
Hold  for three seconds.
Transportation Modes
 Automobile mode
Pedestrian mode
Routing and navigation are calculated differently based on your transportation mode.
For example, in Automobile mode, the estimated time of arrival is calculated using the speed limit of the roads on the route. Pedestrian mode calculates time of arrival based on walking speed.
NOTE: Pedestrian routes do not include highways. If you have cityXplorer™ maps loaded on your device, pedestrian routes may include public transit (page 29).
Choosing a Transportation Mode
Select  or
or  .
.
6 |
nüvi 2405/2505 Series Owner’s Manual |

Battery Information
After the device is connected to power, it begins to charge.
 in the status bar indicates the status of the internal battery. To increase the accuracy of the battery gauge, you should fully discharge the battery and then fully charge it. Do not unplug the device until it is fully charged.
Using the On-screen Buttons
•Select  to return to the previous screen.
•Hold  to quickly return to the main menu.
•Select  or
or  to see more choices.
•Hold  or
or  to scroll faster.
•Select  to see a menu of options for the current screen.
Using the On-screen Keyboard
See “Language and Keyboard Settings” to change the keyboard layout (page 56).
•Select a character on the keyboard to enter a letter or number.
•Select  to add a space.
•Select  to delete an entry.
•Select  to delete a character.
• Select |
to select the keyboard language |
mode. |
|
•Select  to enter special characters, such as punctuation marks.
•Select  to change character capitalization.
nüvi 2405/2505 Series Owner’s Manual |
7 |
About Shortcuts
You can add shortcuts to the Where To? menu. A shortcut can point to a location, a category, or a search tool.
Adding a Shortcut Icon
The Where To? menu can contain up to 36 shortcut icons.
1 Select Where To? > Add Shortcut.
2 Select an item.
Removing a Shortcut
1Select Where To >  > Remove Shortcut(s).
2 Select the shortcut to remove.
3 Select the shortcut again to confirm.
Finding Locations
The device offers many methods for finding locations.
•By category (page 9)
•Near another location (page 10)
•By spelling the name (page 11)
•By address (page 11)
•Using the map (page 13)
•Using recently found locations (page 14)
•Using coordinates (page 12)
•Using photos (page 15)
•Using saved locations (page 16)
8 |
nüvi 2405/2505 Series Owner’s Manual |
About Locations
The detailed maps loaded in your device contain locations, such as restaurants, hotels, and auto services. You can use the Categories function to browse for nearby businesses and attractions.
Finding a Location by Category 1 2 3 4
Searching Within a Category
To narrow your search results, you can search within some categories.
1 Select Where To?.
2 Select a category, or select Categories.
3 If necessary, select a subcategory.
4 Select the search bar .
5 Enter all or part of the name.
6 Select  .
.
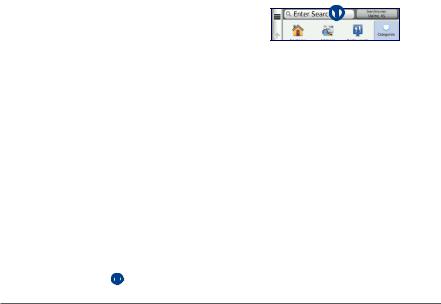
Finding a Location Using the Search Bar
You can use the search bar to search for locations by entering a category, brand name, address, or city name.
1 Select Where To?.
2 Select the search bar.
3Enter a search term.
Suggested search terms appear below the search bar as you type.
•To search for a type of business, enter a category name, such as “movie theaters” or “coffee shops.”
nüvi 2405/2505 Series Owner’s Manual |
9 |

•To search for a business by name, enter all or part of the name.
•To search for an address near you, enter the street number and street name.
•To search for an address in another city, enter the street number, street name, city, and state.
•To search for a city, enter the city and state.
•To search for coordinates, enter latitude and longitude coordinates.
4Select an option:
•To search using a suggested search term, select the term.
•To search using the text you entered, select  .
.
5 If necessary, select a location.
Changing the Search Area
By default, your device finds locations closest to your current location. You can find a location near another city or location.
1 Select Where To? > Searching Near.
2 Select an option.
3 If necessary, select a location.
Reporting a Closed or Missing Location
If your search results include an outdated or incorrect location, you can report the error to Garmin and remove the location from future searches.
1 Find a location (page 8).
2 Select a location from the list.
3 Select  .
.
4 Select  > Edit.
5Select Report as Closed or Report as Missing.
10 |
nüvi 2405/2505 Series Owner’s Manual |

This information is sent to Garmin when you connect your device to myGarmin™ using your computer.
Editing Location Information
You can change the address or phone number for a location that appears in the search results.
1 Find a location (page 8).
2 Select a location from the list.
3 Select  .
.
4 Select  > Edit.
5Select Address or Phone Number, and enter the new information.
Rating a Point of Interest
You can assign a star rating to a point of interest.
1 Find a location (page 8).
2 Select  >
>  .
.
3 Select the stars to rate the point of interest.
The star rating updates on your device.
About Search Tools
Search tools allow you to search for cities, addresses, intersections, or coordinates. By default, the address search tool appears in the Where To? menu. To search for cities, intersections, and coordinates, you must add those search tools to the Where To? menu (page 8).
Finding an Address
NOTE: The order of the steps may change depending on the map data loaded on your device.
1 Select Where To? > Address.
2Enter information as prompted by the onscreen instructions.
3If necessary, select Searching Near, and enter a different city or postal code.
nüvi 2405/2505 Series Owner’s Manual |
11 |

4 If necessary, select the address.
Finding a City
Before you can find a city, you must add the city search tool to the Where To? menu (page 8).
1 Select Where To? > Cities.
2 Select Enter Search.
3 Enter a city name, and select  .
.
4 Select a city.
Finding an Intersection
Before you can find an intersection, you must add a shortcut to the intersection search tool (page 8).
1 Select Where To? > Intersections.
2Select a state or province.
NOTE: If necessary, select State or Country to change the country, state, or province.
3 Enter the first street name, and select Next. 4 If necessary, select the street.
5Enter the second street name, and select
Next.
6 If necessary, select the street.
7 If necessary, select the intersection.
Finding a Location Using Coordinates
You can find a location using latitude and longitude coordinates. This method can be helpful when geocaching.
1Select Where To? > Categories > Coordinates.
2If necessary, select  > Format, select the correct coordinate format for the type of map you are using, and select Save.
3 Select the latitude coordinate.
4 Enter the new coordinate, and select Done.
5 Select the longitude coordinate.
6 Enter the new coordinate, and select Done.
7 Select View on Map.
12 |
nüvi 2405/2505 Series Owner’s Manual |

Finding a Location by Browsing the Map
Before you can find places included in the map data, such as restaurants, hospitals, and fuel stations, you must enable the map layer for places along the road (page 25).
1 Select View Map.
2 Select the screen.
3Drag and zoom the map to display the area to search.
Location markers appear on the map for places along the road.
4If necessary, select  , and select a category icon to view only a specific category of places.
5Select an option:
•Select a location marker.
•Select a point, such as a street, intersection, or address location.
6If necessary, select the location description to view additional information.
Finding a Location Using Quick Search
After you have performed a search for a point of interest, certain categories may display a Quick Search list that displays the last four destinations you selected.
1 Select Where To?.
2 Select a category, or select Categories.
3If applicable, select a destination from the Quick Search list.
4If necessary, select the appropriate destination.
nüvi 2405/2505 Series Owner’s Manual |
13 |

Saving a Home Location
You can set your home location for the location you return to most often.
1Select Where To? >  > Set Home Location.
2Select Enter My Address, Use My Current Location, or Recently Found.
The location is saved as “Home” in the Saved folder (page 16).
Going Home
Select Where To? > Go Home.
Editing Your Home Location Information
1 Select Where To? > Saved > Home.
2 Select  > Edit.
3 Enter your changes.
4 Select Done.
Finding Recently Found Places
Your device stores the last 50 locations you have found.
1 Select Where To? > Recent.
2 Select a location.
Clearing the List of Recently Found Places
Select Where To? > Recent >  > Clear > Yes.
Finding Parking
You can find detailed parking information and pricing information.
1 Select Where To? > Categories > Parking.
2 Select an option.
3 Select a parking location.
14 |
nüvi 2405/2505 Series Owner’s Manual |

Using Photo Navigation
You can upload pictures onto your device or memory card that include location information and create routes to the pictured locations.
1Connect your device to your computer (page 51).
2 Go to http://connect.garmin.com/photos.
3Follow the instructions on the Web site to select and load pictures.
4 Disconnect the device from the computer.
5 Turn on the device.
6From the main menu, select Where To? >
Saved > Photos.
A list of pictures with location information appears.
7 Select a picture.
Setting a Simulated Location
If you are indoors or not receiving satellite signals, you can use the GPS to set a simulated location.
1 Select Settings > Navigation.
2 Select GPS Simulator.
3 Select View Map.
4Select an area on the map.
The address of the location appears at the bottom of the screen.
5 Select the address.
6 Select Set Location.
nüvi 2405/2505 Series Owner’s Manual |
15 |
Loading...