


DIGITAL CAMERA
FINEPIX S9400W Series
FINEPIX S9200 Series
FINEPIX S9100 Series
Owner’s Manual
Thank you for your purchase of this product. This manual describes how to use your FUJIFILM digital camera and the supplied software. Be sure that you have read and understood its contents and the warnings in “For Your Safety” (Pii) before using the camera.
For information on related products, visit our website at http://www.fujifilm.com/products/digital_cameras/index.html
BL04501-100 EN
Before You Begin
First Steps
Basic Photography and Playback
More on Photography
More on Playback
Wireless Networks
Movies
Connections
Menus
Technical Notes
Troubleshooting
Appendix

For Your Safety
Be sure to read this notes before using
Safety Notes
•Make sure that you use your camera correctly. Read these Safety Notes and your Owner’s Manual carefully before use.
•After reading these Safety Notes, store them in a safe place.
About the Icons
The icons shown below are used in this document to indicate the severity of the injury or damage that can result if the information indicated by the icon is ignored and the product is used incorrectly as a result.
This icon indicates that death or serious injury can result if the infor- WARNING mation is ignored.
This icon indicates that personal injury or material damage can result CAUTION if the information is ignored.
The icons shown below are used to indicate the nature of the information which is to be observed.
Triangular icons tell you that this information requires attention (“important”).
Circular icons with a diagonal bar tell you that the action indicated is prohibited (“Prohibited”).
Filled circles with an exclamation mark tell you an action that must be performed (“Required”).
|
|
|
|
|
WARNING |
|
|
|
|
|
|
If a problem arises, turn the camera off, remove the battery, disconnect and |
|
|
|
|
|
|
unplug the AC power adapter. |
|
Unplug |
Continued use of the camera when it is emitting smoke, is emitting |
|||||
any unusual odor, or is in any other abnormal state can cause a fire |
||||||
from power |
or electric shock. |
|||||
socket. |
• Contact your FUJIFILM dealer. |
|||||
|
|
|
|
|
||
|
|
|
|
|
Do not allow water or foreign objects to enter the camera. |
|
|
|
|
|
|
If water or foreign objects get inside the camera, turn the camera |
|
|
|
|
|
|
off, remove the battery and disconnect and unplug the AC power |
|
|
|
|
|
|
adapter. |
|
|
|
|
|
|
Continued use of the camera can cause a fire or electric shock. |
|
|
|
|
|
|
• Contact your FUJIFILM dealer. |
|
|
|
|
|
|
Do not use the camera in the bathroom or shower. |
|
Do not use in |
||||||
This can cause a fire or electric shock. |
||||||
the bathroom |
|
|||||
or shower. |
|
|||||
|
|
|
|
|
Never attempt to disassemble or modify (never open the case). |
|
Do not disas- |
Failure to observe this precaution can cause fire or electric shock. |
|||||
semble |
|
|||||
|
|
|
|
|
Should the case break open as the result of a fall or other accident, do not |
|
|
|
|
|
|
touch the exposed parts. |
|
Do not touch |
Failure to observe this precaution could result in electric shock or in |
|||||
injury from touching the damaged parts. Remove the battery im- |
||||||
internal |
mediately, taking care to avoid injury or electric shock, and take the |
|||||
|
parts |
|||||
|
product to the point of purchase for consultation. |
|||||
|
|
|
|
|
||
ii
For Your Safety
 WARNING
Do not change, heat or unduly twist or pull the connection cord and do not place heavy objects on the connection cord.
These actions could damage the cord and cause a fire or electric shock.
• If the cord is damaged, contact your FUJIFILM dealer.
Do not place the camera on an unstable surface.
This can cause the camera to fall or tip over and cause injury.
Never attempt to take pictures while in motion.
Do not use the camera while you are walking or driving a vehicle. This can result in you falling down or being involved in a traffic accident.
Do not touch any metal parts of the camera during a thunderstorm.
This can cause an electric shock due to induced current from the lightning discharge.
Do not use the battery except as specified.
Load the battery as aligned with the indicator.
Do not heat, change or take apart the battery. Do not drop or subject the battery to impacts. Do not store the battery with metallic products. Do not use chargers other than the specified model to charge the battery.
Any of these actions can cause the battery to burst or leak and cause fire or injury as a result.
Use only the battery or AC power adapters specified for use with this camera. Do not use voltages other than the power supply voltage shown.
The use of other power sources can cause a fire.
If the battery leaks and fluid gets in contact with your eyes, skin or clothing. Flush the affected area with clean water and seek medical attention or call an emergency number right away.
Do not use the charger to charge batteries other than those specified here.
The supplied battery charger is for use only with the type of battery supplied with the camera. Using the charger to charge conventional batteries or other types of rechargeable batteries can cause the battery to leak fluid, overheat or burst.
 WARNING
Danger of explosion if battery is incorrectly replaced. Replace only with the same.
Do not use in the presence of flammable objects, explosive gases, or dust.
When carrying the battery, install it in a digital camera or keep it in the hard case. When storing the battery, keep it in the hard case. When discarding, cover the battery terminals with insulation tape.
Contact with other metallic objects or battery could cause the battery to ignite or burst.
Keep Memory Cards out of the reach of small children.
Because Memory Cards are small, they can be swallowed by children. Be sure to store Memory Cards out of the reach of small children. If a child swallows a Memory Card, seek medical attention or call an emergency number.
Turn the camera off in crowds.
The camera emits radio-frequency radiation that may interfere with pacemakers.
Turn the camera off in the vicinity of automatic doors, public address systems, and other automatically controlled devices.
The camera emits radio-frequency radiation that may cause these devices to malfunction.
Keep the camera at least 22 cm (0.7 ft.) away from people wearing pacemakers.
The camera emits radio-frequency radiation that may interfere with pacemakers.
iii

For Your Safety
 CAUTION
Do not use this camera in locations affected by oil fumes, steam, humidity or dust.
This can cause a fire or electric shock.
Do not leave this camera in places subject to extremely high temperatures.
Do not leave the camera in locations such as a sealed vehicle or in direct sunlight. This can cause a fire.
Keep out of the reach of small children.
This product could cause injury in the hands of a child.
Do not place heavy objects on the camera.
This can cause the heavy object to tip over or fall and cause injury.
Do not move the camera while the AC power adapter is still connected. Do not pull on the connection cord to disconnect the AC power adapter.
This can damage the power cord or cables and cause a fire or electric shock.
Do not use the AC power adapter when the plug is damaged or the plug socket connection is loose.
This could cause a fire or electric shock.
Do not cover or wrap the camera or the AC power adapter in a cloth or blanket.
This can cause heat to build up and distort the casing or cause a fire.
When you are cleaning the camera or you do not plan to use the camera for an extended period, remove the battery and disconnect and unplug the AC power adapter.
Failure to do so can cause a fire or electric shock.
 CAUTION
When charging ends, unplug the charger from the power socket.
Leaving the charger plugged into the power socket can cause a fire.
Using a flash too close to a person’s eyes may temporarily affect the eyesight.
Take particular care when photographing infants and young children.
When a memory card is removed, the card could come out of the slot too quickly. Use your finger to hold it and gently release the card.
Injury could result to those struck by the ejected card.
Request regular internal testing and cleaning for your camera.
Build-up of dust in your camera can cause a fire or electric shock.
•Contact your FUJIFILM dealer to request internal cleaning every 2 years.
•Please note this is not a free of charge service.
Remove your fingers from the flash window before the flash fires.
Failure to observe this precaution could result in burns.
Keep the flash window clean and do not use the flash if the window is obstructed.
Failure to observe these precautions could cause smoke or discoloration.
iv

For Your Safety
Power Supply and Battery
*Confirm your battery type before reading the following descriptions.
The following explains proper use of batteries and how to prolong their life. Incorrect use of batteries can cause shorter battery life, as well as leakage, excessive heat, fire or explosion.
1Camera uses the Rechargeable Lithium-ion Battery
*When shipped, the battery is not fully charged. Always charge the battery before using it.
*When carrying the battery, install it in a digital camera or keep it in the soft case.
■ Battery Features
•The battery gradually loses its charge even when not used. Use a battery that has been charged recently (in the last day or two) to take pictures.
•To maximize the life of the battery, turn the camera off as quickly as possible when it is not being used.
•The number of available frames will be lower in cold locations or at low temperatures. Take along a spare fully charged battery. You can also increase the amount of power produced by putting the battery in your pocket or another warm place to heat it and then loading it into the camera just before you take a picture.
If you are using a heating pad, take care not to place the battery directly against the pad. The camera may not operate if you use a depleted battery in cold conditions.
■ Charging the Battery
•Charging times will increase at ambient temperatures below +10 °C
(+50 °F) or above +35 °C (+95 °F). Do not attempt to charge the battery at temperatures above 40 °C
(+104 °F); at |
temperatures below |
0 °C (+32 °F), |
the battery will not |
charge. |
|
•The Rechargeable Lithium-ion Battery does not need to be fully discharged or exhausted flat before being charged.
•The battery may feel warm after it has been charged or immediately after being used. This is perfectly normal.
•Do not recharge a fully charged battery.
■ Battery Life
At normal temperatures, the battery can be used at least 300 times. If the time for which the battery provides power shortens markedly, this indicates that the battery has reached the end of its effective life and should be replaced.
■ Notes on storage
•If a battery is stored for long periods while charged, the performance of the battery can be impaired. If the battery will not be used for some time, run the battery out before storing it.
•If you do not intend to use the camera for a long period of time, remove the battery from the camera.
•Store the battery in a cool place.
-The battery should be stored in a dry location with an ambient temperature between +15°C and +25°C (+59°F and +77°F).
-Do not leave the battery in hot or extremely cold places.
■Handling the Battery Cautions for Your Safety:
•Do not carry or store battery with metal objects such as necklaces or hairpins.
•Do not heat the battery or throw it into a fire.
•Do not attempt to take apart or change the battery.
•Do not recharge the battery with chargers other those specified.
•Dispose of used battery promptly.
•Do not drop the battery or otherwise subject it to strong impacts.
•Do not expose the battery to water.
•Always keep the battery terminals clean.
•Do not store batteries in hot places. Also, if you use the battery for a long period, the camera body and the battery itself will become warm. This is normal. Use the AC power adapter if you are taking pictures or viewing images for a long period of time.
2Camera uses AA Alkaline, Rechargeable Ni-MH (nickel-metal hydride) or AA lithium batteries
*For details on the batteries that you can use, refer to the Owner’s Manual of your camera.
■ Cautions for Using Battery
•Do not heat the batteries or throw them into a fire.
•Do not carry or store batteries with metal objects such as necklaces or hairpins.
•Do not expose the batteries to water, and keep batteries from getting wet or stored in moist locations.
•Do not attempt to take apart or change the batteries, including battery casings.
•Do not subject the batteries to strong impacts.
•Do not use batteries that are leaking, deformed, discolored.
•Do not store batteries in warm or humid places.
•Keep the batteries out of reach of babies and small children.
•Make sure that the battery polarity (Cand D) is correct.
v

For Your Safety
•Do not use new with used batteries. Do not use charged and discharged batteries together.
•Do not use different types or brands of batteries at the same time.
•If you do not intend to use the camera for a long period of time, remove the batteries from the camera. Note if the camera is left with the batteries removed, the time and date settings are cleared.
•The batteries feel warm right after being used. Before removing the batteries, turn the camera off and wait for the batteries to cool down.
•Since batteries do not work well in cold weather or locations, warm the batteries by placing them inside your garments before use. Batteries do not work well when cold. They will work again when the temperature returns to normal.
•Soil (such as fingerprints) on the battery terminals makes the batteries charge less reducing the number of images. Carefully wipe the battery terminals with a soft dry cloth before loading.
If any liquid at all leaks from the batteries, wipe the battery compartment thoroughly and then load new batteries.
If any battery fluid comes into contact with your hands or clothing, flush the area thoroughly with water. Note that battery fluid can cause loss of eyesight if it gets into your eyes. If this occurs, do not rub your eyes. Flush the fluid out with clean water and contact your physician for treatment.
■Using the AA-size Ni-MH batteries correctly
•Ni-MH batteries left unused in storage for long periods can become “deactivated”. Also, repeatedly charging Ni-MH batteries that are only partially discharged can cause them to suffer from the “memory effect”. Ni-MH batteries that are “deactivated” or affected by “memory” suffer from the problem of only providing power for a short time after being charged. To prevent this problem, discharge and recharge them several times using the camera’s “Discharging rechargeable batteries” function.
Deactivation and memory are specific to Ni-MH batteries and are not in fact battery faults.
See Owner’s Manual for the procedure for “Discharging rechargeable batteries”.
 CAUTION
Do not use the “Discharging rechargeable batteries” function when alkaline batteries being used.
•To charge Ni-MH batteries, use the quick battery charger (sold separately). Refer to the instructions supplied with the charger to make sure that the charger is used correctly.
•Do not use the battery charger to charge other batteries.
•Note that the batteries feel warm after being charged.
•Due to the way the camera is constructed, a small amount of current is used even when the camera is turned off. Note in particular that leaving Ni-MH batteries in the camera for a long period will overdischarge the batteries and may render them unusable even after recharging.
•Ni-MH batteries will self-discharge even when not used, and the time for which they can be used may be shortened as a result.
•Ni-MH batteries will deteriorate
rapidly if over-discharged (e.g. by discharging the batteries in a flashlight). Use the “Discharging rechargeable batteries” function provided in the camera to discharge the batteries.
•Ni-MH batteries have a limited service life. If a battery can only be used for a short time even after repeated discharge-charge cycles, it may have reached the end of its service life.
■ Disposing of Batteries
CAUTION: When disposing of batteries, do so in accordance with your local waste disposal regulations.
3Notes on both models ( 1 , 2 )
■AC Power Adapter
Always use the AC Power Adapter with the camera. The use of an AC Power adapter other than FUJIFILM AC Power Adapter can be damaged to your digital camera.
For details on the AC power adapter, refer to the Owner’s Manual of your camera.
•Use the AC power adapter for indoor use only.
•Plug the connection cord plug securely into the DC input terminal.
•Turn off the FUJIFILM Digital camera before disconnecting the cord from the DC input terminal. To disconnect, pull out the plug gently. Do not pull on the cord.
•Do not use the AC power adapter with any device other than your camera.
•During use, the AC power adapter will become hot to the touch. This is normal.
vi

For Your Safety
•Do not take apart the AC power adapter. Doing so could be dangerous.
•Do not use the AC power adapter in a hot and humid place.
•Do not subject the AC power adapter to strong shocks.
•The AC power adapter may emit a humming. This is normal.
•If used near a radio, the AC power adapter may cause static. If this happens, move the camera away from the radio.
Before Using the Camera
Do not aim the camera at extremely bright light sources, such as the sun in a cloudless sky. Failure to observe this precaution could damage the camera image sensor.
■ Test Shots Prior to Photography
For important photographs (such as weddings and overseas trips), always take a test shot and view the image to make sure that the camera is working normally.
•FUJIFILM Corporation cannot accept liability for any incidental losses (such as the costs of photography or the loss of income from photography) incurred as a result of faults with this product.
■ Notes on Copyright
Images recorded using your digital camera system cannot be used in ways that infringe copyright laws without the consent of the owner,
unless intended only for personal use. Note that some restrictions apply to the photographing of stage performances, entertainments and exhibits, even when intended purely for personal use. Users are also asked to note that the transfer of Memory Card containing images or data protected under copyright laws is only permissible within the restrictions imposed by those copyright laws.
■ Handling Your Digital Camera
To ensure that images are recorded correctly, do not subject the camera to impact or shock while an image is being recorded.
■ Liquid Crystal
If the LCD monitor is damaged, take particular care with the liquid crystal in the monitor. If any of the following situations arise, take the urgent action indicated.
•If liquid crystal comes in contact with your skin:
Wipe the area with a cloth and then wash thoroughly with soap and running water.
•If liquid crystal gets into your eye: Flush the affected eye with clean water for at least 15 minutes and then seek medical assistance.
•If liquid crystal is swallowed:
Flush your mouth thoroughly with water. Drink large quantities of water and induce vomiting. Then seek medical assistance.
Although the LCD panel is produced with highly sophisticated technologies, there may be black spots or permanently lit spots. This is not a malfunction, and does not affect recorded images.
■ Trademark Information
xD-Picture Card and E are trademarks of FUJIFILM Corporation. The typefaces included herein are solely developed by DynaComware Taiwan Inc. Macintosh, QuickTime, and Mac OS are trademarks of Apple Inc. in the U.S.A. and other countries. Windows 8, Windows 7, Windows Vista, and the Windows logo are trademarks of the Microsoft group of companies. Wi-Fi® and Wi-Fi Protected Setup® are registered trademarks of the Wi-Fi Alliance. Adobe and Adobe Reader are either trademarks or registered trademarks of Adobe Systems Incorporated in the U.S.A. and/or other countries. The SDHC and SDXC logos are trademarks of SD-3C, LLC. The HDMI logo is a trademark. YouTube is a trademark of Google Inc. Facebook is a trademark of Facebook, Inc. All other trade names mentioned in this manual are the trademarks or registered trademarks of their respective owners.
■ Notes on Electrical Interference
If the camera is to be used in hospitals or aircrafts, please note that this camera may cause interference to other equipment in the hospital or aircraft. For details, please check with the applicable regulations.
■ Exif Print (Exif ver. 2.3)
Exif Print Format is a newly revised digital camera file format that contains a variety of shooting information for optimal printing.
IMPORTANT NOTICE: Read Before
Using the Software
Direct or indirect export, in whole or in part, of licensed software without the permission of the applicable governing bodies is prohibited.
■ IMPORTANT:
Read the following notices before using the camera’s built-in wireless transmitter.
3This product, which contains encryption function developed in the United States, is controlled by the United States Export Administration Regulations and may not be exported or re-exported to any country to which the United States embargoes goods.
vii

For Your Safety
■Use only as part of a wireless network.
FUJIFILM does not accept liability for damages resulting from unauthorized use. Do not use in applications requiring a high degree of reliability, for example in medical devices or other systems that may directly or indirectly impact human life. When using the device in computer and other systems that demand a greater degree of reliability than wireless networks, be sure to take all necessary precautions to ensure safety and prevent malfunction.
■Use only in the country in which the device was purchased.
This device conforms to regulations governing wireless network devices in the country in which it was purchased. Observe all location regulations when using the device. FUJIFILM does not accept liability for problems arising from use in other jurisdictions.
■Wireless data (images) may be intercepted by third parties.
The security of data transmitted over wireless networks is not guaranteed.
■Do not use the device in locations subject to magnetic fields, static electricity, or radio interference.
Do not use the transmitter in the vicinity of microwave ovens or in other locations subject to magnetic fields, static electricity, or radio interference that may prevent reception of wireless signals. Mutual interference may occur when the transmitter is used in the vicinity of other wireless devices operating in the 2.4 GHz band.
■The wireless transmitter operates in the 2.4 GHz band using DSSS and OFDM modulation.
Wireless Network Devices:
Cautions
■This device operates on the same frequency as commercial, educational, and medical devices and wireless transmitters.
It also operates on the same frequency as licensed transmitters and special unlicensed low-voltage transmitters used in RFID tracking systems for assembly lines and in other similar applications.
■To prevent interference with the above devices, observe the following precautions.
Confirm that the RFID transmitter is not in operation before using this device. Should you observe that the device causes interference in licensed transmitters used for RFID tracking, immediately choose a new operating frequency for this device to prevent additional interference. If you notice that this device causes interference in low-voltage RFID tracing systems, contact a FUJIFILM representative.
2.4DS/OF4 This sticker indicates  that this device
operates in the
2.4 GHz band using DSSS and OFDM modulation and may cause interference at distances of up to 40 m.
viii

About This Manual
Before using the camera, read this manual and the warnings on pages ii–viii. For information on specific topics, consult the sources below.
...............................................Table of Contents |
Px |
|
............................................Troubleshooting |
P109 |
The “Table of Contents” gives an overview of the |
|
Having a specific problem with the camera? Find |
||
entire manual. The principal camera operations |
|
the answer here. |
|
|
are listed here. |
|
|
|
|
|
|
|
|
|
Warning Messages and Displays ...................... |
P117 |
|
|
|
Find out what’s behind that flashing icon or error message in the display.
This manual is for use with FINEPIX S9400W Series and FINEPIX S9200 Series/FINEPIX S9100 Series cameras. With the exception of the features below, operations for these models are identical.
Model |
Wireless Network features |
FINEPIX S9400W Series |
Available |
FINEPIX S9200 Series/FINEPIX S9100 Series |
Not available |
 Memory Cards
Pictures can be stored in an optional SD, SDHC, and SDXC memory cards (P11), referred to in this manual as “memory cards”.
 Temperature Warning
The camera will turn off automatically before its temperature or the temperature of the battery rise above safe limits. Pictures taken when a temperature warning is displayed may exhibit higher levels of “noise” (mottling). Turn the camera off and wait for it to cool before turning it on again.
ix

Table of Contents
For Your Safety ................................................................................. |
ii |
Safety Notes ..................................................................................... |
ii |
About This Manual......................................................................... |
ix |
Before You Begin |
|
Introduction....................................................................................... |
1 |
Symbols and Conventions.......................................................... |
1 |
Supplied Accessories.................................................................... |
1 |
Parts of the Camera....................................................................... |
2 |
Camera Displays .......................................................................... |
4 |
The Mode Dial .............................................................................. |
7 |
First Steps |
|
The Strap and Lens Cap ................................................................ |
8 |
Inserting the Batteries .................................................................. |
9 |
Inserting a Memory Card ........................................................... |
11 |
Turning the Camera On and Off.............................................. |
14 |
Shooting Mode ............................................................................. |
14 |
Playback Mode.............................................................................. |
14 |
Basic Setup ....................................................................................... |
15 |
Basic Photography and Playback |
|
Taking Pictures in M(Scene Recognition) Mode... |
16 |
Viewing Pictures ............................................................................ |
21 |
More on Photography |
|
Shooting Mode............................................................................... |
22 |
MSCENE RECOGNITION.................................................. |
22 |
BAUTO .......................................................................................... |
22 |
Adv. ADVANCED........................................................................... |
22 |
SP SCENE POSITION .................................................................... |
26 |
rMOTION PANORAMA 360 ................................................. |
27 |
P: PROGRAM AE ............................................................................ |
29 |
S: SHUTTER PRIORITY AE........................................................... |
30 |
A: APERTURE PRIORITY AE........................................................ |
30 |
M: MANUAL .................................................................................... |
31 |
C: CUSTOM MODE........................................................................ |
32 |
Intelligent Face Detection......................................................... |
33 |
Focus Lock......................................................................................... |
35 |
FMacro and Super Macro Modes (Close-ups)................ |
37 |
NUsing the Flash (Intelligent Flash) ..................................... |
38 |
JUsing the Self-Timer............................................................... |
40 |
ZINSTANT ZOOM........................................................................ |
42 |
The Fn Button.................................................................................. |
45 |
IContinuous Shooting (Burst Mode)................................ |
46 |
dExposure Compensation..................................................... |
49 |
x
Table of Contents
More on Playback |
|
Playback Options........................................................................... |
51 |
Continuous Shooting ................................................................. |
51 |
Playback Zoom.............................................................................. |
51 |
I Favorites: Rating Pictures .................................................... |
52 |
Multi-Frame Playback................................................................. |
53 |
Viewing Panoramas...................................................................... |
54 |
kPhotoBook Assist.................................................................... |
55 |
Creating a PhotoBook ................................................................ |
55 |
Viewing PhotoBooks .................................................................. |
56 |
Editing and Deleting PhotoBooks......................................... |
56 |
bImage Search............................................................................ |
57 |
ADeleting Pictures .................................................................... |
58 |
Wireless Networks |
|
Using Wireless Networks (S9400W Series Only) ............. |
59 |
Connecting with smartphones............................................... |
59 |
Saving Pictures to a Computer ............................................... |
59 |
Movies |
|
Recording Movies.......................................................................... |
60 |
Movie Frame Size ......................................................................... |
62 |
aViewing Movies........................................................................ |
63 |
Connections |
|
Viewing Pictures on TV............................................................... |
64 |
Connecting the Camera to High Definition (HD) TVs .... |
64 |
Printing Pictures via USB............................................................ |
65 |
Connecting the Camera ............................................................ |
65 |
Printing Selected Pictures ........................................................ |
65 |
Printing the DPOF Print Order................................................. |
66 |
Creating a DPOF Print Order.................................................... |
68 |
Viewing Pictures on a Computer............................................ |
71 |
Windows: Installing MyFinePix Studio................................. |
71 |
Importing pictures or movies to Mac (Macintosh).......... |
73 |
Connecting the Camera ............................................................ |
73 |
Menus |
|
Using the Menus: Shooting Mode ......................................... |
75 |
Using the Shooting Menu......................................................... |
75 |
Shooting Menu Options............................................................ |
76 |
NISO............................................................................................ |
78 |
OIMAGE SIZE............................................................................ |
78 |
TIMAGE QUALITY .................................................................. |
79 |
PFINEPIX COLOR.................................................................... |
80 |
DWHITE BALANCE ................................................................. |
80 |
CPHOTOMETRY...................................................................... |
81 |
FAF MODE................................................................................ |
82 |
FMOVIE AF MODE................................................................. |
83 |
JAE BKT EV STEPS ................................................................. |
83 |
IFLASH...................................................................................... |
83 |
xi

Table of Contents
Using the Menus: Playback Mode.......................................... |
84 |
Using the Playback Menu.......................................................... |
84 |
Playback Menu Options............................................................. |
85 |
iMOVIE EDIT........................................................................... |
86 |
jMARK FOR UPLOAD........................................................... |
87 |
ISLIDE SHOW ......................................................................... |
89 |
BRED EYE REMOVAL............................................................. |
90 |
DPROTECT ................................................................................ |
91 |
GCROP........................................................................................ |
92 |
ORESIZE ..................................................................................... |
93 |
CIMAGE ROTATE..................................................................... |
94 |
ECOPY........................................................................................ |
95 |
JDISP. ASPECT ........................................................................ |
95 |
The Setup Menu ............................................................................. |
96 |
Using the Setup Menu................................................................ |
96 |
Setup Menu Options................................................................... |
97 |
NTIME DIFFERENCE............................................................ |
100 |
KFORMAT................................................................................ |
101 |
AIMAGE DISP. ........................................................................ |
101 |
BFRAME NO........................................................................... |
102 |
IPLAYBACK VOLUME......................................................... |
102 |
JLCD BRIGHTNESS.............................................................. |
102 |
hLCD POWER SAVE............................................................. |
102 |
MAUTO POWER OFF........................................................... |
103 |
RINTELLIGENT DIGITAL ZOOM...................................... |
103 |
PDISCHARGE (Ni-MH Batteries Only) ......................... |
104 |
SDATE STAMP...................................................................... |
105 |
Technical Notes |
|
Optional Accessories................................................................. |
106 |
Accessories from FUJIFILM ..................................................... |
107 |
Caring for the Camera .............................................................. |
108 |
Troubleshooting |
|
Troubleshooting ......................................................................... |
109 |
Warning Messages and Displays .......................................... |
117 |
Appendix |
|
Memory Card Capacity ............................................................. |
121 |
Specifications................................................................................ |
122 |
xii
Introduction
Symbols and Conventions
The following symbols are used in this manual:
3: This information should be read before use to ensure correct operation. 1: Points to note when using the camera.
2: Additional information that may be helpful when using the camera.
P: Other pages in this manual on which related information may be found.
Menus and other text in the camera monitor are shown in bold. In the illustrations in this manual, the monitor display may be simplified for explanatory purposes.
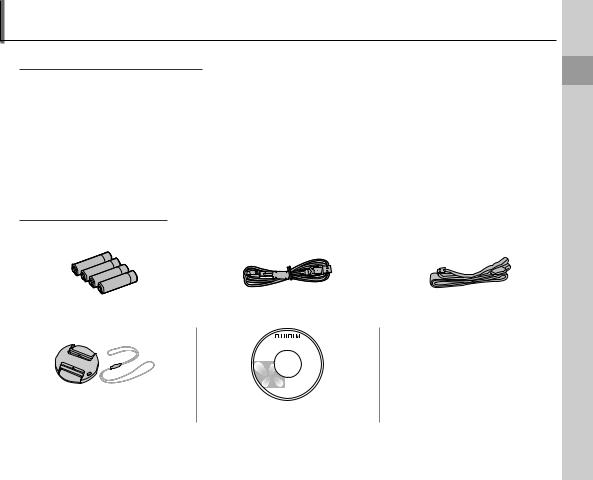
Supplied Accessories
The following items are included with the camera:
AA alkaline (LR6) batteries (×4) |
|
|
USB cable |
|
Strap |
|||
|
|
|
|
|
|
|
|
|
|
|
|
|
|
|
|
|
|
• Basic Manual
Lens cap |
CD-ROM |
Begin You Before
1

Introduction
Parts of the Camera
For more information, refer to the page listed to the right of each item.
A Microphone................................................. |
|
60 |
B Strap eyelet.................................................... |
|
8 |
C Diopter adjustment control ................ |
|
6 |
D Zoom control................................ |
17, 51, 53 |
|
E Shutter button........................................... |
|
19 |
F d(exposure compensation) button |
.........49 |
|
G I(burst mode) button |
..............................46 |
L Flash.................................................................. |
38 |
H Gswitch .......................................... |
14 |
M Flash pop-up button.............................. |
38 |
I Indicator lamp............................................ |
20 |
N Side lever....................................................... |
17 |
J Mode dial ........................................................ |
7 |
O Lens......................................................... |
14, 122 |
K AF-assist illuminator ............................... |
36 |
|
|
Self-timer lamp.......................................... |
41 |
|
|
* Illustrations in this manual may be simplified for explanatory purposes.
2

Introduction
P Electronic viewfinder .................... |
6 |
X EVF/LCD (display selection) button |
.... 6 |
|
Q Selector button (see below) |
|
Y t(movie recording) button ............ |
60 |
|
R Monitor................................................... |
4 |
Z a(playback) button ................ |
21, 51 |
|
S DISP (display)/BACK button............... |
5 |
a Terminal cover.................. |
64, 65, 73 |
|
T Tripod mount |
|
b Memory card slot........................... |
|
12 |
U Speaker................................................. |
63 |
c USB multi-connector........... |
65, 73 |
|
V Battery-chamber cover ................ |
9 |
d HDMI Mini Connector................ |
|
64 |
W Battery-chamber latch.................. |
9 |
|
|
|
 The Selector Button
Move cursor up |
MENU/OK button |
Fn (Function) button (P45) |
|
b(delete) button (P58) |
(P15, 75, 84, 96) |
Move cursor left |
Move cursor right |
F(macro) button (P37) |
N(flash) button (P38) |
Move cursor down |
Command dial |
J(self-timer) button (P40) |
Begin You Before
3
Introduction
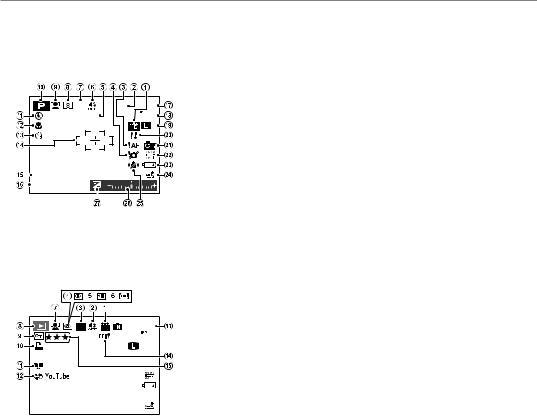
Camera Displays
The following indicators may appear during shooting and playback. The indicators displayed vary with camera settings.
■ Shooting
J |
a |
19 |
DATE |
|
100 |
|
|
N |
|
|
12/31/2050 |
10:00 AM |
||
|
|
||||
|
1000 |
F7. 1 |
|
|
|
|
|
|
|||
|
|
|
|
|
|
*a: indicates that no memory card is inserted and that pictures will be stored in the camera’s internal memory (P12).
A Movie mode................................................ |
62 |
O Date and time............................................. |
15 |
B Internal memory indicator * |
P Shutter speed and aperture ............. |
29 |
|
C Focus warning ........................................... |
19 |
Q Number of available frames........... |
121 |
D Blur warning............................ |
38, 112, 117 |
R Sensitivity...................................................... |
78 |
E Date stamp................................................ |
105 |
S Image size/quality ........................... |
78, 79 |
F Silent mode ................................................. |
97 |
T Temperature warning ............................. |
ix |
G Burst mode .................................................. |
46 |
U FinePix color................................................ |
80 |
H Metering ........................................................ |
81 |
V White balance ............................................ |
80 |
I Intelligent Face Detection |
W Battery level................................................. |
17 |
|
indicator......................................................... |
33 |
X Location data download status |
|
J Shooting mode......................................... |
22 |
(S9400W Series Only)............................. |
99 |
K Flash mode................................................... |
38 |
Y IS mode .......................................................... |
18 |
L Macro (close-ups) mode ..................... |
37 |
Z Exposure indicator .................................. |
49 |
M Self-timer indicator ................................. |
40 |
a Exposure compensation |
|
N Focus frame................................................. |
35 |
indicator......................................................... |
49 |
■ Playback
100-0001 |
100 |
4:3 N |
12/31/2050 |
10:00 AM |
|
1/250 |
F3.1 |
|
A Gift image..................................................... |
51 |
B Silent mode ................................................. |
97 |
C Advanced Filter ......................................... |
23 |
D Red-eye removal indicator ................ |
90 |
E Pro low-light mode................................. |
24 |
F Motion panorama 360.................. |
27, 54 |
G Intelligent Face Detection |
|
indicator......................................................... |
33 |
H Playback mode indicator ............. |
21, 51 |
I Protected image....................................... |
91 |
J DPOF print indicator.............................. |
68 |
K Photobook assist indicator ................ |
55 |
L Mark for upload to................................... |
87 |
M Frame number........................................ |
102 |
N Location data |
|
(S9400W Series Only)............................. |
99 |
O Rating............................................................... |
52 |
4

Introduction
 Hiding and Viewing Indicators
Press DISP/BACK to cycle through shooting and playback indicators as follows:
•Shooting: Indicators displayed/indicators hidden/best framing/HD framing/histogram
•Playback: Indicators displayed/indicators hidden/I favorites (P52)/photo info
 Histograms
100-0001

4:3 N

 ISO 400
 1/250 F3.5
: STD |
: OFF |
: |
: -1 2 3 |
12/31/2050 10:00 AM
qImage quality |
and size, |
wSensitivity, eShut- |
ter speed/aperture, |
rFinePix |
color, tFlash mode, |
yWhite balance, uExposure compensation, iFrame number, oPicture (overexposed areas blink on and off), !0Histogram
Overexposed areas blink on and off.
Histograms show the distribution of tones in the image. Brightness is shown by the horizontal axis, the number of pixels by the vertical axis.
of .No pixels
 Pixel brightness
  Shadows Highlights
Optimal exposure: Pixels are distributed in an even curve throughout the tone range.
Overexposed: Pixels are clustered at the right side of the graph.
Underexposed: Pixels are clustered at the left side of the graph.
Begin You Before
5
Introduction
 The Electronic Viewfinder (EVF)
The electronic viewfinder provides the same information as the monitor, and can be used when bright lighting conditions make the display in the monitor difficult to see. To switch between the monitor and electronic viewfinder, press the EVF/LCD button (your selection remains in effect when the camera is turned off or the mode dial is rotated to another setting).
EVF
LCD
 Bright Ambient Lighting
Reflections and glare caused by bright ambient lighting may make it hard to see the display in the monitor, particularly when the camera is used outdoors. This can be addressed by holding the EVF/LCD button to trigger outdoor mode. Outdoor mode can also be enabled using the TMONITOR SUNLIGHT MODE option in the setup menu (P97).
 Diopter adjustment control
The camera is equipped with diopter adjustment to accommodate individual differences in vision. Slide the diopter adjustment control up and down until the viewfinder display is in sharp focus.
3
Strong sunlight focused through the viewfinder may damage the panel of electronic viewfinder (EVF). Do not aim the electronic viewfinder at the sun.
6
Introduction
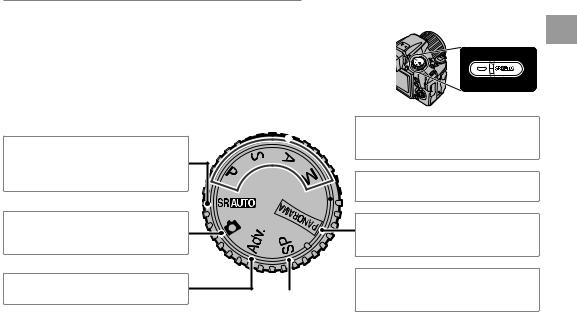
The Mode Dial
To select a shooting mode, align the mode icon with the mark next to the mode dial.
M (SCENE RECOGNITION): A “point- and-shoot” mode in which the camera automatically adjusts settings to suit the scene (P16).
B (AUTO): A simple “point-and-shoot” mode recommended for first-time users of digital cameras (P22).
Adv. (ADVANCED): Sophisticated techniques made easy (P22).
P, S, A, M: Select for full control over cam- 


 era settings, including aperture (M and A)
and/or shutter speed (M and S) (P29).
 C (CUSTOM): Recall stored settings for
 modes P, S, A, and M (P32).
N(MOTION PANORAMA): Take a series of |
photographs and combine them to form |
a panorama (P27). |
SP (SCENE POSITION): Choose a scene suited  to the subject or shooting conditions and
let the camera do the rest (P26).
Begin You Before
7

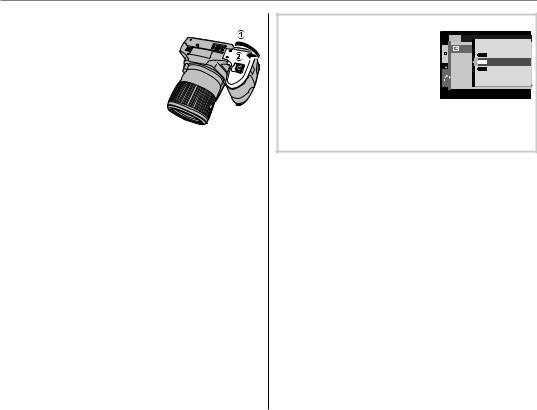
The Strap and Lens Cap
Attaching the Strap
Attach the strap to the two strap eyelets as shown below.
Steps First
3
To avoid dropping the camera, be sure the strap is correctly secured.
The Lens Cap
Attach the lens cap as shown.
To avoid losing the lens cap, pass the supplied string through the eyelet (q) and secure the lens cap to the strap (w).
8
Inserting the Batteries
The camera takes four AA alkaline, lithium, or rechargeable Ni-MH batteries. A set of four alkaline batteries is supplied with the camera. Insert the batteries in the camera as described below.
1 Open the battery-chamber cover.
Slide the battery-cham- ber latch in the direction shown and open the battery-chamber cover.
1
Be sure the camera is off before opening the bat- tery-chamber cover.
3
•Do not open the battery-chamber cover when the camera is on. Failure to observe this precaution could result in damage to image files or memory cards.
•Do not use excessive force when handling the battery-chamber cover.
2Insert the batteries.
Insert the batteries in the
orientation shown by the “+“ and “–“ marks inside the battery chamber.
3
• Insert the batteries in the correct orientation.
• Never use batteries with peel-
ing or damaged casing or mix old and new batteries, batteries with different charge levels,
or batteries of different types. Failure to observe these precautions could result in the batteries leaking or overheating.
•Never use manganese or Ni-Cd batteries.
•The capacity of alkaline batteries varies with the manufacturer and drops at temperatures below 10 °C/50 °F; Ni-MH batteries are recommended.
•Fingerprints and other soil on the battery terminals can shorten battery life.
Steps First
9
Inserting the Batteries
3 Close the battery-chamber cover.
Close the battery-cham- ber cover and slide it in until the latch clicks into place.
3
Do not use force. If the bat- tery-chamber cover does
not close, check that the batteries are in the correct orientation and try again.
2 Using an AC Power Adapter
The camera can be powered by an optional AC power adapter and DC coupler (sold separately).
 Choosing the Battery Type
After replacing the batteries with batteries of a different type,
select the battery type using the TBATTERY TYPE option in the setup menu (P99) to
ensure that the battery level is
displayed correctly and the camera does not turn off unexpectedly.
10

Inserting a Memory Card
The camera can store pictures on SD, SDHC, and SDXC memory cards (sold separately).
■ Compatible Memory Cards
FUJIFILM and SanDisk SD, SDHC, and SDXC memory cards have been approved for use in the camera. A complete list of approved memory cards is available at http://www.fujifilm.com/products/digital_ cameras/index.html. Operation is not guaranteed with other cards. The camera can not be used with xD-Picture Cards or MultiMediaCard (MMC) devices.
3
Memory cards can be locked, making it impossible to format the card or to record or delete images. Before inserting a memory card, slide the write-protect switch to the unlocked position.
Write-protect switch
Steps First
11

Inserting a Memory Card
■ Inserting a Memory Card
1 Open the battery-chamber cover.
1
Be sure the camera is off before opening the bat- tery-chamber cover.
2Insert the memory card.
Holding the memory card in the orientation shown below, slide it in until it clicks into place at the back of the slot.
Click
Be sure card is in correct orientation; do not insert at an angle or use force.
3 Close the battery-chamber cover.
Close the battery-cham- ber cover and slide it in until the latch clicks into place.
 Removing Memory Cards
After confirming that the camera is off, press the card in and then release it slowly. The card can now be removed by hand.
3
•The memory card may spring out if you remove your finger immediately after pushing the card in.
•Memory cards may be warm to the touch after being removed from the camera. This is normal and does not indicate a malfunction.
12
Inserting a Memory Card |
|
||
|
|
|
|
3 |
|
|
|
• Do not turn the camera off or remove the memory card while the memory card is being formatted or data are being recorded to or |
|
||
deleted from the card. Failure to observe this precaution could damage the card. |
|
||
|
|||
• Format SD/SDHC/SDXC memory cards before first use, and be sure to reformat all memory cards after using |
|
||
them in a computer or other device. For more information on formatting memory cards, see page 101. |
|
||
First |
|||
• Memory cards are small and can be swallowed; keep out of reach of children. If a child swallows a memory card, |
|||
|
|||
seek medical assistance immediately. |
Steps |
||
• miniSD or microSD adapters that are larger or smaller than the standard dimensions of an SD/SDHC/SDXC card |
|||
may not eject normally; if the card does not eject, take the camera to an authorized service representative. Do |
|||
not forcibly remove the card. |
|
||
• Do not affix labels to memory cards. Peeling labels can cause camera malfunction. |
|
||
• Movie recording may be interrupted with some types of SD/SDHC/SDXC memory card. Use a Hcard or |
|
||
better when shooting HD movies, Full HD movies or high-speed movies. |
|
||
• Formatting a memory card in the camera creates a folder in which pictures are stored. Do not rename or delete |
|
||
this folder or use a computer or other device to edit, delete, or rename image files. Always use the camera to |
|
||
delete pictures from memory cards; before editing or renaming files, copy them to a computer and edit or re- |
|
||
name the copies, not the originals. |
|
||
13

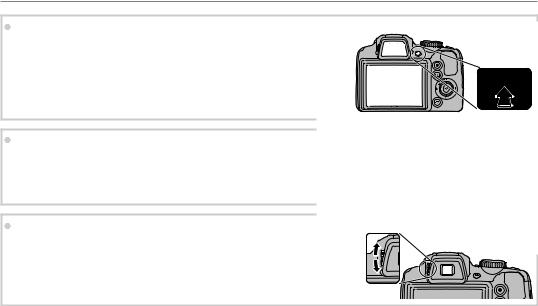
Turning the Camera On and Off
Shooting Mode |
Playback Mode |
Slide the Gswitch in the direction shown |
To turn the camera on and begin playback, press |
below. The lens will extend automatically. |
the abutton for about a second. |
|
Press the a button again or slide the G |
|
Slide the Gswitch to turn the camera off. |
switch to turn the camera off. |
|
2 Switching to Shooting Mode |
||
2 Switching to Playback Mode |
||
To exit to shooting mode, press the shutter button |
||
Press the abutton to start playback. Press the shutter |
||
halfway. Press the abutton to return to playback. |
||
button halfway to return to shooting mode. |
||
|
3
•Be sure that the lens cap is removed before turning the camera on.
•Forcibly preventing the lens from extending could cause damage or product malfunction.
•Pictures can be affected by fingerprints and other marks on the lens. Keep the lens clean.
•The Gbutton does not completely disconnect the camera from its power supply.
2 Auto Power Off
The camera will turn off automatically if no operations are performed for the length of time selected in the MAUTO POWER OFF menu (see page 103). To turn the camera on, use the Gswitch or press the a
button for about a second.
14

Basic Setup
A language-selection dialog is displayed the first time the camera is turned on. Set up the camera as described below (for information on resetting the clock or changing languages, see page 97).
1 Choose a language. |
1.1 Press the selector up or down to highlight a language. |
||||||
|
|
START MENU |
|
|
|
||
|
|
|
|
|
|
||
|
|
|
|
|
|
|
|
|
|
ENGLISH |
|
|
|
|
|
|
|
FRANCAIS |
|
|
|
|
|
|
|
DEUTSCH |
|
|
|
|
|
|
|
ESPAÑOL |
|
|
|
|
|
|
|
PORTUGUÊS |
|
|
|
1.2 Press MENU/OK. |
|
|
|
SET |
NO |
|
|
|
|
2 Set the date and time. |
|||||||
|
|
|
|
|
|
2.1 Press the selector left or right to highlight the year, month, day, |
|
|
|
DATE / TIME NOT SET |
|
|
|
||
|
|
|
2016 |
|
|
|
hour, or minute and press up or down to change. To change |
|
|
|
2015 |
|
|
|
the order in which the year, month, and day are displayed, high- |
|
|
YY. MM. DD |
2014 1. 1 |
12:00 |
|
|
|
|
|
|
2013 |
AM |
light the date format and press the selector up or down. |
||
|
|
|
2012 |
|
|
|
|
|
|
|
|
|
|
|
|
|
|
SET |
NO |
|
|
|
|
2.2Press MENU/OK. A battery type message will be displayed; if the type differs from the type inserted in the camera, use the setup menu TBATTERY TYPE option (P99) to specify the correct type.
2 The Camera Clock
If the batteries are removed for an extended period, the camera clock and battery type will be reset and the language-selection dialog will be displayed when the camera is turned on. If the batteries are left in the camera for about 10 hours, the battery can be removed for about 24 hours without resetting the clock, language, or battery type.
Steps First
15

Playback and Photography Basic
Taking Pictures in M(Scene Recognition) Mode
This section describes how to take pictures in Mmode.
1Turn the camera on.
Slide the Gswitch to turn the camera on.
2Select Mmode.
Rotate the mode dial to M.
 M
M
In this mode, the camera au-
tomatically analyzes the composition and selects a scene according to shooting condi-
tions and the type of subject:
• b(PORTRAIT): Human portrait Selected scene subject.
•c(LANDSCAPE): Man-made or natural landscape.
•d(NIGHT): Poorly-lit landscape.
•e(MACRO): Subject close to camera.
•f(NIGHT PORTRAIT): Poorly-lit portrait subject.
•g(BACKLIT PORTRAIT): Back-lit portrait subject.
a(AUTO) is selected if none of the above are detected.
16

Taking Pictures in M(Scene Recognition) Mode
3 Check the battery level. |
4 Frame the picture. |
|
||
Check the battery level in the display. |
Use the zoom control or side lever to frame |
|||
|
|
|
the picture in the display. |
|
|
q |
w |
Select W to zoom out |
Select T to zoom in |
|
|
|
||
|
|
|
Zoom indicator |
|
Indicator |
|
Description |
|
|
NO ICON |
Batteries are partially discharged. |
|
|
|
qB |
Batteries are low. Replace as soon |
|
|
|
(red) |
as possible. |
|
|
|
wA |
Batteries are exhausted. Turn cam- |
|
|
|
(blinks red) era off and replace batteries. |
|
|
||
1 |
|
|
|
|
A battery warning may not be displayed before |
|
|
||
the camera turns off, particularly if batteries are |
|
|
||
reused after having once been exhausted. Power |
|
|
||
consumption varies greatly from mode to mode; |
|
|
||
the low battery warning (B) may not be dis- |
|
|
||
played or may be displayed only briefly before |
|
|
||
the camera turns off in some modes or when |
|
|
||
switching from shooting to playback mode. |
|
|
||
Playback and Photography Basic
17

Taking Pictures in M(Scene Recognition) Mode
1
•When the side lever is set to H, M or L, the side lever functions as same as the zoom lever.
•When setting the side lever to H, the side lever can zoom faster than zoom lever. In the same way when setting the side lever to L, the side lever can zoom slower than zoom lever.
•When using the zoom control and side lever simultaneously, the zoom control is activated.
2 Focus Lock
Use focus lock (P35) to focus on subjects that are not in the focus frame.
 Auto back zoom
In the setup menu (P98), you can change the setting of the side lever. Select WSIDE ZOOM LEVER then AUTO BACK to enable auto back zoom. Auto back zoom allows the camera to zoom out and in quickly. It makes it easy to find the lost subject when zooming in.
 Holding the Camera
Hold the camera steady with both hands and brace your elbows against your sides. Shaking or unsteady hands can blur your shots.
To prevent pictures that are out of focus or too dark (underexposed), keep your fingers and other objects away from the lens and flash.
 Avoiding Blurred Pictures
If the subject is poorly lit, blurring caused by camera shake can be reduced using the LIS MODE option in the setup menu (P98). In Bmode, blur caused by subject movement is also reduced.
Note that blurring may still occur depending on the scene.
18
 Loading...