


DIGITAL CAMERA
FINEPIX L50 Series
FINEPIX L30 Series
Owner’s Manual
Thank you for your purchase of this product. This manual describes how to use your FUJIFILM digital camera and the supplied software. Be sure that you have read and understood its contents and the warnings in “For Your Safety” (Pii) before using the camera.
BL01438-200 EN
Before You Begin
First Steps 
Basic Photography and Playback 
More on Photography 
More on Playback 
Movies 
Connections 
Menus 
Technical Notes 
Troubleshooting 
Appendix 

 For Your Safety
IMPORTANT SAFETY INSTRUCTIONS
•Read Instructions: All the safety and operating instructions should be read before the appliance is operated.
•Retain Instructions: The safety and operating instructions should be retained for future reference.
•Heed Warnings: All warnings on the appliance and in the operating instructions should be adhered to.
•Follow Instructions: All operating and use instructions should be followed.
Installation
Power Sources: This video product should be operated only from the type of power source indicated on the marking label. If you are not sure of the type of power supply to your home, consult your appliance dealer or local power company. For video products intended to operate from battery power, or other sources, refer to the operating instructions.
Grounding or Polarization: This video product is equipped with a polarized alternatingcurrent line plug (a plug having one blade wider than the other). This plug will fit into the power outlet only one way. This is a safety feature. If you are unable to insert the plug fully into the outlet, try reversing the plug. If the plug should still fail to fit, contact your electrician to replace your obsolete outlet. Do not defeat the safety purpose of the polarized plug.
Alternate Warnings: This video product is equipped with a three-wire grounding-type plug, a plug having a third (grounding) pin. This plug will only fit into a grounding-type power outlet. This is a safety feature. If you are unable to insert the plug into the outlet, contact your electrician to replace your obsolete outlet. Do not defeat the safety purpose of the grounding type plug.
Overloading: Do not overload wall outlets and extension cords as this can result in a risk of fire or electric shock.
Ventilation: Slots and openings in the cabinet are provided for ventilation, to ensure reliable operation of the video product and to protect it from overheating, and these openings must not be blocked or covered. The openings should never be blocked by placing the video product on a bed, sofa, rug, or other similar surface.
This video product should not be placed in a built-in installation such as a bookcase or rack unless proper ventilation is provided or the manufacturer’s instructions have been adhered to. This video product should never be placed near or over a radiator or heat register.
Attachments: Do not use attachments not recommended by the video product manufacturer as they may cause hazards.
Water and Moisture: Do not use this video product near water—for example, near a bath tub, wash bowl, kitchen sink, or laundry tub, in a wet basement, or near a swimming pool, and the like.
Power-Cord Protection: Power-supply cords should be routed so that they are not likely to be walked on or pinched by items placed upon or against them, paying particular attention to cords at plugs, convenience receptacles, and the point where they exit from the appliance.
Accessories: Do not place this video product on an unstable cart, stand, tripod, bracket, or table. The video product may fall, causing serious injury to a child or adult, and serious damage to the appliance. Use only with a cart, stand, tripod, bracket, or table recommended by the manufacturer, or sold with the video product. Any mounting of the appliance should follow the manufacturer’s instructions, and should use a mounting accessory recommended by the manufacturer.
An appliance and cart combination should be moved with care. Quick stops, excessive force, and uneven surfaces may cause the appliance and cart combination to overturn.
ii

For Your Safety
Antennas
Outdoor Antenna Grounding: If an outside antenna or cable system is connected to the video product, be sure the antenna or cable system is grounded so as to provide some protection against voltage surges and builtup static charges. Section 810 of the National Electrical Code, ANSI/NFPA No. 70, provides information with respect to proper grounding of the mast and supporting structure, grounding of the lead-in wire to an antenna discharge unit, size of grounding conductors, location of antenna discharge unit, connection to grounding electrodes, and requirements for the grounding electrode.
EXAMPLE OF ANTENNA GROUNDING AS PER
NATIONAL ELECTRICAL CODE
Ground Clamp |
Antenna Lead |
|
in Wire |
Electric Service
Equipment
Ground Clamps 
Power Service Grounding
Electrode System (NEC ART
250. PART H)
Antenna Discharge Unit  (NEC SECTION 810-20)
Grounding
Conductors
(NEC SECTION
810-21)
Power Lines: An outside antenna system should not be located in the vicinity of overhead power lines or other electric light or power circuits, or where it can fall into such power lines or circuits. When installing an outside antenna system, extreme care should be taken to keep from touching such power lines or circuits as contact with them might be fatal.
Use
Cleaning: Unplug this video product from the wall outlet before cleaning. Do not use liquid cleaners or aerosol cleaners. Use a damp cloth for cleaning.
Object and Liquid Entry: Never push objects of any kind into this video product through openings as they may touch dangerous voltage points or short out parts that could result in a fire or electric shock. Never spill liquid of any kind on the video product.
Lightning: For added protection for this video product receiver during a lightning storm, or when it is left unattended and unused for long periods of time, unplug it from the wall outlet and disconnect the antenna or cable system. This will prevent damage to the video product due to lightning and powerline surges.
Service
Servicing: Do not attempt to service this video product yourself as opening or removing covers may expose you to dangerous voltage or other hazards. Refer all servicing to qualified service personnel.
Damage Requiring Service: Unplug this video product from the wall outlet and refer servicing to qualified service personnel under the following conditions:
•When the power-supply cord or plug is damaged.
•If liquid has been spilled, or objects have fallen into the video product.
•If the video product has been exposed to rain or water.
•If the video product has been dropped or the cabinet has been damaged.
If the video product does not operate nor-
mally follow the operating instructions. Adjust only those controls that are covered by the operating instructions as an improper adjustment of other controls may result in damage and will often require extensive work by a qualified technician to restore the video product to its normal operation.
When the video product exhibits a distinct change in performance—this indicates a need for service.
Replacement Parts: When replacement parts are required, be sure the service technician has used replacement parts specified by the manufacturer or have the same characteristics as the original part. Unauthorized substitutions may result in fire, electric shock or other hazards.
Safety Check: Upon completion of any service or repairs to this video product, ask the service technician to perform safety checks to determine that the video product is in proper operating condition.
iii
For Your Safety
Be sure to read these notes before use
Safety Notes
•Make sure that you use your camera correctly. Read these safety notes and your Owner’s Manual carefully before use.
•After reading these safety notes, store them in a safe place.
About the Icons
The icons shown below are used in this document to indicate the severity of the injury or damage that can result if the information indicated by the icon is ignored and the product is used incorrectly as a result.
This icon indicates that death or serious injury can result if the WARNING information is ignored.
This icon indicates that personal injury or material damage can CAUTION result if the information is ignored.
The icons shown below are used to indicate the nature of the instructions which are to be observed.
|
Triangular icons tell you that this information requires atten- |
|
tion (“Important”). |
|
Circular icons with a diagonal bar tell you that the action indi- |
|
cated is prohibited (“Prohibited”). |
|
|
|
Filled circles with an exclamation mark indicate an action that |
|
must be performed (“Required”). |
|
|
|
|
|
WARNING |
|
If a problem arises, turn the camera off, remove the battery, and |
|
disconnect and unplug the AC power adapter. Continued use of |
|
the camera when it is emitting smoke, is emitting any unusual |
Unplug from |
odor, or is in any other abnormal state can cause a fire or elec- |
power socket |
tric shock. Contact your FUJIFILM dealer. |
|
Do not allow water or foreign objects to enter the camera. If water |
|
or foreign objects get inside the camera, turn the camera off, |
|
remove the battery, and disconnect and unplug the AC power |
Avoid exposure |
adapter. Continued use of the camera can cause a fire or elec- |
to water |
tric shock. Contact your FUJIFILM dealer. |
|
 WARNING
Do not use the camera in the bathroom or shower. This can cause
Do not use in a fire or electric shock. the bathroom or
shower
|
|
|
|
|
Never attempt to change or take apart the camera (never open |
|
|
|
|
|
the case). Failure to observe this precaution can cause fire or |
|
Do not |
||||
|
electric shock. |
||||
disassemble |
|
||||
|
|
|
|
|
Should the case break open as the result of a fall or other accident, |
|
|
|
|
|
do not touch the exposed parts. Failure to observe this precau- |
|
|
|
|
|
|
|
|
|
|
|
tion could result in electric shock or in injury from touching the |
|
|
|
damaged parts. Remove the battery immediately, taking care |
||
Do not touch |
|||||
internal parts |
to avoid injury or electric shock, and take the product to the |
||||
|
|
|
|
|
point of purchase for consultation. |
|
|
|
|
|
Do not change, heat or unduly twist or pull the connection cord and |
|
|
|
|
|
do not place heavy objects on the connection cord. These actions |
|
|
|
|
|
could damage the cord and cause a fire or electric shock. If the |
|
|
|
|
|
cord is damaged, contact your FUJIFILM dealer. |
|
|
|
|
|
Do not place the camera on an unstable surface. This can cause the |
|
|
|
|
|
camera to fall or tip over and cause injury. |
|
|
|
|
|
|
|
|
|
|
|
Never attempt to take pictures while in motion. Do not use the |
|
|
|
|
|
camera while you are walking or driving a vehicle. This can |
|
|
|
|
|
result in you falling down or being involved in a traffic accident. |
|
|
|
|
|
Do not touch any metal parts of the camera during a thunderstorm. |
|
|
|
|
|
This can cause an electric shock due to induced current from |
|
|
|
|
|
the lightning discharge. |
|
|
|
|
|
Do not use the battery except as specified. Load the battery as |
|
|
|
|
|
shown by the indicator. |
|
|
|
|
|
|
|
|
|
|
|
Do not heat, change or take apart the battery. Do not drop or subject |
|
|
|
|
|
the battery to impacts. Do not store the battery with metallic prod- |
|
|
|
|
|
ucts. Any of these actions can cause the battery to burst or leak |
|
|
|
|
|
and cause fire or injury as a result. |
|
|
|
|
|
Use only the battery or AC power adapters specified for use with this |
|
|
|
|
|
camera. Do not use voltages other than the power supply voltage |
|
|
|
|
|
shown. The use of other power sources can cause a fire. |
|
|
|
|
|
If the battery leaks and fluid gets in contact with your eyes, skin or |
|
|
|
|
|
clothing, flush the affected area with clean water and seek medical |
|
|
|
|
|
attention or call an emergency number right away. |
iv
For Your Safety
 WARNING
Do not use the charger to charge batteries other than those specified here. The supplied battery charger is for use only with the type of battery supplied with the camera. Using the charger to charge conventional batteries or other types of rechargeable batteries can cause the battery to leak fluid, overheat or burst.
When carrying the battery, install it in a digital camera or keep it in the hard case. When storing the battery, keep it in the hard case. When discarding, cover the battery terminals with insulation tape.
Contact with other metallic objects or batteries could cause the battery to ignite or burst.
Keep memory cards out of the reach of small children. Because memory cards are small, they can be swallowed by children. Be sure to store memory cards out of the reach of small children. If a child swallows a memory card, seek medical attention or call an emergency number.
 CAUTION
Do not use this camera in locations affected by oil fumes, steam, humidity or dust. This can cause a fire or electric shock.
Do not leave this camera in places subject to extremely high temperatures. Do not leave the camera in locations such as a sealed vehicle or in direct sunlight. This can cause a fire.
Keep out of the reach of small children. This product could cause injury in the hands of a child.
Do not place heavy objects on the camera. This can cause the heavy object to tip over or fall and cause injury.
Do not move the camera while the AC power adapter is still connected. Do not pull on the connection cord to disconnect the AC power adapter. This can damage the power cord or cables and cause a fire or electric shock.
Do not use the AC power adapter when the plug is damaged or the plug socket connection is loose. This could cause a fire or electric shock.
Do not cover or wrap the camera or the AC power adapter in a cloth or blanket. This can cause heat to build up and distort the casing or cause a fire.
When you are cleaning the camera or you do not plan to use the camera for an extended period, remove the battery and disconnect and unplug the AC power adapter. Failure to do so can cause a fire or electric shock.
When charging ends, unplug the charger from the power socket.
Leaving the charger plugged into the power socket can cause
Unplug from a fire. power socket
Using a flash too close to a person’s eyes may temporarily affect the eyesight. Take particular care when photographing infants and young children.
When a memory card is removed, the card could come out of the slot too quickly. Use your finger to hold it and gently release the card. Injury could result to those struck by the ejected card.
Request regular internal testing and cleaning for your camera.
Build-up of dust in your camera can cause a fire or electric shock. Contact your FUJIFILM dealer to request internal cleaning every two years. Please note that this service is not free of charge.
v

For Your Safety
The Battery and Power Supply
Note: Check the type of battery used in your camera and read the appropriate sections.
The following describes the proper use of batteries and how to prolong their life. Incorrect use can shorten battery life or cause leakage, overheating, fire, or explosion.
Li-ion Batteries
Read this section if your camera uses a rechargeable Li-ion battery.
The battery is not charged at shipment. Charge the battery before use. Keep the battery in its case when not in use.
■ Notes on the Battery
The battery gradually loses its charge when not in use. Charge the battery one or two days before use.
Battery life can be extended by turning the camera off when not in use.
Battery capacity decreases at low temperatures; a depleted battery may not function at when cold. Keep a fully charged spare battery in a warm place and exchange as necessary, or keep the battery in your pocket or other warm place and insert it in the camera only when shooting. Do not place the battery in direct contact with hand warmers or other heating devices.
■ Charging the Battery
Charge the battery in the supplied battery charger. Charging times will increase at ambient temperatures below +10 °C (+50 °F) or above +35 °C (+95 °F). Do not attempt to charge the battery at temperatures above 40 °C (+104 °F); at temperatures below 0 °C (+32 °F), the battery will not charge.
Do not attempt to recharge a fully charged battery. The battery does not however need to be fully discharged before charging.
The battery may be warm to the touch immediately after charging or use. This is normal.
■ Battery Life
At normal temperatures, the battery can be recharged about 300 times. A noticeable decrease in the length of time the battery will hold a charge indicates that it has reached the end of its service life and should be replaced.
■ Storage
Performance may be impaired if the battery is left unused for extended periods when fully charged. Run the battery flat before storing it.
If the camera will not be used for an extended period, remove the battery and store it in a dry place with an ambient temperature of from +15 °C to +25 °C (+59 °F to +77 °F). Do not store in locations exposed to extremes of temperature.
■ Cautions: Handling the Battery
•Do not transport or store with metal objects such as necklaces or hairpins.
•Do not expose to flame or heat.
•Do not disassemble or modify.
•Use with designated chargers only.
•Do not drop or subject to strong physical shocks.
•Do not expose to water.
•Keep the terminals clean.
•The battery and camera body may become warm to the touch after extended use. This is normal.
AAAlkaline/Rechargeable Ni-MH Batteries
Read this section if your camera uses AA alkaline or rechargeable AA Ni-MH batteries. Information on compatible battery types may be found elsewhere in the camera manual.
■ Cautions: Handling the Batteries
•Do not expose to water, flame, or heat, or store in warm or humid conditions.
•Do not transport or store with metal objects such as necklaces or hairpins.
•Do not disassemble or modify the batteries or battery casing.
•Do not subject to strong physical shocks.
•Do not use batteries that are leaking, deformed, or discolored.
•Keep out of reach of infants and small children.
•Insert in the correct orientation.
vi

For Your Safety
•Do not mix old and new batteries, batteries with different charge levels, or batteries of different types.
•If the camera will not be used for an extended period, remove the batteries. Note that the camera clock will be reset.
•The batteries may be warm to the touch immediately after use. Turn the camera off and allow the batteries to cool before handling.
•Battery capacity tends to decrease at low temperatures. Keep spare batteries in a pocket or other warm place and exchange as necessary. Cold batteries may recover some of their charge when warmed.
•Fingerprints and other stains on the battery terminals can impair battery performance. Thoroughly clean the terminals with a soft, dry cloth before inserting them in the camera.
If the batteries leak, clean the battery compartment thoroughly before inserting new batteries.
If fluid from the battery comes into contact with skin or clothing, flush the affected area with water. If fluid enters your eyes, immediately flush the affected area with water and seek medical attention. Do not rub your eyes. Failure to observe this precaution could result in permanent visual impairment.
■ Ni-MH Batteries
The capacity of Ni-MH batteries may be temporarily reduced when new, after long periods of disuse, or if they are repeatedly recharged before being fully discharged. This is normal and does not indicate a malfunction. Capacity can be increased by repeatedly discharging the batteries using the discharge option in the camera setup menu and recharging them using a battery charger (sold separately).
QCAUTION: Do not use the discharge option with alkaline batteries.
The camera draws a small amount of current even when off. Ni-MH batteries that have been left in the camera for an extended period may be drawn down to the point that they no longer hold a charge. Battery performance may also drop if the batteries are run down in a device such as a flashlight. Use the discharge option in the camera setup menu to discharge Ni-MH batteries. Batteries that no longer hold a charge even after repeatedly being discharged and recharged have reached the end of their service life and must be replaced.
Ni-MH batteries can be recharged in a battery charger (sold separately). Batteries may become warm to the touch after charging. Refer to the instructions provided with the charger for more information. Use the charger with compatible batteries only.
Ni-MH batteries gradually lose their charge when not in use.
■ Disposal
Dispose of used batteries in accord with local regulations.
AC Power Adapters (Available Separately)
This section applies to all camera models. Use only FUJIFILM AC power adapters designated for use with this camera. Other adapters could damage the camera.
•The AC power adapter is for indoor use only.
•Be sure the DC plug is securely connected to the camera.
•Turn the camera off before disconnecting the adapter. Disconnect the adapter by the plug, not the cable.
•Do not use with other devices.
•Do not disassemble.
•Do not expose to high heat and humidity.
•Do not subject to strong physical shocks.
•The adapter may hum or become hot to the touch during use. This is normal.
•If the adapter causes radio interference, reorient or relocate the receiving antenna.
vii

For Your Safety
Using the Camera
Do not aim the camera at extremely bright light sources, such as the sun in a cloudless sky. Failure to observe this precaution could damage the camera image sensor.
Take Test Shots
Before taking photographs on important occasions (such as at weddings or before taking the camera on a trip), take a test shot and view the result in the LCD monitor to ensure that the camera is functioning normally. FUJIFILM Corporation can not accept liability for damages or lost profits incurred as a result of product malfunction.
Notes on Copyright
Unless intended solely for personal use, images recorded using your digital camera system cannot be used in ways that infringe copyright laws without the consent of the owner. Note that some restrictions apply to the photographing of stage performances, entertainments, and exhibits, even when intended purely for personal use. Users are also asked to note that the transfer of memory cards containing images or data protected under copyright laws is only permissible within the restrictions imposed by those copyright laws.
Handling
To ensure that images are recorded correctly, do not subject the camera to impact or physical shocks while images are being recorded.
Liquid Crystal
In the event that the LCD monitor is damaged, care should be taken to avoid contact with liquid crystal. Take the urgent action indicated should any of the following situations arise:
•If liquid crystal comes in contact with your skin, clean the area with a cloth and then wash thoroughly with soap and running water.
•If liquid crystal enters your eyes, flush the affected eye with clean water for at least 15 minutes and then seek medical assistance.
•If liquid crystal is swallowed, rinse your mouth thoroughly with water. Drink large quantities of water and induce vomiting, then seek medical assistance.
Although the display is manufactured using extremely high-precision technology, it may contain pixels that are always lit or that do not light. This is not a malfunction, and images recorded with the product are unaffected.
Trademark Information
xD-Picture Card and Eare trademarks of FUJIFILM Corporation. The typefaces included herein are solely developed by DynaComware Taiwan Inc. Macintosh, QuickTime, and Mac OS are trademarks of Apple Inc. in the U.S.A. and other countries. Windows 7, Windows Vista, and the Windows logo are trademarks of the Microsoft group of companies. Adobe and Adobe Reader are either trademarks or registered trademarks of Adobe Systems Incorporated in the U.S.A. and/or other countries. The SDHC and SDXC logos are trademarks of SD-3C, LLC. The HDMI logo is a trademark. YouTube is a trademark of Google Inc. All other trade names mentioned in this manual are the trademarks or registered trademarks of their respective owners.
Electrical Interference
This camera may interfere with hospital or aviation equipment. Consult with hospital or airline staff before using the camera in a hospital or on an aircraft.
Color Television Systems
NTSC (National Television System Committee) is a color television telecasting specification adopted mainly in the U.S.A., Canada, and Japan. PAL (Phases Alternation by Line) is a color television system adopted mainly in European countries and China.
Exif Print (Exif Version 2.3)
Exif Print is a newly revised digital camera file format in which information stored with photographs is used for optimal color reproduction during printing.
IMPORTANT NOTICE:
Read Before Using the Software
Direct or indirect export, in whole or in part, of licensed software without the permission of the applicable governing bodies is prohibited.
viii

 About This Manual
Before using the camera, read this manual and the warnings in “For Your Safety” (Pii). For information on specific topics, consult the sources below.
Table of Contents .............................Pxi
The “Table of Contents” gives an overview of the entire manual. The principal camera operations are listed here.
Warning Messages and Displays ..... |
P84 |
Find out what’s behind that flashing icon or error message in the display.
Troubleshooting ............................ |
P79 |
Having a specific problem with the camera? Find the answer here.
 Memory Cards
Pictures can be stored on optional SD and SDHC memory cards (P11). In this manual, SD/SDHC memory cards are referred to as “memory cards.”
ix
 Frequently-Used Buttons
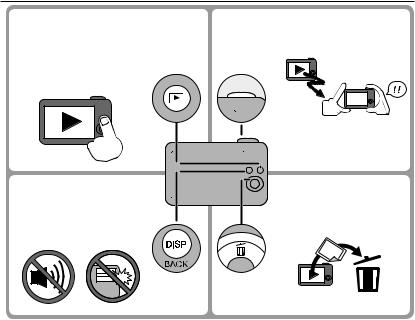
■Turning the Camera on in Playback Mode yWhen the camera is
off, playback can be started by pressing the abutton for about a second.
■Taking Pictures During Playback
yTo return instantly to shooting mode, press the shutter button halfway.
Shoot
View
■Silent Mode
yPress and hold the DISP/ BACK button to disable camera lights and sounds.
■Deleting Pictures
yPress the selector up (b) to display deletion options.
x
 Table of Contents
For Your Safety .................................................................. |
ii |
IMPORTANT SAFETY INSTRUCTIONS .................................. |
ii |
Safety Notes .................................................................. |
iv |
About This Manual ........................................................... |
ix |
Frequently-Used Buttons ................................................. |
x |
Before You Begin |
|
Symbols and Conventions................................................. |
1 |
Supplied Accessories ......................................................... |
1 |
Parts of the Camera .......................................................... |
2 |
Camera Displays............................................................... |
4 |
Shooting ........................................................................ |
4 |
Playback......................................................................... |
5 |
First Steps |
|
Charging the Battery ........................................................ |
6 |
Inserting the Battery and a Memory Card....................... |
8 |
Compatible Memory Cards ............................................. |
11 |
Turning the Camera on and Off...................................... |
13 |
Shooting Mode .............................................................. |
13 |
Playback Mode............................................................... |
13 |
Basic Setup ...................................................................... |
15 |
Basic Photography and Playback |
|
Taking Pictures in Q(Scene Recognition) Mode...... |
16 |
Viewing Pictures ............................................................. |
19 |
More on Photography |
|
Shooting Mode................................................................ |
20 |
Choosing a Shooting Mode ............................................ |
20 |
Shooting Mode Options ................................................. |
21 |
rPANORAMA........................................................... |
23 |
Focus Lock........................................................................ |
26 |
dExposure Compensation .......................................... |
28 |
FMacro Mode (Close-ups) ........................................... |
29 |
NUsing the Flash (Intelligent Flash) ............................ |
30 |
hUsing the Self-Timer ................................................. |
32 |
bIntelligent Face Detection....................................... |
33 |
More on Playback |
|
Playback Options............................................................. |
34 |
Playback Zoom............................................................... |
35 |
Multi-Frame Playback.................................................... |
36 |
ADeleting Pictures...................................................... |
37 |
bImage Search............................................................ |
38 |
kPhotoBook Assist ..................................................... |
39 |
Creating a PhotoBook..................................................... |
39 |
Viewing Photobooks ...................................................... |
40 |
Editing and Deleting Photobooks................................... |
40 |
Viewing Panoramas ........................................................ |
41 |
xi

Table of Contents
Movies |
|
Recording Movies............................................................ |
42 |
Viewing Movies ............................................................... |
44 |
Connections |
|
Viewing Pictures on TV ................................................... |
45 |
Printing Pictures via USB................................................ |
46 |
Printing the DPOF Print Order......................................... |
48 |
Viewing Pictures on a Computer.................................... |
50 |
Windows: Installing MyFinePix Studio ........................... |
50 |
Macintosh: Installing FinePixViewer............................... |
52 |
Connecting the Camera.................................................. |
54 |
Menus |
|
Using the Menus: Shooting Mode |
..................................57 |
Using the Shooting Menu............................................... |
57 |
Shooting Menu Options ................................................. |
57 |
ASHOOTING MODE.................................................... |
57 |
NISO........................................................................ |
57 |
OIMAGE SIZE............................................................ |
58 |
TIMAGE QUALITY ..................................................... |
59 |
DWHITE BALANCE .................................................... |
60 |
bFACE DETECTION .................................................... |
61 |
PMODE.................................................................... |
61 |
OQUALITY................................................................ |
61 |
xii

Table of Contents
Using the Menus: Playback Mode |
..................................62 |
Using the Playback Menu............................................... |
62 |
Playback Menu Options.................................................. |
62 |
kPHOTOBOOK ASSIST................................................ |
62 |
bIMAGE SEARCH ...................................................... |
62 |
AERASE ................................................................... |
62 |
jMARK FOR UPLOAD TO............................................ |
63 |
ISLIDE SHOW .......................................................... |
64 |
DPROTECT................................................................ |
65 |
GCROP..................................................................... |
65 |
ORESIZE................................................................... |
66 |
CIMAGE ROTATE ....................................................... |
66 |
KPRINT ORDER (DPOF).............................................. |
66 |
The Setup Menu .............................................................. |
67 |
Using the Setup Menu.................................................... |
67 |
Setup Menu Options ...................................................... |
68 |
FDATE/TIME ............................................................ |
68 |
NTIME DIFFERENCE ................................................... |
68 |
La...................................................... |
68 |
oSILENT MODE......................................................... |
68 |
RRESET.................................................................... |
69 |
KFORMAT ................................................................ |
69 |
AIMAGE DISP. ........................................................... |
69 |
BFRAME NO. ............................................................ |
70 |
sOPERATION SOUND ................................................ |
70 |
eSHUTTER SOUND.................................................... |
71 |
JLCD BRIGHTNESS .................................................... |
71 |
ELCD MODE ............................................................. |
71 |
MAUTO POWER OFF................................................... |
71 |
LDIGITAL IS.............................................................. |
71 |
mBLINK DETECTION................................................... |
72 |
DDIGITAL ZOOM ....................................................... |
73 |
pMOVIE ZOOM TYPE ................................................. |
73 |
OBACKGROUND COLOR.............................................. |
74 |
cGUIDANCE DISPLAY ................................................ |
74 |
QVIDEO SYSTEM ....................................................... |
74 |
xiii

Table of Contents
Technical Notes |
|
Optional Accessories ....................................................... |
75 |
Printing........................................................................ |
75 |
Computer Related.......................................................... |
75 |
Audio/Visual................................................................. |
75 |
Accessories from FUJIFILM.............................................. |
76 |
Caring for the Camera..................................................... |
77 |
Storage and Use ............................................................. |
77 |
Water and Sand............................................................. |
77 |
Condensation................................................................ |
77 |
Cleaning......................................................................... |
78 |
Traveling ........................................................................ |
78 |
Troubleshooting |
|
Problems and Solutions.................................................. |
79 |
Warning Messages and Displays .................................... |
84 |
Appendix |
|
Tips and Tricks.................................................................. |
88 |
Memory Card Capacity.................................................... |
91 |
FinePix L50 Series.......................................................... |
91 |
FinePix L30 Series.......................................................... |
92 |
Specifications .................................................................. |
93 |
xiv

Before You Begin
 Symbols and Conventions
The following symbols are used in this manual:
Q: This information should be read before use to ensure correct operation. R: Additional information that may be helpful when using the camera. P: Other pages in this manual on which related information may be found.
Menus and other text in the LCD monitor are shown in bold. In the illustrations in this manual, displays may be simplified for explanatory purposes.
 Supplied Accessories
The following items are included with the camera:
|
|
|
|
|
|
NP-45A/B rechargeable |
AC power adapter * |
USB cable |
CD-ROM (contains |
||
battery |
|
|
this manual) |
||
|
|
|
|
|
|
 Attaching the Strap
Attach the strap as shown.
• Strap
• User Guide
* Shape of adapter varies with region of sale.
1

 Parts of the Camera
For more information, refer to the page listed to the right of each item.
Selector button
Move cursor up |
|
d(exposure compensation) button (P28) |
|
b(delete) button (Px) |
MENU/OK button |
Move cursor left |
Move cursor right |
F(macro) button (P29) |
N(flash) button (P30) |
Move cursor down
h(self-timer) button (P32)
2 |
|
|
|
Before You Begin |
|
|
|

Parts of the Camera
1 |
..............................................................Shutter button |
18 |
9 |
2 |
..................................................................Microphone |
42 |
10 |
3 |
.............................................................................Flash |
30 |
11 |
4 |
Lens and lens cover |
|
12 |
5 |
....................................................................LCD monitor |
4 |
13 |
6 |
.....................................DISP (display)/BACK button |
5, 15 |
14 |
|
................................................o(silent mode) button* |
x |
15 |
7 |
...............................................W (zoom out) button |
17, 35 |
16 |
8 |
.............................................................ON/OFF button |
13 |
|
*Press and hold the DISP/BACK button until ois displayed.
T (zoom in) button................................................... |
17, 35 |
a(playback) button .................................................. |
19 |
USB multi-connector ......................................... |
45, 46, 54 |
Strap eyelet .................................................................... |
1 |
Battery-chamber cover................................................... |
8 |
Tripod mount |
|
Battery chamber............................................................. |
8 |
Memory card slot............................................................ |
9 |
Before You Begin |
3 |
Parts of the Camera
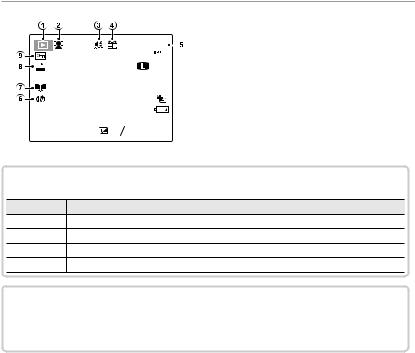
Camera Displays
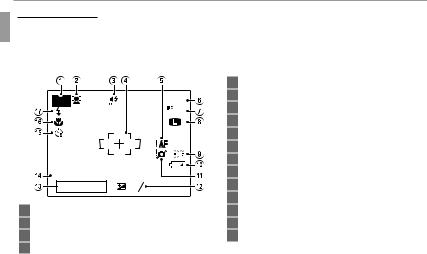
The following types of indicator may be displayed during shooting and playback. Indicators vary with camera settings.
■ Shooting |
|
|
P |
|
9 |
|
|
800 |
|
|
N |
12/31/2050 |
10:00 AM |
|
250 |
F4.5 |
-12 3 |
1 |
Shooting mode............................................................. |
20 |
2 |
Intelligent Face Detection indicator .............................. |
33 |
3 |
Silent mode indicator ................................................ |
3, 68 |
4 |
Focus frame .................................................................. |
26 |
5 |
Focus warning ......................................................... |
18, 84 |
6 |
Number of available frames.......................................... |
91 |
7 |
Sensitivity..................................................................... |
57 |
8 |
Image size/Image quality ........................................ |
58, 59 |
9 |
White balance............................................................... |
60 |
10 |
Battery level ................................................................... |
5 |
11 |
Blur warning............................................................ |
31, 84 |
12 |
Exposure compensation................................................ |
28 |
13 |
Shutter speed/Aperture |
|
14 |
Date and time............................................................... |
15 |
15 |
Self-timer indicator ...................................................... |
32 |
16 |
Macro (close-up) mode................................................. |
29 |
17 |
Flash mode ................................................................... |
30 |
4 |
Before You Begin |
Parts of the Camera
■ Playback
YouTube |
12 / 31 / 2050 |
10:00 AM |
1/250 F4.5 |
-12 3 |
|
|
|
|
|
|
|
|
|
1 |
..........................................Playback mode indicator |
19, 34 |
|
|
100-0001 |
|
2 |
.........................Intelligent Face Detection indicator |
33, 61 |
|
|
|
||||||
|
|
3 |
Silent mode indicator |
3, 68 |
|
|
400 |
|
|
||||
|
|
|
|
|
|
|
|
|
4 |
Gift image |
34 |
|
|
4:3N |
|
|
|
|||
|
|
5 |
..............................................................Frame number |
70 |
|
|
|
|
6 |
........................................................Mark for upload to |
63 |
|
|
|
|
7 |
...........................................................Photobook assist |
39 |
|
|
|
|
8 |
.....................................................DPOF print indicator |
48 |
|
|
|
|
9 |
...........................................................Protected image |
65 |
|
|
 Battery Level
Battery level is shown as follows:
Indicator |
Description |
D(white) Battery partially discharged.
C(white) Battery more than half discharged.
B(red) Low battery. Charge as soon as possible.
A(blinks red) Battery exhausted. Turn camera off and charge battery.
 Hiding and Viewing Indicators
Press DISP/BACK to cycle through shooting and playback indicators as follows:
•Shooting: Indicators displayed/indicators hidden/best framing
•Playback: Indicators displayed/indicators hidden
Before You Begin |
5 |
First Steps
 Charging the Battery
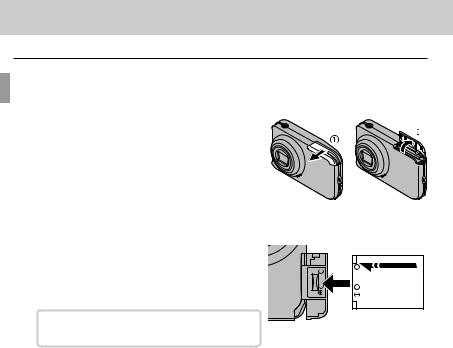
The battery is not charged at shipment. Charge the battery before use. The camera charges the battery internally.
1 Open the battery-chamber cover.
R Be sure the camera is off before opening the battery-chamber cover.
Q Do not open the battery-chamber cover when the camera is on. Failure to observe
this precaution could result in damage to image files or memory cards.
Q Do not use excessive force when handling the battery-chamber cover.
2 Insert the battery.
Insert the battery into the camera as shown, making sure that the battery is in the orientation indicated by the DBC labels.
The camera uses an NP-45A/B rechargeable battery.
QInsert the battery in the correct orientation. Do NOT use force or attempt to insert the battery upside down or backwards. The battery will slide in easily in the correct orientation.
Q Make sure that battery does not fall out when inserting it.
6
Charging the Battery
3Close the battery-chamber cover.
4Charge the battery.
Connect the camera and AC power adapter using the included USB cable. Then plug the AC power adapter into a power outlet.
 The Charging Indicator
The charging indicator is displayed in the center of the LCD monitor.
Charging indicator |
Battery status |
Action |
|
a |
Battery charging. |
— |
|
|
|
|
|
s |
Battery fault. |
Unplug the AC power adapter from the power |
|
outlet and remove the battery. |
|||
|
|
The charging indicator will disappear when charging completes.
RThe camera operates in external power mode if the camera is turned on while plugged into AC power.
First Steps |
7 |

 Inserting the Battery and a Memory Card
Insert the battery and memory card as described below.
1 Open the battery-chamber cover.
R Be sure the camera is off before opening the battery-chamber cover.
Q Do not open the battery-chamber cover when the camera is on. Failure to observe
this precaution could result in damage to image files or memory cards.
Q Do not use excessive force when handling the battery-chamber cover.
2 Insert the battery.
Insert the battery into the camera as shown, making sure that the battery is in the orientation indicated by the DBC labels.
QInsert the battery in the correct orientation. Do NOT use force or attempt to insert the battery upside down or backwards. The battery will slide in easily in the cor-
rect orientation.
Q Make sure that battery does not fall out when inserting it.
8 |
First Steps |
Inserting the Battery and a Memory Card
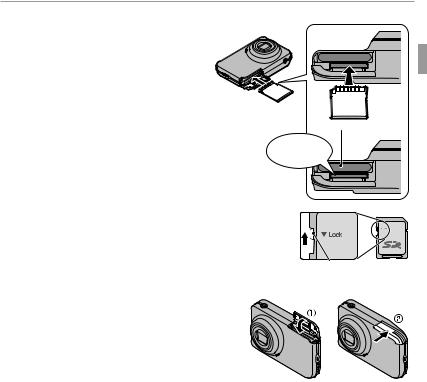
3Insert the memory card.
Holding the memory card in the orientation shown at right, slide it in until it clicks into place at the back of the slot.
Q Be sure card is in the correct orientation; do not insert at an angle or use force.
 Battery
Click
Q SD/SDHC memory cards can be locked, making it im- |
|
possible to format the card or to record or delete im- |
|
ages. Before inserting an SD/SDHC memory card, slide |
|
the write-protect switch to the unlocked position. |
Write-protect switch |
|
4 Close the battery-chamber cover.
First Steps |
9 |

Inserting the Battery and a Memory Card
 Removing the Battery and Memory Card
Before removing the battery or memory card, turn the camera off and open the battery-chamber cover.
To remove the battery, slide the battery out of the camera as shown.
Q Make sure that battery does not fall out when removing it.
To remove the memory card, press it in and release it slowly. The card can then be removed by hand. When a memory card is removed, the card could come out of the slot too quickly. Use your finger to hold it and gently release the card.
10 |
First Steps |

Inserting the Battery and a Memory Card
■ Compatible Memory Cards
FUJIFILM and SanDisk SD and SDHC memory cards have been approved for use in the camera. Operation is not guaranteed with other cards. The camera can not be used with xD-Picture Cards or MultiMediaCard (MMC) devices.
Q Memory Cards
•Do not turn the camera off or remove the memory card while the memory card is being formatted or data are being recorded to or deleted from the card. Failure to observe this precaution could damage the card.
•Format SD/SDHC memory cards before first use, and be sure to reformat all memory cards after using them in a computer or other device. For more information on formatting memory cards, see “KFORMAT” (P69).
•Memory cards are small and can be swallowed; keep out of reach of children. If a child swallows a memory card, seek medical assistance immediately.
•miniSD or microSD adapters that are larger or smaller than the standard dimensions of an SD/SDHC memory card may not eject normally; if the card does not eject, take the camera to an authorized service representative. Do not forcibly remove the card.
•Do not affix labels to memory cards. Peeling labels can cause camera malfunction.
•Formatting a memory card in the camera creates a folder in which pictures are stored. Do not rename or delete this folder or use a computer or other device to edit, delete, or rename image files. Always use the camera to delete pictures; before editing or renaming files, copy them to a computer and edit or rename the copies, not the originals.
First Steps |
11 |

Inserting the Battery and a Memory Card
Q Batteries
•Remove dirt from the battery terminals with a clean, dry cloth. Failure to observe this precaution could prevent the battery from charging.
•Do not affix stickers or other objects to the battery. Failure to observe this precaution could make it impossible to remove the battery from the camera.
•Do not short the battery terminals. The battery could overheat.
•Read the cautions in “The Battery and Power Supply” (Pvi).
•Use only battery chargers designated for use with the battery. Failure to observe this precaution could result in product malfunction.
•Do not remove the labels from the battery or attempt to split or peel the outer casing.
•The battery gradually loses its charge when not in use. Charge the battery one or two days before use.
12 |
First Steps |

 Turning the Camera on and Off
Shooting Mode
Press the ON/OFF button to turn the camera on. The lens will extend and the lens cover will open.
Press ON/OFF again to turn the camera off.
R Switching to Playback Mode
Press the a button to start playback. Press the shutter button halfway to return to shooting mode.
Playback Mode
To turn the camera on and begin playback, press the a button for about a second.
Press the a button again or press the ON/OFF button to turn the camera off.
R Switching to Shooting Mode
To exit to shooting mode, press the shutter button halfway. Press the a button to return to playback.
First Steps |
13 |

Turning the Camera on and Off
Q Forcibly obstructing the lens could cause damage or product malfunction.
QFingerprints and other marks on the lens can affect pictures. Keep the lens clean.
QThe ON/OFF button does not completely end the supply of power to the camera.
RAuto Power Off
The camera will turn off automatically if no operations are performed for the length of time selected for MAUTO POWER OFF (P71).
14 |
First Steps |

 Basic Setup
A language-selection dialog is displayed the first time the camera is turned on. Set up the camera as described below (you can reset the clock or change languages at any time using the FDATE/TIME or Laoptions in the setup menu; for information on displaying the setup menu, see page 68).
1Highlight a language and press MENU/OK.
R Press DISP/BACK to skip the current step. Any steps you skip will be displayed the next time the camera is turned on.
 START MENU
 ENGLISH
FRANCAIS
DEUTSCH
ESPAÑOL
 SET
SET  NO
NO
2 The date and time will be displayed. Press the selector left or right to highlight the year, month, day, hour, or minute and press up or down to change. To change the order in which the year, month, and day are displayed, highlight the date format and press the selector up or down. Press MENU/OK when settings are complete.
|
DATE/TIME NOT SET |
|
|
|
|
2013 |
|
|
|
2012 |
|
YY. MM. DD |
2011 |
1. 1 12:00 |
|
|
|
2010 |
AM |
|
|
2009 |
|
|
SET |
NO |
|
R The Camera Clock
If the battery is removed for an extended period, the camera clock will be reset and the language-selection dialog will be displayed when the camera is turned on.
First Steps |
15 |
Basic Photography and Playback
 Taking Pictures in Q(Scene Recognition) Mode
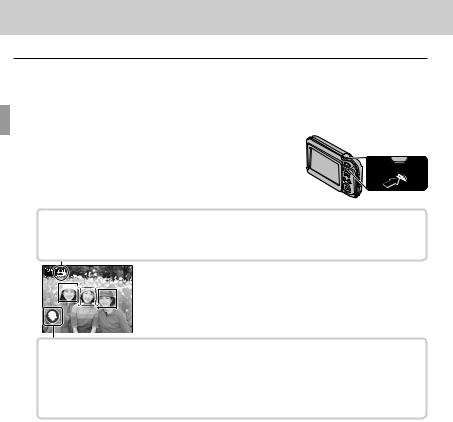
This section describes how to take pictures in Q(scene recognition) mode. The camera automatically analyzes the composition and adjusts settings appropriately.
1Turn the camera on.
Press the ON/OFF button to turn the camera on.
Qshooting indicators will be displayed.
 The gIcon
This icon indicates that the camera continuously searches for faces to select the appropriate scene, increasing the drain on the battery.
 The Scene Icon
The camera selects the scene according to shooting conditions and the type of subject: bPORTRAIT (portraits), cLANDSCAPE (landscapes), dNIGHT (poorly-lit landscapes), fNIGHT PORTRAIT (poorly-lit portraits), gBACKLIT PORTRAIT (backlit portraits), aAUTO (all other scenes)
16
 Loading...