


S9800

BL00004671-201
EN
DIGITAL CAMERA
FINEPIX S9900W Series
FINEPIX S9800 Series
FINEPIX S9700 Series
Owner’s Manual
Thank you for your purchase of this product. This manual describes how to use your
FUJIFILM digital camera and the supplied
software. Be sure that you have read and
understood its contents and the warnings
in “For Your Safety” (P ii) before using the
camera.
For information on related products, visit our website at
http://www.fujifilm.com/products/digital_cameras/index.html
Before You Begin
First Steps
Basic Photography and Playback
More on Photography
More on Playback
Wireless Networks
Movies
Connections
Menus
Technical Notes
Tro ubl esh oot ing
Appendix
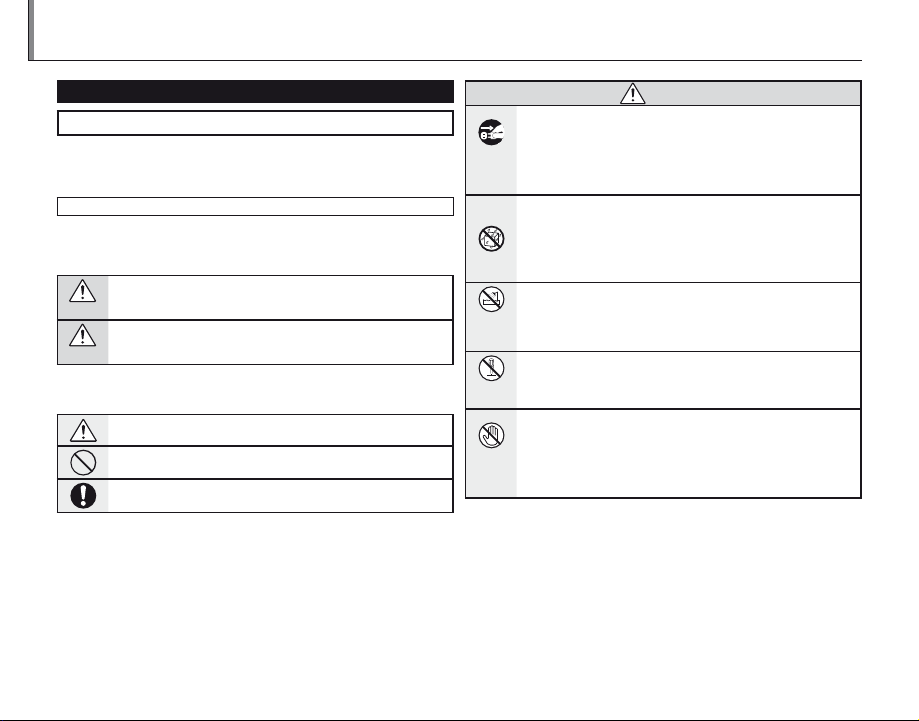
WARNING
For Your Safety
Be sure to read this notes before using
Safety Notes
• Make sure that y ou use your camera corre ctly. Read these Safe ty Notes and
your Owner’s Manual carefully before use.
• After reading these Safet y Notes, store them in a safe pla ce.
About th e Icons
The icons sho wn below are used in this do cument to indicate the sev erity of
the injury o r damage that can result if the information indic ated by the icon
is ignored and the product is used incorrectly as a result.
This icon indi cates that death or serious inj ury can resu lt if the information is ignored.
WARNING
This icon indicates that personal injury or material damage can result
if the infor mation is ignored.
CAUTION
The icons shown below are used to indicate the nature of the information
which is to be observed.
Triangular icons tell you that this infor mation requi res attention (“important”).
Circular icons w ith a diagonal bar tell you that the action i ndicated is
prohibited (“Prohibited”).
Fill ed circl es with a n excla mation m ark tell you an ac tion th at must b e
performed (“Required”).
WARNING
If a prob lem arises, tu rn the camer a off, remove th e battery, dis connect and
unplu g the AC power ad apter.
Continued use of the camera when it is emitting smoke, is emitting
Unplug
any unusual odor, or is in any other abn ormal state can cause a fi re
from power
or electric shock.
socket.
• Contact yo ur FUJIFILM dealer.
Do not all ow water or f oreign ob jects to e nter the ca mera.
If water or foreign objec ts get insid e the camer a, turn the ca mera
off, remove the battery and disco nnect an d unplug the AC p ower
adapter.
Continued us e of the camera can caus e a fire or electric sh ock.
• Contact yo ur FUJIFILM dealer.
Do not us e the camer a in the bath room or sho wer.
Do not use in
This can caus e a fire or electric s hock.
the bathroom
or shower.
Never at tempt to di sassemb le or modi fy (never op en the case).
Failure to obser ve this precaution ca n cause fire or elec tric shock.
Do not disas-
semble
Should the case break open as the r esult o f a fall or o ther acc ident, do not
touch t he expose d parts.
Failure to obser ve this preca ution could re sult in elec tric shock or in
Do not touch
injury from touching the damaged parts. Remove the battery im-
internal
mediately, taking care to avoid injury or electric shock, and take the
parts
produc t to the point of purchase fo r consultation.
ii
For Your Safety
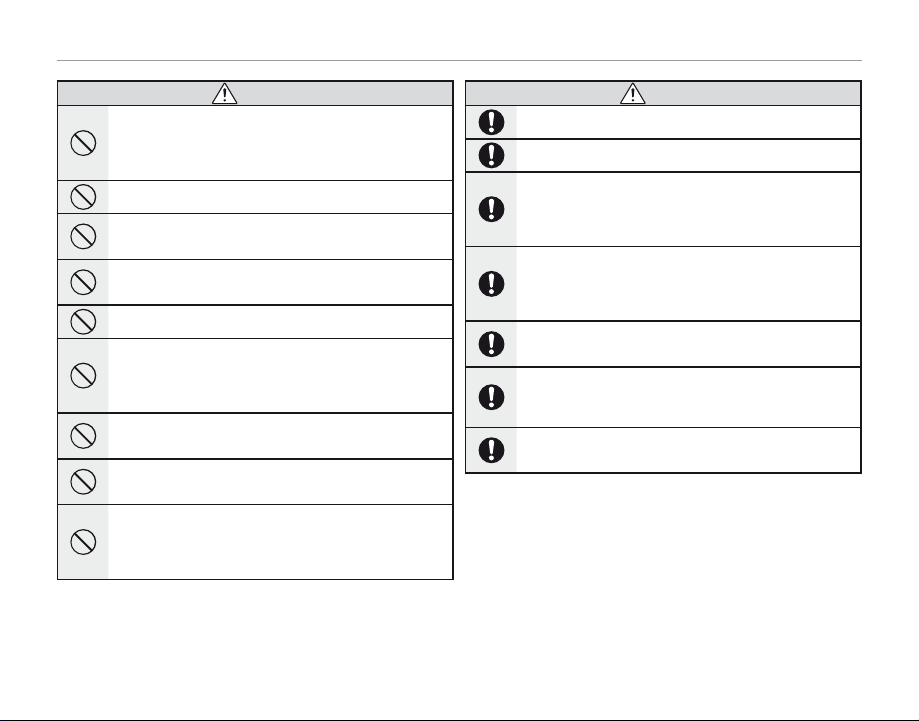
WARNING
WARNING
WARNING
Do not ch ange, he at or undu ly twi st or pul l the conn ecti on cord and do not
place he avy obje cts on the c onnect ion cord.
These ac tions coul d damage the co rd and cause a fire or elec tric
shock.
• If the cord is dam aged, contact your FUJIFI LM dealer.
Do not pl ace the cam era on an uns table su rface.
This can caus e the camera to fall or ti p over and cause injury.
Never at tempt to ta ke pictu res while i n motion.
Do not use the c amera while you are w alking or drivin g a vehicle. This
can result in yo u falling down or bein g involved in a traff ic accident.
Do not tou ch any meta l parts o f the camer a during a th unders torm.
This can caus e an electric shock du e to induced cur rent from the
lightning discharge.
Do not us e the batte ry excep t as specif ied.
Load the bat tery as aligned w ith the indicator.
Do not he at, change o r take apar t the batter y. Do not drop o r subjec t the battery to i mpacts. Do n ot store the ba ttery with m etallic pr oducts. Do n ot use
charg ers othe r than the sp ecifie d model to ch arge the ba ttery.
Any of these a ctions can cause the battery to b urst or leak and cause
fire or injur y as a result.
Use only t he batter y or AC power adap ters speci fied for use w ith this cam era.
Do not us e voltages o ther than t he power su pply volt age shown.
The use of ot her power sources can ca use a fire.
If the bat tery leak s and fluid ge ts in contac t with your eye s, skin or clot hing.
Flush th e affect ed area wit h clean wate r and seek me dical att ention or c all an
emerg ency num ber right a way.
Do not us e the charg er to char ge batter ies other t han those s pecifi ed here.
The supplied battery charger is f or use only wi th the type of batte ry
supplied w ith the camera. Using the charger to charge convention al
batteri es or other t ypes of re chargeable batterie s can cause th e battery to leak f luid, overheat or bur st.
WARNING
Danger o f explosion if batter y is incorrec tly replace d. Repla ce only w ith the
same.
Do not us e in the pres ence of fl ammable o bjects , explosi ve gases, o r dust.
When ca rrying th e battery, in stall it in a dig ital camer a or keep it in th e hard
case. Wh en stor ing the b atter y, keep it in t he hard c ase. Whe n disc ardin g,
cover th e batter y termina ls with ins ulation t ape.
Contact wi th other met allic objec ts or bat tery coul d cause the battery to igni te or burst.
Keep Mem ory Card s out of the r each of sma ll child ren.
Because M emory Cards are small , they can be swallowe d by children.
Be sure to store Memory Cards out of the reach of small children. If
a child swall ows a Memor y Card, seek medical at tention or c all an
emergency number.
Turn the c amera of f in crowds .
The camera emits radio-frequenc y radiation t hat may interfere with
pacemakers.
Turn the c amera of f in the vic inity of a utomati c doors, p ublic ad dress sys tems,
and oth er automat ically c ontroll ed device s.
The camera emits ra dio-frequenc y radiation that may cause these
devices to mal function.
Kee p th e ca me ra a t le as t 22c m (0 .7 f t.) a way fr om p eop le w ea rin g p ace mak er s.
The camera emits radio-frequenc y radiation t hat may interfere with
pacemakers.
iii
For Your Safety
CAUTION
CAUTION
CAUTION
Do not us e this camera i n location s affecte d by oil fumes, s team, humid ity or
dust.
This can caus e a fire or electric s hock.
Do not le ave this cam era in plac es subjec t to extr emely hig h tempera tures.
Do not leave the camera in lo cations such as a sealed vehicle or in
direct sun light. This can cause a fir e.
Keep out o f the reac h of small ch ildren.
This produ ct could cause injur y in the hands of a child.
Do not pl ace heavy o bjects o n the camer a.
This can caus e the heavy objec t to tip over or fall and cause i njury.
Do not mov e the camera w hile the AC po wer adapter i s still con nected. D o not
pull on t he connec tion cor d to disconn ect the AC po wer adapte r.
This can dama ge the power cord or cab les and cause a fire or ele ctric
shock.
Do not us e the AC power ada pter when th e plug is dam aged or the pl ug socket
connection is loose.
This could ca use a fire or electri c shock.
Do not cov er or wrap th e camera or t he AC power ad apter in a cl oth or blan ket.
This can caus e heat to build up and distor t the casing or cause a f ire.
When you a re clea ning th e camer a or you do no t plan to u se the ca mera for
an exte nded pe riod, re move the b atter y and disconne ct and unplug th e AC
power adapter.
Failure to do so can ca use a fire or electr ic shock.
CAUTION
When ch arging en ds, unplu g the char ger from th e power soc ket.
Leaving the charger plugged into the power socket can cause a fire.
Using a f lash too cl ose to a per son’s eyes may te mporar ily affe ct the eyes ight.
Take particula r care when photographin g infants and young children.
When a memory card is removed, the card could come out of the slot too quickly. Use you r finger to h old it and ge ntly rel ease the ca rd.
Injury cou ld result to those struc k by the ejected card .
Reques t regula r interna l testing a nd cleani ng for your c amera.
Build-u p of dust in your camera c an cause a fire or elec tric shock.
• Contact your FUJIFILM deal er to request internal cleani ng every 2
years.
• Please note this is n ot a free of charge serv ice.
Remove yo ur finge rs from th e flash wi ndow befo re the fla sh fires .
Failure to obser ve this precaution cou ld result in burns.
Keep the f lash wi ndow cle an and do no t use the f lash if th e window i s obstr ucted .
Failure to obser ve these precau tions could cause sm oke or discolorat ion.
iv

For Your Safety
Power Supp ly and Batter y
* Confirm your batter y typ e before read -
ing the follo wing descriptions .
The following explains proper use of
batteries and how to prolong their
life. Incorrect use of bat teries can
cause shor ter batter y life, as well as
leakage, e xcessive heat, fire or expl osion.
Camera uses the Rechargeable
1
Lithium-ion Ba
* When shipp ed, the bat tery is not
fully charged. Always charge the
battery before using it.
* When c arrying the bat tery, install it
in a digital camera or keep it in the
soft case.
■ Battery Features
• The battery gra dually loses its
charge even when not used. Use
a batter y that has been charged
recently (in the last day or two) to
take pictures.
• To maximize the life of the bat tery,
turn the camera off as quickly as
possible when it is not being used.
• Th e number of availabl e frames will
be lower in cold locations or at low
temperatures. Take along a spare
fully charged batter y. You can also
increase the am ount of power produced by put ting the battery in
your pocket or another warm place
to heat it and then loading it into
the camera just before you take a
picture.
ttery
If you are using a heating pad, take
care not to place th e batter y directly against the pad. The camera
may not operate if you use a depleted bat tery in cold conditions.
■ Ch arging th e Batter y
• Charging times will increase at ambient temperatures below +10 °C
(+50 °F) or above +35 °C (+95 °F).
Do not attempt to charge the battery at temperatures above 4 0 °C
(+104 °F); at temperatures below
0 °C (+32 °F), the battery will not
charge.
• The Rechargeable Lithium-ion Battery does not need to be fully discharged or exhausted flat before
being charged.
• The battery may feel warm after it
has been charged or immediately
after being used. This is p erfec tly
normal.
• Do not recharge a fully charged
battery.
■ Battery Life
At normal temperatures, the battery can be used at least 300 times.
If the time for which the bat tery
provides power shortens markedly,
this indicates that the battery has
reached the end of its ef fective life
and should be replaced.
■ No tes on stora ge
• If a battery is stored for long
periods while charged, the performance of the batter y can be
impaired. If the battery will not be
used for som e time, run the batter y
out before storing it.
• If you do not intend to use the
camera for a long perio d of time,
remove the bat tery from the camera.
• Store the batter y in a cool place.
- The batter y should b e stored in
a dry location with an ambient
temperature b etween +15°C and
+25°C (+59°F and +77°F).
- Do not leave the batter y in hot or
extrem ely cold places.
■ Ha ndling th e Battery
Cauti ons for Your Sa fety:
• Do not carry or store bat tery with
metal objects such as necklaces or
hairpins.
• Do not heat the batter y or throw it
into a fire.
• Do not attempt to take apart or
change the battery.
• Do not recharge the bat tery with
chargers other those spe cified.
• Dispose of used battery promptly.
• Do not drop the bat tery or otherwise subjec t it to strong impacts .
• Do not expose the batter y to water.
• Always keep the battery terminals
clean.
• Do not store bat teries in hot places. Also, if you use the batter y for
a long period, the camera body
and the bat tery itself will be come
warm. This is n ormal. Use the AC
power adapter if you are taking
pictures or viewing images for a
long period of time.
Camera uses AA Alkaline,
2
Rechargeable Ni-MH (nick
hydride) or AA lithium batteries
* For details on the batteries that
you can use, refer to the Owner’s
Manual of your camer a.
■ C autions fo r Using Batt ery
• Do not heat the batteries or throw
them into a fire.
• Do not carr y or store batteries with
metal objects such as necklaces or
hairpins.
• Do not expose the batteries to water, and keep bat teries from get ting
wet or stored in moist locations.
• Do not attempt to take apart or
change the batteries, including
battery casings.
• Do not subject the batteries to
strong impacts.
• D o not use batteries that are leaking, deformed, discolored.
• Do not store batteries in warm or
humid places .
• Keep the batteries out of reach of
babies and small children.
• Make sure that the battery polarit y
(C and D) is correct.
el-metal
v

For Your Safety
CAUTION
CAUTION:
• Do not use new with used batteries. Do not use charged and discharged bat teries together.
• Do not use different types or
brands of bat teries at the same
time.
• If you do not intend to use the
camera for a long perio d of time,
remove the bat teries from the
camera. Note if the camera is left
with the batteries removed, the
time and date set tings are cleared.
• The batteries feel warm right after being used. Before removing
the batteries, turn th e camera of f
and wait for the batteries to cool
down.
• Since batteries do not work well in
cold weather or locations, warm
the batteries by placing them inside your garments before use.
Batteries do not work well when
cold. They will work again when
the temperat ure returns to normal.
• Soil (such as fingerprints) on the
batter y terminals makes the batteries charge less reducing the
number of images. Carefully wipe
the battery terminals with a sof t
dry cloth b efore loading.
If any liquid at all leaks from
the batteries, wipe the battery
compartment thorou ghly and
then load new batteries.
If any batter y fluid comes into
contact with your hands or
clothing, f lush the area thoroughly with water. Note that
battery fluid can c ause loss
of eyesight if it gets into your
eyes. If this occurs, do not rub
your eyes. Flush the fluid out
with clean water and contact
your physician fo r treatment.
■ Us ing the AA-s ize Ni-MH bat teries
correctly
• Ni-MH batteries left unused in
storage for long periods can become “deactivated”. Also, repeatedly charging Ni-MH bat teries
that are only par tially discharged
can cause them to suffer from the
“memory effec t”. Ni-MH bat teries
that are “deactivate d” or affected
by “memory” suffer from the problem of only providing power for a
short time after being charged. To
prevent this problem, discharge
and recharge them several times
using the camera’s “Discharging
rechargeable batteries” function.
Deactivation and memory are spe-
cific to Ni- MH batteries and are not
in fact battery faults.
See Owner’s Manual for the proce-
dure for “Discharging recharg eable
batteries”.
CAUTION
Do not use the “Discharging rechargeable batteries” function when
alkaline bat teries being used.
• To charge Ni-MH batteries, use the
quick battery charger (sold separately). Refer to th e instruc tions
supplied with the charger to make
sure that the charger is used correctly.
• Do not use the bat tery charger to
charge other batteries .
• Note that the batteries feel warm
after being charged.
• Due to the way the camera is construc ted, a small amount of current
is used even when the camera is
turned off. Note in particular that
leaving Ni-MH batteries in the
camera for a long perio d will overdischarge the batteries and may
render them unusable even after
recharging.
• Ni-MH batteries will self-discharge
even when not used, and the time
for which they can be used may b e
shortened as a result.
• Ni-MH batteries will deteriorate
rapidly if over-discharge d (e.g.
by discharging the batteries in a
flashlig ht). Use the “D ischarging rechargeable batteries” function provided in the camera to discharge
the batteries.
• Ni-MH batteries have a limited
service life. If a battery can only
be used for a short time even after
repeated discharge-charge cycles,
it may have reached the end of its
service life.
■ Disposing of Batteries
CAUTION: When disposing of batter-
ies , do so in acco rdanc e with your l ocal waste disposal regulations.
Notes on both models (1, 2)
3
■
AC Power Ada pter
Always use the AC Power Adapter
with the camera. The use of an AC
Power adapter other than FUJIFILM
AC Power Adapter can be damaged
to your digital camera.
For details on the AC power adapter,
refer to the Owner’s Manual of your
camera.
• Use the AC power adapter for indoor use only.
• Plug the connection cord plug securely into the DC input terminal.
• Turn of f the FUJIFILM Digital camera before dis connecting the cord
from the DC inp ut terminal. To disconnect, pull out the plug gently.
Do not pull on the cord.
• Do not use the AC power adapter
with any device other than your
camera.
• During use, the AC power adapter
will become hot to the touch. This
is normal.
vi

For Your Safety
• Do not take apar t the AC power
adapter. Doing so could be dangerous.
• Do not use the AC power adapter
in a hot and humid place.
• Do not subject th e AC power
adapter to strong shocks.
• The AC power adapter may emit a
humming. This is normal.
• If used near a radio, the AC power
adapter may cause s tatic. If this
happens, move the camera away
from the radio.
Befor e Using the Came ra
Do not aim the camera at extremely
bright light sources, such as the sun
in a cloudless sky. Failure to obser ve
this precaution could damage the
camera image sensor.
■ Test S hots Prio r to Photogr aphy
For important photographs (such as
weddings an d overseas trips), always
take a test shot and view the im age to make sure that the camera is
working normally.
• FUJIFILM Corporation cannot accept liabilit y for any incidental
losses (such a s the costs of photog raphy or the loss of income f rom
photography) incurred as a result
of faults with this product.
■ No tes on Copyr ight
Images recorded using your digital
camera system cannot be used in
ways that infringe copyright laws
without the consent of the owner,
unless intended only for personal
use. Note that some restrictions apply to the photographing o f stage
performances, entertainments and
exhibits, even when intended purely
for perso nal use. Users are also asked
to note that the transfer of Memory
Card containing images or data protected under copyright laws is only
permissible within the restrictions
imposed by those copyr ight laws.
■ Handling Your Digital Camera
To ensure that images are recorded
correctly, do not subject the camera
to impact or shock while an image is
being recorded.
■ Liquid Crystal
If the LCD monitor is damaged, take
particular care with the liquid crystal
in the monitor. If any of the following situations arise, take the urgent
action indicated.
• If liquid crystal comes in contact
with your skin:
Wipe the area with a cloth and
then wash thoroughly with soap
and running water.
• If liquid crystal gets into your eye:
Flush the affected eye with clean
water for at least 15 minutes and
then seek medical assis tance.
• If liquid crys tal is swallowed:
Flush your mouth thoroughly with
water. Drink large quantities of water and induce vo miting. Then see k
medical assistance.
Although the LCD panel is produced
with highly sophisticated technologies, there may be black spots or
permanently lit spots. This is not a
malfunction, and does not affect recorded images.
■ Trademark Information
xD-Picture Card and E are trade-
marks of FUJIFILM Corporation. The
typef aces included herein are solely
develope d by DynaComware Taiwan Inc. Macintosh, QuickTime, and
Mac OS are trademarks of Apple Inc.
in the U.S.A. and other countries.
Windows 8, Windows 7, Windows
Vista, and the Windows logo are
trademar ks of the Microsof t group of
companies. Wi-Fi® and Wi-Fi Protected Setup® are registered trademarks
of the Wi-Fi Alliance. Adob e and
Adobe Reader are either trademarks
or registered trademarks of Adobe
Systems Incorporated in the U.S.A.
and/or other countries. T he SDHC
and SDXC logos are trademark s of
SD-3C , LLC. The H DMI logo is a trade mark. YouTube is a trademark of
Google Inc. Facebook is a trademark
of Facebook, Inc. All other trade
names mentioned in this manual are
the trademarks or registered trademarks of their respec tive owners.
■ No tes on Elec trical In terfere nce
If the camera is to be used in hospitals or aircrafts, please note that
this camera may cause interference
to other equipment in the hospital
or aircraft. For details, please check
with the applicable regulations.
■ E xif Print (Ex if ver. 2.3)
Exif Print Format is a newly revise d
digital camera file format that contains a variety of shooting informa tion for optimal printing.
IMPORTANT NOTIC E: Read Before
Using th e Softwar e
Direct or indirect export, in whole or
in part, of licensed software without
the permission of the applicable
governing bodies is prohibited.
■ IMPORTANT:
Read the following notices before
using the camera’s built-in wireless
transmitter.
3 This product, which contains encryption function developed in the
United States, is controlled by the
United States Export Administration
Regulations and may not be exported or re-expor ted to any countr y to
which the United States embargoes
goods.
vii

For Your Safety
■ Us e only as par t of a wirel ess networ k.
FUJIFILM does not accept liabilit y for
damages resulting from unauthorized use. Do not use in applications
requiring a high degree of reliability,
for example in medical devices or
other systems that may directly or
indirectly impact human life. When
using the device in computer and
other sys tems that demand a greater
degree of reliability than wireless
networks, be sure to take all necessary precautions to ensure safety
and prevent malfunction.
■ Us e only in the co untry in w hich the
device w as purcha sed.
This device conforms to regulations governing wireless network
devices in the country in which it
was purchase d. Observe all location
regulations wh en using the device.
FUJIFILM does not accept liabilit y for
problems arising from use in other
jurisdictions.
■ Wi reless da ta (images) ma y be
interc epted by thi rd parti es.
The secu rity of data trans mitted over
wireless networks is not guaranteed.
■ Do n ot use the dev ice in loca tions
subjec t to magne tic field s, static
electricity, or radio interference.
Do not use the tr ansmitter in the vicinity of m icrowave ovens or in other
locations subject to magnetic fields,
static electricity, or radio interference that may prevent reception of
wireless signals. Mutual interference
may occur when the transmit ter is
used in the vicinity of other wireless devices operating in the 2.4GHz
band.
■ Th e wireles s transmi tter oper ates in
the 2.4GHz b and using D SSS and OFDM
modulation.
Wireless Network Devices:
Cautions
■ Th is device op erates on t he same fre -
quenc y as commer cial, educ ational,
and med ical devic es and wire less
transmitters.
It also operates on the same frequency as licensed transmitters
and special unlicensed low-volta ge
transmitters used in RFID tracking
systems for assembly lines and in
other similar applications.
■ To pr event inter ference w ith the
above dev ices, obse rve the fol lowing
precautions.
Confirm that the RFID transmitter is
not in operation before using this
device. If the device causes interference to premises radio stations used
for RFID track ing, immediately either
relocate this device or stop the emission of radio waves. If you notice
that this device causes interference
in low-voltage RFID tracing systems,
contact a FUJIFIL M representative.
2.4DS/OF4
This sticke r indicates
that this device
operates in the
2.4GHz band using
DSSS and OFDM
modulation and
may cause interference at distances of
up to 40m.
viii

About This Manual
Model
Wireless Network features
✔✔ Warning Messages and Displays
......................
117
✔✔ Troubleshooting
............................................
109
✔✔ Table of Contents
...............................................
Before using the camera, read this manual and the warnings on pages ii–viii. For information on specific topics, consult the sources below.
Table of Contents
...............................................P P xx
The “Table of Contents” gives an overview of the
entire manual. The principal camera operations
Troubleshooting
Having a specific problem with the camera? Find
the answer here.
............................................P P
109
are listed here.
Warning Message s and Displays
......................P P
117
Find out what’s behind that flashing icon or error
message in the display.
This manual is for use with FINEPIX S9900W Series and FINEPIX S9800 Series/FINEPIX S9700 Series cameras.
With the exception of the features below, operations for these models are identical.
Model
FINEPIX S9900W Se ries Available
FINEPIX S9800 Ser ies/FINEPIX S9700 Seri es Not available
Memory Cards
Pictures can be stored in an optional SD, SDHC, and SDXC memory cards (P 11), referred to in this manual as
“memory cards”.
Temperature Warning
The camera will turn off automatically before its temperature or the temperature of the battery rise above safe
limits. Pictures taken when a temperature warning is displayed may exhibit higher levels of “noise” (mottling).
Turn the camera off and wait for it to cool before turning it on again.
Wireless Network features
ix

Before You Begin
First Steps
Basic Photography and Playback
More on Photography
Table of Contents
For Your Safety ................................................................................. ii
Safety Notes ..................................................................................... ii
About This Manual ......................................................................... i x
Before You Begin
Introduction ....................................................................................... 1
Symbols and Conventions .......................................................... 1
Supplied Accessories .................................................................... 1
Parts of the Camera ....................................................................... 2
Camera Displays ..........................................................................4
The Mode Dial ..............................................................................7
First Steps
The Strap and Lens Cap ................................................................ 8
Inserting the Batteries .................................................................. 9
Inserting a Memory Card ........................................................... 11
Turning the Camera On and Off .............................................. 14
Shooting Mode .............................................................................14
Playback Mode ..............................................................................14
Basic Setup ....................................................................................... 15
Basic Photography and Playback
Taking Pictures in M (Scene Recognition) Mode
Viewing Pictures ............................................................................21
...16
More on Photography
Shooting Mode ...............................................................................22
M SCENE RECOGNITION..................................................22
B AUTO ..........................................................................................22
Adv. ADVANCED ...........................................................................22
SP SCENE POSITION ....................................................................26
r MOTION PANORAMA 360 .................................................27
P: PROGRAM AE ............................................................................29
S: SHUTTER PRIORITY AE ...........................................................30
A: APERTURE PRIORITY AE ........................................................30
M: MANUAL ....................................................................................31
C: CUSTOM MODE ........................................................................32
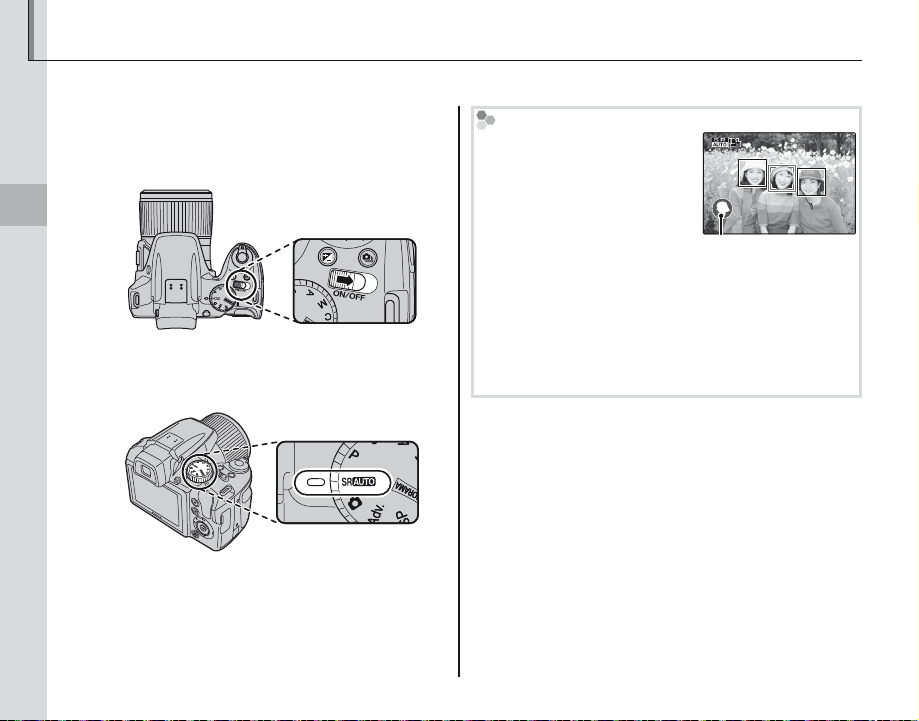
Intelligent Face Detection .........................................................33
Focus Lock.........................................................................................35
F Macro and Super Macro Modes (Close-ups) ................37
N Using the Flash (Intelligent Flash) .....................................38
J Using the Self-Timer ...............................................................40
e Interval shooting ...................................................................41
Z INSTANT ZOOM ........................................................................42
The Fn Button .................................................................................. 45
I Continuous Shooting (Burst Mode) ................................46
d Exposure Compensation .....................................................49
x

Table of Contents
More on Playback
Wireless Networks
Movies
Connections
Menus
More on Playback
Playback Options ........................................................................... 51
Continuous Shooting .................................................................51
Playback Zoom .............................................................................. 51
I Favorites: Rating Pictures ....................................................52
Multi-Frame Playback .................................................................53
Viewing Panoramas ......................................................................54
k PhotoBook Assist ....................................................................55
Creating a PhotoBook ................................................................55
Viewing PhotoBooks ..................................................................56
Editing and Deleting PhotoBooks .........................................56
b Image Search ............................................................................57
A Deleting Pictures ....................................................................58
Wireless Networks
Using Wireless Networks (S9900W Series Only) ............. 59
Connecting with smartphones ...............................................59
Saving Pictures to a Computer ...............................................59
Movies
Recording Movies ..........................................................................60
Movie Frame Size .........................................................................62
a Viewing Movies ........................................................................63
Connections
Viewing Pictures on TV ...............................................................6 4
Connecting the Camera to High Definition (HD) TVs ....64
Printing Pictures via USB ............................................................65
Connecting the Camera ............................................................65
Printing Selected Pictures ........................................................65
Printing the DPOF Print Order .................................................66
Creating a DPOF Print Order ....................................................68
Viewing Pictures on a Computer ............................................71
Windows: Installing MyFinePix Studio .................................71
Importing pictures or movies to Mac (Macintosh) ..........73
Connecting the Camera ............................................................73
Menus
Using the Menus: Shooting Mode .........................................75
Using the Shooting Menu .........................................................75
Shooting Menu Options ............................................................76
N ISO ............................................................................................78
O IMAGE SIZE ............................................................................78
T IMAGE QUALITY ..................................................................79
P FINEPIX COLOR ....................................................................80
D WHITE BALANCE .................................................................80
C PHOTOMETRY ......................................................................81
F AF MODE ................................................................................82
FMOVIE AF MODE .................................................................83
J AE BKT EV STEPS .................................................................83
I FLASH ......................................................................................83
xi

Table of Contents
Technical Notes
Troubleshooting
Appendix
Using the Menus: Playback Mode .......................................... 84
Using the Playback Menu..........................................................84
Playback Menu Options .............................................................85
iMOVIE EDIT ...........................................................................86
j MARK FOR UPLOAD ...........................................................87
I SLIDE SHOW .........................................................................89
B RED EYE REMOVAL .............................................................90
D PROTECT ................................................................................91
G CROP........................................................................................92
O RESIZE .....................................................................................93
C IMAGE ROTATE .....................................................................94
E COPY ........................................................................................95
J DISP. ASPECT ........................................................................95
The Setup Menu .............................................................................96
Using the Setup Menu................................................................96
Setup Menu Options ...................................................................97
N TIME DIFFERENCE ............................................................100
K FORMAT................................................................................101
A IMAGE DISP. ........................................................................101
B FRAME NO. ..........................................................................102
I PLAYBACK VOLUME .........................................................102
J LCD BRIGHTNESS ..............................................................102
h LCD POWER SAVE .............................................................102
M AUTO POWER OFF ........................................................... 103
l DIGITAL IMAGE STABILIZER ......................................... 103
R INTELLIGENT DIGITAL ZOOM ...................................... 103
P DISCHARGE (Ni-MH Batteries Only) ......................... 104
S DATE STAMP ...................................................................... 105
Technical Notes
Optional Accessories................................................................. 106
Accessories from FUJIFILM .....................................................107
Caring for the Camera .............................................................. 108
Troubleshooting
Tro ubl es hoo tin g ......................................................................... 109
Warning Messages and Displays .......................................... 117
Appendix
Memory Card Capacity .............................................................121
Specifications ................................................................................122
xii

Introduction
Symbols and Conventions
Supplied Accessories
Symbols and Conventions
The following symbols are used in this manual:
3: This information should be read before use to ensure correct operation.
1: Points to note when using the camera.
2: Additional information that may be helpful when using the camera.
P: Other pages in this manual on which related information may be found.
Menus and other text in the camera monitor are shown in bold. In the illustrations in this manual, the
monitor display may be simplified for explanatory purposes.
Supplied Accessories
The following items are included with the camera:
AA alkaline (LR6) batteries (×4) USB cable Strap
• Basic Manual
Lens cap CD-ROM
Before You Begin
1

Parts of the Camera
Parts of the Camera
For more information, refer to the page listed to the right of each item.
Introduction
A Microph one .................................................60
B Strap eyelet ....................................................8
C Diopter adjustment control ................6
D Zoom control ................................17, 51, 53
E Shutter button ........................................... 19
F d (expo sure compensation) button .........49
* Illustrations in this manual may be simplified for explanatory purposes.
G I (burst mode) button ..............................46
H G switch ..........................................14
I Indicator lamp ............................................20
J Mode dial ........................................................ 7
K AF-assist illuminator ...............................36
Self-timer lamp ..........................................41
2
L Flash ..................................................................38
M Flash pop-up button..............................38
N Side lever .......................................................17
O Lens .........................................................14, 122

Introduction
P Electronic viewfinder ....................6
Q Selector button (se e below)
R Monitor ................................................... 4
S DISP (di splay)/BACK button ............... 5
T Trip od m ount
U Speaker .................................................63
V Battery-chamber cover ................ 9
W Battery-chamber latch ..................9
The Selector Button
Move cursor up
Fn (Function) button (P 45)
b (del ete) button (P 58)
Move cursor left
F (mac ro) button (P 37)
Move cursor down
J (self-timer) button (P 40)
X EVF/LCD (display selection) button .... 6
Y t (movie recording) button ............ 60
Z a (playback) button ................21, 51
a Terminal cover ..................64, 65, 73
b Memor y card slot ........................... 12
c USB multi-connector ...........65, 73
d HDMI Mini Connector ................ 64
MENU/OK button
(P 15, 75, 84, 96)
Move curs or right
N (flas h) button (P 38)
Command dial
Before You Begin
3
Introduction
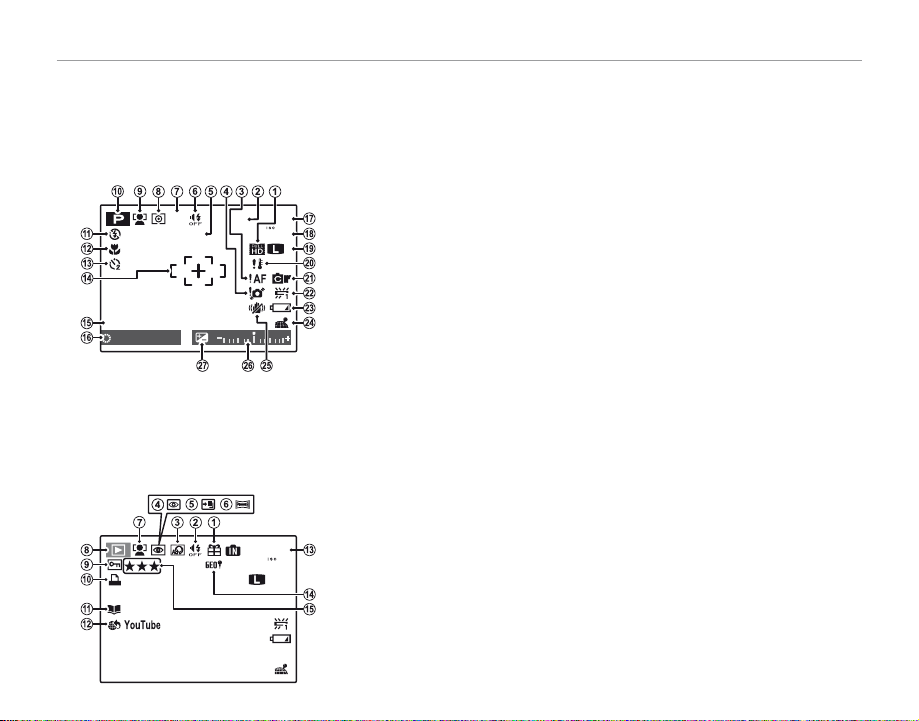
Camera Displays
■■ Shooting
19
DATE
12/31/2050
N
J
a
■■ Playback
10:00
AM
100-0001
12/31/2050
N
1/250
F3.1
Camera Displays
The following indicators may appear during shooting and playback. The indicators displayed vary with
camera settings.
Shooting
O Date and time .............................................15
P Shutter speed and aperture .............29
Q Number of available frames ........... 121
R Sensitiv ity ...................................................... 78
S Image size/quality ...........................78, 79
T Temperature warning .............................ix
U FinePix color ................................................80
V White balance ............................................80
W Battery level ................................................. 17
X Location data download status
(S9900W Series Only) .............................99
Y IS mode ..........................................................18
Z Exposure indicator ..................................49
a Exposure compensation
indicator .........................................................49
I Protected image .......................................91
J DPOF print indicator ..............................68
K Photobook assist indicator ................55
L Mark for upload to ...................................87
M Frame number ........................................ 102
N Location data
(S9900W Series Only) .............................99
O Rating ...............................................................52
J
DATE
12/31/2050
10:00
F
7. 11000
* a: indicates that no memory
card is inserted and that pictures will be stored in the camera’s internal memory (P 12) .
Playback
12/31/2050
1/250
F3.1
10:00
4
A Movie mode ................................................62
a
B Internal memory indicator *
19
C Focus warning ...........................................19
100
N
D Blur warning ............................ 38, 112, 117
E Date stamp ................................................ 105
F Silent mode .................................................97
G Burst mode ..................................................46
AM
H Metering ........................................................ 81
I Intelligent Face Detection
indicator .........................................................33
J Shooting mode .........................................22
K Flash mode...................................................38
L Macro (close-ups) mode .....................37
M Self-timer indicator .................................40
N Focus frame .................................................35
A Gift image .....................................................51
B Silent mode .................................................97
100-0001
4:3
AM
C Advanced Filter .........................................23
D Red-eye removal indicator.................90
100
E Pro low-light mode .................................24
N
F Motion panorama 360 .................. 27, 54
G Intelligent Face Detection
indicator .........................................................33
H Playback mode indicator .............21, 51
Hidi ng and Viewing Indicators
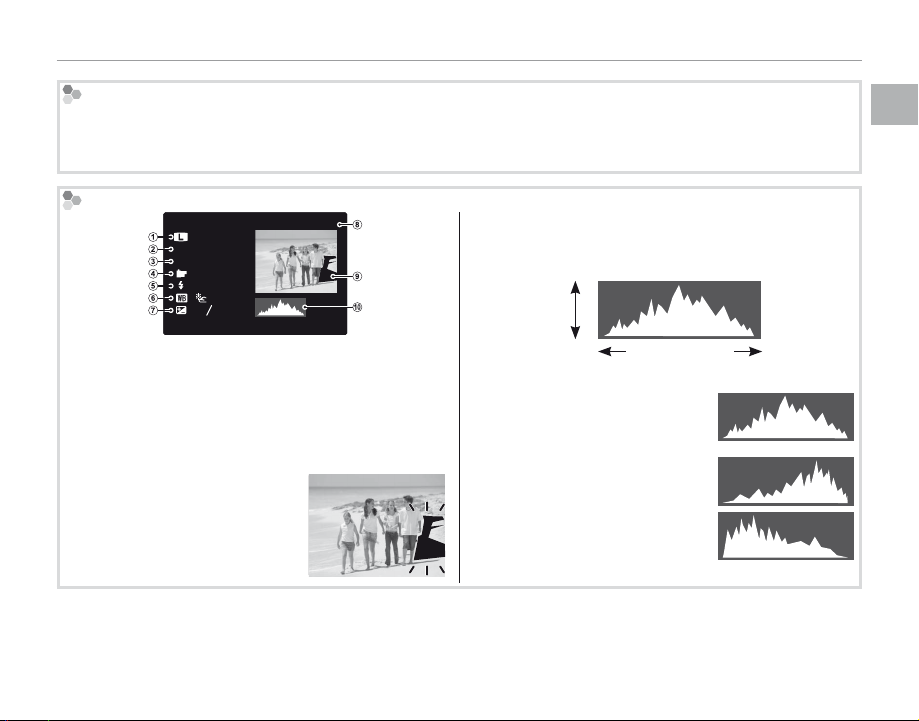
Press DISP/BACK to cycle through shooting and playback indicators as follows:
• Shooting: Indicators displayed/indicators hidden/best framing/HD framing/histogram
• Playback: Indicators displayed/indicators hidden/I favorites (P 52)/photo info
Histograms
4:3
N
ISO
400
F
3.5
1/250
: STD
: OFF
:
2
:
-
1
3
12/ 31/2050 10: 00
Image quality and size, w Sensitivity, e Shut-
q
100-0001
AM
ter speed/aperture, r FinePix color, t Flash mode,
White balance, u Exposure compensation, i Frame
y
number, o Picture (overexposed areas blink on and off),
Histogram
!0
Histograms show the distribution of tones in the image. Brightness is shown by the horizontal axis, the
number of pixels by the vertical axis.
No. of
pixels
Pixel brightness
Shadows Highlights
Optimal exposure: Pixels are
distributed in an even curve
throughout the tone range.
Overexposed: Pixels are clustered
Overexposed areas blink on and
at the right side of the graph.
off.
Underexposed: Pixels are clustered
at the left side of the graph.
Introduction
Before You Begin
5
Introduction
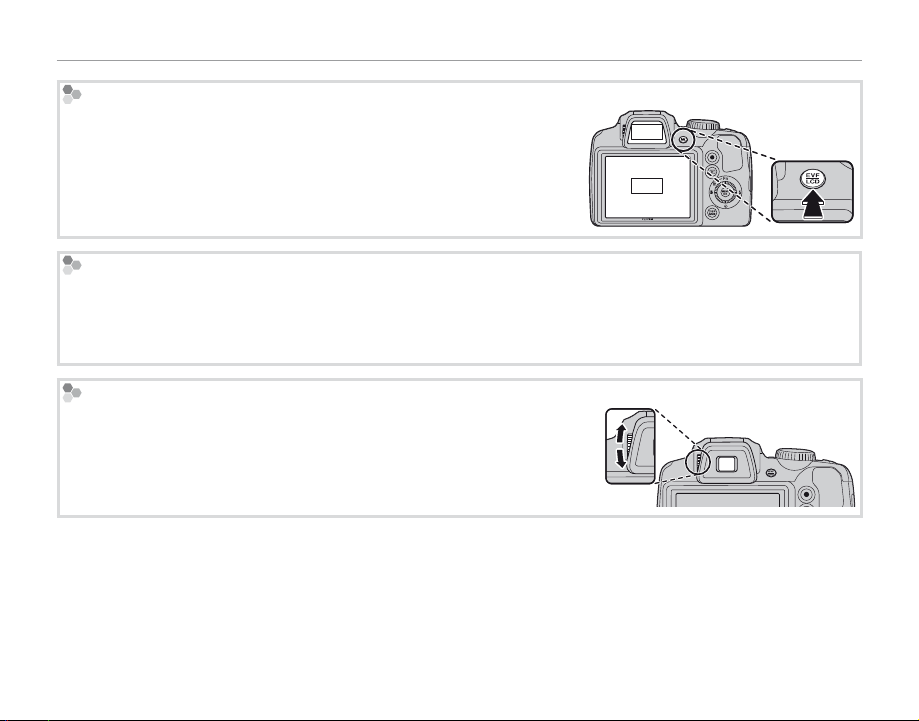
The Electronic Viewfinder (EVF)
The electronic viewfinder provides the same information as the monitor,
and can be used when bright lighting conditions make the display in the
EVF
monitor difficult to see. To switch between the monitor and electronic
viewfinder, press the EVF/LCD button (your selection remains in effect
LCDLCD
when the camera is turned off or the mode dial is rotated to another
setting).
Bright Ambient Lighting
Reflections and glare caused by bright ambient lighting may make it hard to see the display in the monitor,
particularly when the camera is used outdoors. This can be addressed by holding the EVF/LCD button to trigger
outdoor mode. Outdoor mode can also be enabled using the T MONITOR SUNLIGHT MODE option in the
setup menu (P 97).
Diopter adjustment control
The camera is equipped with diopter adjustment to accommodate individual differences in vision. Slide the diopter adjustment control up and
down until the viewfinder display is in sharp focus.
3
Strong sunlight focused through the viewfinder may damage the panel of electronic viewfinder (EVF). Do not
aim the electronic viewfinder at the sun.
6

The Mode Dial
The Mode Dial
To select a shooting mode, align the mode icon with the mark next to the
mode dial.
P, S, A, M: Select for full control over cam-
M (SCENE RECOGNITION): A “pointand-shoot” mode in which the camera
automatically adjusts settings to suit the
scene (P 16 ).
era settings, including aperture (M and A)
and/or shutter speed (M and S) (P 29).
C (C USTOM): Recall stored settings for
modes P, S, A, and M (P 32).
Introduction
Before You Begin
B (AUTO): A simple “point-and-shoot”
mode recommended for first-time users
of digital cameras (P 22).
Adv. (ADVANCED): Sophisticated techniques
made easy (P 22).
N (MOTION PANORAMA): Take a series of
photographs and combine them to form
a panorama (P 27).
SP (SCENE P OSITION ): Choose a scene suited
to the subject or shooting conditions and
let the camera do the rest (P 26).
7
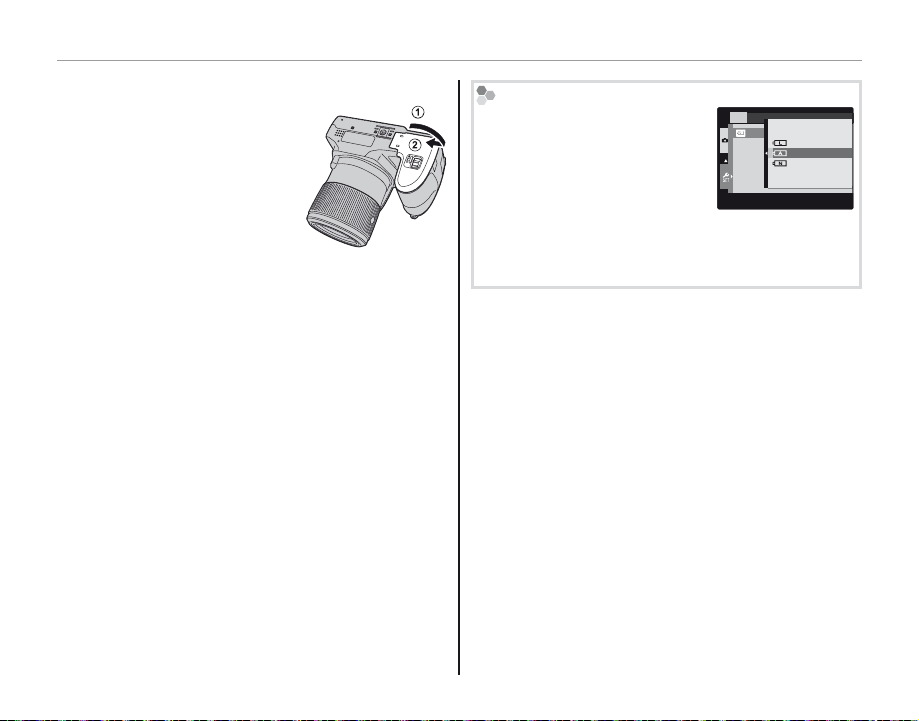
The Strap and Lens Cap
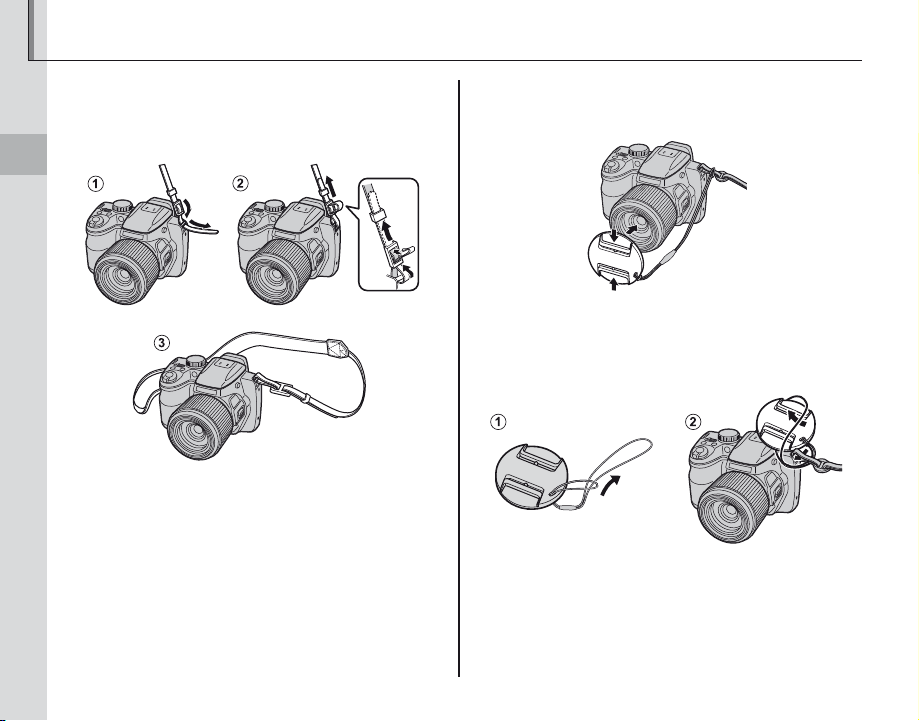
Attaching the Strap
The Lens Cap
Attaching the Strap
Attach the strap to the two strap eyelets as shown
below.
First Steps
3
To avoid dropping the camera, be sure the strap is correctly secured.
The Lens Cap
Attach the lens cap as shown.
To avoid losing the lens cap, pass the supplied
string through the eyelet (q) and secure the lens
cap to the strap (w).
8
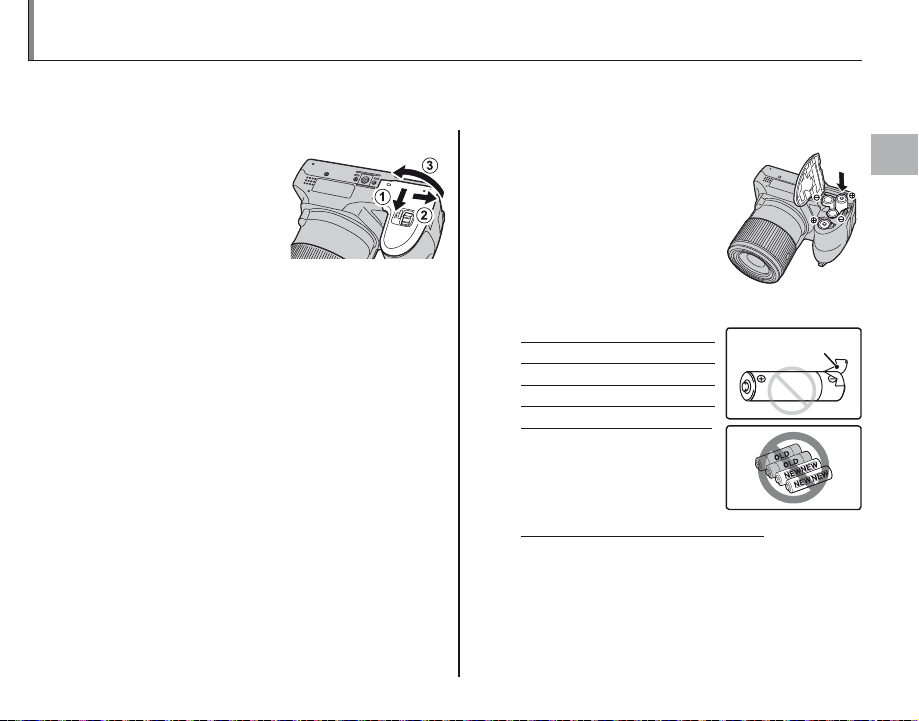
Inserting the Batteries
Battery casing
The camera takes four AA alkaline, lithium, or rechargeable Ni-MH batteries. A set of four alkaline batteries is supplied with the camera. Insert the batteries in the camera as described below.
Open the battery-chamber cover.
1
Slide the battery-chamber latch in the direction
shown and open the
battery-chamber cover.
1
Be sure the camera is off before opening the battery-chamber cover.
3
• Do not open the battery-chamber cover when
the camera is on. Failure to observe this precaution could result in damage to image files or
memory cards.
• Do not use excessive force when handling the
battery-chamber cover.
Insert the batteries.
2
Insert the batteries in the
orientation shown by the
“+“ and “–“ marks inside
the battery chamber.
3
• Insert the batteries in the correct orientation.
• Never use batteries with peel-
ing or damaged casing or mix
old and new batteries, batteries with different charge levels,
or batteries of different types.
Failure to observe these
precautions could result
in the batteries leaking or
overheating.
• Neve r use manganese or Ni- Cd batteries.
• The capacity of alkaline batteries varies with the
manufacturer and drops at temperatures below
10 °C/50 °F; Ni-MH batteries are recommended.
• Fingerprints and other soil on the battery terminals can shorten battery life.
Battery casing
First Steps
9
Inserting the Batteries
Close the battery-chamber cover.
3
Close the battery-chamber cover and slide it in
until the latch clicks into
place.
3
Do not use force. If the battery-chamber cover does
not close, check that the batteries are in the correct orientation and try again.
2 Using an AC Power Adapter
The camera can be powered by an optional AC
power adapter and DC coupler (sold separately).
Choosing the Battery Type
After replacing the batteries
with batteries of a different type,
select the battery type using
SET-UP
BATTERY TYPE
LITHIUM
ALKALINE
NI-MH
the T BATTERY TYPE option
in the setup menu (P 99) to
ensure that the battery level is
displayed correctly and the camera does not turn off
unexpectedly.
10

Inserting a Memory Card
■■ Compatible Memory Cards
Write-protect
switch
The camera can store pictures on SD, SDHC, and SDXC memory cards (sold separately).
Compatible Memory Cards
FUJIFILM and SanDisk SD, SDHC, and SDXC memory cards have been approved for use in the camera. A complete list of approved memory cards is available at http://www.fujifilm.com/products/digital_
cameras/index.html. Operation is not guaranteed with other cards. The camera can not be used with
xD-Picture Cards or MultiMediaCard (MMC) devices.
3
Memory cards can be locked, making it impossible to format the card or to record or delete
images. Before inserting a memory card, slide the write-protect switch to the unlocked position.
Write -protect
switch
First Steps
11
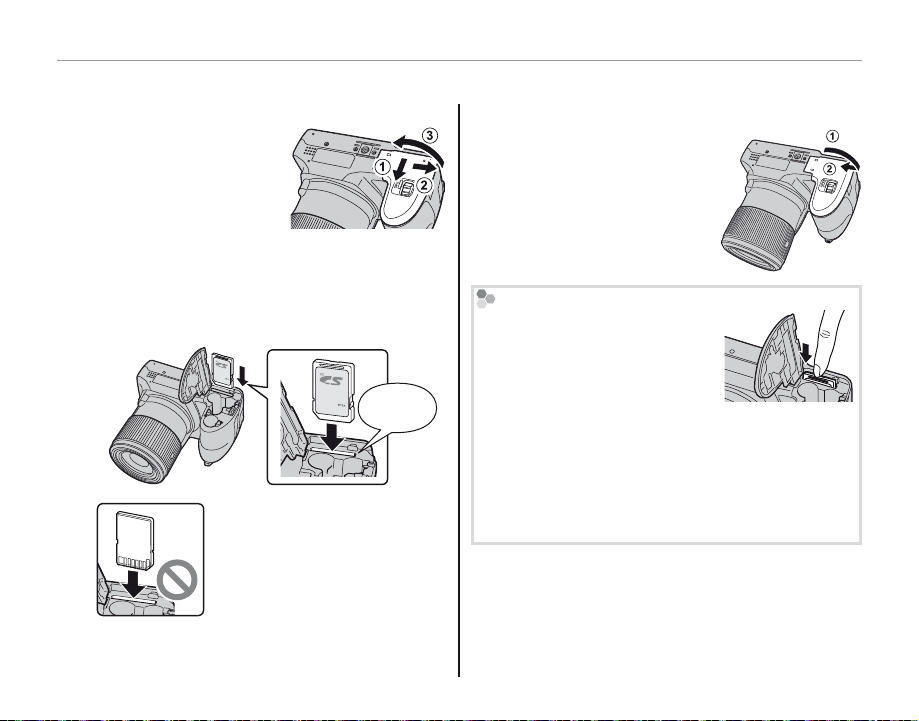
■■ Inserting a Memory Card
Inserting a Memory Card
Open the battery-chamber cover.
1
1
Be sure the camera is off
before opening the battery-chamber cover.
Insert the memory card.
2
Holding the memory card in the orientation
shown below, slide it in until it clicks into
place at the back of the slot.
Be sure card is in correct orientation; do not insert at an angle or
use force.
Click
Inserting a Memory Card
Close the battery-chamber cover.
3
Close the battery-chamber cover and slide it in
until the latch clicks into
place.
Removing Memory Cards
After confirming that the camera
is off, press the card in and then
release it slowly. The card can
now be removed by hand.
3
• The memory card may spring out if you remove
your finger immediately after pushing the card in.
• Memory cards may be warm to the touch after being removed from the camera. This is normal and
does not indicate a malfunction.
12

Inserting a Memory Card
3
• Do not turn the camera off or remove the memory card while the memory card is being format ted or data are being recorded to or
deleted fro m the card. Failure to observe this precaution could damage the card.
• Format SD/SDHC/SDXC memory cards before first use, and be sure to reformat all memory cards after using
them in a computer or other device. For more information on formatting memory cards, see page 101.
• Memory cards are small and can be swallowed; keep out of reach of children. If a child swallows a memory card,
seek medical assistance immediately.
• miniSD or microSD adapters that are larger or smaller than the standard dimensions of an SD/SDHC/SDXC card
may not eject normally; if the card does not eject, take the camera to an authorized service representative. Do
not forcibly remove the card.
• Do not affix labels to memory cards. Peeling labels can cause camera malfunction.
• Movie recording may be interrupted with some types of SD/SDHC/SDXC memory card. Use a H card or
better when shooting HD movies, Full HD movies or high-speed movies.
• Formatting a memory card in the camera creates a folder in which pictures are stored. Do not rename or delete
this folder or use a computer or other device to edit, delete, or rename image files. Always use the camera to
delete pictures from memory cards; before editing or renaming files, copy them to a computer and edit or rename the copies, not the originals.
First Steps
13
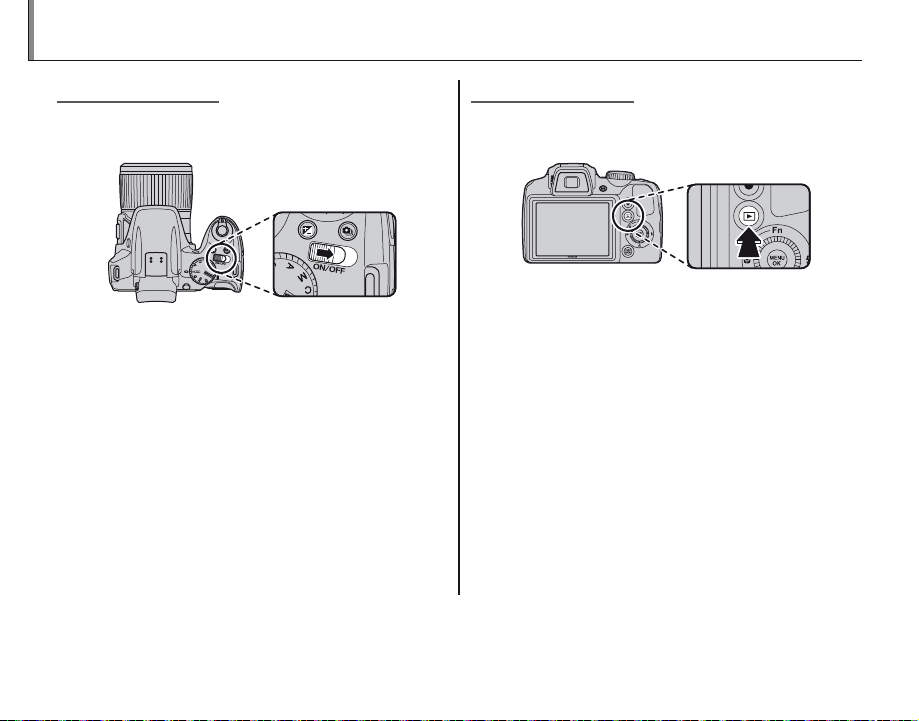
Turning the Camera On and Off
Shooting Mode
Playback Mode
MM
Shooting Mode
Slide the G switch in the direction shown
below. The lens will extend automatically.
Playback Mode
To turn the camera on and begin playback, press
the a button for about a second.
Press the a button again or slide the G
Slide the G switch to turn the camera off.
2 Switc hing to Playback Mode
Press the a button to start playback. Press the shutter
button halfway to return to shooting mode.
3
• Be sure that the lens cap is removed before turning
the camera on.
• Forcibly preventing the lens from extending could
cause damage or product malfunction.
• Pictures can be affected by fingerprints and other
marks on the lens. Keep the lens clean.
• The G button does not completely disconnect
the camera from its power supply.
2 Auto Power Off
The camera will turn off automatically if no operations are performed for the length of time selected in the
AUTO POWER OFF menu (see page 103). To turn the camera on, use the G switch or press the a
button for about a second.
14
switch to turn the camera off.
2 Switc hing to Shooting Mode
To exit to shooting mode, press the shutter button
halfway. Press the a button to return to playback.
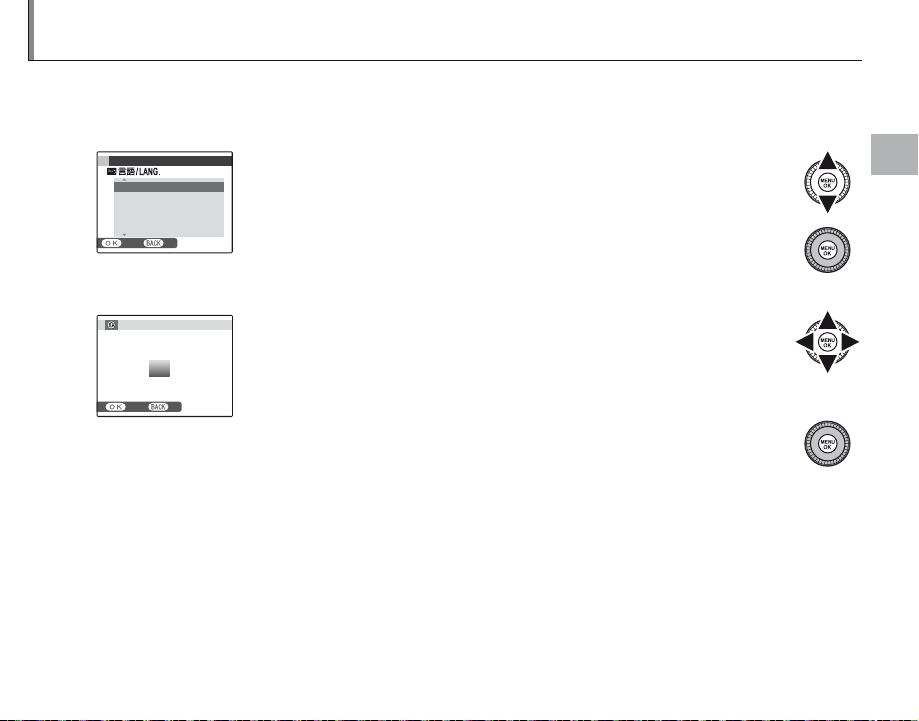
Basic Setup
A language-selection dialog is displayed the first time the camera is turned on. Set up the camera as
described below (for information on resetting the clock or changing languages, see page 97).
Choose a language.
1
START MENU
ENGLISH
FRANCAIS
DEUTSCH
ESPAÑOL
PORTUGUÊS
SET NO
Set the date and time.
2
DATE / TIME NOT SET
2017
2016
YY. MM. DD
1. 1 12 : 00
2015
2014
2013
SET NO
2 The Camera Clock
If the batteries are removed for an extended period, the camera clock and battery type will be reset and the
language-selection dialog will be displayed when the camera is turned on. If the batteries are left in the camera
for about 10 hours, the battery can be removed for about 24 hours without resetting the clock, language, or battery type.
1.1 Press the selector up or down to highlight a language.
1.2 Press MENU/OK.
2.1 Press the selector left or right to highlight the year, month, day,
hour, or minute and press up or down to change. To change
AM
the order in which the year, month, and day are displayed, highlight the date format and press the selector up or down.
2.2 Press MENU/OK. A battery type message will be displayed; if the
type differs from the type inserted in the camera, use the setup
menu
T BATTERY TYPE option (
P 99) to specify the correct
type.
First Steps
15
Taking Pictures in M (Scene Recognition) Mode
This section describes how to take pictures in M mode.
Turn the camera on.
1
Slide the G switch to turn the camera
on.
Basic Photography and Playback
Select M mode.
2
Rotate the mode dial to M.
16
M
In this mode, the camera automatically analyzes the composition and selects a scene
according to shooting conditions and the type of subject:
• b (PORTRAIT): Human por trait
subject.
• c (LANDSCAPE): Man-made or natural landscape.
• d (NIGHT): Poorly-lit landscape.
• e (MACRO): Subject close to camera.
• f (NIGHT PORTRAIT ): Poorly-lit portrait subject.
• g (BACKLIT PORTRAIT): Back-lit portrait subject.
a (AUTO) is selected if none of the above are detected.
Selected scene

Taking Pictures in M (Scene Recognition) Mode
Indicato r
Description
Check the battery level.
3
Check the battery level in the display.
qw
Indicator
NO ICON Batteries are partially discharged.
B
q
(red )
A
w
(blinks red)
1
A battery warning may not be displayed before
the camera turns off, particularly if batteries are
reused after having once been exhausted. Power
consumption varies greatly from mode to mode;
the low battery warning (B) may not be displayed or may be displayed only briefly before
the camera turns off in some modes or when
switching from shooting to playback mode.
Batteries are low. Replace as soon
as possible.
Batteries are exhausted. Turn camera off and replace batteries.
Description
Frame the picture.
4
Use the zoom control or side lever to frame
the picture in the display.
Select W to zoom out Select T to zoom in
Zoom indicator
Basic Photography and Playback
17

Taking Pictures in M (Scene Recognition) Mode
1
• When the side lever is set to H, M or L, the side lever
functions as same as the zoom lever.
• When setting the side lever to H, the side lever can
zoom faster than zoom lever. In the same way when
setting the side lever to L, the side lever can zoom
slower than zoom lever.
• When using the zoom control and side lever simultaneously, the zoom control is activated.
2 Focus Lock
Use focus lock (P 35) to focus on subjects that are not
in the focus frame.
Auto back zoom
In the setup menu (P 98), you can change the set-
ting of the side lever. Select W SIDE ZOOM LEVER
then AUTO BACK to enable auto back zoom. Auto
back zoom allows the camera to zoom out and in
quickly. It makes it easy to find the lost subject when
zooming in.
Holding the Camera
Hold the camera steady with
both hands and brace your
elbows against your sides.
Shaking or unsteady hands
can blur your shots.
To prevent pictures that are
out of focus or too dark (underexposed), keep your fingers and other objects away
from the lens and flash.
Avoiding Blurred Pictures
If the subject is poorly lit, blurring caused by camera
shake can be reduced using the L IS MODE option
in the setup menu (P 98). In B mode, blur caused
by subject movement is also reduced.
Note that blurring may still occur depending on the
scene.
18
 Loading...