


US
Endoscope
ED-530XT
OPERATION MANUAL
(Preparation and Operation)
Thank you for purchasing our product. Read this manual carefully before use to avoid unexpected accidents and to take full advantage of the product’s capabilities.
Please refer to separate operation manual (Cleaning, Disinfection and Storage) for detailed recommendations on the cleaning, high-level disinfection and sterilization of FUJIFILM endoscopes. Also, refer to the third operation manual containing recommendations on electrosurgical instruments.

Important Safety Information
Important Safety Information
For the USA MarketCAUTION:
Federal law restricts this device to sale by or on the order of a physician.
1. Intended Use
This product is a medical Endoscope for the duodenum and upper G.I. tract. It is intended for observation, diagnosis, and endoscopic treatment of the esophagus, stomach and duodenum. Never use this product for any other purposes.
2. Safety
Read and understand this manual carefully before use. Use the Endoscope by following the provided instructions. Items important for the safe use of the Endoscope are summarized in Chapter 1 “Safety.”
Safety precautions associated with individual operations or procedures are provided separately, indicated “ WARNING” or “
 CAUTION.”
3. Warning
Items that must be observed for safety when performing endoscopy or electrosurgery are identified by “ WARNING” or “
 CAUTION.” Perform procedures correctly by reading and understanding the warning information carefully.
 WARNING
Improper use or operation of the equipment may injure patients, physicians, or people in the vicinity.
Read and understand this manual carefully before operating the equipment.
Improper operations that will damage the equipment only are identified by “CAUTION.”
4. About Clinical Procedures
This manual assumes that the product will be used by medical specialists who have received proper training in endoscopic procedures. It does not provide information about clinical procedures. Regarding clinical procedures, use proper clinical judgment.
2

Important Safety Information
5. When Using the Endoscope for the First Time
This product has not been sterilized. When using it for the first time, use the level of highlevel disinfection or sterilization suitable to the application, in accordance with Chapter 7 “Cleaning,” Chapter 8 “High-Level Disinfection,” and Chapter 9 “Gas Sterilization.”
6. Single Use Only
Forceps valve are intended for single use. To prevent infection, do not reuse them.
7. Treatment with Electrosurgical Instruments
Before electrosurgery, basic in vitro experiments must be performed to learn how to tighten the snare properly and how repeated use affects the cutting quality of therapeutic accessories.
8. IfAnyAbnormality Occurs During the Clinical Procedure
If any abnormality occurs with the equipment, refer to “Troubleshooting.” Especially, continued use of the equipment with abnormal images can cause burn and injury by heat generation from the distal of the Endoscope.
9. Loss of Function
During an examination, if the endoscopic image disappears, a live image is not displayed after freeze mode has been cancelled, or the endoscopic image is discolored, reset the processor and light source.
During treatment, if the endoscopic image disappears, a live image is not displayed after freeze mode has been cancelled, or the endoscopic image is discolored, stop treatment immediately, remove the treatment tool from the endoscope, and then reset the processor and light source.
If an appropriate image does not appear even after resetting the processor and light source, turn them off, straighten the bending portion to unlock, release the angle knobs, and then withdraw the endoscope slowly from the patient.
Should the endoscopic image disappear during an examination or treatment, and if the processor and light source are not turned off, it may cause overheating of the distal end of the endoscope, possibly resulting in mucosal burns or other injury.
[Note] Reset: Turn off the processor and the light source, and wait for at least 5 seconds. Turn on the processor and the light source again, and then light the lamp by pressing the Lamp button.
3

OperaImportantion ManualsSafetyInformationand Contents
Operation Manuals and Contents
(Preparation and Operation)
Important Safety Information...................................................................................... |
2 |
||
Preface ........................................................................................................................ |
|
|
6 |
Conventions Used in This Manual ............................................................................. |
6 |
||
Chapter 1 |
Safety .................................................................................................. |
1-1 |
|
Chapter 2 Composition of Set and System Configuration ................................... |
2-1 |
||
|
2.1 |
Composition of Set ...................................................................... |
2-2 |
|
2.2 |
System Configuration .................................................................. |
2-4 |
Chapter 3 Names and Functions of Parts ............................................................ |
3-1 |
||
Chapter 4 |
Control Portion .................................................................................... |
4-1 |
|
|
4.1 |
How to Operate the Bending Mechanism .................................... |
4-2 |
|
4.2 |
Valve Control Buttons and Forceps Inlet..................................... |
4-4 |
|
4.3 |
Remote Operating Switches for Images and Recording ............... |
4-5 |
|
4.4 |
Forceps Valve .............................................................................. |
4-6 |
|
4.5 |
How to Operate Forceps Elevator Mechanism ............................ |
4-7 |
Chapter 5 Preparation for Use of the Endoscope ................................................. |
5-1 |
||
|
5.1 |
Preparing Equipment ................................................................... |
5-2 |
|
5.2 |
Preparing Forceps Valve .............................................................. |
5-4 |
|
5.3 |
Connecting the Endoscope ......................................................... |
5-6 |
|
5.4 |
Inspection of Endoscope ............................................................ |
5-8 |
|
5.5 |
Inspection of Forceps ............................................................... |
5-13 |
Chapter 6 |
Method of Use .................................................................................... |
6-1 |
|
|
6.1 |
Preparation .................................................................................. |
6-2 |
|
6.2 |
Insertion and Observation........................................................... |
6-3 |
|
6.3 |
Biopsy ......................................................................................... |
6-7 |
|
6.4 |
ERCP ......................................................................................... |
6-9 |
|
6.5 |
Pulling Out the Endoscope ........................................................ |
6-11 |
Appendix ................................................................................................... |
|
|
Appendix-1 |
|
Main Specifications............................................................... |
Appendix-2 |
|
|
Troubleshooting ................................................................... |
Appendix-6 |
|
|
After-Sales Service ................................................................ |
Appendix-9 |
|
|
Index .................................................................................... |
Appendix-10 |
|
|
Service Centers .................................................................... |
Appendix-12 |
|
4

OperationImportantManualsSafetyandInformationContents
(Cleaning, Disinfection and Storage) [Note]
Chapter 7 |
Cleaning .............................................................................................. |
7-1 |
Chapter 8 |
High-Level Disinfection ...................................................................... |
8-1 |
Chapter 9 |
ETO Gas Sterilization ........................................................................... |
9-1 |
Chapter 10 |
Cleaning and High-Level Disinfection/Sterilization |
|
|
of Endoscopic Accessories ............................................................... |
10-1 |
Chapter 11 |
Storage .............................................................................................. |
11-1 |
(Electrosurgical Instruments) [Note]
Chapter 12 Treatment with Electrosurgical Instruments ...................................... |
12-1 |
[Note] These instructions are described in separate operation manuals.
5

PrefaceImportant Safety Information
Preface
This manual describes how to use ED-530XT.
Conventions Used in This Manual
This manual uses the following conventions for easier understanding.
 General conventions
Convention |
Description |
|
|
|
|
|
Indicates a potential danger that may cause harm to people. |
|
WARNING |
Explains dangerous situations that may cause death or serious |
|
injury if not avoided. |
||
|
||
CAUTION |
Explains situations that may cause injury if not avoided. |
|
CAUTION |
Explains situations that may cause damage to equipment if not |
|
avoided. |
||
|
||
(1), (2), (3), ... |
Indicates consecutive numbers in operating procedures for the |
|
order in which successive steps in the procedure should be |
||
|
taken. |
|
[Note] |
Indicates a comment or supplementary information. |
|
|
Indicates a reference. |
|
|
|
6

Chapter 1 Safety
Chapter 1 |
Safety |
This chapter summarizes the information necessary for safe use of Endoscope.
1-1

Chapter 1 Safety
Chapter 1 Safety
1.Precautions in Using Endoscope
1)Preparation and inspection before use
Prior to using this product, prepare a spare one to avoid unexpected accidents such as equipment failure. If a replacement is not available, you may not be able to continue endoscopic procedures.
Make sure to inspect the equipment before use according to the procedures provided in this manual, to avoid unexpected accidents, and take full advantage of the equipment’s capabilities. If the inspection result shows any abnormality, do not use the same equipment.
2) Combination of equipment
The Endoscope may be used in combination with peripherals. To avoid an electric shock accident, do not use any peripherals than the ones specified in this operation manual.
3) Abnormality in use
If any abnormality is noticed during use, carry out safety checks and discontinue use immediately.
4) Maintenance
The equipment will wear out and degrade after repeated use for a long period. Especially, the portions such as rubber and resin deteriorate also by chemicals to be used a change with the passage of time. Have it checked by specialists once every six months or once every 100 cases. Also have it checked if there is anything wrong with the equipment.
Do not disassemble or modify the equipment.
5) Operation of Endoscope
Endoscope is a precision instrument. Unnatural force or impact on the insertion portion, flexible portion, or distal end may injure the inside of the patient as well as damage the instrument. If you encounter any resistance, insert it slowly. Do not force it in. Do not insert or bend the Endoscope without securing the view on the monitor.
1-2

Chapter 1 Safety
6) Handling of Endoscope
When holding Endoscope, hold it by the control portion. Handling it up by the insertion portion or LG flexible portion is difficult to hold and may exert an unnatural force, resulting in instrument failure.
Pull on rubber gloves when handling an Endoscope to prevent infection and static charges.
7) Temperature at distal end
When the Endoscope projects light at high brightness for an extended time, the temperature may exceed 41°C at the distal end. Turn off the lamp when you hang the Endoscope on the cart hanger.
8) Electromagnetic interference
This equipment has been tested and found to comply with the limits for medical devices defined in EN 60601-1-2:2001. These limits are designed to provide reasonable protection against harmful interference in a typical medical installation. However, it is possible that it may cause harmful interference to other devices in the vicinity, if it is installed and used in accordance with the instructions. Also, there is no guarantee that interference will not occur in a particular installation. Therefore, if this equipment does cause harmful interference to other devices, which can be determined by turning the equipment off and on, the user is encouraged to try to correct the interference by one or more of the following measures:
 Change the orientation or position of any affected device.
 Increase the spacing between devices.
 Consult the manufacturer or dealer of the device.
Noise may appear on the monitor of this equipment due to the effect of electromagnetic waves. In this case, turn off the device emitting the electromagnetic waves or move the device away from this equipment.
2. Cleaningand High-Level Disinfection/Sterilization
This product has not been sterilized. When using it for the first time, perform high-level disinfection or sterilization suitable for the application.
When reusing this product, clean and then, disinfect or sterilize it (Cleaning, Disinfection and Storage). Inadequate cleaning, high-level disinfection or sterilization may result in infection. Cleaning, high-level disinfection or sterilization the insertion portion and channels especially carefully.
Wear protective gear during chemical cleaning and high-level disinfection to protect your skin and to prevent infection.
1-3

Chapter 1 Safety
When using this product for a patient with Creutzfeldt-Jakob disease (especially variant Creutzfeldt-Jakob disease), use it exclusively for a patient with the same disease, or properly discard this product after use. Since the cleaning, high-level disinfection and sterilization methods described in the manual (Cleaning, Disinfection and Storage) of this product cannot eliminate the causal agents of Creutzfeldt-Jakob disease, the product could be a source of infection. For the treatment of Creutzfeldt-Jakob disease, refer to the guidelines for it available.
3. Disposal
This product has heavy metal parts. When disposing of this product, comply with local laws and regulations in your area. Determine whether or not the product is to be treated as infective waste, depending on the usage state.
4. “ Warning” and “
 Caution” MessagesAppearing in Individual Chapters
Chapter 5 Preparation for Use of the Endoscope
The use of abnormal equipment will cause wrong diagnosis or injury. Do not use the abnormal equipment.
5.3 Connecting the Endoscope
Touching the LG connector with hands immediately after use of the Endoscope may cause to burn. Do not touch the LG connector tip until it will be cooled down (approximately 5 minutes).
Endoscope may be adhered to mucous membrane, resulting in damage to the mucous membrane. Set a suction pressure at 53kPa or less.
5.4.5 Inspecting the Objective Lens
Viewing the light of light guide directly may damage your eyes. Switch off the light before inspecting the lens.
Chapter 6 Method of Use
Do not supply an excessive amount of air or gas during electrosurgery. It could cause an embolism.
6.2 Insertion and Observation
Energy of illumination may burn. Do not allow the distal end to touch the same part for 5 minutes or more.
6.3 Biopsy
It may cause holing or bleeding. Do not press them the digestive tract wall with undue force.
6.4 E RCP
Pressing the cannulation tube strongly against the digestive tract wall may damage it. Do not press it against digestive tract wall with undue force.
1-4
Chapter 1 Safety
Chapter 7 Cleaning
7.4.5 Disconnecting Endoscope from Processor
Do not touch the tip of LG (Light Guide) connector until it has cooled down (approximately 5 minutes after turning off the power of the light source). Touching the LG connector tip with one’s hand immediately after use of this product may cause a burn.
7.4.6 Detaching Endoscope Components (A/W button, suction button, forceps valve, etc.)
The forceps valve is a single patient use item. DO NOT reuse it as continued reuse presents an infection risk.
7.5 Manual Cleaning (cleaning in basin)
Carefully inspect all cleaning brushes prior to use and check the brushes integrity after use to ensure that the accessories are not damaged and no brush or accessory fragment remains inside the channel. Retained brush/accessory fragments could be a potential source of infection and/or cause patient injury.
Before using any cleaning brush for a valve cylinder or channel port, remove any debris from the bristles on the brush. This will avoid reintroduction of patient material into the channels/ lumens.
7.5.9 Rinsing Endoscope
After cleaning, thoroughly remove all detergent residue as per the provided instructions that follow to prevent the potential for inadvertent dilution or adulteration of the liquid chemical germicide used in subsequent steps.
Thoroughly rinse any remaining detergent with potable water after the cleaning process.
Chapter 8 High-Level Disinfection
8.4 Rinsing Endoscope
After disinfection, thoroughly remove all high-level disinfectant solution residue as per the provided rinsing instructions that follow to prevent patient injury from contact with the residual high-level disinfectant solution.
8.5 Cleaning and/or Disinfection Using an Automated Endoscope Reprocessor (AER)
Some legally marketed automated endoscope reprocessors (AERs) may be able to clean and/or disinfect Fujinon/Fujifilm endoscopes. However, end-users should check with each AER manufacturer to confirm they have validation data to support their reprocessing claims for Fujinon/ Fujifilm endoscopes and removable endoscope components, such as valve mechanisms. Inadequate device-specific instructions and/or non-validated AER recommendations could result in unsuccessful cleaning and/or disinfection which may increase risks to patient safety.
1-5

Chapter 1 Safety
Chapter 9 ETO Gas Sterilization
Ensure that all instrument surfaces are dry before attempting ETO gas sterilization. Failure to do so can result in inadequate sterilization.
Aeration procedures must be performed immediately after ETO gas sterilization in order to remove potentially harmful gas residuals from contacting patients. No or incomplete aeration can potentially harm patients.
Chapter 10 Cleaning and High-Level Disinfection/Sterilization of Endoscopic Accessories
10.4.1 High-Level Disinfection of Forceps Valve
The forceps valve must be completely immersed in a high-level disinfectant solution. Remove air bubbles completely. If any air bubbles remain, effective disinfection cannot be achieved and an inadequately high-level disinfected forceps valve may be an infection risk.
Chapter 11 Storage
Do not store this product in a carrying case. Storage of this product in a carrying case and subsequent clinical use may cause infection.
Chapter 12 Using Electrosurgical Instruments
12.1 High-frequency cauterization
Do not use an electrosurgical unit when supplying flammable gas. There is a risk of ignition. If necessary, use nonflammable gas such as carbon dioxide. Do not use excessive nonflammable gas.
Wear electrically insulating gloves when using an electrosurgical unit or accessory. If not worn, there is a risk of thermal injury or electric shock.
Be sure electrically conductive parts within the patient vicinity such as metal parts of a bed are not in direct contact with a patient's body. There is a risk of thermal injury.
Always keep patients with a pacemaker away from electrosurgical instruments. The operation of the pacemaker may malfunction by the electrosurgical instruments.
Do not energize the electrosurgical instruments when the electrically active portion of highfrequency surgical instrument and the metal part at the distal end of endoscope are in contact with each other. Thermal injury or scope damage may occur.
Connect the electrosurgical instruments and electrosurgical generators in accordance with each operating manual. Incorrect connection may cause electric shock and/or burns.
Operate the instruments within specified output range as per the device’s operating instructions. Leakage current may cause thermal injury.
1-6

Chapter 2 Composition of Set and System Configuration
Chapter 2 Composition of Set and System
Configuration
This chapter describes the composition of Endoscope set and system configuration.
2.1 |
Composition of Set ...................................................... |
2-2 |
2.2 |
System Configuration .................................................. |
2-4 |
|
|
|
|
|
|
2-1
Chapter 2 Composition of Set and System Configuration
Chapter 2 Composition of Set and System Configuration
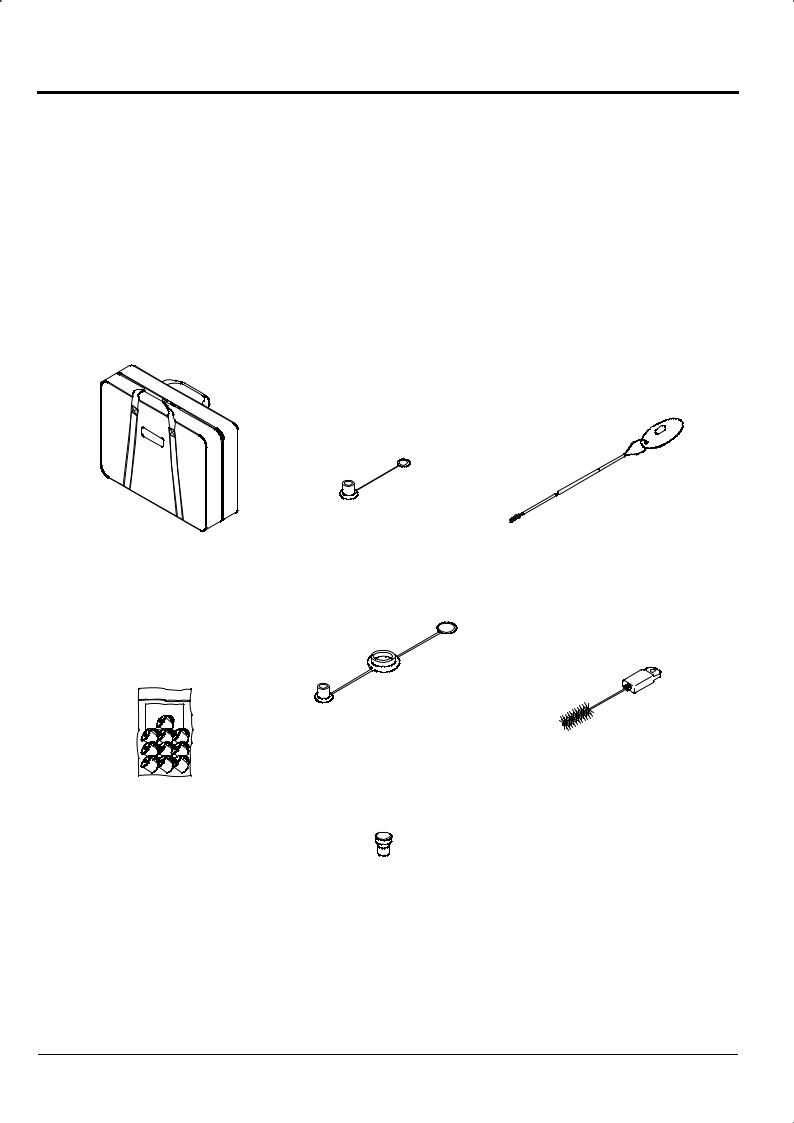
2.1 Composition of Set
The Endoscope set is provided in a carrying case. The set consists of the following items.
[Note] Figures in parentheses indicate quantities.
Protective Cap |
Cleaning Brush |
|
Suction (1) |
WB4321FW2 |
(1) |
Carrying Case (1)
Protective Cap
A/W Ventilation Connector (1)
Cleaning Brush (for Valve)
WB11002FW2(1)
Forceps Valve
FOV-DV7 (10)
S Connector Cap
CAP-E (1)
2-2
Chapter 2 Composition of Set and System Configuration
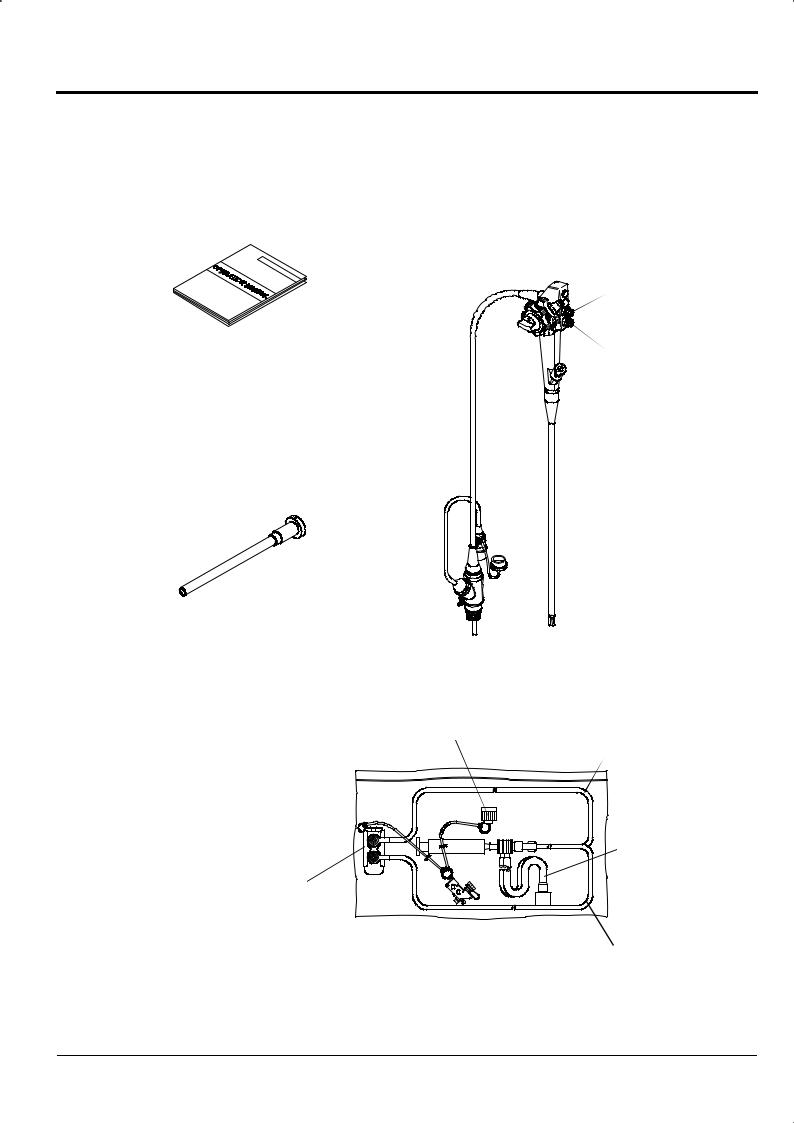
|
Suction Button |
|
SB-500 (1) |
OperationManual |
Air/Water Button |
Preparation and Operation (1) |
AW-500 (1) |
Cleaning, Disinfection and Storage (1) |
|
Electrosurgical Instruments (1) |
|
|
Endoscope (1) |
VentilationAdapter
AD-7 (1)
Syringe (1) |
Tank Receiving Cap (1) |
|
Tube for Air/Water Supply Channel (1) |
||
|
Valve Set (1)
Valve Adapter
CA-503S/A (1)
Forceps Inlet Cleaning Adapter (with a Cap) |
|
CA-503B/C (1) |
Tube for Suction Channel (1) |
|
CleaningAdapter Kit
CA-503/A (1)
2-3

Chapter 2 Composition of Set and System Configuration
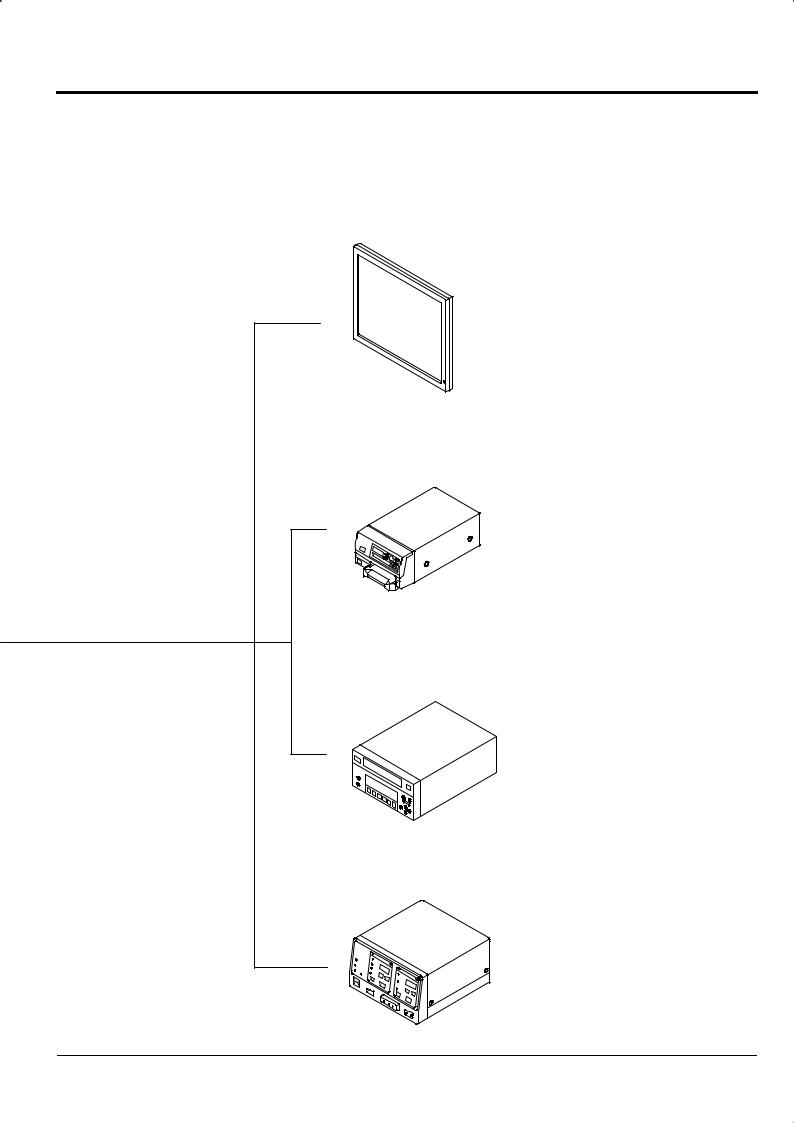
2.2 System Configuration
You may use the ED-530XT with various peripherals attached to it. These peripherals are available separately. Extension makes the following possible.
 Endoscopic treatment
 Ultrasonography through forceps channel
 Recording of Video images
 Printer output
Sonoprobe System |
Water Tank |
|||||||||
|
|
|
|
|
|
|
|
|
|
|
|
|
|
|
|
|
|
|
|
|
WT-2 |
|
|
|
|
|
|
|
|
|
|
|
|
|
|
|
|
|
|
|
|
|
|
|
|
|
|
|
|
|
|
|
|
|
|
|
|
|
|
|
|
|
|
|
|
|
|
|
|
|
|
|
|
|
|
|
|
|
|
|
|
|
|
|
|
|
|
Light Source
XL-4400
Processor
Endoscope 


 VP-4400
ED-530XT
Data Keyboard |
Foot Switch |
DK-4400E |
FS1 |
Cart
2-4
Chapter 2 Composition of Set and System Configuration
[Note] For details on the connections of peripherals other than those listed here, please contact your local dealer.
LCDMonitor
CDL1576A
CDL1909A
Video Printer
UP-51MD-120V,230V-(SONY)
UP-51MDU-120V-(SONY)
UP-21MD(SONY)
UP-55MD(SONY)
CP900E-230V-(MITSUBISHI)
CP900UM-120V-(MITSUBISHI)
DVD Recorder
DSR-20MD(SONY)
LQ-MD800(Panasonic)
Electrosurgical Instrument
ICC200(ERBE)
2-5

Chapter 2 Composition of Set and System Configuration
This page intentionally left blank
2-6

Chapter 3 Names and Functions of Parts
Chapter 3 Names and Functions of Parts
This chapter describes the names and functions of Endoscope parts as well as the composition of the main body.
3-1
Chapter 3 Names and Functions of Parts
Chapter 3 Names and Functions of Parts
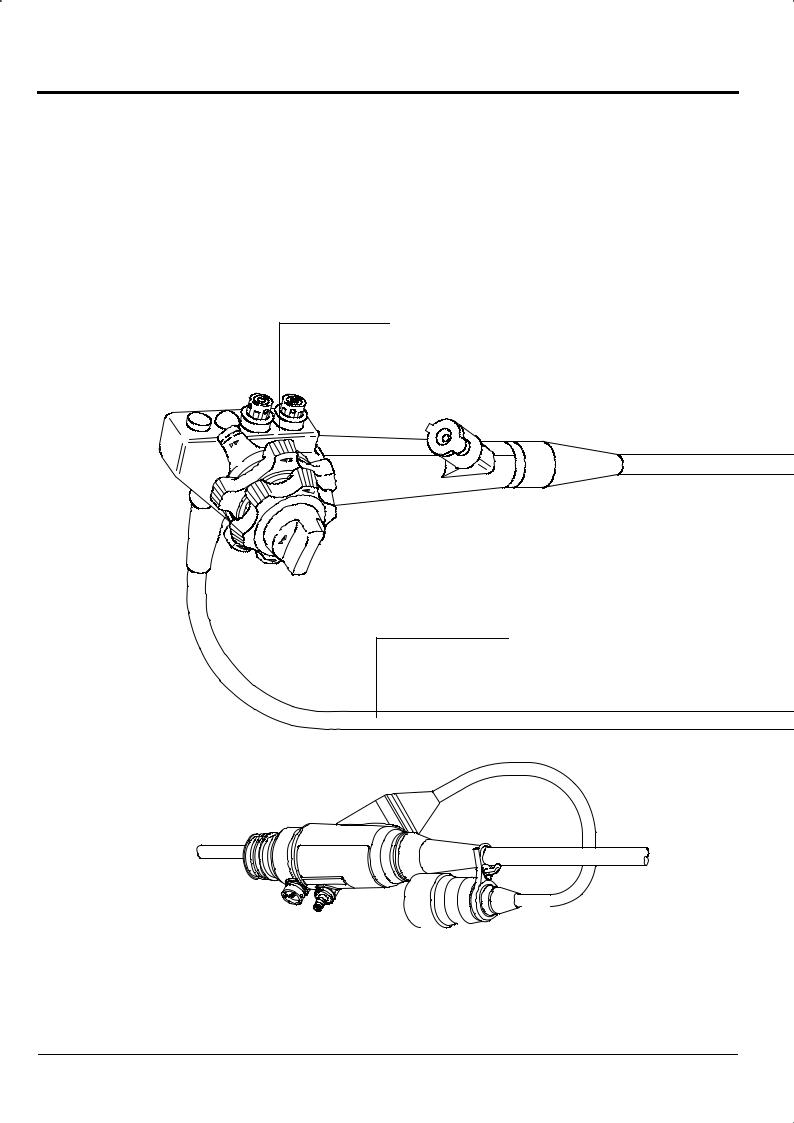
The main body of the ED-530XT consists of the following parts.
Control portion
Provides a grip for holding the Endoscope.
Also contains parts for operating the Endoscope.
LG flexible portion
Contains light guide, air/water supply tube, suction tube and cables.
|
|
|
|
|
|
|
|
|
|
|
|
|
|
|
|
|
|
|
|
|
|
|
|
|
|
|
|
|
|
|
|
|
|
|
|
|
|
|
|
Feed water connector |
|
Ventilation connector |
|
||||||
Connects to the water tank. |
Connects to the air leak tester or ventilation adapter. |
||||||||
3-2
Chapter 3 Names and Functions of Parts
Enlarged view of distal end
 Insertion portion
This portion is inserted into body cavities and contains the distal end, bending portion and flexible portion.
Flexible portion
Connects bending portion and control portion.
The Endoscope can be inserted into the body cavity up to this portion.
ED-530XT
Distal end
Contains objective lens, air/water nozzles, forceps channel, etc. Air/water supply and suction are controlled by buttons on the control portion.
|
Bending portion |
|
Bend this portion with the knobs |
Waterproof cap |
on the control portion. |
|
|
Prevent water from remaining on electric contact. |
|
|
LG connector |
|
This connector connects to the scope |
|
socket on the light source. |
Suction connector
Accepts tube from suction unit.
EVE connector
S connector
This connector connects to the EVE connector socket on the processor.
Accepts S-cord when using electrosurgical instrument (electric cautery).
3-3
 Loading...