


1 |
Getting Started With |
the QuickTake 200 Camera |
The QuickTake 200 is an easy-to-use digital camera that produces highquality images you can quickly transfer to your Macintosh Operating System (Mac OS)–based computer. Using your computer you can manipulate and modify the images to suit your purposes. The QuickTake 200 is a valuable tool for graphic artists, publishing professionals, and anyone who wants to use images to communicate.
IMPORTANT Save this manual. It contains important safety and operating instructions.
This chapter contains information about system requirements; installing the QuickTake software, the storage card, and the batteries; and setting the date and time.
1
Do you have what you need?
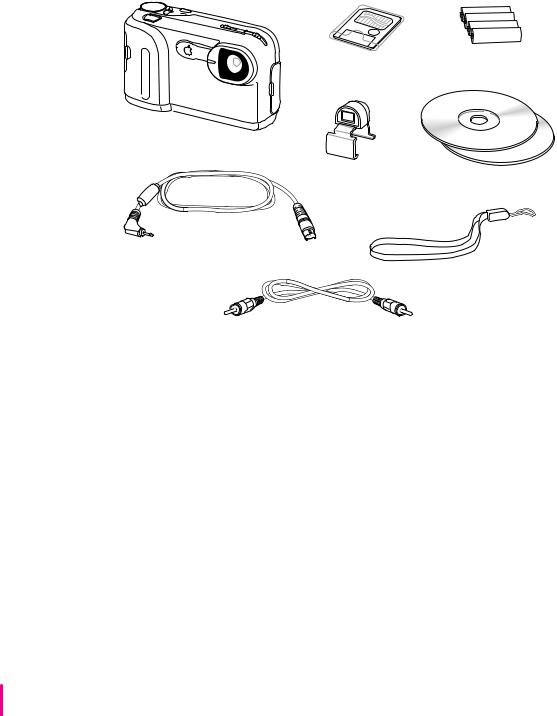
Be sure you have all the items shown here:
Storage card |
AA batteries |
QuickTake 200 camera
Optical viewfinder
QuickTake CD-ROM discs
Mac OS–based computer cable
Carrying strap
TV video cable
System requirements
To use the QuickTake 200 camera with your computer, you need
ma Mac OS–based 68040 computer or a Power Macintosh computer
mMac OS version 7.5 or later
mQuickTime version 2.0 or later
mApple recommends that you have at least 16 megabytes (MB) of randomaccess memory (RAM) with at least an 8-MB RAM partition available
ma hard drive with at least 10 MB available
ma CD-ROM drive
2 Chapter 1

Your camera at a glance
Front view
Mode dial
Shutter release
Timer/sleep light
Back view
Iø Power switch
LCD screen (liquid-crystal display)
– (Time) button |
+ (Date) button |
Iø
Bottom view
¤LCD brightness dial
Tripod mount
Battery door
¤
ATTENTION |
CAUTION |
 Action button
Aperture selector
Focus selector
Camera lens
Terminal door
Storage card door
Carrying strap mount
Storage card slot
Battery door release button
Getting Started With the QuickTake 200 Camera |
3 |
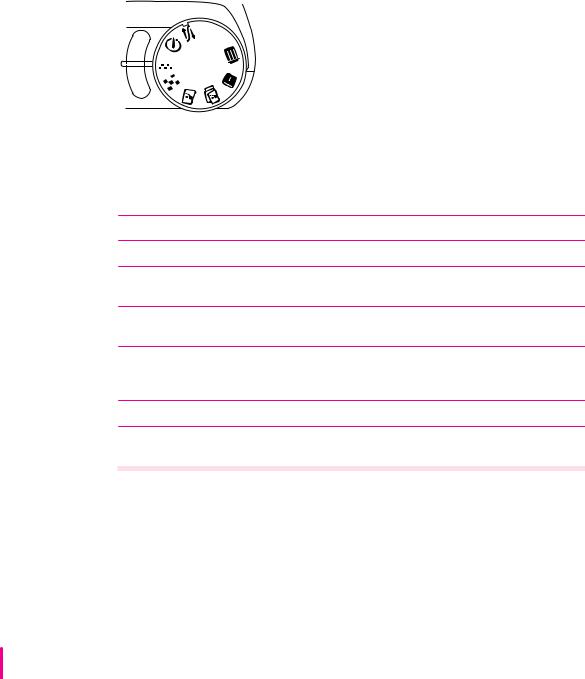
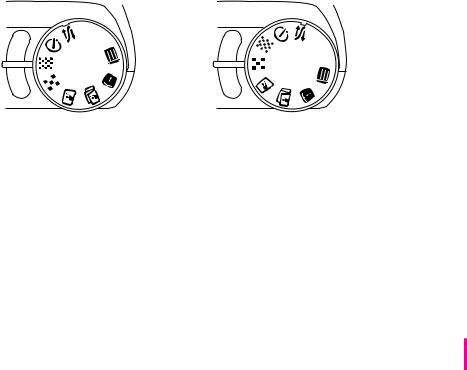
The camera mode dial
Use the camera mode dial to select modes; for example, turn to Computer mode to use the camera with your computer. This section describes the modes available. See Chapter 2 for information on how to use each mode.
Mode dial


Icon Mode |
Description |
` Computer mode |
Use this mode, along with the included Mac–OS based computer |
|
cable, to transfer images from the camera to your computer. |
|
(PC-Mode appears on your LCD screen.) |
~
1
!
2
@
Self-Timer mode |
Use this mode to set the camera to take a picture after 10 seconds. |
Record mode |
Use this mode to take good-quality pictures. |
Record-Fine mode |
Use this mode when you want the highest picture quality. You can |
|
also change the date and time in this mode. |
Play mode |
Use this mode to view single or multiple camera images on the |
|
LCD screen. |
Auto-Playback mode |
Use this mode to automatically play back consecutive frames |
|
on the LCD screen. You also use this mode to view images on |
|
your television. |
3
#
Protect mode |
Use this mode to prevent images from being erased. |
Erase mode |
Use this mode to erase a single image, erase all images on the |
|
storage card, or to format the storage card. |
4 Chapter 1

Installing the QuickTake software
Before you can transfer images from your camera to your computer, you need to install the QuickTake software on your computer.
1Insert the Apple QuickTake 200 Software CD-ROM disc into the CD-ROM drive of your computer.
Note: For information about the second CD that contains other applications, see Chapter 3.
2Double-click the folder called QuickTake 200 Software to open it.
3Double-click the Installer icon to begin the installation process.
IMPORTANT Do not install the QuickTake software by dragging its icons to your hard disk. You must use the Installer to install the software on your computer correctly.
4In the Welcome dialog box that appears, click Continue.
5In the Installer dialog box, click Install.
Easy Install is already selected to ensure that all the necessary software is installed. Make sure that you install the software on your startup disk.
A software license agreement appears.
6Read the agreement.
7If you agree with the terms of the license, click Agree to continue with installation.
You may also print the license agreement or save it to your hard disk. If you click Disagree, the software will not be installed.
8When you see a message reporting that the installation was successful, click Restart.
The Installer restarts your computer, and a new folder called QuickTake 200 appears on your hard disk. This folder contains the Camera Access software.
Getting Started With the QuickTake 200 Camera |
5 |
Installing the batteries
Before you begin using your camera, you need to install the batteries. Use the four lithium batteries (AA size) that came with your camera. To obtain maximum use from your batteries, turn off the camera whenever you are not using it.
Lithium
(Li)
WARNING Installing the batteries incorrectly may cause an explosion. Follow the instructions in this manual to replace the batteries. Use only the same type of batteries or an equivalent batteries recommended by the manufacturer of the original batteries. Do not mix different types of batteries in the camera.
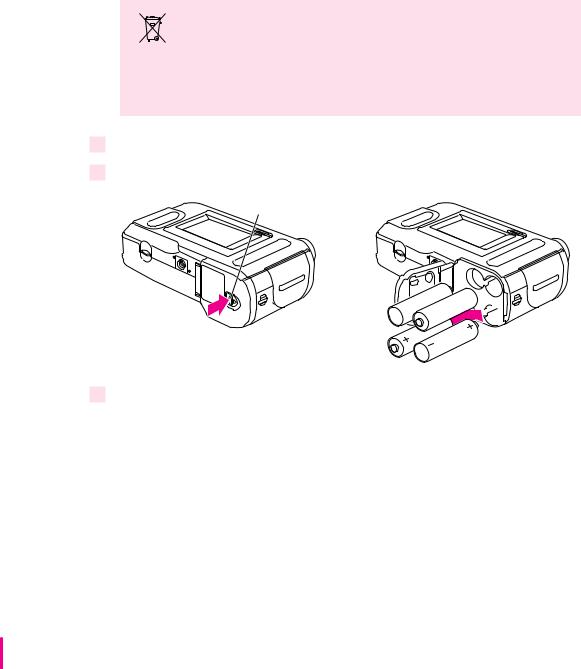
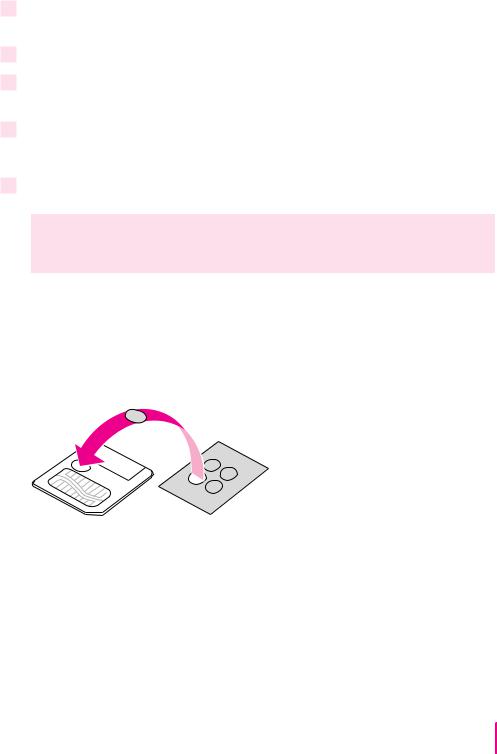
1Press down on the Push button and slide and open the battery door.
2Insert the batteries into the camera as shown.
Push button
Battery door


3Close the battery door by sliding it into place.
See also: Appendix B, “Battery Information.”
6 Chapter 1

Lithium
(Li)
Replacing the batteries
When the batteries are low, the battery warning flashes on the liquid-crystal display (LCD) screen to remind you to replace the batteries. The camera turns itself off when the batteries get too low to use.
IMPORTANT Do not use old and new batteries together or batteries of different types together.
IMPORTANT Batteries contain chemicals, some of which may be harmful to the environment. Please dispose of used batteries according to your local environmental guidelines.
Installing the storage card
Before you can use your QuickTake 200 camera, you must install the storage card that you received with the camera. After you install the card, you need to format it using the Erase mode Format function. (You format the card the first time that you use it in the camera.)
WARNING The use of storage cards other than that specified for use with your camera may result in damage to your camera.
If the card is not in the camera, a NO CARD message flashes on
the LCD screen when you turn on the camera. You cannot take pictures without a card.
Getting Started With the QuickTake 200 Camera |
7 |
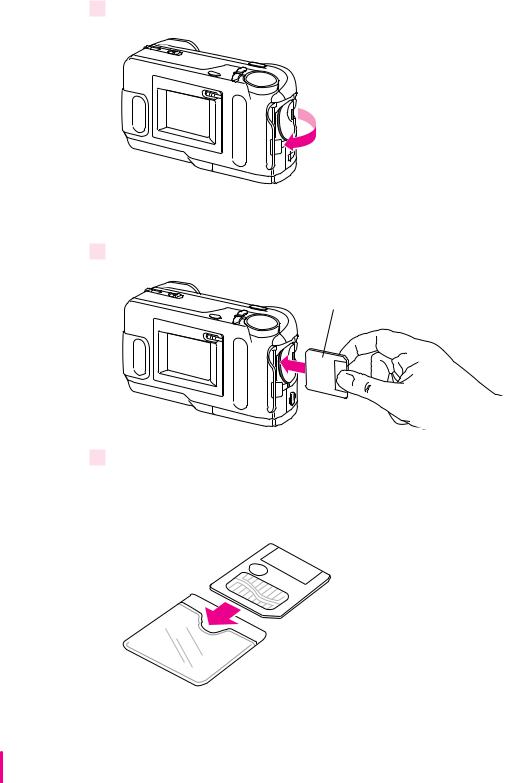
1 Open the storage card door.
 Storage card door
IMPORTANT Opening the storage card door always turns off the camera.
2 Hold the card as shown, and gently push it all the way into the card slot.
Storage card
3Close the card door.
IMPORTANT When storing the camera, you should remove the card and store it in its plastic case.
8 Chapter 1
Formatting the storage card
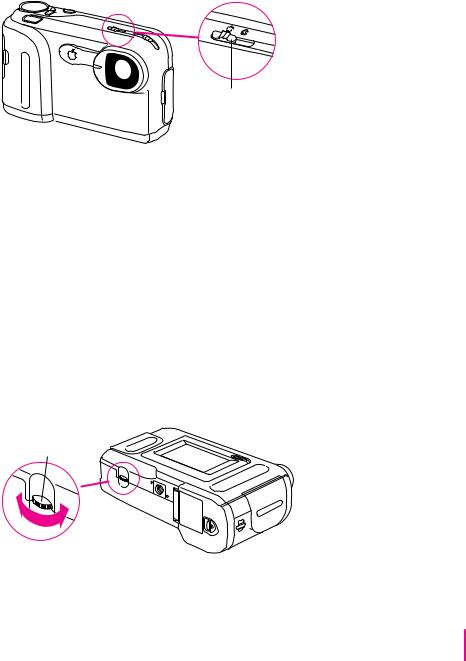
1Turn on the camera by sliding the power switch (‰) (above the LCD screen) in the direction indicated by the arrow and then releasing it.
2To format the storage card, turn the mode dial to Erase (#) mode.
3Use the plus (+) and minus (–) buttons (next to the mode dial) to select FORMAT on the screen.
4Press the action button (next to the + and – buttons).
OK? appears blinking on your screen.
5Press the action button again to format the card.
WARNING When you format a card, all the data on the card is removed, including any protected images.
Write-protecting the storage card
To prevent erasing important data from your storage card, place a writeprotect seal over the write-protect circle on the card. You receive 4 seals with every card you buy. (You cannot reuse seals.)
impossible to record data to or erase data from the card. To again use the card to record or erase data, remove the seal.
IMPORTANT Write-protection might not function if the seal becomes dirty. Use a dry, lint-free cloth to wipe the seal clean.
Getting Started With the QuickTake 200 Camera |
9 |

Attaching the carrying strap
Always use the carrying strap to avoid dropping the camera.
1 Pass the end of the strap through the strap mount on the camera.
Strap mount
Strap
2 Pull the strap through the strap fastener.
Loop the carrying strap over your wrist before grasping the camera.
10 Chapter 1
Setting the date and time in the camera
You can set the date and time to date-stamp your images. The date and time are automatically recorded and appear on the LCD screen or the television monitor.
1 Turn the mode dial to Record-Fine (!) mode.
2Hold down the plus (+) and minus (–) buttons at the same time for 3 or more seconds.
The date appears with the year flashing.
3Press the + button to change the year.
IMPORTANT If you advance beyond the number that you want to set, continue pressing the + button. When the highest number is reached, the display goes back to the lowest number. For example, when you set the month, the display goes from 12 back to 1.
4Press the – button to set the year and advance to the month.
The month appears flashing.
IMPORTANT Press the – button only when you want to set your choice. You cannot use the – button to go backward if you pass the number that you wanted.
5Repeat steps 3 and 4 to change and set the month, day, and time.
Press the + button to advance the number flashing. Press the – button
to set the flashing number and move to the next setting. The time appears after you set the day.
IMPORTANT To set AM and PM, you must advance the hours using the + button.
Getting Started With the QuickTake 200 Camera |
11 |

6After you set the number for minutes, press the – button again.
The date and time are now set.
Displaying and hiding the date and time
You can display and hide the date and time on your LCD screen when you are using either Record-Fine or Record mode.
Press the + button to display the date and press again to hide it.
Press the – button to display the time and press again to hide it.
IMPORTANT The date and time remain set for up to 5 minutes while you change the battery. You must reset the date and time after 5 minutes have elapsed without batteries in the camera.
What if you upgrade your system software?
If you decide to replace or upgrade your system software after you’ve installed the QuickTake software, you might not be able to connect to the camera. You must reinstall the Apple QuickTake 200 software. See “Installing the QuickTake Software,” earlier in this chapter.
What’s next?
Read Chapter 2 for instructions about how to take pictures with your
QuickTake 200 camera.
12 Chapter 1

2 Using the Camera to Take Pictures
This chapter provides information about turning on the camera and taking pictures; using the optical viewfinder; using the camera mode dial; the auto-power-off function; and using the camera with the optional AC power adapter.
Turning on the camera
To turn on the camera, slide the power switch (‰) (above the LCD screen) in the direction indicated by the arrow and then release it.
Iø
Iø Power switch
13

When the camera is on, the LCD screen displays live, video images. If the camera does not turn on, check to make sure that you’ve installed the storage card and the batteries correctly (see Chapter 1). Also make sure that the card door is closed and that the mode dial is correctly positioned.
mTurn the mode dial to the Record-Fine (!) mode when you want highquality images, and you want to preserve the details of the image.
mTurn the mode dial to the Record (1) mode when you want good-quality images, but you don’t need to show as much detail.
To turn off the camera, again slide the power switch (‰) in the direction indicated by the arrow and then release it.
IMPORTANT When not using your camera for long periods or when you store the camera, remove the storage card and keep it in its plastic case.
Taking pictures
1Turn the mode dial to Record-Fine (!) or Record (1).
The LCD screen displays live, video images.
2Take time to frame the subject that you want to photograph using the LCD screen.
14 Chapter 2
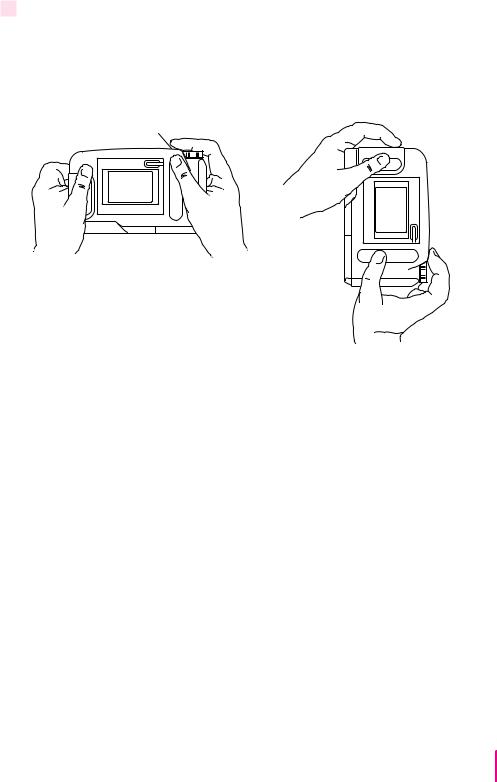
3Hold the camera steady, and press the shutter release.
The screen displays a still image (the picture that you just took) for about 5 to 8 seconds with REC or REC-FINE flashing in the upper-left corner of the screen. When the camera is ready for you to take the next picture, REC or REC-FINE stops flashing and the live, video images resume.
Shutter release
You can hold the camera horizontally or vertically.
Frame numbers
A frame number is automatically assigned to each photograph that you take. It appears in the top-right corner of the LCD screen during Play, Auto-Play, Erase, and Protect modes when you have screen information displayed. (To hide or show LCD screen information, press the action button.)
Frame numbers are assigned a 5-digit number from 00001 to 30000. If you take pictures without erasing all previous images, the frame numbers continue from the last image that you captured.
Using the Camera to Take Pictures |
15 |
Setting the focus
Use the focus selector to set the distance from the lens to the subject.
Focus selector
1Estimate the focal distance from the front surface of the LCD screen to the object being photographed.
2Set the focus for the correct distance:
Icon |
Name |
Description |
4
$
5
Close-up |
3.5 to 5.1 inches (9 to 13 cm) |
Portrait |
17.7 to 35.4 inches (45 to 90 cm) |
Far |
35.4 inches and farther (90 cm and farther) |
For close-up images, you can set the focus between close-up and portrait.
IMPORTANT Do not use the close-up focus when you use the viewfinder. It is not accurate.
16 Chapter 2
Selecting the aperture
Selecting the aperture (the light setting) for your camera is a simple process. (The aperture is the opening in the lens that lets in light.) You can switch the aperture between ƒ2.2 and ƒ8.0. Use the X (ƒ2.2) setting when you have low light, and use the ◊ setting (ƒ8.0) when you have bright light.
Aperture selector
If the overexposure (%) warning is flashing on the LCD screen, indicating too much light, change the setting to ◊ (ƒ8.0).
If the underexposure (⁄) warning is flashing on the LCD screen, indicating too little light, change the setting to X (ƒ2.2).
Adjusting the LCD screen brightness
Use the brightness dial on the bottom of the camera to set the LCD screen to a visible brightness. Note: While taking pictures indoors, the brightness of an image might be affected by the flicker of fluorescent lighting.
IMPORTANT The brightness dial does not adjust the brightness of images that you have already taken; it only adjusts the brightness of the LCD screen.
Brightness dial
Using the Camera to Take Pictures |
17 |

Using the optical viewfinder
Attach the optical viewfinder to your camera to use when you are taking a series of pictures, when you want to conserve the batteries, or when you are outdoors and sunlight is distorting the LCD screen view.
Note that when you use the viewfinder, you will not be able to tell whether the aperture setting is correct before you take the picture, because the LCD screen is asleep. However, the overexposure or underexposure warning will appear flashing on the screen after you take the picture if the condition exists.
IMPORTANT Do not use the close-up focus with the viewfinder; it is not accurate, because the parallex correction is off.
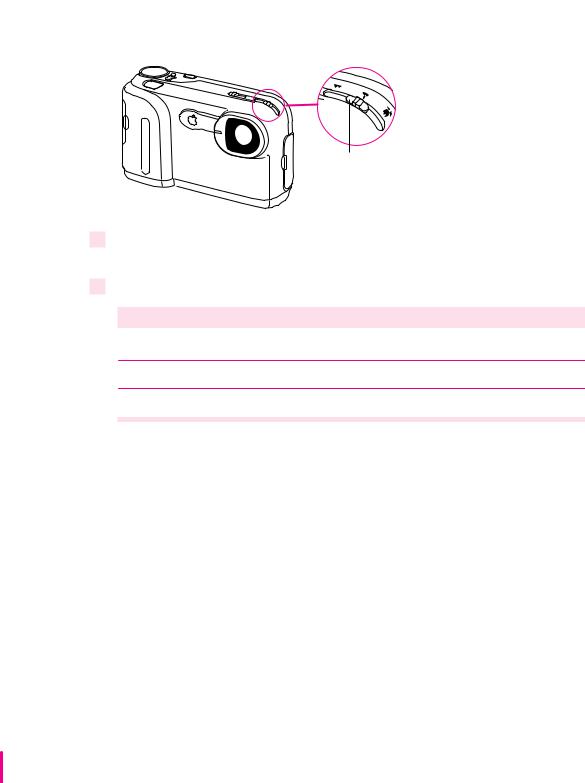
To install the optical viewfinder, hook the viewfinder to the front of the camera first, then hook it to the back of the camera. Remove it in the same way; don’t pull the viewfinder off the camera.
 Optical viewfinder
18 Chapter 2
Press the action button twice when the camera is in Record-Fine or Record mode. The LCD screen turns off and the red sleep light on the front of the camera goes on. When you press the shutter, the LCD screen turns on and lets you review the image. Then the LCD screen turns itself off again. To reactivate the LCD screen, press the action button twice again.
While you are framing your picture, use the viewfinder’s clear, center circle as a reference point for the center of the picture.
For more information about using the viewfinder, see “Battery-Saving Mode,” later in this chapter.
Using the camera mode dial
The mode dial on the right side of the top of the camera provides eight settings (represented by icons) that let you choose how you want your camera to work.
Record-Fine and Record modes for taking pictures
You take pictures by turning the mode dial to either Record-Fine (!) for highest-quality images or Record (1) for good-quality images.
Record-Fine mode |
Record mode |
mIn Record-Fine (!) mode, high-quality images have 640 x 480 pixels resolution and you can take up to 20 high-quality pictures. Use RecordFine mode to print or display the image when you want to preserve the details of the image.
Using the Camera to Take Pictures |
19 |

mIn Record (1) mode, good-quality images have 640 x 480 pixels resolution, and you can take up to 30 standard-quality pictures. Use Record mode when you don’t need to show as much detail.
You can mix high-quality and standard-quality images on the camera—all in 24-bit color. The camera holds a maximum of 30 images.
1Set the mode dial to either Record-Fine (!) or Record (1).
Live, video images appear on the LCD screen.
2Frame your picture using the LCD screen as your guide.
3Adjust the brightness of the LCD screen using the brightness dial and select the correct focus using the focus selector.
4Press the shutter release.
The photographed image is displayed for about 5 to 8 seconds. REC or RECFINE (to indicate that the camera is recording) appears flashing in the upperleft corner of the LCD screen.
WARNING Never open the storage card door while the camera is recording an image. This can damage the card or corrupt data on the card.You might have to reformat the card, which means that all the images on the card will be erased.
Images available
When the LCD display is on, the number in the upper-right corner of the LCD screen shows how many more pictures you can take. The number decreases as you take pictures, and indicates the number of pictures you can take at the current image quality before the card is full.
20 Chapter 2
Self-Timer mode
You can take delayed photographs by turning to the Self-Timer (~) mode on the mode dial. This setting uses the Record-Fine mode.
1Set the mode dial to Self-Timer (~).
2Press the shutter release.
The LCD screen displays the countdown—from 10 to 1. The shutter opens after 10 seconds and the camera captures the image. (REC flashes in the upper-left corner of the LCD screen while the image is being recorded.)
On the front of the camera, the red self-timer light stays on for 5 seconds and then flashes for 5 seconds.
3To stop the timer, turn the mode dial to another setting.
Play mode for the camera and the television
Use the Play (2) mode to view the images in the camera on your LCD screen or on a television screen.
To view one image on the LCD screen
1Plug the optional AC power adapter into your camera to conserve the batteries.
See “Using the Camera With the Optional AC Power Adapter,” later in this chapter.
2Set the mode dial to Play (2).
The last image that you captured is played back.
3Use the + and – buttons to scroll forward and backward one frame at a time through your pictures.
4Press the action button to show the Play mode, the frame number, and the date and the time on the LCD screen.
Press the action button again to hide this information.
Using the Camera to Take Pictures |
21 |

Viewing nine images on the LCD screen
1Plug the optional AC power adapter into your camera to conserve the batteries.
2Set the mode dial to Play (2).
3Press the + and – buttons at the same time.
Nine images appear on your LCD screen.
4Press the + and – buttons to select and view the frames.
5To revert to single-frame playback, press the + and the – buttons at the same time again.
A single image appears on your LCD screen.
Viewing images on a color television
IMPORTANT Your television must meet NTSC (National Television System Committee) color television telecasting specifications (adopted mainly in the United States, Canada, and Japan).
1Make sure the camera and television are turned off.
2Plug the optional power adapter into your camera to conserve the batteries.
See “Using the Camera With the Optional AC Power Adapter,” later in this chapter.
3Set the mode dial to Play (2).
4Connect the video cable to the Video Out port on the camera.
Video Out port
Video cable
5 |
Connect the other end of the video cable to the video |
on the television. |
|
Turn on the camera. |
|
6 |
|
22 Chapter 2

7Use the + and – buttons to scroll forward and backward one frame at a time through your pictures.
8Press the + and – buttons at the same time to view multiple images on your television screen.
Auto-Play mode
Use the Auto-Play (@) mode to have the camera automatically play back consecutive frames of images.
1Set the mode dial to Auto-Play (@).
The Auto-Play settings appear on the LCD screen.
2Press the + or – button to select 3, 5, or 10 seconds between each frame.
3Press the action button to begin viewing the images.
Using Auto-Play mode with your television
You can also use the Auto-Play (@) mode to play back consecutive frames of images on your television.
1Follow the steps in Play mode to connect the camera to the television.
2Follow the steps in Auto-Play mode to view images on your television.
Computer mode
In Computer (`) mode, you can connect your camera to your computer to transfer pictures and perform other camera functions using the Camera Access software (see Chapter 3 for more information about Camera Access).
1Turn off the camera.
2Set the mode dial to Computer (`).
3Connect the computer cable to the Digital port on the camera.
4Connect the other end of the computer cable to the modem or printer port.
Apple recommends that you connect to the modem port.
5Turn on the camera.
PC-MODE appears on the LCD screen.
6To open the Camera Access application, double-click the icon on your computer.
Using the Camera to Take Pictures |
23 |

See Chapter 3 for more information about using the Camera Access software with your computer.
Erase mode
When the camera is in Erase (#) mode, you can erase a single frame, erase all the frames on the storage card, or format the card before you use it. Remember, you cannot erase protected images.
IMPORTANT You cannot use Erase mode with write-protected cards.
1Turn the mode dial to Erase (#).
The ERASE-MODE selections appear on the LCD screen.
2Use the plus + and minus – buttons to select the function that you want. m FRAME: Erase one image.
m ALL: Erase all images.
m FORMAT: Format a storage card.
IMPORTANT See Chapter 1 for information about formatting a card.
3Press the action button.
The function you selected appears in the upper-left corner of the LCD screen:
ERASE FRAME or ERASE ALL.
4Press the action button again.
OK? flashes on your screen, giving you a chance to verify that you want to erase the image.
5Press the action button a third time to erase the image.
If you selected ERASE FRAME, the next image appears on the screen. You can continue to erase frame-by-frame or skip a frame by moving forward or backward using the + and - buttons.
6Turn the mode dial to leave Erase mode.
24 Chapter 2

Viewing nine images in Erase mode
1Set the mode dial to Erase (#).
2Press the action button to select ERASE FRAME.
3Press the + and – buttons at the same time.
Nine images appear on your LCD screen.
4Press the + and – buttons to select a frame.
5Press the action button again to erase the frame.
OK? flashes on your screen, giving you a chance to verify that you want to erase the image.
6Press the action button a third time to erase the image.
7To revert to single-frame playback, press the + and – buttons at the same time again.
A single image appears on your LCD screen.
Protect mode
Use Protect (3) mode to assign read-only, protected status to an image to prevent it from being erased.
IMPORTANT Even protected, read-only images are erased when the storage card is formatted. (See Chapter 1 for more information about formatting the card.)
1Set the mode dial to Protect (3).
2Press the plus + or minus – button to select the frame that you want to protect.
3Press the action button.
The image is now protected and cannot be erased. The protection icon appears next to the image number on your LCD screen when you view this image.
Using the Camera to Take Pictures |
25 |

Note: After you transfer your images to the computer, you can erase all the images from your camera. However, the images that you have protected are not erased.
To remove protection
While the camera is in Protect mode, select the protected frame, and press the action button again. The protection icon disappears and the image is no longer protected.
Battery-saving mode
To conserve your batteries, you can turn off your LCD screen and still take pictures using the optical viewfinder.
1Attach the optical viewfinder to your camera.
2Turn on the camera using the power switch (‰).
3In either Record or Record-Fine mode to take pictures, press the action button twice to put the LCD screen to sleep.
The red sleep light on the front of the camera goes on. You cannot see live, video images on the LCD screen when you put the screen to sleep.
4Use the viewfinder to focus on the image that you want to capture.
5Press the shutter release to take a picture.
The LCD screen turns on and captures the image. The image appears on the screen for about 5 to 8 seconds allowing you to review the picture that you just captured, and then the screen goes to sleep—ready for you to take another picture.
6Press the shutter release again to take another picture.
IMPORTANT Press the action button once to again turn on the LCD screen.
26 Chapter 2

Auto-power-off function
Your camera automatically switches itself off when you do not use it for more than 2 minutes as a way to conserve batteries and to save power when you use the optional AC power adapter.
IMPORTANT The auto-power-off function does not operate in Computer mode.
To disable the auto-power-off function in all modes, hold down the action button while turning on the camera. The camera will continue to use battery power even if you do not use it for several minutes. When you turn off the camera and then turn it back on, auto-power-off is again enabled.
It is especially good to disable auto-power-off when you are using a television to view images or when you are recording a video; you do not want the camera to turn off during those operations.
IMPORTANT You should always use the optional power adapter when you disable the auto-power-off function.
Using the Camera to Take Pictures |
27 |

Using the camera with the optional AC power adapter
To conserve battery power when you use the camera indoors, use the optional AC power adapter plugged into an available power outlet.
WARNING Use only the QuickTake 200 AC Adapter with the QuickTake 200 camera. The use of other power sources might cause a fire.
With the camera turned off, connect the adapter to the camera DC IN 6V socket, plug the adapter into an outlet, and then turn on the camera.
DC IN 6V socket
Use the optional AC power adapter when you play back and erase images, for power while the camera is connected to your computer or television, and when you disable the auto-power-off function.
Note: The power adapter does not recharge batteries in the camera. If you have rechargeable batteries, use a charger designed for them.
WARNING Never alter the plug on the power adapter. If it will not fit an electrical outlet, have a proper outlet installed by a qualified electrician. Improper connection may result in electrical shock. Use of a power adapter not recommended or sold by Apple Computer, Inc., may result in a risk of fire, electrical shock, injury, or damage to the camera.
28 Chapter 2

What’s next?
Now you’re ready to transfer the pictures that you’ve taken from the camera to your computer. Read Chapter 3 for instructions about connecting the camera to your computer and transferring images—and about using the Camera Access software.
Using the Camera to Take Pictures |
29 |
 Loading...