


Fujifilm FinePix J27, FinePix J28, FinePix J29, FinePix J30, FinePix J32 Owner Manual
...
Owner’s Manual
Thank you for your purchase of this product. This manual describes how to use your FUJIFILM FinePix J27, J28, J29, J30, J32, J37 or J38 digital camera and the supplied software. Be sure that you have read and understood its contents before using the camera.
For information on related products, visit our website at http://www.fujifilm.com/products/index.html
BL00881-201 EN
Before You Begin
First Steps
Basic Photography and Playback
More on Photography
More on Playback
Movies
Connections
Menus
Technical Notes
Troubleshooting
Appendix

Camera Q & A
Find items by task.
Camera Setup
Question |
Key phrase |
See page |
|
How do I set the camera clock? |
Date and time |
13 |
|
Can I set the clock to local time when I travel? |
Time difference |
77 |
|
How do I keep the monitor from turning off automatically? |
Auto power off |
76 |
|
How do I stop the camera beeping and clicking? |
Silent mode |
25 |
|
Operation and shutter volume |
73 |
||
|
|||
What are the parts of the camera called? |
Parts of the camera |
2 |
|
What do the icons in the monitor mean? |
Monitor |
3 |
|
How do I use the menus? |
Menus |
56 |
|
What’s behind that flashing icon or error message in the monitor? |
Messages and displays |
86 |
|
How much charge is left in the battery? |
Battery level |
14 |
Taking Pictures
Question |
Key phrase |
See page |
How many pictures can I take? |
Memory capacity |
91 |
Is there a quick and easy way to take snapshots? |
k mode |
14 |
How can I make good portraits? |
Intelligent Face Detection |
19 |
Can the camera automatically select the most suitable mode? |
G mode |
29 |
Is there a simple way to adjust settings for different scenes? |
Shooting mode |
28 |
How do I shoot a panorama? |
W mode |
30 |
How do I shoot close-ups? |
Macro mode (Close-ups) |
23 |
ii

|
|
|
Camera Q & A |
|||
|
|
|
|
|
|
|
Question |
|
Key phrase |
|
See page |
||
|
|
|||||
How do I keep the flash from firing? |
|
|
|
|
|
|
How do I stop my subjects’ eyes glowing red when I use the flash? |
|
Flash mode |
|
24 |
||
How do I “fill-in” shadows on back-lit subjects? |
|
|
|
|
|
|
How do I take a group portrait that includes the photographer? |
|
Self-timer mode |
|
26 |
||
How do I frame pictures with the subject off to one side? |
|
Focus lock |
|
21 |
||
How do I shoot movies? |
|
Recording movies |
|
39 |
||
Viewing Pictures |
|
|
|
|
|
|
Question |
|
|
Key phrase |
|
|
See page |
|
|
|
|
|||
How do I view my pictures? |
|
|
Single-frame playback |
|
33 |
|
Is there a simple way to delete one image? |
|
|
Deleting pictures |
|
18 |
|
How do I delete one or all images at once? |
|
|
Erase |
|
37 |
|
Can I zoom in on pictures during playback? |
|
|
Playback zoom |
|
34 |
|
How do I view a lot of pictures at once? |
|
|
Multi-frame playback |
|
35 |
|
How do I view all pictures taken on the same day? |
|
|
Sort by date |
|
36 |
|
Can I protect my pictures from accidental deletion? |
|
|
Protect |
|
67 |
|
Can I hide the icons in the monitor when viewing my pictures? |
|
|
Choosing a display format |
|
33 |
|
How do I view my pictures on TV? |
|
|
Viewing pictures on TV |
|
42 |
|
Sharing Pictures |
|
|
|
|
|
|
Question |
|
Key phrase |
|
See page |
||
Can I print pictures on my home printer? |
|
Printing pictures |
|
43 |
||
Can I copy my pictures to my computer? |
|
Viewing pictures on a computer |
|
49 |
||
iii

Table of Contents
Camera Q & A..................................................................................... |
ii |
Camera Setup ............................................................................... |
ii |
Taking Pictures............................................................................. |
ii |
Viewing Pictures......................................................................... |
iii |
Sharing Pictures.......................................................................... |
iii |
About This Manual......................................................................... |
vi |
Before You Begin |
|
Introduction....................................................................................... |
1 |
Symbols and Conventions.......................................................... |
1 |
Supplied Accessories.................................................................... |
1 |
Parts of the Camera....................................................................... |
2 |
The Monitor................................................................................... |
3 |
First Steps |
|
Inserting the Battery...................................................................... |
4 |
Charging the Battery ..................................................................... |
6 |
Inserting a Memory Card............................................................. |
8 |
Turning the Camera on and Off .............................................. |
12 |
Shooting Mode ............................................................................. |
12 |
Playback Mode.............................................................................. |
12 |
Basic Setup ....................................................................................... |
13 |
Basic Photography and Playback |
|
Taking Pictures in k (Auto) Mode........................................ |
14 |
Viewing Pictures............................................................................ |
18 |
More on Photography |
|
Intelligent Face Detection......................................................... |
19 |
Focus Lock ........................................................................................ |
21 |
L Macro mode (Close-ups) ...................................................... |
23 |
K Using the Flash........................................................................... |
24 |
J Using the Self-Timer............................................................... |
26 |
a Shooting Mode......................................................................... |
28 |
Selecting a Shooting Mode...................................................... |
28 |
Shooting Modes ........................................................................... |
29 |
G SCENE RECOGNITION........................................................ |
29 |
More on Playback |
|
Single-Frame Playback ............................................................... |
33 |
Playback Zoom.............................................................................. |
34 |
Multi-Frame Playback ................................................................. |
35 |
Sort by Date ..................................................................................... |
36 |
A Deleting Pictures..................................................................... |
37 |
Movies |
|
A Recording Movies................................................................... |
39 |
D Viewing Movies ....................................................................... |
41 |
Connections |
|
Viewing Pictures on TV............................................................... |
42 |
Printing Pictures via USB ........................................................... |
43 |
Connecting the Camera ............................................................ |
43 |
Printing Selected Pictures ........................................................ |
43 |
Printing the DPOF Print Order ................................................ |
44 |
Creating a DPOF Print Order.................................................... |
46 |
Viewing Pictures on a Computer............................................ |
49 |
Installing FinePixViewer............................................................ |
49 |
Installing FinePixViewer S: Windows................................. |
49 |
Installing FinePixViewer: Macintosh.................................. |
52 |
Connecting the Camera ............................................................ |
54 |
iv

Table of Contents
Menus |
|
The Shooting Menu...................................................................... |
56 |
Using the Shooting Menu......................................................... |
56 |
Shooting Menu Options............................................................ |
57 |
g ISO............................................................................................. |
58 |
k QUALITY.................................................................................. |
59 |
d EXP. COMPENSATION......................................................... |
60 |
e WHITE BALANCE.................................................................. |
61 |
c CONTINUOUS (Continuous shooting)......................... |
62 |
The Playback Menu....................................................................... |
63 |
Using the Playback Menu ......................................................... |
63 |
Playback Menu Options............................................................. |
64 |
b RED EYE REMOVAL.............................................................. |
65 |
B SLIDE SHOW .......................................................................... |
66 |
E PROTECT................................................................................. |
67 |
F COPY......................................................................................... |
68 |
D IMAGE ROTATE...................................................................... |
70 |
H TRIMMING.............................................................................. |
71 |
The Setup Menu............................................................................. |
72 |
Using the Setup Menu ............................................................... |
72 |
Setup Menu Options................................................................... |
73 |
a IMAGE DISP. .......................................................................... |
74 |
b FRAME NO............................................................................. |
74 |
c DIGITAL ZOOM.................................................................... |
75 |
a LCD POWER SAVE ............................................................... |
75 |
f PLAYBACK VOLUME........................................................... |
75 |
g LCD BRIGHTNESS................................................................ |
75 |
m FORMAT ................................................................................. |
76 |
o AUTO POWER OFF.............................................................. |
76 |
p TIME DIFFERENCE............................................................... |
77 |
Technical Notes |
|
Optional Accessories ................................................................... |
78 |
Accessories from Fujifilm.......................................................... |
79 |
Troubleshooting |
|
Troubleshooting ............................................................................ |
80 |
Warning Messages and Displays............................................ |
86 |
Appendix |
|
Glossary ............................................................................................. |
90 |
Internal Memory/Memory Card Capacity.......................... |
91 |
Specifications.................................................................................. |
93 |
Caring for the Camera ................................................................. |
98 |
v

About This Manual
This manual is for use with the following FinePix cameras: the J27, J28, J29, J30, J32, J37 and J38. All operations are identical; save where otherwise noted, the illustrations in this manual show the J30.
Model |
|
Effective pixels |
Image size (pixels) |
|
FinePix J27 / J28 |
/ J29 |
|
10.2 million |
rF/rN/g3:2/o/n/m/p |
FinePix J30 / J32 |
/ J37 |
* / J38 |
12.2 million |
yF/yN/!3:2/0/n/m/p |
* FinePix J37 has a 3.0-inch monitor and the others each have a 2.7-inch monitor.
Before using the camera, read this Owner’s Manual and the other supplied documents. For information on specific topics, consult the sources below.
Camera Q & A .................................................... pg. ii
Know what you want to do but don’t know the name for it? Find the answer in “Camera Q & A.”
Table of Contents ..............................................pg. iv
The “Table of Contents” gives an overview of the entire manual. The principal camera operations are listed here.
..............................................Troubleshooting |
pg. 80 |
Having a specific problem with the camera? |
|
Find the answer here. |
|
|
|
Glossary .......................................................... |
pg. 90 |
The meanings of some technical terms may be found here.
Warning Messages and Displays |
.......................pg. 86 |
Find out what’s behind that flashing icon or error message in the monitor.
Restrictions on Camera Settings
See another supplied document for restrictions on the options available in each shooting mode.
 Memory Cards
Pictures can be stored in the camera’s internal memory or on optional SD and SDHC memory cards. In this manual, SD memory cards are referred to as “memory cards.” For more information, see page 8.
vi
Introduction
Symbols and Conventions
The following symbols are used in this manual:
CCaution: This information should be read before use to ensure correct operation. ANote: Points to note when using the camera.
B Tip: Additional information that may be helpful when using the camera.
Menus and other text in the camera monitor are shown in bold. In the illustrations in this manual, the monitor display may be simplified for explanatory purposes.
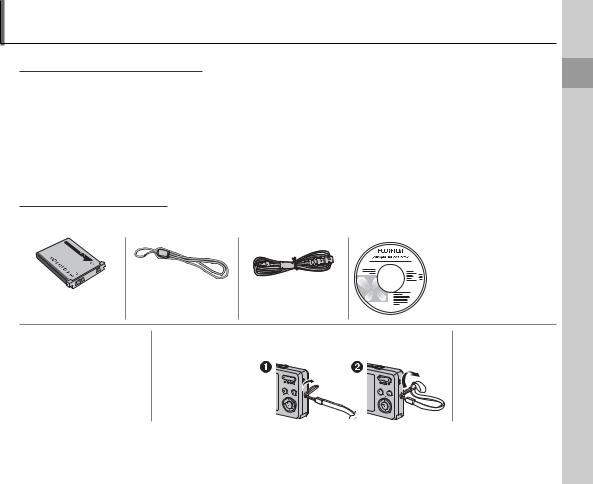
Supplied Accessories
The following items are included with the camera:
FinePix software CD
NP-45A rechargeable |
Strap |
USB cable |
battery |
|
|
AC adapter
(The type of the plug depends on the country or region where you purchased the camera.)
 Attaching the Strap
Attach the strap as shown.
Owner’s Manual (may be distributed on CD in some countries or regions)
Begin You Before
1

Introduction
Parts of the Camera
For more information, refer to the page listed to the right of each item.
|
8 |
9 |
10 |
7 |
|
||
|
|
||
|
|
|
1 2
|
|
3 |
|
|
|
4 |
|
|
|
17 |
|
|
|
|
16 |
|
|
|
20 |
6 |
5 |
18 |
19 |
|
|||
|
|
|
Selector button |
|
|
11 |
Move cursor up |
|
|
|
|
||
12 |
o (monitor brightness) |
|
|
button (see below) |
MENU/OK button |
||
|
|||
13 |
I (delete) button (pg. 18) |
(pg. 13) |
|
14 |
Move cursor left |
Move cursor right |
|
15 |
L (macro) |
K (flash) button |
|
|
button (pg. 23) |
(pg. 24) |
|
|
Move cursor down |
|
|
|
J (self-timer) button (pg. 26) |
||
1 |
...................................Shutter button |
16–17 |
8 |
.............................................................Monitor |
|
3 |
14 |
............................D (playback) button |
33 |
2 |
ON/OFF button............................................. |
12 |
9 |
DISP (display)/BACK button.......... |
16, 33 |
15 |
Strap eyelet.................................................... |
1 |
|
3 |
Flash.................................................................. |
24 |
|
( (silent mode) button.................... |
25 |
16 |
Battery-chamber cover.......................... |
4 |
|
4 |
Self-timer lamp.......................................... |
26 |
10 |
Indicator lamp............................................ |
|
17 |
17 |
Tripod mount |
|
5 |
Lens and lens cover |
|
11 |
W (zoom out) button..................... |
|
15, 35 |
18 |
Battery chamber......................................... |
4 |
6 |
Microphone................................................. |
39 |
12 |
T (zoom in) button........................... |
|
15, 34 |
19 |
Battery latch .................................................. |
4 |
7 |
Speaker........................................................... |
41 |
13 |
USB multi-connector........ |
6, 42, 43, 54 |
20 |
Memory card slot....................................... |
9 |
|
B Tip: Monitor Brightness
Pressing the o button briefly increases monitor brightness, making the display easier to see in bright light. Normal brightness is restored when a photograph is taken.
2

Introduction
The Monitor
The following indicators may appear in the monitor during shooting and playback:
■ Shooting |
|
|
|
|
|
|
|
4 |
3 |
2 |
1 |
|
12 |
|
|
|
|
|
|
|
5 |
|
|
|
N |
9 |
13 |
6 |
|
|
|
ISO 100 |
14 |
|
7 |
|
|
|
|
|
15 |
8 |
|
|
|
|
|
16 |
9 |
|
|
|
|
|
|
|
|
|
|
|
|
|
10 |
|
|
|
|
|
17 |
|
|
|
|
|
18 |
|
11 |
12/31/2050 |
|
10:00 AM |
|
||
|
|
|
||||
|
|
|
|
-12 3 |
|
19 |
1 |
.............Macro (close-up) mode |
23 |
11 |
...................................Date and time |
|
13 |
2 |
Flash mode......................................... |
24 |
12 |
Quality........................................... |
39, 59 |
|
3 |
Silent mode ...................................... |
25 |
13 |
Number of available frames |
....91 |
|
4 |
Intelligent Face Detection |
|
14 |
Sensitivity........................................... |
|
58 |
|
indicator............................................... |
19 |
15 |
Focus warning ................................. |
|
16 |
5 |
Shooting mode............................... |
28 |
16 |
Blur warning...................................... |
|
24 |
6 |
Battery level....................................... |
14 |
17 |
Bright monitor indicator.............. |
|
2 |
7 |
Self timer indicator........................ |
26 |
18 |
Internal memory indicator * |
|
|
8 |
White balance .................................. |
61 |
19 |
Exposure compensation.......... |
|
60 |
9 |
Continuous mode ......................... |
62 |
|
|
|
|
10 |
Focus frame....................................... |
16 |
|
|
|
|
|
|
|
|
|
|
|
■ Playback |
|
|
|
|
|
5 |
4 |
3 |
2 |
1 |
7 |
|
|
|
|
|
|
6 |
|
|
|
100-0001 |
8 |
|
|
|
|
N |
|
|
|
|
|
ISO 100 |
|
12/31/2050 |
10:00 AM |
1/250 F3.3 |
-12 3 |
*Indicates that no memory card is inserted and that pictures will be stored in the camera’s internal memory (pg. 8).
1 |
.............................Protected image |
67 |
5 |
.................Silent mode indicator |
25 |
2 |
DPOF print indicator................... |
46 |
6 |
Playback mode indicator .......... |
33 |
3 |
Red-eye removal indicator * ... |
65 |
7 |
Gift image........................................... |
33 |
4 |
Intelligent Face Detection |
|
8 |
Frame number................................. |
74 |
|
indicator............................................... |
19 |
|
|
|
|
|
|
|
|
|
*This icon appears when playing back an image processed using the redeye removal function in the playback menu, although the camera does not have the function in the shooting mode.
Begin You Before
3
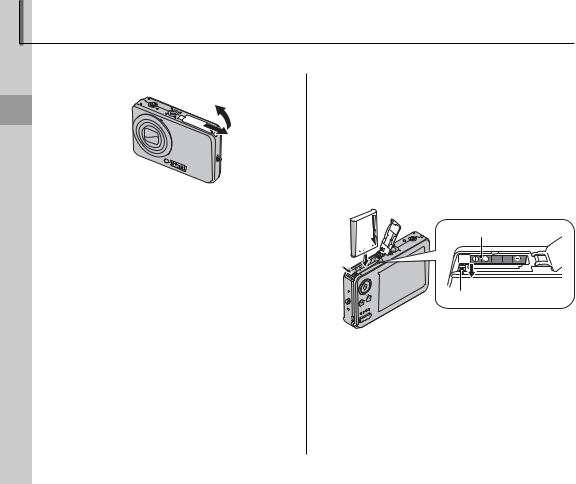
Inserting the Battery
Steps First
The following explains how to insert the battery into the camera.
1 Open the battery-chamber cover.
ANote
Be sure the camera is off before opening the battery-chamber cover.
C Cautions
•Do not open the battery-chamber cover when the camera is on. Failure to observe this precaution could result in damage to image files or memory cards.
•Do not use excessive force when handling the battery-chamber cover.
2Insert the battery.
Face the gold contacts downward and insert the battery into the battery-chamber as shown by the marks F, Band E inside the battery-chamber, pressing the battery latch with the battery in the direction shown below. Confirm that the battery is securely latched.
FBE
Battery latch
C Caution
Insert the battery in the correct orientation. Do
NOT use force or attempt to insert the battery upside down or backwards. The camera will not function if the battery is inserted backwards or upside down.
4
Inserting the Battery
3 Close the battery-chamber cover.
 Removing the Battery
After turning the camera off, open the batterychamber cover, press the battery latch to the top, and slide the battery out of the camera as shown.
Battery latch
C Caution
Turn the camera off before removing the battery.
Steps First
5

Charging the Battery
The battery is not charged at shipment. Charge the battery before use.
1Connect the supplied AC adapter into the USB multi-connector.
Confirm that the camera is off.
2Plug the AC adapter in.
Plug the AC adapter into a power outlet. The Indicator Lamp will light up red (pg. 17). The Indicator Lamp will turn off when the battery is fully charged.
ANote
The camera operates in external power mode if you plug the AC adapter in with the camera powered on.
6

Charging the Battery
C Cautions: Caring for the Battery
•The only types of batteries you can use are NP-45A (supplied) and NP-45 (optional).
•Use only the camera to charge NP-45A. Failure to observe this precaution could result in product malfunction.
•Do not affix stickers or other objects to the battery. Failure to observe this precaution could make it impossible to remove the battery from the camera.
•Do not short the battery terminals. The battery could overheat.
•Do not remove the labels from the battery or attempt to split or peel the outer casing.
•The battery gradually loses its charge when not in use. Charge the battery one or two days before use.
•Read the supplied documentation for additional cautions concerning battery use.
C Caution: Battery Life
A noticeable decrease in the length of time the battery will hold a charge indicates that it has reached the end of its service life and should be replaced.
C Cautions: Charging the Battery
•Remove dirt from the battery terminals with a clean, dry cloth. Failure to observe this precaution could prevent the battery from charging.
•Charging times increase at low temperatures.
Steps First
7

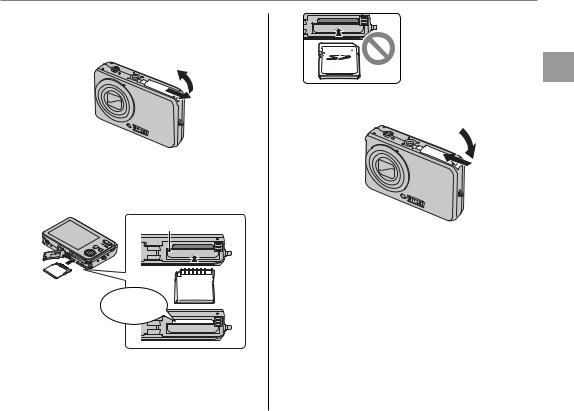
Inserting a Memory Card
Although the camera can store pictures in internal memory, SD memory cards (sold separately) can be used to store additional pictures.
When no memory card is inserted, d appears in the monitor and internal memory is used for recording and playback. Note that because camera malfunction could cause internal memory to become corrupted, the pictures in internal memory should periodically be transferred to a computer and saved on the computer hard disk or on removable media such as CDs or DVDs. The pictures in internal memory can also be copied to a memory card (see page 68). To prevent internal memory from becoming full, be sure to delete pictures when they are no longer needed.
When a memory card is inserted as described below, the card will be used for recording and playback.
■ Compatible Memory Cards
SanDisk SD and SDHC memory cards have been tested and approved for use in the camera. A complete list of approved memory cards is available at http://www.fujifilm.com/products/digital_ cameras/index.html. Operation is not guaranteed with other cards. The camera can not be used with MultiMediaCard (MMC) or xD-Picture cards.
C Caution
Memory cards can be locked, making it impossible to format the card or to record or delete images. Before inserting a memory card, slide the write-protect switch to the unlocked position.
Write-protect switch
8
Inserting a Memory Card
■ Inserting a Memory Card
1 Open the battery-chamber cover.
2Insert the memory card.
Holding the memory card in the orientation shown below, slide it all the way in.
Be sure card is in correct orientation; do not insert at an angle or use force.
3 Close the battery-chamber cover.
Battery
CLICK
Steps First
9
Inserting a Memory Card
 Removing Memory Cards
Be sure the camera is off before opening the battery-chamber cover. Press the card in and then release it slowly. The card can now be removed by hand.
C Cautions
•The memory card may spring out if you remove your finger immediately after pushing the card in.
•Memory cards may be warm to the touch after being removed from the camera. This is normal and does not indicate a malfunction.
10

Inserting a Memory Card
C Cautions
•Format memory cards before first use, and be sure to reformat all memory cards after using them in a computer or other device. For more information on formatting memory cards, see page 76.
•Memory cards are small and can be swallowed; keep out of reach of children. If a child swallows a memory
card, seek medical assistance immediately.
•Do not use miniSD or microSD adapters that expose the back of the card. Failure to observe this precaution may cause damage or malfunction. Adapters that are larger or smaller than the standard dimensions of an SD card may not eject normally; if the card does not eject, take the camera to an authorized service representative. Do not forcibly remove the card.
•Do not turn the camera off or remove the memory card while the memory card is being formatted or data are being recorded to or deleted from the card. Failure to observe this precaution could damage the card.
•Do not affix labels to memory cards. Peeling labels can cause camera malfunction.
•Movie recording may be interrupted with some types of memory card.
•The data in internal memory may be erased or corrupted when the camera is repaired. Please note that the repairer will be able to view pictures in internal memory.
•Formatting a memory card or internal memory in the camera creates a folder in which pictures are stored. Do not rename or delete this folder or use a computer or other device to edit, delete, or rename image files. Always use the camera to delete pictures from memory cards and internal memory; before editing or renaming files, copy them to a computer and edit or rename the copies, not the originals.
Steps First
11

Turning the Camera on and Off
Shooting Mode
Press the n button to turn the camera on. The lens will extend and the lens cover will open.
Press n again to turn the camera off.
B Tip: Switching to Playback Mode
Press the D button to start playback. Press the shutter button halfway to return to shooting mode.
C Cautions
•Pictures can be affected by fingerprints and other marks on the lens. Keep the lens clean.
•The n button does not completely disconnect the camera from its power supply.
B Tip: Auto Power Off
Playback Mode
To turn the camera on and begin playback, press the D button for about a second.
Press the D button again to turn the camera off.
B Tip: Switching to Shooting Mode
To exit to shooting mode, press the shutter button halfway. Press the D button to return to playback.
The camera will turn off automatically if no operations are performed for the length of time selected in the AUTO POWER OFF menu (see page 76).
12

Basic Setup
A language-selection dialog is displayed the first time the camera is turned on. Set up the camera as described below (for information on resetting the clock or changing languages, see page 72).
1 Choose a language.
 START MENU


 / LANG.
 SET
SET  NO
NO
1.1Press the selector up, down, left, or right to highlight a language.
1.2Press MENU/OK.
2 Set the date and time.
|
DATE / TIME NOT SET |
|
|
|
|
2011 |
|
|
|
2010 |
|
YY.MM.DD |
2009 |
1. 1 12:00 |
|
|
|
2008 |
AM |
|
|
2007 |
|
|
SET |
NO |
|
2.1 Press the selector left or right  to highlight the year, month,

 day, hour, or minute and press
  up or down to change. To change the order in which the year, month, and day are displayed, highlight the date format and press the selector up or down.
2.2Press MENU/OK.
Steps First
ANote
Go to the setup menu if you try to set the language and date again (pg. 72).
B Tip: The Camera Clock
If the battery is removed for an extended period, the camera clock will be reset when the camera is turned on. If the battery has been left in the camera for about 2 hours or more, the battery can be removed for about 24 hours without resetting the clock.
13
Taking Pictures in k (Auto) Mode
Playback and Photography Basic
This section describes how to take pictures in k mode.
1Turn the camera on.
Press the n button to turn the camera on.
B Tip: Intelligent Face Detection
The first time the camera is turned on, Intelligent Face Detection is automatically activated and the camera is optimized for taking portrait photographs. For more information on using Intelligent Face Detection, see page 19.
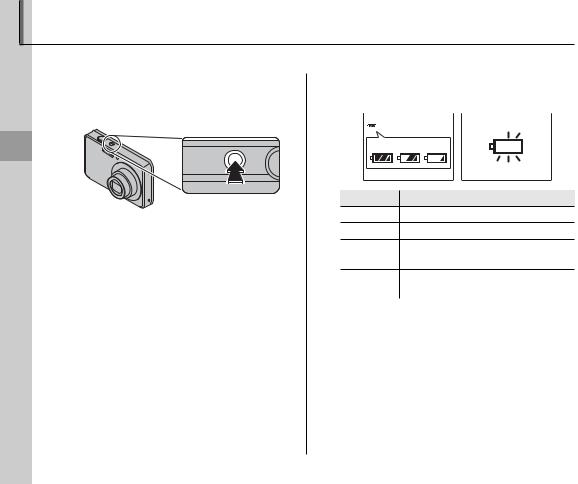
2Check the battery level.
Check the battery level in the monitor.
r 
q w e
Indicator |
Description |
q (white) Battery partially discharged.
w (white) Battery more than half discharged.
e (red) Low battery. Charge as soon as possible.
r (blinks red) Battery exhausted. Turn camera off and charge battery.
14
Taking Pictures in k(Auto) Mode
3Frame the picture.
Position the main subject in the focus area and use the zoom buttons to frame the picture in the monitor.
Press W to zoom out |
Press T to zoom in |
||||||||||||||||
|
|
|
|
|
|
|
|
|
|
|
|
|
|
|
|
|
|
|
|
|
|
|
|
|
|
|
|
|
|
|
|
|
|
|
|
|
|
|
|
|
|
|
|
|
|
|
|
|
|
|
|
|
|
|
|
|
|
|
|
|
|
|
|
|
|
|
|
|
|
|
|
Zoom indicator
Zoom in using optical zoom, or use digital zoom (pg. 75) to zoom in closer.
 Holding the Camera
Hold the camera steady with both hands and brace your elbows against your sides. Shaking or unsteady hands can blur your shots.
To prevent pictures that are out of focus or too dark (underexposed), keep your fingers and other objects away from the lens and flash.
B Tip: Focus Lock
Use focus lock (pg. 21) to focus on subjects that are not in the focus frame.
Playback and Photography Basic
15
Taking Pictures in k(Auto) Mode
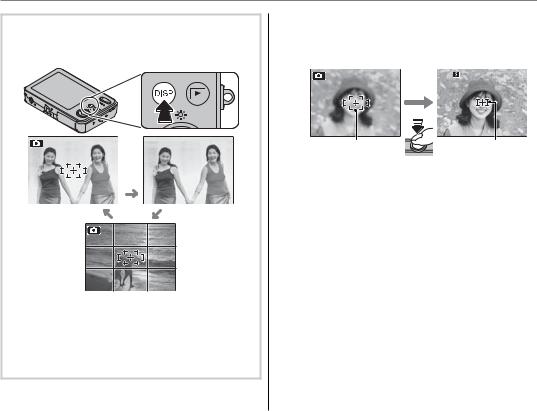
 Framing Guideline
The images change as shown below if you press the
DISP/BACK button.
Indicators |
Indicators |
displayed |
hidden |
|
Best framing |
To use the best framing, position the main subject at the intersection of two lines or align one of the horizontal lines with the horizon. Use focus lock (pg. 21) to focus on subjects that will not be in the center of the frame in the final photograph.
4Focus.
Press the shutter button halfway to focus on the main subject in the focus frame.
|
250 |
F3.3 |
Focus frame |
Camera selects small |
|
Press
focus frame and
halfway
focuses on subject
If the camera is able to focus, it will beep twice and the indicator lamp will glow green.
If the camera is unable to focus, the focus frame will turn red, a R indicator will appear
in the monitor, and the indicator lamp will blink green. Change the composition or use focus lock (pg. 21).
ANote
The lens may make a noise when the camera focuses. This is normal.
16

Taking Pictures in k(Auto) Mode
5Shoot.
Smoothly press the shutter button the rest of the way down to take the picture.
B Tip: The Shutter Button
The shutter button has two positions. Pressing the shutter button halfway (q) sets focus and exposure; to shoot, press the shutter button the rest of the way down (w).
ANote
Double |
CLICK |
|
beep |
||
|
||
q |
w |
If the subject is poorly lit, the flash may fire when the picture is taken. To take pictures without the flash, choose another flash mode (pg. 24).
 The Indicator Lamp


 Indicator lamp
The indicator lamp shows camera status as follows:
Indicator lamp |
Camera status |
Glows green |
Focus locked. |
Blinks green |
Camera shake warning, AF warning, |
or AE warning (ready to shoot) |
|
Blinks green |
Recording pictures. Additional |
and orange |
pictures can be taken. |
Glows |
Recording pictures. No additional |
orange |
pictures can be taken at this time. |
Blinks orange |
Flash charging; flash will not fire |
when picture is taken. |
|
Glows red |
Battery charging while camera is off. |
Blinks red |
Recording or lens error. |
B Tip: Warnings
Detailed warnings appear in the monitor. See pages 86–89 for more information.
Playback and Photography Basic
17
Viewing Pictures
Pictures can be viewed in the monitor. When taking important photographs, take a test shot and check the results.
1 Press the D button.
The most recent picture will be displayed in the monitor.
100-0001  N ISO 100
12/31/2050 10:00 AM 1/250 F3.3
2 View additional pictures.
Press the selector right to view pictures in the order recorded, left to view pictures in reverse order.
Press the shutter button to exit to shooting mode.
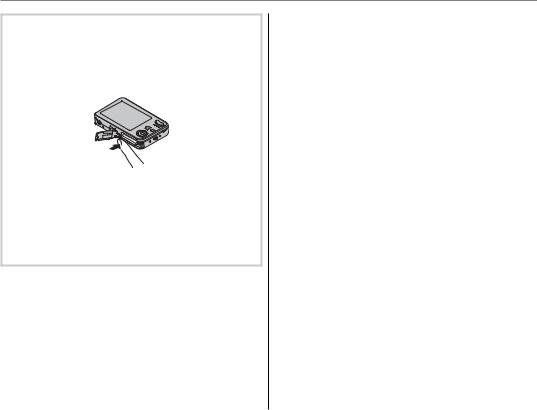
 Deleting Pictures
To delete the picture currently displayed in the monitor, press the selector up (A). The following dialog will be displayed.
 ERASE OK?
OK CANCEL
 SET
SET
To delete the picture, press the selector left to highlight OK and press MENU/OK. To exit without deleting the picture, highlight CANCEL and press MENU/OK.
B Tip: The Playback Menu
Pictures can also be deleted from the playback menu (pg. 37).
18
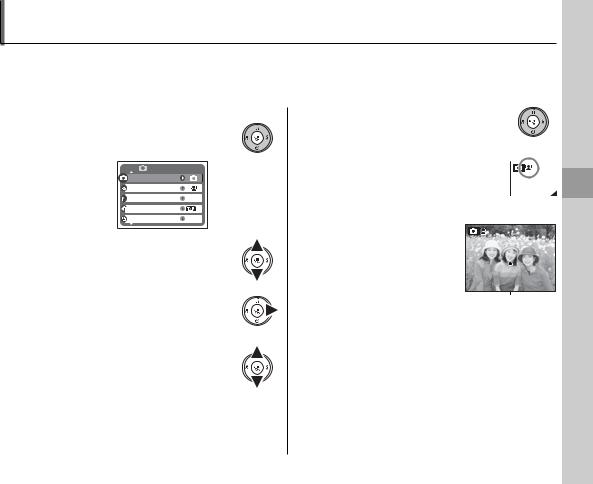
Intelligent Face Detection
Intelligent Face Detection allows the camera to automatically detect human faces and set focus and exposure for a face anywhere in the frame for shots that emphasize portrait subjects. Choose for group portraits to prevent the camera from focusing on the background.
1Turn Intelligent Face Detection on.
1.1Press MENU/OK to display the shooting menu.
SHOOTING MENU |
|
SHOOTING MODE |
|
FACE DETECTION |
|
ISO |
AUTO |
QUALITY |
N |
CONTINUOUS |
OFF |
1.2Press the selector up or down to highlight c FACE DETECTION.
1.3Press the selector right to display Intelligent Face Detection options.
1.4Press the selector up or down to highlight the desired option.
1.5 Press MENU/OK to select the highlighted option and return to shooting mode.
B icon appears in monitor when Intelligent Face
Detection is on.
2 Frame the picture.
If a face is detected, it will
be indicated by a green border. If there is more than one face in the
frame, the camera will select the face closest
to the center; other faces are indicated by white borders.
Photography on More
19
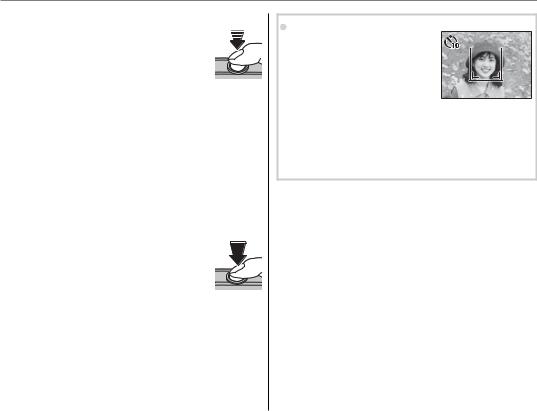
Intelligent Face Detection
3 Focus.
Press the shutter button halfway to set focus and exposure for the subject in the green border.
C Cautions
•If no face is detected when the shutter button is pressed halfway (pg. 82), the camera will focus on the subject at the center of the monitor.
•In each shooting mode, the camera will detect and focus on faces but exposure will be optimized for the entire scene rather than the selected portrait subject.
4 Shoot.
Press the shutter button all the way down to shoot.
C Caution
If the subject moves as the shutter button is pressed, their face may not be in the area
indicated by the green border when the picture is taken.
 Intelligent Face Detection
Intelligent Face Detection is
7 recommended when using the 
self-timer for groupor selfportraits (pp. 26–27).
•The camera can zoom in on pictures taken with Intelligent Face Detection during slide shows (pg. 66).
•Red-eye removal (b) is available in the playback menu (pg. 65).
20
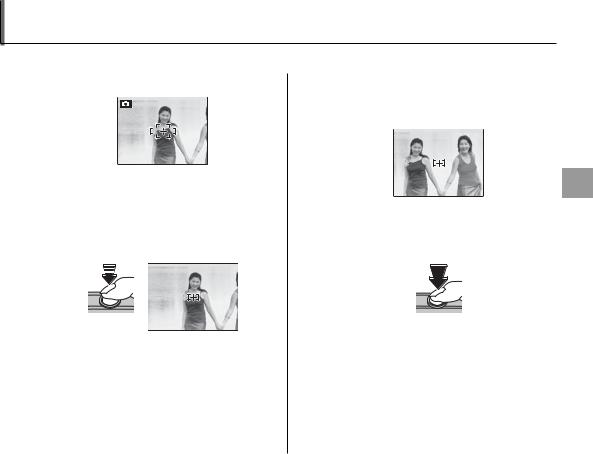
Focus Lock
To compose photographs with off-center subjects:
1 Position the subject in the focus frame.
2Focus.
Press the shutter button halfway to set focus and exposure. Focus and exposure will remain locked while the shutter button is pressed halfway (AF/AE lock).
Press |
250 F3.3 |
halfway
Repeat steps 1 and 2 as desired to refocus before taking the picture.
3Recompose the picture.
Keeping the shutter button pressed halfway, recompose the picture.
250 F3.3
4Shoot.
Press the shutter-release button the rest of the way down to take the picture.
Press the rest of the way down
Photography on More
21

Focus Lock
 Autofocus
Although the camera boasts a high-precision autofocus system, it may be unable to focus on the subjects listed below. If the camera is unable to focus using autofocus, use focus lock (pg. 21) to focus on another subject at the same distance and then recompose the photograph.
• Very shiny subjects such as mirrors or car bodies.
• Fast-moving subjects.
•Subjects photographed through a window or other reflective object.
•Dark subjects and subjects that absorb rather than reflect light, such as hair or fur.
•Insubstantial subjects, such as smoke or flame.
•Subjects that show little contrast with the background (for example, subjects in clothing that is the same color as the background).
•Subjects positioned in front of or behind a high-contrast object that is also in the focus frame (for example, a subject photographed against a backdrop of highly contrasting elements).
22

L Macro mode (Close-ups)
To select macro mode, press the selector left (L).
Licon appears in monitor when camera is in macro mode
When macro mode is in effect, the camera focuses on subjects near the center of the monitor. Use the zoom buttons to frame pictures.
To exit macro mode, press the selector left (L). Macro mode can also be cancelled by turning the camera off or selecting another shooting mode.
ANote
Use of a tripod is recommended to prevent blur caused by camera shake.
Photography on More
23

K Using the Flash
Use the flash when lighting is poor, for example when shooting at night or indoors under low light.
To choose a flash mode, press the selector right (K). The flash mode changes each time the selector is pressed; in modes other than AUTO, the current mode is indicated by an icon in the monitor. Choose from the following options (some options are not available in all shooting modes; see the restrictions in another supplied document):
Mode |
Description |
|
AUTO (no icon) |
The flash fires when required. Recommended in most situations. |
|
S (red eye |
Recommended to take a portrait shot in the dark. Red-eye can be reduced. |
|
reduction) |
||
|
||
K (fill flash) |
The flash fires whenever a picture is taken. Use for backlit subjects or for natural coloration |
|
when shooting in bright light. |
||
|
||
W (suppressed |
The flash does not fire even when the subject is poorly lit. 0 will appear in the monitor at |
|
flash) |
slow shutter speeds to warn that pictures may be blurred. Use of a tripod is recommended. |
|
T (slow sync) |
Capture both the main subject and the background when shooting at night (note that |
|
Z (red eye |
||
brightly lit scenes may be overexposed). If U is selected for a SHOOTING MODE, shutter |
||
reduction + |
||
speed may be slow. Use a tripod. In Z mode, red-eye can be reduced. |
||
slow sync) |
||
|
If the flash will fire, X will be displayed in the monitor when the shutter button is pressed halfway.
C Caution
The flash may fire several times with each shot. Do not move the camera until shooting is complete.
24
 Loading...