


English
Svenska
Norsk
Dansk
Suomi
Français
Deutsch
Español
Italiano
HandleEasy
328gsm

1
2

3


4
5


ABC
GHI JKL
PQRS TUV
DEF
MNO
XYZ
9 |
8 |
7 |
6 |
English
1 |
UP volume/ |
6 |
# and ring setup/ |
|
navigation |
|
vibrator |
2 |
DOWN volume/ |
7 |
Disconnect |
|
navigation |
|
(ON/OFF) |
3 |
Menu/OK w |
8 |
One-touch keys |
4 |
Call/answer |
9 |
Charging/headset |
5 |
* and Keylock |
|
socket |
Svenska
1 |
UPP volym/navigering 6 |
# och ringsignal/ |
|
2 |
NED volym/navigering |
|
vibrator |
3 |
Menyknapp/OK w |
7 |
Nedkoppling (AV/PÅ) |
4 |
Uppringning/svara |
8 |
Direktvalsknappar |
5 |
* och knapplås |
9 |
Laddnings/ |
|
|
|
headset-uttag |
Norsk
1 |
OPP volum/navigering |
6 |
# og ringesignal/ |
2 |
NED volum/navigering |
|
vibrator |
3 |
Meny/OK w |
7 |
Nedkobling (AV/PÅ) |
4 |
Oppringing/svar |
8 |
Hurtigtaster |
5 |
* og tastelås |
9 |
Lade-/hodesettuttak |
Dansk
1 |
OP lydstyrke/ |
5 |
* og tastaturlås |
|
|
navigering |
6 |
# og ringesignal/ |
|
2 |
NED lydstyrke/ |
|
vibrator |
|
|
navigering |
7 |
Afbrydertast (TIL/FRA) |
|
3 |
Menutast/ OK w |
8 |
Hurtigvalgstaster |
|
4 |
Opkalds-/besvartast |
9 |
Stik til opladning/ |
|
Suomi |
|
headset |
||
4 |
Soitto-/vastauspainike |
|||
1 |
Lisää |
|||
|
äänenvoimakkuutta/ |
5 |
* ja näppäinlukko |
|
|
siirtyminen ylös |
6 |
# ja soittoääni/ |
|
2 |
Vähemmän |
|
värinähälytin |
|
|
äänenvoimakkuutta/ |
7 |
Katkaisu-/virtapainike |
|
|
siirtyminen alas |
8 |
Pikavalintapainikkeet |
|
3 |
Valikkonäppäin/OK w |
9 |
Lataamis-/ |
|
Français |
|
kuulokeliitäntä |
||
|
|
|||
1 |
Augmentation du |
|
de réglage de |
|
|
volume/navigation |
|
sonnerie/vibreur |
|
2 |
Diminution du |
7 |
Touche de raccroché |
|
|
volume/navigation |
|
et de mise en/ |
|
3 |
Touche de défilement |
|
hors service |
|
|
du menu/OK w |
8 |
Touches de |
|
4 |
Touche de décroché |
|
mémoires directes |
|
5 |
Touche * et de |
9 |
Prise du chargeur |
|
|
verrouillage du clavier |
|
et du casque |
|
6 |
Touche # et |
|
|
|
Deutsch
1 |
Lautstärke/ |
5 |
* und Tastensperre |
|
Navigation |
6 |
# und Rufaufbau/ |
|
AUFWÄRTS |
|
Vibrationsalarm |
2 |
Lautstärke/Navigation |
7 |
Verbindung beenden |
|
ABWÄRTS |
|
(EIN/AUS) |
3 |
Menü/OK w |
8 |
Kurzwahltasten |
4 |
Anruf/beantworten |
9 |
Laden/Headset- |
Español |
|
Buchse |
|
|
|
||
1 |
Volumen + / Navegación |
6 |
# y Configuración |
2 |
Volumen - / Navegación |
|
de señal de |
3 |
Tecla de menú/ |
|
llamada/vibrador |
|
Aceptar w |
7 |
Tecla de desconexión |
4 |
Tecla llamar/ |
|
(encendido/apagado) |
|
Responder |
8 |
Teclas de |
5 |
*y bloqueo del teclado |
9 |
marcación directa |
|
|
Conector de carga/ |
|
Italiano |
|
auriculares |
|
|
|
||
1 |
SU volume/ |
6 |
# e configurazione |
|
navigazione |
|
squillo/vibrazione |
2 |
GIÙ volume/ |
7 |
Pulsante di |
|
navigazione |
|
disconnessione |
3 |
Pulsante Menu/OK w |
|
(ON/OFF) |
4 |
Pulsante di |
8 |
Tasti di selezione |
|
chiamata/risposta |
|
rapida |
5 |
* e blocco tasti |
9 |
Presa carica/auricolare |

English
Installation
Note!
Always turn off the telephone before removing the battery cover.
Battery cover
To remove the battery cover, press carefully on the cover and slide it downwards.
To replace the battery cover, slide it from below and up along the telephone.
Installation/removal of SIM card
The SIM card holder is located behind the battery.
Make sure that the SIM card’s contacts are facing inwards and that the cut-off corner is pointing upwards. Take care not to scratch or bend the contacts on the SIM card.
If the SIM card is missing or incorrectly inserted,  is shown in the display.
If the SIM card is damaged,  is shown in the display.

English
Installation/removal of battery
Place the top of the battery in the battery slot with the battery contacts facing the contacts in the slot, then press carefully on the bottom of the battery until it locks in place.
To remove the battery, carefully press and lift the bottom of the battery in the “finger-shaped” groove.
Charging
Connect the mains adapter to the wall socket and to the socket on the telephone. Charge the telephone for 24 hours the first time. After that, it takes approximately 5 hours to fully charge the battery.
Battery
Full battery capacity will not be reached until the batteries have been charged 4–5 times. Batteries degrade over time, which means that call time and standby time will normally decrease with regular use.

English
The automatic charging mechanism prevents the batteries from being overcharged or damaged due to prolonged charging.
When the battery is running low, 
 is displayed and a warning signal is heard.
Warning!
Only use batteries, charger and accessories that have been approved for use with
this particular model. Connecting other accessories may be dangerous and may invalidate the telephone’s type approval and guarantee.
Connection to a USB port on a computer may damage the telephone or the computer.
English
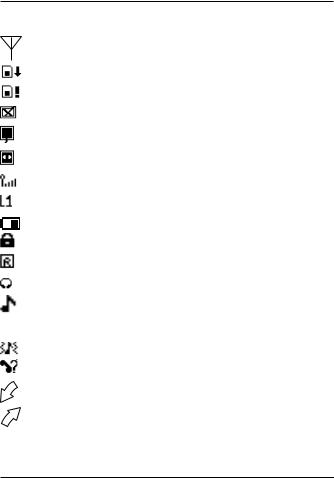
Display symbols
Searching for networks
No SIM card
SIM card error
General error indication
Charger connected
Charging completed
Signal strength
Line 1 (some operators have 2 lines)
Battery indicator
Keylock active
Roaming (connected to other network)
Headset connected
Ring only
Vibrator only
Vibrator + Ring
Missed call
Incoming call
Outgoing call
z Incoming SMS message

English
Operation
Activating the telephone
Press and hold L/1 4–5 seconds until the ON signal is heard and the display lights up.
If the SIM card is locked with a PIN code (Personal Identification Number), enter your PIN code now and confirm with w .
The SIM card will only accept a certain number of incorrect PIN code attempts. The display shows how many attempts you have left with ”Remain: #”, where # is the number of attempts left.
When no attempts remain, you need the PUK code (Personal Unblocking Key) supplied with your SIM card to unlock the card and supply a new PIN code.
Enter the PUK code, confirm with w, then enter a new PIN code and confirm it.
If PIN and PUK codes were not supplied with the SIM card, contact your network operator.
English
To turn off the telephone, press L/1 until the OFF signal is heard.
Making a call
1. Enter the desired number with the keypad. Skip backwards with L.
2. Press q to dial. A signal will be heard as the number is dialled.
3. Press L to end the call.
Note!
When making international calls, press * twice for the international prefix "+".
Dialling with the one-touch keys
1.Press one of the one-touch keys A–D followed by q. A signal will be heard as the number is dialled.
Alternatively, press and hold the one-touch key until the signal is heard.
2.Press L to end the call.

English
Dialling with the phonebook
1.Press w , then scroll the list of entries with }/{ or press a keypad key to jump to the entries beginning with that character.
2.Press q to view details for the selected entry. Press L briefly to go back to the list, or press and hold L then w to delete the entry.
3.Press q to dial the number shown on the display. A signal will be heard as the number is dialled.
4.Press L to end the call.
Receiving a call
1.Press q to answer, or L to reject the call without answering.
2.Press L to end the call.
Caller ID
The telephone number of an incoming call is shown on the display. If no information is available, ????? is displayed.
English
Call memory
The 15 most recent calls are saved in the call memory. If multiple calls are related to the same number only the most recent of these calls will be saved.
Retrieving and dialling
1.Press q.
2.Scroll through the call list with {/}.
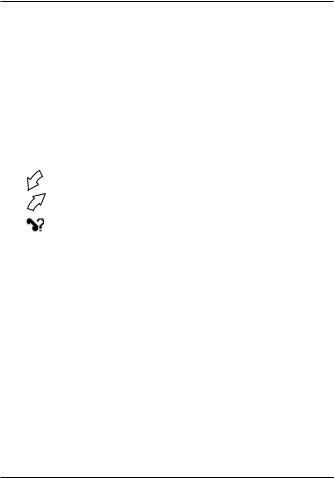
= Incoming call = Outgoing call = Missed call
3.Press q to view details for the selected call.
4. Press q to dial the number, or press L briefly to go back to the call list. To delete the call, press and hold L then acknowledge with w.
5. Press L to end the call.

English
Missed calls
When an incoming call is unanswered,  is
is
shown on the display. The most recent missed call(s) can then be retrieved by immediately pressing w .
1.Press w.
2.Scroll through the missed calls list with
{/}.
3.Press q to view details for the selected call.
4. Press q to dial the number, or press L briefly to go back to the call list. To delete the call, press and hold L then acknowledge with w.
5. Press L to end the call.
Note!
This only works immediately after the call has been received. After that, missed calls can be retrieved from the call list (see page 8).

English
Speakerphone function
The speakerphone function allows the telephone to be used without holding it, e.g. placed on a table in front of you.
1.Place a call in the usual way. When the call is connected, press q again.
2.Speak into the microphone on the lower front edge of the telephone (max 1 metre away).
3.The volume can be adjusted during a call with }/{.
4.To change between speakerphone and normal function, press q.
5.Press L to end the call.
Note!
The speakerphone function allows only one person at a time to talk. Switching between talk/listen is automatic and triggered by the sound of the person talking. Loud noises (music, etc.) in the background may interfere with the speakerphone function.
10

English
SMS text messages
The telephone can receive (but not send) SMS text messages. zis shown in the display when a message is received.
Retrieving text messages
1.Press w twice.
2.Scroll to the desired entry with {/}.
3.Press q to read the message.
4. Press L twice to end or q to dial the number of the sender.
Deleting text messages
1.Press and hold L until w is shown on the display.
2.Press w to delete the message or L to cancel.
11

English
Volume control
The volume can be adjusted during a call with }/{ on the side of the telephone.
Redial
Press q and scroll between the 15 most recently dialled/incoming numbers with }/{.
Press q to review details, then press q to dial the number or L to end.
Press and hold L then w to delete the entry.
Emergency calls
When the telephone is switched on, it is possible to place an emergency call by entering 112 followed by q.
Most mobile networks accept emergency calls even when the SIM card is not in the telephone.
12

English
Keylock
Press and hold */Lfor 2 seconds to lock/ unlock the keypad.  is shown in the display when keylock is active.
Headset
When a headset is connected, the internal microphone in the telephone is disconnected automatically.
When receiving a call, the answer key on the headset cable can be used instead of q.
Warning!
Using a headset on high volume can damage your hearing. Adjust the sound volume carefully when using a headset.
13

English
Settings
Saving telephone numbers
One-touch numbers
Four numbers can be stored under the onetouch keys A–D.
1.Enter the number, including the area code. Skip backwards with L.
2.Press and hold one of the one-touch button A–D until the text cursor appears.
3.Enter a name or description for the number using the keypad (see page 15).
4.Press w twice to save or L to end.
Phone book numbers
100 numbers can be stored in the phone book.
1.Enter the number, including the area code. Skip backwards with L.
2.Press w .
3.Enter a name or description for the number using the keypad (see page 15).
4.Press w twice to save or L to end.
14

English
Sending additional numbers
Additional numbers can be saved with an entry and sent after the call is connected.
1.Enter the telephone number.
2.Press * 4 times until w is shown.
3.Enter the additional number.
4.Save the entry (see page 14).
After dialling, wait until the call is connected then press w to send the additional number.
Inserting a pause in a number
A short pause (3 seconds) can be inserted anywhere in the saved number.
1.Enter the first part of the telephone number (before the pause).
2.Press * 3 times until p is shown.
3.Enter the last part of the number.
4.Save the entry (see page 14).
15
English
International numbers
To save an international number, press * twice for the international prefix (+), then enter the country code, area code (possibly leaving out the first digit) and telephone number.
Deleting phonebook entries
1.Press w and scroll through the list to select the phonebook entry to be deleted.
2.Press q to show details for the selected entry.
3.Press and hold L until w is shown on the display.
4.Press w to delete the entry or L to cancel.
16

English
Keypad characters
 1 Γ Θ Λ Ξ Π
 A B C 2 a b c Å å Ä ä Æ æ Ą ą Ç ç Ć ć
 D E F 3 d e f Ę ę
 G H I 4 g h i
 J K L 5 j k l Ł ł
 M N O 6 m n o Ñ ñ Ń ń Ö ö Ø ø Ó ó Ô ô
 P Q R S 7 p q r s Ś ś
 T U V 8 t u v Ü ü Ű ű
 W X Y Z 9 w x y z Ź ź Ż ż
 * | / µ
 space 0
 # Σ Φ Ψ Ω
17

English
Ring setup
Selecting ring signal
1.Press w. The phone book numbers will be displayed.
2.Press w again. Stored SMS messages will be displayed. If no messages are stored, phone book numbers are displayed.
3.Press and hold w for 2 seconds. The ring signals will be displayed.
4.Scroll between ring signals with {/}.
5.Press w to select a signal.
6.Press L to end.
Adjusting ring volume
1.In standby mode, press and hold } for 2 seconds.
2.Press }/{ to adjust the ring volume.
Vibrator
Press and hold # for 2 seconds to change the signalling mode:
Ring only
Vibrator only
Ring and vibrator
18

English
Time/date
Setting the time and date
1.Press w, the phone book numbers will be displayed.
2.Press w again, stored SMS messages will be shown. If no messages are stored, phone book numbers are still displayed.
3.Press and hold w for approx. 2 seconds, the ring signals will be displayed.
4.Press and hold w for approx. 2 seconds.
5.Press w to enter time (HH:MM).
6.Press w to save.
7.Scroll to date with }/{.
8.Press w and enter date (YYYY.MM.DD).
9.Press w to save.
10.Press L to end.
19

English
Care and Maintenance
Your unit is a technically advanced product and should be treated with the greatest care. By following the advice below, you can ensure that the guarantee will cover any damage.
•Protect the unit from moisture. Rain/snowfall, moisture and all types of liquid can contain substances that corrode the electronic circuits. If the unit gets wet, you should remove the battery and allow the unit to dry completely before you replace it.
•Do not use or keep the unit in dusty, dirty environments. The unit’s moving parts and electronic components can be damaged.
•Do not keep the unit in warm places. High temperatures can reduce the lifespan for electronic equipment, damage batteries and distort or melt certain plastics.
•Do not keep the unit in cold places. When the unit warms up to normal temperature, condensation can form on the inside which can damage the electronic circuits.
•Do not try to open the unit in any other way than that which is indicated here.
•Do not drop the unit. Do not knock or shake it either. If it is treated roughly the circuits and precision mechanics can be broken.
•Do not use strong chemicals to clean the unit.
•Use the charger indoors.
The advice above applies to the unit, battery, charger or other accessories. If the telephone is not working as it should, please contact the place of purchase for service. Don’t forget the receipt or a copy of the invoice.
20

English
Further safety information
The unit and the accessories can contain small parts. Keep them out of the reach of small children.
Operating environment
Remember to follow any particular rules that may apply wherever you happen to be, and always turn off the unit whenever its use is forbidden, or it can cause interference or danger. Only use the unit in its normal user position.
This unit complies with guidelines for radiation when it is used either in a normal position against your ear, or when it is at least 2.2 cm (7/8 inch) from your body. If the unit is carried close to your body in a case, belt holder or other holder these should not contain any metal, and the product should be placed at the distance from your body specified above. Make sure that the distance instructions above are followed until the transfer is complete.
Parts of the unit are magnetic. The unit can attract metal objects. Do not keep credit cards or other magnetic media near the unit, as information stored on them can be erased.
Medical units
The use of equipment that transmits radio signals, e.g. mobile phones, can interfere with insufficiently protected medical apparatus. Consult a doctor or the manufacturer of the apparatus to determine if it has adequate protection against external radio signals, or if you have
any questions. If notices have been put up at health care facilities instructing you to turn off the unit while you are there, you should comply. Hospitals and other health care facilities sometimes use equipment that can be sensitive to external radio signals.
21

English
Pacemaker
Pacemaker manufacturers recommend a distance of at least 15 cm (6 inches) between a mobile phone and a pacemaker to avoid the risk of interference with the pacemaker. These recommendations are in accordance with independent research and recommendations from Wireless Technology Research. People with pacemakers should:
•always keep the unit at a distance of at least 15 cm from the pacemaker
•not carry the unit in a breast pocket
•hold the unit against the ear on the opposite side from the pacemaker to reduce the risk of interference.
If you suspect that there is a risk of interference, turn off the unit and move it further away.
Hearing aids
Some digital wireless units can cause interference to some hearing aids. Using the Doro HearPlus eh346m EarHook can eliminate this for hearing aids with a ‘T’ position. If any other interference occurs, please contact your operator.
22

English
Vehicles
Radio signals can affect electronic systems in motor vehicles (e.g. electronic fuel injection, ABS brakes, automatic cruise control, air bag systems) that have been incorrectly installed or are inadequately protected. Contact the manufacturer or its representative for more information about your vehicle or any additional equipment.
Do not keep or transport flammable liquids, gases or explosives together with the unit or its accessories. For vehicles equipped with air bags: Remember that air bags fill with air with considerable force.
Do not place objects, including fixed or portable radio equipment in the area above the airbag or the area where it might expand. Serious injuries may be caused if the mobile phone equipment is incorrectly installed and the airbag fills with air.
It is forbidden to use the unit whilst flying. Turn off the unit before you board a plane. Using wireless telecom units inside a plane can involve risks for air safety and interfere with telecommunications. It can also be illegal.
Areas with explosion risk
Always turn off the unit when you are in an area where there is a risk of explosion and follow all signs and instructions. An explosion risk exists in places that include areas where you are normally requested to turn off your car engine. Within such an area, sparks can cause explosion or fire which can lead to personal injuries, even death.
Turn off the unit at filling stations i.e. near petrol pumps and garages. Follow the restrictions that are in force on the use of radio equipment near places where fuel is stored and sold, chemical factories and places where blasting is in progress.
Areas with risk for explosion are often – but not always – clearly marked. This also applies to below decks on ships; the transport or storage of chemicals; vehicles that use liquid fuel (such as propane or butane); areas where the air contains chemicals or particles, such as grain, dust or metal powder.
23

English
Emergency calls Important!
Mobile phones such as this unit use radio signals, the mobile phone network, the terrestrial network and user-programmed functions. This means that connection in all circumstances cannot be guaranteed. Therefore you should never rely solely on a mobile phone for very important calls such as medical emergencies.
Specific Absorption Rate (SAR)
This device meets applicable international safety requirements for exposure to radio waves. This telephone measures 0.3 W/kg (GSM 900MHz), 0.2 W/kg (DCS 1800MHz) (measured over 10g tissue). The max. limit according to WHO is 2W/kg (measured over 10g tissue).
Declaration of conformity
Doro hereby declares that the Doro HandleEasy 328gsm conforms to the essential requirements and other relevant regulations contained in the Directives 1999/5/EC (R&TTE) and 2002/95/EC (RoHS).
A copy of the Declaration of Conformity is available at www.doro.com/dofc
Specifications
Network: GSM 900/DCS1800/PCS1900 Triple Band
Size: 135mm x 58.5mm x 16mm
Weight: 111g (incl. battery)
Battery 700 mAh Li-ion battery
24

English
Guarantee
This product is guaranteed for a period of 12 months from the date of purchase. In the unlikely event of a fault occurring during this period, please contact the place of purchase. Proof of purchase is required for any service or support needed during the guarantee period.
This guarantee will not apply to a fault caused by an accident or a similar incident or damage, liquid ingress, negligence, abnormal usage, nonmaintenance or any other circumstances on the user’s part. Furthermore, this guarantee will not apply to any fault caused by a thunderstorm or any other voltage fluctuations. As a matter of precaution, we recommend disconnecting the device during a thunderstorm.
Batteries are consumables and are not included in any guarantee.
This guarantee does not apply if batteries other than DORO original batteries have been used.
UK
Technical support is available by email on tech@doro-uk.com
Premium rate telephone number: 0905 895 0854, calls cost 50 pence per minute (price correct at the time of
publication).
You can also contact us in writing (regarding any Spares or Technical query):
Customer Services Doro UK Ltd
1 High Street Chalfont St Peter Buckinghamshire
SL9 9QE
Further contact details are available on our website: www.doro-uk.com.
25
 Loading...