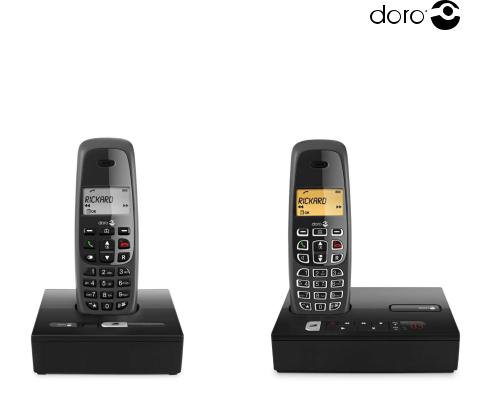
Doro NEOBIO 15R, NEOBIO 10, NEOBIO 25R, NEOBIO 20 User Manual

NeoBio 10/15r/20/25r

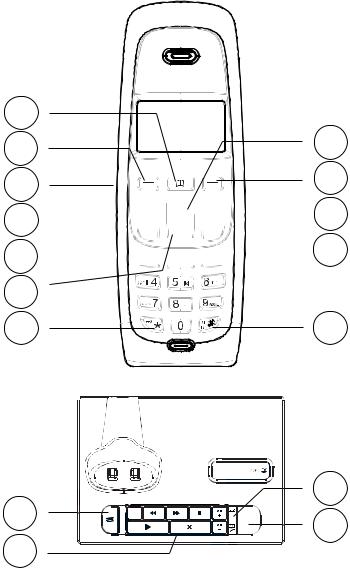
1 |
12 |
2 |
|
3 |
11 |
4


 10
10
5


 9
9
6 |
|
7 |
8 |
NeoBio 15r/25r 


13 |
16 |
|
15 |
||
14 |
||
|
English
1 |
Phone book |
10 |
End call and on / off button |
2 |
Left menu button/OK |
11 Right menu button/Back/Internal call |
|
3 |
Headset connector (NeoBio 20/25r) |
12 |
Up / missed call |
4 |
Talk button |
13 |
Paging |
5 |
Speaker phone (NeoBio 20/25r) |
Only for NeoBio 15r/25r: |
|
|
Redial (NeoBio 10/15r) |
||
6 |
Down/Redial |
14 |
Answer machine functions, see |
7 |
* and keypad lock |
|
answer machine section |
8 |
# and ring signal off/on |
15 |
Message indication/display |
9 |
Recall button (PBX features) |
16 |
Indicators, see separate description |
Français
1 |
Répertoire |
11 |
Touche menu / Retour / Intercom |
2 |
Touche menu / OK |
12 |
Touche défilement / Journal des |
3 |
Prise casque (NeoBio 20/25r) |
|
appelants |
4 |
Touche de prise de ligne |
13 |
Touche de recherche du combiné |
5 |
Touche Mains-libres (NeoBio 20/25r) |
UniquementpourlemodèleNeoBio15r/25r: |
|
|
Touche Bis (NeoBio 10/15r) |
||
6 |
Touche défilement / Bis |
14 |
Fonctions répondeur, voir la section |
7 |
* et Verrouillage du clavier |
|
Répondeur |
8 |
Touche # et Sonnerie Off/On |
15 |
Compteur de messages |
9 |
Touche R |
16 |
Témoins lumineux, voir description. |
10 |
Touche de raccroché et on/off |
|
|

English
Connection
1.Connect mains adapter/phone cable to wall sockets.
2.Insert batteries (1.2V NiMH AAA) in accordance with the markings.
3.Charge with the keypad facing outwards (24 hours the first time).
4. Press
5.Scroll {/} to HS SETTINGS.
6.Press OK (left menu button).
7.Scroll to LANGUAGE. Press OK.
8.Scroll to ENGLISH. Press OK.
9. Press L or
If the NeoBio 15r/25r base unit’s display is showing -- the answer machine is disconnected, or time/date is not set.
Date/Time
10.Press (left menu button).
11.Scroll {/} to HS SETTINGS. Press OK.
12.Scroll to HS DISPLAY. Press OK.
13.Scroll to TIME. Press OK.
14.Scroll to DATE & TIME. Press OK.
15.Scroll to SET TIME. Press OK.
16.Enter time of day (HH-MM). Press OK. 17.Scroll to SET DATE. Press OK. 18.Enter date (DD MM YY). Press OK.
19.Press L or several times to exit the menu screens.
The format of date/time can also be adjusted.
Battery
When the batteries are relatively new and fully-charged (10 hours) they will last for approx. 100 hours’ standby time or approx. 10 hours’ call time. These times apply at normal room temperature. Full battery capacity will not be reached until the batteries have been charged 4-5 times. It is not possible to overcharge or damage the batteries by charging them for ”too long”. It may take up to 5 minutes charging before display wakes up, if batteries are totally empty.
Please note!
When the battery is low or when there is too great a distance to the base unit the telephone will be unable to connect to a line. Do not place the base unit close to other electrical equipment, in direct sunlight or other
strong heat sources! This is to minimize the risk of any interference. It is normal for the device to become warm during charging and this is not dangerous. Use only original batteries. The guarantee does not cover any damage caused by using the wrong batteries.

English
Battery LED
When the batteries are running low,  will flash and a warning tone will be heard when a call is in progress.
Please note that the complete battery indicator in the display will flash as long as the handset is charging, and when the battery is fully charged only the inner segment will flash.
Base unit indicators
7 Steady light while charging is in progress and flashes when fully charged.
Only NeoBio 15r/25r:
Steady light during calls and flashes when there is an incoming call or new message on the answer
machine.
Range
The telephone’s range depends on whether or not the radio waves carrying the call are restricted by obstacles in their path, and is usually between 50 and 300 metres. Coverage can be improved by turning one’s head so that the handset is aligned with the base unit. Sound quality declines as the limit is reached until the call is finally interrupted.
The 6 symbol is shown when the phone is within range and goes out/flashes when it is out of range.
Making a call
1.Enter the required number. Delete if necessary with right menu button C.
2.Press q to make the call. Press L to end the call.
Please note! (Only NeoBio 20/25r)
To switch between handset/speaker press . In speaker mode, you cannot both speak at once – you must take it in turns to talk.
Receiving a call
1.Wait for the handset to ring.
2.Press q to answer. Press L to end the call.
Volume control
The volume may be adjusted during a call with {/}.
Redial
Press r. Scroll among the 5 most recently dialled numbers with {/}. Press q.
Mute button
The microphone can be switched off/on during a call with C (right menu button).
Paging
The handset will ring when J (on the base unit) is pressed. The signal will stop automatically after a while or if the L button on the handset or the J button on the base unit are pressed.

English
Temporary silent mode
When someone calls, you can press C (right menu button) to turn off the handset ring signal.
Softkeys
Note the top two keys are “softkeys”. Their function is shown in the Display directly above them.
Phonebook
You can save 20 numbers/names. If you subscribe to a caller ID service, the name allocated to the caller in the phonebook will be shown for incoming calls. It is possible to choose between various ringers for the numbers saved in the Phonebook (only functions if you subscribe to a caller ID service).
Save name/number in handset
1.Press b. Press  .
.
2.Scroll to ADD. Press OK.
3.Press equivalent digit key several times for desired name. Press OK.
4.Enter the telephone number, including the area code. Delete if necessary with right menu button C. Press OK.
5.Scroll to required ringer. Press OK.
Managing the phonebook
1.Press b. Scroll between entries with {/}. You can quick search the phonebook by pressing the corresponding number key for the first letter.
2.Press q to make a call or press  for various options.
Incoming numbers/Caller ID
The display shows you who is calling and the 10 most recent missed calls. NEW CALLS will be shown in standby mode and in the list indicates a missed call. This function requires a subscription from your service provider!
Retrieving and dialling |
|
||
1. |
Press {. Scroll to the desired entry with }. |
||
2. |
Press q to call or press |
for various options |
|
|
( |
= back). |
|
Caller identification messages
In addition to number display, the following messages will be shown occasionally: OUT OF AREA Unknown number, e.g. international call.
WITHHELD Information about the number is blocked. Number cannot be shown.
a |
MSG indication from your network operator* |
*To remove the message indicator press: Press { and then hold down 4.

English
Functions
1. Press . Scroll to HS SETTINGS. Press OK.
2.Scroll to desired function e.g. LANGUAGE. Press OK.
3.Scroll to desired setting. Press OK.
Alarm |
When the alarm is activated |
will be shown in standby mode. When the alarm goes |
|
off, a signal will be heard for 45 seconds. The signal can be turned off with any button. If |
|
|
SNOOZE is activated the alarm will go off again approx. 7 minutes later. Turn the alarm |
|
|
off permanently via the menu or by holding L down for a few seconds. The volume is |
|
|
determined by the set ringer level. |
|
Ring sETUP |
The handset’s ringer signal. |
INT/EXT=internal/external. |
Melodies 2,3,4... can continue for up to 8 seconds if the call is answered in another phone.
TONE SETUP Any of the following warning tones can be disbled, Keytone, low battery and range. LANGUAGE The language of the display texts.
RENAME HS The text shown in standby mode. HS DISPLAY Show name or time in standby mode.
Auto Answer The call is answered when the handset is lifted from the base. Date & Time Setting the date/time. The format of date/time can also be adjusted.
System settings
System PIN is 0000 on delivery.
1. Press . Scroll to Bs SeTTINGS. Press OK.
2.Scroll to desired function. Press OK.
3.Enter the desired setting. Press OK.
BS RINGER/ |
The base unit’s ringer signal can be |
RING VOLUME |
adjusted. Only applies to NeoBio 15r/25r. |
DeLETE HS |
Warning: To de-register a handset: WARNING, A deregistered handset can not be used with |
|
the system. |
DIAL MODE |
TONE/PULSE, should normally be set to TONE. |
Flash Time |
RECALL TIME. |
|
LONG=New Zealand. |
|
MEDIUM=France/Portugal. |
|
SHORT=others incl. UK/AUS. |
CHANGE PIN |
The code(e.g. 0000) can be changed. |

English
Expanded system (Two or more handsets e.g +1...)
The call number for internal calls will be shown in the display in standby mode. The base unit should be positioned centrally so that the coverage area is roughly equal for all handsets.
Intercom / internal call
1.Press  (right menu button).
2.If using more than 2 handsets: Enter call number 1-6 for the desired handset or press 9 for all.
A tone will be heard if an external call comes in while an internal call is in progress. End the internal call with L and then answer the external call with q.
Transferring calls/Conference between handsets
When an external call is connected;
1. Press . Scroll to INTERCOM. Press OK.
2.If using more than 2 handsets: Enter call number 1-6 for the desired handset or press 9 for all.
3.To transfer: press L,
For conference: hold * pressed down.
Register a new handset
All handsets included in the package are already registered to the base unit. Only for separate handsets/ service measures. You can register up to 6 handsets to one base unit.
This model is GAP (Generic Access Profile) compatible, which means that the handset and the base unit can both be used with most other GAP compatible units irrespective of manufacturer. However the GAP protocol cannot guarantee that all functions may be accessed. Extra handsets will not be available as accessories.
1.Hold down J (base unit) until indicator flashes.
2.Press . Scroll to Registration. Press OK.
3.Enter the base unit’s PIN code (e.g. 0000). Press OK.
4.If the registration is successful the unit will return to standby mode within one minute.
 Loading...