


Prosound
hs1910 DECT

1 |
2 |
4 |
|
||
|
3 |
|
|
|
5 |
6 |
7 |
8 |
9 |
10 |
11 |
12 13 14 15 16 |
English
1 |
Answer button q |
9 |
Termination (A-G) |
|
2 |
Volume control +/- |
10 |
Adjustment of amplification }/{ |
|
3 |
Mute button/Call Waiting z/ R |
11 |
Settings w |
|
4 |
Receiver |
12 |
Handset lifter (q , blue) |
|
5 |
Microphone |
|
|
|
13 |
Power (Y, green) |
|||
6 |
Register button J |
|||
14 |
Line (T, red) |
|||
7 |
Charging cradle |
|||
15 |
Telephone (q, orange) |
|||
8 |
Base indicators |
16 |
Handset (q, light blue) |
|
Svenska |
|
|
||
1 |
Svarsknapp q |
9 |
Terminering (A–G) |
|
2 |
Volymkontroll +/- |
10 |
Förstärkningsreglage }/{ |
|
3 |
Sekretess/samtal väntar z/ R |
11 |
Inställningar w |
|
4 |
Högtalare |
12 |
Lurlyftare (q , blå) |
|
5 |
Mikrofon |
13 |
|
|
Ström (Y, grön) |
||||
6 |
Registreringsknapp J |
14 |
Linje (T, röd) |
|
7 |
Laddningsklyka |
15 |
Telefon (q, orange) |
|
8 |
Basenhetsindikatorer |
16 |
Lur (q, ljusblå) |
|
Norsk |
|
|
||
1 |
Svar-knapp q |
9 |
Terminering (A-G) |
|
2 |
Volumregulering +/- |
10 |
Regulering av forsterkning }/{ |
|
3 |
Mikrofonsperre/Samtale venter z/R |
11 |
Innstillinger w |
|
4 |
Mottaker |
12 |
Håndsettløfter (q , blå) |
|
5 |
Mikrofon |
|
|
|
13 |
Strøm (Y, grønn) |
|||
6 |
Registrer-knapp J |
|||
14 |
Linje (T, rød) |
|||
7 |
Lader |
15 |
Telefon (q, oransje) |
|
8 |
Indikatorer på baseenhet |
16 |
Håndsett (q, lyseblå) |
|
Dansk |
|
|
||
1 |
Svarknap q |
9 |
Terminering (A-G) |
|
2 |
Lydstyrkeregulering +/- |
10 |
Forstærkningsjustering }/{ |
|
3 |
Mikrofonafbryder/Banke på z/ R |
11 |
Indstillinger w |
|
4 |
Modtager |
12 |
Håndsætløfter (q , blå) |
|
5 |
Mikrofon |
|
|
|
13 |
Strøm (Y, grøn) |
|||
6 |
Registreringsknap J |
|||
14 |
Linje (T, rød) |
|||
7 |
Opladningsholder |
15 |
Telefon (q, orange) |
|
8 |
Indikatorer på baseenheden |
16 |
Håndsæt (q, lyseblå) |
|
Suomi
1Vastauspainike q
2Äänenvoimakkuuden säätö +/-
3Mykistyspainike/Koputus z/ R
4Kuuloke
5Mikrofoni
6Rekisteröintipainike J
7Laturi
8Tukiaseman merkkivalot
Français
1Bouton de prise d’appel q
2Réglage du volume +/-
3Bouton sourdine/appel en attente z/ R
4Récepteur
5Microphone
6Bouton d’enregistrement J
7Socle de charge
8Voyants de la base
Deutsch
1Abheben/Auflegen-Taste q
2Lautstärke-Einstellung +/-
3Stummschaltung/R-Funktion z/ R
4Lautsprecher
5Mikrofon
6Anmeldetaste J
7Ladestation
8LED-Anzeigen an der Basis
9Anpassungseinstellung (A-G)
Nederlands
1Antwoordknop q
2Volumeknop +/-
3Mute-knop/Wisselgesprek z/ R
4Ontvanger
5Microfoon
6Registratieknop J
7Lader
8Indicatoren basisstation
9Liitäntä (A-G)
10Vahvistuksen säätö }/{
11Asetukset w
12Luurin suodatin (q , sininen)
13Vista (Y, vihreä)
14Linja (T, punainen)
15Puhelin (q, oranssi)
16Luuri (q, vaaleansininen)
9Terminaison (A-G)
10Réglage de l’amplification }/{
11Réglages w
12Décrocheur de combiné (q , bleu)
13Alimentation (Y, vert)
14Ligne (T, rouge)
15Téléphone (q, orange)
16Combiné (q, bleu clair)
10Mikrofon-Empfindlichkeit }/{
11Einstellmenü w
12Hörerlifter (q , blau)
13Netzteilanschluss (Y, grün)
14Direkter analoger Anschluss (T, rot)
15Anschluss zur Hörerkabelbuchse
(oder Headsetbuchse) am Telefon (q, orange)
16Anschluss Kabel zum Hörer (q, hellblau)
9Afsluitingen (A-G)
10Afstelling signaalversterking }/{
11Instellingen w
12Telefoonhoornopnemer (q , blauw)
13Voeding (Y, groen)
14Lijn (T, rood)
15Telefoon (q, oranje)
16Handset (q, lichtblauw)
English
Installation
You must install and charge the battery before using the headset.
Installation options
IMPORTANT: If you have the handset lifter (purchased separately), follow the installation instructions in the Lifter for hs1910 DECT manual.
Installation options:
1.Using the headset connected to the handset socket on any telephone. q MUST be lit on the base (see Settings).
2.Using the headset connected to a telephone with separate headset outlet. q MUST be lit on the base (see Settings).
3.Using the headset with a standard analog telephone line as a stand-alone product. TMUST be lit on the base (see Settings).
4.Using the headset with a standard analog telephone line together with a telephone. TMUST be lit on the base (see Settings).
Cord labels
The cords provided with your headset have coloured labels attached to help you plug them into the headset base. The back of the headset base has coloured dots above the sockets that correspond to the labels on the cords.
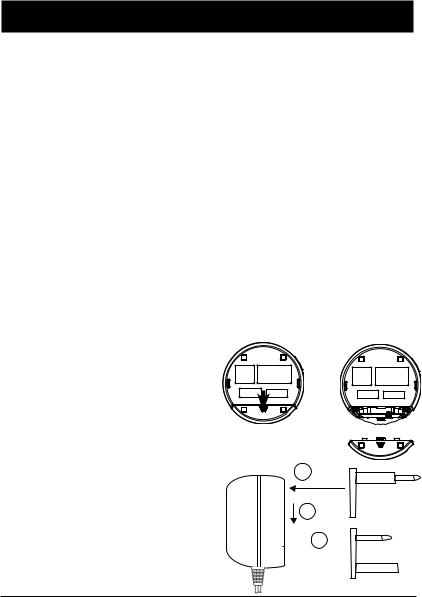
Headset base installation
Before installing the headset base: Remove the rear bottom piece of the headset base by pushing it away from the base.
Install the headset base as shown on the following pages.
After completing the installation:
Slide the rear bottom piece towards the base until it clicks into place.
Changable adapters
The mains power adapter has changable plugs
1.Place the UK or EU plug in the adapter slot.
2.Slide it gently downwards until you hear a click. The adapter is now ready for use.
3.To change plug, press the release button.
1
2


 3
3
EU
UK
English
Battery
The battery in the headset is charged when the headset is placed on the base unit. The light on the headset is lit during the entire charging period.
When the batteries are fully charged (4 hours) they are sufficient for about
6–9 hours call time and about 100 hours in standby mode. The times apply at normal room temperature. For optimum daily performance, return the headset to the base when not in use. Full battery capacity is only achieved when the batteries have been charged 4-5 times. The base unit has an automatic charging mechanism that prevents the battery from being overcharged or damaged
due to prolonged charging. As batteries only have a certain lifespan it is quite normal that call time and standby time will decrease somewhat compared to the
specifications when the telephone is used regularly.
1 |
2 |
3 |
1. |
Press on both sides of the battery compartment |
|
|
cover and remove the cover. |
|
2. |
Insert battery according to the markings and lay |
|
|
the wires flat on top of the battery. |
|
3. |
Insert the tab on the bottom of the battery cover |
4 |
|
into the battery compartment. Press down gently |
|
4. |
on the battery cover until it snaps into place. |
|
Place the headset on the headset base and push |
|
|
|
it downward until the light on the headset turns |
|
|
on. |
|
Warning!
Danger of explosion if battery is incorrectly placed.
Replace only with the same type.
English
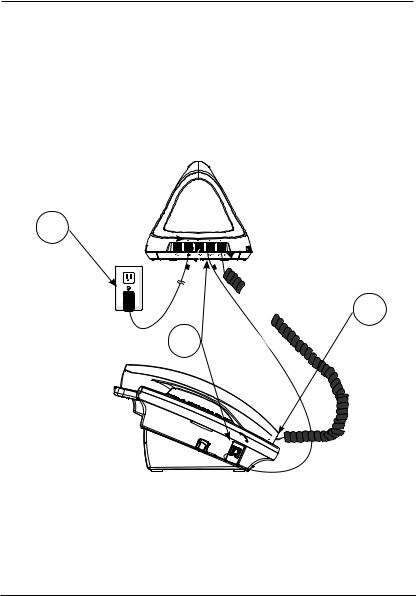
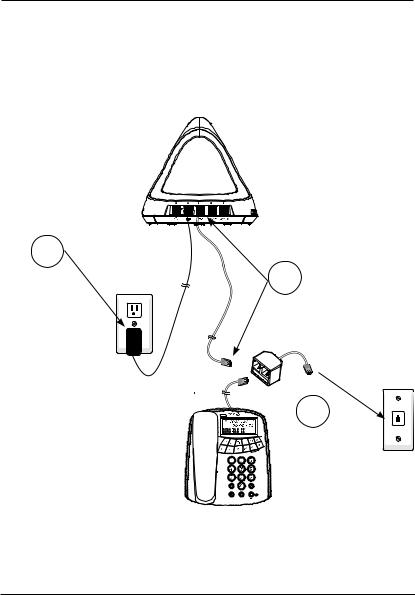
Option 1: Analog or digital phone installation
With this installation, you can make and receive calls using the
PHONE MODE (q). Please note that the handset must be used to connect/ disconnect the headset to the line. This is also the installation option to be used together with the Lifter for hs1910 DECT.
1.Connect the mains adapter to Y (green) and to an electrical outlet.
2.Disconnect the curly handset cord from the telephone. Connect the end of the curly handset cord to q (light blue).
3.Connect the orange cord to q (orange) and the other end to the handset outlet of the phone.
1 
 2
2
3
Make/answer a call
1.Use your telephone as normal to make/answer a call.
2.On the headset, press q to connect to the line.
3.On the headset, press q again to disconnect the call.
4.Replace handset to end the call.
Note!
The headset can be kept active, but that will drain the battery faster.
English
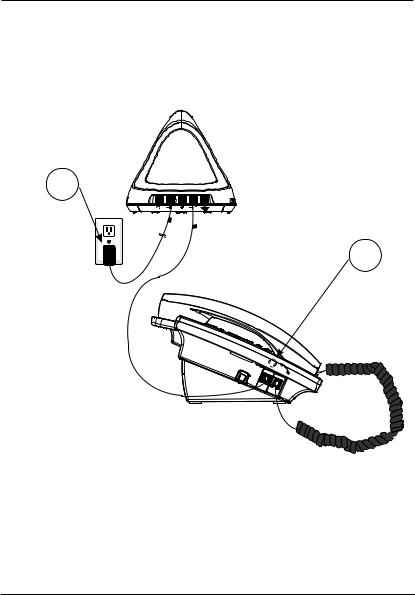
Option 2: Analog or digital phone with headset outlet installation
With this installation, you can make and receive calls using the
PHONE MODE (q). Use the phone’s headset button to connect/disconnect the headset to the line.
1.Connect the mains adapter to Y (green) and to an electrical outlet.
2.Connect the orange cord to q (orange) and the other end to the headset outlet of the phone.
1 


 2
2
Make/answer a call
1.On the headset, press q to connect.
2.Use the headset button on your telephone and make/answer a call.
3.On the headset, press q again to disconnect the call.
4.Use the headset button on your telephone to end the call.
Note!
The headset can be kept active, but that will drain the battery faster.

English
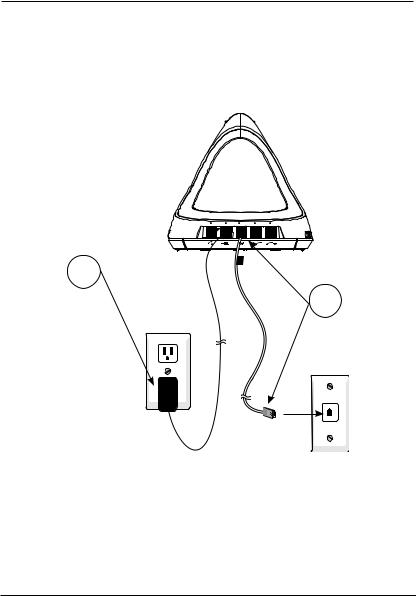
Option 3: Stand-alone installation (analog telephone line)
With this installation, you can receive calls only. Please note that the headset must be in LINE MODE (T).
1.Connect the mains adapter to Y (green) and to an electrical outlet.
2.Connect the line cord to T (red) and to a telephone outlet (both RJ11 and UK available).
1 
2
Answer a call
1.On the headset, press q to answer an incoming call.
2.On the headset, press q again to disconnect the call.
Note!
The ring volume will be very low with this option.
English
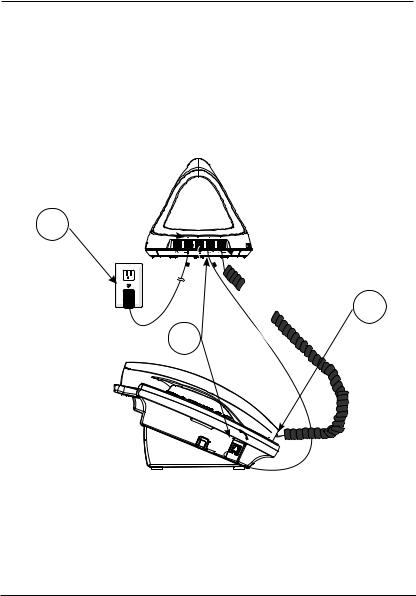
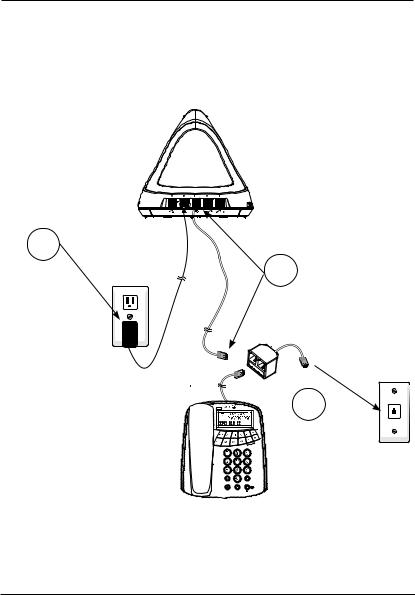
Option 4: Parallel phone installation (analog telephone line)
With this installation, you can make and receive calls using the analog phone with the headset in LINE MODE (T).
1.Connect the mains adapter to Y (green) and to an electrical outlet.
2.Connect the line cord to T (red) and into the supplied splitter (both RJ11 and UK avaiable).
3.Connect the telephone’s line cord into the splitter and connect the splitter to a telephone outlet.
1 


2
 /
/
Make/answer a call
Answer a call as described on previous page.
3 |
1.Use your telephone as normal to make/answer a call.
2.On the headset, press q to connect to the line. You can replace the handset after you hear sound in the headset.
3.On the headset, press q again to disconnect the call.
English
Range
The headset’s coverage varies depending on whether the radio waves carrying the conversation are blocked by obstacles in their path (up to 50 m in a typical office environment). Coverage can be improved by turning one’s head so that the headset is aligned with the base unit.
Sound quality declines as the limit is reached until the call is finally interrupted.
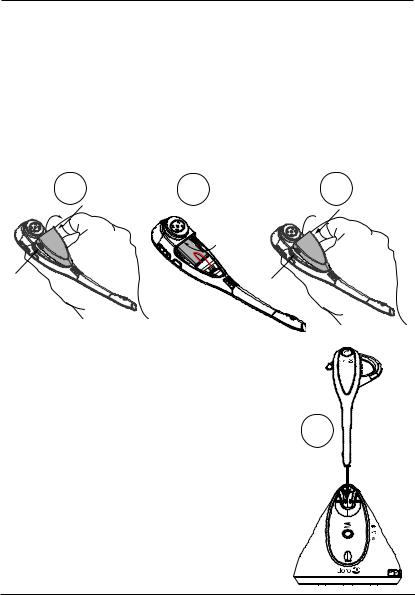
Headset positioners
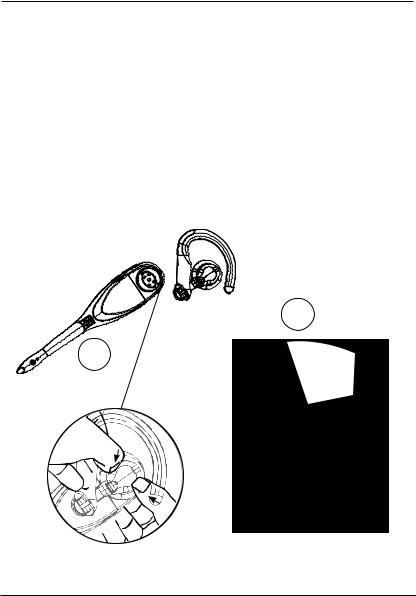
Over-the-ear
To attach the ear hook to the headset:
1.Insert the earpiece into the ear hook and press it towards the earpiece until it clicks into place.
2.Hook the headset onto the desired ear. Adjust the angle of the headset until the microphone is pointing towards your mouth.
2
1
NOTE: You may rotate the hook to fit either the right or left ear.
To remove, twist and pull the ear hook until it separates.
English
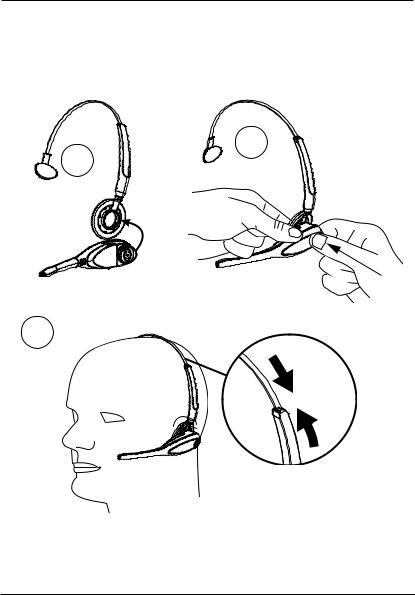
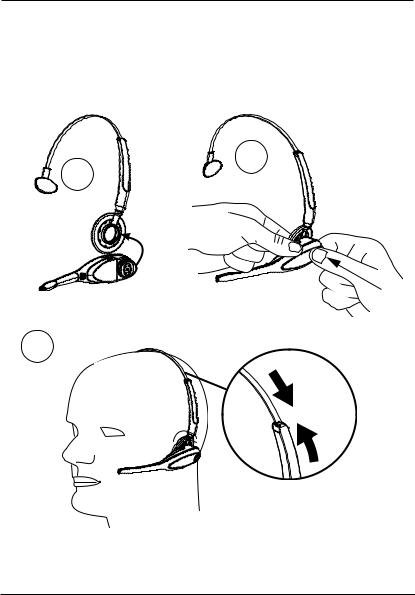
Over-the-head
To attach the headset to the headband for wearing on the left or right ear:
1.Insert the earpiece into the headband ring.
2.Push the earpiece towards the headband ring until it clicks into place.
3.Adjust the headband to fit your head. Adjust and rotate the angle of the headset until the microphone is pointing toward your mouth.
1 2
3
NOTE: To wear on the other ear, rotate the headset within the headband ring. To remove, twist and pull the headset until it separates from the ring of the headband.
English
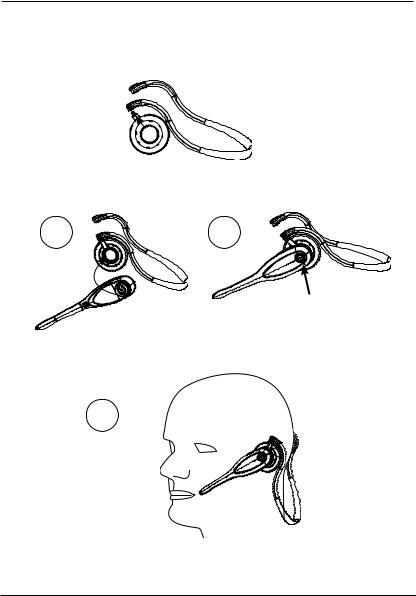
Behind-the-neck
The neckband ring is positioned to wear on the right ear when first purchased.
To wear the headset on your left ear:
1.Remove the ring from the neckband by pulling the ring downwards.
2.Insert the ring into the left arm of the neckband.
To attach the headset to the neckband for wearing on the left or right ear:
1.Insert the earpiece into the neckband ring.
2.Push the earpiece towards the neckband ring until it clicks into place.
1 2
3.Place the neckband around your neck and over your ears and adjust and rotate the angle of the headset until the microphone is pointing toward your mouth.
3
NOTE: To remove, hold on both sides of the headset and twist and pull the headset until it separates from the ring of the headband.

English
Settings
q PHONE MODE or T LINE MODE
There are two modes available on the headset base:
•PHONE MODE (q): If you are connecting to a phone via the handset or headset outlet or using the handset lifter (sold separately) (is the default).
-OR-
•LINE MODE (T): with a standard analog telephone line.
To change the mode:
In idle mode, press w on the headset base to select LINE MODE (T) or
PHONE MODE (q). The corresponding light on the front of the headset base will turn on to indicate the mode setting.
For full instructions on installing and using the handset lifter, see the Lifter for hs1910 DECT manual.
Adaptation to different telephones
Termination
The base unit has a termination switch for adaptation to different telephone systems. The switch can be set in different positions (A-G). If the headset does not work, try all positions until both the receiver and sender have good sound quality. D is standard.
Adjustment of signal amplification
If necessary the sending level (your talk) can be adjusted in 5 stages with the MIC. }(down)/{(up) on the speech.
Volume control
The volume can be adjusted during a call with the +v and -V buttons on the headset. A “triple beep” is heard at the highest and lowest level respectively.
Mute button z/R
The microphone can be switched off/on during a call. Press z/R on the headset to turn off the headset microphone. When mute is on, the z light on the headset base will be on and a short beep will be heard every 15 seconds until mute is turned off. Press z/R again to unmute the call.
Call waiting
If your phone line supports call waiting service, you will hear a beep if there is an incoming call while you are already in a call. Press and hold z/R (2 sec.) on
10

English
the side of the headset to put your current call on hold and answer the new call. You can press and hold z/R at any time to switch back and forth between calls.
NOTE: R + 2 is sent through the line. Your telephone line must comply with this code to work with call waiting.
The timing of the R (recall) is set for EU standard. If the headset should be used in France, Portugal or under PABX with other line characteristics, please change the setting as follows:
1.Press and hold wuntil T/q/z on the base starts blinking.
2.Use MIC. { one base to select:
T 100ms, all European countries except France and Portugal. q 300ms, France and Portugal.
z 600ms, New Zealand and USA.
3.Press wto confirm.
Registration
Adding and registering headset
Your base can register up to two cordless headsets.
The first registered headset will have a blue O light. When you register a second headset to the headset base the O light of the headset will be orange. You cannot register a headset if any headset is in use.
A headset can only be registered to one product at a time, so the headset must be unregistered before registering to another headset base or cordless phone/system.
To register a headset to the headset base:
1.Make sure the battery is properly installed in the headset. O will flash twice every five seconds to indicate the headset is not registered.
2.On the headset base, press and hold J until z on the headset base turns on (about four seconds) and release the button.
3.Place the headset into the headset base.
Registration may take up to 30 seconds to complete. z on the headset base will turn off and O of the newly registered headset will turn orange if registration is successful.
If the registration is not successful, O on the headset will flash twice every five seconds. To reset the headset, remove the headset from the charger and try the registration process again.
11

English
Replacing a headset
You may need to de-register your headsets if:
You have two registered headsets and need to replace one of them.
-OR-
You wish to change the designated headset number of your registered headsets.
You must first de-register both headsets, and then re-register each headset you wish to use. Please read carefully through all the instructions on this page before beginning the de-registration process.
To de-register all headsets
1.Press and hold J on the headset base until z on the headset base turns on and starts to flash (at least 10 seconds), then release the J button.
2.Immediately press and release J again. You must press J while z is still flashing. (The light flashes for about seven seconds. If the light stops flashing, start again with step one above.)
3.z will be off and O on the headset(s) will flash twice in a few seconds indicating the headset is not registered.
4.To re-register the headset(s) to the headset base, follow the registration instructions on previous page.
NOTE!
If the de-registration process was not successful, you may need to reset the system and try again.
You cannot de-register the headsets if any other headset is in use.
Register the headset to a third party device
Prior to registration onto any other DECT-system you need to de-register the headset from the base. You can register this headset onto most GAP-compatible DECT-system, providing that they use PIN 0000.
This model is GAP (Generic Access Profile) prepared, which means that the headset can be used with most other GAP compatible units irrespective of manufacturer. However the GAP protocol cannot guarantee that all functions may be accessed.
Before attempting to register the headset, first read the instructions for registering a new DECT handset in the manual supplied with your DECT system. Registering the headset will be very similar and the information below describes the registration sequence for a typical DECT telephone.
1.Change the system Authentication code of your DECT system to 0000 to match the preset PIN of the headset. Your DECT telephone manual will describe how to do this.
Note: Many DECT telephones already use 0000 as their default Authentication code, so you may not need to change it.
12

English
2.Set the DECT telephone base to subscription mode by following the instructions in your DECT system manual.
3.Place the headset into the headset hs1910-base.
4.Complete registration by following any remaining instructions in your DECT telephone manual.
Registration may take up to 60 seconds to complete. O on the newly registered headset will turn blue/orange if registration was successful.
If the registration is not successful, O on the headset will flash twice every five seconds. To reset the headset, remove the headset from the charger and try the registration process again.
NOTE!
The headset MUST be de-registered from the active DECT system before being registered to another. Follow you DECT system manual for instructions on how to do this.
Sound/light descriptions
Headset alert tones
Three quick beeps. |
• VOLUME }/{ keys are pressed when the volume |
|
is already at its highest or lowest setting. |
|
• The headset is not registered and the headset O |
|
button was pressed. |
|
• The headset has gone out of the range of the base |
|
during a call. |
|
|
1 short beep every |
Low battery warning. |
20 seconds. |
|
|
|
1 short beep every |
The call is muted. |
15 seconds. |
|
|
|
1 long beep |
There is an incoming call. |
repeated. |
|
|
|
1 short beep. |
When O is pressed to go on-hook or off-hook. |
|
|
13

|
|
|
English |
|
|
|
|
Headset q indicator status |
|||
On |
• Headset is charging on the headset base. |
||
|
• Headset is trying to register to the headset base. |
||
|
• On when the headset is out of range. |
||
|
|
|
|
Flash |
• The battery is very low. Three flashes and pause, will repeat |
||
|
three times then shut down. |
||
|
• Flashes twice every five seconds to indicate that the headset is |
||
|
not registered. |
||
|
• Flashes every 20 seconds to indicate that the battery is low |
||
|
and needs to be charged on the headset base. |
||
|
• Flashes every three seconds to indicate the headset is in use. |
||
|
• Flashes quickly when there is an incoming call. |
||
|
|
|
|
|
|
||
Base indicator status |
|||
T |
|
• |
On when T LINE MODE is selected. |
LINE MODE |
• Flashes quickly when there is an incoming call. |
||
|
|
||
|
|
• Flashes when the headset is in use or another |
|
|
|
|
telephone is in use on the same line. |
|
|
|
|
q |
|
• On when q PHONE MODE is selected. |
|
PHONE MODE |
• |
Flashes quickly when there is an incoming call. |
|
|
|
• Flashes when the headset is in use. |
|
|
|
|
|
z |
|
• On when a call is muted or you are registering |
|
MUTE |
|
|
a headset. |
|
|
• Flashes when you are de-registering headset(s). |
|
|
|
|
|
14

English
Troubleshooting
Disconnect any additional equipment, extension cords and other phones. If the problem is resolved, the fault lies with another piece of equipment.
•Check that all cords are undamaged and correctly plugged in.
•Make sure that the battery connector is plugged into the cordless headset.
•Charge the battery in the cordless headset for at least 4 hours. For optimum daily performance, return the cordless headset to its base when not in use.
•Move the cordless headset closer to the headset base. You might have moved out of range.
•When the handset lifter is used, make sure PHONE MODE is selected on the headset base and the headset is in use (pressing O on the headset
and the q on the headset base flashes). Slide on the side of the headset base from A to G until the dial tone is clear.
•If you subscribe to a high-speed Internet service (Digital Subscriber Line
- DSL) through your telephone lines, you must install a DSL filter between the telephone line cord and the telephone wall jack. The filter will prevent noise caused by DSL interference.
•Reset the headset base. Unplug the unit’s electrical power. Wait for approximately 15 seconds, then plug it back in. Allow up to one minute for the cordless headset and headset base to reset.
If despite the above measures the device still doesn’t work, contact the place where the equipment was purchased for service. Don’t forget the receipt/invoice.
15

English
Others
Specific Absorption Rate (SAR)
This device meets applicable international safety requirements for exposure to radio waves.
This device measures 0.02 W/kg (measured over 10 g tissue).
The max. limit according according to the WHO is 2W/kg (measured over 10 g tissue).
Declaration of conformity
We hereby declare that the product ‘Prosound hs1910 DECT’ conforms to the essential requirement and other relevant regulations contained in the directives 1999/5/EC(R&TTE), 2002/95/EC(ROHS). A copy of the manufacturer’s declaration is available at: www.doro.com/dofc
Guarantee
This product is guaranteed for a period of 24 months from the date of purchase. In the unlikely event of a fault occurring during this period, please contact the place of purchase. Proof of purchase is required for any service or support needed during the guarantee period.
This guarantee will not apply to a fault caused by an accident or a similar incident or damage, liquid ingress, negligence, abnormal usage, nonmaintenance or any other circumstances on the user’s part. Furthermore, this guarantee will not apply to any fault caused by a thunderstorm or any other voltage fluctuations. As a matter of precaution, we recommend disconnecting the device during a thunderstorm.
Batteries are consumables and are not included in any guarantee.
This guarantee does not apply if batteries other than DORO original batteries have been used.
NOTE! This guarantee does not affect your legal (statutory) rights under your applicable national laws relating to the sale of consumer products.
Specifications
Battery: |
3.7 V, 240 mAh Lithium Polymer |
Mains adapter: SW-6030090300,
INPUT: 100-240 VAC, 50-60 Hz, 200mA
OUTPUT: 6 VDC, 300 mA + 9VDC, 300 mA Use only original battery and orignal power adapter.
Danger of explosion if battery is incorrectly placed.
16
Svenska
Installation
Du måste installera och ladda batteriet innan du använder headsetet.
Installationsalternativ
VIKTIGT: Om du använder lurlyftaren (säljs separat) följer du installationsinstruktionerna i manualen för Lifter for hs1910 DECT.
Fyra olika alternativ vid installation:
1.Anslut headsetet till telefonlursuttaget på valfri telefon. q MÅSTE lysa på basenheten (se Inställningar).
2.Anslut headsetet till en telefon med separat headsetuttag. q MÅSTE lysa på basenheten (se Inställningar).
3.Använd headsetet som fristående produkt med en analog standardtelefonlinje. TMÅSTE lysa på basenheten (se Inställningar).
4.Anslut headsetet till telefon med en analog standardtelefonlinje. TMÅSTE lysa på basenheten (se Inställningar).
Sladdmärkning
För att underlätta installationen har de medföljande sladdarna färgade etiketter. På baksidan av basenheten sitter färgade prickar ovanför uttagen som motsvarar etiketterna på sladdarna.
Installation av headsetets basenhet
Avlägsna den bakre luckan på headsetets basenhet genom att skjuta den utåt från basenheten.
Sätt tillbaka luckan efter slutförd installation
Utbytbara adaptrar
Nätadaptern har utbytbara kontakter
1.Placera UKeller EU-kontakten i adapteröppningen.
2.Skjut den försiktigt nedåt tills du hör ett klickljud. Adaptern är nu klar att användas.
3.Om du vill byta kontakt trycker du på spärrknappen.
1
2


 3
3
EU
UK

Svenska
Batteri
Batteriet i headsetet laddas när headsetet placeras i basenheten. Lampan på headsetet lyser under hela laddningsperioden.
När batteriet är fulladdat (4 timmar) räcker de till cirka 6–9 timmars samtalstid eller cirka 100 timmars standbyläge. De här tiderna gäller vid normal rumstemperatur. Headsetet bör placeras i basenheten när det inte används för att fungera så bra som möjligt. Fullständig batterikapacitet uppnås först när batterierna har laddats 4–5 gånger. Basenheten har automatisk laddningsfunktion som förhindrar att batteriet skadas av för lång laddning. Eftersom batterier har en begränsad livslängd är det helt normalt att samtalstiden och standbytiden minskar något jämfört med specifikationerna vid
regelbunden användning.
1 |
2 |
3 |
1. |
Tryck inåt på båda sidorna om batteriluckan och |
|
|
avlägsna den. |
|
2. |
Sätt i batteriet enligt markeringarna och lägg |
|
|
ledningarna plant mot batteriets ovansida. |
|
3. |
Infoga fliken längst ned på batteriluckan |
4 |
|
i batterifacket. Tryck försiktigt ned batteriluckan |
|
4. |
tills det klickar till och den sitter på plats. |
|
Placera headsetet i basenheten och tryck det |
|
|
|
nedåt tills lampan på headsetet börjar lysa. |
|
Varning!
Explosionsrisk om batteriet är felaktigt placerat.
Byt endast ut mot batteri av samma typ.
Svenska
Alternativ 1: Installation till telefon utan uttag för headset
Med den här installationen kan du ringa och ta emot samtal i TELEFONLÄGE (q). Eftersom telefonen saknar headsetuttag måste linjen
kopplas upp/ner genom att lyfta telefonluren. Detta är även det installationsalternativ som ska användas ihop med lurlyftaren, Lifter for hs1910 DECT.
1.Anslut nätadaptern till Y (grön) och till ett eluttag.
2.Koppla ur spiralsladden för luren från telefonen. Anslut änden av spiralsladden till q (ljusblå).
3.Anslut den orangea sladden till q (orange) och den andra änden till telefonlursuttaget på telefonen.
1 
 2
2
3
Ringa/besvara ett samtal
1.Använd telefonen som vanligt när du vill ringa/besvara ett samtal.
2.Tryck på q på headsetet när du vill ansluta till telefonlinjen.
3.Tryck en gång till på q på headsetet när du vill avsluta samtalet.
4.Avsluta samtalet genom att lägga på luren.
Obs!
Headsetet kan vara på hela tiden, men det innebär att batteriet tar slut snabbare.

Svenska
Alternativ 2: Installation till telefon med uttag för headset
Med den här installationen kan du ringa och ta emot samtal i TELEFONLÄGE (q). Headsetet ansluts till/kopplas från telefonlinjen med hjälp av telefonens headsetknapp.
1.Anslut nätadaptern till Y (grön) och till ett eluttag.
2.Anslut den orangea sladden till q (orange) och den andra änden till telefonens headsetuttag.
1 


 2
2
Ringa/besvara ett samtal
1.Tryck på q på headsetet när du vill ansluta.
2.Använd headsetknappen på telefonen för att ringa/besvara ett samtal.
3.Tryck en gång till på q på headsetet när du vill avsluta samtalet.
4.Använd headsetknappen på telefonen när du vill avsluta samtalet.
Obs!
Headsetet kan vara på hela tiden, men det innebär att batteriet tar slut snabbare.
Svenska
Alternativ 3: Fristående installation (analog telefonlinje)
Med den här installationen kan du endast ta emot samtal. Observera att headsetet måste vara i LINJELÄGE (T).
1.Anslut nätadaptern till Y (grön) och till ett eluttag.
2.Anslut telefonsladden till T (röd) och till ett telejack (både RJ11 och UK medföljer).
1 
2
Besvara ett samtal
1.Tryck på q på headsetet när du vill besvara ett inkommande samtal.
2.Samtal avslutas med q på headsetet.
Obs!
Ringsignalen är mycket svag med det här alternativet.
Svenska
Alternativ 4: Installation för parallell telefon (analog telefonlinje)
Med den här installationen kan du ringa och ta emot samtal på den analoga telefonen med headsetet i LINJELÄGE (T).
1.Anslut nätadaptern till Y (grön) och till ett eluttag.
2.Anslut telefonsladden till T (röd) och till den medföljande förgreningen (både RJ11 och UK medföljer).
3.Anslut telefonsladden till förgreningen och anslut förgreningen till ett telejack.
1 


2
 /
/
Ringa/besvara ett samtal
3 |
Besvara ett samtal enligt beskrivningen på föregående sida.
1.För utgående samtal, lyft telefonluren och tryck q på headsetet. Slå telefonnumret. När samtalet har kopplats upp kan du lägga på telefonluren.
2.Vid inkommande samtal tryck q på headsetet för att besvara.
Samtal avslutas med q på headsetet.
Svenska
Räckvidd
Headsetets täckning varierar beroende på om radiovågorna som överför konversationen blockeras av några hinder (upp till 50 m i en normal kontorsmiljö). Täckningen kan förbättras om huvudet vrids så att headsetet är i riktning mot basenheten.
Ljudkvaliteten försämras i räckviddens yttre område och samtalet bryts slutligen helt.
Headsetbyglar
Över örat
Så här fäster du öronbygeln i headsetet:
1.Infoga öronsnäckan i öronbygeln och tryck den mot öronsnäckan tills det klickar till.
2.Placera headsetet på ena örat. Justera vinkeln för headsetet tills mikrofonen pekar mot munnen.
2
1
OBS! Du kan rotera bygeln så att den passar antingen höger eller vänster öra. Avlägsna öronbygeln genom att vrida och dra tills den lossnar.
Svenska
Över huvudet
Så här fäster du headsetet i huvudbygeln för att bära det i vänster eller höger öra:
1.Infoga öronsnäckan i ringen på huvudbygeln.
2.Tryck öronsnäckan mot ringen på huvudbygeln tills det klickar till.
3.Justera huvudbygeln efter ditt huvud. Justera och rotera vinkeln för headsetet tills mikrofonen pekar mot munnen.
1 2
3
OBS! Om du vill bära headsetet i andra örat roterar du det i ringen på huvudbygeln. Avlägsna genom att vrida och dra i headsetet tills det lossnar från ringen på huvudbygeln.

Svenska
Bakom nacken
Ringen på nackbygeln är från början placerad för att headsetet ska bäras i höger öra. Så här gör du om du vill bära headsetet i vänster öra:
1.Avlägsna ringen från nackbygeln genom att dra ringen nedåt.
2.Infoga ringen i vänster arm på nackbygeln.
Så här fäster du headsetet i nackbygeln för att bära det i vänster eller höger öra:
1.Infoga öronsnäckan i ringen på nackbygeln.
2.Tryck öronsnäckan mot ringen på nackbygeln tills det klickar.
1 2
3.Placera nackbygeln runt nacken och över öronen och justera och rotera vinkeln för headsetet tills mikrofonen pekar mot munnen.
3
OBS! Avlägsna genom att hålla på båda sidor om headsetet och vrida och dra i headset tills det lossnar från ringen på nackbygeln.

Svenska
Inställningar
q TELEFONLÄGE eller T LINJELÄGE
Det finns två lägen tillgängliga på headsetets basenhet:
•TELEFONLÄGE (q): om headsetet ansluts till en telefons lureller
headsetuttag (eller lurlyftare som säljs separat).
-ELLER-
•LINJELÄGE (T): om du kopplar headsetet till en analog telefonlinje.
Så här ändrar du läge:
Tryck på w på headsetets basenhet i viloläge för att välja LINJELÄGE (T) eller TELEFONLÄGE (q). Inställningen indikeras med lampan på basenhetens framsida.
Fullständiga instruktioner om hur du installerar och använder lurlyftaren finns i manualen till Lifter for hs1910 DECT.
Anpassning för olika telefoner
Terminering
Basenheten har ett reglage för anpassning till olika telefonsystem. Reglaget kan ställas in på olika lägen (A–G). Koppla upp ett samtal med någon annan och flytta reglaget steg för steg tills både mottagning och sändning fungerar.
D är standard.
Justering av signalförstärkningen (mikrofonnivån)
Om det behövs kan sändningsnivån (ditt tal) justeras i 5 steg med hjälp av MIC. }(ned)/{(upp) på basenheten.
Volymkontroll
Volymen kan justeras under ett samtal med knapparna +v och -V på headsetet. Tre pipsignaler hörs på högsta respektive lägsta nivå.
Sekretess z/R
Tryck z/R på headsetet när du vill stänga av headsetmikrofonen. När sekretess är aktiverat lyser lampan z på headsetet och en kort pipsignal hörs var 15:e sekund tills det inaktiveras. Tryck z/R igen när du vill slå på mikrofonen.
Samtal väntar
Om telefonlinjen har stöd för tjänsten Samtal väntar hörs en pipsignal vid ett inkommande samtal när du redan sitter i ett samtal. Tryck och håll in z/R (ca 2 sek.) på sidan av headsetet om du vill placera det aktuella samtalet i kö och
10
 Loading...