


319i ph
MemoryPlus 319i ph
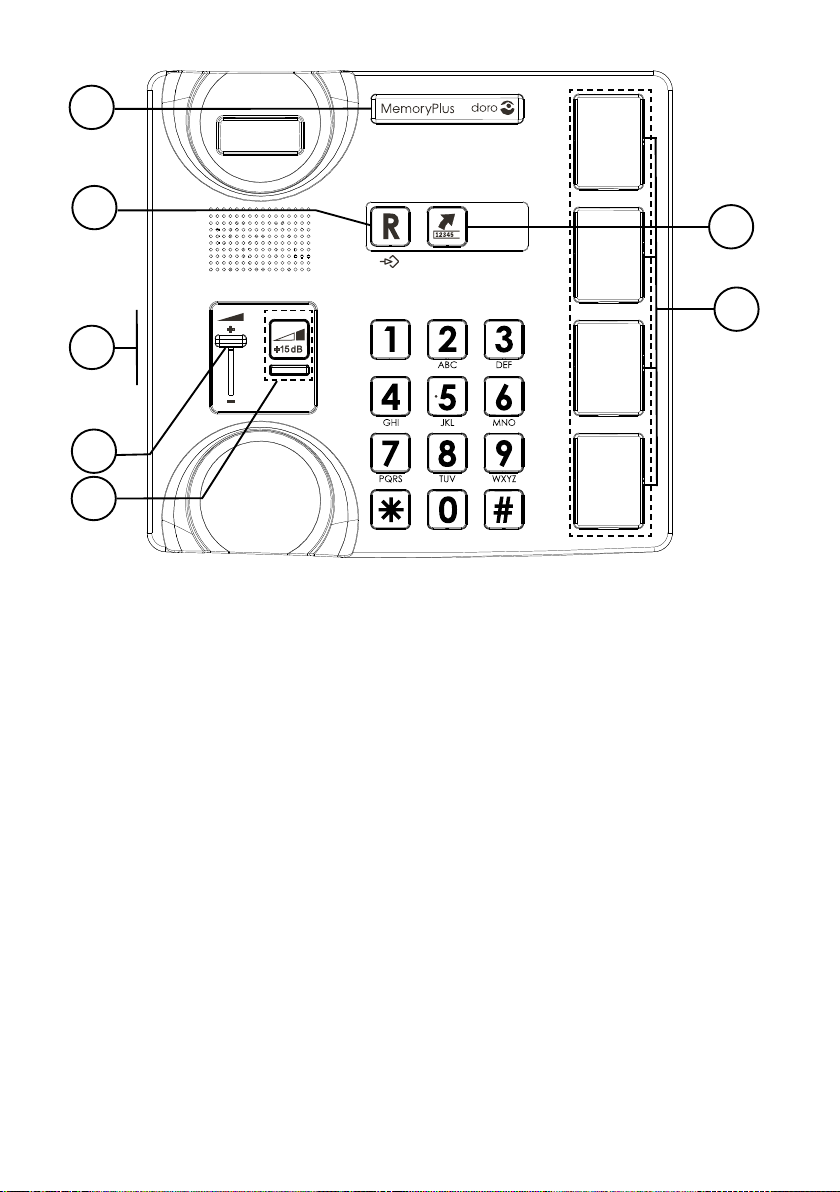
Ringindikator
R-knapp/programmering
Tonkontroll
Volymkontroll
1.
2.
3.
4.
Volymförstärkning
Återuppringning
Snabbval
5.
6.
7.
Svenska
Ringer indicator
Flash button/programming
Tone control
Volume control
1.
2.
3.
4.
Volume Boost
Redial function
Speed dial memories
5.
6.
7.
English
Témoin de sonnerie
Touche R et de
programmation
Curseur de réglage de la
tonalité
Curseur de réglage du
volume d’écoute combiné
1.
2.
3.
4.
Amplification du volume
Touche Bis
Touches des mémoires
directes
5.
6.
7.
Français
2
3
4
7
5
1
6

Optische Rufanzeige
R-Taste/Programmierung
Klangeinstellung
Lautstärkeinstellung
1.
2.
3.
4.
Lautstärkeanhebung +15dB
Wahlwiederholung
Direktwahltasten (Foto
einlegen möglich)
5.
6.
7.
Deutsch
Indicador de llamada
Tecla R/programación
Control de tonos
Control de volumen
1.
2.
3.
4.
Amplificación potente
Rellamada
Marcación rápida
5.
6.
7.
Español
Indicatore suoneria
Tasto flash/programmazione
Regolazione toni
Regolazione del volume
1.
2.
3.
4.
Amplificazione extra
Richiamata
Composizione rapida
5.
6.
7.
Italiano
Ringeindikator
R-knapp/programmering
Tonekontroll
Volumkontroll
1.
2.
3.
4.
Volumforsterker (Boost)
Repetisjon
Hurtigtaster
5.
6.
7.
Norsk
Ringeindikator
R-tast/programmering
Genopkald
Toneregulering
1.
2.
3.
4.
Volumforsterker (Boost)
Lydstyrkeregulering
Hurtigvalg
5.
6.
7.
Dansk
Soiton merkkivalo
R-painike/ohjelmointi
Uudelleensoittaminen
Äänen sävyn säätö
1.
2.
3.
4.
Voimakas vahvistus
Äänenvoimakkuuden
säätäminen
Pikavalinta
5.
6.
7.
Suomi
Beltoonindicator
Flash-toets/programmeren
Terugbellen
Toonregeling
1.
2.
3.
4.
Krachtige versterking
Volumeregeling
Snelkeuze
5.
6.
7.
Nederlands

1
Svenska
Handhavande
Att ringa
Vanlig uppringning
1. Lyft luren.
2. Slå önskat telefonnummer.
Återuppringning
Om det var upptaget på ett telefonnummer eller om det
senast slagna telefonnumret önskas ringas upp igen, lyft
luren och tryck på återuppringningsknappen .
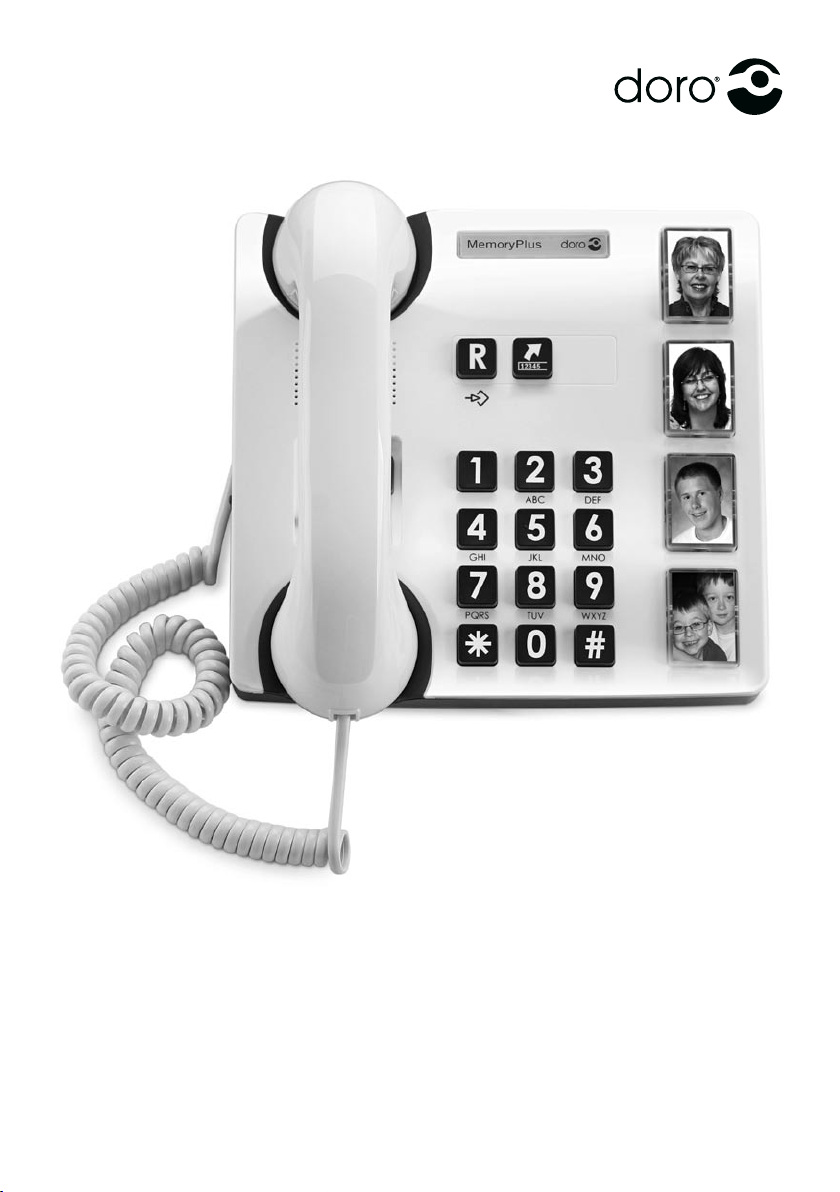
Minnen
Telefonen har 4 snabbvalsminnen.
När ett telefonnummer är lagrat i något av dessa kan
uppringning ske med endast en knapptryckning. Under
det genomskinliga locket på snabbvalsknapparna kan det
läggas en bild eller symbol så att man enkelt kan se till
vem snabbvalen går.
Uppringning med snabbval
1. Lyft luren och invänta kopplingston.
2. Välj önskat snabbval genom att trycka på motsvarande
knapp.
Ljudkontroll
Denna produkt kan justera ljudet på flera sätt:
Normal volymkontroll för luren (under luren).
Tryck på knappen (under luren) för att aktivera
kraftig volymförstärkning. Lysdioden börjar lysa.
Förstärkningen deaktiveras normalt efter varje
samtal. Denna skyddsfunktion är ställbar, se
Teknisk information.
Ändra frekvensomfång/ljudbilden (på vänstersidan).
OBS! Fungerar endast när den kraftiga
volymförstärkningen är aktiv.

2
Svenska
Inställningar
Inkoppling
1. Anslut telesladden till ett telejack och till uttaget
T
på
telefonens baksida.
2. Anslut spiralsladden till luren och till uttaget
q
på
telefonens undersida, se Teknisk Information (6).
3. Ett klickljud hörs när modularkontakten kommit på plats.
4. Ställ in rätt R-knappstid till 100, se Teknisk Information (4).
5. Lyft luren och kontrollera att kopplingston hörs.
Minnen
Lagra snabbval
1. Se till att omkopplaren
R
/
P
på telefonens undersida
står i läge
P
. Se Teknisk Information (5).
2. Lyft luren och tryck
P
(
R
) (bry dig inte om
kopplingstonen).
3. Slå telefonnumret (max 16 siffror) med siffertangenterna.
Tryck
P
(
R
).
4. Välj snabbval genom att trycka på motsvarande knapp.
5. Lägg på luren. Numret är lagrat.
Tänk på att återställa omkopplaren
R
/
P
på telefonens
undersida till läge
R
när samtliga önskade telefonnummer
är lagrade.
Om en paus önskas i telefonnumret tryck .

3
Svenska
Teknisk Information
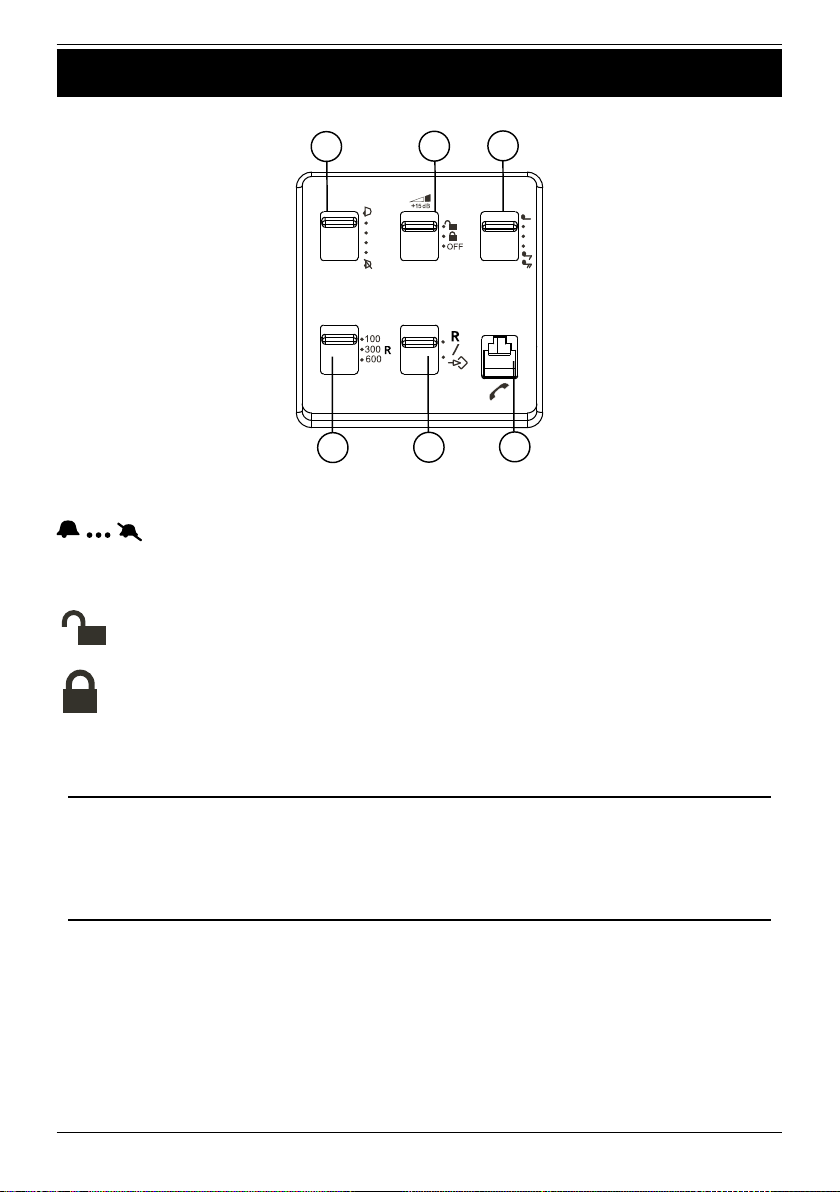
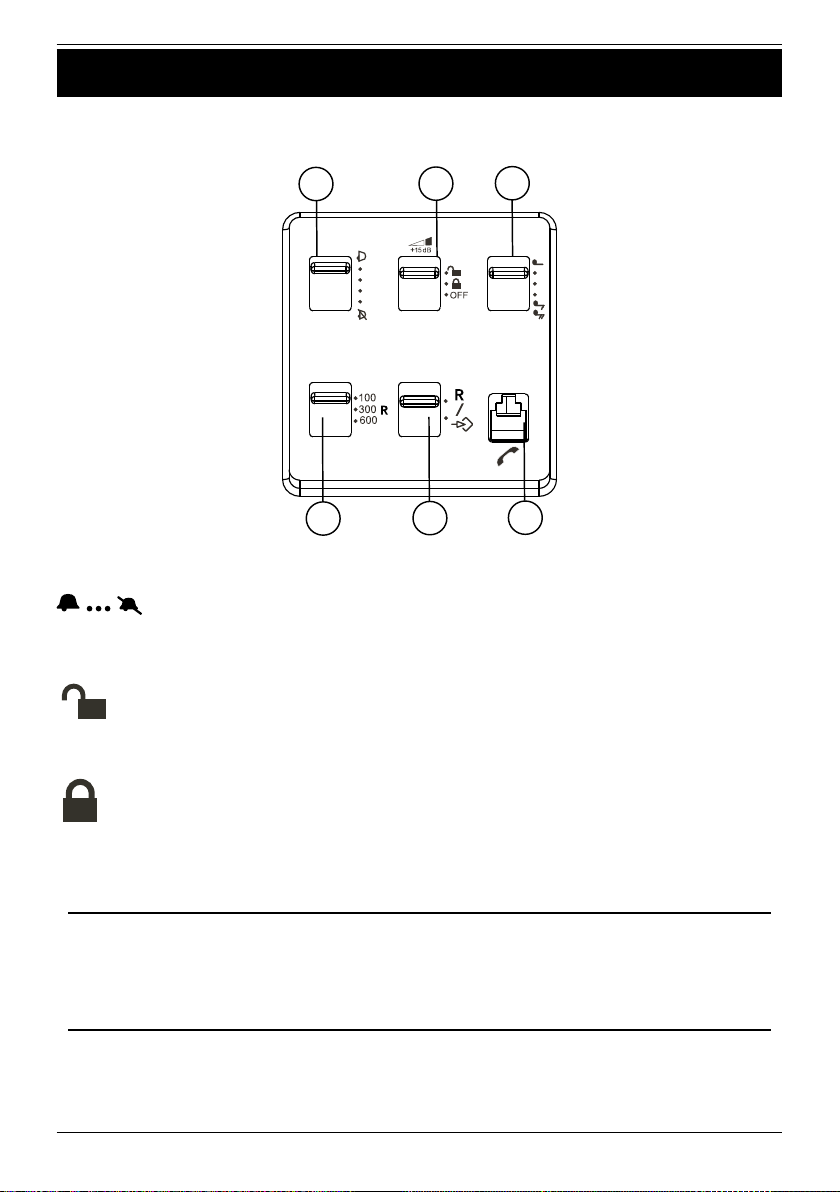
På telefonens undersida finns flera omkopplare.
1
2
3
4
5 6
1. Ringvolym
2. Kraftig volymförstärkning (Boost)
Tryck på knappen under luren för att aktivera.
Normalinställning.
Volymförstärkningen deaktiveras efter varje samtal
för att inte skada personer med normal hörsel.
Volymförstärkningen behålls efter varje samtal.
Denna inställning skall bara aktiveras om samtliga
användare har nedsatt hörsel som kräver kraftig
förstärkning.
OFF Kraftig volymförstärkning avstängd.
Varning!
Lurens volym kan bli väldigt hög om kraftig
volymförstärkning används.
Volymförstärkning ska bara användas av personer med
nedsatt hörsel.

4
Svenska
3. Klangfärg
4
4. R-knappstid (100/300/600)
100 är normalinställningen för de flesta länder.
Hörslinga
Luren har en inbyggd hörslinga för de som vill använda sin
hörapparat när de telefonerar. Koppla in hörapparaten genom
att ställa hörapparaten i T-läge.

5
Svenska
Övrigt
Om utrustningen inte fungerar
Kontrollera att telesladden är hel och ordentligt isatt.
Koppla bort alla eventuella tillsatsutrustningar,
förlängningskablar och andra telefoner. Om apparaten
fungerar nu finns felet i någon annan utrustning.
Prova gärna på en annan telelinje (t ex hos en granne).
Fungerar apparaten där är det troligen fel på din telelinje.
Ring felanmälan till din teleoperatör.
Om inget av ovanstående hjälper, kontakta inköpsstället.
Garanti
Denna apparat har ett års normal varugaranti. Vid eventuell
reklamation, tag kontakt med inköpsstället. Garantiservice
utförs endast mot uppvisande av giltigt inköpskvitto/
fakturakopia.
Garantiåtagandet gäller inte om felet beror på
olyckshändelse eller därmed jämförlig händelse eller
åverkan, inträngande vätska, vanvård, onormalt brukande
eller något annat förhållande på köparens sida. Garantin
gäller inte heller för fel som uppstått på grund av åska eller
andra elektriska spänningsvariationer.
För säkerhets skull rekommenderar vi att du drar ur
apparatens teleanslutning under åskväder.
Declaration of conformity
Doro deklarerar härmed att produkten Doro MemoryPlus
319i ph överensstämmer med de väsentliga kraven
och övriga relevanta bestämmelser i direktiv 1999/5/
EC (R&TTE), 2002/95/EC (ROHS). Kopia av
tillverkardeklarationen finns på www.doro.com/dofc

1
English
Operation
Making a call
Regular dialling
1. Pick up the handset.
2. Enter the desired number.
Redial function
If a number was previously engaged or if you wish to redial
the most recently entered number, pick up the handset and
press the redial button .
Memories
This telephone has 4 speed dial memories.
Once a number has been saved in a memory location, you
only need to press one button to make the call. A picture or
symbol can be placed under the transparent cover on the
speed dial buttons so it is easy to see who you are calling.
Dialling with speed dial
1. Pick up the handset and wait for the dialling tone.
2. Select required speed dial by pressing on the appropriate
button.
Volume control
This product can adjust the sound in a number of ways:
Normal volume control for the handset (under the
handset).
Press the button (under the handset) to activate
Volume Boost. The LED indicator will light up.
Volume Boost is normally deactivated at the end
of each call to avoid harming people with normal
hearing. This safety function is adjustable,
see Technical Information.
Change frequency range/sound level and quality (on
the left side). PLEASE NOTE! Only works when the
powerful amplification is active.

2
English
Settings
Connection
1. Connect the telephone cord to a telephone network
wall socket and to the
T
socket on the back of the
telephone.
2. Connect the spiral cord to the handset and to the
q
socket on the base of the telephone. See Technical
Information (6).
3. You will hear a click when the modular plug is correctly in
place.
4. Set correct Flash (R) button time to 100. See Technical
Information (4).
5. Lift the handset and listen for the dial tone.
Memories
Saving speed dial numbers
1. Make sure that the
R
/
P
switch on the base of the
telephone is set to
P
. See Technical Information (5).
2. Lift the receiver and press
P
(
R
) (ignore anything you
hear in the earpiece).
3. Enter the phone number (up to 16 digits) using the
keypad. Press
P
(
R
).
4. Select memory position by pressing the corresponding
button.
5. Replace the handset. The number has now been saved.
Remember to return the
R
/
P
switch on the base of the
telephone (5) to the
R
position when all the telephone
numbers have been saved.
Press if you want a pause in the telephone number.
3
English
Technical Information
There are several switches on the underside.
1
2
3
4
5 6
1. Ring volume
2. Volume Boost (high amplification)
Standard setting. The Volume Boost is set to switch
off after every call.
Volume Boost stays permanent switched on. This
setting should only be activated if all users have
impaired hearing and require powerful amplification.
OFF Volume Boost deactivated.
Warning!
The handset volume can be very loud with Volume Boost.
Volume boost should only be used by persons with
impaired hearing.
3. Ring tone
4
4. Flash button time (100/300/600)
100 is the standard setting for most countries.
300 for France/Portugal. 600 for New Zealand.

4
English
Hearing loop
The handset has a built-in hearing loop for those who wish to
use their hearing aids while using the telephone. Select the T
mode on your hearing aid to enable this feature.
Others
Troubleshooting
Check that the telephone cord is undamaged and properly
plugged in. Disconnect any additional equipment, extension
cords and other phones. If the problem is resolved, the fault is
with some other equipment. Test the equipment on a known
working line (e.g. at a neighbour’s house). If the equipment
works there the fault is probably with your telephone line.
Please report this to your network operator. If you are still
experiencing difficulties, contact the place of purchase.
Guarantee
This product is guaranteed for a period of 12 months from
the date of purchase. If you experience any problems please
contact the place of purchase. Proof of purchase is required for
any service or support needed during the guarantee period.
This guarantee shall not apply to a fault caused by an accident
or a similar incident or damage, liquid ingress, negligence,
abnormal usage or any other circumstances on the purchaser’s
part. Furthermore, this guarantee will not apply to any fault
caused by a thunderstorm or any other voltage fluctuations.
As a matter of precaution, we recommend disconnecting the
telephone during a thunderstorm.
Declaration of conformity
Doro hereby declares that the product Doro MemoryPlus
319i ph conforms to the essential requirements and other
regulations contained in the directives 1999/5/EC (R&TTE),
2002/95/EC (ROHS).
A copy of the manufacturer’s declaration is available at
www.doro.com/dofc

1
Français
Utilisation
Appeler
Appel normal
1. Prenez le combiné.
2. Composez le numéro désiré.
Touche Bis
Lorsque la ligne de votre correspondant est occupée ou si
vous désirez rappeler le dernier numéro composé, prenez
le combiné et appuyez sur la touche .
Mémoires directes
Ce téléphone possède 4 touches de mémoire directe.
Une fois qu’un numéro est enregistré sur l’une d’elles,
vous le composez en pressant simplement la touche
correspondante. Vous pouvez placer une photo ou un
symbole sous le couvercle transparent des touches d’appel
direct pour reconnaître facilement le destinataire.
Appeler un numéro en mémoire directe
1. Prenez le combiné et attendez la tonalité.
2. Sélectionnez une plage d’appel direct en appuyant sur la
touche correspondante.
Régler le volume
Il existe plusieurs façons de régler le volume :
Réglage normal du volume du combiné.
Appuyez sur cette touche pour activer l’amplification
du volume (Boost). Le témoin LED s’allume.
Cette amplification du volume est désactivée
en fin d’appel. Cette fonction est réglable, voir
Informations techniques.
Curseur situé sur le côté gauche permettant de
changer la réponse fréquentielle du combiné (gain
réglable en fonction de la fréquence).
REMARQUE ! Ne fonctionne que lorsque le niveau
extra-fort est activé.

2
Français
Réglages
Raccordement
1. Reliez le câble téléphonique fourni à la prise
téléphonique et à la prise située au dos du téléphone
marquée
T
.
2. Reliez le cordon spiralé au combiné et à la fiche de
la base du téléphone marquée
q
. Voir Informations
techniques (6).
3. Un clic indique que la prise est branchée correctement.
4. Vérifiez que le curseur de synchronisation de la touche
R
est bien sur 300. Voir Informations techniques (4).
5. Prenez le combiné : vous devez entendre la tonalité.
Touches des mémoires directes
Enregistrer un numéro en mémoire directe
1. Vérifiez que le curseur
R
/
P
de la base du téléphone est
sur
P
. Voir Informations techniques (5).
2. Prenez le combiné et appuyez sur la touche
P
(
R
)
(ne tenez pas compte de la tonalité).
3. Composez normalement le numéro de téléphone
(16 chiffres max.). Appuyez sur
P
(
R
).
4. Sélectionnez une plage de mémoire en appuyant sur la
touche correspondante.
5. Raccrochez. Le numéro est enregistré.
Une fois tous les numéros enregistrés, n’oubliez pas de
remettre le curseur
R
/
P
de la base du téléphone sur
R
.
Insérez une pause en appuyant sur .
3
Français
Informations techniques
Les différents curseurs situés au dos du téléphone
permettent de configurer l’appareil.
1
2
3
4
5 6
1. Volume de la sonnerie
2. Amplification du volume (Boost)
Le réglage par défaut. Par mesure de sécurité,
cette amplification du volume est désactivée en fin
d’appel.
L’amplification du volume est conservée en fin
d’appel. Ce réglage ne doit être utilisé que par des
personnes à déficience auditive.
OFF Amplification du volume désactivée.
Avertissement !
Le volume du combiné peut être très élevé avec ce réglage.
L’amplication du volume ne doit être utilisée que par des
personnes souffrant de troubles de l’audition.
3. Tonalité d’appel
4

4
Français
4. Synchronisation de la touche R (100/300/600)
300 est le réglage pour la France et le Portugal.
Prothèse auditive
Ce téléphone est compatible avec l’usage d’une prothèse
auditive. Sélectionnez le mode T sur votre prothèse
auditive pour activer cette fonction.
Autres
En cas de problèmes
Vérifiez que le câble téléphonique soit en bon état et qu’il
soit branché correctement. Débranchez tout autre matériel,
rallonges et téléphones. Si l’appareil fonctionne alors
normalement, la panne est causée par le matériel additionnel.
Testez le matériel sur une ligne en état de marche (chez un
voisin par ex.). Si le matériel fonctionne sur ce raccordement,
votre propre ligne téléphonique est défectueuse. Signalez la
panne à votre opérateur.
En cas d’échec de ces solutions, contactez votre revendeur.
 Loading...